Table des Matières

Publicité

Les langues disponibles
  • FR

Les langues disponibles

  • FRANÇAIS, page 25

Liens rapides

MilchaufschäuMer
latte sempre
Bedienungsanleitung
Modell 28495/28497
Instructions for use - Notice d´utilisation
Gebruiksaanwijzing - Istruzioni per l'uso
Manual de instrucciones - Návod k obsluze
Instrukcja obsługi

Publicité

Table des Matières
loading

Sommaire des Matières pour Unold 28495

  • Page 1 MilchaufschäuMer latte sempre Bedienungsanleitung Modell 28495/28497 Instructions for use - Notice d´utilisation Gebruiksaanwijzing - Istruzioni per l’uso Manual de instrucciones - Návod k obsluze Instrukcja obsługi...
  • Page 2 Impressum: Bedienungsanleitung Modell 28495/28497 Stand: Mai 2012 /nd Copyright © Mannheimer Straße 4 68766 Hockenheim Telefon +49 (0) 62 05/94 18-0 Telefax +49 (0) 62 05/94 18-12 E-Mail info@unold.de Internet www.unold.de...
  • Page 3 SERVICE-HOTLINE Bei Fragen zu den Rezepten und zum Gebrauch des Gerätes können Sie sich direkt an unsere Beraterin Frau Blum wenden: Montag und Dienstag von 8 bis 12 Uhr und 13 bis 17 Uhr Rufnummer: 0 18 05/94 18 99* *derzeit 0,14 EUR/Minute aus dem Festnetz der Deutschen Telekom.
  • Page 4: Table Des Matières

    .......... 37 Service-Adressen ........15 Vóór het dagelijkse gebruik ......37 Tips voor het juiste gebruik van de melk ..37 Instructions for use Model 28495/28497 Hete melk maken ........38 Technical Specifications ......16 Melkschuim voor Cappuccino of Latte Explanation of the symbols ......
  • Page 5 Dane techniczne ........70 Smaltimento / Tutela dell’ambiente .... 51 Objaśnienie symboli ........70 Dla bezpieczeństwa użytkownika ....70 Manual de instrucciones Modelo 28495/28497 Państwa nowy spieniacz mleka ....72 Datos técnicos ......... 52 Przed pierwszym użyciem / po dłuższej Explicación de los símbolos .......
  • Page 6: Bedienungsanleitung Modell 28495/28497 Technische Daten

    BeDIeNUNGsaNleItUNG MoDell 28495/28497 technische Daten Leistung: 1.000 W, 220-240 V~, 50/60 Hz Maße: Ca. 33,0 x 11,5 x 25,5 cm (L/B/H) Zuleitung: Ca. 150 cm Gewicht: Ca. 2,9 kg (ohne Zubehör) Farbe: Modell 28495: Schwarz Modell 28497: Braun Wassertank Fassungsvermögen: 600 ml Ausstattung: Programmierbarer, vollautomatischer Milchaufschäumer, produziert...
  • Page 7 Anschlusskabels oder anderer Teile sen- 21. Tragen Sie das Gerät nicht am Anschluss- den Sie das Gerät bitte zur Überprüfung kabel. und Reparatur an unseren Kundendienst 22. Verwenden Sie das Gerät nur in Innenräu- (Anschrift siehe Garantiebestimmungen). men. Unsachgemäße Reparaturen können zu 23.
  • Page 8: Ihr Neuer Milchaufschäumer

    ihr neuer MilchaufschäuMer Abtropfschale klein Abtropfschale groß Abtropfgitter Milchtank Deckel Milchtank Ansaugrohr Adapter mit Silikonschlauch Reinigungsbecher Frontabdeckung Milchschaum-Kopf Grundgehäuse Wassertank mit Deckel Taste A "Heiße Milch" Taste "Clean" für Reinigung Taste B "Milchschaum"...
  • Page 9: Vor Dem Ersten Benutzen/Nach Längerer Nutzungspause

    Vor DeM ersten benutzen/nach längerer nutzungspause 1. Entfernen Sie alle Verpackungsmaterialien und ggf. Transportsicherungen. 2. Reinigen Sie alle Teile mit einem feuchten Tuch, wie im Kapitel „Reinigen und Pfle- gen“ auf Seite 11 beschrieben. 3. Prüfen Sie, ob das Gerät stabil steht. Wäh- len Sie einen kühlen, schattigen Platz, da direktes Sonnenlicht oder die Hitze von Öfen dazu führen, dass sich die Milch im...
  • Page 10: Herstellung Von Heißer Milch

    herstellung Von heisser Milch 1. Bereiten Sie das Gerät wie im Abschnitt „Vor dem täglichen Gebrauch“ beschrieben, vor. 2. Stellen Sie eine Tasse auf die hohe Abtropf- schale. 3. Drücken Sie die Taste A. 4. Die heiße Milch fließt in die Tasse, das Gerät stoppt automatisch.
  • Page 11: Programmierung Der Füllmenge

    prograMMierung Der füllMenge 1. Achten Sie beim Programmieren der Füll- grammierung überschrieben wird, oder das menge darauf, dass sich genug Milch im Gerät auf die Werkseinstellung zurückge- Milchtank befindet und stellen Sie ein aus- setzt wird. Der Einstellbereich reicht von reichend großes Gefäß...
  • Page 12: Entkalken

    4. Wenn Sie das Gerät gründlich reinigen, fül- 9. Drücken Sie die Taste CLEAN für 2 Sekun- len Sie ebenfalls den Milchtank mit Wasser den, das Gerät führt für ca. 60 Sekunden (mindestens 200 ml, maximal 600 ml Was- das lange Reinigungsprogramm durch. ser).
  • Page 13: Fehler Beheben

    Gerät dabei aber noch nicht ausschalten! entkalken, wenn das Gerät warm ist: Reinigen Sie wie im Kapitel Reinigen und 12. Führen Sie die Punkte 1-3 wie oben Pflegen beschrieben, alle Zubehörteile. beschrieben, durch. Säubern Sie außerdem den Wassertank 13. Drücken Sie auf die Taste CLEAN und schal- gründlich, um alle Entkalkerrückstände zu ten Sie mit der anderen Hand das Gerät ein.
  • Page 14: Garantiebestimmungen

    garantiebestiMMungen Wir gewähren auf unsere Geräte eine Garantie von 24 Monaten, bei gewerblichem Gebrauch 12 Monate, ab dem Kaufda- tum für Schäden, die bei bestimmungsgemäßem Gebrauch nachweislich auf Werksfehler zurückzuführen sind. Innerhalb der Garantiezeit beheben wir Material- und Herstellungsfehler nach unserem Ermessen durch Reparatur oder Umtausch. Unsere Garantieleistungen gelten ausschließlich für in Deutschland und Österreich verkaufte Geräte.
  • Page 15: Service-Adressen

    68766 Hockenheim Internet www.unold.de Sie möchten innerhalb der Garantiezeit ein Gerät zur Reparatur einsenden? Auf unserer Internetseite www.unold.de/ruecksendung können Sie sich einen Rücksendeaufkleber ausdrucken, um damit das Paket kostenlos bei der Post abzugeben (nur für Einsendungen aus Deutschland und Österreich).
  • Page 16: Instructions For Use Model 28495/28497 Technical Specifications

    INstRUctIoNs FoR Use MoDel 28495/28497 technical specifications Power: 1,000 W, 220-240 V~, 50/60 Hz Dimensions: Approx. 36.5 x 11.5 x 25.5 cm (L / W / H) Power cord: Approx. 150 cm Weight: Approx. 4.40 kg Color: Model 28495: Black...
  • Page 17 Information on setup and use of the appliance 24. Use the appliance only for heating milk or – in cleaning mode – water. Do not heat any 11. Make sure that the electrical outlet used other liquids, since this could damage the is easily accessible, in order to unplug the appliance in an emergency.
  • Page 18: Your New Milk Frother

    your new Milk frother Drip tray, small Drip tray, large Drip grate Milk tank Lid for milk tank Suction tube Adapter with silicone hose Cleaning cup Front cover Milk frothing head Base housing Water tank with lid Button A “Hot milk” "Clean"...
  • Page 19: Before First Use / After Extended Non-Use

    before first use / after extenDeD non-use 1. Remove all packaging materials and any transport safety devices. 2. Clean all parts with a damp cloth, as descri- bed in the chapter “Cleaning and care” on page 21. 3. Check to make sure that the appliance is stable.
  • Page 20: Making Hot Milk

    Making hot Milk 1. Prepare the appliance as described in the section “Before daily use”. 2. Place a cup on the high drip tray. 3. Press the A button. 4. The hot milk flows into the cup and the appliance stops automatically. If you wish to interrupt the process earlier, press the A button again.
  • Page 21: Programming The Fill Quantity

    prograMMing the fill quantity 1. When programming the fill quantity, make set to 60 seconds the appliance prepares sure that there is enough milk in the milk about 300 ml of hot milk. tank and always place a large enough con- Frothed milk tainer under the milk spout.
  • Page 22: Descaling

    5. Press the CLEAN button briefly; the appli- 9. When you have completed the long cleaning ance executes the short cleaning program program, the front cover and the milk (about 30 seconds). frothing head must be cleaned, for hygienic reasons. The milk tank and the removable suction tube should be placed in warm water over night.
  • Page 23: Troubleshooting

    14. The descaling process starts. Continue with step 5 as described above. troubleshooting Problem cause solution After switching on the The plug is not seated firmly in Plug in the power cord appliance, the indicator the socket or the electrical outlet lamps do not flash No milk flows The milk tank is empty...
  • Page 24: Guarantee Conditions

    guarantee conDitions We guarantee our appliances for 24 months, or in case of commercial use for 12 months, from the date of purchase in case of defects that occur during normal use and are demonstrably due to a factory fault. Within the warranty period we will remedy defective materials or workmanship through repair or replacement, at our option.
  • Page 25: Notice D´utilisation Modèle 28495/28497 Spécification Technique

    NotIce D´UtIlIsatIoN MoDèle 28495/28497 spécification technique Puissance : 1.000 W, 220-240 V~, 50/60 Hz Dimensions : Env. 36,5 x 11,5 x 25,5 cm (longueur/largeur/hauteur) Cordon d’alimentation : Env. 150 cm Poids : Env. 4,40 kg Couleur : Modèle 28495 : Noir Modèle 28497 : Marron...
  • Page 26 8. N’ouvrez en aucun cas le boîtier de 19. N‘enroulez jamais le cordon d‘alimentation l’appareil. Il y a risque d’électrocution. autour de l‘appareil. 9. Vérifiez régulièrement que l‘appareil, la 20. Débranchez le cordon d’alimentation de la prise mâle et le cordon d‘alimentation ne prise de courant uniquement au niveau de sont pas usés ni abîmés.
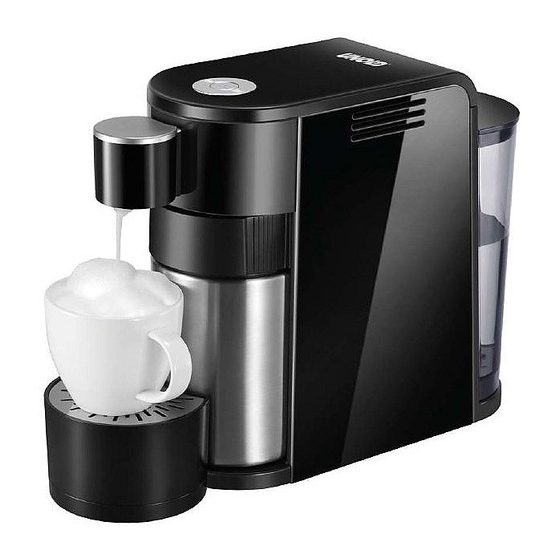
  • Page 27: Votre Nouveau Mousseur À Lait

    Votre nouVeau Mousseur à lait Petit bac recueille-gouttes Grand bac recueille-gouttes Grille recueille-gouttes Réservoir à lait Couvercle du réservoir à lait Tube d'aspiration Adaptateur avec flexible en silicone Pichet de nettoyage Protection de façade Embout mousseur de lait Socle Réservoir à eau avec couvercle Touche A "Lait chaud"...
  • Page 28: Avant La Première Utilisation/Après Une Pause Prolongée

    aVant la preMière utilisation / après une pause prolongée 1. Retirez tous les matériaux d‘emballage et éventuellement les sécurités de transport. 2. Nettoyez toutes les pièces avec un chiffon humide, conformément à l‘explication du chapitre „Nettoyer et Entretenir“ page 30. 3.
  • Page 29: Production De Lait Chaud

    proDuction De lait chauD 1. Préparez l’appareil conformément aux indi- cations du paragraphe „Avant l‘utilisation quotidienne“. 2. Mettez une tasse sur le grand bac recueille- gouttes. 3. Appuyez sur la touche A. 4. Le lait chaud coule dans la tasse et l‘appareil s‘arrête automatiquement.
  • Page 30: Programmation De La Quantité De Remplissage

    prograMMation De la quantité De reMplissage 1. Lors de la programmation de la quantité de des. En 60 secondes, l‘appareil produit remplissage, veillez à ce qu‘il y ait suffisam- environ 300 ml de lait chaud. ment de lait dans le réservoir à lait et met- Mousse de lait tez un récipient suffisamment grand sous la sortie de lait.
  • Page 31: Détartrage

    3. Si vous souhaitez nettoyer l‘appareil à fond, 8. Appuyez brièvement sur la touche CLEAN versez également de l‘eau dans le réservoir pendant 2 secondes, l‘appareil exécute à lait (au moins 200 ml, maximum 600 ml le programme de nettoyage long pendant d‘eau).
  • Page 32: Résoudre Les Problèmes

    ! Nettoyez toutes les accessoires conformé- 12. La touche CLEAN s‘allument et les touches ment à l‘explication du chapitre Nettoyer et A et B clignotent jusqu‘à ce que l‘appareil Entretenir. Nettoyez en outre le réservoir à soit suffisamment refroidi. Cette procédure eau minutieusement pour éliminer tous les peut durer un petit moment.
  • Page 33: Conditions De Garantie

    conDitions De garantie Les défauts de l’appareil qui se produisent malgré l’utilisation correcte suite à une faute de l‘usine et dont nous sommes informés immédiatement après qu’ils soient constatés dans les 24 mois après la livraison aux preneur final, seront réparés gratuitement.
  • Page 34: Gebruiksaanwijzing Model 28495/28497 Technische Gegevens

    GeBRUIKsaaNWIjzING MoDel 28495/28497 technische gegeVens Vermogen: 1.000 W, 220-240 V~, 50/60 Hz Afmetingen: Ca. 36,5 x 11,5 x 25,5 cm (l/b/h) Aansluitkabel: Ca. 150 cm Gewicht: Ca. 4,40 kg Kleur: Model 28495: zwart Model 28497: bruin Watertank inhoud: 600 ml...
  • Page 35 beschadigd zijn, stuur het apparaat dan 21. Draag het apparaat niet aan de kabel. a.u.b. ter controle en reparatie naar onze 22. Gebruik het apparaat uitsluitend binnens- klantenservice (voor het adres zie de garan- huis. tiebepalingen). Ondeskundige reparaties 23. Gebruik het apparaat uitsluitend voor het kunnen ernstige gevaren voor de gebruiker verhitten van melk resp.
  • Page 36: Uw Nieuwe Melkopschuimer

    uw nieuwe MelkopschuiMer Druppelschaal klein Druppelschaal groot Druppelrooster Melktank Deksel melktank Aanzuigbuis Adapter met siliconen slang Reinigingsbeker Frontafdekking Melkschuim-kop Basisbehuizing Watertank met deksel Toets A "Hete melk" Toets "Clean" voor reiniging Toets B "Melkschuim"...
  • Page 37: Voor Het Eerste Gebruik/Na Een Langere Gebruikspauze

    Voor het eerste gebruik/na een langere gebruikspauze 1. Verwijder alle verpakkingsmaterialen en evt. transportbeveiligingen. 2. Reinig alle delen met een vochtige doek, zoals beschreven in het hoofdstuk „Reini- ging en onderhoud“ op pagina 39. 3. Controleer of het apparaat stabiel staat. Kies een koele plaats in de schaduw, omdat direct zonlicht of de hitte van een oven tot gevolg heeft dat de melk in de melktank...
  • Page 38: Hete Melk Maken

    hete Melk Maken 1. Bereid het apparaat voor, zoals beschre- ven in het hoofdstuk „Vóór het dagelijkse gebruik“. 2. Zet een kopje op de hoge druppelschaal. 3. Druk op de toets A. 4. De hete melk loopt in het kopje, het apparaat stopt automatisch.
  • Page 39: De Vulhoeveelheid Programmeren

    De VulhoeVeelheiD prograMMeren 1. Let er bij het programmeren van de vul- den. Bij 60 seconden wordt ca. 300 ml hete hoeveelheid op dat zich genoeg melk in de melk geproduceerd. melktank bevindt en zet een kan die groot Melkschuim genoeg is, onder de melkuitloop.
  • Page 40: Ontkalken

    Kort reinigingsprogramma 8. Druk 2 seconden lang op de toets CLEAN, dan voert het apparaat ca. 60 seconden 4. Dagelijks voordat u het apparaat op die dag lang het lange reinigingsprogramma uit. voor het eerst gebruikt en overdag, als het apparaat langer dan 30 minuten niet gebru- 9.
  • Page 41: Storingen Verhelpen

    ontkalken, als het apparaat warm is 13. Als het apparaat afgekoeld is, brandt de toets CLEAN constant, de toetsen A en B 10. Voer de punten 1-3 uit, zoals hierboven knipperen niet meer. Druk één keer op de beschreven. 11. Druk op de toets CLEAN en zet het apparaat toets CLEAN.
  • Page 42: Garantievoorwaarden

    garantieVoorwaarDen Wij geven op onze apparaten een garantietermijn van 24 maanden, gerekend vanaf de dag van aanschaf. Deze garantie geldt voor schade, die bij correct gebruik aantoonbaar is veroorzaakt door een fout in de productie. Binnen de garantietermijn verhelpen wij materiaal- en productiefouten door herstelling of vervanging naar onze keuze. Onze garantie is slechts geldig voor in Duitsland en Oostenrijk verkopte apparaten.
  • Page 43: Istruzioni Per L'uso Modello 28495/28497 Dati Tecnici

    IstRUzIoNI PeR l’Uso MoDello 28495/28497 Dati tecnici Potenza: 1.000 W, 220-240 V~, 50/60 Hz Misure: 36,5 x 11,5 x 25,5 cm circa (lu./la./h.) Cavo di alimentazione: Circa 150 cm Peso: Circa 4,40 kg Colore: Modello 28495: nero Modello 28497: marrone Serbatoio dell’acqua...
  • Page 44 9. Controllare regolarmente che l’apparecchio, 19. Non avvolgere mai il cavo di alimentazione la spina e il cavo di alimentazione non siano attorno all‘apparecchio. danneggiati o usurati. In caso di danni al 20. Staccare il cavo di alimentazione dalla presa cavo di collegamento o ad altre parti, inviare elettrica sempre mediante la spina, mai tra- l’apparecchio per il controllo e la riparazione...
  • Page 45: Il Vostro Nuovo Schiumatore Per Latte

    il Vostro nuoVo schiuMatore per latte Bacinella raccogligocce piccola Bacinella raccogligocce grande Griglia raccogligocce Serbatoio del latte Coperchio del serbatoio del latte Tubo di aspirazione Adattatore con flessibile in silicone Bacinella per pulizia Copertura frontale Testa schiumatrice Scocca base Serbatoio dell'acqua con coperchio Tasto A "Latte caldo"...
  • Page 46: Prima Del Primo Impiego/Dopo Lunghe Pause Nell'utilizzo

    priMa Del priMo iMpiego/Dopo lunghe pause nell‘utilizzo 1. Rimuovere tutti i materiali da imballo e le eventuali protezioni da trasporto. 2. Pulire tutti i componenti con un panno umido come illustrato nel capitolo „Pulizia e cura“ a pagina 48. 3. Controllare che l‘apparecchio si regga in maniera stabile.
  • Page 47: Produzione Di Latte Caldo

    proDuzione Di latte calDo 1. Preparare l‘apparecchio come descritto nella sezione „Prima dell‘uso giornaliero“. 2. Mettere una tazza sulla bacinella raccogli- gocce alta. 3. Premere il tasto A. 4. Il latte caldo scorre nella tazza, l‘apparecchio si arresta automaticamente. Per interrom- pere la procedura anzitempo, premere nuo- vamente il tasto A.
  • Page 48: Programmazione Della Quantità Di Riempimento

    prograMMazione Della quantità Di rieMpiMento 1. Nel programmare la quantità di riempi- secondi. In 60 secondi vengono prodotti mento controllare che nel serbatoio sia circa 300 ml di latte caldo. presente una quantità di latte sufficiente e schiuma di latte mettere sotto lo scarico del latte un recipi- ente di grandezza idonea.
  • Page 49: Decalcificazione

    3. Per pulire a fondo l‘apparecchio, riem- 8. Premendo il tasto CLEAN per 2 secondi, pire con acqua anche il serbatoio del latte l‘apparecchio esegue il programma di puli- (minimo 200 ml, massimo 600 ml d‘acqua). zia lungo per circa 60 secondi. 9.
  • Page 50: Eliminazione Dei Difetti

    fondo il serbatoio dell‘acqua, in modo da entemente raffreddato. Questa procedura eliminare tutti i residui di decalcificante. può richiedere parecchio tempo. 9. Prima di produrre nuovamente il latte caldo 13. Quando l‘apparecchio si è raffreddato, il o la schiuma di latte, eseguire due volte il tasto CLEAN si illumina in maniera conti- programma di pulizia lungo.
  • Page 51: Norme Die Garanzia

    norMe Die garanzia I nostri prodotti sono garantiti per 24 mesi dalla data di acquisto per i guasti manifestatisi durante un utilizzo conforme alle disposizioni e attribuibili in modo dimostrabile a difetti di fabbricazione. Nel periodo di garanzia porremo rimedio ai difetti materiali e di produzione secondo la nostra valutazione, procedendo alla riparazione o alla sostituzione dell’apparecchio.
  • Page 52: Manual De Instrucciones Modelo 28495/28497 Datos Técnicos

    MaNUal De INstRUccIoNes MoDelo 28495/28497 Datos técnicos Potencia: 1.000 W, 220-240 V~, 50/60 Hz Medidas: Aprox. 36,5 x 11,5 x 25,5 cm (L/An/Al) Cable de alimentación: Aprox. 150 cm Peso: Aprox. 4,40 kg Color: Modelo 28495: negro Modelo 28497: marrón Depósito de agua...
  • Page 53 8. No abra nunca la carcasa del aparato. Existe 18. El cable de alimentación debe estar colo- peligro de electrocución. cado de forma que no se pueda tirar de él ni 9. Controle periódicamente si el equipo, el tropezar con él. enchufe y el cable de alimentación presen- 19.
  • Page 54: Su Nuevo Espumador De Leche

    su nueVo espuMaDor De leche Bandeja de goteo pequeña Bandeja de goteo grande Rejilla de goteo Depósito de leche Tapa del depósito de leche Tubo de aspiración Adaptador con tubo de silicona Recipiente de limpieza Cubierta frontal Cabezal de espuma de leche Carcasa básica Depósito de agua con tapa Tecla A "leche caliente"...
  • Page 55: Antes Del Primer Uso/Tras Una Pausa Prolongada Sin Utilizar

    antes Del priMer uso/tras una pausa prolongaDa sin utilizar 1. Retire todos los materiales de embalaje y dado el caso, los seguros de transporte. 2. Limpie todas las piezas con un paño húm- edo como se describe en el capítulo „Lim- pieza y cuidado“, en la página 57.
  • Page 56: Preparación De Leche Caliente

    preparación De leche caliente 1. Prepare el aparato como se indica en el apartado „Antes del uso diario“. 2. Coloque una taza sobre la bandeja de goteo alta. 3. Pulse la tecla „A“. 4. La leche caliente cae en la taza, el aparato se detiene automáticamente.
  • Page 57: Programación De La Cantidad De Llenado

    prograMación De la cantiDaD De llenaDo 1. Al programar la cantidad de llenado, asegú- segundos. Con 60 segundos, se preparan rese de que el depósito de leche tiene unos 300 ml de leche caliente. leche suficiente y coloque un recipiente de tamaño adecuado debajo de la salida de espuma de leche leche.
  • Page 58: Descalcificación

    Programa de limpieza corto 9. Una vez finalizado el programa de limpieza 4. Antes del primer uso diario del aparato y largo, es necesario limpiar con agua la durante el día, si el aparato no se ha utiliz- cubierta frontal y el cabezal de espuma de leche por motivos de higiene.
  • Page 59: Solución De Problemas

    9. Antes de volver a preparar leche caliente o enfriado lo suficiente. Este proceso puede espuma de leche, ejecute dos veces el pro- requerir más tiempo. grama de limpieza largo. 13. Una vez que el aparato se ha enfriado, la tecla CLEAN se enciende de forma perma- Descalcificar cuando el aparato está...
  • Page 60: Condiciones De Garantia

    conDiciones De garantia Otorgamos garantía de 24 meses sobre nuestros aparatos a partir de la fecha de compra por daños que durante su uso com- prabadamente tengan que ver con errores de fábrica. Dentro del período de garantía, solucionamos errores de material y de fabricación a consideración nuestra mediante reparación o cambio.
  • Page 61: Návod K Obsluze Modelu 28495/28497 Technické Údaje

    NávoD K oBslUze MoDelU 28495/28497 technické úDaje Výkon: 1000 W, 220-240 V~, 50/60 Hz Rozměry: Cca. 36,5 x 11,5 x 25,5 cm (D/Š/V) Přívod: Cca 150 cm Hmotnost: Cca 4,40 kg Barva: Model 28495: černá Model 28497: hnědá Nádrž na vodu...
  • Page 62 mohou vést k značnému nebezpečí pro 22. Používejte přístroj pouze ve vnitřních pros- uživatele a mají za následek ztrátu záruky. torech. 23. Používejte přístroj výhradně k ohřívání Pokyny k postavení a používání přístroje mléka popř. v režimu čištění k ohřevu vody. 10.
  • Page 63: Váš Nový Výrobník Mléčné Pěny

    Váš noVý Výrobník mléčné Pěny Odkapávací miska malá Odkapávací miska velká Odkapávací mřížka Zásobník mléka Kryt zásobníku mléka Sací trubička Adaptér se silikonovou hadičkou Čisticí pohár Přední kryt Hlava na mléčnou pěnu Základní těleso Zásobník vody s krytem Tlačítko A „Horké mléko“ Tlačítko „Clean“...
  • Page 64: Před Prvním Použitím / Po Delší Přestávce V Používání

    Před PrVním Použitím / Po delší PřestáVce V PoužíVání 1. Odstraňte všechny části balení a případné transportní pojistky. 2. Všechny díly vyčistěte vlhkou utěrkou, jak je popsáno v kapitole „Čištění a péče“ na straně 66. 3. Zkontrolujte, zda přístroj stabilně stojí. Zvolte chladné, zastíněné...
  • Page 65: Příprava Horkého Mléka

    PříPraVa horkého mléka 1. Připravte přístroj tak, jak je popsáno v části „Před každodenním použitím“. 2. Postavte šálek na vysokou odkapávací misku. 3. Stiskněte tlačítko A. 4. Horké mléko teče do šálku, přístroj se zas- taví automaticky. Když chcete tento postup přerušit dříve, znovu stiskněte tlačítko A.
  • Page 66: Programování Plnicího Množství

    ProgramoVání Plnicího množstVí 1. Při programování plnicího množství dbejte nastavení je 5-60 vteřin. Při 60 vteřinách se na to, aby se v zásobníku mléka nacházel připraví cca 300 ml horkého mléka. dostatek mléka a pod výstup mléka dejte Mléčná pěna dostatečně...
  • Page 67: Odvápnění

    5. Stiskněte tlačítko CLEAN po dobu 2 vteřin, 10. Otřete základní těleso měkkou, suchou přístroj provede dlouhý čisticí program trva- utěrkou. jící cca 60 vteřin. 11. Nepoužívejte abrazivní čisticí prostředky, 6. Když jste dlouhý čisticí program ukončili, drátěnku, kovové předměty, leštěnku na musíte z hygienických důvodů...
  • Page 68: Odstranění Chyby

    odstranění chyby chyba Příčina Řešení Po zapnutí přístroje Zástrčka nesedí dobře v síťové Zasuňte zástrčku kontrolky neblikají zásuvce nebo v zásuvce přístroje. Mléko neteče Zásobník mléka je prázdný Naplňte zásobník mléka Přední kryt není správně nasazen Upevněte přední kryt Sací trubička není správně Správně...
  • Page 69: Záruční Podmínky

    záruční Podmínky Na naše přístroje poskytujeme záruku v trvání 24 měsíců (u průmyslového využití 12 měsíců) od data koupě výrobku, záruka se vztahuje na poškození, která prokazatelne vznikla při správném použití v důsledku výrobních vad. Po dobu záruky budeme odstraňovat materiální i výrobní vady opravou nebo výměnou podle našeho uvážení. Poskytnutí...
  • Page 70: Instrukcja Obsługi Model 28495/28497 Dane Techniczne

    InsTrUKcJa ObsłUgI MODel 28495/28497 Dane techniczne Moc: 1000 W, 220-240 V~, 50/60 Hz Wymiary: Około 36,5 x 11,5 x 25,5 cm (L/B/H) Przewód zasilający: Ok. 150 cm Ciężar: Ok. 4,40 kg Kolor: Model 28495: czarny Model 28497: brązowy Zbiornik wody Pojemność:...
  • Page 71 innych części prosimy odesłać urządzenie 23. Urządzenia używać wyłącznie do podgrze- do sprawdzenia i naprawy do naszego ser- wania mleka lub w trybie czyszczenia wodą. wisu (adres patrz dokument gwarancyjny). Nie podgrzewać żadnych innych cieczy, gdyż Niewłaściwe naprawy mogą powodować zna- mogą...
  • Page 72: Państwa Nowy Spieniacz Mleka

    Państwa nowy sPieniacz mleka Podstawka ociekowa mała Podstawka ociekowa duża Kratka ociekowa Pojemnik na mleko Pokrywka pojemnika na mleko Rurka zasysania Adapter z wężem silikonowym Kubek do czyszczenia Pokrywa przednia Głowica mlecznej pianki Obudowa podstawowa Zbiornik wody z pokrywą Przycisk A "Gorące mleko" Przycisk "Clean"...
  • Page 73: Przed Pierwszym Użyciem / Po Dłuższej Przerwie W Użytkowaniu

    Przed Pierwszym użyciem / Po dłuższej Przerwie w użytkowaniu 1. Usunąć całkowicie materiał opakowania i zabezpieczenia transportowe. 2. Oczyścić wszystkie części wilgotną ścierką zgodnie z opisem podanym w rozdziale „Czyszczenie i konserwacja“ na stronie 75. 3. Sprawdzić, czy urządzenie ustawione jest stabilnie.
  • Page 74: Wytwarzanie Gorącego Mleka

    wytwarzanie gorącego mleka 1. Przygotować urządzenie zgodnie z opisem podanym w rozdziale „Przed codziennym użyciem“. 2. Postawić filiżankę na wysokiej podstawce ociekowej. 3. Nacisnąć przycisk A. 4. Gorące mleko spływa do filiżanki, urządzenie zatrzymuje się automatycznie. Jeśli chce się przerwać operację wcześniej, nacisnąć ponownie przycisk A.
  • Page 75: Programowanie Ilości Napełnienia

    Programowanie ilości naPełnienia 1. Podczas programowania ilości napełnienia Zakres nastaw wynosi 5-60 sekund. W cza- zwrócić uwagę na to, czy w zbiorniku znaj- sie 60 sekund wytwarza się około 300 ml duje się dostateczna ilość mleka i podstawić gorącego mleka. dostatecznie duże naczynie pod wylot mleka.
  • Page 76: Odkamienianie

    Krótki program czyszczenia 8. Nacisnąć przycisk CLEAN przez 2 sekundy, 4. Przed codziennym pierwszym użyciem urządzenie wykona długi program czyszcze- urządzenia i w ciągu dnia, gdy urządzenie nia przez około 60 sekund. 9. Po zakończeniu długiego programu czysz- nie jest używane dłużej niż 30 minut. czenia pokrywę...
  • Page 77: Usuwanie Usterek

    dostatecznie ochłodzone. Ta czynność może 14. Odkamienianie uruchamia się. Kontynuować trwać dłuższy czas. czynności od punktu 5 zgodnie z powyższym 13. Po ochłodzeniu urządzenia przycisk CLEAN opisem. będzie świecić się stale, natomiast przyciski A i B już nie migają. Nacisnąć jeden raz przycisk CLEAN.
  • Page 78: Warunki Gwarancji

    warunki gwarancji Udzielamy na nasze produkty 24 miesięcznej gwarancji od daty zakupu (warunkiem jest zachowanie faktury zakupu lub para- gonu) na szkody, które przy użytkowaniu zgodnym z przeznaczeniem wskazują na wadę fabryczną. W czasie trwania gwarancji usuniemy wady materiałowe bądź fabryczne zgodnie z naszym osądem poprzez naprawę lub wymianę. Gwarancja udzielana jest na produkty sprzedawane na terenie Polski, Niemiec i Austrii.
  • Page 80 aus dem hause...

Ce manuel est également adapté pour:

28497

Table des Matières