Table des Matières

Publicité

Les langues disponibles

Les langues disponibles

Liens rapides

MANUALE UTENTE
MIA 90
MANUEL DE
L'UTILISATEUR
MIA 90
USER MANUAL
MIA 90

Publicité

Table des Matières
loading

Sommaire des Matières pour Ravelli MIA 90

  • Page 1 MANUALE UTENTE MIA 90 MANUEL DE L'UTILISATEUR MIA 90 USER MANUAL MIA 90...
  • Page 2 Modello stufa: Mia 90 Nr. matricola stufa: Data installazione stufa: Riferimento assistenza: Numero telefonico:...
  • Page 3 Periodicità delle attività di manutenzione..............................Pag. 13 Esempi di installazione della cucina a pellet............................Pag. 15 Caratteristiche tecniche............................Pag. 17 Caratteristiche della cucina a pellet Mia 90............................. Pag. 18 Utilizzo del piano cottura..................................Pag. 18 Utilizzo del forno...................................... Pag. 18 Operazioni preliminari............................
  • Page 4: Table Des Matières

    Vers. 1 del 20/10/16 Manuale utente MIA 90 Pag.4 Indice Indice Schema sintetico fasi in modalità RISCALDAMENTO..................Pag. 36 Schema sintetico fasi in modalità COTTURA....................Pag. 37 Pop up di segnalazione............................Pag. 38 Allarmi (tabella codici di riferimento)......................... Pag. 39 Pulizia a cura dell’utente.............................
  • Page 5: Avvertenze

    Avvertenze: Le stufe e le cucine Ravelli sono costruite prestando particolare cura ad ogni singolo componente, in modo da proteggere sia l’utente sia l’installatore dal pericolo di eventuali incidenti. Si raccomanda al personale autorizzato di prestare particolare attenzione ai collegamenti elettrici dopo ogni intervento effettuato sul prodotto.
  • Page 6: Informazioni Sulla Sicurezza

    Vers. 1 del 20/10/16 Manuale utente MIA 90 Pag.6 Informazioni sulla sicurezza La cucina deve essere installata e collaudata da personale specializzato e istruito dalla casa madre. Si prega di leggere attentamente questo manuale d’uso e manutenzione prima di installare e mettere in funzione la cucina. In caso si necessiti di chiarimenti, rivolgersi al rivenditore Aico SpA più...
  • Page 7 Mantenere i combustibili e altri infiammabili ad adeguata distanza. Ravelli consiglia l’utilizzo di pellet di legno certificato classe A1 e A2 secondo la norma EN ISO 17225-2:2014 (EN PLUS), oppure certificato DIN PLUS (più restrittiva della classe A1) o ONORM M 7135.
  • Page 8: Dispositivi Di Sicurezza

    Vers. 1 del 20/10/16 Manuale utente MIA 90 Pag.8 La combustione La combustione è una reazione chimica in cui due reagenti, chiamati combustibile e comburente, si combinano generando energia termica (calore) e producendo nuove sostanze (fumi). Per comprendere l’espressione sopra descritta, prendiamo in considerazione questo schema pratico nominato “triangolo della combustione”;...
  • Page 9: Raccomandazioni Per L'installazione

    Vers. 1 del 20/10/16 Manuale utente MIA 90 Pag.9 INSTALLAZIONE DELLA CUCINA Raccomandazioni per l’installazione A causa dei frequenti incidenti causati dal cattivo funzionamento delle canne fumarie nelle abitazioni civili, è stato realizzato questo capitolo in collaborazione con Assocosma (associazione fumisti/spazzacamini e addetti al settore) in modo da facilitare l’installatore nell’installazione della stufa e nella realizzazione di un impianto atto all’evacuazione dei fumi secondo le normative vigenti:...
  • Page 10: Canna Fumaria

    Vers. 1 del 20/10/16 Manuale utente MIA 90 Pag.10 Canale da fumo e raccordi: Con il termine canali da fumo si indicano le tubazioni che collegano l’apparecchio a combustione con la canna fumaria. Per gli apparecchi generatori di calore muniti di elettroventilatore per l’espulsione dei fumi dovranno essere seguite le istruzioni di installazione del costruttore per quanto concerne la lunghezza massima ed il numero di curve dei canali da fumo.
  • Page 11 Vers. 1 del 20/10/16 Manuale utente MIA 90 Pag.11 Comignolo La norma UNI 10683 prescrive che il comignolo deve soddisfare le seguenti caratteristiche: - La sezione di uscita fumi deve essere almeno il doppio della sezione interna del camino; - Essere conformato in modo da impedire penetrazione di acqua o neve;...
  • Page 12 Vers. 1 del 20/10/16 Manuale utente MIA 90 Pag.12 Quota di sbocco in presenza di un volume tecnico od ostacolo con aperture e finestre Con il simbolo Z si intende l’altezza (mm) dell’ostacolo o vano tecnico Quota di sbocco in presenza di un volume tecnico od ostacolo senza aperture Tetto con inclinazione β...
  • Page 13 Vers. 1 del 20/10/16 Manuale utente MIA 90 Pag.13 Periodicità delle attività di manutenzione La manutenzione dell’apparecchio deve essere effettuata con cadenza periodica, come da tabella qui di seguito riportata, e nelle modalità previste dalla norma ed eseguita da personale abilitato alla professione; alla fine dovrà essere rilasciato regolare rapporto di intervento.
  • Page 14 Vers. 1 del 20/10/16 Manuale utente MIA 90 Pag.14 DICHIARAZIONE Dl CONFORMITÀ DELL’IMPIANTO ALLA REGOLA D’ARTE Conforme all.I di cui all’art. 7 del DM 37 del 22 gennaio 2008 n. 20 Il sottoscritto ___________________________________ titolare o legale rappresentante dell’impresa ___________...
  • Page 15 Vers. 1 del 20/10/16 Manuale utente MIA 90 Pag.15 Esempi di installazione della cucina a pellet E’ OBBLIGATORIO L’UTILIZZO DI TUBAZIONI A TENUTA STAGNA CON GUARNIZIONI SILICONICHE. Questo tipo di installazione (Vedi Fig.1) necessita di canna fumaria coibentata nonostante tutto il condotto venga montato all’interno dell’abitazione.
  • Page 16 Vers. 1 del 20/10/16 Manuale utente MIA 90 Pag.16 Questo tipo di installazione (Vedi Fig.4) necessita di canna fumaria coibentata, in quanto tutto il condotto fumi è stato montato all’esterno dell’abitazione. Nella parte inferiore della canna fumaria, è stato montato un raccordo di tipo “T”...
  • Page 17 (DENOMINATION) MATERIALE CUCINA PELLET (MATERIAL) TRATTAM. SUPERFICIALE I dati sopra riportati sono indicativi e non impegnativi e possono variare a seconda del tipo di pellet utilizzato. Ravelli si riserva la facoltà di apportare qualsiasi modifica DIS. CONTR. A.Odori (DESIGNER) (CHECKED)
  • Page 18: Operazioni Preliminari

    Caratteristiche della cucina a pellet MIA 90 La cucina a pellet Ravelli Mia 90 è un prodotto di ultimissima generazione che unisce la tradizione della cucina a legna alla tecnologia, al comfort e alla silenziosità delle moderne stufe a pellet.
  • Page 19 Vers. 1 del 20/10/16 Manuale utente MIA 90 Pag.19 Rimozione delle piastre di fissaggio al bancale La cucina viene fissata al bancale con apposite piastre, per prevenire danneggiamenti durante il trasporto. Per rimuovere le piastre è necessario togliere i pannelli laterali.
  • Page 20 Vers. 1 del 20/10/16 Manuale utente MIA 90 Pag.20 Collegamento elettrico La spina del cavo di alimentazione dell’apparecchio deve essere collegata solo dopo la conclusione dell’installazione e dell’assemblaggio dell’apparecchio e deve rimanere accessibile dopo l’installazione. Porre attenzione affinchè il cavo di alimentazione (e Interruttore I/0 gli altri eventuali cavi esterni all’apparecchio) non...
  • Page 21: Scheda Elettronica

    Vers. 1 del 20/10/16 Manuale utente MIA 90 Pag.21 Descrizione dei comandi della scheda elettronica: Per accedere alla scheda elettronica aprire il cassetto porta oggetti. Scheda elettronica L’interfaccia della scheda elettronica è quella riportata in figura Presa seriale Presa collegamento cavo palmare...
  • Page 22: Inserimento Delle Batterie Nel Palmare

    Dopo aver inserito le batterie o aver collegato il palmare alla scheda elettronica della cucina, sul display comparirà un prima breve schermata indicante il logo Ravelli, la schermata con la versione dei firmware e la banca dati ed, infine, la schermata per la scelta della lingua dei menù.
  • Page 23 Vers. 1 del 20/10/16 Manuale utente MIA 90 Pag.23 Nel caso di primo utilizzo del palmare, scegliere SI con i tasti di selezione e convalidare con il tasto di conferma. Il display del palmare mostrerà la seguente schermata: Mantenere premuto per alcuni secondi il tasto di comunicazione radio (RADIO ADJ) della scheda elettronica, per inizializzare il palmare.
  • Page 24: Accensione E Spegnimento Dell'apparecchio

    Vers. 1 del 20/10/16 Manuale utente MIA 90 Pag.24 2. Mostra la potenza di lavoro della cucina. La pressione del tasto di scorrimento GIU’ permette di visualizzare il settaggio potenza, modificabile con i due tasti di scorrimento SU/GIU’. La conferma di ogni variazione avviene in automatico entro 3 secondi dall’avvenuta modifica o per mezzo della pressione del tasto di conferma.
  • Page 25 Vers. 1 del 20/10/16 Manuale utente MIA 90 Pag.25 Flow chart menù riscaldamento Qui riportato lo schema del menù in modalità riscaldamento. Impostazione cottura/riscaldamento Scelta: Riscaldamento Impostazione della temperatura ambiente. RISCALDAMENTO Impostazione della potenza di funzioanmento Accesso al menù utente riscaldamento Ritorno al menù...
  • Page 26 Vers. 1 del 20/10/16 Manuale utente MIA 90 Pag.26 Flow chart menù cottura Qui riportato lo schema di funzionamento menù in modalità cottura. Impostazione cottura/riscaldamento Scelta: Cottura COTTURA Ritorno al menù di scelta cottura/riscaldamento Impostazione della timer di cottura Conferma del tempo impostato...
  • Page 27 Vers. 1 del 20/10/16 Manuale utente MIA 90 Pag.27 Note su alcune funzioni Ogni volta che dalla modalità cottura si seleziona la modalità riscaldamento compare il seguente avviso. Quando compare l’avviso “Infornare il cibo”, parte un conto alla rovescia durante il quale la cucina emette un segnale acustico di segnalazione.
  • Page 28 Vers. 1 del 20/10/16 Manuale utente MIA 90 Pag.28 Menù utente modalità cottura Menù impostazioni Accensione/Spegnimento luce forno Accensione/Spegnimento grill Accesso al menù Cambio stato Cambio stato Impostazioni Per uscire dal menù utente e dai sotto menù premere Funzionamento dell grill elettrico Il forno della Cucina a pellet è...
  • Page 29: Menù Impostazioni

    TECNICO e PRODUTTORE sono protetti da password d’accesso. L’accesso aI menù TECNICO e PRODUTTORE può essere effettuato solo da un tecnico autorizzato da Ravelli. La modifica dei parametri contenuti all’interno di questi menù potrebbe compromettere il funzionamento e la sicurezza e fa invalidare la garanzia del prodotto.
  • Page 30: Comfort Clima

    Vers. 1 del 20/10/16 Manuale utente MIA 90 Pag.30 Carico della coclea Eseguire questa operazione per agevolare le fasi di prima accensione della cucina; Controllare inoltre di avere introdotto il pellet all’interno del serbatoio ed attendere che la cucina sia in stato di “SPENTO” o “PULIZIA FINALE”. Il numero espresso in secondi indica il tempo rimanente della fase di primo carico.
  • Page 31 Vers. 1 del 20/10/16 Manuale utente MIA 90 Pag.31 Una volta effettuato l’accesso al menu Comfort clima è possibile operare sui 3 tipi di impostazioni dedicate alla funzione: Premere ripetutamente il tasto fino al ritorno della schermata di Stand-by. La prima impostazione permette l’attivazione della funzione COMFORT CLIMA; questa funzione ha lo scopo di verificare che la temperatura impostata all’ambiente venga mantenuta al valore impostato per un periodo massimo di “X”...
  • Page 32 Vers. 1 del 20/10/16 Manuale utente MIA 90 Pag.32 Cronotermostato La funzione CRONOTERMOSTATO è attiva solo in modalità RISCALDAMENTO. Con la funzione Cronotermostato è possibile programmare per ogni giorno della settimana l’accensione e lo spegnimento automati- co della cucina in 4 intervalli temporali indipendenti (IMPOSTA CRONO 1-2-3-4) Di seguito sono riportati i passi da seguire, partendo dalla schermata di Stand-By, per accedere al relativo menu.
  • Page 33 Si consiglia, comunque, di utilizzare pellet certificato EN PLUS A1, che è il tipo di pellet utilizzato da Ravelli per la messa a punto e il collaudo.
  • Page 34: Stato Stufa

    Vers. 1 del 20/10/16 Manuale utente MIA 90 Pag.34 Stato Stufa Di seguito sono riportati i passi da seguire, partendo dalla schermata principale, per accedere al relativo menu. Accesso al menù IMPOSTAZIONI Pressione del tasto Pressione del tasto di “conferma”...
  • Page 35 Vers. 1 del 20/10/16 Manuale utente MIA 90 Pag.35 Nella schermata principale, al posto della temperatura ambiente rilevata ed impostabile, compare la scritta OFF t. ext se la stanza in cui è installato il termostato non ha ancora raggiunto la temperatura richiesta, oppure la scritta ON t.ext se nella stanza la temperatura ambiente viene...
  • Page 36 Vers. 1 del 20/10/16 Manuale utente MIA 90 Pag.36 Schema sintetico fasi della cucina in modalità RISCALDAMENTO FASE DESCRIZIONE SPENTO La cucina è spenta È stata avviata la fase di preriscaldo resistenza, ed il pellet comincia a cadere nel braciere.
  • Page 37 Vers. 1 del 20/10/16 Manuale utente MIA 90 Pag.37 FASE DESCRIZIONE SISTEMA PULITORE È in corso la pulizia meccanica del braciere (prima dell’accensione o dopo il tempo di fun- AUTOMATICO ATTIVO zionamento preimpostato). Schema sintetico fasi della cucina in modalità COTTURA...
  • Page 38: Pop Up Di Segnalazione

    Vers. 1 del 20/10/16 Manuale utente MIA 90 Pag.38 Pop Up di segnalazione RICHIESTA DESCRIZIONE INFORNARE IL CIBO Il forno è arrivato alla temperatura impostata ed è possibile iniziare la cottura. SFORNARE IL CIBO Il timer di cottura è terminato ed è possibile sfornare il cibo.
  • Page 39: Allarmi (Tabella Codici Di Riferimento)

    Vers. 1 del 20/10/16 Manuale utente MIA 90 Pag.39 Allarmi (tabella codici di riferimento) COD. TITOLO MOTIVAZIONE RISOLUZIONE - Mancata tensione durante la fase di lavoro - Premere il tasto di spegnimento e ripetere l’accensione della cucina AL 01 BLACK OUT - Se il problema persiste rivolgersi al Servizio di Assistenza.
  • Page 40: Pulizia A Cura Dell'utente

    Vers. 1 del 20/10/16 Manuale utente MIA 90 Pag.40 OGNI CONDIZIONE DI ALLARME CAUSA L’IMMEDIATO SPEGNIMENTO DELLA STUFA. PREMERE IL TASTO DI ACCENSIONE PER RESETTARE L’ALLARME. PRIMA DI RIACCENDERE LA STUFA, VERIFICARE CHE LA CONDIZIONE CHE HA CAUSATO L’ALLARME SIA STATA RISOLTA.
  • Page 41: Pulizia Del Vetro

    Vers. 1 del 20/10/16 Manuale utente MIA 90 Pag.41 La pulizia del cassetto cenere deve essere effettuata ogni 30 giorni. La frequenza dipende comunque dal tempo di utilizzo della cucina e dal tipo di pellet utilizzato. Per accedere al cassetto aprire la porta (1), svitare i galletti e sfilarlo (2).
  • Page 42 Vers. 1 del 20/10/16 Manuale utente MIA 90 Pag.42 Il FIREX 600 è resistente al calore ma non agli urti: maneggiare con cura qualora rimosso. Dopo alcune ore di funzionamento Il FIREX 600 potrebbe presentare una leggera abrasione: questo è del tutto normale, in quanto la fiamma crea dei microsolchi nel pannello, pur senza comprometterlo.
  • Page 43: Pulizia Del Vetro Del Piano Cottura

    Vers. 1 del 20/10/16 Manuale utente MIA 90 Pag.43 Pulizia del vetro del piano cottura La pulizia del vetro del piano cottura deve essere eseguita a cucina fredda. Si possono utilizzare i prodotti in commercio normalmente utilizzati per la pulizia dei piani cottura, sgrassatori e prodotti per la pulizia del vetro.
  • Page 44: Rimozione Del Cassetto Porta Oggetti

    Vers. 1 del 20/10/16 Manuale utente MIA 90 Pag.44 Rimozione del cassetto porta oggetti Per agevolare la pulizia del cassetto portaoggetti, è possibile rimuoverlo completamente. Per rimuovere il cassetto è necessario sbloccare le guide laterali, agendo sull’apposito fermo da entrambi i lati.
  • Page 45: Pulizia Condotto Fumi

    Pag.45 Pulizia condotto fumi Questo tipo di pulizia va accordato con il vostro centro assistenza Ravelli. L’accesso al girofumi per la pulizia è possibile grazie alle apposite botole evidenziate nelle figure. Al momento della chiusura delle botole verificare l’integrità delle guarnizioni ed, eventualmente, sostituirle con delle...
  • Page 46: Schema Elettrico Scheda Madre

    Vers. 1 del 20/10/16 Manuale utente MIA 90 Pag.46 Schema elettrico Scheda madre Connessione OPZIONALE per gestione domotica G5 G5 Scheda OPZIONALE per gestione 10 9 domotica RETE ALIMENTAZIONE 220 V Fase Neutro verde bianco rosso LEGENDA: Relè 220V doppio contatto...
  • Page 47: Garanzia

    Vers. 1 del 20/10/16 Manuale utente MIA 90 Pag.47 Di seguito vengono riassunti gli interventi di controllo e/o manutenzione indispensabii per il corretto funzionamento della cucina. PARTI / FREQUENZA 1 GIORNO 2-3 GIORNI 30 GIORNI 60-90 GIORNI 1 STAGIONE •...
  • Page 48: Contatto Caldaia A Gas (Opzionale)

    Vers. 1 del 20/10/16 Manuale utente MIA 90 Pag.48 Contatto caldaia a gas (Opzionale) La cucina prevede (optional) la possibilità di gestire un contatto per accensione della caldaia a gas se la cucina passa in stato di allarme. • L’uscita va connessa al morsetto posto in cucina – G6 (sul contatto NC del relè) •...
  • Page 49 MANUTENZIONE DATA INTERVENTO EFFETTUATO...
  • Page 50: Référence Pour Assistance

    Modèle de poêle : Mia 90 N° de matricule du poêle : Date d'installation du poêle : Référence pour assistance : Numéro de téléphone :...
  • Page 51 Périodicité des activités d'entretien............................... Page 13 Exemples d'installation de la cuisinière à pellet............................ Page 15 Caractéristiques techniques..........................Page 17 Caractéristiques de la cuisinière à pellet Mia 90..........................Page 18 Utilisation du piano de cuisson................................Page 18 Utilisation du four....................................Page 18 Opérations préliminaires...........................
  • Page 52: Indice

    Vers. 1 du 20/10/16 Manuel de l'utilisateur MIA 90 Page52 Indice Indice Schéma synthétique des phases en mode CHAUFFAGE.................. Page 36 Schéma synthétique des phases en mode CUISSON..................Page 37 Pop up de signalisation............................Page 38 Alarmes (tableau des codes de référence)......................
  • Page 53: Introduction

    Description du manuel d'utilisation et d'entretien : Avec ce manuel d'utilisation et d'entretien, Ravelli veut fournir à l'utilisateur toutes les informations en matière de sécurité lors de l'utilisation du poêle afin d'éviter tout dommage causé à des choses, à des personnes ou à des parties du poêle même.
  • Page 54: Informations En Matière De Sécurité

    Vers. 1 du 20/10/16 Manuel de l'utilisateur MIA 90 Page54 Informations en matière de sécurité La cuisinière doit être installée et testée par du personnel spécialisé et instruit par la société mère. Veuillez lire attentivement ce manuel d'utilisation et d'entretien avant d'installer et de mettre la cuisinière en fonction. Si vous avez besoin de clarifications, contactez votre revendeur Aico SpA le plus proche.
  • Page 55: Généralités

    Maintenez les combustibles et les autres matériaux inflammables à une distance appropriée. Ravelli conseille l'utilisation de pellet de bois certifié de classe A1 et A2 conformément à la norme EN ISO 17225-2:2014 (EN PLUS), ou bien certifié DIN PLUS (plus restrictive de la classe A1) ou ONORM M 7135.
  • Page 56: La Combustion

    Vers. 1 du 20/10/16 Manuel de l'utilisateur MIA 90 Page56 La combustion La combustion est une réaction chimique dans laquelle deux réactifs, appelés combustible et comburant, se combinent en générant une énergie thermique (chaleur) et en produisant de nouvelles substances (fumées).
  • Page 57: Installation De La Cuisinière

    Vers. 1 du 20/10/16 Manuel de l'utilisateur MIA 90 Page57 INSTALLATION DE LA CUISINIÈRE Recommandations en matière d'installation En raison des nombreux incidents liés à un mauvais fonctionnement des carneaux dans les habitations civiles, ce chapitre a été réalisé en collaboration avec Assocosma (association des fumisteries/ramoneurs et employés du secteur) afin d'aider l'installateur lors de l'installation...
  • Page 58: Canal Pour Fumée Et Raccords

    Vers. 1 du 20/10/16 Manuel de l'utilisateur MIA 90 Page58 Canal pour fumée et raccords Par le terme canaux de fumée, on entend les tuyaux raccordant l'appareil de combustion au carneau. Pour les appareils générateurs de chaleur équipés d'un ventilateur électrique pour l'expulsion des fumées, les instructions d'installation du constructeur concernant la longueur maximum et le nombre de courbures des canaux de fumée devront être suivies.
  • Page 59: Bloc Cheminée

    Vers. 1 du 20/10/16 Manuel de l'utilisateur MIA 90 Page59 Bloc cheminée La norme UNI 10683 exige que le bloc cheminée satisfasse les caractéristiques suivantes: - La section de sortie de fumées doit correspondre au moins au double de la section interne de la cheminée;...
  • Page 60: Déclaration De Conformité De L'installation Dans Les Règles De L'art

    Vers. 1 du 20/10/16 Manuel de l'utilisateur MIA 90 Page60 DÉCLARATION DE CONFORMITÉ DE L'INSTALLATION DANS LES RÈGLES DE L'ART Conforme à l'alinéa I de l'art. 7 du DM 37 du 22 janvier 2008 n° 20 Je soussigné ___________________________________ titulaire ou représentant légal de l'entreprise ___________...
  • Page 61: Exemples D'installation De La Cuisinière À Pellet

    Vers. 1 du 20/10/16 Manuel de l'utilisateur MIA 90 Page61 Exemples d'installation de la cuisinière à pellet IL EST OBLIGATOIRE D'UTILISER DES TUYAUX ÉTANCHES AVEC DES JOINTS EN SILICONE. Ce type d'installation (voir la fig. 1) nécessite un carneau calorifugé, même si le conduit doit être monté à l'intérieur de l'habitation.
  • Page 62 Vers. 1 du 20/10/16 Manuel de l'utilisateur MIA 90 Page62 Ce type d'installation (consultez la fig. 4) nécessite un carneau calorifugé dans la mesure où l'intégralité du conduit de fumées a été monté à l'extérieur de l'habitation. Dans la partie inférieure du carneau, un raccord en T avec bouchon d'inspection a été...
  • Page 63: Caractéristiques Techniques

    (SCHEET) (DENOMINATION) MATERIALE CUCINA PELLET (MATERIAL) TRATTAM. SUPERFICIALE Les données reportées ci-dessus sont indicatives et sans engagement et sont susceptibles de varier en fonction du type de pellet utilisé. Ravelli se réserve la faculté DIS. CONTR. A.Odori (DESIGNER) (CHECKED) d'apporter toute modification dans le but d'améliorer les prestations des produits...
  • Page 64: Caractéristiques De La Cuisinière À Pellet Mia 90

    Caractéristiques de la cuisinière à pellet MIA 90 La cuisinière à pellet Ravelli Mia 90 est un produit de dernière génération unissant la tradition de la cuisinière à bois à la technologie, au confort et à la silenciosité des poêles à pellet modernes.
  • Page 65: Enlèvement Des Plaques De Fixation

    Vers. 1 du 20/10/16 Manuel de l'utilisateur MIA 90 Page65 Enlèvement des plaques de fixation à la palette La cuisinière est fixée à la palette par le biais de plaques prévues à ce effet afin d'éviter tout endommagement au cours du transport.
  • Page 66: Branchements Électriques

    Vers. 1 du 20/10/16 Manuel de l'utilisateur MIA 90 Page66 Branchements électriques La fiche du câble d'alimentation de l'appareil doit être branchée uniquement après avoir terminé l'installation et l'assemblage de l'appareil et doit rester accessible après l'installation. Veillez à ce que le câble d'alimentation (et les autres éventuels câbles externes de l'appareil) ne touche pas les...
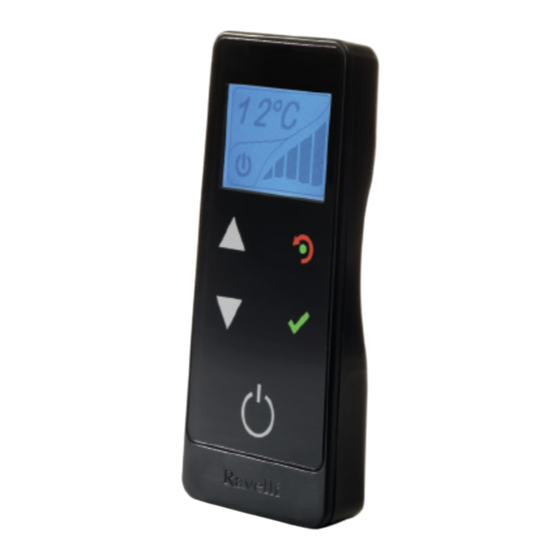
  • Page 67: Description Des Commandes De La Carte Électronique

    Vers. 1 du 20/10/16 Manuel de l'utilisateur MIA 90 Page67 Description des commandes de la carte électronique: Pour accéder à la carte électronique, ouvrez le tiroir porte-objets. Carte électronique L'interface de la carte électronique est celle reportée dans la figure Prise en série...
  • Page 68: Description De L'ordinateur De Poche

    Après avoir inséré les piles ou après avoir raccordé l'ordinateur de poche à la carte électronique de la cuisinière, un premier écran bref s'affichera, indiquant le logo Ravelli, l'écran avec la version de micrologiciel ainsi que la banque de données et enfin, l'écran pour le choix de la langue des menus.
  • Page 69: Chargement Initial De Pellet

    Vers. 1 du 20/10/16 Manuel de l'utilisateur MIA 90 Page69 Lorsqu'il s'agit de votre première utilisation de l'ordinateur de poche, choisissez OUI avec les touches de sélection et validez en utilisant la touche de confirmation. L'écran de l'ordinateur de poche affichera l'écran suivant : Maintenez pressée pendant quelques secondes la touche de communication radio (RADIO ADJ) de la carte technique pour initialiser...
  • Page 70: Que Se Passe-T-Il Si Les Piles Sont À Plat

    Vers. 1 du 20/10/16 Manuel de l'utilisateur MIA 90 Page70 2. Affiche la puissance de travail de la cuisinière. La pression de la touche de défilement BAS permet de visualiser le réglage de la puissance modifiable avec les deux touches de défilement HAUT/BAS.
  • Page 71: Tableau De Cheminement Menu Chauffage

    Vers. 1 du 20/10/16 Manuel de l'utilisateur MIA 90 Page71 Tableau de cheminement menu chauffage Voici ci-après le schéma du menu en mode chauffage. Configuration cuisson/chauffage Sélection : Chauffage Configuration de la température ambiante. CHAUFFAGE Configuration de la puissance de fonctionnement Accès au menu utilisateur chauffage...
  • Page 72: Tableau De Cheminement Menu Cuisson

    Vers. 1 du 20/10/16 Manuel de l'utilisateur MIA 90 Page72 Tableau de cheminement menu cuisson Voici ci-après le schéma de fonctionnement du menu en mode cuisson. Configuration cuisson/chauffage Sélection : Cuisson CUISSON Retour au menu de sélection cuisson/chauffage Configuration de la minuterie de cuisson Confirmation de la durée configurée...
  • Page 73: Remarques Concernant Certaines Fonctions

    Vers. 1 du 20/10/16 Manuel de l'utilisateur MIA 90 Page73 Remarques concernant certaines fonctions Chaque fois que l'on sélectionne le mode chauffage depuis le mode cuisson, l'avertissement suivant apparaît. Lorsque l'avertissement « Enfourner la nourriture » apparaît, un compte à rebours au cours duquel la cuisinière émet un signal sonore démarre.
  • Page 74: Menu Utilisateur Mode Cuisson

    Vers. 1 du 20/10/16 Manuel de l'utilisateur MIA 90 Page74 Menu utilisateur mode cuisson Menu des configurations Allumage/Extinction de la lumière du four Allumage/Extinction du grill Accès au menu Changement d'état Changement d'état Configurations Pour sortir du menu utilisateur et du sous-menu, appuyez Fonctionnement du grill électrique...
  • Page 75: Menu Des Configurations

    UTILISATEUR. Les menus TECHNICIEN et PRODUCTEUR sont protégés par un mot de passe d'accès. Seul un technicien autorisé par Ravelli peut accéder aux menus TECHNICIEN et PRODUCTEUR. La modification des paramètres contenus à l'intérieur de ces menus pourrait compromettre le fonctionnement et la sécurité ainsi qu'invalider la garantie du produit.
  • Page 76: Chargement De La Vis San Fn

    Vers. 1 du 20/10/16 Manuel de l'utilisateur MIA 90 Page76 Chargement de la vis san fn Effectuez cette opération pour faciliter les phases de premier allumage de la cuisinière ; Assurez-vous en outre d'avoir introduit le pellet à l'intérieur du réservoir et attendez que la cuisinière soit en état « ÉTEINTE » ou « NETTOYAGE FINAL ».
  • Page 77 Vers. 1 du 20/10/16 Manuel de l'utilisateur MIA 90 Page77 Après avoir accédé au menu Comfort clima, il est possible d'opérer sur les 3 types de configurations dédiées à la fonction: Appuyez de manière répétée sur la touche jusqu'à retourner à l'écran de veille.
  • Page 78: Thermostat Programmable

    Vers. 1 du 20/10/16 Manuel de l'utilisateur MIA 90 Page78 Thermostat programmable La fonction THERMOSTAT PROGRAMMABLE est uniquement activée en mode CHAUFFAGE. Avec la fonction Thermostat programmable, il est possible de programmer pour chaque jour de la semaine l'allumage et l'extinction automatiques de la cuisinière en 4 intervalles temporels indépendants (CONFIGURER THERM.
  • Page 79: Réglage Air/Pellet

    : les petits sacs de pellet d'une même marque peuvent avoir des valeurs différentes. Il est par conséquent conseillé d'utiliser du pellet certifié EN PLUS A1 qui est un type de pellet utilisé par Ravelli pour la mise au point et pour l'essai.
  • Page 80: État Du Poêle

    Vers. 1 du 20/10/16 Manuel de l'utilisateur MIA 90 Page80 État du poêle Voici ci-dessous les étapes à suivre, en partant de l'écran principal, pour accéder au menu relatif. Accès au menu CONFIGURATIONS Pression de la touche Pression de la touche de «...
  • Page 81: Contraste

    Vers. 1 du 20/10/16 Manuel de l'utilisateur MIA 90 Page81 Sur l'écran principal, à la place de la température ambiante relevée et configurable, on trouve la mention OFF t. ext si la pièce dans laquelle le thermostat est installé n'a pas encore atteint la température requise ou bien la mention...
  • Page 82: Schéma Synthétique Des Phases En Mode Chauffage

    Vers. 1 du 20/10/16 Manuel de l'utilisateur MIA 90 Page82 Schéma synthétique des phases de la cuisinière en mode CHAUFFAGE PHASE DESCRIPTION ÉTEINT La cuisinière est éteinte LA phase de préchauffage de la résistance a été amorcée et le pellet commence à tomber ALLUMAGE sur le brasier.
  • Page 83: Schéma Synthétique Des Phases En Mode Cuisson

    Vers. 1 du 20/10/16 Manuel de l'utilisateur MIA 90 Page83 PHASE DESCRIPTION SYSTÈME NETTOYEUR LE nettoyage mécanique du brasier est en cours (avant l'allumage ou après la durée de AUTOMATIQUE ACTIVÉ fonctionnement préconfigurée). Schéma synthétique des phases de la cuisinière en mode CUISSON...
  • Page 84: Pop Up De Signalisation

    Vers. 1 du 20/10/16 Manuel de l'utilisateur MIA 90 Page84 Pop up de signalisation DEMANDE DESCRIPTION ENFOURNER Le four a atteint la température configurée et il est possible de débuter la cuisson. LA NOURRITURE RETIRER LA NOURRITURE La minuterie de cuisson s'est écoulée et il est possible de retirer la nourriture du four.
  • Page 85: Alarmes (Tableau Des Codes De Référence)

    Vers. 1 du 20/10/16 Manuel de l'utilisateur MIA 90 Page85 Alarmes (tableau des codes de référence) COD. TITRE MOTIVATION RÉSOLUTION - Absence de tension au cours de la phase de travail - Appuyez sur la touche de mise hors tension et allumez à...
  • Page 86: Nettoyage À Effectuer Par L'utilisateur

    Vers. 1 du 20/10/16 Manuel de l'utilisateur MIA 90 Page86 CHAQUE CONDITION D'ALARME ENTRAÎNE L'EXTINCTION IMMÉDIATE DU POÊLE. APPUYER SUR LA TOUCHE ALLUMAGE POUR RÉINITIALISER L'ALARME. AVANT DE RALLUMER LE POÊLE, ASSUREZ-VOUS QUE LA CONDITION AYANT DÉCLENCHÉ L'ALARME AIT ÉTÉ RÉSOLUE.
  • Page 87: N.b.: L'opération Doit Être Effectuée Lorsque La Cuisinière Est Froide

    Vers. 1 du 20/10/16 Manuel de l'utilisateur MIA 90 Page87 Le nettoyage du tiroir à cendres doit être effectué tous les 30 jours. La fréquence dépend malgré tout de la durée d'utilisation de la cuisinière et du type de pellet utilisé.
  • Page 88 Vers. 1 du 20/10/16 Manuel de l'utilisateur MIA 90 Page88 Le FIREX 600 résiste à la chaleur mais pas aux chocs: manipulez-le avec précaution lorsqu'il est retiré du poêle. Après quelques heures de fonctionnement, le FIREX 600 pourrait présenter une légère abrasion: ceci est tout à fait normal dans la mesure où...
  • Page 89: Nettoyage De La Grille D'aération Supérieure

    Vers. 1 du 20/10/16 Manuel de l'utilisateur MIA 90 Page89 Nettoyage du vitrocéramique du piano de cuisson Le nettoyage du vitrocéramique du piano de cuisson doit être effectué lorsque la cuisinière est froide. Il est possible d'utiliser les produits du commerce normalement utilisés pour effectuer le nettoyage des pianos de cuisson, des produits dégraissants ainsi que des produits à...
  • Page 90: Enlèvement Du Tiroir Porte-Objets

    Vers. 1 du 20/10/16 Manuel de l'utilisateur MIA 90 Page90 Enlèvement du tiroir porte-objets Pour faciliter le nettoyage du tiroir porte-objets, il est possible de le retirer intégralement. Pour retirer le tiroir, il est nécessaire de débloquer les guides latéraux en utilisant le blocage prévu à cet effet situé sur les deux côtés.
  • Page 91: Nettoyage Du Conduit De Fumées

    Page91 Nettoyage du conduit de fumées Ce type de nettoyage doit être convenu avec votre centre d'assistance Ravelli. Il est possible d'accéder au parcours de fumées pour le nettoyage grâce aux orifices prévus à cet effet identifiés dans les figures.
  • Page 92: Schéma Électrique De La Carte Mère

    Vers. 1 du 20/10/16 Manuel de l'utilisateur MIA 90 Page92 Schéma électrique de la carte mère Connexion EN OPTION pour gestion domotique AUCUNE AUCUNE G5 G5 Carte EN OPTION pour gestion 10 9 domotique RÉSEAU D'ALIMENTATION 220 V Phase Neutre...
  • Page 93: Garantie

    Vers. 1 du 20/10/16 Manuel de l'utilisateur MIA 90 Page93 Voici ci-après un résumé des interventions de contrôle et/ou d'entretien indispensables pour garantir un fonctionnement correct de la cuisinière. PARTIES / FRÉQUENCE 1 JOUR 2-3 JOURS 30 JOURS 60-90 JOURS 1 SAISON •...
  • Page 94: Contact Chaudière À Gaz (En Option)

    Vers. 1 du 20/10/16 Manuel de l'utilisateur MIA 90 Page94 Contact chaudière à gaz (en option) La cuisinière prévoit (en option) la possibilité de gérer un contact pour l'allumage de la chaudière à gaz si la cuisinière entre en état d'alarme.
  • Page 95: Intervention Éffectuée

    ENTRETIEN DATE INTERVENTION ÉFFECTUÉE...
  • Page 96 Stove model: Stove serial number: Date of installation: Support reference data: Telephone number:...
  • Page 97 Maintenance frequency..................................Page 13 Examples of installation of a pellet stove..............................Page 15 Technical specifications............................. Page 17 Mia 90 pellet stove specifications ................................. Page 18 How to use the cooktop..................................Page 18 How to use the oven....................................Page 18 Preliminary operations............................
  • Page 98 Vers. 1 du 20/10/16 User manual MIA 90 Page98 Table of contents Contents Synthetic scheme in HEATING mode......................Page 36 Synthetic scheme in COOKING mode....................Page 37 Warning pop up............................Page 38 Alarms (table with reference codes)......................... Page 39 Cleaning provided by the user...........................
  • Page 99: Introduction

    Warnings: Ravelli stoves and cookers are manufactured with utmost attention to each component, to protect both the user and the installer from the danger of possible accidents. We recommend authorised staff pay particular attention to electrical connections after each intervention on the product.
  • Page 100: Safety Information

    Vers. 1 du 20/10/16 User manual MIA 90 Page100 Safety information The cooker must be installed and inspected by specialist staff trained by head office. Please carefully read this user and maintenance manual before installing and operating the cooker. If you require further clarification, contact your nearest Aico SpA dealer.
  • Page 101: General Information

    Keep the fuel and other flammable materials at an adequate distance. Ravelli recommends using wood pellets certified class A1 and A2 according to EN ISO 17225-2:2014 (EN PLUS), or standard DIN PLUS (more restrictive than the class A1) or STANDARD M 7135.
  • Page 102: Combustion

    Vers. 1 du 20/10/16 User manual MIA 90 Page102 Combustion Combustion is a chemical reaction in which two reactants, called fuel and oxidizer, combine generating thermal energy (heat) and producing new substances (fumes). To understand the expression described above, we consider this practical scheme named "combustion triangle"; it consists of three elements that are necessary to have the combustion reaction.
  • Page 103: Advice For Installation

    Vers. 1 du 20/10/16 User manual MIA 90 Page103 COOKER INSTALLATION Advice for installation Because of the frequent accidents caused by the malfunctioning of the flues in residential buildings, this chapter has been drafted in collaboration with Assocosma (association of stove/sweepping technicians and specialists of the field) in order to facilitate the installer to install the stove and build a system able to evacuate fumes in accordance with the regulations in force.
  • Page 104: Fume Duct And Fittings

    Vers. 1 du 20/10/16 User manual MIA 90 Page104 Fume duct and fittings: The term fume channels refers to the pipes that connect the appliance to the chimney. For heat generating devices equipped with an electric fume exhaust fan you must follow the installation instructions of the manufacturer regarding the maximum length and number of bends of the exhaust ducts.
  • Page 105: Chimney Cap

    Vers. 1 du 20/10/16 User manual MIA 90 Page105 Chimney cap The UNI 10683 prescribes that the chimney cap must meet the following characteristics: - The flue section must be at least twice the inner section of the chimney; - Have a structure suitable to prevent water or snow from entering;...
  • Page 106: Testing And Commissioning

    Vers. 1 du 20/10/16 User manual MIA 90 Page106 Outlet height in the presence of a technical volume or obstacle with openings and windows The symbol Z indicates the height (mm) from the obstacle or the technical compartment Outlet height in the presence of a technical volume or obstacle without openings Roof with slope β...
  • Page 107 Vers. 1 du 20/10/16 User manual MIA 90 Page107 Maintenance schedule. Maintenance should be carried out periodically as shown in the table below, and in the manner prescribed by standards and performed by qualified personnel; upon completion a regular intervention report should be issued.
  • Page 108 Vers. 1 du 20/10/16 User manual MIA 90 Page108 DECLARATION OF CONFORMITY OF THE STATE-OF-THE-ART SYSTEM In accordance with. art. 7 of MD 37 dated January 22, 2008 n. 20 The undersigned ___________________________________ owner or legal representative of the company ___________...
  • Page 109 Vers. 1 du 20/10/16 User manual MIA 90 Page109 Examples of installation of a pellet cooker IT IS MANDATORY TO USE WATERTIGHT PIPES WITH SILICONE SEALS. This type of installation (See Figure 1) requires the chimney to be insulated despite the fact that the entire duct is installed inside the building.
  • Page 110 Vers. 1 du 20/10/16 User manual MIA 90 Page110 This type of installation (see Figure 4) requires insulated chimney since the entire smoke duct was assembled inside the house. The lower part of the flue has an assembled “T” joint with an inspection plug.
  • Page 111 (DENOMINATION) MATERIALE CUCINA PELLET (MATERIAL) TRATTAM. SUPERFICIALE The data reported above are indicative and not binding. They can vary based on the type of pellets used. Ravelli reserves the right DIS. CONTR. A.Odori (DESIGNER) to make changes to enhance the performance of its products...
  • Page 112: Mia 90 Pellet Cooker Specifications

    Page112 MIA 90 pellet cooker specifications Ravelli cooker Mia 90 is a product of the latest generation combining tradition of wood cookers with technology, comfort and quietness of modern pellet stoves. It has been designed to ensure the heating of homes and, simultaneously, to be used as a cooker. In fact, you can cook either on the cooktop in ceramic glass or in the oven, heated directly by flame and hot fumes.
  • Page 113: How To Remove The Fixing Plates

    Vers. 1 du 20/10/16 User manual MIA 90 Page113 How to remove the fixing plates The cooker is secured to the pallet with special plates, to prevent damage during transport. To remove the plates it is necessary to remove the side panels.
  • Page 114: Wiring

    Vers. 1 du 20/10/16 User manual MIA 90 Page114 Wiring The power cord of the appliance should only be connected after the end of the installation and assembly of the equipment and must remain accessible after installation. Make sure that the power cord (and any other external cables to the unit) does not touch the hot parts.
  • Page 115: Description Of Controls Of The Electronic Board

    Vers. 1 du 20/10/16 User manual MIA 90 Page115 Description of controls of the electronic board: To access the electronic board open the storage box. Electronic circuit board The interface of the electronic board is shown in figure Serial port...
  • Page 116: Description Of The Handheld Set

    After inserting the batteries or connecting the handheld unit to the electronic board of the cooker, the display will show a short screen indicating the logo Ravelli, the screen with firmware version and the database and, finally, the screen for selecting the menu language.
  • Page 117: First Pellet Load

    Vers. 1 du 20/10/16 User manual MIA 90 Page117 If the handheld set is used for the first time, select YES using the selection keys and confirm with the dedicated key. On the display of the handheld set appears the following: Hold down for a few seconds the button of radio communication (RADIO ADJ) of the PCB to initialize the device.
  • Page 118: What Happens If The Batteries Are Empty

    Vers. 1 du 20/10/16 User manual MIA 90 Page118 2. View the operating power of the cooker. In addition, by pressing the DOWN scroll button, you can display the power settings, that can be edited using the two scroll keys UP/DOWN.
  • Page 119: Heating Menu Flow Chart

    Vers. 1 du 20/10/16 User manual MIA 90 Page119 Heating menu flow chart Here is the menu schema in heating mode. Setting cooking/heating Selection: Temperature rise Setting the room temperature. HEATING Setting the operating power Access to user menu heating...
  • Page 120: Cooking Menu Flow Chart

    Vers. 1 du 20/10/16 User manual MIA 90 Page120 Cooking menu flow chart Here is the operating diagram of the menu in cooking mode. Setting cooking/heating Selection: Cooking COTTURA FIRING Back to cooking/heating selection menu Setting the cooking timer Confirm the set time Hold the button Setting the oven temperature.
  • Page 121: Notes On Some Functions

    Vers. 1 du 20/10/16 User manual MIA 90 Page121 Notes on some functions Whenever you select the heating mode from the cooking mode, the following warning appears. When you see the warning "Put the food in the oven", a countdown starts, during which the cooker will beep.
  • Page 122: Cooking Mode User Menu

    Vers. 1 du 20/10/16 User manual MIA 90 Page122 Cooking mode user menu Settings menu. Oven light on/off Grill on/off Menu access Change state Change state Settings To exit the user menu and submenu press Electric grill operation The pellet Cooker oven is equipped with an electric grill.
  • Page 123: Settings Menu

    The first screen of the settings menu appears as shown in the diagram. You can only access the USER menu. The TECHNICIAN and MANUFACTURER menus are protected by password. Access to TECHNICIAN and MANUFACTURER menu is reserved exclusively to qualified technician authorized by Ravelli. Changing parameters contained within these menus could compromise the functionality and safety and makes the warranty void.
  • Page 124: Loading The Auger

    Vers. 1 du 20/10/16 User manual MIA 90 Page124 Loading the auger Carry out this operation to facilitate cooker's first start operations; you should also check that you have introduced pellets into the hopper and wait until the cooker is in “SHUTDOWN” or “FINAL CLEANING” mode. The number expressed in seconds indicates the remaining time of the first loading cycle.
  • Page 125 Vers. 1 du 20/10/16 User manual MIA 90 Page125 Once you have accessed the Climate Comfort menu, it is possible to operate on the 3 types of settings dedicated to the function: Press the key for several times until the Stand-by page is displayed.
  • Page 126: Chronothermostat

    Vers. 1 du 20/10/16 User manual MIA 90 Page126 Chronothermostat The PROGRAMMABLE THERMOSTAT function is only active in HEATING mode. With the Programmable thermostat function, you can set the cooker to switch on and off automatically within four independent time intervals (SET CRONO 1-2-3-4).
  • Page 127: Set Air/Pellet

    We recommend, however, to use pellets certified EN PLUS A1, which is the type of pellets used by Ravelli for fine-tuning and testing. Usually, the variation must be done on the FLOW percentage to adjust the input air and, therefore, the combustion; should the regulation of flow be insufficient, it may be necessary to also change the percentage of PELLET load.
  • Page 128: Stove State

    Vers. 1 du 20/10/16 User manual MIA 90 Page128 Stove State Below are given the steps for accessing the relative menu from the home page. Menu access SETTINGS Press the key Press the key “confirm” several times to access the...
  • Page 129: Contrast

    Vers. 1 du 20/10/16 User manual MIA 90 Page129 On the home page, instead of the room temperature de- tected and settable, the message OFF t. ext appears if the room where the thermostat is installed has not yet reached the required temperature, or the message ON t.ext if the...
  • Page 130 Vers. 1 du 20/10/16 User manual MIA 90 Page130 Synthetic scheme of cooker stages in HEATING mode PHASE DESCRIPTION The cooker is off the coil pre-heating phase has started and the pellets start to fall into the brazier. The pellets...
  • Page 131 Vers. 1 du 20/10/16 User manual MIA 90 Page131 PHASE DESCRIPTION AUTOMATIC CLEANING mechanical cleaning of the brazier is in progress (before switch-on or after the preset SYSTEM ACTIVE operating time). Synthetic scheme of cooker stages in COOKING mode PHASE...
  • Page 132: Warning Pop Up

    Vers. 1 du 20/10/16 User manual MIA 90 Page132 Warning Pop-Up REQUEST DESCRIPTION PUT THE FOOD IN THE The oven has reached the set temperature, and you can start cooking. OVEN TAKE THE FOOD OUT OF The cooking timer is complete and you can take the food out.
  • Page 133: Alarms (Table With Reference Codes)

    Vers. 1 du 20/10/16 User manual MIA 90 Page133 Alarms (table with reference codes) TITLE REASON SOLUTION CODE - No voltage during work phase - Press the switch off key and switch on cooker switch-on AL 01 BLACK OUT - If the problem persists, contact the Support Service.
  • Page 134: Cleaning Provided By The User

    Vers. 1 du 20/10/16 User manual MIA 90 Page134 EACH ALARM CAUSES THE IMMEDIATE SWITCHING OFF OF THE STOVE. PRESS THE SWITCH-ON BUTTON TO RESET THE ALARM. BEFORE SWITCHING ON THE STOVE, MAKE SURE THE CONDITION THAT CAUSED THE ALARM HAS BEEN RESOLVED.
  • Page 135: Cleaning Glass

    Vers. 1 du 20/10/16 User manual MIA 90 Page135 The ash pan must be cleaned every 30 days. The frequency depends however on the time of use of the cooker and the type of pellets used. To access the pan, open the door (1), unscrew the wing nuts and remove it (2).
  • Page 136 Vers. 1 du 20/10/16 User manual MIA 90 Page136 The FIREX 600 is resistant to heat but not to shock: handle with care when removed. After a few hours of operation the FIREX 600 might present a slight abrasion: this is completely normal, as the flame creates tiny scratches in the panel, without compromising the same.
  • Page 137: Cleaning The Glass Of The Cooktop

    Vers. 1 du 20/10/16 User manual MIA 90 Page137 Cleaning the glass of the cooktop The glass of the cooktop must be cleaned with the cooker cooled down. You can use the products available on the market that are normally used for cleaning of hobs, degreasers and glass cleaning products.
  • Page 138: Remove The Storage Box

    Vers. 1 du 20/10/16 User manual MIA 90 Page138 Removing the storage box To facilitate cleaning of the storage box, you can take it out completely. To remove the pan you need to unlock the side guide rails, using the special stopper, on both sides.
  • Page 139: Cleaning The Flue

    Page139 Cleaning the flue For this type of cleaning, you have to contact the Technical Support Service of Ravelli. Access to the exhaust circuit for cleaning is possible thanks to the special trap doors highlighted in figures. When closing the trap doors, check if the gaskets are intact and, if necessary, replace them with new ones.
  • Page 140 Vers. 1 du 20/10/16 User manual MIA 90 Page140 AUCUNE G5 G5 OPTIONAL board Carte EN OPTION pour gestion for home automa- 10 9 domotique tion control RÉSEAU D'ALIMENTATION 220 V Phase Neutre vert blanc rouge bleu KEY: Double contact relay 220V...
  • Page 141: Warranty

    Vers. 1 du 20/10/16 User manual MIA 90 Page141 Below are summarised the checks and/or maintenance interventions required for the proper operation of the cooker. PARTS / FREQUENCY 1 DAY 2-3 DAYS 30 DAYS 60-90 DAYS 1 SEASON • Ash pan (approximate time) •...
  • Page 142 Vers. 1 du 20/10/16 User manual MIA 90 Page142 Gas boiler contact (Optional) The cooker features (optional) a contact that switches on the gas boiler if the cooker goes in alarm state. • The output must be connected to the terminal on the cooker – G6 (on relay NC contact) •...
  • Page 143 Maintenance DATE INTERVENTION CARRIED OUT...
  • Page 144 Ravelli does not assume any responsibility for any errors in this booklet and considers itself free to make any variations to the features of its products without notice.

Table des Matières