Télécharger Imprimer la page

Publicité

Les langues disponibles
  • FR

Les langues disponibles

Liens rapides

EL302P
Bench Power Supply

Publicité

loading

Sommaire des Matières pour Aim TTi EL302P

  • Page 1 EL302P Bench Power Supply...
  • Page 2 Istruzioni in Italiano Instrucciones en Español Introduction The EL302P is a digitally controlled version of the standard EL302 linear power supply with an isolated RS-232 interface. It offers a low-cost solution for a basic programmable PSU, and will be sufficient for many applications where the sophistication and complexity of GPIB is not needed.
  • Page 3 Specification General specifications apply for the temperature range 5°C to 40°C. Accuracy specifications apply for the temperature range 18°C to 28°C after 1 hour warm-up with no load and calibration at 23°C. Typical specifications are determined by design and are not guaranteed. OUTPUT Voltage Range: 0V to 30V minimum.
  • Page 4 RS-232 CONTROL Interface: RS-232 interface, fully opto-isolated from power supply output. 9-pin D connector. Baud Rate: Variable from 600 baud to 9,600 baud. Remote Functions: Set Voltage, Set Current, Set Output On/Off, Read Voltage, Read Current, Read On/Off, Read Mode (CV or CC). Setting Accuracy: Voltage 0.3% ±...
  • Page 5 Safety This power supply is a Safety Class I instrument according to IEC classification and has been designed to meet the requirements of EN61010-1 (Safety Requirements for Electrical Equipment for Measurement, Control and Laboratory Use). It is an Installation Category II instrument intended for operation from a normal single phase supply.
  • Page 6 Installation Mains Operating Voltage Check that the instrument operating voltage marked on the rear panel is suitable for the local supply. Should it be necessary to change the operating voltage, proceed as follows: Ensure that the instrument is disconnected from the AC supply. Remove the screws holding the case upper and handle and lift off the case upper.
  • Page 7 Connections Output Terminals All power connections are made from the front panel. The load should be connected to the positive (red) and negative (black) terminals marked OUTPUT. Both are fully floating and either can be connected to ground. The terminal marked is connected to the chassis and safety earth ground.
  • Page 8 Efficiency To improve efficiency at low output levels the overhead voltage to the output regulators is automatically switched by a relay to a lower voltage; hysteresis at the threshold point prevents unnecessary switching when the output voltage is set at about that level. Apart from an audible ‘click’...
  • Page 9 Remote Operation Remote command format and the remote commands themselves are detailed in the Remote Commands chapter. Baud Rate Selection The Baud rate is set by pressing the OPTION SELECT/OK button until appears in the bAUd left-hand display; the right-hand display shows the current setting in the form of for 9600 Baud etc.
  • Page 10 Connect to a PC with a cable which has pins 2, 3, 5, wired plus pins 1, 4, 6 and pins 7 and 8, linked at the PC end, see diagram. Baud rate is set as described above; the other interface parameters are fixed as follows: Start Bits: 1 Parity: None Data Bits: 8...
  • Page 11 Remote Commands RS232 Remote Command Formats The instrument's input buffer accepts a single command (or query) at a time, under interrupt, in a manner transparent to other instrument operations. Commands and queries must be sent as specified in the command list and must be terminated with the command terminator code 0AH (Line Feed, LF).
  • Page 12 Returns the output current limit in Amps in <nr2> numeric format. The syntax of the response is I<nr2><rmt> Example: If the current limit is 1.00 Amps the response to the command I? will be I 1.00<rmt>. Reads and returns the actual output voltage in Volts in <nr2> numeric format.
  • Page 13 Maintenance The Manufacturers or their agents overseas will provide repair for any unit developing a fault. Where owners wish to undertake their own maintenance work, this should only be done by skilled personnel in conjunction with the service manual which may be purchased directly from the Manufacturers or their agents overseas.
  • Page 14 Sécurité Cet instrument est de Classe de sécurité 1 suivant la classification IEC et il a été construit pour satisfaire aux impératifs EN61010-1 (impératifs de sécurité pour le matériel électrique en vue de mesure, commande et utilisation en laboratoire). Il s'agit d'un instrument d'installation Catégorie II devant être exploité...
  • Page 15 Installation Tension d’utilisation secteur Vérifier que la tension opérationnelle de l'instrument indiquée sur le panneau arrière est appropriée pour l'alimentation locale. S'il s'avère nécessaire de modifier la tension opérationnelle, procéder de la manière décrite ci-dessous: S'assurer que l'instrument est débranché de l'alimentation c.a. Enlever les vis de retenue de la partie supérieure du boîtier et de la manette et soulever la partie supérieure du boîtier.
  • Page 16 
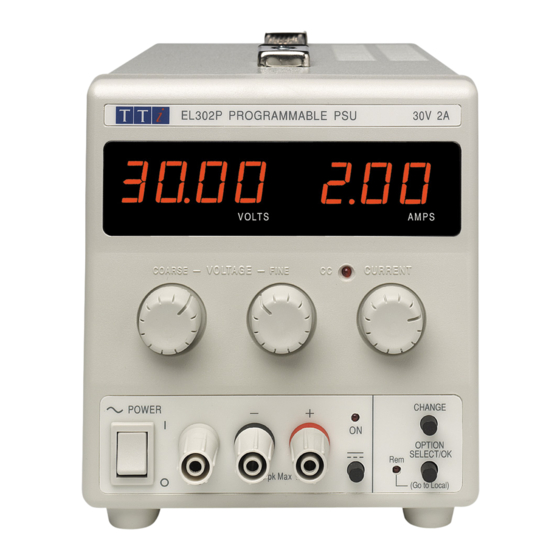
Connexions Bornes de sortie Toutes les connexions d’alimentation s’effectuent à partir du panneau avant. Relier la charge aux bornes positive (rouge) et négative (noire) marquées OUTPUT (Sortie). Les deux sont entièrement flottantes et l'une ou l'autre peut être connectée à la masse. La borne désignée est reliée au châssis et à...
  • Page 17 alimentations de précision sur banc, un condensateur est relié aux bornes de la sortie, afin de maintenir la stabilité, ainsi qu’une bonne réponse transitoire. Ce condensateur se charge jusqu’à la tension de sortie, et le court-circuitage de la sortie produira une impulsion de courant, lors du déchargement du condensateur indépendamment du réglage de limite de courant.
  • Page 18 Fonctionnement à distance Le format des commandes à distance et les commandes à distance elles-mêmes sont détaillés dans le chapitre Commandes à distance. Sélection de la vitesse de transmission Appuyer sur le bouton OPTION SELECT/OK jusqu'à ce que apparaisse dans l'affichage bAUd de gauche permet de régler la vitesse de transmission ;...
  • Page 19 Connecter à un PC avec un câble comportant les broches 2, 3, 5 câblées plus les broches 1, 4, 6 et les broches 7 et 8, reliées côté PC, voir le schéma. La vitesse de transmission est réglée comme décrit plus haut ; les autres paramètres de l'interface sont fixés comme suit : Bits de départ : 1 Parité...
  • Page 20 Commandes à distance Formats des commandes à distances RS232 Le tampon d'entrée de l'instrument accepte une seule commande (ou interrogation) à la fois, sous interruption, d'une manière transparente pour les autres opérations de l'instrument. Les commandes et interrogations doivent être envoyées comme spécifié dans la liste des commandes et doivent se terminer par le code de fin de commande 0AH (saut de ligne, LF).
  • Page 21 Renvoie la limite d’intensité de sortie réglée en A sous le format numérique <nr2>. La syntaxe de la réponse est I<nr2><rmt> Exemple : Si la limite d’intensité de sortie réglée est de 1,00 A, la réponse à la commande I? sera I 1.00<rmt>. Lit et renvoie la tension réelle de sortie en Volts sous le format numérique <nr2>.
  • Page 22 Sicherheit Dieses Gerät wurde nach der Sicherheitsklasse (Schutzart) I der IEC-Klassifikation und gemäß den europäischen Vorschriften EN61010-1 (Sicherheitsvorschriften für elektrische Meß-, Steuer, Regel- und Laboranlagen) entwickelt. Es handelt sich um ein Gerät der Installationskategorie II, das für den Betrieb von einer normalen einphasigen Versorgung vorgesehen ist. Das Gerät wurde gemäß...
  • Page 23 Installation Netzbetriebsspannung Sicherstellen, daß die auf der Geräterückwand angegebene Betriebsspannung mit der Versorgungsspannung am Ort übereinstimmt. Falls es erforderlich ist, die Betriebsspannung zu ändern, wie folgt vorgehen: Sicherstellen, daß das Gerät vom Wechselstromnetz getrennt ist. Schrauben entfernen, mit denen die obere Gehäusehälfte und der Handgriff befestigt sind und obere Gehäusehälfte abheben.
  • Page 24 Anschlüsse Ausgangsklemmen Alle Anschlüsse werden auf der Vorderseite hergestellt. Der Verbraucher sollte an die mit AUSGANG (OUTPUT) markierte positive (rot) und negative (schwarz) markierte Klemme angeschlossen werden. Beide sind galvanisch getrennt und können beliebig geerdet werden. Die mit dem Symbol gekennzeichnete Klemme ist mit dem Chassis und der Schutzerde verbunden.
  • Page 25 Augenblickstromausgang Mit der Strombegrenzung kann der kontinuierliche Ausgangsstrom bis auf 10 mA begrenzt werden. Wie bei allen Präzisions-Stromversorgungs-Tischgeräten ist der Ausgang zur Aufrechterhaltung der Stabilität und zwecks gutem Einschwingverhalten mit einem Kondensator versehen. Der Kondensator wird bis zur Höhe der Ausgangsspannung aufgeladen. Ein Kurzschließen des Ausgangs bewirkt beim Entladen des Kondensators einen Stromimpuls, der von der Strombegrenzungseinstellung unabhängig erfolgt.
  • Page 26 Fernbedienung Format und Inhalt der Fernbedienungsbefehle sind im Kapitel “Fernbedienungsbefehle” aufgeführt. Wahl der Baudrate Die Einstellung der Baudrate erfolgt durch Drücken der Taste OPTION SELECT/OK bis bAUd auf der linken Anzeige erscheint. Die rechte Anzeige zeigt nun die aktuelle Einstellung an, z. B bei einer Baudrate von 9600 Baud usw.
  • Page 27 Zum Anschluss an einen PC werden lediglich die Stifte 2, 3 und 5 benötigt. Die Stifte 1, 4, 6 sowie 7 und 8 müssen am PC-seitigen Steckverbinder verbunden sein (siehe Zeichnung). Die Baudrate wird wie bereits beschrieben eingestellt. Die übrigen Parameter sind wie folgt festgelegt: Startbits: 1 Parität: Keine...
  • Page 28 Fernbedienungsbefehle RS232 Format der Fernbedienungsbefehle Der Eingabepuffer des Geräts akzeptiert jeweils einen einzelnen Befehl (bzw. Abfrage). Dies erfolgt unter Verwendung eines Interrupts, quasi im Hintergrund und unabhängig zu allen anderen Gerätefunktionen. Befehle und Abfragen müssen entsprechend der Befehlsliste gesendet und mit dem Befehlsschlusszeichen „0AH“ (Line Feed, LF) abgeschlossen werden. Die Parameter müssen durch ein Leerzeichen (20H) vom eigentlichen Befehl getrennt werden.
  • Page 29 Rückmeldung der Ausgangsstrombegrenzung in <nr2> Ampere (numerisches Format). Die Antwort ist I<nr2><rmt> Beispiel: Wurde die Strombegrenzung auf 1,00 Ampere gesetzt, so lautet die Antwort auf den Befehl I? I 1.00<rmt>. Rückmeldung der tatsächlichen Ausgangsspannung in <nr2> Volt (numerisches Format). Die Antwort ist <nr2>V<rmt>...
  • Page 30 Sicurezza Questo strumento appartiene alla Categoria di Sicurezza 1, secondo la classifica IEC, ed è stato progettato in modo da soddisfare i criteri EN61010-1 (requisiti di Sicurezza per Apparecchiature di misura, controllo e per uso in laboratorio). È uno strumento di Categoria d’installazione II ed è inteso per il funzionamento con un’alimentazione normale monofase.
  • Page 31 Installazione Tensione d’esercizio Controllare che la tensione d’esercizio dello strumento segnata sul pannello posteriore sia uguale a quella della rete elettrica locale. Se dovesse rendersi necessario cambiare la tensione d'esercizio, osservare il seguente procedimento: Controllare che lo strumento sia scollegato dall'alimentazione a c.a. Togliere le viti che fissano il coperchio superiore e la maniglia e sollevare il coperchio superiore.
  • Page 32 Collegamenti Morsetti di uscita Tutti i collegamenti elettrici si realizzano dal quadro anteriore. Il carico va collegato ai morsetti positivo (rosso) e negativo (nero) contrassegnati OUTPUT (uscita). Entrambe le uscite sono a tensione variabile e possono essere collegate a terra. Il morsetto segnato è...
  • Page 33 Uscita di corrente istantanea Il comando di limitazione di corrente può essere impostato per limitare la corrente di uscita continua a livelli fino a 10mA. Tuttavia, in comune con tutti gli alimentatori da banco di precisione, sull’uscita è collegato un condensatore che consente di mantenere stabilità ed una buona risposta ai transienti.
  • Page 34 Funzionamento remoto Il formato dei comandi remoti e la descrizione dei comandi stessi sono illustrati nel capitolo Comandi remoti. Selezione della velocità di trasmissione La velocità di trasmissione, espressa in Baud, viene impostata agendo sul pulsante OPTION SELECT/OK fino a quando compare la scritta sul display a sinistra dello strumento;...
  • Page 35 Collegare ad un PC con un cavo con i pin 2, 3, 5 cablati e i pin 1, 4, 6 e 7 e 8 collegati al PC; vedi lo schema illustrativo La velocità di trasmissione espressa in Baud viene impostata osservando le istruzioni di cui sopra;...
  • Page 36 Comandi remoti Formato dei comandi remoti RS232 La memoria di transito destinata alla memorizzazione dei dati ricevuti dallo strumento è in grado di accettare un singolo comando (o richiesta di informazioni) per volta, durante l'interrupt, senza interferire con le operazioni eseguite dallo strumento. I comandi e le richieste di informazioni devono essere inviate come prevede l'elenco comandi e devono contenere il codice finale del comando 0AH (interlinea, LF).
  • Page 37 Ritorna il valore massimo di corrente erogata in Ampere nel formato numerico <nr2>. La sintassi della risposta è: I<nr2><rmt> Esempio: Se il valore massimo di corrente è impostato su 1,00 Ampere, la risposta al comando I? sarà I 1.00<rmt>. Rileva e ritorna il valore effettivo della tensione erogata in Volt nel formato numerico <nr2>.
  • Page 38 Seguridad Este es un instrumento de Clase de Seguridad I según la clasificación del IEC y ha sido diseñado para cumplir con los requisitos del EN61010-1 (Requisitos de Seguridad para Equipos Eléctricos para la Medición, Control y Uso en Laboratorio). Es un instrumento de Categoría de Instalación II propuesto para ser usado con un suministro monofásico normal.
  • Page 39 Instalación Tensión de la Red Eléctrica Verificar que la tensión de funcionamiento del instrumento que figura en el panel trasero concuerde con el suministro local. Si fuese necesario cambiar la gama de tensiones de functionamiento, proceda de la siguiente manera: Cerciorarse de que el instrumento esté...
  • Page 40 Conexiones Terminales de salida Todas las conexiones de corriente se realizan desde el panel frontal. La carga debe conectarse a los bornes positivos (rojos) y negativos (negros) marcados OUTPUT (SALIDA). Ambos bornes son totalmente libres y cualquiera de los dos se puede conectar a masa.
  • Page 41 Salida Instantánia de Corriente Se puede ajustar el control de límite de la corriente para limitar la salida de corriente continua a niveles de hasta 10mA. Sin embargo, en común con todas las alimentaciones eléctricas de precisión de banca, se conecta una capacitancia a través de la salida para mantener estabilidad y repuesta buena a tensiones de ondas transitorias.
  • Page 42 Funcionamiento remoto Los comandos remotos y su formato se describen pormenorizadamente en el capítulo Comandos Remotos. Selección de la velocidad en baudios La velocidad en baudios se ajusta pulsando el botón OPTION SELECT/OK hasta que bAUd se muestra en la pantalla de la izquierda; la pantalla de la derecha muestra el ajuste actual bajo la forma de para 9600 baudios, etc.
  • Page 43 Conecte a un PC con un cable que tenga las clavijas 2, 3, 5, cable más clavijas 1, 4, 6 y clavijas 7 y 8, conectadas en el PC. Véase el diagrama. La velocidad en baudios se describe de la forma descrita anteriormente. los otros parámetros de interfaz son fijos: Bits de inicio: 1 Paridad: Ninguna...
  • Page 44 Comandos remotos Formato de los Comandos Remotos de RS232 La memoria intermedia de entrada del instrumento acepta un solo comando individual (o pregunta) al mismo tiempo, bajo interrupción, de forma transparente a las demás operaciones del instrumento. Los comandos y las preguntas se deben enviar de la forma especificada en la lista de comandos y deben finalizar con el código de finalización de comandos 0AH (Avance de línea, LF).
  • Page 45 Devuelve el límite de corriente de salida en amperios en formato numérico <nr2>. La sintaxis de la respuesta es I<nr2><rmt> Ejemplo: Si el límite de corriente es 1.00 amperios, la respuesta al comando I? será I 1.00<rmt>. Lee y devuelve el voltaje de salida real en voltios en formato numérico <nr2>. La sintaxis de la respuesta es <nr2>V<rmt>...
  • Page 46 Thurlby Thandar Instruments Ltd. Glebe Road • Huntingdon • Cambridgeshire • PE29 7DR • England (United Kingdom) Telephone: +44 (0)1480 412451 • Fax: +44 (0)1480 450409 International web site: www.aimtti.com • UK web site: www.aimtti.co.uk Email: info@aimtti.com   Aim Instruments and Thurlby Thandar Instruments...