Titan FLEXSPRAY Manuel De L'utilisateur
Table des Matières
Les langues disponibles
Les langues disponibles
Liens rapides
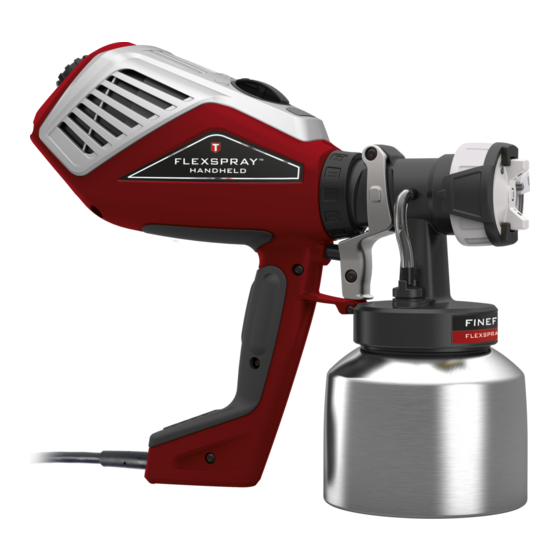
FLEXSPRAY
HANDHELD
Model 0524093
Questions?
Call Titan Technical Service at:
1-800-526-5362
Register your product online at:
www.titantool.com
All manuals and user guides at all-guides.com
Owner's Manual
Read this manual for complete instructions
Contents
2
Important Safety Information
3
4
5
6
7
8
9
10
12
13
14
44
Parts List
48
Warranty
• Form No. 0529895A
0914
Chapitres
Table des Matières
Dépannage

Manuels Connexes pour Titan FLEXSPRAY


Sommaire des Matières pour Titan FLEXSPRAY
- Page 15 Introduction à la pulvérisation de peinture Pièces et composants Système de changement rapide (Quick Change) Besoin d’aide? Guide pour appliquer du ruban Montage appelez le service technique Titan Réglage des commandes du pistolet pulvérisateur 1-800-526-5362 Pulvérisation Nettoyage enregistrement du produit en ligne...
-
Page 16: Directives Sur La Mise À La Terre
10. Le cordon d’alimentation doit être branché à un circuit trifilaire. Ce produit doit être utilisé sur un circuit d’une tension nominale de 120 volts 11. Utiliser que des piéces recommandée de Titan FlexSpray. et comporte une fiche de mise à la terre semblable à celle illustrée ci-dessous. -
Page 17: Introduction À La Pulvérisation De Peinture
Pureté du matériau de revêtement Une condition préalable absolue du fonctionnement sans problème du système de FLEXSPRAY est que le matériau de revêtement ne soit pas contaminé. Si vous doutez de la pureté du matériau de revêtement, nous vous recommandons de filtrer le matériau de revêtement à... -
Page 18: Pièces Et Composants
All manuals and user guides at all-guides.com Pièces et Avis : Démarrer composants Examinez l’information figurant dans cette page pour vous familiariser avec les pièces et les composants de votre appareil. # Description # Description # Description Embout 11 Crochet de la courroie d’épaule (peut 18 Tube d’air être monté... -
Page 19: Système De Changement Rapide (Quick Change)
All manuals and user guides at all-guides.com Système de Avis : Démarrer changement Grâce au système de changement rapide, la partie avant du pistolet (ensemble avant) rapide (Quick peut être remplacée rapidement et facilement. Cela permet le changement rapide de produit pour différents revêtements et les Change) plus gros travaux. -
Page 20: Guide Pour Appliquer Du Ruban
All manuals and user guides at all-guides.com Guide pour Avis : Démarrer appliquer Si vous pulvérisez à l’intérieur d’une pièce, suivez les directives figurant sur cette feuille afin de masquer du ruban correctement les choses qui ne devraient pas être peintes. -
Page 21: Montage
All manuals and user guides at all-guides.com Montage Avis : Démarrer Des instructions supplémentaires se trouvent à l’intérieur du boîtier de transport. Ces directives constituent un complément de ce manuel d’instructions. ImpoRTanT : avant de brancher l’appareil à la source d’alimentation, s’assurer que la tension du cordon d’alimentation correspond à... -
Page 22: Réglage Des Commandes Du Pistolet Pulvérisateur
Remarque : Suivre les directives du fabricant quant à l’utilisation du matériau de revêtement sur le réservoir de peinture ou sur la fiche de données techniques. Guide de démarrage rapide FLEXSPRAY Largeur de la application Frontale FlexFinish application Frontale FineFinish (1) Commencez avec une répartition... -
Page 23: Pulvérisation
Une affiche de pulvérisation est également inclusse dans le boîtier de transport. Cette affiche peut être consultée pour obtenir des conseils supplémentaires. Consulter les réglages du guide de démarrage rapide FLEXSPRAY à la page précédente pour établir un point de départ. Préparation de la surface Tous les objets à... -
Page 24: Nettoyage
All manuals and user guides at all-guides.com Nettoyage Avant de commencer : Démarrer Pour le nettoyage, utilisez la solution de nettoyage appropriée (eau chaude, savonneuse pour les peintures aux latex; essences minérales pour les peintures à l’huile) ImpoRTanT : ne jamais nettoyer la buse ou l’alésage d’air du pistolet avec des objets métalliques pointus. - Page 25 All manuals and user guides at all-guides.com Safety Nettoyage (suite) 7. Debrancher le cordon d’alimentation. Diviser le pistolet de pulvérisation. Poussez le levier de changement rapide sous la détente (a), tournez et séparez l’ensemble avant de la turbine. 8. Retirer le réservoir de 0,9 litre et le vider. 9.
-
Page 26: Remontez
All manuals and user guides at all-guides.com Remontez IMPORTANT : Démarrer Suivre les étapes décrites ci-dessous pour le remontage. Un mauvais remontage risque d’endommager le pistolet de pulvérisation. Remontez : 1. Insérer d’abord l’embout d’étanchéité (a)avec rainure (fente) dans l’embout (éloigné... -
Page 27: Entretien
Remarque : Assurez-vous que les onglets du couvercle de filtre (e) s’enclenchent sur la turbine (schéma en médaillon). Remarque : Lors du remplacement, utiliser uniquement des filtres de TITAN FLEXSPRAY HANDHELD . Tube d’air: Remarque : Si de la peinture s’est introduite dans le tube d’air, suivre les étapes suivantes. -
Page 28: Dépannage
All manuals and user guides at all-guides.com Dépannage Toute tentative par une personne autre qu’un technicien autorisé d’ouvrir le carter du moteur ou de réparer un composant électrique pourrait entraîner des blessures graves et annulerait la garantie. Probleme Cause Solution La turbine ne dèmarre pas 1.