Publicité

Les langues disponibles
  • FR

Les langues disponibles

Liens rapides

00424A SCC-B2307P-eng 4/7/05 9:11 PM ˘ ` 1
DAY/NIGHT COLOR CAMERA
E
SCC-B2303(P)/B2003P
D
SCC-B2307P/B2007P
F
User's Manual
Es
I

Publicité

Table des Matières
loading

Sommaire des Matières pour Samsung SCC-B2303

  • Page 1 00424A SCC-B2307P-eng 4/7/05 9:11 PM ˘ ` 1 DAY/NIGHT COLOR CAMERA SCC-B2303(P)/B2003P SCC-B2307P/B2007P User’s Manual...
  • Page 2 00424A SCC-B2307P-eng 4/7/05 9:11 PM ˘ ` 2 CAUTION This symbol indicates high voltage is present RISK OF ELECTRIC SHOCK DO NOT OPEN inside. It is dangerous to make any kind of contact with any inside part of this product. This symbol alerts you CAUTION: TO REDUCE THE that important literature...
  • Page 3: Important Safety Instructions

    00424A SCC-B2307P-eng 4/7/05 9:11 PM ˘ ` 3 Important Safety Instructions Read these instructions. Keep these instructions. Heed all warnings. Follow all instructions. Do not use this apparatus near water. Clean only with dry cloth. Do not block any ventilation openings. Install in accordance with the manufacturer’s instructions.
  • Page 4 00424A SCC-B2307P-eng 4/7/05 9:11 PM ˘ ` 4 Contents Chapter 1 Introduction ............5 Chapter 2 Special Features ..........6 Chapter 3 Part Names and Functions ....... 7 Chapter 4 Installation ............12 Cautions for Installation and Use ....... 13 Connecting Automatic Shutter Lens Connector...
  • Page 5 00424A SCC-B2307P-eng 4/7/05 9:11 PM ˘ ` 5 Chapter 1 Introduction The DAY/NIGHT Camera operates in a color mode in an the illumination over the standard value and otherwise in B/W mode by deleting the IR Cut function, which contributes to the improvement of sensitivity so that it is called a low illumination camera which is able to identify objects in a dark area.
  • Page 6 00424A SCC-B2307P-eng 4/7/05 9:11 PM ˘ ` 6 Chapter 2 Special Features High Sensitivity It has an up-to-date 1/3" Super(EXview)-HAD IT CCD for an image of high sensitivity. Low Illumination Function It has both a low illumination function and DAY/NIGHT function based on digital signal technology in order to operate in the worst environment without light.
  • Page 7: Part Names And Functions

    00424A SCC-B2307P-eng 4/7/05 9:11 PM ˘ ` 7 Chapter 3 Part Names and Functions Side View Mount Adapter Fixing Groove Auto Iris Lens Connector Back Focus Control Bar ALC Lens Selection Switch Automatic Shutter Lens Control Cable Camera Lens Mount Adapter Fixing Groove This groove is used for screwing the mount adapter, a part of the bracket where the camera will be installed.
  • Page 8: Rear View

    00424A SCC-B2307P-eng 4/7/05 9:11 PM ˘ ` 8 Auto Iris Lens Control Cable This cable transmits the control signal from the camera to control the lens shutter. Back Focus Control Bar It controls the back focus. ALC Lens Setting Switch This switch sets the Auto Iris lens type for use.
  • Page 9 00424A SCC-B2307P-eng 4/7/05 9:11 PM ˘ ` 9 Power Display LED When the camera is supplied with power, LED is on. Video Output Terminal The monitor video input terminal is connected with this terminal through which the camera video signal comes out. Remote Input Terminal(RS-232) This terminal is used for camera control at the production plant.
  • Page 10 00424A SCC-B2307P-eng 4/7/05 9:11 PM ˘ ` 10 DAY/NIGHT External Signal Input & Alarm Signal Output This is a function to receive the external DAY/NIGHT signal from the sensor(option) and convert the signal into BW. The MOTION DET function generates an alarm signal when a movement is detected. DAY/NIGHT IN ALARM OUT Connect an external sensor to the DAY/NIGHT terminal as shown in...
  • Page 11 00424A SCC-B2307P-eng 4/7/05 9:11 PM ˘ ` 11 Camera Operation Switch(Setup Switch) The function of the camera operation switch changes depending on whether the camera is currently in the usual operation mode(No setup menu is seen on the screen) or the setup menu mode. [LEFT/RIGHT] key [UP/DOWN] key [ENTER] key...
  • Page 12: Before Installation

    00424A SCC-B2307P-eng 4/7/05 9:11 PM ˘ ` 12 Chapter 4 Installation This chapter describes what should be checked before installation, how to set the installation environment, and what should be done during installation. Then, it describes how to install the camera and connect the cable in actual circumstances.
  • Page 13 00424A SCC-B2307P-eng 4/7/05 9:11 PM ˘ ` 13 What should be done during installation and use Do not disassemble the camera on your own. Be careful when handling the camera at all times. Do not strike the camera with your fists or shake it. The camera should be stored and treated with care to avoid any damage.
  • Page 14 00424A SCC-B2307P-eng 4/7/05 9:11 PM ˘ ` 14 Connecting Auto Iris Lens Connector Prepare the Auto Iris lens connector, a camera auxiliary, as follows : Connect each uncovered shutter control cable wire to the Auto Iris lens connector as follows. Pin No.
  • Page 15 00424A SCC-B2307P-eng 4/7/05 9:12 PM ˘ ` 15 Installation Lens Fixing In case of CS lenses Turn the CS lens clockwise until it is fixed as shown as follows. CS lens In case of C lenses Turn the C-mount adapter clockwise to fix it. Then turn the C lens clockwise until it is fixed as follows.
  • Page 16: Back Focus Adjustment

    00424A SCC-B2307P-eng 4/7/05 9:12 PM ˘ ` 16 Setting Switch Control You should change the position of the lens setting switch on the side of the camera according to the lens type. Depending on whether you fixed the DC control type Auto Iris lens or video control type automatic shutter lens, you should put the switch in "DC"...
  • Page 17 00424A SCC-B2307P-eng 4/7/05 9:12 PM ˘ ` 17 Lenses with zoom function Image an object with high resolution(letticed) at a distance of 3 to 5 m and zoom in the lens as close to TELE as possible. Then adjust the lens focus bar until the object is seen best.
  • Page 18 00424A SCC-B2307P-eng 4/7/05 9:12 PM ˘ ` 18 Connecting Cables and Checking Operation 1 First, connect the connector of the BNC cable to the Video Out terminal 2 Second, connect the other connector of the BNC cable to the Video In terminal.
  • Page 19 00424A SCC-B2307P-eng 4/7/05 9:12 PM ˘ ` 19...
  • Page 20: Camera Set-Up

    00424A SCC-B2307P-eng 4/7/05 9:12 PM ˘ ` 20 Chapter 5 Camera Set-Up This chapter describes how to set up the camera. The first part describes the whole set up menu and composition and the second part describes the function of each menu. ON...
  • Page 21 00424A SCC-B2307P-eng 4/7/05 9:12 PM ˘ ` 21 CAMERA ID This CAMERA ID menu designates a CAMERA ID on the monitor screen connected to the camera. If you turn on the CAMERA ID menu and press the [ENTER] key, the sub-screen will appear to designate a CAMERA ID. The CAMERA ID may be composed of letters, numbers, special texts, or a combination of these up to 20 digits.
  • Page 22 00424A SCC-B2307P-eng 4/7/05 9:12 PM ˘ ` 22 IRIS This CAMERA has an IRIS function for automatic control of the brightness level through the intensity of radiation. ❿ ALC If you select the ALC menu and press the [ENTER] key, the sub-screen will appear to set the brightness level.
  • Page 23 00424A SCC-B2307P-eng 4/7/05 9:12 PM ˘ ` 23 The DC IRIS level setting is available in the SETUP MENU mode as well as in the operation mode. If you press the LEFT or RIGHT key for about 2 seconds, the DC IRIS Brightness Level setting menu will appear. Please press the LEFT or RIGHT key to change the mode from EXIT to SAVE and hit the [ENTER] key to save the file.
  • Page 24 00424A SCC-B2307P-eng 4/7/05 9:12 PM ˘ ` 24 If you use an ordinary camera when there is an intense and concentrated illumination behind an object, the back light will shade the image on the monitor screen. The BLC function prevents such a back light effect to secure a clear image under all illumination environments.
  • Page 25 00424A SCC-B2307P-eng 4/7/05 9:12 PM ˘ ` 25 ❿ USER AREA If you select USER... in the BLC menu by using the LEFT or RIGHT key and press the [ENTER] key, you will be able to determine the size and location of the BLC area by yourself.
  • Page 26 00424A SCC-B2307P-eng 4/7/05 9:12 PM ˘ ` 26 COLOR/BW The COLOR/BW menu turns the IR(Infrared) Filter on or off. In low illumination environments, the BW mode will turn off the IR Filter and the sensitivity will be as high as that of BW cameras. Otherwise, the BW mode will turn on the IR Filter and the sensitivity will return to normal to recover the normal screen.
  • Page 27 00424A SCC-B2307P-eng 4/7/05 9:12 PM ˘ ` 27 ❿ BW... This is the IR Filter OFF Mode in black and white.(high sensitivity like BW cameras) If you select the BW... and press the [Enter] key, the BW submenu screen will appear. You will be able to send out the BURST signal by turning on or off in this menu.
  • Page 28 00424A SCC-B2307P-eng 4/7/05 9:12 PM ˘ ` 28 ❿ AUTO... This menu automatically converts the COLOR Mode into the BW Mode or vice versa depending on illumination. In low illumination environments, it turns off the IR Filter to raise sensitivity, otherwise it turns on the IR Filter to lower sensitivity.
  • Page 29 00424A SCC-B2307P-eng 4/7/05 9:12 PM ˘ ` 29 ❿ EXT... This menu automatically converts the COLOR Mode into the BW Mode or vice versa depending on illumination with an external sensor. If you select the EXIT menu and press the [Enter] key, the EXTERNAL BW submenu will appear on the menu screen.
  • Page 30 00424A SCC-B2307P-eng 4/7/05 9:12 PM ˘ ` 30 SHUTTER The SHUTTER menu sets up the high speed electronic shutter, AUTO low speed shutter, and FIX low speed shutter. The high speed electronic shutter covers 7 shutter speeds from 1/100 to 1/10K seconds and is commonly used for imaging fast moving objects.
  • Page 31 00424A SCC-B2307P-eng 4/7/05 9:12 PM ˘ ` 31 AGC/MOTION ❿ AGC The AGC menu lightens the screen below the standard brightness because of the object taken in dark illumination. Setting up the AGC menu is available only in either High Speed Shutter mode or OFF mode. If you press the LEFT or RIGHT key to reach the LOW or HIGH position, the AGC function will start activating.
  • Page 32 00424A SCC-B2307P-eng 4/7/05 9:12 PM ˘ ` 32 ❿ MOTION The MOTION function is available only in the AUTO or FIX mode with these 5 steps: S.SLOW, SLOW, NORM, FAST, F.FAST. The S.SLOW minimizes the intensity of the AGC to monitor stable objects in the dark The SLOW keeps the intensity of AGC low to monitor objects with a little movement in the dark.
  • Page 33: White Bal

    00424A SCC-B2307P-eng 4/7/05 9:12 PM ˘ ` 33 WHITE BAL ❿ ATW If you select the ATW mode in the WHITE BAL menu, you will be able to monitor the color temperature change by real time and set up the White Balance to the real time color temperature automatically.
  • Page 34 00424A SCC-B2307P-eng 4/7/05 9:12 PM ˘ ` 34 (AWB/MANU) (AWB/MANU) press the [Left/Right] BURST OFF(USER)-- (00) ----I---- PRESET 3200K BLUE (00) ----I---- SYNC The INT mode is necessary for using the internal synchronization and the LINE... mode is necessary for the operation of multi cameras because it synchronizes the camera phase by using the external signal(AC Signal).
  • Page 35 00424A SCC-B2307P-eng 4/7/05 9:12 PM ˘ ` 35 SPECIAL You can control the BAUD RATE, D-ZOOM, PIP, MIRROR, POSI/NEGA, DETAIL, and MOTION DET function by yourself in the SPECIAL menu. If your select the SPECIAL menu and press the [ENTER] key, the SPECIAL submenu screen will appear.
  • Page 36 00424A SCC-B2307P-eng 4/7/05 9:12 PM ˘ ` 36 ❿ MIRROR : Horizontally flips the video signal. ❿ POSI/NEGA : Outputs the video brightness signal normally or reversely. ❿ DETAIL : Adjusts the horizontal and vertical sharpness. ❿¤MOTION DET MOTION DET detects any movement of objects. if you activate the MOTION DET function at the time when you expect nobody to move, the function will detect the movement of an intruder Once detected, the function outputs the ALARM signal.
  • Page 37 00424A SCC-B2307P-eng 4/7/05 9:12 PM ˘ ` 37 The AREA menu sets size and position like AREA in the BLC menu. If you want to select the screen area where the MOTION DET function is applied, you should press the [ENTER] key in the AREA USER.. by yourself or set the AREA menu to the PRESET..
  • Page 38 00424A SCC-B2307P-eng 4/7/05 9:12 PM ˘ ` 38 EXIT The EXIT menu is used for the termination of the CAMERA SETUP menu. ❿ QUIT Ignores any change and returns to the previously saved SETUP menu. ❿ SAVE Saves all the changes to the menu until now. ❿...
  • Page 39: Product Specification

    00424A SCC-B2307P-eng 4/7/05 9:12 PM ˘ ` 39 Product Specification SCC-B2303 Special Features ITEM DESCRIPTION Definition CCTV Camera (DAYNIGHT) Power Source AC 24V ± 10% (NTSC:60Hz ± 0.1Hz), DC12V +10% ~ -5% Power Consumption Approx. 4.5W Broadcasting System NTSC Standard Color System...
  • Page 40 POSI/NEGA, Mirror(Left/Right), Detailed Setting Signal Output Composite Video Out : 1.0 Vp-p 75 ohms/BNC AI Lens VIDEO/DC Lens Mount CS/C (Mount Adaptor) Operating Temperature -10°C ~ +50°C Operating Humidity ~90% Physical Size 68(W) x 55(H) x 128.5(D) mm Weight SCC-B2303 : Approx. 450g...
  • Page 41 00424A SCC-B2307P-eng 4/7/05 9:12 PM ˘ ` 41 Product Specification SCC-B2303P/B2003P/B2307P/B2007P Special Features ITEM DESCRIPTION Definition CCTV Camera (DAYNIGHT) Power Source SCC-B2303P/B2307P : AC 24V ± 10% (50Hz ± 0.1Hz), DC12V +10% ~ -5% SCC-B2003P/B2007P : AC220V ~ AC240V (50Hz ± 0.1Hz) Power Consumption SCC-B2303P/B2307P : Approx.
  • Page 42 00424A SCC-B2307P-eng 4/7/05 9:12 PM ˘ ` 42 Item Description Day/Night COLOR/B/W/AUTO/EXT Color Temperature ATW/AWC/Manual MODE (3200°K, 5600°K, R/B Gain Adjustment) Electronic Shutter Speed ALC:OFF~1/10K sec (7 steps) ELC:Max 1/100K sec Back Light Compensation OFF/BOTTOM/TOP/LEFT/RIGHT/CENTER/USER Sense Up OFF/AUTO2X~128X/FIX2X~128X Digital Zoom OFF/ON(X10), PIP Motion Detection OFF/ON (Area/Sensitivity Setting)
  • Page 43 00424A SCC-B2307P-GER 4/7/05 9:44 PM ˘ ` 1 TAG/NACHT FARBE KAMERA SCC-B2303(P)/B2003P SCC-B2307P/B2007P BEDIENUNGSANLEITUNG...
  • Page 44: Sicherheitshinweise

    00424A SCC-B2307P-GER 4/7/05 9:44 PM ˘ ` 2 Sicherheitshinweise Ziel dieser Informationen ist es, den ordnungsgemäßen Gebrauch dieses Geräts sicherzustellen und dadurch Gefahren oder Sachbeschädigungen zu vermeiden. Bitte befolgen Sie alle Anweisungen. Warnung Die Nichtbeachtung eines Warnhinweises kann zum Tode oder zu schweren Verletzungen führen.
  • Page 45 9. Sollte das Gerät nicht störungfrei funktionieren, setzen Sie sich mit Ihrem Händler oder dem nächsten Kundendienstzentrum in Verbindung. Das Gerät darf niemals in keiner Weise zerlegt oder modifiziert werden. (Samsung übernimmt keine Haftung für Probleme, die durch unbefugte Abänderungen oder einen Reparaturversuch herbeigeführt sind.)
  • Page 46: Table Des Matières

    00424A SCC-B2307P-GER 4/7/05 9:44 PM ˘ ` 4 INHALTVERZEICHNIS Kapitel 1 ÜBERSICHT ............5 Kapitel 2 SPEZIALE MERKMALE ........6 Kapitel 3 BEZEICHNUNG DER TEILE UND IHRE FUNKTIONEN ............ 7 Kapitel 4 INSTALLATION ........... 12 Vorsichtmaßnahmen für die Installation und den Gebrauch .............
  • Page 47: Kapitel 1 Übersicht

    00424A SCC-B2307P-GER 4/7/05 9:44 PM ˘ ` 5 Kapitel 1 Übersicht Die TAG/NACHT Kamera ist eine niedrige Beleuchtung Kamera, die auch im dunklen Bereich der Gegenstände identifiziert; die Kamera betreibt in der Farbmode über den bestimmten Beleuchtung und andernfalls in der SW Mode beseitigt die IR Cut Funktion. Inzwischen, ist es eine Sense Up Funktion aufgenommen, mit Hilfe des Langezeit Verschlußes und der Field Anhäufung Methode, um die Leistung der niedrigen Beleuchtung Eigenschaft zu verbessern.
  • Page 48: Kapitel 2 Speziale Merkmale

    00424A SCC-B2307P-GER 4/7/05 9:44 PM ˘ ` 6 Kapitel 2 Speziale Merkmale Hohe Empfindlichkeit Es hat ein neuesten 1/3" Super(EXview)-HAD IT CCD für ein Bild der hohen Empfindlichkeit. Niedrige Beleuchtung Funktion Es hat beide Funktionen; eine Illumination Funktion und TAG/NACHT funktion auf Grund der Digitalsignal Technologie, um in der schlechten Umgebung ohne Licht betreiben zu können.
  • Page 49: Funktionen

    00424A SCC-B2307P-GER 4/7/05 9:44 PM ˘ ` 7 Kapitel 3 Teilnamen und Funktionen Seite Ansicht Passepartout Adapter Befestigungsrille Automatischer Verschluß Objektiv Anschluß Gegen Brennpunkt (Back Focus) Kontrollstab ALC Objektiv Auswahlschalter Automatische Verschluß Objektive Kontrollkabel Kamera Objektiv Passepartout Adapter Befestigungsrille Diese Rille benutzt für die Befestigung des Adapters, ein Teil der Klammer wo die Kamera installiert wird.
  • Page 50: Vista Posteriore

    00424A SCC-B2307P-GER 4/7/05 9:44 PM ˘ ` 8 Automatische Verschluß Objektiv Kontrollkabel Diese Kabel senden das Kontrollsignal von der Kamera über, den Objektiv Verschluß zu kontrollieren. Gegen Brennpunkt (Back Focus) Kontrollstab Es kontrolliert das Gegenbrennpunkt. ALC Objektiv Auswahlschalter Dieser Schalter stellt für die Verwendung des Auto Blende-blende Verschluß...
  • Page 51 00424A SCC-B2307P-GER 4/7/05 9:44 PM ˘ ` 9 Strom Anzeiger LED Wenn die Kamera mit dem Strom geliefert ist, schaltet LED ein. Video Ausgabe Terminal Der Monitor Video Input Terminal ist angeschloßen, mit diesem Terminal, der durch diesen Terminal das Videosignal der Kamera senden. Fernbedienung Input Terminal (RS-232) Dieser Terminal ist für die Kamera Kontrolle an der Produktion Fabrik.
  • Page 52 00424A SCC-B2307P-GER 4/7/05 9:44 PM ˘ ` 10 TAG/NACHT Außensignal Input ? ALARM Signal Ausgabe Diese Funktion empfängt das außen TAG/NACHT Signal von dem Außenlicht Sensor (Option) und zum SW umwandeln lassen. Die BEWEGUNG DET Funktion führt zu einem ALARM Signal wenn eine Bewegung wahrgenommen wird.
  • Page 53 00424A SCC-B2307P-GER 4/7/05 9:44 PM ˘ ` 11 Kamera Betriebsschalter (Setup Schalter) Diese Funkton des Kamera Betriebsschalters ist anhängig von der Kamera ob sie zur Zeit in der üblichen Mode (kein Setup Menu ist auf das Bild aufgezeigt) ist, oder in der Setup Menu Mode. [LINK/RECHTS] Taste [OBEN/UNTEN] Taste [ENTER] Taste...
  • Page 54: Kapitel 4 Installation

    00424A SCC-B2307P-GER 4/7/05 9:44 PM ˘ ` 12 Kapitel 4 Installation In diesem Kapitel wird erläutert, was vor der Installation der Kamera zu beachten ist, wie man eine geeignete Installationsstelle auswählt und welche Vorsichtsmaßnahmen bei der Installation zu treffen sind. Nun können Sie die Kamera installieren und die Kabel anschließen.
  • Page 55: Gebrauch

    00424A SCC-B2307P-GER 4/7/05 9:44 PM ˘ ` 13 Vorsichtsmaßnahmen für die Installation und den Gebrauch Der Benutzer darf niemals selber die Kamera demontieren. Bei dem Umgehen der Kamera immer vorsichtig sein. Die Kamera nicht mit der Faust schlagen oder schüttern. Die Kamera muß...
  • Page 56: Objektiv Anschlußes

    00424A SCC-B2307P-GER 4/7/05 9:44 PM ˘ ` 14 Verbindung des Automatischen Verschluß Objektiv Anschlußes Der Kamera, dazu der Automatische Verschluß Objektiv Anschluß wie folgt vorbereiten: Jede Abgezogene Verschluß Kontrollkabel Leitung zu dem automatischen Verschluß Objektiv Anschluß wie folgt verbinden. Stecknadel Nr. DC Kontrolltyp VIDEO Kontrolltyp Damp(-)
  • Page 57 00424A SCC-B2307P-GER 4/7/05 9:44 PM ˘ ` 15 Installation Einstellung des Objektivs CS Objektive Fall Der CS Objektiv im Uhrzeigersinn drehen, bis es wie unten befestigt wird. CS Objektive C Objektive Fall Der C Passepartout Adapter im Uhrzeigersinn drenen, um es zu befestigen.
  • Page 58: Schalters

    00424A SCC-B2307P-GER 4/7/05 9:44 PM ˘ ` 16 Einstellung des Auswahlschalters Sie müßen die Position des Objektiv Einstellschlter neben der Kamera, je nach dem Objektivtyp ändern. Sie müßen der Schalter in der "DC" oder beziehungsweise "VIDEO" Position drehen, ob der Einstellobjektiv DC Kontrolltyp automatische Verschlußobjektiv ist oder der Video Kontrolltyp automatische Verschluß-objektiv ist.
  • Page 59 00424A SCC-B2307P-GER 4/7/05 9:44 PM ˘ ` 17 Objektive mit Zoom Funktion Ein Gegenstand mit hocher Resolution (Gitterförmige Gegenstand) einer Entfernung 3m bis 5m einbilden und der Zoom in dem Objektiv zu TELE als möglich nahe einstellen. Dann drehen der Objektiv Brennpunktring, bis der Gegenstand deutlicher sein wird.
  • Page 60: Anschluß Der Kabel

    00424A SCC-B2307P-GER 4/7/05 9:44 PM ˘ ` 18 Anschluß der Kabel und Überprüfung des Betriebs 1 Schließen Sie zuerst das eine Ende des BNC-Videokabels an den Videoausgang (VIDEO OUT) an. 2 Schließen Sie als nächstens das andere Ende des BNC-Kabels an die Videoeingangsbuchse des Monitors an.
  • Page 61 00424A SCC-B2307P-GER 4/7/05 9:44 PM ˘ ` 19...
  • Page 62 00424A SCC-B2307P-GER 4/7/05 9:44 PM ˘ ` 20 Kapitel 5 Aufbau der Kamera Dieses Kapatel gibt einen Überblick über den Aufbau der Einstellmenu. Zuerst das Totale Einstellmenu und der Aufbau und dann erläutert ihre Funktionen. EIN... KAMERA ID AND KAMERA ID LOCATION SETUP EIN.../AUS ALC...
  • Page 63 00424A SCC-B2307P-GER 4/7/05 9:44 PM ˘ ` 21 KAMERA ID Im Menu KAMERA ID können Sie eine Kennung für die Kamera festlegen, die auf dem Bildschirm des mit der Kamera angeschloßene Monitors erscheint. Wenn Sie im Einstellmenu KAMERA ID auf EIN stellen und [ENTER] drücken, wird ein Untermenubildschirm eingeblendet, in dem Sie der Kamera eine Kennung zuweisen können.
  • Page 64 00424A SCC-B2307P-GER 4/7/05 9:44 PM ˘ ` 22 BLENDE Diese KAMERA ist grundsätzlich je nach Intensität des einfallenden Lichts die Fuktion gestruert werden und das Niveau des Lichts aufbauen. ❿ ALC Wenn Sie die BLENDE auf ALC einstellen und [ENTER] drücken, wird ein Unterbildschirm, wo kann das Niveau des Lichts aufbauen, eingeblendet.
  • Page 65 00424A SCC-B2307P-GER 4/7/05 9:44 PM ˘ ` 23 DC BLENDE (00) ----I---- AUSGANG VERL ❿ ELC Wenn es zu viele Radiation gibt, dieses Menu kontrolliert automatisch den hohen Schnelligkeit Verschluß Niveau bei der Verwendung des manuellen Objektivs und mit dem bestimmten Einstellniveau erhalten lassen.
  • Page 66 00424A SCC-B2307P-GER 4/7/05 9:44 PM ˘ ` 24 Wird bei einer normalen Kamera eine starke Lichtquelle benutzt, wie z.B. ein Scheinwerfer, der das Objekt vom hinten beleuchtet, dann erscheint esauf dem Monitor aufgrund des Gegenlichts dunkel. Zur Lösung des Gegenlichtproblems kann die passende BLC Funktion so eingestellt werden, daßbei allen Lichtverhältnissen klare Videobilder gelingen.
  • Page 67 00424A SCC-B2307P-GER 4/7/05 9:44 PM ˘ ` 25 ❿ BENUTZER BEREICH Im Menu BLC mit Hilfe der Taste [LINKS, RECHTS] die Kennung auf BENUTZER... platzieren, dann können Sie die Größe und die Position des BLC Bereichs direkt angeben. Wenn der Bereich nicht blinkt, die Tasten [LINKS, RECHTS, OBEN oder UNTEN] drücken, können Sie die Größen des Bereichs angeben.
  • Page 68 00424A SCC-B2307P-GER 4/7/05 9:44 PM ˘ ` 26 FARBE/S/W Das FARBE/SW Menu hat eine Funktion, das IR(Infrarot) Filter ein-oder ausschalten. In niedriger Beleuchtungsumgebung, die SW Mode wird das IR Filter ausschalten und die Empfindlichkeit wird hoch wie die SW Kamera sein.
  • Page 69 00424A SCC-B2307P-GER 4/7/05 9:44 PM ˘ ` 27 ❿ S/W... Es ist die IR Filter AUS (AUS) Mode in Schwarz und Weiss (hohe empfindlichkeit wie SW Kamera). Wenn Sie die SW... wählen und die Taste ENTER drücken, das SW Untermenu erscheint werden. Sie können einstellen, das BRUCH Signal auszusenden drehend auf EIN oder AUS.
  • Page 70 00424A SCC-B2307P-GER 4/7/05 9:44 PM ˘ ` 28 ❿ AUTO... Dieses Menu umwandelt die FARBE mode in der SW Mode automatisch oder umgekehrt je nach der Beleuchtung. In der niedrigen Beleuchtungsumgebung, die SW Mode wird das IR Filter ausschalten und die Empfindlichkeit wird hoch. Andernfalls, in der hohen Beleuchtungsumgebung, die FARBE Mode wird das IR Filter einschalten und die Empfindlichkeit wird niedriger.
  • Page 71 00424A SCC-B2307P-GER 4/7/05 9:44 PM ˘ ` 29 ❿ EXT... Dieses Menu umwandelt die FARBE Mode in der SW Mode automatisch oder umgekehrt je nach der Beleuchtung mit dem äußeren Sensor. Wenn Sie das EXT Menu wählen und die Taste [ENTER] drücken, wird das EXTERNAL S/W Untermenu auf dem Menubild erscheinen.
  • Page 72 00424A SCC-B2307P-GER 4/7/05 9:44 PM ˘ ` 30 SHUTTER Im Menu VERSCHLUß können Sie die Verschlußzeiten des elektronischen Schnellverschlußes sowie von AUTO Langsamezeit Verschluß und FEST Langsamezeit Verschluß festlegen. Der elektronische Schnellverschluß unterstützt 7 Verschlußzeiten von 1/100 Sekunden bis 1/10K Sekunden, und im allgemeinen ist für das Bild des bewegenden Objekts benutzt.
  • Page 73 00424A SCC-B2307P-GER 4/7/05 9:44 PM ˘ ` 31 AGC/BEWEGUNG ❿ AGC Das Menu AGC hat die Funktion, das Bild klar zu sehen, wenn das erhaltene Videobild unter einer bestimmten Helligkeit liegt, weil es bei unzureichende Licht- verhältnissen aufgenommen wurde. Beim nur Schnellverschluß...
  • Page 74 00424A SCC-B2307P-GER 4/7/05 9:44 PM ˘ ` 32 ❿ BEWEGUNG Diese Option kann in der AUTO und FEST Mode benutzt werden; Es stehen fünf Stufen, S.LANGS, LANGS, NORM, SCHN und S.SCHN zur Auswahl. Mit S.LANGS läßt sich die AGC-Verstärkung minimieren, um unbewegliche Objekte an dunklen Orten überzuwachen.
  • Page 75 00424A SCC-B2307P-GER 4/7/05 9:44 PM ˘ ` 33 WEISSABGL ❿ ATW Wenn Sie WEISSABAL Menu auf ATW Mode einstellen, wacht die Kamera kontinuierlich die Veränderung der Farbtemperatur über und passt den Weissabgleich automatisch an die Farbtemperatur an. ❿ AWC Wenn Das WEISSABAL Menu auf AWC Mode einstellen, wird der Weissabgleich einmal an die Farbtemperatur angepasst, und dieser Wert wird beibehalten.
  • Page 76 00424A SCC-B2307P-GER 4/7/05 9:44 PM ˘ ` 34 (AWB/MANU) (AWB/MANU) Die Taste PRESET AUS(BENUTZER) [LINKS/ PRESET 3200K ( 00) ----I---- RESCHTS] BLAU ( 00) ----I---- verwenden SYNC Wählen Sie INT, wenn Sie die interne Synchronisation verwenden. LINIE... ist für die Synchronisation der Kameraphasen erforderlich, um mehrere Kameras mit Hilfe des externen Signals (AC Signal) zu betreiben.
  • Page 77 00424A SCC-B2307P-GER 4/7/05 9:44 PM ˘ ` 35 SPEZIAL Im Menu SPEZIAL können Sie die Optionen BAUD RATE D-ZOOM, PIP, SPIEGEL, POSI/NEGA, EINZELHEITEN, BEWEGUNG DET direkt steuern. Wenn Sie SPEZIAL wählen und [ENTER] drücken, wird ein SPEZIAL - Untermenu eingeblendet. KAMERA ID (SPEZIAL) BLENDE...
  • Page 78 00424A SCC-B2307P-GER 4/7/05 9:44 PM ˘ ` 36 ❿ SPIEGEL : Das Video Ausgangssignal horizontal drehen. ❿ POSI/NEGA : Das Video Helligkeitssignal normal oder umgekehrt ausgeben. ❿ DTAIL : Die horizontale und vertikale Schärfe regulieren. ❿¤AKTIVITAET Die BEWEGUNG DET funktion erkennt sich bewegende Objekte und kann zur Erkennung von Eindringling bei Abwesenheit eingesetzt werden.
  • Page 79 00424A SCC-B2307P-GER 4/7/05 9:44 PM ˘ ` 37 Das BEREICH menu stellt die Größe und die Position wie der Bereich im BLC Menu ein. Wenn Sie das Bild-bereich, wo die AKTIVITAET Funktion eingestellt wird, wählen möchten, müßen Sie die Taste [ENTER] in dem BEREICH BENUTZER...
  • Page 80 00424A SCC-B2307P-GER 4/7/05 9:44 PM ˘ ` 38 EXIT Das AUSGANG Menu benutzt für die Beendigung des Kamera Aufbaumenus. ❿ VERL Übergeht alle von Ihnen vorgenommenen Veränderungen und stellt das vorherig gespeicherte Einstellmenu wieder her. ❿ SICHERN Speichert die Einstellmenu, die bisher verändert worden sind. ❿...
  • Page 81: Produkt Spezifikationen

    00424A SCC-B2307P-GER 4/7/05 9:44 PM ˘ ` 39 Produkt Spezifikationen SCC-B2303 Charakteristische Merkmale ARTIKEL BESCHREIBUNG Definition CCTV Kamera (TAG/NACHT) Spannungsquelle AC 24V ± 10% (60Hz ±0.1Hz), DC12V+10% ~ -5% Leistungsaufnahme Approx. 4.5W Fernsehnorm NTSC Standard Farbe System Bildaufnehmer 1/3 Inch IT CCD...
  • Page 82 00424A SCC-B2307P-GER 4/7/05 9:44 PM ˘ ` 40 ARTIKEL BESCHREIBUNG Bewegungsmeldung AUS/EIN(Einstellung von BEREICH/ EMPFINDLICHKEIT) Videosteuerung Einstellung von POSI/NEGA,SPIEGEL (LINKS/RECHTS) DETAIL Signalausgang Composite Videoausgang: 1.0Vp-p 75 ohms/BNC Objektiv VIDEO / DC Objektiv Passepartout CS/C (Passepartout Adapter) Temperatur bei Betrieb -10°C ~ +50°C Luftfeuchtigkeit bei Betrieb ~ 90% Abmessungen...
  • Page 83 00424A SCC-B2307P-GER 4/7/05 9:44 PM ˘ ` 41 Prodotto Specificazione SCC-B2303P/B2003P/B2307P/B2007PCharakteristische Merkmale ARTIKEL BESCHREIBUNG Definition CCTV Kamera (TAG/NACHT) Spannungsquelle SCC-B2303P/B2307P :AC24V±10% (50Hz±0.1Hz), DC12V+10% ~ -5% SCC-B2003P/B2007P:AC220V ~ AC240V (50Hz±0.1Hz) Leistungsaufnahme SCC-B2303P/B2307P:Approx. 4.5W, SCC-B2003P/B2007P:Approx.5W Fernsehnorm PAL Standard Farbe System Bildaufnehmer SCC-B2303P/B2003P:1/3 inch Super HAD CCD SCC-B2307P/B2007P:1/3 inch EXview HAD CCD Effektive Pixel 753 (H) x 582 (V)
  • Page 84 00424A SCC-B2307P-GER 4/7/05 9:44 PM ˘ ` 42 ARTIKEL BESCHREIBUNG TAG/NACHT FARBE/S/W/AUTO/EXT Farbtemperatur ATW/AWC/MANUELL MODE (3200°K,5600°K,R/B Verstärkungsregelung) Elektronische Verschlusszeit ALC:OFF~1/10K sek (7 Stufen) ELC:Max 1/100K sek Gegenlichtkompensation AUS/UNTEN/OBEN/LINKS/RECHTS/ MITTE/BENUTZER Restlichtbetrieb AUS/AUTO 2x ~ 128x/ FEST 2x ~128x Digitalzoom AUS/EIN (x10), BIB Bewegungsmeldung AUS/EIN(Einstellung von BEREICH/EMPFINDLICHKEIT)
  • Page 85 00424A SCC-B2307P-Fra 4/7/05 9:40 PM ˘ ` 1 CAMERA COULEUR JOUR/NUIT SCC-B2303(P)/B2003P SCC-B2307P/B2007P Manuel d’Utilisation...
  • Page 86: Précautions De Sécurité

    00424A SCC-B2307P-Fra 4/7/05 9:40 PM ˘ ` 2 Précautions de sécurité L’objectif des précautions de sécurité est d’assurer l’utilisation correcte de ce produit afin d’éloigner tout risque et tout dégât à la propriété. Assurez- vous de bien observer toutes les précautions. AvertissementNe pas tenir compte d’un avertissement risque de causer des blessures graves, voire mortelles.
  • Page 87 9. Si ce produit cesse de fonctionner correctement, communiquez avec votre revendeur ou le centre d’entretien dans votre localité. Ne démontez ni ne modifiez jamais ce produit. (Samsung n’est pas responsable des problèmes techniques découlant d’une modification non autorisée ou d’une tentative de réparation.)
  • Page 88 00424A SCC-B2307P-Fra 4/7/05 9:40 PM ˘ ` 4 Sommaire Chapitre 1 Introduction ............5 Chapitre 2 Caractéristiques ..........6 Chapitre 3 Noms et Fonctions des Composants ....7 Chapitre 4 Installation ............12 Précautions d’installation et d’utilisation .... 13 Raccordement du connecteur de l’objectif à diaphragme automatique ........
  • Page 89: Chapitre 1 Introduction

    00424A SCC-B2307P-Fra 4/7/05 9:40 PM ˘ ` 5 Chapitre 1 Introduction La caméra JOUR/NUIT est une caméra de surveillance qui fonctionne en mode couleur jusqu’à une certaine luminosité et change en dessous de celle-ci son mode de fonctionnement en noir et blanc en désactivant la fonction ‘IR Cut’.
  • Page 90: Chapitre 2 Caractéristiques

    00424A SCC-B2307P-Fra 4/7/05 9:40 PM ˘ ` 6 Chapitre 2 Caractéristiques Haute sensibilité La technologie de pointe ‘1/3" Super(EXview)-HAD IT CCD’ permet d’obtenir des images d’une haute sensibilité. Fonctionnement en basse luminosité Le fonctionnement en basse luminosité basé sur la technologie du signal numérique et la fonction JOUR/NUIT offre une possibilité...
  • Page 91: Chapitre 3 Noms Et Fonctions Des Composants

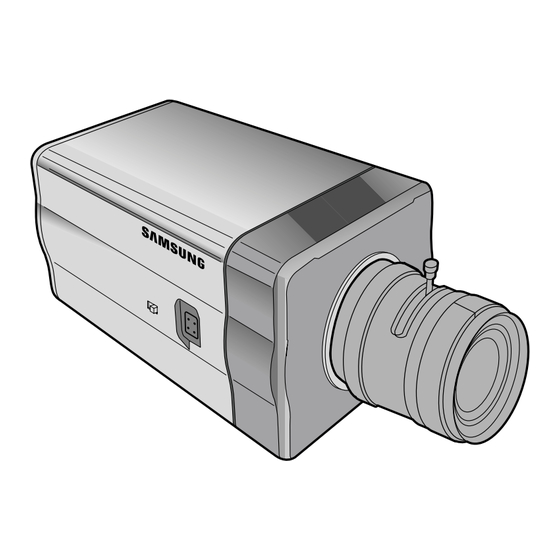
    00424A SCC-B2307P-Fra 4/7/05 9:40 PM ˘ ` 7 Chapitre 3 Noms et Fonctions des Composants Vue de côté Encoche pour la fixation sur le support d’installation Connecteur de l’objectif à diaphragme automatique Barre de focalisation Bouton de sélection de l’objectif ALC Câble de contrôle de l’objectif à...
  • Page 92: Vue Arrière

    00424A SCC-B2307P-Fra 4/7/05 9:40 PM ˘ ` 8 Câble de contrôle de l’objectif à diaphragme automatique Ce câble transmet le signal de contrôle émis par la caméra pour contrôler le diaphragme de l’objectif. Barre de focalisation Utilisez cette barre pour la focalisation. Bouton de sélection de l’objectif ALC Utilisez ce bouton pour sélectionner le type d’objectif à...
  • Page 93 00424A SCC-B2307P-Fra 4/7/05 9:40 PM ˘ ` 9 LED de l’alimentation La LED s’allume lorsque l’alimentation fonctionne. Sortie vidéo Cette sortie est reliée à l’entrée vidéo du moniteur et donne le signal vidéo de la caméra. Entrée REMOTE (RS-232) Cette entrée est utilisée pour le réglage de la caméra en usine.
  • Page 94 00424A SCC-B2307P-Fra 4/7/05 9:40 PM ˘ ` 10 Entrée de signal externe JOUR/NUIT & sortie de signal d’alarme C’est une fonction qui permet de recevoir le signal externe JOUR/NUIT émis par un détecteur de luminosité externe (option) et de changer le mode de fonctionnement en noir et blanc.
  • Page 95 00424A SCC-B2307P-Fra 4/7/05 9:41 PM ˘ ` 11 Bouton de réglage de la caméra (Setup) Les fonctions de contrôle de la caméra varient selon le mode utilisé : mode standard (le menu Setup ne s’affiche pas sur l’écran) ou mode Setup.
  • Page 96: Chapitre 4 Installation

    00424A SCC-B2307P-Fra 4/7/05 9:41 PM ˘ ` 12 Chapitre 4 Installation Ce chapitre contient des informations relatives aux vérifications avant l’installation de la caméra, au choix de sa mise en place et aux précautions d’installation. Veuillez lire attentivement ces indications avant d’installer la caméra et de connecter le câble Avant l’installation Lors du déballage, vérifiez le contenu du paquet :...
  • Page 97: Précautions D'installation Et D'utilisation

    00424A SCC-B2307P-Fra 4/7/05 9:41 PM ˘ ` 13 Précaution d’installation et d’utilisation La caméra de doit pas être démontée par l’utilisateur lui-même. Veuillez toujours utiliser la caméra avec précaution. Evitez les chocs, les secousses, un stockage sans soin et une mauvaise manipulation qui peuvent endommager la caméra.
  • Page 98: Raccordement Du Connecteur De L'objectif À Diaphragme Automatique

    00424A SCC-B2307P-Fra 4/7/05 9:41 PM ˘ ` 14 Raccordement du connecteur de l’objectif à diaphragme automatique Préparez le connecteur de l’objectif à diaphragme automatique fourni avec la caméra. Otez la protection des câbles de contrôle du diaphragme et reliez chaque câble au connecteur de l’objectif du diaphragme automatique en vous référant au tableau suivant : N°...
  • Page 99: Fixation De L'objectif

    00424A SCC-B2307P-Fra 4/7/05 9:41 PM ˘ ` 15 Installation Fixation de l’objectif Lors de l’objectif CS : Vissez l’objectif CS dans le sens des aiguilles d’une montre, comme l’indique la figure ci-dessous. l’objectif CS Lors de l’objectif C : Vissez d’abord le support d’installation dans le sens des aiguilles d’une montre.
  • Page 100: Sélection De L'objectif

    00424A SCC-B2307P-Fra 4/7/05 9:41 PM ˘ ` 16 Réglage du bouton de sélection de l’objectif Vous devez régler le bouton de sélection de l’objectif situé sur le côté de la caméra selon le type d’objectif. Positionnez le bouton sur « DC » si l’objectif fixé...
  • Page 101 00424A SCC-B2307P-Fra 4/7/05 9:41 PM ˘ ` 17 Objectif avec fonction de zoom Prenez l’image d’un objet net (en forme de carreau) placé à une distance de 3 à 5 m, puis réglez le zoom au maximum vers TELE. Ensuite, réglez l’anneau de la focale jusqu’à ce que l’image de l’objet soit la plus nette possible.
  • Page 102: Connexion Du Câble

    00424A SCC-B2307P-Fra 4/7/05 9:41 PM ˘ ` 18 Connexion du câble & Vérification du fonctionnement 1 Reliez d’abord un côté du connecteur du câble BNC à la sortie VIDEO (VIDEO OUT). 2 Reliez l’autre côté du connecteur du câble BNC à l’entrée VIDEO du moniteur.
  • Page 103 00424A SCC-B2307P-Fra 4/7/05 9:41 PM ˘ ` 19...
  • Page 104: Chapitre 5 Configuration De La Caméra

    00424A SCC-B2307P-Fra 4/7/05 9:41 PM ˘ ` 20 Chapitre 5 Configuration de la Caméra Ce chapitre contient des informations relatives au menu Setup de la caméra. Lisez d’abord les informations générales sur le menu Setup, puis la fonction de chaque menu. ON...
  • Page 105 00424A SCC-B2307P-Fra 4/7/05 9:41 PM ˘ ` 21 CAMERA ID Le menu d’identification de la caméra (CAMERA ID) permet de lui attribuer un nom qui s’affichera sur le moniteur. Sélectionnez ON… dans le menu CAMERA ID et appuyez sur la touche ENTER pour accéder au sous-menu afin d’attribuer un nom à...
  • Page 106 00424A SCC-B2307P-Fra 4/7/05 9:41 PM ˘ ` 22 IRIS Cette caméra dispose d’une fonction de réglage automatique d’IRIS selon la quantité de lumière. Vous pouvez régler le niveau de luminosité. ❿ ALC Dans le menu IRIS, sélectionnez ALC… pour accéder au sous-menu qui vous permettra de régler la luminosité, puis appuyez sur la touche [ENTER].
  • Page 107 00424A SCC-B2307P-Fra 4/7/05 9:41 PM ˘ ` 23 Le niveau de DC IRIS est réglable non seulement dans le menu SETUP mais aussi pendant le fonctionnement. Appuyez pendant 2 secondes sur la touche [Gauche] ou [Droite] pour entrer dans le menu de réglage de la luminosité.
  • Page 108 00424A SCC-B2307P-Fra 4/7/05 9:41 PM ˘ ` 24 CJOUR Si vous utilisez une caméra normale en présence d’un éclairage intense comme celui d’un spot derrière un objet, l’image de l’objet sur le moniteur s’assombrie. Cette caméra dispose d’une fonction CJOUR pour résoudre ce problème de contre-jour, permettant d’obtenir une image nette sous n’importe quel éclairage.
  • Page 109 00424A SCC-B2307P-Fra 4/7/05 9:41 PM ˘ ` 25 ❿ UTIL ZONE Dans le menu CJOUR, positionnez le curseur sur UTIL… à l’aide des touches [Gauche/Droite], puis appuyez sur la touche [ENTER] pour régler vous-même la dimension et la position de la zone CJOUR. Pour régler la dimension de la zone, appuyez sur les touches [Gauche/Droite/Haut/Bas] pendant que la zone ne clignote pas.
  • Page 110 00424A SCC-B2307P-Fra 4/7/05 9:41 PM ˘ ` 26 COULEUR/N&B C’est un menu pour activer ou désactiver le filtre IR (infrarouge). En basse luminosité, le filtre IR est désactivé et la caméra fonctionne en mode N&B (noir et blanc) en augmentant sa sensibilité jusqu’au niveau d’une caméra noir et blanc.
  • Page 111 00424A SCC-B2307P-Fra 4/7/05 9:41 PM ˘ ` 27 ❿ N&B… Ceci est un mode noir et blanc et le filtre IR est désactivé (avec la sensibilité de caméra noir et blanc). Lorsque vous appuyez sur la touche [ENTER] après avoir sélectionné N&B …, le sous-menu de N&B s’affiche sur l’écran.
  • Page 112 00424A SCC-B2307P-Fra 4/7/05 9:41 PM ˘ ` 28 ❿ AUTO... Le mode bascule automatiquement du mode couleur au mode noir et blanc selon la luminosité. En basse luminosité, le filtre IR est désactivé et la caméra fonctionne en mode N&B (noir et blanc) en augmentant sa sensibilité.
  • Page 113 00424A SCC-B2307P-Fra 4/7/05 9:41 PM ˘ ` 29 ❿ EXT... C’est un menu pour la conversion automatiquement du mode couleur en mode noir et blanc selon la luminosité, à l’aide du détecteur externe. Lorsque vous appuyez sur la touche [ENTER] après avoir sélectionné SORTIE, le sous-menu EXTERNAL N&B apparaît sur l’écran.
  • Page 114 00424A SCC-B2307P-Fra 4/7/05 9:41 PM ˘ ` 30 SHUTTER Le menu SHUTTER règle la vitesse du diaphragme électrique à haute vitesse, celle du diaphragme AUTO à basse vitesse et celle du diaphragme FIXE à basse vitesse. Le diaphragme électrique à haute vitesse couvre 7 vitesses de diaphragme allant de 1/100 à...
  • Page 115 00424A SCC-B2307P-Fra 4/7/05 9:41 PM ˘ ` 31 CAG/MOUVEMENT ❿ CAG Le menu CAG éclaire l’écran présenté ci-dessous avec une luminosité standard lorsque l’image a été prise en basse luminosité. Le réglage du menu CAG est possible uniquement en mode High Speed Shutter ou OFF.
  • Page 116 00424A SCC-B2307P-Fra 4/7/05 9:41 PM ˘ ` 32 ❿ MOUVEMENT La fonction MOUVEMENT est utilisable avec les diaphragmes AUTO et FIXE. Elle est constituée de 5 modes : T.LENT, LENT, NORM, VITE, T.VITE. T.LENT est utilisé pour surveiller les objets immobiles en zone sombre en minimisant le niveau AGC.
  • Page 117: Bal Blancs

    00424A SCC-B2307P-Fra 4/7/05 9:41 PM ˘ ` 33 BAL BLANCS ❿ BA Si vous sélectionnez le mode BA dans le menu BAL BLANCS, Le changement de la température de couleur sera détecté en temps réel et la balance de blanc sera automatiquement réglée selon la température de couleur.
  • Page 118 00424A SCC-B2307P-Fra 4/7/05 9:41 PM ˘ ` 34 (ABB/MANU) (ABB/MANU) Appuyez sur la touche PRESET OFF(UTIL)-- [Gauche/Droite] ROUGE (00) ----I---- PRESET 3200K BLEU (00) ----I---- SYNC La fonction INT est utilisée pour la synchronisation interne. La fonction LINE… synchronise des fréquences frame et réseau en utilisant le signal AC, et elle est indispensable lors du fonctionnement de plusieurs caméras.
  • Page 119 00424A SCC-B2307P-Fra 4/7/05 9:41 PM ˘ ` 35 SPECIAL Dans le menu SPECIAL, vous pouvez régler vous-même les fonctions VITESSE, D-ZOOM, PIP, MIRROR, POSI/NEGA, DETAIL et DET MOUVE. Appuyez sur la touche [ENTER] après avoir sélectionné le menu SPECIAL pour accéder au sous-menu. CAMERA ID (SPECIAL) IRIS...
  • Page 120 00424A SCC-B2307P-Fra 4/7/05 9:41 PM ˘ ` 36 ❿ MIROIR : inverse le signal vidéo dans le sens gauche/droite. ❿ POSI/NEGA : émet le signal de luminosité de la vidéo en mode normal ou en mode inverse. ❿ DETAIL : Vous pouvez régler la netteté horizontale ou verticale. ❿¤DET MOUVE La fonction DET MOUVE contribue à...
  • Page 121 00424A SCC-B2307P-Fra 4/7/05 9:41 PM ˘ ` 37 Vous pouvez régler la dimension et la position comme dans le menu ZONE du menu CJOUR. Pour sélectionner la zone d’image où vous appliquerez la fonction DET MOUVE, appuyez sur la touche ENTER sur ZONE UTIL.. ou sélectionnez PRESET..
  • Page 122 00424A SCC-B2307P-Fra 4/7/05 9:41 PM ˘ ` 38 SORTIE Utilisez ce menu pour fermer le menu CAMERA SETUP. ❿ QUITTER Annule les modifications et retourne au menu SETUP précédent. ❿ SAUVER Sauvegarde les modifications effectuées jusqu’à présent. ❿ PRESET Annule les modifications et rétablit les paramètres par défaut du menu CAMERA SETUP réglés en sortie d’usine.
  • Page 123: Spécifications Techniques

    00424A SCC-B2307P-Fra 4/7/05 9:41 PM ˘ ` 39 Spécifications Techniques SCC-B2303 ARTICLE DESCRIPTION Type de produit Caméra de surveillance (JOUR/NUIT) Source d’alimentation AC 24V ± 10% (60Hz±0.1Hz), DC12V +10% ~ -5% Consommation d’électricité Approx. 4.5W Système de diffusion Système couleur standard NTSC...
  • Page 124 00424A SCC-B2307P-Fra 4/7/05 9:41 PM ˘ ` 40 ARTICLE DESCRIPTION Zoom numérique OFF/ON (x10), PIP Détection de mouvement OFF/ON (Réglage de ZONE/SENSIBILITÉ) Contrôle vidéo POSI/NEGA, Inversion (gauche/droite) Réglage du DETAIL Sortie Signal Sortie vidéo composite : 1.0 Vp-p 75 ohms/BNC Objectif VIDEO/DC Support d’objectif...
  • Page 125 00424A SCC-B2307P-Fra 4/7/05 9:41 PM ˘ ` 41 SCC-B2303P/B2003P/B2307P/B2007P ARTICLE DESCRIPTION Type de produit Caméra de surveillance (JOUR/NUIT) Source d’alimentation SCC-B2303P/B2307P : AC 24V ± 10% (50Hz±0.1Hz), DC12V +10% ~ -5% SCC-B2003P : AC220V ~ AC240V (50Hz±0.1Hz) Consommation d’électricité SCC-B2303P/B2307P : Approx. 4.5W , SCC-B2003P/B2007P : Approx.
  • Page 126 00424A SCC-B2307P-Fra 4/7/05 9:41 PM ˘ ` 42 Article Description JOUR/NUIT COULEUR/N&B/AUTO/EXT Température de couleur Mode BA/BM/Manuel (3200°K, 5600°K, contrôle du gain R/B) Vitesse d’obturation ALC:OFF~1/10K sec (7 étape) électronique ELC:Max 1/100K sec Correction du contre-jour OFF/BAS/HAUT/GAUCHE/DROITE/CENTRE/UTIL Sense Up OFF/AUTO2X~128X/FIXE2X~128X Zoom numérique OFF/ON (X10), PIP Détection de mouvement...
  • Page 127 00424A SCC-B2307P-SPA 4/7/05 9:48 PM ˘ ` 1 CÁMARA COLOR POR DÍA/NOCHE SCC-B2303(P)/B2003P SCC-B2307P/B2007P Manual del usuario...
  • Page 128: Medidas De Seguridad

    00424A SCC-B2307P-SPA 4/7/05 9:48 PM ˘ ` 2 Medidas de seguridad El propósito de esta información es garantizar el uso apropiado de este producto con el fin de prevenir cualquier peligro o daño a la propiedad. Sírvase tomar en cuenta todas las medidas de seguridad. Advertencia El ignorar este aviso de advertencia puede ocasionar una lesión grave o la muerte.
  • Page 129 9. Si este producto presenta una falla de operación, comuníquese con la tienda en donde lo adquirió, o con el centro de servicios más cercano. Nunca desarme ni modifique este producto de ninguna manera. (Samsung no es responsable por los problemas causados por modificaciones no autorizadas o por intentos de reparación.)
  • Page 130 00424A SCC-B2307P-SPA 4/7/05 9:48 PM ˘ ` 4 Contenido Capítulo 1 Introducción ............5 Capítulo 2 Características Especiales ......... 6 Capítulo 3 Nombres de los Components y Funciones ..7 Capítulo 4 Instalación ............12 Precauciones de Instalación y el Uso ....13 Conectar Conectador de la Lente del Obturador Automático ............
  • Page 131: Capítulo 1 Introducción

    00424A SCC-B2307P-SPA 4/7/05 9:48 PM ˘ ` 5 Capítulo 1 Introducción Cámara de DIA /NOCHE opera en el modo de color en el valor de iluminición. y de otra manera en el modo de B/W, por suprimir la función de IR que desarolla la sensibilidad. Por eso se llama cámara de baja iluminación que es disponible identificar los objetos en zonas oscuras.
  • Page 132: Capítulo 2 Características Especiales

    00424A SCC-B2307P-SPA 4/7/05 9:48 PM ˘ ` 6 Capítulo 2 Características Especiales Alta Sensibilidad Tiene un actualizado 1/3" Super(EXview)-HAD IT CCD por la imagen de la alta sensibilidad. Función de la Baja Iluminación Tiene ambas función de baja iluminación y función de DÍA/NOCHE basada en la tecnología digital de señal para funcionar en el ambiente peor sin luz.
  • Page 133: Capítulo 3 Nombres De Los Components Y Funciones

    00424A SCC-B2307P-SPA 4/7/05 9:48 PM ˘ ` 7 Capítulo 3 Nombres de los Componentes y Funciones Vista Lateral Adaptador de Montaje de la Fijación de Groove Conectador Automático de la Lente del Obturador Barra del Control del Foco Trasera Conmutador de la Selección de Lentes ALC Cable de Control Automático de Lente de...
  • Page 134: Vista Posterior

    00424A SCC-B2307P-SPA 4/7/05 9:48 PM ˘ ` 8 Cable de Control Conectador Automático de Lente de la Lente Del Obturador Este cable transmite la señal de control de la cámara para controlar el obturador de la lente. Barra del Control del Foco Trasera Controla el foco trasero.
  • Page 135 00424A SCC-B2307P-SPA 4/7/05 9:48 PM ˘ ` 9 LED de Visualización de la Energía Cuando la cámara se provee de energía, el LED está encendido. Terminal de Salida de Video El terminal de entrada de video de monitor está conectado con este terminal a través de lo cual la señal de video de la cámara venga.
  • Page 136 00424A SCC-B2307P-SPA 4/7/05 9:48 PM ˘ ` 10 Salida Externa de la Entrada de Señal de DÍA/NOCHE y De la Señal de Alarmar Esto es una función para recibir la señal externa de Día/Noche del sensor (opción) y para convertir la señal a BW. La función del MOVIMIENTO DET genera una señal de alarmar cuando se detecta el movimiento.
  • Page 137 00424A SCC-B2307P-SPA 4/7/05 9:48 PM ˘ ` 11 Conmutador de Operación de Cámara (Conmutador de Configuración) La función del conmutador de la operación de la cámara cambia dependiendo de si la cámara está en el modo general de operación actualmente (el menú de configuración no está mostrado en la pantalla) o el modo del menú...
  • Page 138: Instalación

    00424A SCC-B2307P-SPA 4/7/05 9:48 PM ˘ ` 12 Capítulo 4 Instalación Este capítulo describe qué se debe comprobar antes de instalación, cómo fijar el ambiente de la instalación, y qué se debe hacer durante la instalación. Entonces, describe cómo instalar la cámara y conectar el cable en circunstancias reales Antes de la Instalación Comprobación del contenido del paquete...
  • Page 139 00424A SCC-B2307P-SPA 4/7/05 9:48 PM ˘ ` 13 Qué se debe hacer durante la instalación y el uso No desmonte la cámara en sus propios. should be stored and treated with care to avoid any damage. Tenga cuidado para manejar la cámara toda la hora. No pulse la cámara con sus puños ni sacudárala.
  • Page 140 00424A SCC-B2307P-SPA 4/7/05 9:48 PM ˘ ` 14 Conectar conectador de la Lente de Obturador Automático Prepare el conectador de la lente de obturador automático, auxiliar de la cámara como sigue. Conecte cada alambre destapado del cable de control del obturador con el conectador de la lente del obturador automático como sigue.
  • Page 141 00424A SCC-B2307P-SPA 4/7/05 9:48 PM ˘ ` 15 Instalación Fijación de la Lente En caso de las lentes de CS Dé vuelta la lente a la derecha hasta que está fijada según lo demostrado como sigue. lentes de CS En caso de las lentes de C Dé...
  • Page 142: Ajustar El Foco Trasero

    00424A SCC-B2307P-SPA 4/7/05 9:48 PM ˘ ` 16 Fijar Control del Conmutador Usted debe cambiar la posición de la lente que fija el conmutador respecto al lado de la cámara según el tipo de la lente. Dependiendo de si usted fijó la lente del obturador automática del tipo del control de DC o la lente del obturador automática del tipo del control de de video, usted debe poner el conmutador en “DC”...
  • Page 143 00424A SCC-B2307P-SPA 4/7/05 9:48 PM ˘ ` 17 Lentes sin la Función de Zoom Capture la imagen de objeto con el alto resolution (objeto) en la distancia más de 10m y ponga la anilla del foco de la lente en la posición infinita ( ∞ ) . Rote la anilla del ajuste del FOCO TRASERO hasta que el objeto se mostra lo más mejor posible.
  • Page 144: Conectar Cables

    00424A SCC-B2307P-SPA 4/7/05 9:48 PM ˘ ` 18 Conectar Cables y Comprobar la Operación 1 Primero, conecte el conectador del cable de BNC con el terminal de salida de video. 2 En segundo lugar, conecte el otro conectador del cable de BNC con el terminal de entrada de video.
  • Page 145 00424A SCC-B2307P-SPA 4/7/05 9:48 PM ˘ ` 19...
  • Page 146: Configurar La Cámara

    00424A SCC-B2307P-SPA 4/7/05 9:48 PM ˘ ` 20 Capítulo 5 Configurar la Cámara Este capítulo describe cómo instalar la cámara. La primera parte describe el menú entero de configuración y la composición y la segunda parte describe la función de cada menú. ON...
  • Page 147 00424A SCC-B2307P-SPA 4/7/05 9:48 PM ˘ ` 21 CÁMARA ID Este menú de CÁMARA ID designa identificación a la CÁMARA en la pantalla del monitor conectada con la cámara. Si usted activa el menú de CÁMARA ID y presiona la tecla [ENTER], la pantalla de submenú aparecerá...
  • Page 148 00424A SCC-B2307P-SPA 4/7/05 9:48 PM ˘ ` 22 DIAFRAGMA Esta CÁMARA tiene la función del DIAFRAGMA para permitir el control automático del nivel del brillo por la intensidad de la radiación básicamente. ❿ ALC Si usted selecciona el menú de ALC y presiona la tecla [ENTER], aparecerá...
  • Page 149 00424A SCC-B2307P-SPA 4/7/05 9:48 PM ˘ ` 23 El ajuste del nivel de DIAFRAGMA de DC está disponible en el modo del MENÚ CONFIGURACIÓN así como en el modo de la operación. Si usted presiona la tecla IZQUIERDA O DERECHA durante cerca de 2 segundos, aparecerá...
  • Page 150 00424A SCC-B2307P-SPA 4/7/05 9:48 PM ˘ ` 24 CLUZ Si usted utiliza la cámara fordinaria cuando hay una iluminación intensa y concentrada detrás de un objeto, la luz trasera sombreará la imagen en la pantalla del monitor. La función de BLC previene tal efecto ligero trasero para asegurar la imagen clara bajo todos los ambientes de la iluminación.
  • Page 151 00424A SCC-B2307P-SPA 4/7/05 9:48 PM ˘ ` 25 ❿ UTIL ZONA Si usted selecciona USUARIO... en el menú de CLUZusando la tecla IZQUIERDA o DERECHA y presiona la tecla [ENTER] la tecla, usted puede determinar el tamaño y la localización del área de CLUZpor sí mismo.
  • Page 152 00424A SCC-B2307P-SPA 4/7/05 9:48 PM ˘ ` 26 COLOR/ByN El menú de COLOR/ByN se activa o se desavtiva el filtro de IR(Infrarrojo). En ambientes de la baja iluminación, el modo de ByN desactivará el filtro de IR y la sensibilidad será tan alta como la de las cámaras de ByN. Si no, el modo de BW volverá...
  • Page 153 00424A SCC-B2307P-SPA 4/7/05 9:48 PM ˘ ` 27 ❿ ByN... Éste es el modo de OFF de filtro de IR en el negro y blanco.(la alta sensibilidad como cámaras de ByN...) si usted selecciona el ByN... y presiona la tecla [Enter], la pantalla del submenú...
  • Page 154 00424A SCC-B2307P-SPA 4/7/05 9:48 PM ˘ ` 28 ❿ AUTO... Este menú convierte automáticamente el modo del COLOR en el modo de ByN o viceversa dependiendo de la iluminación. En ambientes de la baja iluminación, apague el filtro de IR para aumentar la sensibilidad de otra manera encienda el filtro de IR para bajar la sensibilidad.
  • Page 155 00424A SCC-B2307P-SPA 4/7/05 9:48 PM ˘ ` 29 ❿ SALIDA... Este menú convierte automáticamente el modo del COLOR en el modo de ByN o viceversa dependiendo de la iluminación con el sensor externo. Si usted selecciona el menú de la SALIDA y presiona la tecla [Enter], el submenú...
  • Page 156 00424A SCC-B2307P-SPA 4/7/05 9:48 PM ˘ ` 30 OBTURADOR El menú del OBTURADOR instala la velocidad electrónica del obturador de alta velocidad, del obturador AUTO de la baja velocidad, y del obturador FIJO de la baja velocidad. El obturador electrónico de alta velocidad ofrece 7 velocidades del obturación desde 1/100 segundos hasta 1/10K segundos y se utiliza comúnmente para los objetos móviles rápidos de la proyección de imagen.
  • Page 157 00424A SCC-B2307P-SPA 4/7/05 9:48 PM ˘ ` 31 CAG/MOVIMIENTO ❿ CAG El menú de CAG ilumina la pantalla debajo del brillo estándar debido al objeto tomado en la iluminación oscura. Instalar el menú de CAG está disponible solamente en modo de obturador de alta velocidad o de modo OFF.
  • Page 158 00424A SCC-B2307P-SPA 4/7/05 9:48 PM ˘ ` 32 ❿ MOVIMIENTO La función del MOVIMIENTO está disponible solamente en el modo de AUTO O FIJO con los 5 pasos, M.DULC, DULC, NORM, RÁPIDO, R. RÁPIDO. El M.DULC minimiza la intensidad de CAG para supervisar objetos estables en la obscuridad.
  • Page 159: Bal Blanco

    00424A SCC-B2307P-SPA 4/7/05 9:48 PM ˘ ` 33 BAL BLANCO ❿ BA Si usted selecciona el modo de BA en el menú de BAL BLANCO, usted puede supervisar el cambio de temperatura del color por tiempo real e instalar el BAL BLANCO al tiempo real de la temperatura del color automáticamente.
  • Page 160 00424A SCC-B2307P-SPA 4/7/05 9:48 PM ˘ ` 34 (ABB/MANU) (ABB/MANU) Usando las teclas PRESET OFF(UTIL)-- [Izquierda y ROJO (00) ----I---- PRESET 3200K Derecha] AZUL (00) ----I---- SYNC El modo INTERNO es necesario para usar la sincronización interna y el modo de la LÍNEA...
  • Page 161 00424A SCC-B2307P-SPA 4/7/05 9:48 PM ˘ ` 35 ESPECIAL Usted puede controlar función de VELOCIDAD, D-ZOOM, PIP, ESPEJO,POSI/NEGA, DETALLE, y del DET MOVI por sí mismo en el menú ESPECIAL. Si seleciona el menú ESPECIAL y presiona la tecla [ENTER], aparecerá la pantalla del submenú ESPECIAL. CÁMARA ID (ESPECIAL) DIAFRAGMA...
  • Page 162 00424A SCC-B2307P-SPA 4/7/05 9:48 PM ˘ ` 36 ❿ ESPEJO : Voltea horizontalmente por la señal de salida de video. ❿ POSI/NEGA : Produce la señal de brillo de video normal o reversa ❿ DETALLE : Ajusta la nitidez horizontal y vertical. ❿¤DET MOVI El DET MOVI detecta cualquier movimiento de objetos.
  • Page 163 00424A SCC-B2307P-SPA 4/7/05 9:48 PM ˘ ` 37 El menú ZONA fija la dimensión y la posición como ZONA en el menú CLUZ. Si usted desea seleccionar el área de pantalla donde se aplica la función DET MOVI, usted debe presionar la tecla [ENTER] en el UTIL del ÁREA.
  • Page 164 00424A SCC-B2307P-SPA 4/7/05 9:48 PM ˘ ` 38 SALIDA El menú SALIDA se utiliza para la terminación del menú CONFIGURACIÓN de CÁMARA. ❿ DEJAR No hace caso de cualquier cambio y vuelve al menú CONFIGURACIÓN ya grabado. ❿ SALVAR Graba todos los cambios al menú hasta ahora. ❿...
  • Page 165 00424A SCC-B2307P-SPA 4/7/05 9:48 PM ˘ ` 39 Especificación de Producto Características Especiales de SCC-B2303 IARTÍCULO DESCRIPCIÓN Definición Cámara CCTV (DÍA/NOCHE) Fuente de Alimentación AC 24V ± 10% (60Hz±0.1Hz), DC12V +10% ~ -5% Consumo Elétrico Approx. 4.5W Sistema de Transmisión Sistema de Color Estándar NTSC...
  • Page 166 00424A SCC-B2307P-SPA 4/7/05 9:48 PM ˘ ` 40 ARTÍCULO DESCRIPCIÓN Detección de Movimiento OFF/ON(Ajuste ZONA/SENSIBILIDAD) Control de Video Ajuste de POSI/NEGA, ESPEJO (IZQUIERDA/DERECHA), DETALLE Salida de Señal Salida de video compuesto : 1.0 Vp-p 75 ohms/BNC Lente VIDEO/DC Lente de Montaje CS/C (Adaptador de Montaje) Temperatura de Funcionamiento -10°C ~ +50°C...
  • Page 167 00424A SCC-B2307P-SPA 4/7/05 9:48 PM ˘ ` 41 Product Specification Características Especiales de SCC-B2303P/B2003P/B2307P/B2007P ARTÍCULO DESCRIPCIÓN Definición Cámara CCTV (DÍA/NOCHE) Fuente de Alimentación SCC-B2303P/B2307P : AC 24V ± 10% (50Hz ± 0.1Hz), DC12V +10% ~ -5% SCC-B2003P/B2007P : AC220V ~ AC240V (50Hz ±...
  • Page 168 00424A SCC-B2307P-SPA 4/7/05 9:48 PM ˘ ` 42 ARTÍCULO DESCRIPCIÓN DÍA/NOCHE COLOR/ByN/AUTO/EXT Temperatura del Color BA/BM/MANUAL MODE (3200°K,5600°K,R/B Ajuste de Ganancia) Velocidad del obturador ALC:OFF~1/10K seg (7 pasos) electrónico ELC:Max 1/100K seg Compensación de Luz Ambiental OFF/ABAJO/ARRIBA/IZQUIERDA/ DERECHA/CENTRO/UTIL Sense Up OFF/ AUTO2X~128X/FIJO2X~128X Zoom Digital OFF/D-ZOOM(X10), PIP...
  • Page 169 00424A SCC-B2307P-ITA(02) 4/7/05 9:46 PM ˘ ` 1 MACCHINA FOTOGRAFICA COLORE GIORNO/NOTTE SCC-B2303(P)/B2003P SCC-B2307P/B2007P Manuale d’Utente...
  • Page 170: Norme Di Sicurezza

    00424A SCC-B2307P-ITA(02) 4/7/05 9:46 PM ˘ ` 2 Norme di sicurezza Scopo di queste informazioni è garantire l’uso corretto del prodotto per prevenire pericoli o danni alla proprietà. Attenersi a tutte le precauzioni. Avvertenza La mancata osservanza di questa indicazione può provocare la morte o gravi lesioni.
  • Page 171 9. In caso di funzionamento difettoso dell’apparecchio, rivolgersi al rivenditore presso cui è stato effettuato l’acquisto oppure al centro di assistenza più vicino. Non smontare né modificare il prodotto. (Samsung non è responsabile di problemi causati da modifiche non autorizzate o da tentativi di riparazione.)
  • Page 172 00424A SCC-B2307P-ITA(02) 4/7/05 9:46 PM ˘ ` 4 Contenuti Capitolo 1 Introduction ............5 Capitolo 2 Special Features ..........6 Capitolo 3 Part Names and Functions ....... 7 Capitolo 4 Installazione ............12 Cauzione per l’Installazione e l’Uso ....13 Connettendo Otturatore Automatica Connettore Lenti ..............
  • Page 173 00424A SCC-B2307P-ITA(02) 4/7/05 9:46 PM ˘ ` 5 Capitolo 1 Introduzione La camera Giorno/Notte opera nel modo colore nell’illuminazione sopra di valore standard e altrimenti in modo B/W da cancellando la funzione IR Cut, che fornire alla sensibilità miglioramenta. Questo è chiamato alla camera d’illuminazione bassa che può...
  • Page 174 00424A SCC-B2307P-ITA(02) 4/7/05 9:46 PM ˘ ` 6 Capitolo 2 Caratteri Speciali Sensibilità Alta Ha un up-to-date 1/3" Super(EXview)-HAD IT CCD per un imaggine di sensibilità alta. Funzione Illuminazione Debole Hanno tutti e due della funzione di illuminazione debole e Giorno/Notte funziona in base sul segno digitale tecnologia allo scopo to operare nell’ambiente peggiore senza luce.
  • Page 175 00424A SCC-B2307P-ITA(02) 4/7/05 9:46 PM ˘ ` 7 Capitolo 3 Nomi e Funzione dei componenti Vista Fianco Solco Fissando Adattore Supporto Connectore Lente Otturatore Automatica Bar Controllo Fuoco Retro Interrutore Setting Lente ALC Cavo Controllo Lente Otturatore Automatica Lente Cammera Solco Fissando Adattore Supporto Questo solco è...
  • Page 176 00424A SCC-B2307P-ITA(02) 4/7/05 9:46 PM ˘ ` 8 Cavo Controllo Lente Otturatore Automatica Questo cavo trasmette lo segnale di controllo dalla camera per controllare l’otturatore della lente. Bar Controllo Fuoco Retro Controllare il fuoco retro. Interrutore Setting Lente ALC Questo interrutore mette il tipo di lente Iris per usare. DC: Quando attacare un lente Iris Auto richiedendo la segnale di controllo DC, per favore mette questo interrutore nella posizione DC.
  • Page 177 00424A SCC-B2307P-ITA(02) 4/7/05 9:46 PM ˘ ` 9 LED Display Potenza Quando la camenra è fornita con la potenza, LED è on. Terminale Output Video Il terminale input di monitor del video è collegato con questa terminale attraverso che il video segnale della camera uscire. Terminale Input Remoto (RS-232) Questa terminale è...
  • Page 178 00424A SCC-B2307P-ITA(02) 4/7/05 9:46 PM ˘ ` 10 Input Segnale Esteriore E Output Segnale Allarme Giorno/Notte Questo è una funzione per ricevere la segnale DAY/NIGHT esteriore dal sensore(opzionale) E convertire la segnale nel BW. La funzione MOVIMENTO DET genera un segnale allarme quando un movimento è scoperto.
  • Page 179 00424A SCC-B2307P-ITA(02) 4/7/05 9:46 PM ˘ ` 11 Interruttore Operazione Camera (Interruttore Setup) La funzione dell’interruttore operazione della camera cambia non cè dubbio se la camera è è attualmente nel modo d’operazione usuale. (Il menu di No setup è visto sullo schermo) o il modo del menu di setup. [LEFT/RIGHT] chiave [UP/DOWN] chiave [ENTER] chiave...
  • Page 180: Prima Installazione

    00424A SCC-B2307P-ITA(02) 4/7/05 9:46 PM ˘ ` 12 Capitolo 4 Installazione Questo capitolo descrive che cosa dovrebbe essere controllato prima l’installazione, come mettere l’ambiente d’installazione, e che cosa dovrebbe essere fatto mentre installazione. Poi, descrivere come per installare la camera e collegare il cavo nelle circostanze reale. Prima Installazione Controllazione Gli Contenuti del Pacco Non mancare di controllare se l’articolo seguente sono incluso nel pacco.
  • Page 181 00424A SCC-B2307P-ITA(02) 4/7/05 9:46 PM ˘ ` 13 Che cosa dovrebbe essere fatto mentre l’installazione e uso Non smontare la camera da solo. Attentare quando il trattamento della camera sempre. Non battere la camera con vostro pugno o scrollarlo. La camera dovrebbe essere depositato e trattato con cura per evitare altro danno.
  • Page 182 00424A SCC-B2307P-ITA(02) 4/7/05 9:46 PM ˘ ` 14 Collegamento Lente Otturatore Automatico Collegatore Preparare il connettore lente otturatore automatico, una camera ausiliaria, come seguente: Collegare ogni cavo di filo metalico d’otturatore rivelato al collegatore otturatore automatico come seguente. Numero Pin Tipo Controllo DC Tipo Controllo Video Damp(-)
  • Page 183 00424A SCC-B2307P-ITA(02) 4/7/05 9:46 PM ˘ ` 15 INSTALLAZIONE Fissaggio Lente Nel caso di lenti CS Girare il lenti CS in senso orario fino questo è fissato come è mostrato come seguente. lenti CS Nel caso di lenti C Girare l’adattore C-supporto in senso orario per fissarlo. Poi girare il lente C in senso orario fino è...
  • Page 184 00424A SCC-B2307P-ITA(02) 4/7/05 9:46 PM ˘ ` 16 Controllo Interruttore montaggio Dovrebbe cambiare la posizione dell’interruttore di montaggio per lente sulle parte della camera secondo del tipo dilente. Può contarci se ha fissato il tipo lente d’otturatore automatica di tipo del controllo DC, deve mettere l’interruttore nel posizione ripettivamente “DC”...
  • Page 185 00424A SCC-B2307P-ITA(02) 4/7/05 9:46 PM ˘ ` 17 Lenti con funzione zoom Immaginare un oggetto con la risoluzione(letticed) alta a una distanza di 3 a 5m e zoom nel lente al più chiudere a TELE. Poi aggiustare il fuoco del lente anello fino l’oggetto è visto migliore. Zoom nel lente al più...
  • Page 186 00424A SCC-B2307P-ITA(02) 4/7/05 9:46 PM ˘ ` 18 Collegamento cavi e controllazione operazione 1 Prima, collegare il collegatore del cavo BNC al terminale Video Out. 2 Secondo, collegare il collegatore altro del cavo BNC al terminale Video Morsetto di Video in dello schermo posteriore.
  • Page 187 00424A SCC-B2307P-ITA(02) 4/7/05 9:46 PM ˘ ` 19...
  • Page 188 00424A SCC-B2307P-ITA(02) 4/7/05 9:46 PM ˘ ` 20 Capitolo 5 Set-up Camera Questo capitolo descrive come fare set-up la camera. La parte prima descrive il menu di setup interna e il composizione e la parte secondo descrive l’ogni menu del funzione. ON...
  • Page 189 00424A SCC-B2307P-ITA(02) 4/7/05 9:46 PM ˘ ` 21 ID CAMERA Questo menu di ID CAMERA designa un ID CAMERA sullo schermo di monitor collegato alla camenra. Se accende il menu ID CAMERA e premere la chiave [ENTER], il sotto-schermo sarà apparire di designata un ID CAMERA.
  • Page 190 00424A SCC-B2307P-ITA(02) 4/7/05 9:46 PM ˘ ` 22 IRIS Questa CAMERA ha una funzione IRIS per controllo automatico del livello della luminosità attraverso il radiazione dell’intensità. ❿ ALC Se selezionare il menu ALC e premere la chiave [ENTER], il sotto schermo sarà...
  • Page 191 00424A SCC-B2307P-ITA(02) 4/7/05 9:46 PM ˘ ` 23 Il setting del livello DC IRIS è disponibile nel modo SETUP MENU come pure nel modo d’operazione. Se premere la chiave LEFT o RIGHT per circa 2 secondi, il livello della luminosità di setting sarà apparire. Per risparmiare nel condizione USCITAcambiare l’articolo SAVE con ;’uso le chiavi [Sinistra, Destra] e poi premere la chiave [ENTER].
  • Page 192 00424A SCC-B2307P-ITA(02) 4/7/05 9:46 PM ˘ ` 24 Se usare una camera ordinaria quando c’è un intenso e l’illuminazione concentrato dietro un oggetto, la luce retro sarà l’ombra dell’immagine sullo schermo del monitor. Il funzione BLC impedisce come un effetto della luce retro per assicurare uno immagine chiaro sotto gli ambiento dell’illuminazione d’intero.Premere la chiave LEFT o RIGHT per mettere la funzione OFF o la funzione UTIL per il setting già...
  • Page 193 00424A SCC-B2307P-ITA(02) 4/7/05 9:46 PM ˘ ` 25 ❿ UTIL ZONA Se selezionare UTIL… nel menu BLC da usando la chiave il LEFT o RIGHT e premere la chaive [ENTER], sarà potere a determinare la misura e la locazione dell’area BLC da solo. Quando l’area non è lampeggiato, può...
  • Page 194 00424A SCC-B2307P-ITA(02) 4/7/05 9:46 PM ˘ ` 26 COLORE / B/N Il menu COLORE/ByNgirare il Filtro IR(Infrarosso) on o off. Negli ambienti dell’illuminazione debole, il modo B/N sarà spento il Filtro IR e la sensitività sarà essere così alto come dellla camera B/N. Altrimenti, il modo B/N sarà accendere il Filtro IR e la sensitività...
  • Page 195 00424A SCC-B2307P-ITA(02) 4/7/05 9:46 PM ˘ ` 27 ❿ B/N... Questo è il Filtro IR di Modo OFF in nero e bianco.(la sensività alta piace la camera B/N) Se selezionare il B/N…e premere il chave [Enter], lo schermo di sottomenu B/N sarà apparire. Deve potere a mandare la segnale BURST da acceso o spento in questo menu.
  • Page 196 00424A SCC-B2307P-ITA(02) 4/7/05 9:46 PM ˘ ` 28 ❿ AUTO... Questo menu automaticamente convertire il Modo COLORE nel Modo B/N o viceversa secondo l’illuminazione. Negli ambienti dell’illuminazione devole, spengere il Filtro IR per alzare sensibilità, altrimenti accendere il Filtro IR a bassare sensibilità. Se selezionare il menu AUTO e premere la chiave [Enter], Il Controllo B/N LEVEL del sottomenu AUTO B/N sarà...
  • Page 197 00424A SCC-B2307P-ITA(02) 4/7/05 9:46 PM ˘ ` 29 ❿ EST... Questo menu automaticamente convertire il Modo COLORE nel Modo B/N o viceversa secondo l’illuminazione con un sensore esteriore. Se selzionare il menu USCITAe premere la chiave [Enter], il sottomenu EXTERNAL B/N sarà apparire sul menu di schermo. Sarà potere a mandare fuori la segnale BURST da accendo o spento in questo menu.
  • Page 198 00424A SCC-B2307P-ITA(02) 4/7/05 9:46 PM ˘ ` 30 SHUTTER Il menu SHUTTER setup la velocità alta elettronico della velocità d’otturatore, la velocità d’otturatore della velocità devole AUTO, e la velocità d’otturatore della velocitàdebole FISSO. La velocità alta elettronica d’otturatore coprire la velocità d’otturatore 7 da 1/100 a 1/10K secondi e è...
  • Page 199 00424A SCC-B2307P-ITA(02) 4/7/05 9:46 PM ˘ ` 31 AGC/MOVIMENTO ❿ AGC Il menu AGC alleggerire lo schermo sotto la luminosità standard perche l’oggetto preso nell’illuminazione scuro. Setting up il menu AGC è disponibile solo nell’uno o l’altro modo High Speed Shutter o modo OFF. Se premere la chiave LEFT o RIGHT per arrivare la posizione BASSO o ALTO, la funzione AGC sarà...
  • Page 200 00424A SCC-B2307P-ITA(02) 4/7/05 9:46 PM ˘ ` 32 ❿ MOVIMENTO La funzione MOVIMENTO è disponibile solo nel modo AUTO o FISSO con queste 5 passi: M.LENTO, LENTO, VELOC, M.VELOC Il M.LENTO minimizzare la intensità del AGC agli oggetti stabile di monitor nel buio.
  • Page 201: Bil Bianco

    00424A SCC-B2307P-ITA(02) 4/7/05 9:46 PM ˘ ` 33 BIL BIANCO ❿ ATW Se selezionare il modo ATW nel menu BIL BIANCO, sarà potere al monoitor il colore della temperatura cambia dal tempo reale e set up la Bilancia Bianca al tempo reale di coore della temperatura automaticamente.
  • Page 202 00424A SCC-B2307P-ITA(02) 4/7/05 9:46 PM ˘ ` 34 (AWB/MANU) (AWB/MANU) Usare Chiave PRESET OFF(UTIL)-- PRESET 3200K [Left/Right] ROSSO (00) ----I---- (00) ----I---- SYNC Il modo INT è necessario per usando la sincronizzazione internale e il modo LINE è necessario per la operazione del multi camere perchè questo sincronizzare il fase della camera da usando la segnael esteriore (AC segnale).
  • Page 203 00424A SCC-B2307P-ITA(02) 4/7/05 9:46 PM ˘ ` 35 SPECIALE Può controllare la funzione VELOCITÁ, D-ZOOM, PIP, MIRROR, POSI/NEGA, DETAIL, e ACTIVITY DET Da solo nel menu SPECIALE. Se selezionare il menu SPECIALE e premere la chiave [ENTER], il sottomenu SPECIALE dello schermo sarà apparire.
  • Page 204 00424A SCC-B2307P-ITA(02) 4/7/05 9:46 PM ˘ ` 36 ❿ MIRROR : Colpetti Orizzontalmente il video segnale. ❿ POSI/NEGA : Output l’illuminazione di segnale del video normalmente o rovesiamente. ❿ DETTAGLIO : Aggiustare l’affilamento dell’orizzontale e verticale. ❿¤ACTIVITY DET ACTIVITY DET trovare qualche movimento degli oggetti. Se acttivare la funzione ACTIVITY DET sempre quando aspetta per muovere qualcuno, la funzione sarà...
  • Page 205 00424A SCC-B2307P-ITA(02) 4/7/05 9:46 PM ˘ ` 37 Il menu ZONA mette la misura e la posizione come ZONA nel menu BLC. Se vuole selezionare l’area dello schermo dove la funzione ACTIVITY DET è applicato, dovrrebe premere la chiave [ENTER] nel ZONA UTIL.. da solo o mette il menu ZONA al PRSET..Poi, la funzione ACTIVITY DET sara essere applicato per l’aria selezionata del prodotto mentre l’imbarco.
  • Page 206 00424A SCC-B2307P-ITA(02) 4/7/05 9:46 PM ˘ ` 38 USCITA Il menu USCITAè usato per la terminazione del menu CAMERA SETUP. ❿ ESCI Ignorare qualche cambiamento e ritornare al menu SETUP risparmiato precedentemente. ❿ SALVA Risparmiare tutti cambiamenti al menu fino d’ora. ❿...
  • Page 207 00424A SCC-B2307P-ITA(02) 4/7/05 9:46 PM ˘ ` 39 Prodotto Specificazione SCC-B2303 Caratteri Speciali ARTICOLO DESCRIZIONE Definizione CCTV Camera (DAYNIGHT) Alimentazione AC 24V ± 10% (60Hz±0.1Hz) DC12V +10% ~ -5% Consuzione Potenza Approx. 4.5W Sistema Radiodiffusione Sistema Colore Standardo NTSC Dispositivo Imagine...
  • Page 208 Setting DETTAGLIO Segnale Output Composito Video Out : 1.0 Vp-p 75 ohms/BNC Lenti VIDEO/DC Suppport Lente CS/C (Adarratore Supporto) Operazone Temperatura -10°C ~ +50°C Operazione Humidità ~90% Misura Fisicale 68(W) x 55(H) x 128.5(D) mm Peso SCC-B2303 : Approx. 450g...
  • Page 209 00424A SCC-B2307P-ITA(02) 4/7/05 9:46 PM ˘ ` 41 Prodotto Specificazione SCC-B2303P/B2003P/B2307P/B2007P Caratteri Speciali ARTICOLO DESTRIZIONE Definizione CCTV Camera (Giorno/Notte) Alimentazione SCC-B2303P/B2307P : AC 24V ± 10% (50Hz ± 0.1Hz), DC12V +10% ~ -5% SCC-B2003P/B2007P : AC220V ~ AC240V (50Hz ± 0.1Hz) Consuzione Potenza SCC-B2303P/B2307P : Approx.
  • Page 210 00424A SCC-B2307P-ITA(02) 4/7/05 9:46 PM ˘ ` 42 Item Description Giorno/ NOtte COLORE/B/N/AUTO/EST Temperatura Colore ATW/AWC/MANU (3200°K,5600°K,R/B Aggiustamento Gain) Velocità otturatore elettronic ALC:OFF~1/10K sec (7 passi) ELC:Max 1/100K sec Compensazione Luce Retro OFF/BASSO/ALTO/SINISTRA/DESTRA/ CENTRO/UTIL Senso Sopra OFF/AUTO 2X~128X/FISSO 2X~128X Zoom Digitale OFF/ON(X10), PIP Moto Scoperta OFF/ON (ZONA/SETTING SENSIBILITÀ)
  • Page 211 00424A SCC-B2307P-ITA(02) 4/7/05 9:46 PM ˘ ` 43 Part No: AB68-00424A(02) Made in Korea...

Ce manuel est également adapté pour:

Scc-b2003pScc-b2307pScc-b2007pScc-b2303p

Table des Matières