Table des Matières

Publicité

Les langues disponibles
  • FR

Les langues disponibles

Liens rapides

Part : AB68-00357A
Printed in Korea
Combi Dome Camera
SCC-643(P)
Owner's Instructions
Benutzerhandbuch
D
Manuel d'instruction
Manual del usuario
Es
Istruzioni per l'uso
E
F
I

Publicité

Table des Matières
loading

Sommaire des Matières pour Samsung SCC-643

  • Page 1 Combi Dome Camera SCC-643(P) Owner’s Instructions Benutzerhandbuch Manuel d’instruction Manual del usuario Istruzioni per l’uso Part : AB68-00357A Printed in Korea...
  • Page 2: Safety Precautions

    9. If this product fails to operate normally, contact the store of purchase or your nearest service center. Never disassemble or modify this product in any way. (SAMSUNG is not liable for problems caused by unauthorized modifications or attempted repair.)
  • Page 3: Before Usage

    Before Usage This is a basic instruction manual for the SCC-643(P) user. It contains all the instructions needed to use the SCC-643(P) from a simple introduction of the control locations and functions of the SCC-643(P) to installation methods in the set up menu.
  • Page 4: Table Des Matières

    Table of contents Before Usage --------------------------------------------------------------------------------------1-1 - AGC ----------------------------------------------------------------------------3-10 Chapter 1 SCC-643(P) Overview -----------------------------------------------------------1-5 - S.S ------------------------------------------------------------------------------3-10 SCC-643(P) Introduction ---------------------------------------------------------1-6 - SLOW --------------------------------------------------------------------------3-11 SCC-643(P)Locations of Control-----------------------------------------------1-7 - NORMAL ----------------------------------------------------------------------3-11 SCC-643(P) FRONT --------------------------------------------------------------1-7 - FAST ---------------------------------------------------------------------------3-11 SCC-643(P) BACK ----------------------------------------------------------------1-8 - F.F ------------------------------------------------------------------------------3-11...
  • Page 5: Chapter 1 Scc-643(P) Overview

    The SCC-643(P) is the best performing zoom lens integrated surveillance camera. It can be used with CCTV in banks or In this chapter we will briefly introduce the SCC-643(P) and show companies to provide high level of security. main functions, locations of control and Switch Setting.
  • Page 6: P)Locations Of Control

    Locations of Control FRONT BACK COVER BODY COVER DOME ZOOM LENS...
  • Page 7: Adapter Connection

    INITIAL SETTING CAMERA ADDRESS SETUP Dip Switch setting is same as the following example: EX) CAMERA ADDR: When it's number 1, set as follows. SCC-643(P) Adapter BOARD SW500 Setting communication Protocol Use number 5~8 PIN of SW501 to set communication Protocol.
  • Page 8: Setting Rs-422A/Rs-485 Termination

    Setting RS-422A/RS-485 termination SWITCH SETTING Receiver Address SW500-1 SW500-2 SW500-3 SW500-4 SW500-5 SW500-6 SW500-7 SW500-8 SW 501 As it is shown in the structure map, when Controller and RS-422A/RS-485 is connected it should be terminated according to the Cable feature of impedance on the each end of the transmitting line to transfer the signals in long distance by controlling the reflection of the signals to the lowest.
  • Page 9 Receiver Address SW500-1 SW500-2 SW500-3 SW500-4 SW500-5 SW500-6 SW500-7 SW500-8 Receiver Address SW500-1 SW500-2 SW500-3 SW500-4 SW500-5 SW500-6 SW500-7 SW500-8 1-13 1-14...
  • Page 10 Receiver Address SW500-1 SW500-2 SW500-3 SW500-4 SW500-5 SW500-6 SW500-7 SW500-8 Receiver Address SW500-1 SW500-2 SW500-3 SW500-4 SW500-5 SW500-6 SW500-7 sw500-8 1-15 1-16...
  • Page 11: Chapter 2 Scc-643(P) Installation

    Please check that all components listed below are included in the package: In this chapter, we will check the contents of the package before installing the SCC-643(P), and prepare a power adapter suitable for the power supply system. (Power Consumption: 18W; Voltage: 24VAC, 1.5A) Then, we will install the SCC-643(P) and connect the cables.
  • Page 12: Preparing The Cables

    Video Output Terminal (VIDEO OUT) Power Adapter Cable 2. Then, connect the other end of The cable that plugs into the SCC-643(P) power input receptacle has the the connector to the Video Input rated voltage of 24VAC, 1.5A. Terminal of the monitor.
  • Page 13: Installing Scc-643(P)

    1) Make sure that the installation site can sufficiently support a minimum of wall or a ceiling. four times the net weight of the SCC-643(P) Combi Dome Camera and other accessories. 2) Install in an area where the space above the ceiling board is over 18 cm (7 in.) high.
  • Page 14: Installing The Camera

    Installing the Camera 1. [Figure 1] Install the structure on the ceiling. 5) CEILING MOUNT ADAPTOR (SADT-100CM) (Refer to Installation reference for the Length of the structure) This adaptor is used for installing the indoor housing or the outdoor housing for the Combi Dome Camera to a concrete ceiling. * Built in by the builder of the structure [Figure 1] Length of...
  • Page 15: Chapter 3 Setup Menu Overview

    Chapter 3 Setup Menu Overview CAMERA ADAPTER In this chapter, we will look over the Setup Menu of the SCC-643(P), First we'll look over the overall structure of the Setup Menu, and then we'll look at the functions of each menu.
  • Page 16: Structure Of The Setup Menu

    CAM RESET LANGUAGE ENGLISH EXIT QUIT/SAVE The diagram shown above illustrates the overall structure of the Setup Menu. In this section, a description of the Setup menu features will enable users of the SCC-643(P) to tailor it to their personal needs.
  • Page 17: Camera Set Menu

    CAMERA ID to ON and press [Enter]. You will see the sub screen for deciding on the ID of the SCC-643(P). The Camera ID can have up to 12 COLOR : The IR Filter is ON and the screen is normal.
  • Page 18: Zoom Speed

    Alarm signal of the Controller. EXIT The EXIT menu is used to quit the CAMERA SET (MOTION DET) (CAMERA SET) (CAMERA SET) menu of the SCC-643(P) and return to the MAIN CAMERA ID CAMERA ID MENU. V-SYNC V-SYNC...
  • Page 19: Alc

    In the SHUTTER menu, the high-speed Electric shutter and AUTO low speed If the AREA menu is set to USER and [ENTER] is pressed, the user can shutter of the SCC-643(P) and the FIX low speed shutter can be set. select the applied area of the backlight compensation function.
  • Page 20: Agc

    SLOW If your press the left/right keys continuously, the speed will appear in the This enhances the resolution of a still image by selecting a low value for AGC GAIN and a slow speed for SHUTTER SPEED. following order. (This is used mainly to monitor inanimate objects in dark places.) Order 1/100(1/120) 1/250...
  • Page 21: White Bal

    WHITE BAL WHITE BAL Lights are generally denoted as color temperatures and expressed in The WHITE BAL menu insures that white is calibrated normally under any Kelvin (°K) units. color temperature condition. The general light color temperatures are shown below. When the WHITE BAL menu is set to the ATW mode, the white balance is automatically specified according to the color temperature.
  • Page 22: Special

    - ONEAF : The ONEAF Mode performs Auto-focusing only when the SCC-643(P) - MIRROR: Reverse the video output signal horizontally. stops after moving and when the SCC-643(P) is not moving it is same - H-DTL: Adjust Horizontal Detail Level. as MF mode.
  • Page 23: Preset

    3. PRESET POSITION SET... PRESET NO.0 From "POSITION SET..." press [ENTER] to get SET PAN/TILT into the PAN/TILT, FOCUS/ZOOM SET screen This is the menu that user sets the PAN/TILT location, Zoom/Focus, and SET ZOOM/FOCUS to set the PAN/TILT location and FOCUS/ZOOM screen condition, so the camera can monitor the presetting area on condition then press [ENTER] to return to a demand.
  • Page 24: Auto Mode

    4. AUTO MODE DIRECTION This sets up the movement direction of the START to END location (PAN location standard) AUTO PAN and PATTERN functions are in AUTO MODE. "RIGHT " : "LEFT " : AUTO PAN After selecting the locations of two points (PAN/TILT) of START and END, it loops continuously in the set up SPEED.
  • Page 25: Alarm Set

    PATTERN can be set upto 3. Choose 1, 2, or 3 with the left or right key in the ALARM OUT ALARM OUT "PATTERN SET" and press [ENTER] to get into the PATTERN set up screen. Each ALARM input corresponds to one of the ALARM1 From the moment "PATTERN 1 SET"...
  • Page 26: Other Set

    6. OTHER SET PRIVACY ZONE Pan/Tilt position and the size of Masking area can be set for up to 8 HOME RETURN privacy zones. When shooting the areas where privacy zones are set, the When there is no KEY input or other movement for a certain time, the relevant areas will be concealed from view to protect privacy.
  • Page 27: Product Specifications

    Product specifications PRIVACY ZONE SET 1 PRIVACY ZONE SET 1 SET PAN/TILT ... SET PAN/TILT ... SCC-643 SET AREA SET AREA [Enter] KEY Entering the Items Contents [Down] KEY AREA Setup Product Type Zoom lens single body COMBI DOME CAMERA...
  • Page 28 Zoom lens single body COMBI DOME CAMERA Product Type - AC 24 ± 10% (50Hz ± 0.3Hz) Power Input • The copyright of the manual belongs to Samsung Electronics Co., - 18W Power Consumption Ltd. - PAL STANDARD COLOR SYSTEM...
  • Page 29 Combi Dome Camera SCC-643(P) Benutzerhandbuch...
  • Page 30: Sicherheitshinweise

    Verkaufsstelle, in der Sie das Gerät erworben haben, oder an das nächste Kundendienstzentrum. Das Gerät darf niemals und in keiner Weise selbst zerlegt oder modifiziert werden. (SAMSUNG übernimmt keine Haftung für Probleme, die durch unbefugte Abänderungen oder einen Reparaturversuch herbeigeführt sind.)
  • Page 31 Kapitelzusammenfassungen. werden. Wenn das Gerät störende Interferenzen beim Radio- oder Fernsehempfang "Kapitel 1 : Überblick über die SCC-643(P) ” enthält eine kurze verursacht, was durch ein oder Ausschalten des Geräts überprüft werden kann, Einführung in die Speed-Dome Kamera SCC-643(P), ihre sollte einer oder mehrere der folgenden Ratschläge befolgt werden:...
  • Page 32 Inhaltsverzeichnis Vor Inbetriebnahme------------------------------------------------------------------------------1-1 - AGC ----------------------------------------------------------------------------3-10 Kapitel 1 Überblick über die SCC-643(P) ----------------------------------------------1-5 - S.LANG------------------------------------------------------------------------3-10 Einführung in die SCC-643(P) --------------------------------------------------1-6 - LANG---------------------------------------------------------------------------3-11 Steuerungselemente der SCC-643(P) ---------------------------------------1-7 - NORM--------------------------------------------------------------------------3-11 Steuerungselemente Vorderseite ----------------------------------------------1-7 - SCHN --------------------------------------------------------------------------3-11 Steuerungselemente Rückseit--------------------------------------------------1-8 - S.SCHN -----------------------------------------------------------------------3-11 ADAPTERANSCHLUSS ---------------------------------------------------------1-9...
  • Page 33: Kapitel 1 Überblick Über Die Scc-643(P)

    Kapitel 1 : Überblick über die SCC-643(P) Die Speed-Dome Kamera SCC-643(P) ist eine hochwertige Überwachungskamera mit integriertem ZOOM-Objektiv. Sie kann In diesem Kapitel werden die Funktionen der SCC-643(P) kurz mit CCTV in Banken oder Firmengebäuden eingesetzt werden, um höchste Sicherheit zu gewährleisten.
  • Page 34 Steuerungselemente Vorderseite Rückseite...
  • Page 35: Adapteranschluss

    KAMERAADRESSE EINSTELLUNG Dip Switch setting (Dip-Schalter-Einstellung) ist gleich wie das folgende Beispiel: EX) KAMERA ADDR: Wenn ihre Ziffer 1 ist, stellen Sie so ein. SCC-643(P) Anschlussfeld SW500 Einstellung des Kommunikationsprotokolls. Benutzen Sie die Ziffern 5 bis 8 PINs von SW501, um das Kommunikationsprotokoll einzustellen.
  • Page 36: Einstellung Der Rs-422A/Rs-485 Abschlüss

    Einstellung der RS-422A/RS-485 Abschlüsse Schaltereinstellung Empfänger-adresse SW500-1 SW500-2 SW500-3 SW500-4 SW500-5 SW500-6 SW500-7 SW500-8 SW 501 Wenn der Controller und RS-422A/RS-485 Buchsen verbunden sind, sollte, wie in der Übersicht dargestellt, der Abschluss entsprechend der Impedanz (des Scheinwiderstandes) des jeweiligen Übertragungsweges eingestellt werden, um Signale bei großen Entfernungen durch Kontrolle der Reflektionen auf der Leitung auszugleichen.
  • Page 37 Empfänger-adresse SW500-1 SW500-2 SW500-3 SW500-4 SW500-5 SW500-6 SW500-7 SW500-8 Empfänger-adresse SW500-1 SW500-2 SW500-3 SW500-4 SW500-5 SW500-6 SW500-7 SW500-8 1-13 1-14...
  • Page 38 Empfänger-adresse SW500-1 SW500-2 SW500-3 SW500-4 SW500-5 SW500-6 SW500-7 SW500-8 Empfänger-adresse SW500-1 SW500-2 SW500-3 SW500-4 SW500-5 SW500-6 SW500-7 sw500-8 1-15 1-16...
  • Page 39: Kapitel 2 Installation Der Scc-643(P)

    Kapitel 2 : Installation der SCC-643(P) Überprüfen Sie bitte, ob alle unten aufgelisteten Teile in der Packung enthalten sind In diesem Kapitel wird zunächst der Lieferumfang der SCC-643(P) überprüft und ein zur Stromversorgung geeigneter Netzadapter vorbereitet. (Leistungsaufnahme: 18 W; Spannung: 24 V Wechselstrom, 1,5 A).
  • Page 40: Vorbereitung Der Kabel

    Vorbereitung der Kabel Kabelanschlüsse 1. Verbinden Sie ein Ende des Um die Speed-Dome Kamera SCC-643(P) zu installieren und in Betrieb BNC-Video-Kabels mit dem zu nehmen, werden folgende Kabel benötigt: Videoausgang (VIDEO OUT). Netzanschlusskabel 2. Verbinden Sie dann das andere Ende mit dem Videoeingang des Das Kabel, das an den Netzeingang der SCC-643(P) angeschlossen wird, Monitors.
  • Page 41: Installation Der Scc-643(P)

    Dieses Gehäuse eignet sich zur Installation der Combi-Dome-Kamera 1) Vergewissern Sie sich, dass die Installationsstelle mindestens das an einer Wand in einem Innenraum. vierfache Eigengewicht der SCC-643(P) Combi-Dome-Kamera einschließlich Zubehör tragen kann. 2) Installieren Sie das Gerät an einer Stelle, an der der Abstand zwischen Deckenplatte und Decke mindestens 18 cm beträgt.
  • Page 42: Installation Der Kamera

    Installation der Kamera 1. [Bild 1] Befestigen Sie den Aufbau an der Decke. 5) DECKENHALTERUNG (SADT-100CM) (Beachten Sie bei der Installation die Höhe des Aufbaus.) Diese Halterung wird bei der Installation des Combi-Dome- * Eingebaut vom Hersteller. Kameragehäuses für innen oder außen an einer Betondecke verwendet.
  • Page 43: Kapitel 3 Überblick Über Das Setup-Men

    (PH M4X8) fest. Kapitel 3: Überblick über das Setup-Menü Dieses Kapitel gibt einen Überblick über das Setup-Menü der Speed-Dome Kamera SCC-643(P). Zuerst wird die allgemeine Struktur des Setup-Menüs erläutert und dann die Funktionen der einzelnen Menüs. 6. [Bild 6] Stecken Sie passend auf [Bild 6] die 3 Löcher an der Rückseite der...
  • Page 44: Aufbau Des Setup Menüs

    PRIVAT ZONE KAM RESET SPRACHE DEUTSCH AUSGANG VERL/SICHERN Das oben gezeichnete Diagramm zeigt die allgemeine Struktur des Setup-Menüs. Im nächsten Abschnitt werden die Merkmale des Setup-Menüs erläutert, die Nutzern eine Anpassung der Speed-Dome Kamera SCC-643(P) an die persönlichen Bedürfnisse ermöglichen.
  • Page 45: Kamera Prog Menü

    Das KAMERA ID-Menü legt eine Bezeichnung für die Speed-Dome ausschalten. Bei schlechten Lichtverhältnissen wird der KAMERA ID SYNC IR-Filter deaktiviert und die Kamera in den Kamera SCC-643(P) fest, die auf dem Monitor angezeigt wird. Stellen Sie FARBE S/W AUTO... Schwarzweißmodus umgeschaltet, wodurch ihre ZOOM GESCH auf dem KAMERA PROG- Menü-bildschirm KAMERA ID auf EIN und...
  • Page 46: Zoom Gesch

    Eindringlings registriert werden. Wenn die Bewegung registriert wird, wird von der Steuerung ein Alarmsignal abgegeben. Das AUSGANG-Menü wird zum Beenden des KAMERA SET-Menüs der Speed-Dome Kamera (KAMERA PROG) SCC-643(P) und zum Zurückkehren in das Haupt- (AKTIVITAET) (KAMERA PROG) KAMERA ID Menü verwendet.
  • Page 47: Alc

    Objekte und lässt sie dunkel erscheinen. Bei der Speed-Dome Kamera BEWEGUNG NORM WEISSABGL SCC-643(P) kann das Problem des Gegenlichts gelöst und ein klares Bild SPEZIAL AUTO FOKUS UNAF erzeugt werden, wenn man GLK, ein Untermenü des ALC/MANU-Menüs, PEGEL ( 00)
  • Page 48: Agc

    LANG Wenn Sie die rechts/links-Tasten kontinuierlich drücken, erscheint die Mit dieser Option kann die Auflösung eines Standbildes durch die Auswahl eines niedrigen Wertes für die Automatische Geschwindigkeit in der folgenden Reihenfolge. Verstärkungsregelung (AGC) und einer langen Verschlusszeit (SHUTTER GESCH) verbessert werden. 1/100(1/120) 1/250 1/500...
  • Page 49: Weissabgl

    WEISSABGL WEISSABGL Licht wird allgemein in Farbtemperaturen angegeben und in Kelvin- Das WEISSABGL-Menü stellt sicher, dass weißes Licht unter beliebigen Einheiten gemessen.(°k). Farbtemperaturbedingungen auf normal abgeglichen wird. Die allgemeine Farbtemperatur von verschiedenen Lichtverhältnissen ist Wenn das WEISSABGL-Menü auf ATW Modus eingestellt ist, wird der unten angegeben.
  • Page 50: Spezial

    - EINAF : Der EINAF-Modus führt den Autofokus nur durch, wenn die - SPIEGEL: Kehrt das Videoausgangssignal horizontal um. SCC-643(P) nach einer Bewegung anhält. Findet keine - H-DTL: Anpassen des horizontalen Detaillierungsgrades Kamerabewegung statt, ist er mit dem MF-Modus identisch.
  • Page 51: Preset

    3. PRESET POSITION PROG PRESET NR.0 Drücken Sie ausgehend von “POSITION PROG ...” S/N PROG die [Enter]-Taste, um in das Menü zur Einstellung Über dieses Menü können S/N-Position, Zoom/Fokus und ZOOM FOKUS PROG von S/N und ZOOM/FOKUS zu gelangen. Bildschirmzustand eingestellt werden, so dass sich mit der Kamera ein Drücken Sie [Enter], um in das nächsthöhere Menü...
  • Page 52: Auto Mode

    4. AUTO MODE RICHTUNG Diese Option bestimmt die Bewegungsrichtung vom START- zum ENDE-Punkt (PAN-Standardposition). Der AUTO-Modus enthält die Funktionen AUTO PAN und PATTERN. "rechts " : "links" : AUTO PAN Nach Auswahl zweier Positionen (S/N) für Start und Ziel wird ein kontinuierlicher Schwenk in der angegebenen Geschwindigkeit gefahren.
  • Page 53: Alarm Prog

    PATTERN kann auf 1 bis 3 gesetzt werden. Wählen Sie 1, 2 oder 3 mit der ALARM AUS PROG ALARM AUS rechten oder linken Taste im PATTERN PROG aus und drücken Sie [ENTER], um Jeder Alarminput entspricht einem der 3 ALARM1 in das Einstellungsmenü...
  • Page 54: Weitere Prog

    6. WEITERE PROG PRIVAT ZONE S/N-Position und Größe des Maskierungsbereichs können für max. 8 HOME ZURÜCK sichere Zonen festgelegt werden. Auf diese Weise lassen sich bestimmte Wenn keine Eingabe oder keine Veränderungen für eine gewisse Zeit Bereiche bei der Bildaufnahme zum Schutz der Privatsphäre abdecken. erfolgen, kehrt die Kamera automatisch in ihre Ausgangsposition zurück.
  • Page 55: Technische Daten

    Technische Daten PRIVAT ZONE 1 PRIVAT ZONE 1 S/N PROG S/N PROG BEREICH PROG BEREICH PROG SCC-643 [ENTER]-Taste BEREICH- [Abwärts]-Taste Artikel Spezifikation Einstellmodus aufrufen - Ein Körper-Kombi-Kuppelkamera mit Zoomobjektiv Produkttyp PEGEL PROG PEGEL PROG AUSGANG VERL AUSGANG VERL - AC 24± 10% (60Hz± 0.3Hz)
  • Page 56 Co., Ltd. Spannungsversorgung - AC 24± 10% (50Hz± 0.3Hz) - 18W Leistungsaufnahme • Ohne vorherige Genehmigung von Samsung Electronics darf es weder - PAL Standard Farbsystem Signalsystem elektronisch, mechanisch, hörbar noch durch eine andere Methode Bildwandler - 1/4 inch IT CCD vervielfältigt werden.
  • Page 57 Combi Dome Camera SCC-643(P) Manuel d’instruction...
  • Page 58: Précautions De Sécurité

    à la propriété. revendeur ou le centre d’entretien de votre localité. Ne démontez ni ne modifiez jamais ce produit. (SAMSUNG ne saurait être tenue pour responsable des problèmes techniques découlant d’une modification ou d’une tentative de réparation non autorisées.)
  • Page 59: Avant L'utilisation

    Menu d’installation de SCC-643(P). digital,conformément à partie 15 des règles FCC. Ces limites sont conçues pour fournir la Le Menu d’installation de SCC-643(P) est exprimé en détail dans le protection résonnable contre l’interface nuisible dans une installation résidentielle.Cet équipement produit,utilise et peut mettre l’énergie de fréquence radio et si non installé...
  • Page 60 Préparation des câbles ---------------------------------------------------------2-3 - PAN AUTO -------------------------------------------------------------------3-18 Connexion de câble --------------------------------------------------------------2-4 - RONDE ------------------------------------------------------------------------3-19 Installation de la camera SCC-643(P) -------------------------------------2-5 5. PROG ALARME---------------------------------------------------------------3-20 Installation de la Camera -------------------------------------------------------2-8 6. AUTRE PROG -----------------------------------------------------------------3-22 Chapitre3 Vue d’ensemble de menu d’installation -----------------------------------3-1 Contenu de menu d’installation ----------------------------------------------3-2...
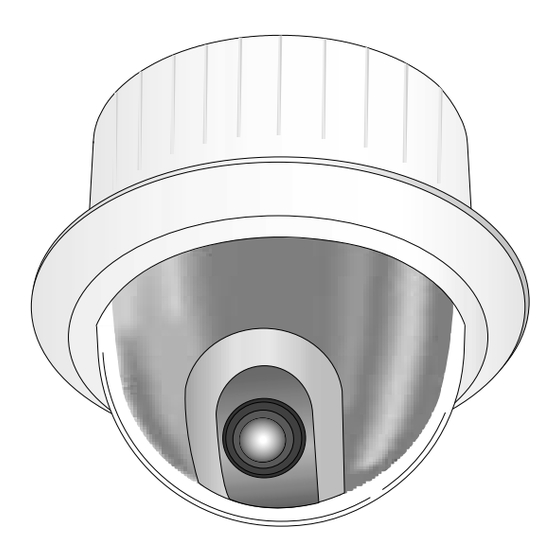
  • Page 61: Chapitre 1 Scc-643(P) Vue D'ensemble

    SCC-643(P) Introduction Chapitre 1 SCC-643(P) vue d’ensemble Le SCC-643(P) est le produit que la meilleure exécution de lentille de zoom a interrâpé la camera de surveillance. Dans ce chapitre nous introduisons brièvement SCC-643(P) et montrerons fonctions principales, contrôle de Location et Le SCC-643(P) est la camera de surveillance de haute qualité...
  • Page 62: Connexion D'adaptateur

    Connexion d’adaptateur Avant Arrière BOÎTIER Couverture de dôme Lentille de zoom...
  • Page 63: Connexion D'adaptateur

    Installation d’adresse de camera Dip Switch setting est même comme l’exemple suivant. EX) CAMERA ADDR : quand il est le nombre 1, mettez comme suit. SCC-643(P) Adapter BOARD SW500 Arrangement de protocole de communication. Utilisez les nombres 5-8 PIN de SW501 pour mettre Protocole de communication.
  • Page 64: Arrangement De Rs-422A/Rs-485 D'une Terminaison

    Arrangement de RS-422A/RS-485 d’une terminaison Arrangement de commutateur Adresse de récepteur SW500-1 SW500-2 SW500-3 SW500-4 SW500-5 SW500-6 SW500-7 SW500-8 SW 501 Comme on le montre dans la carte de structure,quand le contrôleur est joint, il doit être terminé selon la particularité de câble d’impédence sur chaque fin de la ligne de transmission pour transférer les signaux dans la longue distance en contrôlant la réflexion des signaux au plus bas.
  • Page 65 Adresse de récepteur SW500-1 SW500-2 SW500-3 SW500-4 SW500-5 SW500-6 SW500-7 SW500-8 Adresse de récepteur SW500-1 SW500-2 SW500-3 SW500-4 SW500-5 SW500-6 SW500-7 SW500-8 1-13 1-14...
  • Page 66 Adresse de récepteur SW500-1 SW500-2 SW500-3 SW500-4 SW500-5 SW500-6 SW500-7 SW500-8 Adresse de récepteur SW500-1 SW500-2 SW500-3 SW500-4 SW500-5 SW500-6 SW500-7 sw500-8 1-15 1-16...
  • Page 67: Chapitre 2 Scc-643(P) Installation

    Dans le présent chapitre, nous allons vérifier le contenu de l’emballage avant l’installation de la SCC-643(P) et préparer un adaptateur d’alimentation convenable à la source de courant. (Consommation: 18Watts; tension: 24VAC, 1,5A) Ensuite, nous allons installer la SCC-643(P) et procéder à au branchement des câbles. SCC-643(P) Ancre de parenthèse Manueld’instruction...
  • Page 68: Préparation Des Câbles

    électrique au terminal d’entrée électrique. Câble vidéo Le câble de SCC-643(P) est le câble BNC pour connceter le terminal de 4. Ajustez le commutateur ci-dessous à la tension appropriée. production vidéo au terminal d’entrée vidéo du moniteur. Ainsi connectez la prise de l’adaptateur électrique au connecteur électrique.
  • Page 69: Installation De La Camera Scc-643(P)

    Sert à installer la camera combi-dôme au plafond ou sur un mur à l’intérieur 1) Assurez-vous que la zone d’installation puisse supporter au moins quatre du bâtiment. fois le poids net de la camera combi-dôme SCC-643(P) et de ses accessoires. 2) Installez la camera dans une zone où l’espace au-dessus du panneau de plafond mesure au moins 18 cm (7 po).
  • Page 70: Installation De La Camera

    Installation de la Camera 1. [Figure 1] Installez la structure sur le plafond. (Référez-vous à la référence d’installation 5) SUPPORT DE FIXATION AU PLAFOND (SADT-100CM) pour la longueur de la structure.) S’utilise pour installer le boîtier de la camera combi-dôme à un plafond en * Encastré...
  • Page 71: Chapitre3 Vue D'ensemble De Menu D'installation

    Chapitre3 Vue d’ensemble de menu d’installation DISQUE DE FIXATION POUR LA CAMÉRA Dans ce chapitre,nous parcourirons le menu d’installation de SCC-643(P). D’abord nous regarderons la structure complète du menu d’installation et les fonctions de chaque menu. 6. [Figure 6] Correspondez les 3 trous [Figure 6] sur le dos de la camera et le connecteur et tournez-la à...
  • Page 72: Contenu De Menu D'installation

    ZONE PRIVEE RAZ CAM LANGAGE FRANÇAIS SORTIE QUITTER/SAUVER La diagramme montrée ci-dessus illustre la structure complète du menu d’installation. Dans cette section, une description des particularités de menu d’installation permet aux utlisateurs de SCC-643(P) de façonner à leurs besoins personnels.
  • Page 73: Prog Camera

    CAMERA ID conditions de lumière faible, le filtre IR se désactive et la SYNC LIGNE Le menu de CAMERA ID assigne l’ID au SCC-643(P) pour être montré sur le camera passe au mode N&B pour augmenter la sensibilité à COULEUR/N&B AUTO...
  • Page 74: Vite Zoom

    Quand le mouvement est détecté, il fait ressortir le signal d’Alarme du contrôleur. Le menu SORTIE est employé pour quitter le (PROG CAMERA) menu de jeu de camera de SCC-643(P) et (DET MOUVE) (PROG CAMERA) CAMERA ID retourner au MENU PRINCIPAL.
  • Page 75: Alc

    Compensation de Rétro-Éclairage est appliquée aux défauts initiaux d’usine du Dans le menu SHUTTER, l’obturateur électrique ultra-rapide et l’obturateur de SCC-643(P). Si le menu ZONE est mis à USER et [ENTER] est appuyé, vitesse basse Automatique de SCC-643(P) et l’obturateur de vitesse bas FIXE l’utilisateur peut choisir le secteur appliqué...
  • Page 76: Cag

    Cette option rehausse la résolution des images fixes. La camera choisit Si vous pressez les clefs GAUCHE/DROIT continuellement, la vitesse une valeur faible quant au contrôle automatique du GAIN (CAG) et une apparîtra dans l’oredre suivant. vitesse lente quant à la vitesse d’obturation (VITESSE de SHUTTER). (L’option LEN s’utilise principalement pour filmer des objets inanimés L’ordre dans des endroits sombres).
  • Page 77: Bal Blancs

    BAL BLANCS BAL BLANCS Le menu de BAL BLANCS assure que ce blanc est calibré normalement Les feux sont généralement dénotés comme des températures colorées dans n’importe Quelle condition colorée de température. et exprimés dans les unités de Kelvin(°K). Quand le menu de BAL BLANCS est mis au mode BA, l’équilibre blanc On montre la température colorée de lumière générale ci-dessous.
  • Page 78: Special

    - UNAF : Le mode UNAF n’effectue la mise au point automatique (AUTO FOCUS) - MIROIR : Cette fonction permet d’inverser horizontalement le signal que lorsque la SCC-643(P) s’arrête à la suite d’un déplacement. Lorsque la SCC-643(P) demeure immobile, le fonctionnement de ce vidéo de sortie.
  • Page 79: Preset

    3. PRESET PROG POSITION PRESET NO.0 De “PROG POSITION…” pressez [ENTER] pour PR PAN/TILT entrer dans PAN/TILT, FOCUS/ZOOM SET écran Il s’agit du menu où l’utilisateur peut déterminer les positions PAN/TILT PR ZOOM/FOCUS pour mettre l’emplacement PAN/TILT et la condition (panoramique/inclinaison), le ratio zoom-mise au point et les conditions d’écran FOCUS/ZOOM, alors pressez [ENTER] pour pour que la camera puisse surveiller sur demande une des zones que vous...
  • Page 80: Mode Auto

    4. MODE AUTO DIRECTION Cette commande permet de définir l’orientation du mouvement depuis la position DEM jusqu’à la position STOP (position PAN standard). Les fonctions PAN AUTO et RONDE sont dans le MODE AUTO. “Droite”: “Gauche”: PAN AUTO Après sélection de deux points (PAN/TILT) de DEM et STOP, il boucle continuellement dans le jeu d’installation VITESSE.
  • Page 81: Prog Alarme

    RONDE peut être mis à 3. Coisissez 1, 2 ou 3 avec la clef droite/gauche dans le PR SORT ALARME SORT ALARME “PROG RONDE” et pressez [ENTER] pour entrer dans l’écran d’installation de Chaque entrée d’ALARME correpond à un de ALARME1 RONDE.
  • Page 82: Autre Prog

    6. AUTRE PROG ZONE PRIVEE La position Pan/Tilt (panoramique et inclinaison) et la taille du masque RET ORIGINE peuvent être définies pour un maximum de huit zones. Grâce à la fonction Lorsqu’aucune touche n’est actionnée ou qu’aucun mouvement n’est Protection de la vie privée, certaines zones peuvent être cachées à la vue enregistré...
  • Page 83: Spécification Du Produit

    Spécification du produit ZONE PRIVEE 1 ZONE PRIVEE 1 PR PAN/TILT PR PAN/TILT PR ZONE PR ZONE SCC-643 Touche [Enter] Touche Accès au mode Articles Contenus ZONE [Down] (bas) Type de produit Lentille de Zoom à corps simple PR NIVEAU PR NIVEAU - AC 24±...
  • Page 84 Mises en garde Lentille de Zoom à corps simple Type de produit - AC 24± 10% (50Hz± 0.3Hz) Entrée électrique Samsung Electronics Co., Ltd. est le propriétaire des droits d’auteur de • - 18W Consommation électrique ce guide d’utilisation. - Système coloré standard PAL Type de radiodiffusion Il est strictement interdit de copier ce guide sous forme électronique,...
  • Page 85 Combi Dome Camera SCC-643(P) Manual del usuario...
  • Page 86: Medidas De Seguridad

    Nunca desarme ni modifique este producto de ninguna manera. (SAMSUNG no es responsable por los problemas causados por Los avisos de advertencia le Los avisos de precaución le alertan modificaciones no autorizadas o por intentos de reparación.)
  • Page 87: Antes De Instalar El Equipo

    El apartado más usado del SCC-643(P) será el menú de ajustes. El menú de ajustes está explicado con detalle en el Capítulo 3 Nota: Este equipo ha sido probado y cumple los límites de un dispositivo digital Clase B Menú...
  • Page 88 INDICE Antes de Instalar el equipo------------------------------------------------------------------1-1 - CAG ----------------------------------------------------------------------------3-10 - M.DULC -----------------------------------------------------------------------3-10 Capítulo 1 Características del SCC-643(P) ----------------------------------------------1-5 - DULC---------------------------------------------------------------------------3-11 Introducción del SCC-643(P) -------------------------------------------------1-6 - NORM--------------------------------------------------------------------------3-11 SCC-643(P) Localización de controles -------------------------------------1-7 - RÁPI----------------------------------------------------------------------------3-11 SCC-643(P) Frontal---------------------------------------------------------------1-7 - M.RÁPI ------------------------------------------------------------------------3-11 SCC-643(P) Localización de controles - Posterior----------------------1-8...
  • Page 89: Capítulo 1 Características Del Scc-643(P)

    Introducción del SCC-643(P) Capítulo 1 Características del SCC-643(P) El domo SCC-643(P) es una cámara de vigilancia con zoom incorporado. Proporciona altos niveles de seguridad de CCTV En este capítulo se introduce brevemente el SCC-643(P) y sus para banca o todo tipo de compañías.
  • Page 90: Localización De Controles

    Localización de controles Frontal Localización de controles - Posterior CUBIERTA Cubierta externa Lente Zoom...
  • Page 91: Conexiones Del Adaptador

    Ej.: DIRECCION DE LA CAMARA: Para la cámara 1, ajuste como sigue. PLACA de adaptador SCC-643(P) SW500 El SCC-643(P) trae por defecto la dirección 0 que es la primera dirección válida. Ajuste del protocolo de comunicaciones Usar para ello los PIN 5 a 8 del selector SW501.
  • Page 92: Configuración Conmutadores

    Ajuste de la terminación RS-422/RS-485 Configuración Conmutadores Dirección de receptor SW500-1 SW500-2 SW500-3 SW500-4 SW500-5 SW500-6 SW500-7 SW500-8 SW 501 Como se muestra en el mapa de estructuras, la conexión entre el Controlador y el RS-422A/RS-485 se debe terminar según la característica de impedancia del cable en cada extremo de la línea transmisora con el fin de transferir las señales de larga distancia manteniendo la reflexión de las señales en mínimo.
  • Page 93 Dirección de receptor SW500-1 SW500-2 SW500-3 SW500-4 SW500-5 SW500-6 SW500-7 SW500-8 Dirección de receptor SW500-1 SW500-2 SW500-3 SW500-4 SW500-5 SW500-6 SW500-7 SW500-8 1-13 1-14...
  • Page 94 Dirección de receptor SW500-1 SW500-2 SW500-3 SW500-4 SW500-5 SW500-6 SW500-7 SW500-8 Dirección de receptor SW500-1 SW500-2 SW500-3 SW500-4 SW500-5 SW500-6 SW500-7 sw500-8 1-15 1-16...
  • Page 95: Capítulo 2 Instalación Del Scc-643(P)

    Por favor compruebe que todos los componentes indicados más abajo han llegado en la caja del equipo: En este capítulo, revisaremos el contenido del paquete antes de instalar la cámara SCC-643(P), y prepararemos la conexión de un adaptador de corriente que corresponda a la fuente de alimentación del sistema.
  • Page 96: Preparación Del Cable

    SCC-643(P). Cable coaxial El cable de vídeo para el SCC-643(P) debe ser un coaxial RG59 (hasta 300m) o RG11 (hasta 600m) con conectores BNC en ambos extremos 4. Ajuste el interruptor bajo el Adaptador eléctrico al voltaje adecuado.
  • Page 97: Instalación De La Cámara Scc-643(P)

    Cámara combinada tipo domo SCC-643(P) y otros accesorios. 2) Realice la instalación en un sitio en donde el espacio por encima del panel del techo sea de 18 cm.
  • Page 98: Instalación De La Cámara

    Instalación de la cámara 1. [Figura 1] Instalación del equipo empotrado 5) ADAPTADOR DE MONTAJE EN TECHO (SADT-100CM) (Consulte la guía de Instalación Este adaptador sirve para instalar en una techo de concreto la cubierta acerca de la longitud de la estructura) para interiores o la cubierta para exteriores de la Cámara combinada * Empotrar en el cuerpo de la tipo domo.
  • Page 99: Capítulo 3 Menú De Ajustes

    Capítulo 3 Menú de ajustes Adaptador de cámara En este capítulo se recorrerá el menú de ajustes del SCC-643(P). Primero se verá la estructura del menú de ajustes y luego se explicarán cada uno de los menús. 6. [Figura 6] Inserte los tres espárragos...
  • Page 100: Estructura Del Menú De Ajustes

    SALIR/GUARDAR El diagrama anterior ilustra la estructura general del Menú de configuración. En esta sección, se presenta una descripción de las características del menú de configuración que permitirá a los usuarios de la cámara SCC-643(P) adecuarla a sus necesidades personales.
  • Page 101: Prog Cámara

    En condiciones de poca iluminación, el Filtro IR se SYNC COLOR/ByN AUTO... El menú CÁMARA ID asigna una identificación al SCC-643(P) que se desactiva poniéndose en modo ByN y aumenta la VEL ZOOM sensibilidad a la poca iluminación al nivel de una cámara DET MOVI visualizará...
  • Page 102: Vel Zoom

    Movimiento, se detectará el movimiento de un Se usa para salir del menú PROG CÁMARA del intruso. Cuando el movimiento es detectado, se activa una señal de alarma. (PROG CÁMARA) SCC-643(P) y volver al menú MAIN MENU. CÁMARA ID (DET MOVI ) (PROG CÁMARA) -SALIR : Ignora el cambio de información y...
  • Page 103: Alc

    Con cámaras convencionales, una fuerte iluminación de fondo interfiere [Entrar] MOVIMIENTO NORM BAL BLANCO con la claridad de los objetos, haciéndolos aparecer oscuros. ESPECIAL En SCC-643(P), si se fija BLC (compensación de luz de fondo), submenú AUTO FOCUS UNOAF NIVEL (00) ---- ---- D-ZOOM del menú...
  • Page 104: Cag

    DULC Esto mejora la resolución de una imagen fija seleccionando un valor bajo Si el objeto estuviera en movimiento se vería borroso. para el control CAG GAIN y una velocidad lenta de obturación Si pulsa las teclas izquierda/derecha continuamente, la velocidad aparecerá (OBTURADOR VELOCIDAD).
  • Page 105: Bal Blanco

    BAL BLANCO BAL BLANCO La luz se mide en temperaturas del color y se expresan generalmente en El menú BAL BLANCO asegura que el blanco está calibrado normalmente bajo unidades de Kelvin (°k). cualquier condición de temperatura del color. Las temperaturas generales del color de la luz se muestran abajo. Cuando el menú...
  • Page 106: Especial

    - UNOAF: El modo UNOAF realiza un enfoque automático (modo AUTO FOCO) - DTL H : Ajusta el nivel del detalle horizontal. sólo cuando la cámara SCC-643(P) se está moviendo y se detiene. Si - DTL V : Ajusta el nivel del detalle vertical.
  • Page 107: Preset

    Se puede fijar Tiempo de 1 ~ 60 Sec. SALIDA Se usa para salir del menú CAMERA SET del SCC-643(P) y volver al menú MAIN MENU. “SALIR” : para salir de programación sin guardar los datos modificados.
  • Page 108: Auto Modo

    4. AUTO MODO DIRECCION Este ajuste establece la dirección del movimiento de EMPEZAR a STOP Incluye as funciones de AUTO PAN y RONDA. (ubicación estándar de paneo) "a la derecha ": "a la lzquierda " : AUTO PAN Después de programar el comienzo y fin de los dos parámetros (PAN/TILT), rota continuamente entre estas dos posiciones a la VELOCIDAD configurada.
  • Page 109: Alarma Prog

    Se pueden fijar 3 RONDA o recorridos. Elegir 1, 2 o 3 con las flechas izquierda PROG SAL ALARMA SALIDA ALARMA /derecha. y presiona [ENTRAR] para entrar en el menú de configuración del Asigna las entradas de alarma a las 3 salidas ALARMA1 recorrido.
  • Page 110: Altra Prog

    6. ALTRA PROG ZONA PRIVADA Las posiciones PAN/TILT y el tamaño del área de Ocultamiento se VUELTA ORIG pueden establecer en 8 tipos de zonas privadas. Cuando se capte alguna de las áreas establecidas como zonas privadas, las áreas pertinentes no Cuando pasa un cierto tiempo sin realizar ninguna orden de movimiento podrán verse con el fin de proteger la privacidad.
  • Page 111: Especificaciones De Producto

    Especificaciones de producto ZONA PRIVADA 1 ZONA PRIVADA 1 PROG PAN/TILT ... PROG PAN/TILT ... SCC-643 PROG ZONA PROG ZONA Tecla [Entrar] Para entrar en el ITEM CONTENIDOS Tecla [Abajo] modo de Tipo de producto DOME combinando cámara y zoom configuración de...
  • Page 112 SCC-643P Atención ITEM CONTENIDOS DOME combinando cámara y zoom Tipo de producto El copyright del manual es propiedad de Samsung Electronics Co., Ltd. • - 24 VAC± 10% (50Hz± 0.3Hz) Alimentación - 18W Consumo El manual no se podrá reproducir de forma electrónica, mecánica, •...
  • Page 113 Combi Dome Camera SCC-643(P) Istruzioni per l’uso...
  • Page 114: Norme Di Sicurezza

    è acquistato l’apparecchio oppure al centro di assistenza più vicino. Non smontare né modificare il prodotto in alcun modo. (SAMSUNG non è responsabile di problemi causati da alterazioni non autorizzate o da tentativi di riparare l’apparecchio.)
  • Page 115: Prima Dell'uso

    Set-up. Si consiglia a tutti gli utenti del modello SCC-643(P), sia quelli esperti che hanno già utilizzato simili telecamere in precedenza, sia quelli meno esperti, di leggere il manuale prima dell’uso.
  • Page 116 Indice Prima dell’uso -------------------------------------------------------------------------------------1-1 - AGC ----------------------------------------------------------------------------3-10 Capitolo 1 Descrizione di SCC-643(P) ----------------------------------------------------1-5 - M.LENTO ---------------------------------------------------------------------3-10 Introduzione al modello SCC-643(P) -----------------------------------------1-6 - LENTO-------------------------------------------------------------------------3-11 Collocazione dei comandi SCC-643(P) --------------------------------------1-7 - NORM--------------------------------------------------------------------------3-11 FRONTE SCC-643(P) ------------------------------------------------------------1-7 - VELOC-------------------------------------------------------------------------3-11 RETRO SCC-643(P) -------------------------------------------------------------1-8 - M.VELOC ---------------------------------------------------------------------3-11...
  • Page 117: Capitolo 1 Descrizione Di Scc-643(P)

    Il modello SCC-643(P) dispone di una funzione di Allarme per le situazioni di allerta; per spostare la telecamera nella direzione desiderata, è possibile controllare le funzioni ZOOM-IN e...
  • Page 118: Collocazione Dei Comandi Scc-643(P)

    Collocazione dei comandi FRONTE RETRO...
  • Page 119: Relay Esterno

    L’impostazione del commutatore DIP-switch corrisponde all’esempio sottostante. Es. Indirizzo telecamera (CAMERA ADDR): se è su 1, regolare le impostazioni come nel Tabla de adaptador de la SCC-643(P) riquadro. SW500 Impostazioni del Protocollo di comunicazione. Utilizzare il numero PIN 5~8 del modulo SW 501 per impostare il Protocollo di comunicazione.
  • Page 120: Impostazioni Di Terminazione Rs-422A/Rs-485

    Impostazioni di terminazione RS-422A/RS-485 IMPOSTAZIONI DI SELEZIONE identificativo ricevitore SW500-1 SW500-2 SW500-3 SW500-4 SW500-5 SW500-6 SW500-7 SW500-8 SW 501 Come illustrato nella mappa della struttura, quando il Controller e il modulo RS 422A/RS-485 sono connessi, le operazioni di terminazione debbono essere effettuate in base all’impedenza opposta dal cavo in ognuna delle uscite della linea di trasmissione, al fine di trasferire i segnali a lunga distanza controllando però...
  • Page 121 identificativo ricevitore SW500-1 SW500-2 SW500-3 SW500-4 SW500-5 SW500-6 SW500-7 SW500-8 identificativo ricevitore SW500-1 SW500-2 SW500-3 SW500-4 SW500-5 SW500-6 SW500-7 SW500-8 1-13 1-14...
  • Page 122 identificativo ricevitore SW500-1 SW500-2 SW500-3 SW500-4 SW500-5 SW500-6 SW500-7 SW500-8 identificativo ricevitore SW500-1 SW500-2 SW500-3 SW500-4 SW500-5 SW500-6 SW500-7 sw500-8 1-15 1-16...
  • Page 123: Capitolo 2 Installazione Di Scc-643(P)

    Controllare che tutte le componenti sotto elencate siano presenti nella scatola: In questo capitolo controlleremo il contenuto della confezione prima d’installare la telecamera SCC-643(P) e prepareremo un adattatore idoneo al tipo di sistema di alimentazione. (Consumo energetico: 18 W; Tensione: 24 VAC, 1,5 A) Procederemo quindi all’installazione della SCC-643(P) e al...
  • Page 124: Preparazione Dei Cavi

    SCC-643(P). Cavo video Il cavo di SCC-643(P) è un cavo con innesto a baionetta (BNC) che connette il terminale video (video output) con la porta di connessione (video input) del monitor. 4. Regolare lo switch posto sotto l’adattatore per ottenere la tensione desiderata.
  • Page 125: Installazione Della Telecamera Scc-643(P)

    Combi su una parete interna oppure a soffitto. minimo il quadruplo del peso netto della telecamera a cupola Combi SCC-643(P) e di altri accessori. 2) Installare in un’area in cui lo spazio sopra la tavola del soffitto sia superiore a 18 cm.
  • Page 126: Installazione Della Telecamera

    Installazione della telecamera 1. [Figura 1] Installare la struttura sul soffitto (Fare riferimento alle 5) ADATTATORE PER IL MONTAGGIO A SOFFITTO (SADT-100WM) istruzioni di Installazione per valutare la lunghezza della struttura) Questo adattatore viene utilizzato per installare in un soffitto di cemento * Realizzato sul posto dal costruttore l’alloggiamento interno o esterno destinato alla telecamera a cupola della struttura...
  • Page 127: Capitolo 3 Descrizione Del Menù Di Setup

    Capitolo 3: Descrizione del menù di Setup In questo capitolo, ci concentreremo sul menù di Setup di SCC-643(P). Per prima cosa, vedremo la struttura del menù nel suo complesso, per poi soffermarci sulle funzioni di ogni singolo menù. 6. [Figura 6] Incastrare i 3 fori sul...
  • Page 128: Struttura Del Menù Di Setu

    USCITA ESCI/SALVA Il diagramma soprastante rappresenta la struttura del menù di Setup nel suo complesso. In questa sezione, verrà offerta una descrizione delle caratteristiche del menù di Setup, per permettere a ciascun utente di personalizzare SCC-643(P) secondo le proprie necessità.
  • Page 129: Menu Prog Camera

    (IR). ID CAMERA In condizioni di scarsa illuminazione, il filtro IR è ID CAMERA Il menù ID CAMERA assegna a SCC-643(P) un numero di identificazione disattivato nella modalità Bianco e nero e la sensibilità SYNC LINE...
  • Page 130: Vel Zoom

    USCITA movimento, la funzione innesca automaticamente il segnale di allarme del (PROG CAMERA) Il menù USCITA si usa per uscire dal menù Controller. PROG CAMERA di SCC-643(P) e tornare al ID CAMERA SYNC MAIN MENU (menù principale). COLORE B/N AUTO...
  • Page 131: Alc (Compensazione Automatica Di Luce)

    Dal menù SHUTTER, è possibile impostare lo shutter (otturatore) elettrico ad casa costruttrice di SCC-643(P). Se, al contrario, il menù ZONA si trova su alta velocità, nonché lo shutter AUTO (automatico) a bassa velocità di USER e si preme [ENTER], l’utente stesso può...
  • Page 132: Agc

    LENTO Tenendo premuti i pulsanti Sinistra/Destra, la velocità verrà illustrata Questa funzione migliora la risoluzione dei fotogrammi selezionando un valore basso sia di GUADAGNO AGC che di VELOCITÀ SHUTTER. come indicato nel riquadro. (La funzione è utilizzata principalmente per il monitoraggio di oggetti 1/100(1/120) 1/250 1/500...
  • Page 133: Bil Bianco

    BIL BIANCO BIL BIANCO I gradi di luminosità sono generalmente indicati come temperature di Il menù BIL BIANCO serve perché il bianco sia calibrato in modo normale colore, ed espresse in gradi Kelvin (°K). a qualunque temperatura di colore. Le temperature di colore generali in relazione alla luminosità sono Quando il menù...
  • Page 134: Speciale

    1/16. quando la SCC-643(P) si arresta dopo lo spostamento. Quando la SCC-643(P) non è in movimento, la modalità è impostata su “MF”. - MIRROR: Inverte orizzontalmente il segnale di uscita video. (La modalità “UNOAF” non è attiva quando si effettua lo zoom all’indietro.
  • Page 135: Preset

    3. PRESET PROG POSIZIONE... PRESET NO.0 Da “Position Set...” premere [ENTER] per entrare PROG ORR/VERT nella schermata PROG ORR/VERT, PROG In questo menu l’utente può impostare la posizione ORR/VERT, i parametri PROG ZOOM/FUOCO ZOOM/FUOCO ed impostare la collocazione Zoom/FUOCO e la condizione dello schermo, in modo tale che la ORR/VERT e FUOCO/ZOOM, quindi premere telecamera possa –...
  • Page 136: Auto Pan

    4. MODO AUTO DIREZIONE Questo comando imposta la direzione del movimento delle posizioni Le funzioni AUTO PAN e PERCORSO sono in MODO AUTO. INIZIALE e FINALE (posizione PAN standard). AUTO PAN "destra" : "sinistra " : Dopo aver selezionato le collocazioni dei due punti (ORR/VERT) di INIZIO e FINE, si continua fino ad impostare la velocità...
  • Page 137: Prog Allarmi

    Possono esserci 3 pattern. Scegliere 1, 2 o 3 con il pulsante Sinistra o Destra del ALLARMI OUT ALLARMI OUT “PROG PERCORSO”, quindi premere [ENTER] per accedere alla finestra per Ad ogni input di ALLARMI corrisponde uno dei 3 ALLARMI1 l’impostazione del PERCORSO.
  • Page 138: Altra Prog

    6. ALTRA PROG ZONA PRIVACY È possibile impostare la posizione ORR/VERT e la dimensione dell’area RIT POS INIZ di mascheratura per un massimo di 8 zone riservate. Quando si Quando non sono stati inseriti COMANDI per un certo periodo di tempo, riprendono le aree in cui si trovano le zone riservate, queste verranno la telecamera torna automaticamente alla INIZIALE.
  • Page 139: Specifiche Di Prodotto

    Specifiche di prodotto ZONA PRIVACY 1 ZONA PRIVACY 1 PROG ORR/VERT ... PROG ORR/VERT ... PROG ZONA PROG ZONA SCC-643 TASTO [Enter] Avvio della TASTO modalità [Giù] Contenuto Funzione d’impostazione PROG LIVELLO PROG LIVELLO Telecamera Combi Dome con obiettivo focale variabile Tipologia di prodotto “ZONA”...
  • Page 140: Avvertenze

    - AC 24 ± 10% (50Hz ± 0.3Hz) - 18W Consumo di energia Tipologia di trasmissione - Sistema standard colore PAL • Il copyright del manuale è di proprietà di Samsung Electronics - 1/4 inch IT CCD Dispositivo immagine Co., Ltd. - 752(H) x 582(V) Pixel effettivi •...

Ce manuel est également adapté pour:

Scc-643p

Table des Matières