Table des Matières

Publicité

Les langues disponibles

Les langues disponibles

Liens rapides

GEAppliances.com
Safety Instructions
. . . . . . . . . . . .2, 3
Operating Instructions
Additional Features. . . . . . . . . . . . . . . . . . 9
Automatic Icemaker . . . . . . . . . . . . . . . .12
Care and Cleaning . . . . . . . . . . . . . 13-14
Controls . . . . . . . . . . . . . . . . . . . . . . . . . .4-5
Crispers and Pans . . . . . . . . . . . . . . . . . .10
Freezer . . . . . . . . . . . . . . . . . . . . . . . . . . . .11
Replacing the Light Bulbs . . . . . . . . . . .15
Shelves and Bins . . . . . . . . . . . . . . . . . .8, 9
Water Filter . . . . . . . . . . . . . . . . . . . . . . .6, 7
Installing the Refrigerator . . . . . . . 17-21
Installing the Water Line . . . . . . . . 30-32
Preparing to Install
the Refrigerator . . . . . . . . . . . . . . . . . . . .16
Removing and Replacing
the Doors (Double Door
Refrigerator Models only) . . . . . . . 27-29
Removing and Replacing the
Freezer Drawer . . . . . . . . . . . . . . . . 22, 23
Reversing the Door Swing
(Single Door Refrigerator
Models only) . . . . . . . . . . . . . . . . . . . 24-26
Normal Operating Sounds . . . . . . . . . .33
Consumer Support
Consumer Support . . . . . . . . Back Cover
Performance Data Sheet . . . . . . . 41, 41
State of California Water
Treatment Device Certificate . . . . 43, 44
Warranty for Canadian
Customers . . . . . . . . . . . . . . . . . . . . . . . . .40
Warranty for U.S. Customers . . . . . . . .39
Write the model and serial
numbers here:
Model # ____________________
Serial # _____________________
Find these numbers on a label
on the right side, near the top of the
refrigerator compartment.
Réfrigérateurs
La section française commence à la page 45
Refrigeradores
La sección en español empieza en la página 87
. . . . . . 33-37
200D9366P016 49-60603-4 03-14 GE
Owner's Manual and
Installation Instructions
Models 20, 22 and 23
Congélateur inférieur
Manuel d'utilisation
et d'installation
Congelador inferior
Manual del
propietario e
instalación

Publicité

Table des Matières
loading

Sommaire des Matières pour GE 20

  • Page 1: Table Des Matières

    Additional Features....9 Models 20, 22 and 23 Automatic Icemaker ....12 Care and Cleaning .
  • Page 2: Safety Precautions

    IMPORTANT SAFETY INFORMATION. READ ALL INSTRUCTIONS BEFORE USING. WARNING! Use this appliance only for its intended purpose as described in this Owner’s Manual. SAFETY PRECAUTIONS When using electrical appliances, basic safety precautions should be followed, including the following: This refrigerator must be properly installed and In refrigerators with automatic icemakers, avoid located in accordance with the Installation contact with the moving parts of the ejector...
  • Page 3: How To Connect Electricity

    GEAppliances.com WARNING! HOW TO CONNECT ELECTRICITY Do not, under any circumstances, cut or remove the third (ground) prong from the power cord. For personal safety, this appliance must be properly grounded. The power cord of this appliance is equipped with a This provides the best performance and also prevents 3-prong (grounding) plug which mates with a standard overloading house wiring circuits which could cause a...
  • Page 4: Changing The Temperature

    About the controls with temperature settings. (on some models) CTUAL (FIG A) (FIG B) (on some models) NOTE: The refrigerator is shipped with protective film covering the temperature controls. If this film was not removed during installation, remove it now. The temperature controls are preset in the factory at 37°F for the refrigerator compartment and 0°F for the freezer compartment.
  • Page 5: How It Works

    About TurboCool. ™ (on some models) GEAppliances.com How it Works TurboCool rapidly cools the refrigerator How to Use compartment in order to more quickly Press TurboCool. The refrigerator temperature cool foods. Use TurboCool when adding display will show a large amount of food to the refrigerator After TurboCool is complete, the refrigerator compartment, putting away foods after they compartment will return to the original setting.
  • Page 6: Water Filter Cartridge

    United States, visit our Website, display. This light will turn orange to tell you GEAppliances.com, or call GE Parts and that you need to replace the filter soon. The Accessories, 800.626.2002.
  • Page 7 To order additional filter cartridges in the flow of water to the icemaker decreases, or the United States, visit our Website, every 6 months. GEAppliances.com, or call GE Parts and Installing the Filter Cartridge Accessories, 800.626.2002. If you are replacing the cartridge, first Filter Model GSWF remove the old one.
  • Page 8: Refrigerator Compartment

    About the shelves and bins. Not all features are on all models. Rearranging the Shelves Shelves in the refrigerator compartment are adjustable. Refrigerator Compartment To remove: Remove all items from the shelf. Tilt the shelf up at the front. Lift the shelf up at the back and bring the shelf out.
  • Page 9 GEAppliances.com Adjustable Bins on the Door Adjustable bins can easily be carried from The snugger helps prevent tipping, spilling or refrigerator to work area. sliding of small items stored on the door shelf. Grip the finger hold near the rear of the snugger To remove: Lift bin straight up, then pull out.
  • Page 10 About the crispers and pans. Not all features are on all models. Fruit and Vegetable Crisper Excess water that may accumulate in the bottom of the drawers or under the drawers should be wiped dry. Adjustable Humidity Crisper (on some models) Slide the control all the way to the HIGH setting Slide the control all the way to the LOW setting to provide high humidity recommended for...
  • Page 11 About the freezer. GEAppliances.com Not all features are on all models. Freezer Shelves and Baskets NOTE: Do not fill baskets higher than the rim of A shelf above the ice storage bin the basket. This may cause baskets to stick or A half-width basket jam when opening or closing.
  • Page 12: Automatic Icemaker

    About the automatic icemaker. A newly installed refrigerator may take 12 to 24 hours to begin making ice. Automatic Icemaker (on some models) Power Switch You will hear a buzzing sound each time the Icemaker approximately 100–130 cubes in a 24-hour period, icemaker fills with water.
  • Page 13: Care And Cleaning

    Care and cleaning of the refrigerator. GEAppliances.com Cleaning the Outside The door handles and trim. Clean with a cloth The stainless steel panels and door handles. dampened with soapy water. Dry with a soft Stainless steel (on some models) can be cloth.
  • Page 14: Behind The Refrigerator

    Care and cleaning of the refrigerator. (cont.) Behind the Refrigerator Be careful when moving the refrigerator away Lower the leveling legs until they touch the from the wall. All types of floor coverings can floor. be damaged, particularly cushioned coverings When pushing the refrigerator back, make and those with embossed surfaces.
  • Page 15: Replacing The Light Bulbs

    To remove the light shield, grasp the shield NOTE: Appliance bulbs may be ordered from at the back and pull out to release the tabs GE Parts and Accessories, 800.626.2002. at the back. Rotate the shield down and then forward to release the tabs at the front of the shield.
  • Page 16: Installation Instructions

    Installation Refrigerator Instructions Models 20, 22 and 23 Questions? Call 800.GE.CARES (800.432.2737) or visit our Website at: GEAppliances.com In Canada, call 1.800.561.3344 or visit our Website at: www.GEAppliances.ca BEFORE YOU BEGIN TOOLS YOU MAY NEED Read these instructions completely and carefully.
  • Page 17: Installing The Refrigerator

    Install it in the water line Remove the fresh-food door. Refer to Steps 1 near the refrigerator. If using GE SmartConnect ™ through 3 of “Reversing the Door Swing” section. Refrigerator Tubing Kit, you will need an additional tube (WX08X10002) to connect the filter.
  • Page 18 If you are using copper tubing, place a compression nut and ferrule (sleeve) onto the end of the tubing coming from the house cold water supply. If you are using the GE SmartConnect ™ tubing, the nuts are already assembled to the tubing.
  • Page 19 Installation Instructions REMOVE THE FREEZER DOOR HANDLE REMOVE THE FRESH FOOD DOOR HANDLE Stainless steel and plastic handles: Loosen the set screws located on the (For placement in the installation location underside of the handle with the 1/8” Allen or reversal of the handles – on some wrench and remove the handle.
  • Page 20 Installation Instructions INSTALLING THE REFRIGERATOR (cont.) ATTACH THE FREEZER DOOR HANDLE ATTACH THE FRESH FOOD DOOR HANDLE Stainless steel and plastic handles: Attach the handle firmly to the mounting Stainless steel handle: fasteners and tighten the set screws on Attach the the bottom of the handle with a 1/8”...
  • Page 21 Installation Instructions LEVEL THE REFRIGERATOR SET THE CONTROLS The leveling legs have 2 purposes: Set the controls to the recommended setting. 1) Leveling legs adjust so the refrigerator is firmly positioned on the floor and does not wobble. 2) Leveling legs serve as a stabilizing brake to hold the refrigerator securely in position during operation and cleaning.
  • Page 22: Removing The Freezer Drawer

    Installation Instructions REMOVING THE FREEZER DRAWER REMOVE THE DRAWER FRONT FROM The freezer drawer can be removed, if needed, to fit through tight areas. THE SLIDES (cont.) Read these instructions completely and carefully. Lift up on both sides of the freezer drawer handle to separate the drawer railings from the rail assemblies.
  • Page 23 Installation Instructions ATTACH AND SECURE THE DRAWER Two people may be required to complete this procedure. FRONT TO THE SLIDES (cont.) Replace the screws on both rail assemblies. ATTACH AND SECURE THE DRAWER FRONT TO THE SLIDES Pull out the rail assemblies to the full length on each side of the cabinet.
  • Page 24: Reversing The Door Swing

    5/16” Socket Ratchet/ Adjustable Wrench Driver pin hole located in the bottom of the door. Masking Tape Thin-blade Screwdriver Phillips Screwdriver Torx T-20 Driver Set the door on a non-scratching surface with the inside up.
  • Page 25 Installation Instructions REMOVE CENTER HINGE TRANSFER REFRIGERATOR DOOR STOP Remove the hinge pin from the hinge bracket. Remove the door stop on right side of The hinge pin will be used again with the new the bottom of the refrigerator door by hinge bracket for the other side.
  • Page 26 Installation Instructions REVERSING THE DOOR SWING (cont.) REHANG REFRIGERATOR DOOR INSTALL THE LOGO BADGE Lower the refrigerator door onto the center Remove the adhesive backing paper hinge pin. Ensure that the plastic hinge pin and align the pins on the back of the badge thimble is on the center hinge pin or inside with the holes in the door.
  • Page 27: Removing The Doors

    Installation Instructions REMOVING THE DOORS (Double Door Refrigerator Models only) IMPORTANT NOTES REMOVE THE REFRIGERATOR DOORS Tape the doors shut with masking tape. NOTE: Door swing is not reversible. • Read the instructions all the way through before starting. • Handle parts carefully to avoid scratching paint. •...
  • Page 28 Installation Instructions REMOVING THE DOORS (cont.) REMOVE THE REFRIGERATOR DOORS REMOVE CENTER HINGE (cont.) Using a 5/16” socket ratchet/driver, remove the bolts securing the center hinge to the cabinet. Remove the hinge cover on top of the Set the hinge and bolts aside. refrigerator door by removing the Phillips head screw and pulling it up.
  • Page 29: Replacing The Doors

    Installation Instructions REPLACING THE DOORS (Double Door Refrigerator Models only) INSTALL CENTER HINGE REHANG REFRIGERATOR DOORS (CONT.) Install the center hinge on each side. Make sure the gasket on the door is flush against the cabinet and is not folded. Make sure the door is straight and the gap between the doors is even across the front.
  • Page 30: Installing The Water Line

    If using copper, Osmosis Water System, the only approved be sure both ends of the tubing are cut square. installation is with a GE RVKit. For other reverse To determine how much tubing you need: measure osmosis water systems, follow the manufacturer’s the distance from the water valve on the back recommendations.
  • Page 31 • A cold water supply. The water pressure must the connection to the top or side, rather than at be between 20 and 120 p.s.i. (1.4–8.1 bar). the bottom, to avoid drawing off any sediment from the water pipe.
  • Page 32 Pipe Clamp Make sure the tubing is fully inserted into the valve. Tighten the compression nut securely. For plastic tubing from a GE SmartConnect ™ Refrigerator Tubing kit, insert the molded end of the tubing into the shutoff valve and tighten...
  • Page 33: The Refrigerator

    Normal operating sounds. GEAppliances.com Newer refrigerators sound different from older refrigerators. Modern refrigerators have more features and use newer technology. Do you hear what I hear? These sounds are normal. HUMMM... WHOOSH... The new high efficiency compressor may run faster and longer than your old refrigerator and you may You may hear the fans spinning at high speeds.
  • Page 34: Possible Causes

    Before you call for service… Troubleshooting Tips Problem Possible Causes What To Do Motor operates for Normal when refrigerator • Wait 24 hours for the refrigerator to completely long periods or cycles is first plugged in. cool down. on and off frequently. Often occurs when large •...
  • Page 35 GEAppliances.com Problem Possible Causes What To Do Ice cubes have Food transmitting odor/taste • Wrap foods well. odor/taste to ice cubes. Interior of refrigerator • See Care and cleaning. needs cleaning. • Keep an open box of baking soda in the refrigerator; replace every three months.
  • Page 36 Before you call for service… Troubleshooting Tips Problem Possible Causes What To Do Water has poor Water dispenser has not been • Dispense water until all water in system is taste/odor used for a long time. replenished. Water in first glass Normal when refrigerator •...
  • Page 37 GEAppliances.com Problem Possible Causes What To Do My display is TurboCool function is activated. • See About TurboCool for more information. showing Water filter indicator This is normal. • See About the water filter for more information. light changed color Water filter indicator Water filter indicator must •...
  • Page 38 Notes.
  • Page 39 This warranty is extended to the original purchaser and any succeeding owner for products purchased for home use within the USA. If the product is located in an area where service by a GE Authorized Servicer is not available, you may be responsible for a trip charge or you may be required to bring the product to an Authorized GE Service location for service.
  • Page 40: Terms And Conditions

    (From Date of Sale) Repair or Replace at Mabe’s Option Compressor GE Profile: Ten (10) Years GE Profile: Ten (10) Years GE Profile: Five (5) Years GE and All Other GE and All Other GE and All Other Brands: One (1) Year...
  • Page 41 Tested and cer ed by NSF International against NSF/ANSI Standard 42 and Standard 53 in model GE MWF for the reduction of the claims speci d on the performance data sheet. REPLACEMENT...
  • Page 42: Operating Specifications

    > 66.67% 0.003 mg/L * Tested using a flow rate of 0.5 gpm; pressure of 60 psig; pH of 7.5 ± 0.5; temp. of 68° ± 5°F (20° ± 3°C) ** Measurement in Particles/ml. Particles used were 0.5-1 microns *** NTU=Nephelometric Turbidity units Operating Specifications Capacity: certified for up to 750 gallons (2,838 l);...
  • Page 43 Date Issued: February 2,2010 Modified June 25, 2013 Trademark/Model Designation Replacement Elements GE MWF PLWF Manufacturer: General Electric Company The water treatment device(s) listed on this certificate have met the testing requirements pursuant to Section 116830 of the Health and Safety Code for the following health related contaminants:...
  • Page 44 1972 Date Issued: December 18, 2008 Trademark/Model Designation Replacement Elements GE SmartWater GSWF GSWF Manufacturer: GE Appliance The water treatment device(s) listed on this certificate have met the testing requirements pursuant to Section 116830 of the Health and Safety Code for the following health related contaminants:...
  • Page 45 Mesures de sécurité ....46, 47 Fonctionnement Caractéristiques supplémentaires ..53 Clayettes et bacs ......52, 53 Congélateur .
  • Page 46: Mesures De Sécurité

    DANGER! RISQUES POUR LES ENFANTS COMMENT VOUS DÉBARRASSER CONVENABLEMENT DE VOTRE ANCIEN RÉFRIGÉRATEUR Réfrigérants Les enfants pris au piège ou morts d’asphyxie sont toujours d’actualité. Les réfrigérateurs abandonnés Tous les appareils de réfrigération contiennent des sont toujours aussi dangereux, même si on n’attend réfrigérants qui, conformément aux lois fédérales,...
  • Page 47: Raccordement Électrique

    www.electromenagersge.ca AVERTISSEMENT! RACCORDEMENT ÉLECTRIQUE Ne coupez ni retirez en aucun cas la troisième broche (mise à la terre) de la fiche du cordon d’alimentation. Pour votre sécurité, cet appareil doit être correctement mis à la terre. Le cordon d’alimentation de cet appareil est muni Cette précaution est recommandée pour garantir d’une fiche à...
  • Page 48: Changement De La Température

    Les commandes avec réglages de température. (Sur certains modèles) CTUAL (FIG A) (FIG B) (Sur certains modèles) NOTE : Le réfrigérateur est expédié avec une pellicule de protection couvrant les commandes de température. Si cette pellicule n’a pas été retirée au cours de l’installation faites-le maintenant. La temperature est pré-réglée à...
  • Page 49: Fonctionnement

    Au sujet de TurboCool. ™ (sur certains modèles) www.electromenagersge.ca Fonctionnement La commande TurboCool accélère le Utilisation refroidissement du compartiment réfrigération Appuyez sur le bouton TurboCool. L’écran de afin de refroidir plus rapidement les aliments. température du réfrigérateur indique Utilisez TurboCool quand vous ajoutez Quand la commande TurboCool cesse de une grande quantité...
  • Page 50: Cartouche Du Filtre À Eau

    Le filtre à eau. (seulement pour les modèles 22 et 23) Cartouche du filtre à eau Bouchon de dérivation du filtre La cartouche du filtre à eau se trouve dans le Il faut utiliser le bouchon de dérivation du filtre coin droit arrière supérieur du compartiment lorsqu’une cartouche de remplacement n’est réfrigérateur.
  • Page 51 Le filtre à eau. (seulement pour les modèles 20) www.electromenagersge.ca Cartouche du filtre à eau Bouchon de dérivation du filtre La cartouche du filtre à eau se trouve dans le Il faut utiliser le bouchon de dérivation du filtre coin droit arrière supérieur du compartiment lorsqu’une cartouche de remplacement n’est...
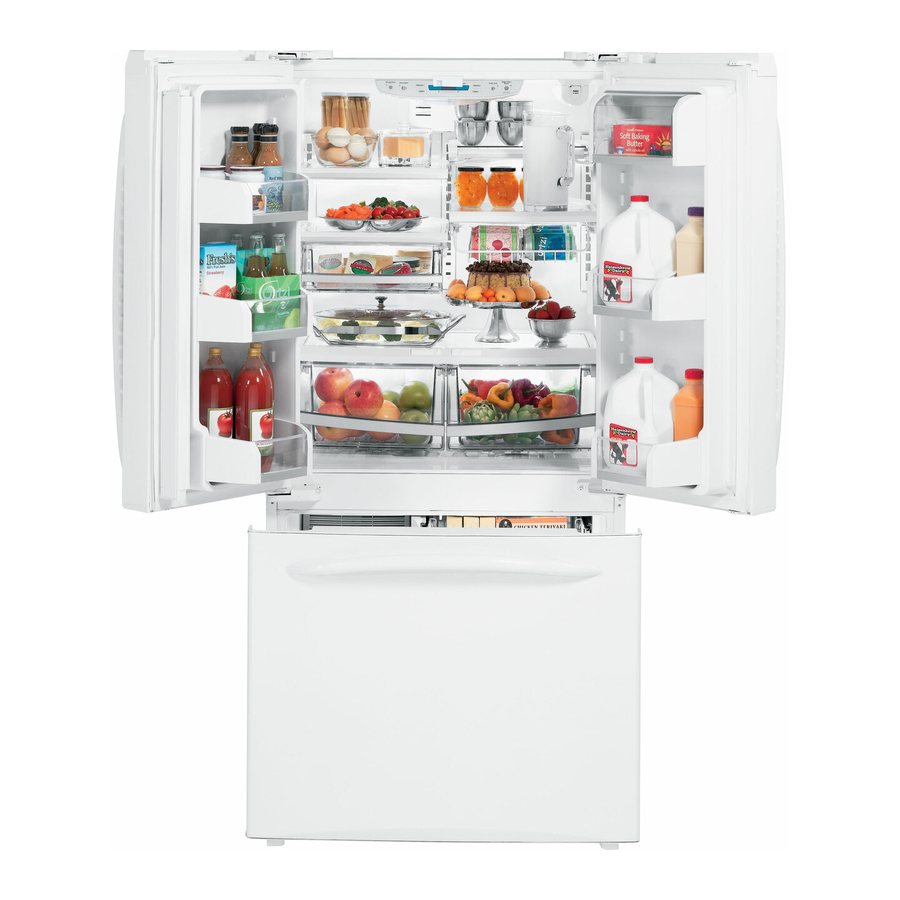
  • Page 52: Mise En Place Des Clayettes

    Les clayettes et les balconnets. Toutes les caractéristiques ne sont pas disponibles sur tous les modèles. Mise en place des clayettes Les clayettes du réfrigérateur sont réglables. Compartiment réfrigération Enlèvement : Enlevez tous les articles de la clayette. Soulevez la clayette à l’avant. Soulevez la clayette à...
  • Page 53: Bacs Réglables De Porte

    www.electromenagersge.ca Bacs réglables de porte Vous pouvez facilement transporter les bacs La séparation aide à empêcher les petits réglables du réfrigérateur à votre surface articles qui se trouvent sur la clayette de de travail. la porte de se renverser, de couler ou de glisser.
  • Page 54: Bac(S) À Fruits Et Légumes

    Bacs à rangement et bacs à légume. Tous les modèles n’ont pas toutes ces caractéristiques. Bacs à fruits et légumes Vous devez bien essuyer toute eau en excès qui peut s’accumuler au fond des bacs ou en dessous des bacs. Bac à...
  • Page 55: Congélateur

    Congélateur. www.electromenagersge.ca Tous les modèles n’ont pas toutes ces caractéristiques. Clayettes et paniers du compartiment congélation NOTE : Ne remplissez pas les paniers au-delà Une clayette située au-dessus du bac du bord du panier. Cela pourrait provoquer à glaçons un bourrage ou coincer le panier, lors de l’ouverture ou de la fermeture.
  • Page 56: Machine À Glaçons Automatique

    Pour distribuer de l’eau : distributeur pendant au moins 2 minutes pour enlever l’air pris au piège dans la conduite d’eau et pour remplir d’eau le Tenir le verre contre le renfoncement. système du distributeur. Durant ce processus, le distributeur peut être bruyant puisque de l’air est expulsé...
  • Page 57: Nettoyage De L'extérieur

    Entretien et nettoyage de votre réfrigérateur. www.electromenagersge.ca Nettoyage de l’extérieur Les poignées de porte et les garnitures. Vous pouvez nettoyer les panneaux et Nettoyez avec un linge trempé dans de l’eau les poignées de porte en acier inoxydable (sur savonneuse. Séchez avec un linge doux. certains modèles) avec un nettoyant d’acier N’appliquez pas de cire sur les poignées inoxydable vendu sur le marché.
  • Page 58: Derrière Le Réfrigérateur

    Entretien et nettoyage de votre réfrigérateur. (suite) Derrière le réfrigérateur Prenez un soin particulier lorsque vous éloignez Abaissez les pieds d’inclinaison jusqu’à le réfrigérateur du mur. Tous les types de ce qu’ils touchent le sol. revêtements de sol peuvent être endommagés, Lorsque vous remettez le réfrigérateur en particulièrement ceux qui sont coussinés ou place en le poussant, veillez à...
  • Page 59: Lumières Du Compartiment Réfrigération

    électroménagers libérer de ses taquets à l’arrière. en téléphonant au service de pièces et accessoires GE, au 1.888.261.3055. Faites tourner le pare-lumière vers le bas, puis tirez pour libérer les taquets à l’avant de le pare-lumière.
  • Page 60: Avant De Commencer

    Instructions Réfrigérateur d’installation Modèles 20, 22 et 23 Questions? Appelez le 1.800.561.3344 ou visitez notre site Web à l’adresse : www.electromenagersge.ca AVANT DE COMMENCER PREPARATION (suite) ALIMENTATION D’EAU DE LA MACHINE À GLAÇONS Veuillez lire toutes les directives attentivement. ET DU DISTRIBUTEUR (SUR CERTAINS MODÈLES) IMPORTANT •...
  • Page 61: Installation Du Réfrigérateur

    Installez-le sur l’arrière du capuchon du haut. Soulevez et enlevez le capuchon la conduite d’eau près du réfrigérateur. Si vous utilisez du haut. une trousse GE SmartConnect Refrigerator Tubing, vous ™ aurez besoin d’un tuyau additionnel (WX08X10002) pour Enlevez la porte du compartiment aliments frais.
  • Page 62 (manchon) à l’extrémité du tuyau qui vient la maison) et vérifiez de l’alimentation d’eau froide de la maison. la présence de fuites. Si vous utilisez un tuyau GE SmartConnect, ™ les écrous sont déjà assemblés au tuyau. BRANCHEZ LE CORDON Si vous utilisez un tuyau de cuivre, insérez...
  • Page 63: Enlèvement De La Poignée De Porte

    Instructions d’installation ENLEVEZ LA POIGNÉE DE LA PORTE ENLEVEZ LA POIGNÉE DE PORTE DU COMPARTIMENT CONGÉLATION DU COMPARTIMENT POUR ALIMENTS FRAIS Poignées en acier inoxydable et en matière (Pour placer dans l’emplacement plastique : de l’installation ou changer le sens d’ouverture des portes –...
  • Page 64 Instructions d’installation INSTALLATION DU RÉFRIGÉRATEUR (SUITE) FIXEZ LA POIGNÉE DE LA PORTE FIXEZ LA POIGNÉE DE LA PORTE DU COMPARTIMENT CONGÉLATION DU COMPARTIMENT ALIMENTS FRAIS Poignées en acier inoxydable et en matière Poignée en acier inoxydable : plastique : Fixez la poignée aux fixations Fixez bien la poignée aux fixations de montage...
  • Page 65: Mettez Le Réfrigérateur De Niveau

    Instructions d’installation METTEZ LE RÉFRIGÉRATEUR RÉGLEZ LES COMMANDES DE NIVEAU Réglez les commandes selon les recommandations. Les pieds de nivellement jouent deux rôles : 1) Elles peuvent être réglées de manière à permettre à l’appareil de reposer solidement sur le sol. 2) Les pieds de nivellement servent de frein de stabilisation, pour tenir le réfrigérateur bien en place pendant...
  • Page 66: Enlèvement Du Tiroir Du Compartiment Congélation

    Instructions d’installation ENLÈVEMENT DU TIROIR DU COMPARTIMENT CONGÉLATION ENLEVEZ L’AVANT DU TIROIR Vous pouvez enlever le tiroir du compartiment congélation, si nécessaire, pour passer par DES GUIDES (suite) des endroits étroits. Soulevez les deux côtés de la poignée du tiroir Lisez ces instructions avec soin et complètement.
  • Page 67: Remise En Place Du Tiroir Du Compartiment Congélation

    Instructions d’installation REMISE EN PLACE DU TIROIR DU COMPARTIMENT CONGÉLATION PLACEMENT ET FIXATION DE L’AVANT Vous aurez peut-être besoin de deux DU TIROIR AUX GUIDES (suite) personnes pour terminer cette procédure. Remettez en place les vis sur les deux mécanismes de rail. PLACEMENT ET FIXATION DE L’AVANT DU TIROIR AUX GUIDES Tirez les mécanismes de rail à...
  • Page 68: Changement Du Sens D'ouverture Des Portes

    Instructions d’installation CHANGEMENT DU SENS D’OUVERTURE DES PORTES (modèles de réfrigérateurs à une porte uniquement) ENLÈVEMENT DE LA PORTE NOTES IMPORTANTES DU COMPARTIMENT RÉFRIGÉRATION Pour changer le sens d’ouverture des portes : Fermez la porte et attachez-la avec le ruban NOTE : Vous ne pouvez pas changer le sens d’ouverture masque.
  • Page 69: Transfert À Droite De La Poignée De La Porte Du Compartiment Réfrigération

    Instructions d’installation ENLÈVEMENT DE LA CHARNIÈRE TRANSFERT DE L’ARRÊT DE LA PORTE DU CENTRE DU COMPARTIMENT RÉFRIGÉRATION Enlevez l’axe de la charnière. L’axe sera réutilisé Enlevez l’arrêt de la porte situé en bas avec la nouvelle charnière de l’autre côté. à...
  • Page 70: Fixez Le Logo

    Instructions d’installation CHANGEMENT DU SENS D’OUVERTURE DES PORTES (modèles de réfrigérateurs à une porte uniquement) (SUITE) RE-SUSPENSION DE LA PORTE FIXEZ LE LOGO DU COMPARTIMENT RÉFRIGÉRATION Enlevez le papier adhésif protecteur et alignez les taquets de l’arrière du logo avec les trous Abaissez la porte du compartiment de la porte.
  • Page 71: Enlèvement Des Portes

    Instructions d’installation ENLÈVEMENT DES PORTES (modèles de réfrigérateurs à deux portes uniquement) NOTES IMPORTANTES ENLÈVEMENT DES PORTES DU COMPARTIMENT RÉFRIGÉRATION NOTE : Vous ne pouvez pas changer le sens d’ouverture des portes. Fermez les portes et attachez-les avec le ruban masque.
  • Page 72 Instructions d’installation ENLÈVEMENT DES PORTES (SUITE) ENLÈVEMENT DES PORTES ENLEVEZ LA CHARNIÈRE DU CENTRE DU COMPARTIMENT RÉFRIGÉRATION À l’aide d’une clé à douille de 5/16 po, (suite) enlevez les boulons qui tiennent la charnière du centre à l’armoire. Mettez de côté Enlevez le couvercle de la charnière du haut les boulons et la charnière.
  • Page 73: Remise En Place Des Portes

    Instructions d’installation REMISE EN PLACE DES PORTES (modèles de réfrigérateurs à deux portes uniquement) INSTALLATION DE LA CHARNIÈRE RE-SUSPENSION DES PORTES DU COMPARTIMENT RÉFRIGÉRATION (suite) DU CENTRE Assurez-vous que le joint de la porte soit aligné contre Installez la charnière du centre de chaque côté. l’armoire et ne soit pas tordu.
  • Page 74: Installation De La Conduite D'eau

    Les coups de bélier (eau qui donne des coups dans les NOTE : Les seuls tuyaux en matière plastique approuvés tuyaux) dans la tuyauterie de la maison peut occasionner par GE sont ceux qui font fournis dans les trousses GE des dommages aux pièces de votre réfrigérateur, ainsi que SmartConnect Refrigerator Tubing.
  • Page 75: Ce Dont Vous Aurez Besoin (Suite)

    • Une alimentation d’eau froide potable. La pression FERMEZ L’ALIMENTATION de l’eau doit être entre 20 et 120 p.s.i. (1,4 et 8,1 bar). PRINCIPALE D’EAU Ouvrez le robinet le plus proche suffisamment longtemps pour purger le tuyau.
  • Page 76: Branchez Le Tuyau Au Robinet

    Collier de serrage Assurez-vous que le tuyau soit bien inséré dans le robinet. Serrez fort l’écrou de compression. Pour le tuyau en matière plastique d’une trousse GE SmartConnect Refrigerator Tubing, insérez ™ l’extrémité moulée du tuyau dans le robinet Tuyau vertical Robinet d’arrêt à...
  • Page 77: Bruits Normaux De Fonctionnement

    Bruits de fonctionnement normaux. Les réfrigérateurs plus récents font des bruits différents de ceux des anciens. Les réfrigérateurs modernes présentent plus de fonctions et sont plus avancés sur le plan technologique. Entendez-vous ce que j’entends ? Ces bruits sont normaux. OUIR ! HUMMM...
  • Page 78 Avant d’appeler un réparateur… Problème Causes possibles Correctifs Le moteur fonctionne Ceci est normal lorsque le • Attendez 24 heures pour que le réfrigérateur refroidisse Le moteur fonctionne pendant de longues réfrigérateur vient d’être branché. complètement. pendant de longues périodes ou démarre périodes ou démarre et Ceci arrive souvent lorsque •...
  • Page 79: Causes Possibles

    www.electromenagersge.ca Problème Causes possibles Correctifs Odeur/saveur Des aliments ont transmis leur • Emballez bien les aliments. anormale des glaçons odeur/goût aux glaçons. Il faut nettoyer l’intérieur • Consultez Entretien et nettoyage. du réfrigérateur. • Gardez une boite de bicarbonate de soude ouverte dans votre réfrigérateur.
  • Page 80 Avant d’appeler un réparateur… Problème Causes possibles Correctifs Mauvais goût/odeur Le distributeur d’eau n’a pas • Faites couler l’eau jusqu’à ce que l’eau du système soit de l’eau été utilisé depuis longtemps. remplacée par de l’eau fraîche. L’eau versée dans Normal lorsque le réfrigérateur •...
  • Page 81 www.electromenagersge.ca Problème Causes possibles Correctifs Mon écran indique La fonction TurboCool est active. • Consultez la section TurboCool pour de plus amples informations. Le voyant lumineux du C’est normal. • Consultez la section Filtre d’eau pour de plus amples filtre d’eau a changé de informations.
  • Page 82: Garantie Du Client

    Réparation ou date d’achat) remplacement au choix de Mabe Compresseur GE Profile : Dix (10) ans GE Profile : Dix (10) ans GE Profile : Cinq (5) ans GE et toutes autre GE et toutes autre GE et toutes autre...
  • Page 83: Fiche Technique De Performance Système De Filtration Smartwater

    Mis à l’essai et certifié par NSF International conformément aux normes 42 et 53 de la ANSI/NSF du modèle MWF de GE pour les énoncés de réductions mentionnés à la fiche technique de performance.
  • Page 84: Feuillet De Données Relatives À La Performance De La Cartouche

    0,003 mg/L * Testé utilisant un débit de 0,5 gpm; une pression de 60 psig; un pH de 7,5 ± 0,5; et une temp. de 20 °C ± 3 °C. ** Mesures en particules/ml. Les particules utilisés étaient de 0,5–1 micron.
  • Page 85 Notes.
  • Page 86: Soutien Au Consommateur

    Pour faire réparer votre électroménager GE, il suffit de nous téléphoner. Studio de conception réaliste Sur demande, GE peut fournir une brochure sur l’aménagement d’une cuisine pour les personnes à mobilité réduite. Écrivez: Directeur, Relations avec les consommateurs, Mabe Canada Inc.
  • Page 87 Información de seguridad ..88, 89 Instrucciones de operación Características adicionales ....95 Cómo reemplazar las bombillas de luz..... 100 Congelador .
  • Page 88: Precauciones De Seguridad

    INFORMACIONES IMPORTANTES DE SEGURIDAD. LEA PRIMERO TODAS LAS INSTRUCCIONES. ¡ADVERTENCIA! Use este aparato sólo para los fines que se describen en este Manual del propietario. PRECAUCIONES DE SEGURIDAD Cuando use electrodomésticos, siga las precauciones básicas de seguridad, incluyendo las siguientes: Antes de usarse, este refrigerador deberá...
  • Page 89 GEAppliances.com ¡ADVERTENCIA! COMO CONECTAR LA ELECTRICIDAD Bajo ninguna circunstancia debe cortar o quitar la tercera punta (tierra) de la clavija. Para su seguridad personal, este aparato deberá conectarse debidamente a tierra. El cable eléctrico de este aparato está equipado con Esto garantiza la mejor ejecución y evita la sobrecarga una clavija de tres puntas (tierra) que enchufa en un del circuito eléctrico de la casa y los daños a causa del...
  • Page 90: Cómo Cambiar La Temperatura

    Los controles con niveles de temperaturas. (en algunos modelos) CTUAL (FIG A) (FIG B) (en algunos modelos) NOTA: El refrigerador se envía con una película de protección que cubre los controles de la temperatura. Si esta película no se retiró durante la instalación, hágalo ahora. Los controles de temperatura vienen preconfigurados de fábrica a 37°...
  • Page 91: Cómo Funciona

    Acerca de TurboCool. ™ (en algunos modelos) GEAppliances.com Cómo funciona TurboCool enfría rápidamente el Cómo usar compartimiento del refrigerador para Presione TurboCool. La temperatura del enfriar los alimentos más rápidamente. refrigerador mostrará Use TurboCool cuando agregue grandes Después de que TurboCool sea completado, el cantidades de alimentos al compartimiento compartimiento del refrigerador regresará...
  • Page 92: El Filtro De Agua

    Estados Unidos, visite nuestro sitio en poco tiempo. El cartucho del filtro debe Web, GEAppliances.com, o llame a GE para cambiarse si se enciende una luz de color rojo partes y accesorios al 800.626.2002.
  • Page 93 Para pedir cartuchos adicionales en los Instalar el cartucho del filtro Estados Unidos, visite nuestro sitio Web, GEAppliances.com, o llame a GE para partes Si está reemplazando el cartucho, primero y accesorios al 800.626.2002. retire el anterior. Abra la tapa del cartucho presionando la pestaña al frente y halando...
  • Page 94 Sobre los estantes y compartimientos. No todas las características están presentes en todos los modelos. Reorganización de los estantes Los estantes en el compartimiento del refrigerador son ajustables. Compartimiento del refrigerador Para quitar: Quite todos los elementos del estante. Incline el estante en la parte del frente. Levante el estante hacia arriba en la parte de atrás y saque el estante.
  • Page 95: Del Refrigerador

    GEAppliances.com Compartimientos ajustables en la puerta Los compartimientos ajustables pueden El reborde ayuda a evitar la caída, llevarse fácilmente del refrigerador al área derramamiento o deslizamiento de elementos de trabajo. pequeños que se almacenen en el estante de la puerta. Agarre el retenedor del dedo cerca de Para retirarlos: Levante el estante recto la parte posterior del reborde y muévalo para y luego hálelo.
  • Page 96 Sobre el congelador. No todas las características están presentes en todos los modelos. Estantes y canastas del congelador NOTA: No llene las canastas más allá del borde Un estante por encima del recipente de la canasta. Esto puede provocar que las para hielo canastas se traben o bloqueen cuando se Una canasta de ancho medio...
  • Page 97: Máquina De Hielo Automática

    Sobre la máquina de hielo automática. GEAppliances.com Un refrigerador recientemente instalado puede tomar entre 12 y 24 horas para empezar a hacer hielo. Máquina de hielo automática Máquina Interruptor de corriente de hielos (en algunos modelos) instalado se puede tomar entre 12 y 24 horas para La máquina de hielos producirá...
  • Page 98: Limpiar El Exterior

    Cuidado y limpieza del refrigerador. Limpiar el exterior Las manijas de la puerta y los ornamentos. Los paneles y las manijas de las puertas Se limpian con un paño humedecido con de acero inoxidable. Acero inoxidable (en una solución de detergente suave y agua. algunos modelos) pueden ser limpiados con Seque con un paño suave.
  • Page 99: Atrás Del Refrigerador

    GEAppliances.com Atrás del refrigerador Se deberá tener cuidado al retirar el en dirección lateral puede causar daños al refrigerador de la pared. Todos los tipos de recubrimiento del piso o al refrigerador. recubrimiento de pisos se pueden dañar, sobre Baje las patas niveladoras hasta que toquen el todo los recubrimientos acojinados y los que piso.
  • Page 100: Luces Del Refrigerador

    Para retirar el protector de la luz, tome NOTA: Las bombillas del artefacto pueden el protector por la parte posterior y hale solicitarse en Piezas y Accesorios de GE, hacia fuera para liberar las pestañas 800.626.2002. en la parte posterior.
  • Page 101: Instrucciones Para La Instalación

    Instrucciones para Refrigerador la Instalación Modelos 20, 22 y 23 ¿Preguntas? Llame al 800.GE.CARES (800.432.2737) o bien visite nuestra página Web: GEAppliances.com ANTES DE INICIAR HERRAMIENTAS QUE USTED PUEDE NECESITAR Lea estas instrucciones completa y cuidadosamente. IMPORTANTE • Guarde estas instrucciones para uso del inspector local.
  • Page 102: Instalación Del Refrigerador

    Retire la gaveta inferior del congelador. Consulte la sección titulada “Cómo retirar la gaveta del congelador”. Si se encuentra usando tuberías de GE SmartConnect, ™ las tuercas están ya ensambladas a la tubería.
  • Page 103: Active La Conexión De Agua

    (el suministro de agua de el accesorio. la casa) e inspeccione en Si se encuentra usando tuberías de busca de fugas. GE SmartConnect, inserte el extremo moldeado de ™ la tubería en la conexión del refrigerador en la parte CONECTE EL REFRIGERADOR posterior del refrigerador, y apriete la tuerca de compresión hasta que esté...
  • Page 104 Instrucciones para la instalación RETIRE LA MANIJA DE LA PUERTA RETIRE LA MANIJA DE LA PUERTA DEL CONGELADOR DE ALIMENTOS FRESCOS (Para la colocación en el lugar de Manijas de acero inoxidable y plástico: instalación o la inversión de las manijas – Afloje los tornillos de fijación ubicados en la parte en algunos modelos) inferior de la manija con una llave Allen de 1/8”...
  • Page 105 Instrucciones para la instalación INSTALACIÓN DEL REFRIGERADOR (cont.) SUJETE LA MANIJA DE LA PUERTA SUJETE LA MANIJA DE LA PUERTA DEL CONGELADOR DE ALIMENTOS FRESCOS Manija de acero inoxidable: Manijas de acero inoxidable y plástico: Sujete la manija Sujete la manija firmemente a los tornillos de montaje a los tornillos de y ajuste los tornillos de fijación en la parte inferior montaje y ajuste...
  • Page 106: Cómo Nivelar El Refrigerador

    Instrucciones para la instalación CÓMO NIVELAR EL REFRIGERADOR AJUSTE LOS CONTROLES Las patas niveladoras tienen dos propósitos: Ajuste los controles donde se recomienda. 1) Las patas niveladoras se ajustan para que el refrigerador esté colocado firmemente en el piso y no tambalee. 2) Las patas niveladoras sirven como un freno estabilizador para sostener el refrigerador firmemente en posición durante la operación...
  • Page 107: Cómo Retirar La Gaveta Del Congelador

    Instrucciones para la instalación CÓMO RETIRAR LA GAVETA DEL CONGELADOR RETIRE EL FRENTE DE LA GAVETA Si es necesario, es posible retirar la gaveta del congelador para que el refrigerador quepa en áreas DESDE LAS CORREDERAS (cont.) estrechas. Levante ambos lados de la manija de la gaveta Lea estas instrucciones completa y cuidadosamente.
  • Page 108 Instrucciones para la instalación CÓMO REEMPLAZAR LA GAVETA DEL CONGELADOR UNA Y ASEGURE EL FRENTE DE Es posible que sean necesarias dos personas LA GAVETA A LAS CORREDERAS (cont.) para completar este procedimiento. Reemplace los tornillos en ambas ensambladuras de las correderas. UNA Y ASEGURE EL FRENTE DE LA GAVETA A LAS CORREDERAS Hale las ensambladuras de las correderas hasta...
  • Page 109: Cómo Invertir El Vaivén De La Puerta

    5/16” en la parte de abajo de la puerta. Destornillador de pala plana Cinta de enmascarar Coloque la puerta en una superficie que Destornillador Phillips Llave torx T-20 no raye con la parte interior hacia arriba.
  • Page 110 Instrucciones para la instalación RETIRE LA BISAGRA CENTRAL TRASLADE EL FRENO DE LA PUERTA DEL REFRIGERADOR Quite el perno de la bisagra desde el soporte de la bisagra. El perno de la bisagra se usará Retire el freno de la puerta en el lado derecho de nuevo con el nuevo soporte de la bisagra de la parte inferior de la puerta del refrigerador en el otro lado.
  • Page 111 Instrucciones para la instalación CÓMO INVERTIR EL VAIVÉN DE LA PUERTA (Modelos de refrigerador de una sola puerta únicamente) (cont.) VUELVA A COLGAR LA PUERTA INSTALE LA INSIGNIA DEL LOGO DEL REFRIGERADOR Quite el papel que cubre el adhesivo y alinee los pernos de la parte trasera de la insignia Baje la puerta del refrigerador en el pasador con los orificios de la puerta.
  • Page 112 Instrucciones para la instalación CÓMO RETIRAR LAS PUERTAS (Modelos de refrigerador de doble puerta únicamente) RETIRE LAS PUERTAS NOTAS IMPORTANTES DEL REFRIGERADOR NOTA: El vaivén de la puerta no es reversible. Pegue las puertas por completo con cinta. • Lea las instrucciones completas antes de empezar. •...
  • Page 113: Cómo Retirar La Gaveta

    Instrucciones para la instalación CÓMO RETIRAR LAS PUERTAS (cont.) RETIRE LA PUERTA CÓMO QUITAR LA BISAGRA CENTRAL DEL REFRIGERADOR (cont.) Mediante una llave de cubo de 5/16”, quite los pernos que sujetan la bisagra central Saque la tapa de la bisagra en la parte superior al gabinete.
  • Page 114: Cómo Volver A Colocar Las Puertas

    Instrucciones para la instalación CÓMO VOLVER A COLOCAR LAS PUERTAS (Modelos de refrigerador de doble puerta únicamente) INSTALE LA BISAGRA CENTRAL VUELVA A COLGAR LAS PUERTAS DEL REFRIGERADOR (CONT.) Instale la bisagra central en cada lado. En las puertas de la izquierda, pase los cables y línea de agua a través del pasador de la bisagra central.
  • Page 115: Del Congelador

    Instrucciones para la instalación CÓMO VOLVER A COLOCAR LAS PUERTAS (Modelos de refrigerador de doble puerta únicamente) (cont.) CÓMO ALINEAR LAS PUERTAS DOBLES Si la parte superior de las puertas está desigual, primero intente levantar la puerta más baja girando la pata niveladora en el mismo costado de la puerta hasta que las puertas estén niveladas.
  • Page 116: Instalación De La Tubería

    NOTA: La única tubería de plástico aprobada de un daño costoso por el agua. GE es la que viene provista con los kits de tubería El martilleo del agua (agua golpeando contra para el refrigerador SmartConnect de GE.
  • Page 117: Del Agua

    O bien SELECCIONE LA UBICACIÓN • Si está usando un kit de tubería para el refrigerador SmartConnect de GE, los accesorios DE LA VÁLVULA ™ necesarios ya vienen preinstalados en la tubería. Seleccione una ubicación para la válvula que sea fácilmente accesible.
  • Page 118: Instalación Del Refrigerador

    Apriete la tuerca de compresión firmemente. Para tubería de plástico de un kit de tubería para el refrigerador SmartConnect de GE, ™ Válvula de Tubería vertical inserte el extremo moldeado de la tubería apagado tipo silla de agua fría...
  • Page 119: Solucionar Problemas

    Sonidos normales de la operación. GEAppliances.com Los refrigeradores más nuevos producen sonidos diferentes a los modelos más antiguos. Los refrigeradores modernos tienen más funciones y usan tecnología más reciente. ¿Usted escucha lo que yo escucho? Estos sonidos son normales. ¡WHIR! HMMMM...
  • Page 120 Antes de solicitar un servicio… Problema Causas Posibles Qué hacer Vibraciones o sacudidas Las patas niveladoras • Vea Cómo nivelar el refrigerador. (una vibración ligera requieren un ajuste. es normal) El motor opera durante Es normal cuando • Espere 24 horas para que el refrigerador se enfríe períodos prolongados o el refrigerador es recién completamente.
  • Page 121 GEAppliances.com Problema Causas Posibles Qué hacer Sonido de zumbido El interruptor del suministro • Coloque el interruptor en la posición 0 (apagado). frecuente eléctrico de la máquina de Mantenerlo en la posición I (encendido) dañará hielos está en la posición la válvula de agua.
  • Page 122 Antes de solicitar un servicio… Problema Causas Posibles Qué hacer La puerta/gaveta Las patas niveladoras • Consulte la sección Instalación del refrigerador. no se cierra sola necesitan ajuste. La puerta/gaveta del Esto es normal si después de • Esto indica que hay un buen sellante en la puerta/gaveta congelador se abre abrirse, la puerta/gaveta del del congelador.
  • Page 123 GEAppliances.com Problema Causas Posibles Qué hacer La pantalla muestra La función TurboCool • Ver Sobre TurboCool para más información. se encuentra activada. La luz del indicador del Esto es normal. • Ver Sobre el filtro de agua para más información. filtro de agua cambió...
  • Page 124 Estados Unidos. Si el producto está situado en un área que no dispone de servicio por parte de un proveedor de servicio autorizado de GE, podría tener que hacerse cargo de los costes de envío o bien podría solicitársele que lleve el producto a una centro de servicio de GE autorizado para realizar la reparación.
  • Page 125: Ficha Técnica De Funcionamiento

    • Proteja el filtro de heladas. Drene el filtro cuando las temperaturas sean deberá • Sistema evaluado y certificado por NSF International contra NSF/ANSI Estándar 42 y Estándar 53 en el modelo GE MWF para la reducción de los reclamos especificados en la ficha técnica de rendimiento. ELEMENTOS DE REEMPLAZO...
  • Page 126: Avisos Especiales

    0,003 mg/L * Probado utilizando una tasa de flujo de 0,5 gpm (1,8927 l/min.); presión de 60 psig (4,218 Kg/cm2); pH de 7,5 ± 0,5; temp. de 20° ± 3°C ** Medición en partículas/ml. Las partículas usadas eran de 0,5–1 micrón.
  • Page 127 Notas…...
  • Page 128 Notas…...
  • Page 129 Notas…...
  • Page 130 Notas…...
  • Page 131 Notas…...
  • Page 132 Notas…...
  • Page 133 Notas…...
  • Page 134 Notas…...
  • Page 135: Servicio Al Consumidor

    Solicite una reparación GEAppliances.com El servicio de expertos GE está a tan sólo un paso de su puerta. ¡Entre en línea y solicite su reparación cuando le venga cualquier día del año! O llame al 800.GE.CARES (800.432.2737) durante horas normales de oficina.
  • Page 136: Parts And Accessories

    Contact Us GEAppliances.com In the U.S.: If you are not satisfied with the service you receive from GE, contact us on our Website with all the details including your phone number, or write to: General Manager, Customer Relations GE Appliances, Appliance Park Louisville, KY 40225 In Canada: www.GEAppliances.ca, or write to:...

Table des Matières