JVC MX-K30 Manuel D'instructions
Table des Matières
Les langues disponibles
Les langues disponibles
Liens rapides
COMPACT COMPONENT SYSTEM
SYSTEME DE COMPOSANTS COMPACT
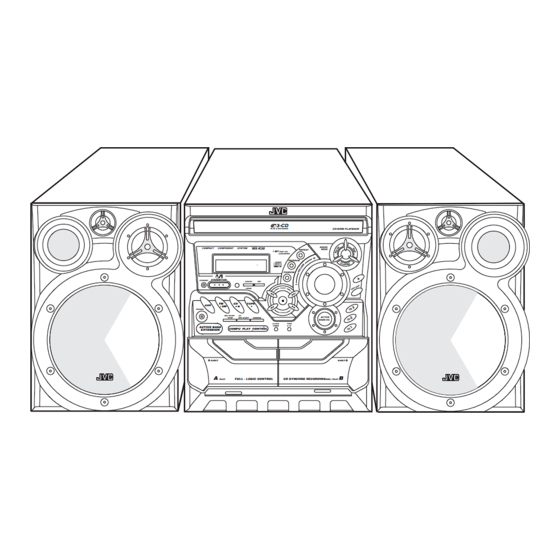
MX-K30/MX-K10
Consists of CA-MXK30 and SP-MXK30
Consists of CA-MXK10 and SP-MXK10
Se compose de CA-MXK30 et de SP-MXK30
Se compose de CA-MXK10 et de SP-MXK10
STANDBY/ON
SLEEP
AUX
FM MODE
FM /AM
1
2
3
CD
CD
CD
CD
PROGRAM
REPEAT
/RANDOM
TAPE
TAPE
A/B
SOUND
VOLUME
MODE
ACTIVE
FADE
BASS EX.
MUTING
SP-MXK30
BASS-REFLEX
STANDBY/ON
SLEEP
AUX
FM MODE
FM /AM
1
2
3
CD
CD
CD
CD
PROGRAM
REPEAT
/RANDOM
TAPE
TAPE
A/B
SOUND
VOLUME
MODE
ACTIVE
FADE
BASS EX.
MUTING
SP-MXK10
INSTRUCTIONS
MANUEL D'INSTRUCTIONS
3-CD
PLAY & EXCHANGE
CD-R/RW PLAYBACK
SOUND
COMPACT
COMPONENT
SYSTEM
MX-K30
REPEAT
MODE
1 BIT
DUAL D/A
CONVERTER
PROGRAM
PANDOM
STANDBY/ON
STANDBY
CANCEL
SET
/ DEMO
PRESET
FM
CD
TAPE
AUX
/ AM
PHONES
TUNING
REC START
CD
/ STOP
REC START
DUBBING
ACTIVE
BASS EX.
CLOCK
TAPE
/TIMER
A / B
ACTIVE BASS
COMPU PLAY CONTROL
EXTENSION
EJECT
EJECT
A
B
FULL - LOGIC CONTROL
CD SYNCHRO RECORDING
PLAY
REC / PLAY
CA-MXK30
SP-MXK30
BASS-REFLEX
3-CD
PLAY & EXCHANGE
CD-R/RW PLAYBACK
SOUND
MX-K10
COMPACT
COMPONENT
SYSTEM
MODE
REPEAT
1 BIT
DUAL D/A
CONVERTER
PROGRAM
PANDOM
STANDBY/ON
STANDBY
CANCEL
SET
/ DEMO
PRESET
FM
CD
TAPE
AUX
/ AM
PHONES
TUNING
REC START
CD
/ STOP
REC START
DUBBING
ACTIVE
BASS EX.
CLOCK
TAPE
/TIMER
A / B
ACTIVE BASS
COMPU PLAY CONTROL
EXTENSION
EJECT
EJECT
A
B
FULL - LOGIC CONTROL
CD SYNCHRO RECORDING
PLAY
REC / PLAY
CA-MXK10
SP-MXK10
For Customer Use:
Enter below the Model No. and Serial No.
which are located either on the rear, bot-
tom or side of the cabinet. Retain this
information for future reference.
Model No.
Serial No.
LVT0860-002D
44-1104-1
[C]
Chapitres
Table des Matières
Dépannage

Manuels Connexes pour JVC MX-K30


Sommaire des Matières pour JVC MX-K30
- Page 30 • La fonction COMPU PLAY de JVC permet de mettre la chaîne sous tension et d'allumer automatiquement la radio, la platine à cassette ou le lecteur CD en enfonçant une seule touche.
- Page 31 Table des matières Introduction ........................1 Fonctions ..............................1 Structure du manuel..........................1 PRECAUTIONS IMPORTANTES......................1 Table des matières ......................2 Introduction ........................3 Accessoires .............................. 3 Comment insérer les piles dans la télécommande ................... 3 Utilisation de la télécommande ....................... 3 Raccordement de l'antenne FM ....................... 4 Branchement de l'antenne AM ........................
-
Page 32: Introduction
Introduction Accessoires Vérifier si vous avez bien reçu tous les éléments suivants, livrés avec la chaîne. Antenne cadre AM (1) Télécommande (1) Piles (2) Fil d'antenne FM (1) Si un de ces éléments devait manquer, contacter immédiatement le revendeur. Comment insérer les piles dans la télécommande Faire correspondre la polarité... -
Page 33: Raccordement De L'antenne Fm
Introduction ATTENTION: • Effectuer tous les branchements avant de raccorder la chaîne à une prise secteur. Raccordement de l'antenne FM Utilisation du fil d'antenne livré Fil d'antenne FM (livré) Déployer l'antenne à fil FM fournie à l'horizontale. Dénuder la gaine en vinyle à la ligne de découpe et torsader l'âme du fil. -
Page 34: Branchement De L'antenne Am
Introduction Branchement de l'antenne AM Dos de l'appareil Tourner le cadre pour avoir la meilleure réception possible. Antenne cadre AM (fournie) Fixer le cadre AM à son socle en insérant à fond les languettes du cadre dans la fente du socle. Fil d'antenne AM (non fourni) Si la réception est mauvaise, raccorder une antenne externe. -
Page 35: Raccordement À Une Prise Secteur
COMPU PLAY La fonction COMPU PLAY de JVC permet de contrôler les fonctions de la chaîne le plus souvent utilisées en appuyant sur une seule touche. Ces opérations à une touche permettent d'écouter un CD, une cassette, d'allumer la radio ou d'écouter un équipement externe en appuyant simplement sur la touche de lecture correspondant à... -
Page 36: Opérations De Base
Opérations de base 3-CD PLAY & EXCHANGE CD-R/RW PLAYBACK STANDBY/ON % STANDBY/ON SOUND COMPACT COMPONENT SYSTEM REPEAT MODE SOUND MODE 1 BIT DUAL D/A SLEEP CONVERTER PROGRAM Touches Affichage numériques Indicateur de veille PANDOM STANDBY/ON VOLUME STANDBY STANDBY CANCEL FM MODE FM /AM / DEMO PRESET... -
Page 37: Fonction De Fondu (Fade Muting)
Opérations de base Fonction de fondu (FADE MUTING) Saisie du numéro avec la télé- commande (touches numériques) Vous pouvez assourdir la diffusion sonore par le biais d'une opéra- tion à une touche. Utiliser les touches numériques de la télécommande pour saisir les numéros en vue de présélectionner les émetteurs, de rappeler les Pour couper la diffusion du son, appuyer sur la touche émetteurs présélectionnés ou de programmer les plages à... -
Page 38: Utilisation Du Tuner
Utilisation du tuner 3-CD 3-CD PLAY & EXCHANGE PLAY & EXCHANGE CD-R/RW PLAYBACK CD-R/RW PLAYBACK STANDBY/ON SOUND SOUND COMPACT COMPACT COMPONENT COMPONENT SYSTEM SYSTEM REPEAT REPEAT MODE MODE 1 BIT 1 BIT DUAL D/A DUAL D/A Touches CONVERTER CONVERTER SLEEP PROGRAM PROGRAM numériques... -
Page 39: Présélection Des Stations
Utilisation du tuner ATTENTION: • Même si la chaîne est débranchée ou en cas de • En mode d'émission AM, vous pouvez changer la sensi- coupure de courant, les stations restent plu- bilité de la réception en tournant l'antenne cadre AM. Tourner l'antenne cadre AM de manière à... -
Page 40: Utilisation Du Lecteur Cd
Utilisation du lecteur CD 3-CD PLAY & EXCHANGE CD-R/RW PLAYBACK STANDBY/ON SOUND COMPACT COMPONENT SYSTEM REPEAT MODE 1 BIT DUAL D/A Touches CONVERTER PROGRAM Ouvrir/fermer numériques SLEEP tiroir CD 0 PANDOM CANCEL STANDBY/ON STANDBY CANCEL DISK SKIP / DEMO PRESET FM MODE FM /AM ¢... -
Page 41: Pour Charger Des Cd
Utilisation du lecteur CD Exemple d'indication: Lorsque la porte du tiroir CD a éjecté le CD puis que vous avez appuyé sur CD-1. (Le DISQUE1 est sélectionné) • Lorsque vous placez un disque dans le tiroir, assurez- Indique que ce numéro de disque est sélectionné. vous que celui-ci est correctement positionné... -
Page 42: Notions De Base Pour L'utilisation Du Lecteur Cd - Lecture Normale
Utilisation du lecteur CD • Retrait/changement de CD pendant la lecture Notions de base pour l'utilisation Pendant la lecture d'un CD (par ex. CD-1), vous pouvez retirer ou changer les autres CD (par ex. CD-2 et CD-3) en réappuyant sur la du lecteur CD - Lecture normale touche CD Ouvrir/Fermer 0. -
Page 43: Programmation De L'ordre De Lecture Des Plages
Utilisation du lecteur CD Répéter les opérations 3 et 4 pour program- Programmation de l'ordre de mer d'autres plages du même CD ou d'un lecture des plages autre CD. Pour écouter le programme, appuyer sur la Vous pouvez programmer l'ordre de lecture des plages sur tous les CD. -
Page 44: Lecture Aléatoire
Utilisation du lecteur CD Lecture aléatoire Fonction de verrouillage du tiroir Lorsque vous utilisez ce mode, vous écouterez les plages du CD Afin de pouvoir conserver en toute sécurité les CD dans le lecteur, dans n'importe quel ordre. il est possible de verrouiller le tiroir de manière électronique. •... -
Page 45: Utilisation De La Platine À Cassette (Écoute D'une Cassette)
Utilisation de la platine à cassette (écoute d'une cassette) 3-CD PLAY & EXCHANGE CD-R/RW PLAYBACK STANDBY/ON SOUND COMPACT COMPONENT SYSTEM REPEAT MODE 1 BIT DUAL D/A CONVERTER PROGRAM SLEEP PANDOM STANDBY/ON STANDBY CANCEL / DEMO PRESET TAPE 3 FM MODE FM /AM TAPE / AM... -
Page 46: Utilisation De La Platine À Cassette (Enregistrement)
Utilisation de la platine à cassette (enregistrement) 3-CD STANDBY/ON PLAY & EXCHANGE CD-R/RW PLAYBACK SLEEP SOUND COMPACT COMPONENT SYSTEM REPEAT MODE 1 BIT DUAL D/A CONVERTER PROGRAM PROGRAM FM MODE FM /AM PANDOM STANDBY/ON STANDBY CANCEL TAPE 3 / DEMO PRESET TAPE / AM... -
Page 47: Enregistrement Normal
Utilisation de la platine à cassette (enregistrement) Insérer une cassette vierge ou effaçable Enregistrement normal dans la platine B et bobiner l'amorce. Appuyer sur la touche CD REC START de Il s'agit de la méthode de base pour enregistrer n'importe quelle source. La chaîne possède également des fonctions spéciales pour enregistrer un CD l'appareil. -
Page 48: Branchement D'équipements Externes
Branchement d'équipements externes STANDBY/ON 3-CD PLAY & EXCHANGE CD-R/RW PLAYBACK SLEEP SOUND COMPACT COMPONENT SYSTEM REPEAT MODE 1 BIT DUAL D/A CONVERTER PROGRAM FM MODE FM /AM PANDOM STANDBY/ON STANDBY CANCEL / DEMO PRESET TAPE / AM PHONES TUNING REC START ACTIVE / STOP REC START... -
Page 49: Utilisation Des Minuteries
Utilisation des minuteries 3-CD PLAY & EXCHANGE CD-R/RW PLAYBACK STANDBY/ON SOUND COMPACT COMPONENT SYSTEM MODE REPEAT 1 BIT DUAL D/A ¢ CONVERTER PROGRAM SLEEP SLEEP PANDOM STANDBY/ON STANDBY CANCEL / DEMO PRESET FM MODE FM /AM TAPE / AM PHONES TUNING REC START / STOP... -
Page 50: Réglage De La Minuterie Quotidienne
Utilisation des minuteries 2. Appuyer sur les touches ¢ ou 4 pour régler les minutes Réglage de la minuterie quotidienne puis appuyer sur SET. Une fois que vous avez programmé la minuterie quotidienne, celle-ci se met en marche tous les jours à la même heure. L'indicateur de la minuterie ( ) montre que la minuterie quotidi- DAILY... -
Page 51: Programmation De La Minuterie Rec (Enregistrement)
Utilisation des minuteries Préparation pour chaque source de musique: Effectuer l'opération suivante en fonction de la source de mu- sique sélectionnée. La chaîne se met ensuite en mode de • Si la chaîne est déjà sous tension lorsque l'heure d'activa- réglage du volume. -
Page 52: Activation Et Désactivation De La Minuterie Rec (Enregistrement)
Utilisation des minuteries Lorsque l'heure d'activation est atteinte: Sur l'appareil • Lorsque l'heure d'activation est atteinte, la chaîne se met Vous pouvez programmer l'heure comme pour la minuterie quotidienne. automatiquement sous tension. Vous entendez alors la station Insérer une cassette vierge ou effaçable dans programmée. -
Page 53: Programmation De La Minuterie Sleep
Utilisation des minuteries Programmation de la minuterie Priorité des minuteries SLEEP Etant donné que vous pouvez programmer chacune des minuteries séparément, vous pouvez vous demander ce qui se passera en cas Utiliser la minuterie Bonsoir pour éteindre la chaîne après un cer- de chevauchement des réglages. -
Page 54: Nettoyage Et Entretien
Nettoyage et entretien Cassettes Manipuler vos CD et vos cassettes avec grand soin, pour qu'ils du- rent plus longtemps. Disques compacts • Si la bande n'est pas suffisamment ten- due dans la cassette, retendez-la en fai- sant tourner un crayon inséré dans un •... -
Page 55: Guide De Dépannage
Guide de dépannage • Si vous avez des problèmes avec votre chaîne, vérifier la liste ci-dessous en vue d'y trouver une solution éventuelle avant d'appeler le service technique. • Si vous ne parvenez pas à résoudre les problèmes après avoir examiné les conseils donnés ou si la chaîne est physiquement endom- magée, appeler du personnel qualifié, comme votre revendeur, pour une intervention technique.