Publicité

Les langues disponibles

Les langues disponibles

Liens rapides

1300W
OBERFRÄSE
DÉFONCEUSE
FRESATRICE VERTICALE
ELECTRIC ROUTER
GEBRAUCHSANWEISUNG I MANUEL D'UTILISATION I
MANUALE DI ISTRUZIONI I OPERATOR'S MANUAL

Publicité

Table des Matières
loading

Sommaire des Matières pour Ayce 1300W

  • Page 1 1300W OBERFRÄSE DÉFONCEUSE FRESATRICE VERTICALE ELECTRIC ROUTER GEBRAUCHSANWEISUNG I MANUEL D'UTILISATION I MANUALE DI ISTRUZIONI I OPERATOR'S MANUAL...
  • Page 2: Technische Daten

    Führungsbuchse 1 Stk. Führungsstab . 1 Stk. WICHTIGE INFORMATIONEN ayce Power Tool behält sich das Recht vor, das Design und die technischen Spezifikationen dieses Produktes jederzeit und ohne Vorankündigung zu modifizieren und zu verbessern. LISTE DER HAUPTTEILE WARNUNG 1 Feineinstellung...
  • Page 3: Bestimmungsgemässe Verwendung

    DE D BESTIMMUNGSGEMÄSSE VERWENDUNG 15. Lassen Sie das Werkzeug nach Beendigung der Arbeit durch Loslassen des Griffs in die Originalposition zurückkehren. Diese Oberfräse ist zum Bearbeiten von Holz und Plastik und zum Herausschneiden 16. Machen Sie sich mit dem Arbeitsbereich vertraut und achten Sie auf mögliche von Knoten, zum Schneiden von Rillen, zum Entfernen von Einschnitten, zum Kopieren Gefahren, die Sie aufgrund des Maschinengeräuschs eventuell nicht hören.
  • Page 4 DE D ALLGEMEINE SICHERHEITSHINWEISE ZUM WERKZEUG elektrischen Schlags. e) Verwenden Sie bei Einsatz eines Elektrowerkzeugs im Freien nur für den Lesen Sie alle Sicherheitshinweise und Anweisungen. Die Aussenbereich geeignete Verlängerungskabel. Die Verwendung eines Nichtbeachtung von Sicherheitshinweisen und Anweisungen kann für den Aussenbereich geeigneten Kabels verringert das Risiko eines einen Stromschlag, Brand und/oder schwere Verletzungen elektrischen Schlags.
  • Page 5 DE D GEHÖRSCHUTZ TRAGEN! 4. Verwendung und Pflege des Elektrowerkzeugs a) Überlasten Sie das Elektrowerkzeug nicht. Verwenden Sie das für Ihre Arbeit Schwingungsgesamtwerte (Vektorsumme dreier Richtungen) ermittelt entsprechend vorgesehene Elektrowerkzeug. Mit dem richtigen Elektrowerkzeug können EN 60745: Sie im angegebenen Leistungsbereich besser und sicherer arbeiten Der in diesem Dokument angegebene Schwingungsemissionswert wurde mit b) Verwenden Sie das Gerät nicht, wenn der An-/Aus-Schalter sich nicht einem Verfahren ermittelt, das dem gemäss EN 60745-1 vorgeschriebenen...
  • Page 6: Beschreibung Der Symbole

    In dieser Bedienungsanleitung und/oder am Gerät werden die folgenden Symbole verwendet. Diese Symbole vermitteln wichtige Informationen über das Gerät oder Vor dem Einsatz bitte das entsprechende Kapitel im dessen Verwendung. Benutzerhandbuch lesen. 1300W 6mm,8mm Fräseinsatz Nennleistung 1300W Ø 6&8mm Diese Symbole weisen daraufhin, dass während der Verwendung des Produkts Gehörschutz, Augenschutz,...
  • Page 7 12 13 DE D BETRIEB b. Installieren der Parallelführung (Abb.2) Abb. 2 1. Die Parallelführung ist eine effiziente 1. Vor dem Betrieb Hilfe zum geradlinigen Schneiden • Entfernen Sie sämtliches Verpackungsmaterial und lose Teile von dem Gerät. beim Abkanten oder Einkerben. •...
  • Page 8 14 15 DE D 3. Bewegen Sie den Tiefenanschlag nach unten in Richtung des Kranzes und f. Geschwindigkeitsregler (Abb.6) erfassen Sie den auf „0“ gesetzten Massstab Abb. 6 Die gewünschte Geschwindigkeit wird mit 4. Stellen Sie den Tiefenanschlag ein, drücken Sie entgegen des Uhrzeigersinns dem Drehknopf ausgewählt (auch während des Betriebs möglich).
  • Page 9 16 17 DE D 4. Schalten Sie die Fräse an. Lösen Sie den Spannhebel zur Der Spanschutz dient dazu, Staub und Späne vom Bediener abzuleiten. Frästiefenarretierung und lassen Sie die Fräse langsam auf das Werkstück Er kann keine Objekte aufhalten, die grösser als Holzspäne sind und herunter, bis der eingestellte Tiefenanschlag erreicht ist.
  • Page 10 18 19 DE D WARTUNG 2. Zur Kontrolle der Oberfräse halten Sie beide Hände an den Griffen. 3. Drehen Sie die Oberfräse beim Schneiden von Aussenkanten gegen den ACHTUNG! Uhrzeigersinn. Drehen Sie die Oberfräse beim Schneiden von Innenkanten im Schalten Sie das Werkzeug vor dem Durchführen von Einstellungen oder Uhrzeigersinn.
  • Page 11 Wahl getroffen. Unsere Qualitätsverpflichtung schliesst auch unseren Vorname Nachname Kundendienst ein. Jumbo bietet einen ausgezeichneten Reparaturdienst für alle ayce Produkte an. Strasse/Hausnummer Telefon Sollte Ihr Gerät entgegen aller Erwartungen bei der privaten Nutzung innerhalb von FÜNF JAHREN ab Kaufdatum einen...
  • Page 12: Eu-Konformitätserklärung

    Die alleinige Verantwortung für die Ausstellung dieser Konformitätserklärung trägt der Hersteller. Gegenstand der Erklärung: Oberfräse Modell: 1328 Spannung: 230-240V~ 50Hz Marke: ayce Der oben beschriebene Gegenstand der Erklärung erfüllt die einschlägigen Harmonisierungsrechtsvorschriften der Union: EMV-Richtlinie 2014/30/EG Maschinenrichtlinie 2006/42/EG RoHS-Richtlinie 2011/65/EG Angabe der einschlägigen harmonisierten Normen, die zugrunde gelegt wurden,...
  • Page 13: Technische Zeichnung

    24 25 DE D TECHNISCHE ZEICHNUNG ERSATZTEILE Nr Teilebezeichnung Anz. Nr Teilebezeichnung Anz. 1 Schraube 43 Drehplatte 2 Grundplatte 44 Blechschraube 3 Basisgruppe 45 Abdeckung rechter Griff 4 Feder 46 Kabelanschluss 5 Arretierbolzen 47 Schalter 6 Balgdichtung 48 Blechschraube 7 Staubsaugeranschluss 49 Abdeckung 8 Sechskantmutter 50 Schwamm...
  • Page 14 26 27 DE D NOTIZEN NOTIZEN 180619_ayce_1328_IM 180619_ayce_1328_IM...
  • Page 15: Caractéristiques Techniques

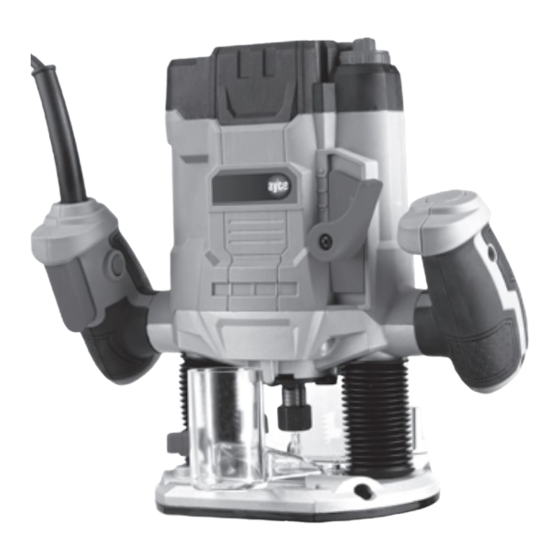
    Clé Bague de copiage Tige de guidage ORMATIONS IMPORTANTES ayce Power Tool se réserve le droit de modifier et d’améliorer à tout moment et sans préavis le design et les spécifications techniques de ce produit. ELEMENTS PRINCIPAUX 11 Interrupteur marche/arrêt AVERTISSEMENT 1 Bouton de précision de réglage...
  • Page 16: Domaine D'utilisation

    30 31 FR F DOMAINE D'UTILISATION 16. Familiarisez-vous avec l’aire de travail. Soyez vigilant vis-à-vis des dangers potentiels que vous pourriez ne pas entendre à cause du bruit généré par Cet outil est conçu pour travailler le bois et le plastique, ainsi que pour réaliser des l’outil.
  • Page 17: Avertissements De Sécurité Généraux Pour L'outil

    32 33 FR F AVERTISSEMENTS DE SÉCURITÉ GÉNÉRAUX POUR L’OUTIL une alimentation protégée par un dispositif à courant différentiel résiduel (RCD). L’usage d’un RCD réduit le risque de choc électrique. AVERTISSEMENT. Lire tous les avertissements de sécurité et toutes les instructions. Ne pas suivre les avertissements et instructions 3.
  • Page 18: Information Sur Le Bruit Et Les Vibrations

    34 35 FR F batterie de l’outil avant tout réglage, changement d’accessoires ou avant de Remarque : Pour une estimation précise de la sollicitation vibratoire pendant un certain temps d’utilisation, il est recommandé de prendre aussi en considération les ranger l’outil. De telles mesures de sécurités préventives réduisent le risque espaces de temps pendant lesquels l’appareil est éteint ou en fonctionnement, mais de démarrage accidentel de l’outil.
  • Page 19: Description Des Symboles

    Puissance de sortie nominale Fraise de 6 ou 8 mm Ce type de symbole oblige l’utilisateur à porter des 1300 W 1300W Ø 6&8mm équipements de protection lors de toute utilisation de la machine. Ces équipements de protection doivent porter le marquage.
  • Page 20: Avant Utilisation

    38 39 FR F UTILISATION b. Assembler le guide parallèle (Fig 2) Fig. 2 1. Le guide parallèle est très utile pour 1. Avant utilisation travailler en ligne droite quand vous • Retirez tous les éléments d’emballage et toutes les pièces non fixées de l’outil. chanfreinez ou rainurer.
  • Page 21: Plastique

    40 41 FR F 4. Réglez la jauge de profondeur sur la profondeur de fraisage requise, puis Matériau Fraise Vitesses déverrouillez le levier de blocage de la plongée en le tournant dans le sens Bois dur 4-10 mm antihoraire et ramenez la défonceuse dans sa position haute. (Hêtre) 12-20 mm correctement réglée et corrigez le réglage si nécessaire.
  • Page 22 42 43 FR F ATTENTION: Veillez à ce que le déflecteur 5. Déplacez la défonceuse en exerçant une légère pression latérale pour que la Fig. 9 bague de copiage suive bien la forme du gabarit. de copeaux soit toujours sur la semelle pendant l’utilisation de la défonceuse.
  • Page 23: Entretien

    44 45 FR F ENTRETIEN en sorte que la fraise soit positionnée directement au-dessus du point que vous voulez couper. Une fois la défonceuse allumée, abaissez lentement ATTENTION ! l’unité dans la pièce à travailler (NE FORCEZ PAS LA DÉFONCEUSE VERS LE BAS).
  • Page 24: Certificat De Garantie

    N° de modèle Code barre (EAN) engagement de qualité inclut également notre service de réparation. Jumbo offre un excellent service de réparation, pour tous les produits ayce. Si, contre toute attente, vous rencontrez un problème dû à un Garantie (cochez la case) défaut de fabrication ou de matériau dans le cadre d’un usage...
  • Page 25: Déclaration Ue De Conformité

    Objet de la déclaration: Défonceuse Modèle: 1328 Tension nominale: 230-240V~ 50Hz Marque: ayce L’objet de la déclaration décrit ci-dessus est conforme à la législation d’harmonisation de l’Union applicable: 2014/30/CE « Compatibilité électromagnétique » 2006/42/CE « Machines » 2011/65/UE « ROHS »...
  • Page 26: Vue Éclatée

    50 51 FR F LISTE DES PIÈCES VUE ÉCLATÉE N° Dénomination des pièces Qté N° Dénomination des pièces Qté 43 Butée de niveau Semelle 44 Vis autotaraudeuse Embase 45 Partie extérieure de la poignée droite Ressort 46 Ancrage de cordon d’alimentation Vis de blocage 47 Interrupteur marche/arrêt Soufflet...
  • Page 27 52 53 FR F REMARQUE REMARQUE 180619_ayce_1328_IM 180619_ayce_1328_IM...
  • Page 28: Caratteristiche Tecniche

    Piastrina di guida 1 pz. Biella di guida 1 pz. INFORMAZIONI IMPORTANTI ayce Power si riserva il diritto di modificare e migliorare il prodotto e le sue specifiche tecniche in qualsiasi momento e senza preavviso. ELENCO DEI COMPONENTI PRINCIPALI AVVERTENZA...
  • Page 29: Uso Previsto

    56 57 IT I USO PREVISTO 17. Attenzione: Aspettare che la punta si fermi completamente dopo aver spento l’apparecchio. Aspettare che la macchina sia completamente ferma prima di Questo apparecchio è progettato per lavorare legno e plastica e anche per tagliare togliere la punta dal pezzo.
  • Page 30: Norme Di Sicurezza Generali

    58 59 IT I NORME DI SICUREZZA GENERALI umido, collegarsi ad un impianto di alimentazione elettrica protetto da un interruttore differenziale (RCD). L’utilizzo di un interruttore RCD limita i AVVERTENZA! Leggere con attenzione tutte le avvertenze e tutte le rischi di scosse elettriche. istruzioni.La mancata osservanza delle istruzioni riportate di seguito potrebbe provocare incidenti quali incendi, scosse elettriche e/o gravi 3.
  • Page 31: Informazioni Sulla Rumorosità E Sulle Vibrazioni

    60 61 IT I c). Scollegare l’apparecchio o rimuovere la batteria prima di procedere ad Questo può aumentare sensibilmente la sollecitazione da vibrazioni per l’intero eventuali regolazioni, alla sostituzione degli accessori o prima di riporlo. In periodo di tempo operativo. questo modo è...
  • Page 32: Descrizione Dei Simboli

    62 63 IT I DESCRIZIONE DEI SIMBOLI Riciclare i materiali di scarto piuttosto che smaltirli. 1. Simboli di sicurezza Tutte le apparecchiature e gli imballaggi devono L’uso di simboli nel presente manuale ha lo scopo di informare circa i possibili rischi. È essere differenziati e portati presso un centro locale opportuno acquisire una perfetta familiarità...
  • Page 33 64 65 IT I FUNZIONAMENTO b. Installazione della guida parallela (Fig.2) Fig. 2 1. La guida parallela è uno strumento 1. Prima dell’uso efficace per tagliare in linea retta • Rimuovere il materiale di imballaggio e gli altri oggetti estranei dall’apparecchio. quando bisogna smussare o scanalare.
  • Page 34 66 67 IT I 4. Regolare la boccola di arresto alla profondità di fresatura richiesta, spostare la leva f. Regolatore di velocità (Fig.6) di blocco dell’abbassamento in senso antiorario e guidare la fresatrice nuovamente Fig. 6 La velocità può essere selezionata verso l’alto.
  • Page 35 68 69 IT I Lo schermo anti-trucioli aiuta a proteggere l’operatore dalla polvere e 4. Accendere la fresatrice. Rilasciare la leva di blocco dell’abbassamento dai trucioli. Non consente tuttavia di arrestare oggetti più grandi di un e abbassare lentamente la fresatrice fino a quando il dispositivo di truciolo di legno lanciati dalla punta.
  • Page 36 70 71 IT I MANUTENZIONE posizionato tra l’operatore e la punta. 5. Dopo avere impostato la profondità di taglio, posizionare la fresatrice in modo ATTENZIONE! che la punta sia direttamente sopra il punto che si desidera tagliare. Mentre Scollegare sempre l’apparecchio dalla presa elettrica prima di qualsiasi operazione la fresatrice è...
  • Page 37: Certificato Di Garanzia

    Cognome Congratulazioni per avere acquistato questo prodotto di alta qualità. Il nostro impegno per la qualità include anche l'assistenza. Jumbo dispone di un eccellente servizio di riparazione, per tutti e prodotti ayce. Via/Num. Telefono Qualora si riscontrino difetti relativi ai materiali o alla fabbri-...
  • Page 38: Dichiarazione Di Conformità Ue

    La presente dichiarazione di conformità è rilasciata sotto la responsabilità esclusiva del fabbricante. Oggetto della dichiarazione : Utensile Multifunzione Modello: 1328 Tensione nominale: 230-240V~ 50Hz Marchio: ayce L’oggetto della dichiarazione di cui sopra è conforme alla pertinente normativa di armonizzazione dell’Unione: Compatibilità elettromagnetica (2014/30/CE ) Macchine (2006/42/CE) ROHS (2011/65/CE)
  • Page 39: Elenco Dei Pezzi Di Ricambio

    76 77 IT I SCHEMI TECNICI ELENCO DEI PEZZI DI RICAMBIO Num. Nome pezzo QTÀ Num. Nome pezzo QTÀ Vite Elemento rotante Piastra base Vite autofilettante Montaggio base Coperchio impugnatura destra Molla Ancoraggio del cavo Bullone di blocco Interruttore Guarnizione con tenuta a soffietto Vite autofilettante Adattatore di aspirazione Coperchio...
  • Page 40 78 79 IT I NOTA NOTA 180619_ayce_1328_IM 180629_ayce_1328_IM...
  • Page 41: Technical Specifications

    Parallel guide Wrench Guide brushing Duide rod IMPORTANT INFORMATION At any time and without prior notice ayce Power tool reserves the right to change and improve the design and the technical specifications of this product. LIST OF MAIN PART WARNING...
  • Page 42: Intended Use

    82 83 INTENDED USE 18. Never slow the router down with your hands. 19. Do not touch the bit immediately after operation; it may be extremely hot and The machine is intended for machining wood and plastic and also for cutting out knots, could burn you.
  • Page 43: General Safety Warnings For The Tool

    84 85 GENERAL SAFETY WARNINGS FOR THE TOOL influence of drugs, alcohol or medication. A moment of inattention while operating power tools may result in serious personal injury. WARNING Read all safety warnings and instructions. Failure to b) Use personal protective equipment. Always wear eye protection. Protective follow all the warnings and instructions may result in electric shock, equipment such as dust mask, non-skid safety shoes, hard hat, or hearing fire and/or serious injury.
  • Page 44: Noise/Vibration Information

    86 87 DESCRIPTION OF THE SYMBOLS g) Use the power tool, accessories and tool bits etc. in accordance with these instructions, taking into account the working conditions and the work to be 1. Safety symbols performed. Use of the power tool for operations different from intended could The use of symbols in this manual is intended to draw your attention to possible risks.
  • Page 45: Functions

    3. Keep the spindle lock button depressed and tighten the collets nut using the wrench. 1300W Rated output 6mm,8mm bit 4. Release the spindle lock. 1300W To remove the bit Ø...
  • Page 46 90 91 b. Installing parallel guide (Fig.2) The coarse adjustment of the depth-of-cut should be checked by a trial cut and corrected, if necessary. Fig. 2 1. The parallel guide is an effective aid Fine adjusting the depth of cut to cutting in a straight line when chamfering or grooving.
  • Page 47 92 93 Note: the template must have a minimum thickness of 6mm, due to the projecting Material Router Speed stages height of the guide bushing. Hardwood 4-10 mm h. Routing circular arc profiles (Fig.8) (Beech) 12-20 mm 1. Remove the parallel guide and insert the guide rods into the base plate, tighten 22-40 mm centering pin to guide rods with wing bolt.
  • Page 48 94 95 MAINTENANCE j. On/off switch (Fig.10) The tool is equipped with a lock-off CAUTION! button to avoid unintentional starting. Always disconnect the device before performing any adjustment or maintenance Before plugging the tool operation. If the supply cord is damaged, it must be replaced by the manufacturer or into the power point its service agent in order to avoid a hazard.
  • Page 49: Warranty Certificate

    Congratulations! You have made an excellent choice with the purchase of this quality First name Last name product. Our commitment to quality also includes our service. Jumbo offers an excellent repair service, exclusively in Switzerland, for all ayce Street/No. Telephone products.
  • Page 50: Eu Declaration Of Conformity

    Object of the declaration Electric router Model: 1328 Rated voltage: 230-240V~ 50Hz Brand: ayce 5. The object of the declaration described above is in conformity with the relevant 2014/30/EU “Electromagnetic Compatibility” 2006/42/EC “Machinery” 2011/65/EU “RoHS” 6. References to the relevant harmonised standards used, including the date of the...
  • Page 51: Technical Drawing

    100 101 SPARE PARTS TECHNICAL DRAWING Part Name Part Name Screw Turntable Base Plate Tapping Screw Base Assembly Right Handle Cover Spring Cord Anchorage Lock Bolt Switch Bellows Seal Tapping Screw Vacuum Adapter Cover Hexagon Nut Sponge Lock Nut Screw With Nut Pinchcock Rear Cover Tapping Screw...
  • Page 52 102 103 NOTE NOTE 180619_ayce_1328_IM 180619_ayce_1328_IM...
  • Page 53 CH-Import & Distributed exclusively by: Jumbo-Markt AG, Industriestrasse 34 8305 Dietlikon...

Table des Matières