Gaggia Milano CADORNA STYLE RI9600 Mode D'emploi

Manuels Connexes pour Gaggia Milano CADORNA STYLE RI9600


Sommaire des Matières pour Gaggia Milano CADORNA STYLE RI9600
-
Page 2: Control Panel / Bandeau De Commande
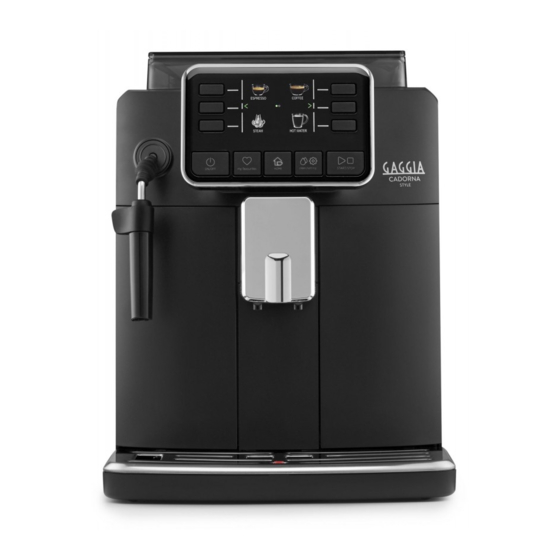
Control panel / Bandeau de commande ESPRESSO COFFEE STEAM HOT WATER ON/OFF my favourites clean/setting START/STOP HOME Beverage menu / Menu des boissons Ristretto Coffee / Café Coffee / Café 30 ml Coffee / Café 120 ml Espresso Americano Coffee / Café 40 ml Coffee / Café... - Page 3 4219-450-07541 MANUAL GAG. CAD. PLUS EN-FR 120US rev_2.indd 3 23/04/2020 09:31:01...
-
Page 4: First Installation / Première Installation
First installation / Première installation Welcome LANGUAGE LANGUAGE CECO SLOVENIJA SLOVENIJA LIETUVOS ENGLISH LIETUVOS ITALIANO ENGLISH ITALIANO DEUTSCH DEUTSCH FRANÇAIS FRANÇAIS ESPAÑOL ESPAÑOL PORTUGUÊS ON/OFF clean/setting START/STOP my favourites HOME ON/OFF clean/setting my favourites HOME START/STOP ON/OFF my favourites HOME clean/setting START/STOP Confermi di voler... - Page 5 English Français 4219-450-07541 MANUAL GAG. CAD. PLUS EN-FR 120US rev_2.indd 5 23/04/2020 09:31:05...
- Page 38 Français Table des matières Informations de sécurité ..................................................................................................Vue d’ensemble de la machine (Fig. 2) ........................................................................... Bandeau de commande et afficheur ................................................................................Vue d’ensemble du bandeau de commande (Fig. 1) ................................................................Touches multifonction ......................................................................................................Première installation ........................................................................................................Cycle de rinçage manuel ..................................................................................................
-
Page 39: Important
Français IMPORTANT Lors de l’utilisation d’appareils électriques, il est indispensable de respecter toujours les précautions de sécurité principales, y compris les suivantes: 1. Lire toutes les instructions. 2. Ne pas toucher les surfaces chaudes. Utiliser les poignées ou les boutons. 3. -
Page 40: Précautions
Français PRÉCAUTIONS La machine est réservée à un usage domestique. Tout entretien, en dehors du nettoyage et de l’entretien usuel par l’usager, doit être fait par un service après- vente autorisé. Ne pas plonger la base dans l’eau. Pour éviter les courts-circuits et les décharges électriques, ne pas démonter la base. -
Page 41: Instructions Sur Le Cordon Électrique
Français INSTRUCTIONS SUR LE CORDON ÉLECTRIQUE A. Votre appareil est muni d’un cordon électrique court ou d’un cordon d’alimentation détachable, afin d’éviter de trébucher ou de s’emmêler avec un câble plus long. B. Des cordons détachables plus longs ou bien des rallonges sont disponibles et ne peuvent être utilisés que si l’on prend toutes les précautions d’usage. -
Page 42: Informations De Sécurité
Français Informations de sécurité importantes Cette machine est équipée de fonctions de sécurité. Veuillez néanmoins lire et suivre attentivement les consignes de sécurité et utiliser la machine uniquement tel qu’indiqué dans ces instructions, afin d’éviter toute blessure ou tout dommage accidentels dus à... - Page 43 Français - N’insérez jamais les doigts ni d’autres objets dans le moulin à café. - Soyez prudent lorsque vous versez de l’eau chaude. De petits jets d’eau chaude peuvent précéder l’écoulement de l’eau. Attendez la fin du cycle de distribution avant de retirer la buse de distribution de l’eau chaude.
-
Page 44: Champs Électromagnétiques (Cem)
Français - Ne nettoyez pas le groupe café dans le lave- vaisselle et n’utilisez pas de liquide vaisselle ou de détergent pour le nettoyer. Cela peut causer un mauvais fonctionnement du groupe de percolation et avoir un effet nuisible sur le goût du café. -
Page 45: Vue D'ensemble De La Machine (Fig. 2)
Français Nous vous félicitons de votre achat de Gaggia Cadorna ! Cette machine vous garantit une grande facilité d’utilisation et toujours des résultats excellents. Grâce à son interface intuitive, vous pouvez choisir entre 6 boissons différentes, les personnaliser et les sauvegarder dans les 4 profils disponibles, pour les retrouver à... -
Page 46: Bandeau De Commande Et Afficheur
Français Bandeau de commande et afficheur Cette machine à café est pourvue d’un afficheur intuitif et convivial. Lire les sections suivantes pour mieux comprendre l’utilisation des touches. Vue d’ensemble du bandeau de commande (Fig. 1) Pour sélectionner la fonction affichée. 1/2 Touches MULTIFONCTION Pour allumer ou éteindre la machine. -
Page 47: Première Installation
Français Première installation Avant d’utiliser la machine, il est essentiel d’effectuer quelques simples opérations, celles-ci étant décrites clairement dans le guide rapide par des dessins explicatifs que vous trouverez au début de ce mode d’emploi. Remarque: pour avoir un café plus savoureux, il est conseillé de commencer par distribuer 5 tasses de café... -
Page 48: Mesure De La Dureté De L'eau
Français Mesure de la dureté de l’eau Lors de la première installation, il faut saisir la valeur correspondante à la dureté de l’eau. Prendre la bande pour mesurer la dureté de l’eau qu’on peut trouver dans l’emballage et suivre les instructions affichées pendant la phase d’installation. Pour modifier la dureté... -
Page 49: Installation Du Filtre À Eau Intenza
Français Installation du filtre à eau INTENZA+ Enlever le petit filtre blanc à l’intérieur du réservoir à eau et le conserver dans un endroit sec. Plonger le filtre à eau INTENZA+ verticalement dans l'eau froide (l'ouverture vers le haut) en le poussant délicatement sur les côtés pour permettre aux bulles d'air de sortir. -
Page 50: Types De Boisson
Français Types de boisson Nom de la boisson Description Ristretto Le ristretto, servi dans une petite tasse, est un espresso dont le temps de distribution est réduit par rapport à l’espresso classique; le café sera donc plus serré et moins riche en caféine. Espresso L’espresso est reconnu dans le monde entier comme étant le véritable « café... -
Page 51: Distribution Du Café
Français Distribution du café Distribution de café avec du café en grains Attention: utiliser uniquement du café en grains pour espresso. Ne pas mettre de café moulu, de café non torréfié ni de café lyophilisé ou soluble dans le réservoir à café... -
Page 52: Comment Émulsionner Le Lait
Français 3 Appuyer sur la touche « ». COFFEE 30 ml Remarque: la fonction « café prémoulu » exclut la possibilité de distribuer deux TEMP medium tasses de café simultanément de même que le réglage de l’arôme, qui ne sont ESPRESSO possibles qu’avec du café en grains. 4 Appuyer sur la touche START/STOP pour commencer la distribution du café. -
Page 53: Pannarello (Seulement Pour Le Modèle Cadorna Plus)
Français Pannarello (seulement pour le modèle Cadorna Plus) Remplir 1/3 environ de la carafe avec du lait froid. Appuyer sur la touche HOME pour accéder au menu des boissons. HOME 3 Dans le menu des boissons sélectionner « VAPEUR » et touche START/STOP pour commencer mousser. -
Page 54: Distribution D'eau Chaude
Français Distribution d’eau chaude Attention: au début de la préparation, des jets de vapeur et d’eau chaude risquent de sortir du pannarello/ lance de vapeur. Mettre un récipient sous le pannarello classique (Cadorna Style) ou lance de vapeur (Cadorna Plus). Appuyer sur la touche HOME HOME Appuyer sur la touche de l’« EAU CHAUDE ». - Page 55 Français Appuyer plusieurs fois de suite la touche « TEMP » pour modifier la COFFEE température de la boisson, en choisissant une des options suivantes: 30 ml TEMP faible; medium ESPRESSO moyen; élevé. Appuyer sur la touche « » pour préparer deux tasse, ou la touche « »...
-
Page 56: Création D'un Profil
Français Création d'un profil Un profil peut être créé de deux façons différentes: À partir de la touche HOME , ainsi qu’il est décrit au chapitre «Personnalisation des boissons », points 9 et 10; HOME À partir de la touche MY FAVOURITES , comme indiqué... -
Page 57: Réglage Du Degré De Mouture
Français Réglage du degré de mouture Le bouton de réglage du degré de mouture situé dans le réservoir à café en grains permet de régler le degré de mouture. Le moulin à café en céramique garantit une mouture parfaite et homogène pour la préparation de chaque tasse de café. L’arôme sera ainsi préservé, ce qui garantit un toujours goût parfait. - Page 58 Français Description de la Quand nettoyer Comment nettoyer pièce Groupe de distribution Une fois par semaine Retirer le groupe de distribution et le laver à l’eau courante. Selon le type d'utilisation Voir le chapitre « Nettoyage et lubrification du groupe de distribution ». Une fois par mois Nettoyer le groupe de distribution avec les tablettes de dégraissage Gaggia pour...
-
Page 59: Nettoyage Du Pannarello Classique (Seulement Pour Le Modèle Cadorna Style)
Français Nettoyage du pannarello classique (seulement pour le modèle Cadorna Style) Enlever le pannarello classique et la poignée et les rincer à l'eau courante. Nettoyer la buse de vapeur avec un chiffon humide. Réassembler toutes les parties. Nettoyage du lance de vapeur (seulement pour le modèle Cadorna Plus) Clean the steam wand with a damp cloth. -
Page 60: Nettoyage Du Groupe De Distribution
Français Nettoyage du groupe de distribution Attention: ne pas laver le groupe de distribution au lave-vaisselle et ne pas utiliser de produits vaisselle ou autres détergents, car cela risquerait de provoquer un dysfonctionnement du groupe de distribution et de nuire au goût du café. Retrait du groupe de distribution Éteindre la machine et débrancher le cordon d'alimentation. -
Page 61: Remise En Place Du Groupe De Distribution
Français Nettoyage du groupe de distribution avec des tablettes pour l’élimination des résidus huileux du café Attention: pour le nettoyage n’utiliser que des tablettes Gaggia pour l’élimination des résidus huileux du café. Mettre un récipient sous la buse de distribution du café. Appuyer sur la touche CLEAN/SETTING et sélectionner la touche « NETTOYAGE »... -
Page 62: Lubrification Du Groupe De Distribution
Français Si le crochet reste dans une position inférieure, il n'est pas correctement positionné. Réinstaller le groupe de distribution dans la machine le long des glissières latérales jusqu’à ce qu’un clic de blocage confirme qu’il est correctement positionné. Attention: ne pas appuyer sur le levier PUSH. Fermer le volet de service. -
Page 63: Détartrage
Français Appliquer une fine couche de lubrifiant sur les glissières, des deux côtés (voir la figure). Remettre le groupe de distribution en place (voir le chapitre « Remise en place du groupe de distribution »). Remarque: le tube de lubrifiant peut être utilisé plusieurs fois. Détartrage Procédure de détartrage Le détartrage est à... -
Page 64: Que Faire En Cas D'interruption De La Procédure De Détartrage
Français Mettre un grand récipient (1,5 l) sous la buse de vapeur et la buse de distribution du café. Suivre les instructions affichées pour lancer la procédure de détartrage. Cette procédure a une durée de 25 minutes environ et comprend un cycle de détartrage suivi d’un cycle de rinçage, qui prévoient des distributions à... -
Page 65: Réglages Divers
Français Réglages divers Appuyer sur la touche CLEAN/SETTING et sélectionner l’option « RÉGLAGES » sur l’afficheur pour rétablir ou modifier certains paramètres de la clean/setting machine, tels que: Langue. Filtre à eau. Minuteur stand-by. Dureté de l’eau. Unité de mesure. Compteur de boissons. Rétablir les réglages d’usine. -
Page 66: Dureté De L'eau
Français Dureté de l’eau Après avoir sélectionné « DURETÉ DE L’EAU » suivre les instructions affichées ainsi que ce qui est indiqué au chapitre « Mesure de la dureté de l’eau ». Unité de mesure Sélectionner « UNITÉ DE MESURE »: LANGUAGE WATER FILTER pour régler l’unité de mesure sur « ml » ou sur « onces ». TIMER STAND-BY UNITS ON/OFF... -
Page 67: Dépannage
Français 03 - 04 Un problème s’est Le groupe de Éteindre la machine en utilisant produit avec le groupe de distribution est sale ou l’interrupteur principal. Retirer le groupe de distribution. il n’est pas bien lubrifié. distribution et le nettoyer soigneusement. (Consulter le chapitre « Nettoyage du groupe de distribution ») Le groupe de... - Page 68 Français Problème Cause Solution L'afficheur montre Le réservoir à marc de café a été Toujours vider le réservoir à marc de café constamment l'icône vidé alors que la machine était pendant que la machine est allumée. Si le « Réservoir à marc de éteinte.
- Page 69 Français Problème Cause Solution Le café ne mousse pas Le moulin à café est réglé sur une Régler le moulin à café sur une mouture plus ou est aqueux. mouture grosse. fine. La machine est en train d’effectuer Distribuer quelques tasses de café pour que la la procédure de réglage machine se règle automatiquement.
-
Page 70: Accessoires Gaggia
Français Problème Cause Solution Il y a de l’eau sous la Le bac d'égouttement est trop plein Vider le bac d'égouttement dès que l'indicateur machine. et a débordé. est visible à travers le bac. Toujours vider le bac d'égouttement avant de lancer la procédure de détartrage. -
Page 71: Données Techniques
Français Données techniques Tension nominale - Puissance Voir la plaquette signalétique dans nominale - Alimentation le volet de service Matériau du corps Thermoplastique Dimensions (Style) 260 x 345 x 440 mm Dimensions (Plus) 260 x 380 x 440 mm Poids (Style) 8,2 kg Poids (Plus) 9 kg Longueur du cordon... - Page 72 GAGGIA S.p.A. reserves the right to make any necessary modification. GAGGIA S.p.A. se réserve le droit d’apporter toute modification jugée nécessaire. GAGGIA S.p.A. Società soggetta a direzione e coordinamento di Philips Innovations S.p.A. Sede Amministrativa/Administrative Office Via Torretta, 240 40041 Gaggio Montano - Bologna - Italia +39 0534 771111 / Fax +39 0534 31025 Sede Legale/Registered Office Piazza A.