Publicité
Les langues disponibles
Les langues disponibles
Liens rapides
Registrieren | Artikulieren
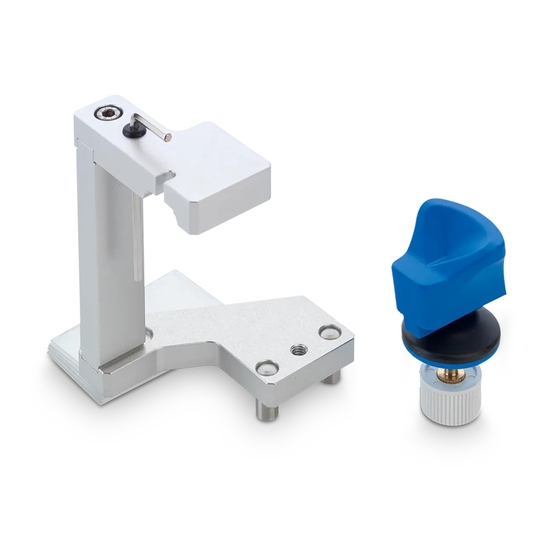
Registration | Articulation
Enregistrement de l'occlusion
Montage sur articulateur
Registrazione | Messa in
articolatore
Registro | Articulación
_Gebrauchsanweisung
_User Manual
_Mode d'emploi
_Istruzioni d'uso
_Modo de empleo
Publicité

Manuels Connexes pour Amann Girrbach Artex Transfer Jig


Sommaire des Matières pour Amann Girrbach Artex Transfer Jig
- Page 1 Registrieren | Artikulieren Registration | Articulation Enregistrement de l’occlusion Montage sur articulateur Registrazione | Messa in articolatore Registro | Articulación _Gebrauchsanweisung _User Manual _Mode d’emploi _Istruzioni d’uso _Modo de empleo...
- Page 2 _Deutsch 04 _English _Française _Italiano _Español...
- Page 4 GEBRAUCHSANWEISUNG ARtEx ÜBERtRAGUNGS- ® SCHlIttEN PRoDUktBESCHREIBUNG Übertragungsalternative zum Ü-Stand oder zur Gesichtsbogen-Direktübertragung: Ü-Schlitten nimmt Gelenksupport mit Bissgabel auf und hält durch Fixierung am Artex -Fußteil das Registrat ® in Achsrelation. BEDIENUNG/HANDHABUNG Frontzahnführungsstift mit Halter entfernen. Frontzahnführungsteller in Oberteil einsetzen. Übertragungsschlitten in Unterteil, auf Anschlag, einsetzen und befestigen. Die Fläche des Front- zahnführungstellers Iiegt auf dem Ü-Schlitten auf. Gabelbock im Unterteil einsetzen (über Magnet oder geschraubt). 3-D-Gelenksupport in Aufnahme am Ü-Schlitten einsetzen und mit Adapterschraube fixieren. (Abb. 1 - 3) Artikulator auf den Kopf stellen. Quersteg des Gabelbocks auf Berührung zur Bissgabel bringen und Rändelschraube anziehen. Annäherung des Quersteges ist möglich über Schraubgewinde und/oder Teleskop. (Abb. 4) Artikulator in Arbeitsposition stellen. OK-Modell in lmpressionen der Bissgabel setzen. Sockelplatte in Oberteil einsetzen. Platzangebot zwischen Modell und Artex -Oberteil prüfen, ggf. regulie- ® ren, z.B. durch Beschleifen des Modelles oder zweiseitiges Gipsen. (Abb. 5 + 6) Dem Platzangebot entsprechende Menge Artikulationsgips cremig-sahnig anrühren.
- Page 5 USER MANUAl ARtEx tRANSfER JIG ® PRoDUCt DESCRIPtIoN Another direct alternative to the transfer stand and to the direct facebow transfer. The universal joint with bite fork is attached to the jig holding the registration in axis relation while fixed at the bottom part of the Artex articulator. ® oPERAtIoN/HANDlING Remove anterior guidance pin and holder. Insert anterior guidance table in top part. Insert transfer jig in bottom part up to stop and secure. The surface of the incisal table lies on the transfer jig. Insert bite fork support in bottom part (via magnet or screwed). Insert 3-D universal joint in the socket on the transfer jig and fix in position with the adapter screw. (fig. 1 - 3) Turn articulator upside down. Move cross bar of the bite fork support until it contacts the bite fork and tighten up the knurled screw. The cross-bar can be brought closer by means of the screwed thread and/or telescopic fitting. (fig. 4) Place articulator in working position. Insert maxillary model in the bite tork impressions. Insert base plate in top part. Check space available between model and top part and regulate if necessary, e.g. by trimming the model or applying piaster in two stages. (fig. 5 + 6) Mix an appropriate quantity ot mounting plaster tor the space avaiIable to a creamy consistency.
- Page 6 MoDE D’EMPloI Mélangez l a quantité de plâtre correspondant à la demande d‘espace jusqu‘ à avoir une pâte BANC DE tRANSfERt ARtEx ® crémeuse. Humidifiez la base du modèle. Mettez du plâtre sur la plaque du socle et sur la surface humidifiée des modèles. Fermez la partie supérieure de l‘Artex . Décollez le plâtre en ® DESCRIPtIoN DU PRoDUIt tapant sur la partie supérieure de l‘Artex ® Ce banc de transfert constitue une autre alter- (soulager). (fig. 7 + 8) native au poste de transfert et à l’arc facial. Le transfert est direct : Le support articulé (muni de la fourchette comprise) est mis dans le banc, lequel maintient l’enregistrement bien dans l’axe grâce au système de fixation situé en bas de l’articulateur l’Artex ® MANIPUlAtIoN / MANIEMENt Enlevez la tige du guidage incisal avec le support de la table incisale. Placez le disque du guidage incisal dans la partie supérieure. Placez en butée le banc de transfert dans la partie inférieure et fixez-le. La surface du disque du guidage incisal est posée sur le banc de transfert. Mettez le support de fourchette dans la partie inférieure (sur l‘aimant ou vissé). Placez en butée, sur le...
- Page 7 IStRUzIoNI D’USo Preparare una quantità adeguata, corrispondente allo spazio da riempire, di gesso di consistenza SlIttA DI tRASfERIMENto cremosa. Inumidire l a superficie d‘appoggio del ARtEx ® modello. Applicare una quantità congrua d i gesso per articolatore sulla piastra per zoccolo e sul gesso inumidito del modello e abbassare la oarte superiore dell‘articolatore. Superare la resistenza DESCRIzIoNE DEl PRoDotto del gesso picchiettando sulla parte superiore Un‘alternativa al banco di trasferimento o al tras- dell‘articolatore (per togliere la tensione al ferimento diretto con l’arco facciale. La slitta con gesso). (fig. 7 + 8) la forchetta e lo snodo tridimensionale viene fis- sata sulla parte inferiore dell’Artex e mantiene ® la corretta relazione assiale della posizione regis- trata. UtIlIzzo Asportare il perno di guida incisale e il portaper- no. Inserire il piatto di guida incisale nella parte superiore e la slitta di trasferimento nella parte inferiore dell‘articolatore. Spingere la slitta di trasferimento fino in fondo e fissarla. Il piano del piatto di guida incisale poggia ora sulla slitta di trasferimento. Inserire il supporto portaforchetta (con calamita o mediante vite). Inserire lo snodo tridimensionale nel suo alloggio sulla slitta di trasferimento e fissarlo con la vite di adattamento.
- Page 8 MoDo DE EMPlEo Preparar una cantidad de yeso de articulación adecuada al espacio disponible, con consistencia CARRo DE tRANSfERENCIA cremosa como la nata. Humedecer la superficie ARtEx ® basal del modelo. Aplicar el yeso de articulación sobre la placa del zócalo y sobre la superficie humedecida de los modelos. Cerrar la parte superior del Artex . Anular la resistencia del yeso, ® DESCRIPCIóN DEl PRoDUCto dando unos golpes sobre la parte superior del Alternativa para la transferencia con dispositivo Artex (quitar tensiones). (fig. 7 + 8) ® de transferencia o para la transferencia direc- ta mediante arco facial: El carro de transferen- cia acoge el soporte articular con horquilla de mordida, manteniendo – debido a la fijación en el pie del articulador Artex – el registro en rela- ® ción axial. MANEJo / USo Retirar la espiga guía de diente frontal con el soporte. Colocar la tabla incisal en la parte superior. Colocar el carro de transferencia en la parte inferior hasta el tope y fijarlo. La superficie...
- Page 10 Made in the European Union ISo 9001 Manufacturer | Hersteller Distribution | Vertrieb Distribution | Vertrieb D/A Amann Girrbach AG Amann Girrbach GmbH Herrschaftswiesen 1 Dürrenweg 40 austria@amanngirrbach.com 6842 Koblach | Austria 75177 Pforzheim | Germany germany@amanngirrbach.com Fon +43 5523 62333-0 Fon +49 7231 957-100 Fax +43 5523 55990 Fax +49 7231 957-159 www.amanngirrbach.com...