Publicité

Les langues disponibles

Les langues disponibles

Liens rapides

H e a r t S t a r t F R x T r a i n e r
I N S T R U C T I O N S F O R U S E
M O D E D ' E M P L O I
B E D I E N U N G S A N L E I T U N G
861306
Edition 4

Publicité

Table des Matières
loading

Sommaire des Matières pour Philips HeartStart FRx Trainer

  • Page 1 H e a r t S t a r t F R x T r a i n e r I N S T R U C T I O N S F O R U S E M O D E D ’ E M P L O I B E D I E N U N G S A N L E I T U N G 861306 Edition 4...
  • Page 2 Intentionally blank. Page intentionnellement laissée vide. Diese Seite bleibt frei.
  • Page 3 HeartStart FRx Trainer 861306 I N S T R U C T I O N S F O R U S E ..........
  • Page 4 Informationen über Änderungen zu erhalten. Unauthorized copying of this publication may not only infringe copyright but also reduce the ability of Philips Medical Systems to Bisherige Auflagen provide accurate and up-to-date information to users and Auflage 4 operators alike.
  • Page 5: Table Des Matières

    To troubleshoot the FRx Trainer ..................... 16 Environmental Considerations ....................17 Intended use of the FRx Trainer The HeartStart FRx Trainer is designed to prepare emergency responders to use the FRx automated external defibrillator (AED). The HeartStart FRx Trainer cannot be used to deliver defibrillation treatment.
  • Page 6 Replacement training pads (REF: 989803139291) are available for use with the Training Pads II case. • The HeartStart FRx Trainer and Training Pads II can also be used with an Infant/Child Pads Placement Guide and an Infant/Child Key, available separately from Philips, for training in pediatric defibrillation.
  • Page 7: Overview Of The Frx Trainer

    Overview of the FRx Trainer back The HeartStart FRx Trainer is designed to look similar to the HeartStart FRx Defibrillator. However, the yellow center label identifies it as a training device. In addition, some of the FRx defibrillator’s features are either inactive in the FRx Trainer or behave differently from their counterparts in the Trainer.
  • Page 8 INFORMATION-BUTTON. In the FRx Trainer, this blue “i-button” flashes when scenario selection is available and at the beginning of a patient care pause when CPR Coaching is available. PADS ICONS. The pads icons flash as a guide to pads placement during the training scenario.
  • Page 9 External Manikin Adapter Check with your medical director or Emergency Medical Services provider for additional training requirements, protocols, and materials. Optional accessories The following accessories are available from Philips separately: • FRx Trainer Instructions for Use [REF: 989803139401] • HeartStart Training Pads II (kit containing one set of Training Pads II in...
  • Page 10: To Set Up The Frx Trainer

    • Internal Manikin Adapter [REF: M5088A] • Replacement FRx Trainer carry case [REF: 989803139531] To set up the FRx Trainer To install or replace the batteries The HeartStart Trainer is powered by four AA alkaline batteries (not included). To install or replace the batteries, follow the steps below: 1.
  • Page 11 External Manikin Adapter M5089A or an Internal Manikin Adapter M5088A. Alternatively, you can use a Laerdal Resusci Anne training manikin equipped with Laerdal Link technology and an adapter available at most electronics stores. Contact Philips for information. To install the external manikin adapter The M5089A External Manikin Adapter is provided with the FRx Trainer.
  • Page 12 To install the internal manikin adapter The Internal Manikin Adapter M5088A, sold separately, works with Laerdal Little Anne CPR and Laerdal Resusci Anne CPR Manikins. To install the Internal Manikin Adapter on a Laerdal Little Anne CPR or Laerdal Resusci Anne CPR Manikin, follow the steps below: 1.
  • Page 13: To Select A Training Scenario

    To select a training scenario 1. Make sure the pads connector is plugged in and the FRx Trainer is turned off. (Press and hold the On/Off button if necessary to turn off the Trainer.) 2. Press the flashing i-button once. The FRx Trainer will tell you how to select a scenario.
  • Page 14: Standard Training Scenarios

    NOTE: Inserting or removing the Infant/Child Key during a scenario will restart the scenario. 3. Follow the FRx Trainer’s voice instructions. 4. If using a clothed manikin, remove the clothing as instructed. 5. Open the Training Pads II case and peel off one pad. NOTE: Avoid touching the pad’s adhesive gel, because this may cause the Trainer to begin analysis prematurely.
  • Page 15 The legend below identifies the symbols used on the rear label of the FRx Trainer and in the following scenario descriptions. NOTE: The shock series can be configured to either one or three shocks. If configured for the default one-shock series, the Trainer provides a pause after each shoc symbol meaning...
  • Page 16 scenario number scenario description Scenario 3 Troubleshooting pads, one shock needed for conversion Details: • Trainer detects poor pad contact, repeats pads placement instructions. • After one pad is removed and reapplied, Trainer detects a shockable rhythm, instructs user to deliver a shock. •...
  • Page 17 scenario number scenario description Scenario 7 Shockable rhythm detected, two shocks needed for conversion, return to shockable rhythm detected, one shock needed for conversion Details: • Trainer detects a shockable rhythm, instructs user to deliver a shock. • Trainer still detects a shockable rhythm, instructs user to deliver another shock.
  • Page 18: Frx Trainer Performance During Use

    FRx Trainer performance during use The Philips HeartStart FRx Trainer is designed for use in an automated external defibrillator training class taught by a qualified instructor. When a training scenario is running, the FRx Trainer mimics the behavior of the FRx Defibrillator during actual emergency use. It provides voice instructions, guides the user through one or more simulated shocks, provides pauses for CPR, offers CPR Coaching, etc.
  • Page 19 parameter switch # setting (default = OFF) volume OFF: high NSA pause 2 & 3 switch #2 switch #3 setting (minutes) CPR Coaching OFF: adult 30 compressions/2 ventilations compressions/ pediatric 30 compressions/2 ventilations † ventilations adult 30 compressions/2 ventilations pediatric 15 compressions/2 ventilations CPR Coaching OFF:...
  • Page 20: To Troubleshoot The Frx Trainer

    To troubleshoot the FRx Trainer The following table provides troubleshooting tips. behavior possible cause recommended action Trainer says • User touched the adhesive gel • Avoid touching the adhesive gel on the pads and activated the on the pads. ANALYZING before sensing circuitry of the Trainer.
  • Page 21: Environmental Considerations

    Environmental considerations By complying with your national regulations regarding disposal of electric, electronic, and battery waste, you can make a positive contribution to our shared environment. Such waste can introduce harmful elements into the environment as a whole and may also endanger human health. The FRx Trainer contains electronic components.
  • Page 22 Notes...
  • Page 23: Utilisation Prévue Du Simulateur Frx

    Simulateur HeartStart FRx 861306 Contenu Utilisation prévue du simulateur FRx ..................19 Fonctions du simulateur FRx ..................... 20 Présentation du simulateur FRx ....................21 Pour configurer le simulateur FRx .................... 24 Pour sélectionner un scénario de formation ..............27 Pour exécuter un scénario de formation ................28 Scénarios de formation standard ....................
  • Page 24: Fonctions Du Simulateur Frx

    Le simulateur HeartStart FRx et les électrodes de formation II peuvent également être utilisés avec le guide de placement des électrodes pour nouveau-né/enfant et une clé nouveau-né/enfant, en vente séparément auprès de Philips pour l'apprentissage de la défibrillation pédiatrique. • Le simulateur HeartStart FRx contient huit scénarios de formation qui simulent des situations d'arrêt cardiaque soudain proches de la réalité.
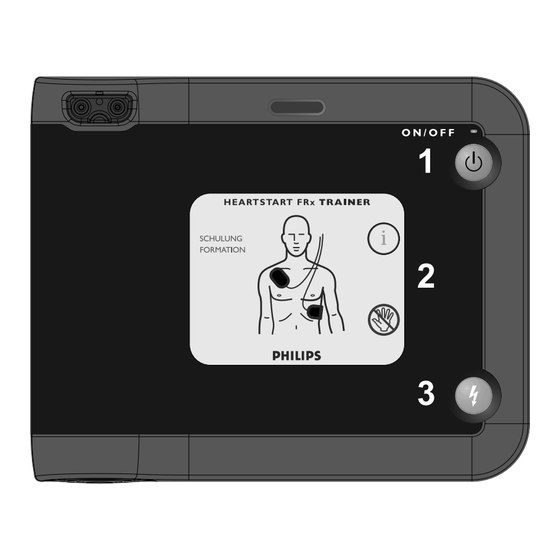
  • Page 25: Présentation Du Simulateur Frx

    Présentation du simulateur FRx arrière Le simulateur HeartStart FRx est conçu pour apparaître pratiquement identique au défibrillateur HeartStart FRx. Toutefois, l'étiquette centrale jaune indique qu'il s'agit d'un appareil d'apprentissage. De plus, certaines fonctions du défibrillateur FRx sont inactives sur le simulateur FRx ou ont un comportement différent des fonctions correspondantes du simulateur.
  • Page 26 D BOUTON MARCHE/ARRÊT. Pour mettre en marche le simulateur FRx, appuyez sur ce bouton vert. Pour éteindre le simulateur, appuyez sur le bouton vert et maintenez-le enfoncé pendant une (1) seconde. BOUTON D’INFORMATIONS. Dans le simulateur FRx, le « bouton-i » clignote quand il est possible de sélectionner un scénario et au début d'une pause pour soins au patient quand la RCP est disponible.
  • Page 27 Accessoires en option Les accessoires suivants peuvent être achetés séparément auprès de Philips : • Mode d'emploi du simulateur FRx [REF : 989803139401] • Électrodes de formation HeartStart II (kit contenant un jeu d'électrodes de formation II dans un étui d'électrodes de formation, un...
  • Page 28: Pour Configurer Le Simulateur Frx

    • Électrodes de formation de remplacement HeartStart II (paire d'électrodes de formation sur doublure jetable à utiliser dans l'étui d'électrodes de formation fourni avec les électrodes de formation HeartStart II) [REF : 989803139291] • Guide de placement des électrodes pour adulte [REF : M5090A] •...
  • Page 29 REMARQUE : Il est conseillé de remplacer les quatre piles en même temps. Pour raccorder ou remplacer les électrodes de formation II Pour raccorder les électrodes de formation II au simulateur FRx, branchez simplement le connecteur des électrodes de formation II dans le port du connecteur du simulateur FRx.
  • Page 30 électroniques. Veuillez vous adresser à Philips pour d’autres renseignements. Pour installer l'adaptateur externe de mannequin L'adaptateur de mannequin externe M5089A est fourni avec le simulateur FRx. Il peut être appliqué à tout mannequin de formation comme illustré...
  • Page 31: Pour Sélectionner Un Scénario De Formation

    3. Placez les sections de l'adaptateur du mannequin interne dans les emplacements appropriés sur le revers de la peau du mannequin. Voir le Mode d'emploi fourni avec l'adaptateur du mannequin interne pour obtenir des illustrations détaillées de placement. Installation de l'adaptateur du mannequin interne M5088A avec le mannequin Laerdal Resusci Anne 4.
  • Page 32: Pour Exécuter Un Scénario De Formation

    sur le bouton marche/arrêt pour lancer immédiatement le scénario. Ou bien, pour simplement sélectionner le scénario sans l'exécuter, appuyez sur le bouton marche/arrêt jusqu'à ce que le simulateur s'arrête ou patientez pendant 10 secondes et il s'arrêtera automatiquement. Le simulateur FRx exécutera le scénario sélectionné jusqu'à ce que les batteries soient remplacées ou qu'un scénario différent soit sélectionné.
  • Page 33: Scénarios De Formation Standard

    6. Placez l'électrode sur le mannequin. Appuyez fermement sur l'électrode. Ensuite, détachez et placez l'autre électrode. 7. Continuez à suivre les instructions du simulateur FRx pendant le reste du scénario. 8. Quand le scénario est complètement terminé ou si vous voulez arrêter un scénario en cours, appuyez sur le bouton marche/arrêt et maintenez-le enfoncé...
  • Page 34 symbole signification Rythme (simulé) propice aux chocs détecté par le simulateur. Rythme (simulé) non propice aux chocs détecté par le simulateur. Problème (simulé) d'électrodes détecté par le simulateur. nº du scénario description du scénario Rythme propice aux chocs, un choc est nécessaire pour la Scénario 1 conversion Détails :...
  • Page 35 nº du scénario description du scénario Scénario 3 Correction du placement des électrodes, un choc nécessaire pour la conversion Détails : • Le simulateur détecte un mauvais contact au niveau des électrodes, répète les instructions de placement des électrodes. • Une fois qu'une électrode est retirée et réappliquée, le simulateur détecte un rythme propice aux chocs, indique à...
  • Page 36 nº du scénario description du scénario Scénario 7 Rythme propice aux chocs détectés, deux chocs nécessaires pour la conversion, retour à un rythme propice aux chocs détecté, un choc nécessaire pour la conversion Détails : • Le simulateur détecte un rythme propice aux chocs, indique à l'utilisateur de délivrer un choc.
  • Page 37: Fonctionnement Du Simulateur Frx Pendant L'utilisation

    évaluer les connaissances des stagiaires sur des sujets comme la RCP et l'évaluation de l'état du patient. Fonctionnement du simulateur FRx pendant l'utilisation Le simulateur HeartStart FRx de Philips est conçu pour être utilisé pendant un cours de formation aux défibrillateurs externes automatisés sous la direction d'un instructeur qualifié.
  • Page 38: Pour Changer La Configuration Par Défaut Du Simulateur Frx

    Pour changer la configuration par défaut du simulateur FRx Le simulateur Philips HeartStart est livré avec une configuration par défaut définie en usine répondant aux besoins de la plupart des utilisateurs. Les réglages de certains paramètres figurant dans le tableau ci-dessous peuvent être modifiés par l'utilisateur.
  • Page 39: Dépannage Du Simulateur Frx

    paramètre commutateur nº paramètre (valeur par défaut = OFF) ventilations des OFF: avec ventilations directives de la RCP sans ventilations série de chocs OFF: pause de protocole 7 & 8 commutateur 7 commutateur 8 réglage (minutes) * Si le simulateur est configuré pour les ventilations des directives de la RCP et que l’utilisateur sélectionne les instructions de RCP en appuyant sur le bouton-i, les paramètres de pause par défaut et d’instructions de RCP (pause de 2 minutes, 30 compressions/2 ventilations) se soldent par 5 cycles d’instructions de RCP.
  • Page 40 comportement cause possible mesure conseillée Le simulateur n'émet pas • Le placement des électrodes est • Vérifiez le placement correct incorrect. des électrodes et de le message sonore l'adaptateur du mannequin. ANALYSE quand les Retirez et repositionnez les électrodes sont électrodes ou l'adaptateur appliquées à...
  • Page 41: Protection De L'environnement

    Protection de l'environnement En respectant les réglementations nationales et locales concernant l'élimination des déchets des accessoires électriques, des accessoires électroniques et des batteries, vous pouvez contribuer à protéger notre environnement commun. Ces types de déchets peuvent introduire dans l'environnement des éléments nocifs en général et présenter un danger pour la santé...
  • Page 42: Remarques

    Remarques...
  • Page 43 So führen Sie eine Fehlersuche mit dem FRx Trainer durch ........55 Umgebungsinformationen ......................57 Verwendungsgebiet des FRx Trainers Der HeartStart FRx Trainer ist für die Vorbereitung von potentiell Hilfeleistenden auf Notfallsituationen gedacht, in denen der automatisierte externe FRx Defibrillator (AED) verwendet wird. Der HeartStart FRx Trainer kann nicht zur Defibrillationsbehandlung verwendet werden.
  • Page 44: Funktionen Des Frx Trainers

    Er hat keine Hochspannungselemente und gewährleistet Sicherheit bei der Schulung. • Der HeartStart FRx Trainer ist für die Verwendung mit HeartStart Schulungselektroden II und Übungspuppen bei Ausstattung mit dem externen Puppenadapter M5089A, der mit dem Trainer geliefert wird, konzipiert. Der FRx Trainer und die Schulungselektroden II können auch mit Laerdal-Übungspuppen verwendet werden, die mit einem...
  • Page 45: Übersicht Über Den Frx Trainer

    Übersicht über den FRx Trainer Rückseite Der HeartStart FRx Trainer sieht dem HeartStart FRx Defibrillator sehr ähnlich. Die gelbe Kennzeichnung in der Mitte weist jedoch darauf hin, dass es sich um ein Übungsgerät handelt. Außerdem sind einige der Gerät- funktionen des FRx Defibrillators beim FRx Trainer entweder inaktiv, oder sie funktionieren anders als ihre Entsprechungen beim Trainer.
  • Page 46 D EIN-/AUS-TASTE. Drücken Sie diese grüne Taste, um den FRx Trainer einzuschalten. Sie schalten den Trainer aus, indem Sie die Taste drücken und eine Sekunde lang gedrückt halten. INFORMATIONSTASTE. Beim FRx Trainer blinkt diese blaue i-Taste, wenn die Szenarioauswahl verfügbar ist, und zu Beginn einer Pause bei der Patientenbehandlung, wenn Herzdruckmassage- und Beatmungs- Anweisungen verfügbar sind.
  • Page 47 FRx Defibrillator bzw. an Orten auf, an denen er in Notsituationen mit einem Defibrillator verwechselt werden kann. Die Schulungselektroden nicht an eine Person anlegen. Inhalt des HeartStart FRx Trainer Kits Der FRx Trainer 861306 enthält Folgendes: • HeartStart FRx Trainer •...
  • Page 48: So Richten Sie Den Frx Trainer Ein

    • Elektrodenplatzierungshilfe für Erwachsene [REF: M5090A] • Elektrodenplatzierungshilfe für Kinder [REF: 989803139281] • Kinderschlüssel [REF: 989803139311] • HeartStart FRx Defibrillator Schulungs-Toolkit für Ausbilder (NTSC) [REF: 989803139321] • HeartStart FRx Defibrillator Schulungs-Toolkit für Ausbilder (PAL) [REF: 989803139331] • HeartStart FRx Defibrillator Schulungs-DVD (NTSC) [REF: 989803139341] •...
  • Page 49 Herzdruckmassage- und Beatmungs-Übungspuppe, die mit einem externen Einweg-Puppenadapter M5089A oder einem internen Puppenadapter M5088A ausgestattet ist. Sie können auch eine Laerdal-Übungspuppe „Resusci Anne“ verwenden, die mit Laerdal Link-Technik und einem Adapter ausgestattet ist, der in den meisten Elektronikgeschäften erhältlich ist. Bei Philips erhalten Sie weitere Informationen.
  • Page 50 So installieren Sie den externen Puppenadapter Der externe Puppenadapter M5089A wird mit dem FRx Trainer geliefert. Wie in Schritt 1 und 2 unten dargestellt, kann er mit beliebigen Übungspuppen verwendet werden. (Wenn die Übungspuppe verwendet wird, sollten die Schulungselektroden II positioniert werden, wie in Schritt 3 unten dargestellt.) Verwenden des externen Puppenadapters M5089A mit einer Erwachsenen-Übungspuppe.
  • Page 51: So Wählen Sie Ein Schulungsszenario Aus

    3. Platzieren Sie die Bereiche des internen Puppenadapters an den geeigneten Stellen an der Unterseite der Hülle der Übungspuppe. Anschauliche Darstellungen zum Platzieren finden Sie in der Bedienungsanleitung zum internen Puppenadapter. Installieren des internen Puppenadapters M5088A für die Laerdal-Übungspuppe „Resusci Anne“ 4.
  • Page 52: So Verwenden Sie Ein Schulungsszenario

    Ein-/Aus-Taste, um das Szenario sofort auszuführen. Möchten Sie jedoch das Szenario lediglich auswählen, ohne es auszuführen, drücken und halten Sie die Ein-/Aus-Taste, bis der Trainer ausgeschaltet wird, oder warten Sie 10 Sekunden, worauf er automatisch ausschaltet. Der FRx Trainer führt das ausgewählte Szenario jedes Mal aus, bis die Batterien gewechselt bzw.
  • Page 53: Standardschulungsszenarien

    6. Platzieren Sie die Elektrode an der Übungspuppe. Drücken Sie die Elektrode fest an. Ziehen Sie dann die andere Elektrode ab und platzieren Sie sie. 7. Befolgen Sie im weiteren Verlauf des Szenarios die Anweisungen des FRx Trainers. 8. Wenn das Szenario beendet ist oder angehalten werden soll, drücken Sie die Ein/Aus-Taste, bis sich der FRx Trainer ausschaltet.
  • Page 54 HINWEIS: Die Schockserie kann mit einem oder drei Schocks konfiguriert werden. Bei der Konfiguration für die standardgemäße Serie mit einem Schock legt der Trainer nach jedem Schock eine Pause ein. Symbol Bedeutung (Simulierter) schockbarer Rhythmus vom Trainer erkannt. (Simulierter) nicht schockbarer Rhythmus vom Trainer erkannt.
  • Page 55 Szenario-Nummer Szenariobeschreibung Szenario 3 Elektroden-Fehlerbehebung, ein Schock erforderlich zur Konvertierung Nähere Angaben: • Der Trainer erkennt schlechten Elektrodenkontakt und wiederholt Elektrodenplatzierungsanweisungen. • Wenn eine Elektrode entfernt und neu angebracht wurde, erkennt der Trainer einen schockbaren Rhythmus und fordert den Benutzer zur Schockabgabe auf. •...
  • Page 56 Szenario-Nummer Szenariobeschreibung Szenario 7 Schockbarer Rhythmus erkannt, zwei Schocks erforderlich zur Konvertierung, zurück zum erkannten schockbaren Rhythmus, ein Schock zur Konvertierung erforderlich Nähere Angaben: • Der Trainer erkennt einen schockbaren Rhythmus und fordert den Benutzer zur Schockabgabe auf. • Der Trainer erkennt einen schockbaren Rhythmus und fordert den Benutzer zu einer weiteren Schockabgabe auf.
  • Page 57: Funktionieren Des Frx Trainers Während Des Einsatzes

    Beurteilung der Benutzerkenntnisse auf Gebieten wie Herzdruckmassage und Beatmung und Patientenuntersuchung. Funktionieren des FRx Trainers während des Einsatzes Der Philips HeartStart FRx Trainer ist für die Verwendung in Schulungen von automatisierten externen Defibrillatoren konzipiert, die von einem qualifizierten Ausbilder gehalten werden.
  • Page 58 Wenn Sie konfigurierbare Trainer-Parameter ändern möchten, nehmen Sie den Batteriefachdeckel des Trainers ab und suchen Sie die Schalter an der Unterseite des Batteriefachs. Nehmen Sie die Einstellungen der Ein (ON)-/Aus (OFF)-Taste, wie in der folgenden Tabelle gezeigt, mit einem kleinen Stift vor. Parameter Schalter-Nr.
  • Page 59: So Führen Sie Eine Fehlersuche Mit Dem Frx Trainer Durch

    Parameter Schalter-Nr. Einstellung (Standard = OFF) Protokollpause 7 und 8 Schalter-Nr. 7 Schalter-Nr. 8 Einstellung (Minuten) * Wenn der Trainer für Herzdruckmassage- und Beatmungs-Anweisungen mit Beatmungen konfiguriert ist und der Benutzer durch Drücken der i-Taste Herzdruckmassage- und Beatmungs-Anweisungen auswählt, führen die Standardpause und die Herzdruckmassage- und Beatmungs Anweisungen-Einstellungen (2 Minuten Pause, 30 Kompressionen/2 Beatmungen) zu 5 Durchläufen von Herzdruck- massage-und Beatmungs-Anweisungen.
  • Page 60 Verhalten Mögliche Ursache Empfohlenes Vorgehen Der Trainer meldet nicht • Die Platzierung der Elektroden • Überprüfen Sie die Platzierung ist nicht korrekt. der Elektroden und der ANALYSE, wenn die Übungspuppe. Entfernen Sie Elektroden mit dem Elektroden bzw. Adapter und Übungspuppenadapter platzieren Sie sie/ihn neu, wenn verbunden sind.
  • Page 61: Umgebungsinformationen

    Umgebungsinformationen Durch Beachtung der landesweiten und örtlichen Vorschriften bezüglich der Entsorgung elektrischen, elektronischen und Batterieabfalls können Sie einen positiven Beitrag zum Umweltschutz leisten. Abfall dieser Art kann die Umwelt schädigende Stoffe enthalten und außerdem eine Gesundheitsgefahr bedeuten. Der FRx Trainer enthält elektrische Komponenten. Diese Komponenten dürfen nicht als unsortierter Normalmüll entsorgt werden.
  • Page 62 Anmerkungen...
  • Page 63 Intentionally blank. Page intentionnellement laissée vide. Diese Seite bleibt frei.
  • Page 64 Philips Medical Systems is part of Philips Medical Systems Royal Philips Electronics United States Philips Medical Systems 2301 Fifth Avenue, Suite 200 Philips Medical Systems est une partie de Seattle, WA, USA 98121 Royal Philips Electronics (800) 263-3342 Canada Philips Medical Systems ist Teil von...

Table des Matières