AEG 97015 Mode D'emploi
Masquer les pouces Voir aussi pour 97015:
Table des Matières

Publicité

Les langues disponibles
  • FR

Les langues disponibles

  • FRANÇAIS, page 43

Liens rapides

97015
97016
97017
97018
Bedienungs-
anleitung
6 V
12 V
12 V
6 V
V
V
V
2 A
1.5 A
4 A
1.5 A
4 A
1.5 A
6 V
12 V
12 V
6 V
V
2 A
1.5 A
4 A
2 A
4 A
6 V
12 V
V
12 V
6 V
V
2,5 A
5 A
V
A
%
V
4 A
2 A
4 A
4 A
V/A/%
5 A
DE
Bedienungsanleitung
Mikroprozessor Ladegerät
GB
Instructions for use
Microprocessor Charger
FR
Mode d'emploi
Chargeur à microprocesseur
IT
Manuale d'istruzioni
Caricabatterie con microprocessore
CZ
Návod k obsluze
Mikroprocesorová nabíječka
SK
Návod na obsluhu
Mikroprocesorová nabíjačka
6 V
12 V
V
12 V
V
2,5 A
5 A
A
%
V
4 A
V/A/%
5 A
6 V
6 V
12 V
12 V
6 V
V
V
2,5 A
3,5 A
5 A
7 A
2,5 A
A
V
%
A
%
V
V/A/%
V/A/%
5 A
7 A
6 V
12 V
V
V
3,5 A
5 A
A
V
%
A
%
V/A/%
5 A

Publicité

Table des Matières
loading

Sommaire des Matières pour AEG 97015

  • Page 1 97015 Bedienungsanleitung Mikroprozessor Ladegerät 97016 Instructions for use Microprocessor Charger 97017 Mode d’emploi Chargeur à microprocesseur 97018 Manuale d’istruzioni Caricabatterie con microprocessore Návod k obsluze Mikroprocesorová nabíječka Návod na obsluhu Mikroprocesorová nabíjačka Bedienungs- anleitung 12 V 12 V 12 V...
  • Page 2 DE - Seite 3 Vor jeder Benutzung unbedingt lesen. Anleitung und Ratschläge befolgen. GB - Page 19 Read these instructions before using the charger. Follow all instructions and recommendations. FR - Page 35 Veuillez lire les présentes instructions avant toute utilisation de l’appareil et suivre les conseils mentionnés ici. IT - Pagina 51 Leggere attentamente le istruzione i seguire tutti i consigli e gli avvisi prima di utilizzare il prodotto.
  • Page 3: Table Des Matières

    INhALT Einleitung ................... . 4 Bestimmungsgemäßer Gebrauch.
  • Page 4: Einleitung

    EINLEITUNG Erklärung der Symbole und Signalworte, die in dieser Bedienungsanleitung und/oder am Gerät verwendet werden: Beachten Sie diese Bedienungsanleitung bei der Verwendung des Geräts. Lebens- und Unfallgefahr für Kinder! Beachten Sie Warn- und Sicherheitshinweise! Stromschlaggefahr! Gerät nur an witterungsgeschützten Standorten verwenden! Schutzisoliertes Gehäuse (Schutzklasse II)
  • Page 5: Bestimmungsgemäßer Gebrauch

    Deutsch Bestimmungsgemäßer Gebrauch Lieferumfang Das Ladegerät ist zum Aufladen von offenen und Kontrollieren Sie unmittelbar nach dem Auspacken einer Vielzahl von geschlossenen, wartungsfreien den Lieferumfang. Prüfen Sie das Gerät sowie alle Blei-Säure-Akkus (Batterien) hergestellt, wie sie Teile auf Beschädigungen. Nehmen Sie ein defektes in Autos, Schiffen, LKW und anderen Fahrzeugen Gerät oder Teile nicht in Betrieb.
  • Page 6: Technische Daten

    Technische Daten Modell LM 1.5 LM 4.0 LD 5.0 LD 7.0 Artikelnummer 97015 97016 97017 97018 230 V AC 230 V AC 230 V AC 230 V AC Eingang 50 hz 50 hz 50 hz 50 hz Eingangsstrom max. 0,3 A max.
  • Page 7: Sicherheit

    Deutsch SIChERhEIT Verätzungsgefahr! • Batterien enthalten Säure, welche Augen und Allgemeine Sicherheitshinweise haut schädigt. Beim Laden der Batterie entstehen Lesen Sie alle Sicherheitshinweise und Anwei- zudem Gase und Dämpfe, welche die Gesundheit sungen. Versäumnisse bei der Einhaltung der gefährden. Sicherheitshinweise und Anweisungen können •...
  • Page 8 Stromschlaggefahr Verletzungsgefahr • • Ladegeräte können aktive elektronische Implanta- Versuchen Sie niemals, nicht wiederaufladbare, te wie z. B. herzschrittmacher in ihrem Betrieb beschädigte oder gefrorene Batterien aufzuladen. • stören und dadurch Personen gefährden. Verwenden Sie das Ladegerät nicht für das Auf- •...
  • Page 9 Deutsch...
  • Page 10: Produktübersicht

    Tegro AG ▪ Ringstr. 3 ▪ 8603 Schwerzenbach - Schweiz www.tegro.ch www.aeg-automotive.com AEG is a registered trademark used under license from AB Electrolux (publ). Input: 220 - 240 V AC; 50/60 Hz; max. 1,5 A Output: 6 / 12 V DC; 3,5 A / 7 A...
  • Page 11 Deutsch Bezeichnung Funktion Taste zur Spannungswahl Mikroprozessor-Ladegerät LM 1.5: 6 V / 1,5 A oder 12 V / 1,5 A Mikroprozessor-Ladegerät LM 4.0: Entsprechend der Auswahl leuchtet die rote LED neben der Taste 6 V / 2 A oder 12 V / 4 A 6 V oder 12 V.
  • Page 12: Funktionen

    Funktionen Gerät anschließen Das Ladegerät ist mit einem Mikroprozessor (MCU - 1. Verbinden Sie das Micro-Computer-Unit) ausgerüstet und besitzt erforderliche Pol- vollautomatische Lade-, Diagnose-, Rettungs- und 12 V 3,5 A anschlusskabel (mit Wartungsfunktionen. Nach der Auswahl des ange- V/A/% Ringanschlüssen oder...
  • Page 13: Ladevorgang Starten

    Deutsch Ladevorgang starten 1. Wählen Sie durch wiederholtes Drücken der Taste „V“ (1) den gewünschten Lademodus 6 V oder 12 V aus. Die Auswahl wird Ihnen durch die LED angezeigt. hinweis: haben Sie einen falschen Lademodus gewählt, leuchtet die LED „Error“ (9). In diesem Fall, das Ladegerät ausstecken, kurz warten und wieder einstecken.
  • Page 14: Ladedauer

    Ladedauer Die Ladedauer einer Batterie hängt im Wesentlichen von ihrem Ladezustand und ihrer Kapazität ab. Ladedauer in Stunden (ca.) Modell LM 1.5 LM 4.0 LD 5.0 LD 7.0 Ladestrom 1,5 A 2,5 A 3,5 A (max.) 6 V/12 V...
  • Page 15: Ladephasen

    Deutsch LADEPhASEN Schritt 3: Vorladung Die Batterie wird mit geringem Ladestrom schonend geladen, um die Batterie in einen ladefähigen Zu- stand zurückzubringen. Schritt 4: Softstart Die Batterie wird mit geringem Ladestrom schonend geladen. Schritt 5: Hauptladung mit konstantem Strom Das Prinzip des Ladevorgangs wird ausgehend von Die Batterie wird mit konstantem Ladestrom schnell einer 12 V-Batterie erklärt.
  • Page 16: Fehlersuche

    FEhLERSUChE Fehler/Problem Mögliche Ursache Abhilfe LED „Error“ (9) Defekte Batterie: Batterie von einer Fachwerkstatt prüfen leuchtet • Batteriespannung liegt unter 1,5 V und lassen. über 0,5 V • Batteriespannung liegt unter 5 V bei Batterie erneuern. einer 6 V-Batterie oder unter 11 V bei...
  • Page 17: Reinigung, Pflege Und Wartung

    Deutsch REINIGUNG, PFLEGE UND WARTUNG • Entsorgung Reinigen Sie die Batterieklemmen jedes Mal nach Beendigung des Ladevorgangs. Wischen Sie, um Die Verpackung besteht aus umweltfreundlichen Korrosion zu vermeiden, jegliche Batterieflüssig- Materialien, die Sie über die örtlichen Recyclingstel- keit ab, die eventuell mit den Batterieklemmen in len entsorgen können.
  • Page 19 TABLE OF cONTENTS Introduction ..................20 Normal use .
  • Page 20: Introduction

    INTRODUcTION Explanation of symbols and signal words used in these operating instructions and/ or the device: Refer to operator‘s manual Risk of bodily or fatal injury to children! Attention - Danger! Follow safety instructions and warnings! Danger of electric shock!
  • Page 21: Normal Use

    English 21 Normal use Contents The charger is intended for charging open and Please check the contents immediately after ope- a variety of closed, maintenance-free lead-acid ning the package. Check the device rechargeable batteries (batteries) as found in cars, and all parts for damage. Do not operate a defective boats, lorries and other vehicles, e.g.: device or parts.
  • Page 22: Technical Data

    Technical data Model LM 1.5 LM 4.0 LD 5.0 LD 7.0 Item number 97015 97016 97017 97018 230 V AC 230 V AC 230 V AC 230 V AC Input 50 hz 50 hz 50 hz 50 hz Input current max.
  • Page 23: Safety

    English 23 SAFETy Risk of chemical burns! • Batteries contain acid, which could damage the General Safety Guidelines eyes and skin. charging batteries further genera- Read all safety guidelines and instructions. Non- tes gasses and vapours hazardous to the health. compliance with safety guidelines and instructions •...
  • Page 24: Risk Of Injury

    Risk of damage! Risk of electrical shock! • Never place the device over or near the battery • to be charged. Gasses from the battery could chargers may interfere with the operation of damage the unit. Place the device as far from the active electronic implants, e.g.
  • Page 25 English 25...
  • Page 26: Product Overview

    Tegro AG ▪ Ringstr. 3 ▪ 8603 Schwerzenbach - Schweiz www.tegro.ch www.aeg-automotive.com AEG is a registered trademark used under license from AB Electrolux (publ). Input: 220 - 240 V AC; 50/60 Hz; max. 1,5 A Output: 6 / 12 V DC; 3,5 A / 7 A...
  • Page 27 English 27 Description Function Button for selecting the voltage LM 1.5 Microprocessor Charger: 6 V / 1.5 A or 12 V / 1.5 A LM 4.0 Microprocessor Charger: The red LED will light up next to 6 V or 12 V per the selection. 6 V / 2 A or 12 V / 4 A LD 5.0 Microprocessor Charger: 6 V / 2 A or 12 V / 5 A...
  • Page 28: Functions

    Functions Connecting the device The charger is equipped with a microprocessor 1. Connect the required (McU - Micro computer Unit) and features fully terminal connection automatic charging-, diagnostic-, emergency- and 12 V 3,5 A cable (with rings or maintenance functions. After selecting the battery V/A/% clamps) to the device’s...
  • Page 29: Start Charging

    English 29 Start charging 1. Repeatedly press the „V“ button (1) to select the desired charging mode, 6 V or 12 V. The LED will indicate your selection. Note: If an incorrect charging mode was selected, the “Error” LED (9) will light up. In this case unplug the charger, wait briefly, and plug in again.
  • Page 30: Charging Time

    Charging time A battery’s charging time greatly depends on its charge condition and the capacity. Charging time in hours (approx.) Model LM 1.5 LM 4.0 LD 5.0 LD 7.0 Charging current 1.5 A 2.5 A 3.5 A (max.) 6 V/12 V...
  • Page 31: Charging Phases

    English 31 ChARGING PhASES Step 3: Precharging The battery is gently charged with a low charging current to return the battery to a chargeable state. Step 4: Soft start The battery is gently charged with a low charging current. Step 5: Base charge with a constant current The battery is quickly and safely charged with a The concept of the charging process is explained consistent current.
  • Page 32: Troubleshooting

    TROUBLESHOOTING Error/Problem Possible cause Correction “Error” LED (9) lit Defective battery: Have the battery checked by a speciality • Battery voltage is under 1.5 V and over repair shop. 0.5 V • Battery voltage is under 5 V for a 6 V Replace battery.
  • Page 33: Cleaning, Care And Maintenance

    English 33 CLEANING, CARE AND MAINTENANCE • clean clamps after every charging. To prevent corrosion, wipe off any battery fluid which may have come into contact with the clamps. • carefully wind the cable when storing the device. This will help prevent accidental damage to the cable and the device.
  • Page 35 TABLE DES MATIèRES Introduction ..................36 Utilisation conforme.
  • Page 36: Introduction

    INTRODUcTION Explication des symboles et mots d’avertissements qui sont utilisés dans la présente notice d’explication et/ou sur l’appareil: Lorsque vous utilisez l’appareil, veuillez vous conformer à la présente notice d’utilisation. Risque d’accident et danger de mort pour les enfants ! Veuillez respecter les consignes de mise en garde et de sécurité...
  • Page 37: Utilisation Conforme

    Français Utilisation conforme Contenu de l‘emballage Ce chargeur est conçu pour recharger toutes les Contrôlez immédiatement le contenu de l‘emballage batteries au plomb (accumulateurs plomb-acide) après avoir déballé l‘appareil. Contrôlez l‘appareil ouvertes ainsi qu’un grand nombre de batteries fer- ainsi que toutes les pièces du point de vue mées ne demandant aucun entretien comme celles d‘éventuels dommages.
  • Page 38: Caractéristiques Techniques

    Caractéristiques techniques Modèle LM 1.5 LM 4.0 LD 5.0 LD 7.0 97015 97016 97017 97018 Numéro d’article 230 V AC 230 V AC 230 V AC 230 V AC Tension d’entrée 50 hz 50 hz 50 hz 50 hz max.
  • Page 39: Sécurité

    Français SÉCURITÉ Risque de brûlure ! • Les batteries contiennent des acides qui peuvent Consignes generales de sécurité brûler les yeux et la peau. Lors de la charge de Veuillez lire toutes les consignes de sécurité et la batterie, des gaz et des vapeurs nocifs pour la les instructions.
  • Page 40 Risque de choc électrique ! Risque de blessure ! • • Les chargeurs peuvent gêner le fonctionnement N’essayez jamais de charger des batteries non des implants électroniques comme les pacema- rechargeables, endommagées ou gelées. • kers cardiaques et ainsi mettre en danger les N’utilisez pas l’appareil pour charger des batteries...
  • Page 41 Français...
  • Page 42: Aperçu Du Produit

    Tegro AG ▪ Ringstr. 3 ▪ 8603 Schwerzenbach - Schweiz www.tegro.ch www.aeg-automotive.com AEG is a registered trademark used under license from AB Electrolux (publ). Input: 220 - 240 V AC; 50/60 Hz; max. 1,5 A Output: 6 / 12 V DC; 3,5 A / 7 A...
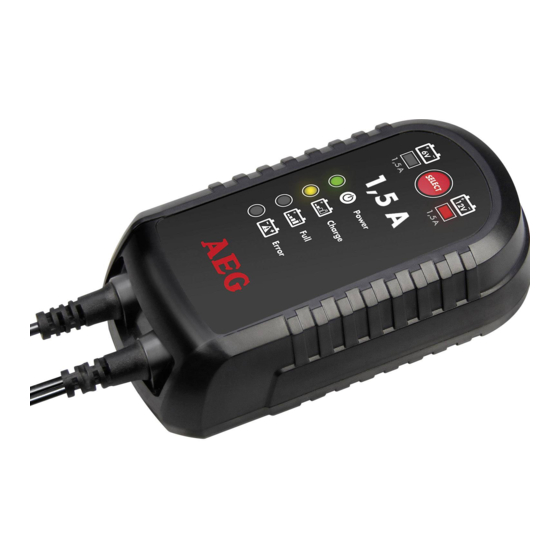
  • Page 43 Français Dénomination Fonction Touche pour sélection de tension Chargeur à microprocesseur LM 1.5 : 6 V / 1,5 A ou 12 V / 1,5 A Chargeur à microprocesseur LM 4.0 : Selon la sélection le voyant LED rouge s‘allume à côté de la touche 6 V 6 V / 2 A ou 12 V / 4 A ou 12 V.
  • Page 44: Fonctions

    Fonctions Brancher l’appareil Le chargeur est équipé d‘un microprocesseur 1. Connectez le câble de (MCU - Micro Computer Unit) et possèdent des fon- branchement nécessaire ctions de charge, de diagnostic, de sauvegarde et de 12 V 3,5 A (avec branchements maintenance entièrement automatiques.
  • Page 45: Démarrer Le Processus De Charge

    Français Démarrer le processus de charge 1. Sélectionnez le mode de charge 6 V ou 12 V souhaité en pressant plusieurs fois la touche « V » (1). La sélection est indiquée par le voyant LED. Remarque : Si vous avez sélectionné un mode de charge erroné, le voyant LED «...
  • Page 46: Durée De Charge

    Durée de charge La durée de charge de la batterie dépend principa- lement de son état de charge et de sa capacité. Durée de charge en heures (env.) Modèle LM 1.5 LM 4.0 LD 5.0 LD 7.0 Courant de charge...
  • Page 47: Phases De Charge

    Français PhASES DE Étape 3: Précharge La batterie est chargée progressivement à l‘aide ChARGE d‘un faible courant de charge afin de l‘amener vers un état de charge possible. Étape 4: Démarrage progressif La batterie est chargée progressivement au moyen d‘un faible courant de charge. Étape 5 : Charge principale à...
  • Page 48: Analyse D'erreurs

    ANALySE D’ERREURS Erreur/Problème Cause possible Remède Le voyant LED « Error » (9) Batterie défectueuse : Faire vérifier la batterie par un atelier s‘allume • La tension de batterie est inférieure à spécialisé 1,5 V et supérieure à 0,5 V •...
  • Page 49: Nettoyage, Entretien Et Maintenance

    Français NETTOyAGE, ENTRETIEN ET MAINTENANCE • Mise au rebut Nettoyez la pince à chaque fois une fois que le processus de charge est terminé. Essuyez tout li- L’emballage est composé de matériaux respectueux quide de la batterie pouvant être entré en contact de l’environnement que vous pourrez éliminer dans avec les pinces pour éviter toute corrosion.
  • Page 51 SOMMARIO Introduzione ..................52 Uso conforme.
  • Page 52: Introduzione

    INTRODUZIONE Spiegazione dei simboli e dei termini di avverten- za utilizzati in queste istruzioni per l’uso e/o sul dispositivo: Per l’utilizzo del dispositivo attenersi a queste istruzioni. Pericolo di vita e di incidenti per i bambini! Rispettare le istruzioni e le avvertenze per...
  • Page 53: Uso Conforme

    Italiano 53 Uso conforme Fornitura Questo caricabatterie è adatto per ricaricare le Controllare la fornitura subito dopo averla aperta. batterie piombo-acido aperte e molti accumulatori Controllare se il dispositivo o i componenti sono (batterie) piombo-acido chiusi che non necessitano danneggiati. Non utilizzare il dispositivo o compo- manutenzione, quali i tipi impiegati su auto, navi, nenti guasti.
  • Page 54: Dati Tecnici

    Dati tecnici Modello LM 1.5 LM 4.0 LD 5.0 LD 7.0 97015 97016 97017 97018 Codice articolo 230 V AC 230 V AC 230 V AC 230 V AC Ingresso 50 hz 50 hz 50 hz 50 hz max. 0,3 A max.
  • Page 55: Sicurezza

    Italiano 55 SICUREZZA Pericolo di corrosione! • Le batterie contengono acido dannoso per gli Indicationi di sicurezza generali occhi e per la pelle. Durante il processo di ricarica Leggere tutte le indicazioni e le istruzioni di sicurez- vengono emessi gas e vapori dannosi per la za.
  • Page 56 Pericolo di folgorazione! Pericolo di lesioni! • • I caricabatterie possono condizionare il funzio- Non cercare mai di caricare batterie danneggiate, namento di impianti elettronici, quali ad esempio non ricaricabili o congelate. • i pace-maker, e quindi essere pericolosi per le Non utilizzare il caricabatterie per caricare persone che li portano.
  • Page 57 Italiano 57...
  • Page 58: Descrizione Del Prodotto

    Tegro AG ▪ Ringstr. 3 ▪ 8603 Schwerzenbach - Schweiz www.tegro.ch www.aeg-automotive.com AEG is a registered trademark used under license from AB Electrolux (publ). Input: 220 - 240 V AC; 50/60 Hz; max. 1,5 A Output: 6 / 12 V DC; 3,5 A / 7 A...
  • Page 59 Italiano 59 Denominazione Funzione Tasto per selezionare la tensione Caricabatterie con microprocessore LM 1.5: 6 V / 1,5 A o 12 V / 1,5 A Caricabatterie con microprocessore In base alla selezione effettuata si illumina il LED rosso accanto al tasto LM 4.0: 6 V / 2 A o 12 V / 4 A 6 V o 12 V.
  • Page 60: Funzioni

    Funzioni Collegamento del dispositivo Questo caricabatterie è provvisto di un micropro- 1. Collegare il cavo di colle- cessore (MCU - Micro-Computer-Unit) e di funzioni gamento polo necessario interamente automatiche di ricarica, diagnosi, 12 V 3,5 A (con attacchi a occhiello recupero e manutenzione.
  • Page 61: Avvio Del Processo Di Ricarica

    Italiano 61 Avvio del processo di ricarica 1. Premendo ripetutamente il tasto „V“ (1) selezio- nare la modalità di ricarica desiderata, 6 V o 12 V. Il LED indicherà la selezione effettuata. Avvertenza: se viene selezionata una modalità di ricarica errata, il LED “Error”...
  • Page 62: Durata Della Ricarica

    Durata della ricarica La durata di ricarica di una batteria dipende essen- zialmente dal suo stato di carica e dalla sua capacità. Durata della ricarica in ore (ca.) Modello LM 1.5 LM 4.0 LD 5.0 LD 7.0 Corrente di ricarica...
  • Page 63: Fasi Di Carica

    Italiano 63 FASI DI CARICA Passo 3: precarica La batteria viene caricata con una corrente ridotta in modo da riportarla a uno stato idoneo alla carica. Passo 4: soft start La batteria viene caricata con una corrente ridotta. Passo 5: Ricarica principale a corrente costante La batteria viene ricaricata a corrente costante in modo rapido e sicuro.
  • Page 64: Analisi Degli Errori

    ANALISI DEGLI ERRORI Guasto / problema Possibili cause Soluzione Il LED “Error” (9) si illumina. Batteria difettosa: Far verificare la batteria presso un centro • la tensione batteria è inferiore a 1,5 V o specializzato. superiore a 0,5 V •...
  • Page 65: Pulizia, Manutenzione Eriparazioni

    Italiano 65 PULIZIA, MANUTENZIONE E RIPARAZIONI • Pulire sempre i morsetti dopo la ricarica. Per evitare la corrosione, pulire i morsetti da eventuali residui di liquido batteria. • Avvolgere con cura i cavi del dispositivo prima di riporlo. Ciò aiuta a evitare danneggiamenti accidentali ai cavi del dispositivo.
  • Page 67 OBSAH Úvod ....................68 Použití...
  • Page 68: Úvod

    ÚVOD Vysvětlení symbolů a signální slov, použitých v tomto návodu k obsluze nebo na přístroji: Při používání přístroje dbejte vždy na tento návod k obsluze. Nebezpečí ohrožení života a nehody pro malé děti! Dbejte na výstražná a bezpečnostní upozornění! Riziko zásahu elektrickým proudem!
  • Page 69: Použití Ke Stanovenému Účelu

    Česky 69 Použití ke stanovenému účelu Obsah dodávky Nabíječka je vyrobena k nabíjení otevřených a Po rozbalení okamžitě proveďte kontrolu komplet- početných uzavřených, bezúdržbových kyselino- nosti dodávky. zkontrolujte, zda není poškozeno olovnatých akumulátorů (baterií), vestavěných v zařízení ani žádná z jeho součástí. neuvádějte vadné osobních autech, lodích, nákladních automobilech a zařízení...
  • Page 70: Technická Data

    Technická data Model LM 1.5 LM 4.0 LD 5.0 LD 7.0 97015 97016 97017 97018 Číslo artiklu 230 V AC 230 V AC 230 V AC 230 V AC Vstup 50 hz 50 hz 50 hz 50 hz max. 0,3 A max.
  • Page 71: Bezpečnost

    Česky 71 BEZPEČNOST Nebezpečí poleptání! • Baterie obsahují kyselinu, která může zranit oči a Všeobecné bezpečnostní pokyny pokožku. Při nabíjení baterie vznikají plyny a páry Přečtěte si bezpečnostní pokyny a pokyny pro ohrožující zdraví. použití. nedodržení bezpečnostních pokynů a • Vyhýbejte se jakémukoliv kontaktu se žíravou pokynů...
  • Page 72 Nebezpečí zásahu elektrickým proudem Nebezpečí zranění! • • Nabíječky mohou rušit aktivní implantáty jako Nenabíjejte nikdy vadné nebo zmrzlé baterie ani např. kardiostimulátory a ohrozit tím dotyčné baterie, které nejsou určené k nabíjení. • osoby. Nepoužívejte přístroj k nabíjení baterií se suchými •...
  • Page 73 Česky 73...
  • Page 74: Popis Výrobku

    Tegro AG ▪ Ringstr. 3 ▪ 8603 Schwerzenbach - Schweiz www.tegro.ch www.aeg-automotive.com AEG is a registered trademark used under license from AB Electrolux (publ). Input: 220 - 240 V AC; 50/60 Hz; max. 1,5 A Output: 6 / 12 V DC; 3,5 A / 7 A...
  • Page 75 Česky 75 Č. Název Funkce Tlačítko pro volbu napětí Mikroprocesorová nabíječka LM 1.5: 6 V / 1,5 A nebo 12 V / 1,5 A Mikroprocesorová nabíječka LM 4.0: Podle volby svítí červená LED vedle tlačítka 6 V nebo 12 V. 6 V / 2 A nebo 12 V / 4 A Mikroprocesorová...
  • Page 76: Funkce

    Funkce Připojení přístroje Nabíječka je vybavena mikroprocesorem (McU - 1. Spojte potřebný pólový Micro-Computer-Unit) a funkcemi automatického kabel (s oky nebo nabíjení, diagnózy, záchrany a údržby baterií. Podle 12 V 3,5 A svorkami) s komfortní připojené baterie (6 V nebo12 V) rozpozná nabíječka V/A/% zástrčkovou přípojkou...
  • Page 77: Start Nabíjení

    Česky 77 Start nabíjení 1. Zvolte, opakovaným stisknutím tlačítka „V“ (1), požadovaný nabíjecí režim 6 V nebo 12 V. Volbu Vám ukazuje LED. Upozornění: Jestliže jste zvolili nesprávný nabíjecí režim, svítí LED „Error“ (9). V tomto případě je zapotřebí vy- táhnou zástrčku nabíječky ze zásuvky, krátce počkat a zase zástrčku zastrčit.
  • Page 78: Životnost

    Životnost Životnost baterie závisí do značné míry na jejím stavu nabití a kapacitě. Doba nabíjení v hodinách (cca) Model LM 1.5 LM 4.0 LD 5.0 LD 7.0 Nabíjecí proud 1,5 A 2,5 A 3,5 A (max.) 6 V/12 V...
  • Page 79: Fáze Nabíjení

    Česky 79 FáZE NABíJENí Krok 4: Plynulý pomalý start Baterie se šetrně nabíjí nízkým nabíjecím proudem. Krok 5: Hlavní nabíjení s konstantním proudem Baterie se s konstantním nabíjecím proudem nabíjí rychle a bezpečně. Krok 6: Hlavní nabíjení s konstantním napětím Baterie se nabíjí...
  • Page 80: Analýza Poruch

    ANALýZA PORUcH Chyba/Problém Možné příčina Pomoc LED „Error“ (9) svítí. Vadná baterie: Baterii nechat přezkoušet v odborné dílně. • Napětí baterie je nižší než 1,5 V a vyšší než 0,5 V Baterii vyměnit za novou. • Po 4 minutách nabíjení baterie 6 V je napětí...
  • Page 81: Čištění, Ošetřování Aúdržba

    Česky 81 ČIšTěNí, OšETřOVáNí A ÚDRŽBA • Po každém nabíjení vyčistěte svorky. Otírejte vždy tekutinu z baterie, která zůstala na svorkách, aby jste zabránili korozi. • Před skladováním přístroje pečlivě stočte kabely. Toto pomáhá vyloučit nechtěné poškození kabelů a přístroje. •...
  • Page 83 OBSAH Úvod ....................84 Používanie v súlade s určeným účelom .
  • Page 84: Úvod

    ÚVOD Význam symbolov a výstražných upozornení, ktoré sú používané v tomto návode na používanie a/alebo na prístroji: Pri používaní prístroja dodržiavajte tento návod na ovládanie. Nebezpečenstvo ohrozenia života a nehody pre deti! Rešpektujte varovné a bezpečnostné pokyny! Riziko zásahu elektrickým prúdom! Prístroj používajte iba na miestach chráne-...
  • Page 85: Používanie V Súlade S Určeným Účelom

    Slovenčina Používanie v súlade s určeným účelom Obsah dodávky Nabíjačka je určená na nabíjanie otvorených a Po rozbalení si hneď skontrolujte obsah. Prístroj a mnohých uzatvorených, bezúdržbových olovo- všetky jeho časti skontrolujte, ak zistíte poškodenie, kyselinových akumulátorov (batérií), ktoré sú prístroj nepoužite.
  • Page 86: Technické Údaje

    Technické údaje Model LM 1.5 LM 4.0 LD 5.0 LD 7.0 97015 97016 97017 97018 Číslo výrobku 230 V AC 230 V AC 230 V AC 230 V AC Vstup 50 hz 50 hz 50 hz 50 hz max. 0,3 A max.
  • Page 87: Bezpečnosť

    Slovenčina BEZPEČNOSť Nebezpečenstvo poranenia! • Batérie obsahujú kyselinu, ktorá poškodzuje oči a Všeobecné bezpečnostné pokyny pokožku. Pri dobíjaní batérií okrem toho dochádza Prečítajte si bezpečnostné pokyny a pokyny pre k tvorbe plynov a výparov, ktoré ohrozujú zdravie. použitie. nedodržanie bezpečnostných pokynov •...
  • Page 88 Nebezpečenstvo zásahu elektrickým Nebezpečenstvo poranenia! prúdom! • Nikdy sa nepokúšajte dobíjať nedobíjateľné, • Nabíjačky batérií môžu rušiť činnosť aktívnych poškodené alebo zamrznuté batérie. • elektronických implantátov ako je napr. kardiosti- Nabíjačku batérií nikdy nepoužívajte na nabíjanie mulátor a tým ohroziť osoby.
  • Page 89 Slovenčina 89...
  • Page 90: Prehľad Produktu

    Tegro AG ▪ Ringstr. 3 ▪ 8603 Schwerzenbach - Schweiz www.tegro.ch www.aeg-automotive.com AEG is a registered trademark used under license from AB Electrolux (publ). Input: 220 - 240 V AC; 50/60 Hz; max. 1,5 A Output: 6 / 12 V DC; 3,5 A / 7 A...
  • Page 91 Slovenčina Č. Označenia Funkcia Tlačidlo pre voľbu napätia Mikroprocesorová nabíjačka LM 1.5: 6 V / 1,5 A alebo 12 V / 1,5 A Mikroprocesorová nabíjačka LM 4.0: Závisle od výberu svieti červená LED-kontrolka vedľa tlačidla 6 V alebo 6 V / 2 A alebo 12 V / 4 A 12 V.
  • Page 92: Funkcie

    Funkcie Zapojenie prístroja Nabíjačka je vybavená mikroprocesorom (McU 1. Zapojte potrebný pólový - Micro-Computer-Unit) a má plnoautomatické pripojovací kábel (s funkcie nabíjania, diagnostiky, revitalizácie a údržby. 12 V 3,5 A prstencovými prípoj- Po voľbe typu pripojenej batérie (6 V alebo 12 V)
  • Page 93: Spustenie Procesu Nabíjania

    Slovenčina Spustenie procesu nabíjania 1. Opakovaným stlačením tlačidla „V“ (1) zvoľte požadovaný nabíjací modus 6 V alebo 12 V. Voľba je indikovaná LED-kontrolkou. Upozornenie: Ak ste zvolili nesprávny nabíjací modus, rozsvieti sa LED-kontrolka „Error“ (9). V tomto prípade odpojte nabíjačku, krátko počkajte a opäť ju zapojte. 2.
  • Page 94: Doba Nabíjania

    Doba nabíjania Doba nabíjania batérie v podstate závisí od stavu nabitia batérie a kapacity batérie. Doba nabíjania v hodinách (cca.) Model LM 1.5 LM 4.0 LD 5.0 LD 7.0 Nabíjací prúd 1,5 A 2,5 A 3,5 A (max.) 6 V/12 V...
  • Page 95: Fázy Nabíjania

    Slovenčina FáZy NABíJANIA Krok č. 4: Soft štart Batéria sa nabíja šetrne nízkym nabíjacím prú- dom. Krok č. 5: Hlavné nabíjanie konštantným prúdom Batéria sa konštantným prúdom nabije rýchlo a bezpečne. Krok č. 6: Hlavné nabíjanie konštantným napätím Batéria je pri konštantnom koncovom napätí nabí- Princíp procesu nabíjania je zdôvodnený...
  • Page 96: Analýza Chýb

    ANALýZA cHýB Chyba/problém Možné príčiny Riešenie LED „Error“ (9) svieti Poškodená batéria: Batériu nechajte skontrolovať v odbornej • Napätie batérie je nižšie ako 1,5 V a dielni. vyššie ako 0,5 V • Napätie v prípade 6 V-batérie je nižšie Batériu vymeňte.
  • Page 97: Čistenie, Starostlivosť Aúdržba

    Slovenčina ČISTENIE, STAROSTLIVOSť A ÚDRŽBA • Po každom ukončení nabíjacieho procesu vyčistite svorky. Aby ste predišli korózii, utrite každú baté- riovú tekutinu, ktorá sa môže eventuálne dostať do kontaktu so svorkami. • Keď prístroj skladujete, dôkladne navite kábel. Tým predídete prípadným poškodeniam kábla a prístroja.
  • Page 99 Made in China AEG is a registered trademark used under license from AB Electrolux (publ).
  • Page 100 76185 Karlsruhe - Germany ▪ www.mts-gruppe.com InterTEC POLSKA Sp. z o.o. Stara Wies, ul. Grodziska 22 05-830 Nadarzyn - Polska ▪ www.intertec-polska.pl Tegro AG Ringstr. 3 8603 Schwerzenbach - Schweiz ▪ www.tegro.ch www.aeg-automotive.com Stand der Informationen: 10/ 2017 EAN: 4038373970152, 4038373970169, 4038373970176, 4038373970183...

Ce manuel est également adapté pour:

970169701797018

Table des Matières