Table des Matières
Publicité
Les langues disponibles
Les langues disponibles
Liens rapides
DE
EEP A5-20-01
Inhaltsverzeichnis
1.
Allgemeine Angaben........................................................................ 2
1.1
Lagerung............................................................................................ 2
1.2
Allgemeine Bedingungen für Verkauf und Lieferung.......................... 2
1.3
Hinweis zur Konformitätserklärung.................................................... 2
1.4
Urheber- und Schutzrechte................................................................ 2
1.5
Hersteller und Kontakt........................................................................ 2
2.
Bestimmungsgemäßer Gebrauch................................................... 2
3.
Technische Beschreibung................................................................ 3
3.1
3.2
Technische Daten............................................................................... 3
3.3
Funktionsweise................................................................................... 4
3.4
Kommunikationstest........................................................................... 6
4.
Montage und Inbetriebnahme des Stellantriebs........................... 7
5.
Demontage „Aktor MH CON B (ENOCEAN)"............................... 10
5.1
6.
Batteriewechsel.............................................................................. 11
7.
Zurücksetzen auf Werkseinstellungen............................................ 12
8.
Entsorgung...................................................................................... 12
Premium Armaturen + Systeme
„Aktor MH CON B (ENOCEAN)"
Montage- und Betriebsanleitung
• Montage & Inbetriebnahme
nur durch Fachhandwerker.
• Vor Montage & Betrieb diese
Anleitung vollständig lesen.
• Anleitung an Endanwender
weitergeben.
• Separate Anleitungen von
angebundenen Systemen lesen.
1/12
Publicité
Chapitres
Table des Matières

Manuels Connexes pour oventrop Aktor MH CON B ENOCEAN


Sommaire des Matières pour oventrop Aktor MH CON B ENOCEAN
-
Page 1: Table Des Matières
Premium Armaturen + Systeme „Aktor MH CON B (ENOCEAN)“ Montage- und Betriebsanleitung • Montage & Inbetriebnahme nur durch Fachhandwerker. • Vor Montage & Betrieb diese Anleitung vollständig lesen. • Anleitung an Endanwender weitergeben. • Separate Anleitungen von angebundenen Systemen lesen. EEP A5-20-01 Inhaltsverzeichnis Allgemeine Angaben................ 2 1.1 Lagerung.................... 2 1.2 Allgemeine Bedingungen für Verkauf und Lieferung......2 1.3 Hinweis zur Konformitätserklärung............ 2 1.4 Urheber- und Schutzrechte..............2 1.5 Hersteller und Kontakt................ 2 Bestimmungsgemäßer Gebrauch........... 2 Technische Beschreibung.............. -
Page 2: Allgemeine Angaben
• keinen aggressiven Medien oder Kleinteile von Kindern fernhalten Hitzequellen aussetzen 1.2 Allgemeine Bedingungen für Verkauf und Lieferung Es gelten die zum Zeitpunkt der Lieferung gültigen allgemeinen Bedingungen für Verkauf und Lieferung von Oventrop. 1.3 Hinweis zur Konformitätserklärung Hiermit erklärt die OVENTROP GmbH & Co. KG, dass sich der „Aktor MH CON B (ENOCEAN)“ in Übereinstimmung mit den grundlegenden Anforderun- gen und den übrigen einschlägigen Bestimmungen der Richtlinien 1999/5/EG (R&TTE) sowie 2014/30/EU (EMV, elektromagnetische Verträglichkeit) befindet. Die Konformitätserklärung kann beim Hersteller angefordert werden. 1.4 Urheber- und Schutzrechte Diese Anleitung ist urheberrechtlich geschützt. Sie ist ausschließlich für die mit dem Produkt beschäftigten Personen bestimmt. Die Überlassung der An- leitung an Dritte ist unzulässig... -
Page 3: Technische Beschreibung
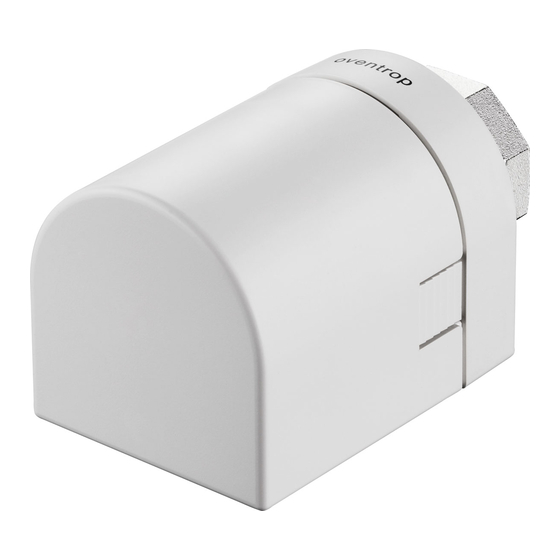
Technische Beschreibung „Aktor MH CON B (ENOCEAN)“ 3. Technische Beschreibung 3.1 Aufbau „Aktor MH CON B (ENOCEAN)“ Typenschild Aktor ID Gehäusedeckel Sichtfenster LED 2 „Anlern“- und Justiertaste Entriegelungslasche LED 2 Antenne LED 1 Befestigungsmutter Batteriefach für zwei Batterien (AA 1,5 V Mignon) M 30x1,5 3.2 Technische Daten Funkfrequenz 868,3 MHz Reichweite im Gebäude abhängig von Materialien & Störquellen Sendeintervall Wintermodus 10 Min.; Sommermodus 30 Min. Wirkungsweise Typ 1 (EN 60730-1) Schutzart IP20 (EN 60529) Schutzklasse III – Schutzkleinspannung Umgebungstemperatur... -
Page 4: Funktionsweise
Technische Beschreibung „Aktor MH CON B (ENOCEAN)“ 3.3 Funktionsweise Der Funk-Stellantrieb öffnet und schließt das Heizkörperventil über einen be- weglichen „Stößel“ (S). Dieser ist im Auslieferungszustand zurückgefahren (Montageposition), damit der Stellantrieb leichter montiert werden kann (sie- he Kapitel 4). In dieser Position ist das Heizkörperventil vollständig geöffnet. LED-Blinkcodes und ihre Bedeutung Blink grün LED1 LED2 Variante Beschreibung Anzahl Montage/Justage/Anlernen/ langsam Kommunikationstest nicht erfolgreich Montage/Justage/Anlernen/ langsam Kommunikationstest erfolgreich Stößel zurückgefahren schnell (Montageposition) langsam Rücksetzung in Werkseinstellung Wechsel fort- Justage nicht durchgeführt oder langsam laufend wurde vergessen fort- 4x schnell Systemfehler laufend pulsierend... - Page 5 Technische Beschreibung „Aktor MH CON B (ENOCEAN)“ Der Funk-Stellantrieb unterstützt für die Heizkörperregelung gemäß EnOcean Funkprofil „EEP A5-20-01“ zwei Varianten: • Der Stellantrieb kann von einem externen Smart-Home-System die An- weisung verarbeiten, das Heizkörperventil zu bewegen (Ventilhub 0-100%). • Der Stellantrieb erhält vom externen Smart-Home-System einen Ist- und einen Soll-Temperaturwert (0-40°C) für einen Raum. Der Stellantrieb nutzt seine interne Regelfunktion zur Berechnung des Ventilhubs. In diesem Modus sollte der Funk-Stellantrieb betrieben werden. Hauptfunktionen für den Regelbetrieb Funktion Bedingung Effekt Anlerntaste (A) kurz Anbindung Smart-Home-System, Anlernen < 3 Sek. drücken Stößel (S) fährt das Ventil zu Anlerntaste (A) Montage Stößel (S) fährt das Ventil zu > 3 Sek. drücken Stößel (S) fährt das Ventil auf;...
-
Page 6: Kommunikationstest
Technische Beschreibung „Aktor MH CON B (ENOCEAN)“ 3.4 Kommunikationstest Wenn der Aktor angelernt ist, kann durch erneutes „kurzes“ Drücken der Anlern-/Justiertaste (A, siehe Abbildung Seite 4) ein Kommunikationstest durchgeführt werden. Ist dieser erfolgreich, blinken LED 1 und LED 2 drei- mal langsam grün. Ist der Kommunikationstest nicht erfolgreich, blinken die beiden LEDs dreimal langsam rot. 6/12... -
Page 7: Montage Und Inbetriebnahme Des Stellantriebs
Montage & Inbetriebnahme „Aktor MH CON B (ENOCEAN)“ 4. Montage und Inbetriebnahme des Stellantriebs HINWEIS Der „Aktor MH CON B (ENOCEAN)“ passt auf Ventile mit dem Anschluss M30 x 1,5 und einem Schließmaß ≥ 11,0 mm. Für das Gewindeanschluss- maß M30 x 1 ist bei Oventrop ein Adapter-Set (Art.-Nr.: 1011445) erhältlich. Für die Montage einen Maulschlüssel (SW 32) bereithalten. 1. Entfernen Sie den Gehäusedeckel vom Stellantrieb. Drücken Sie dazu die beiden Entriegelungslaschen ein und ziehen Sie gleichzeitig den Deckel ab. 2. Setzen Sie 2 Batterien vom Typ AA 1,5 V Mignon in das Batteriefach ein (auf Markierungen +/- achten). Nach Einlegen der Batterien signalisiert der Stellantrieb seine Betriebsbereitschaft durch ein grünes Blinken beider LEDs. - Page 8 Montage & Inbetriebnahme „Aktor MH CON B (ENOCEAN)“ Heizkörperventil Befestigungs- mutter des Stellantriebs (M30 x 1,5) Zuerst muss der Anlernvorgang am Smart-Home-System gestartet wer- den. Die Vorgehensweise sollte in der Bedienungsanleitung des Herstel- lers des Smart-Home-Systems beschrieben sein. Lesen Sie diese ggf. dort nach. 5. Ist das Smart-Home-System entsprechend vorbereitet, drücken Sie am Stellantrieb einmal kurz (< 3 Sek.!) die Anlern-/Justiertaste. Anlern-/Justiertaste (A) LED 1 LED 2 Smart-Home-System Der Stellantrieb führt nach dem erfolgreichen Anlernvorgang automatisch eine Justierung auf das Heizkörperventil durch (die mechanische Stellbe- wegung ist hörbar).
- Page 9 Montage & Inbetriebnahme „Aktor MH CON B (ENOCEAN)“ WICHTIGER HINWEIS Sollten Sie die Anlern-/Justiertaste zu lange drücken, lösen Sie damit eine manuelle Justierung des Stellantriebs aus (siehe Abschnitt 5.1). Beachten Sie, dass damit der Anlernvorgang (noch) nicht erfolgreich abgeschlos- sen ist. In diesem Fall ist der Stellantrieb noch nicht vom Smart-Home- System erkannt worden und wird über dessen Nutzerschnittstelle nicht iden- tifizierbar sein (s.o.). Sollten Sie eine manuelle Justierfahrt durchgeführt haben, ist dies kein Problem. Sie müssen aber nochmals (kurz) die Anlern-/Justiertaste drü- cken, um den Anlernvorgang an das Smart-Home-System nachzuholen.
-
Page 10: Demontage „Aktor Mh Con B (Enocean)
Demontage „Aktor MH CON B (ENOCEAN)“ 5. Demontage „Aktor MH CON B (ENOCEAN)“ WICHTIGER HINWEIS Vor der Demontage müssen Sie den Stellantrieb in seine Montageposition versetzen. Halten Sie dazu die Anlern-/Justiertaste (A) länger als 3 Sekunden gedrückt, damit der Stellantrieb seinen Stößel zurückfährt. Hat der Stellantrieb seine Montageposition erreicht, blinken beide LEDs fünfmal hintereinander schnell grün auf. VORSICHT Verbrühungsgefahr durch unkontrollierten Medienaustritt! Wenn der Stößel nicht zurückgefahren ist, kann bei der Demontage versehentlich das Heizkörperventil mit herausgedreht werden und heißes Wasser unkontrolliert aus dem Heizkörper austreten. Stellantrieb vor der Demontage immer zuerst in seine Montageposition bringen. -
Page 11: Batteriewechsel
Batteriewechsel „Aktor MH CON B (ENOCEAN)“ 6. Batteriewechsel Bei leeren Batterien (Ventil in Notstellung, d.h. zu 20% offen) blinkt die LED 2 im Wechsel rot und grün. Durch das Sichtfenster ist dieses Signal auch bei ge- schlossenem Gehäusedeckel gut wahrnehmbar. 1. Entfernen Sie den Gehäusedeckel. Drücken Sie die beiden Entriegelungslaschen ein und ziehen Sie gleichzeitig den Deckel ab. 2. Entnehmen Sie jetzt die leeren Batterien. Sie können den Stellantrieb drehen, um einen möglichst leichten Zugang zum Batteriefach zu haben. Stellantrieb Aktor MH CON B Entriegelungslaschen Sichtfenster LED 2 Gehäusedeckel 3. Nach Entnahme der Batterien drücken Sie die Anlern-/Justiertaste (A), um die Elektronik zu entladen. 4. Setzen Sie neue Batterien ein. Beide LEDs blinken grün (siehe Blinkcodes). keine Akkus! 5. Setzen Sie den Gehäusedeckel auf den Stellantrieb, bis er hörbar einrastet. Nach dem Batteriewechsel nimmt der Stellantrieb automatisch eine „Justierfahrt“ vor und stellt die Funkverbindung zum Smart-Home-System wieder her. Dies kann mehrere Minuten dauern. -
Page 12: Zurücksetzen Auf Werkseinstellungen
Entsorgung „Aktor MH CON B (ENOCEAN)“ 7. Zurücksetzen auf Werkseinstellungen 1. Eine Batterie entfernen. 2. Anlerntaste (A) drücken und gedrückt halten, bis Batterie wieder eingesetzt ist. 3. Anlerntaste (A) wieder loslassen – Stellantrieb setzt den Stößel zurück (Montageposition). Werkseinstellung wurde ausgelöst. Dies wird abschließend durch ein zweimaliges Blinken der LEDs angezeigt (rot-grün im Wechsel, siehe Blinkcodes). 8. Entsorgung Dieses Produkt darf nicht über den Hausmüll entsorgt werden. Bitte nur in speziellen Einrichtungen für Elek- tronikschrott entsorgen. Erkundigen Sie sich ggf. bei den örtlichen Behörden für eine Recycling-Beratung. Technische Änderungen vorbehalten. 115076580 10/2016 (V1.0) Eine Übersicht der weltweiten Ansprechpartner fi nden Sie unter www.oventrop.de 12/12... - Page 13 Valves, controls + systems “Aktor MH CON B (ENOCEAN)” Installation and operating instructions • Installation and initial operation must only be carried out by a qualified tradesman. • Read instructions in their entirety before installation and operation. • Hand the instructions over to the final user. • Read separate instructions of EEP A5-20-01 connected systems. Content General information................2 1.1 Storage....................2 1.2 General conditions of sales and delivery.......... 2 1.3 Note regarding declaration of conformity........... 2 1.4 Copyright and protective rights............ 2 1.5 Manufacturer and contact..............2 Correct use..................2...
-
Page 14: General Information
General information “Aktor MH CON B (ENOCEAN)” 1. General information 1.1 Storage • Temperature: -10°C ... +65°C • Dry (max. RH 70%); free from dust • Keep packaging material and small • Do not expose to aggressive components away from children fluids or heat sources 1.2 General conditions of sales and delivery Oventrop´s general conditions of sales and delivery valid at the time of supply are applicable. 1.3 Note regarding declaration of conformity Oventrop GmbH & Co. KG hereby declares that the actuator “Aktor MH CON B (ENOCEAN)” complies with the basic requirements and the other relevant pro- visions of the EC guidelines 1999/5/EG (R&TTE) and 2014/30/EC (electromag- netic compatibility). The declaration of conformity can be obtained from the manufacturer 1.4 Copyright and protective rights These installation and operating instructions are copyrighted and are exclu- sively designed for persons involved with the product. Passing these installa- tion and operating instructions on to third parties is not permitted. 1.5 Manufacturer and contact... -
Page 15: Technical Description
Technical description “Aktor MH CON B (ENOCEAN)” 3. Technical description 3.1 Configuration “Aktor MH CON B (ENOCEAN)” Type plate Aktor ID Casing cover Viewer LED 2 “Teach in” /adjustment button Release tab LED 2 Antenna LED 1 Fixing nut M 30 x 1.5 Battery case for two batteries (AA 1.5 V Mignon) 3.2 Technical data Radio frequency 868,3 MHz Radio range within the building Depending on materials & interference sources Transmission interval Winter mode 10 min.; summer mode 30 min. Operating mode Typ 1 (EN 60730-1) Protection IP20 (EN 60529) -
Page 16: Function
Technical description “Aktor MH CON B (ENOCEAN)” 3.3 Function The actuator opens and closes the radiator valve via a “drive shaft” (S). When leaving the factory, the drive shaft is retracted (installation position) to facilitate installation of the actuator (see chapter 4). In this position, the radiator valve is fully open. LED fl ash codes and their meanings number LED1 LED2 fl ashing Description green fl ashes Installation/calibration/adaptation/ slowly communication test not successful Installation/calibration/adaptation/ slowly communication test successful Drive shaft retracted quickly (installation position) slowly alterna- Reset to factory settings ting Calibration has not been carried conti- slowly nuously out or was forgotten... - Page 17 Technical description “Aktor MH CON B (ENOCEAN)” The wireless actuator supports two variants for radiator control according to the EnOcean radio profile “EEP A5-20-01”: • The actuator activates the radiator valve (valve lift 0-100%) according to the instructions of an external Smart Home System. • The actuator receives an actual and a nominal temperature value (0-40°C) for a room from an external Smart Home System. The actuator uses its internal control function for the calculation of the valve lift. The wireless actuator should be operated in this mode. Main functions for control operation Function Condition Effect Press “teach in” button (A) Connection to Smart Home Sys- Adaptation briefly < 3 sec. tem, drive shaft (S) closes the valve Hold “teach in” button (A) Installation Drive shaft (S) closes the valve > 3 sec.
-
Page 18: Communication Test
Technical description “Aktor MH CON B (ENOCEAN)” 3.4 Communication test If the actuator has been “teached in”, a communication test can be carried out by pressing the “teach in”/adjustment button “shortly” again. A triple slow green flashing of LED1 and LED2 signalizes that the communication test has been completed successfully. A triple slow red flashing of both LEDs signalizes that the communication test has not been completed successfully. 6/12... -
Page 19: Installation And Initial Operation Of The Actuator
Installation and initial operation “Aktor MH CON B (ENOCEAN)” 4. Installation and initial operation of the actuator NOTE The actuator “AKTOR MH CON B (ENOCEAN)” fits all valves with connec- tion thread M 30 x 1.5 and a closing dimension ≥ 11.0 mm. An adapter set (item no. 1011445) for valves with connection thread M 30 x1 is available from Oventrop. Keep a spanner (size 32) available for installation. 1. Remove the casing cover of the actuator by pushing down both release tabs and removing the cover at the same time. 2. Insert two AA 1.5V Mignon batteries into the battery case (observe markings +/-). A green flashing of both LEDs signalizes that the actuator is ready for operation. Casing Cover Insert batteries Wireless actuator Push down release tabs and remove cover 3. Remove the mounted radiator thermostat by unscrewing it from the valve (this can be done without draining the system). ATTENTION Risk of scalding due to an uncontrolled escape of hot... - Page 20 Installation and initial operation “Aktor MH CON B (ENOCEAN)” Radiator valve Collar nut of the actuator (M30 x 1.5) Adaptation to the Smart Home System has to be carried out first. This procedure should be detailed in the installation instructions of the man- ufacturer of the Smart Home System. Refer to these installation instruc- tions if required. 5. After having prepared the Smart Home System accordingly, press the “teach in”/adjustment button” at the actuator once briefly (< 3 sec.!). “Teach in”/adjustment button (A) LED 1 LED 2 Smart-Home-System After having completed the “teach in” process successfully, the actuator will be adjusted to the radiator valve automatically (the mechanical travel move- ment is audible). 8/12...
- Page 21 Installation and initial operation “Aktor MH CON B (ENOCEAN)” IMPORTANT NOTE If the “teach in”/adjustment button is pressed too long, an automatic manual adjustment of the actuator will be triggered (see paragraph 5.1). Please note that the “teach in” process will not have been completed successfully. At this stage, the actuator has not yet been detected by the Smart Home System and cannot be identified via the user interface (see above). Should a manual adjustment run have been carried out, the “teach in”/ad- justment button has to be pressed (briefly) again to carry out the adaptation to the Smart Home System. A triple red flashing of the LEDs of the wireless actuator (see flash codes) sig- nalizes that the “teach in” process has not been completed successfully. The following could be the reasons: • The “teach in” process has not been triggered at the Smart Home System before. • The radio connection is disturbed or the radio range is restricted, for instance because of unfavourable spatial conditions. This problem can be solved by using wireless repeaters for signal amplification (e.g. RP-S F, OV item no. 1150699). A triple red flashing of the LEDs of the wireless actuators also signalises that the adjustment has not been completed successfully. The following could be the reason: • The closing dimension of the valve is < 11 mm. • The valve is blocked or stiff. 6. Mount the casing cover onto the actuator until it engages audibly. 9/12...
-
Page 22: Removal "Aktor Mh Con B (Enocean)
Removal “Aktor MH CON B (ENOCEAN)” 5. Removal “Aktor MH CON B (ENOCEAN)” IMPORTANT NOTE Before removal, the actuator has to be set to its installation position. To do so, keep the “teach in/adjustment” button (A) pressed for more than 3 seconds so that drive shaft of the actuator retracts. After having reached the installation position, both LEDs will flash green quickly five times. ATTENTION Risk of scalding due to an uncontrolled escape of hot water! If the drive shaft is not retracted, the valve may inadvertently be unscrewed from the radiator during removal which may lead to an... -
Page 23: Battery Replacement
Battery replacement “Aktor MH CON B (ENOCEAN)” 6. Battery replacement When the batteries are empty (valve in emergency position), LED 2 will flash alternately green and red. This signal is still visible through the viewer even if the casing cover is closed. 1. Remove the casing cover. Push down both release tabs and remove the cover at the same time. 2. Remove the empty batteries. The mounted actuator can be turned so that the battery case is easily accessible. Actuator Aktor MH CON B Release tabs Viewer LED 2 Casing cover 3. Press the “teach in”/adjustment button (A) after having removed the batteries in order to discharge the electronics. 4. Insert new batteries. Both LEDs will flash green (see flash codes). No rechargeable batteries! 5. Mount the casing cover onto the actuator until it engages audibly. After having removed the batteries, an automatic “adjustment run” will be carried out by the actuator and the radio communication between the actuator and the Smart Home System will be restored. -
Page 24: Factory Reset
(A) and keep it pressed until the battery has been reinserted. 3. Release the “teach in”/adjustment button (A) – drive shaft will be reset by the actuator (installation position). A double fl ashing of the LEDs (alternately red and green, see fl ash codes) signalizes that the factory settings were restored. 8. Disposal This product must not be disposed of with the stand- ard waste, but separately as electrical waste. If re- quired contact the local authorities regarding informa- tion on environmentally friendly disposal. Subject to technical modifi cations 115076580 10/2016 (V1.0) without notice. For an overview of our global presence visit www.oventrop.de 12/12... - Page 25 Robinetterie «haut de gamme» + Systèmes «Aktor MH CON B (ENOCEAN)» Notice d’installation et d’utilisation • Ne faire effectuer le montage et la mise en service que par un professionnel qualifié. • Lire intégralement ces instructions avant le montage. • Ces instructions doivent être remise à l’utilisateur final. • Lire les notices des systèmes reliés. EEP A5-20-01 Contenu Généralités..................2 1.1 Stockage.................... 2 1.2 Conditions générales de vente et de livraison........2 1.3 Déclaration de conformité..............2 1.4 Protection de la propriété intellectuelle..........2 1.5 Fabricant et contact................2 Utilisation conforme................. 2 Description technique..............
-
Page 26: Généralités
• Température: -10°C ... +65°C et propre • Stocker les petits accessoires et le matériel d’emballage hors de portée des enfants. 1.2 Conditions générales de vente et de livraison Les conditions générales de vente et de livraison valables au moment de la livraison s’appliquent. 1.3 Déclaration de conformité Par la présente, la société Oventrop GmbH & Co. KG déclare que le moteur «Aktor MH CON B (ENOCEAN)» est en conformité avec les exigences fon- damentales et les autres dispositions applicables des Directives 1999/5/CE (R&TTE) et 2014/30/CE (compatibilité électromagnétique). La déclaration de conformité peut être demandée auprès du fabricant. 1.4 Protection de la propriété intellectuelle Cette notice d’installation et d’utilisation est protégée par le droit de la pro- priété intellectuelle et est uniquement destinée aux personnes travaillant avec ce produit. La transmission de la notice à des tiers est interdite. -
Page 27: Description Technique
Description technique «Aktor MH CON B (ENOCEAN)» 3. Description technique 3.1 Construction «Aktor MH CON B (ENOCEAN)» Plaque signalétique Aktor ID Couvercle du boîtier Fenêtre Touche LED 2 d’apprentissage /ajustage Patte de déblocage LED 2 Antenne LED 1 Ecrou de serrage M 30 x 1,5 Compartiment pour deux piles (AA 1,5 V Mignon) 3.2 Données techniques Fréquence radio 868,3 MHz Portée radio dans le bâtiment En fonction des matériaux et sources parasites Intervalle d’émission Mode hiver 10 min. ; mode été 30 min. Mode d’action Type 1 (EN 60730-1) Type de protection... -
Page 28: Fonctionnement
Description technique «Aktor MH CON B (ENOCEAN)» 3.3 Fonctionnement Le moteur radio ouvre et ferme le robinet de radiateur au moyen d’une «tige» mobile (S). En départ usine, la tige est en position retirée (position de montage) pour faciliter le montage du moteur (voir chapitre 4). Dans cette position, le robinet de radiateur est complètement ouvert. Codes de clignotement des LED et leur signifi cation Nombre Cligno- vert LED1 LED2 Description rouge de cligno- tement tements Montage/ajustage/apprentissage/ lent test de communication échoués Montage/ajustage/apprentissage/ lent test de communication effectués avec succès Tige retirée (position de rapide montage) lent Réactivation des réglages alterné... - Page 29 Description technique «Aktor MH CON B (ENOCEAN)» Le moteur radio prend en charge les deux variantes suivantes pour le réglage de radiateurs selon le profil radio EnOcean «EEP A5-20-01» : • Le moteur actionne le robinet de radiateur selon les instructions émises par un système domotique (levée du robinet 0-100%). • Une valeur de température réelle et de consigne (0-40 °C) pour une pièce est transmise au moteur par un système domotique externe. La levée du robinet est calculée à l’aide de la fonction de réglage interne du moteur. Le moteur radio devrait fonctionner dans ce mode. Fonctions principales pour le fonctionnement de service Fonction Action/Condition Effet Apprentis- Raccordement au système domo- Presser la touche d’apprentissage sage (A) brièvement < 3 sec tique, tige (S) ferme le robinet Presser la touche d’apprentissage Montage Tige (S) ferme le robinet...
-
Page 30: Test De Communication
Description technique «Aktor MH CON B (ENOCEAN)» 3.4 Test de communication Un test de communication peut être effectué après l’apprentissage du mo- teur en pressant la touche d’apprentissage/ajustage (A, voir fig. en page 4) «brièvement». Trois clignotements verts lents des LED 1 et LED 2 signalent que le test de communication a été effectué avec succès. -
Page 31: Montage Et Mise En Service Du Moteur
Montage et mise en service «Aktor MH CON B (ENOCEAN)» 4. Montage et mise en service du moteur NOTE Le moteur «Aktor MH CON B (ENOCEAN)» peut être monté sur les robinets avec raccordement fileté M 30 x 1.5 et ayant un dégagement à la fermeture ≥ 11.0 mm. Pour le raccordement fileté M 30 x 1.0, un adaptateur (réf. 1011445) est proposé par Oventrop. Prévoir une clé plate de 32 mm pour le montage. 1. Enlever le couvercle du boîtier en appuyant sur les deux pattes de déblocage tout en retirant le couvercle. 2. Insérer deux piles AA 1,5 V Mignon dans le compartiment pour piles (respecter les marquages +/-). Trois clignotements verts des deux LED signalent que le moteur est prêt à l’emploi. Couvercle du boîtier Insérer les piles Appuyer sur les pattes de déblocage tout en retirant le couvercle du boîtier Moteur radio 3. Démonter le thermostat existant du radiateur en le dévissant du robinet... - Page 32 Montage et mise en service «Aktor MH CON B (ENOCEAN)» Robinet de radiateur Ecrou de serrage du moteur (M 30 x 1,5) L’apprentissage doit être démarré en premier au niveau du système domotique. Le procédé devrait être détaillé dans le mode d’emploi du fabricant du système domotique. Consulter-le si nécessaire. 5. Après avoir préparé le système domotique, presser la touche d’apprentissage/ajustage au moteur une fois brièvement (< 3 sec. !). Touche d’apprentissage/ajustage (A) LED 1 LED 2 Système domotique Après avoir terminé l’apprentissage avec succès, le moteur s’ajuste automati- quement au robinet de radiateur (le mouvement mécanique est audible).
- Page 33 Montage et mise en service «Aktor MH CON B (ENOCEAN)» NOTE IMPORTANTE Si la touche d’apprentissage/ajustage est pressée trop longtemps, un ajus- tage manuel du moteur est activé (voir paragraphe 5.1). Noter que l’appren- tissage n’est pas (encore) terminé avec succès. A ce moment, le moteur n’a pas encore été détecté par le système domotique et ne peut pas être identifié à travers son interface utilisateur (voir ci-dessus). Si une course d’ajustage manuelle a été effectuée, vous devez presser la touche d’apprentissage/ajustage encore une fois (brièvement) pour réitérer l’apprentissage au système domotique. Trois clignotements rouges des LED du moteur radio signalent que l’ap- prentissage a échoué (voir codes de clignotement). Les raisons peuvent être les suivantes : •...
-
Page 34: Démontage Du «Aktor Mh Con B (Enocean)
Démontage «Aktor MH CON B (ENOCEAN)» 5. Démontage „Aktor MH CON B (ENOCEAN)“ NOTE IMPORTANTE Le moteur doit être mis en position de montage avant le démontage. Pour ce faire, maintenir la touche d’apprentissage/ajustage (A) enfoncée pendant plus de 3 secondes afin que la tige soit retirée. Cinq clignotements verts rapides des deux LED signalent que le moteur se trouve en position de montage. ATTENTION Risque de brûlure par échappement incontrôlé de fluide ! Si la tige n’est pas retirée, le robinet de radiateur peut être dévissé... -
Page 35: Remplacement Des Piles
Remplacement des piles «Aktor MH CON B (ENOCEAN)» 6. Remplacement des piles Lorsque les piles sont déchargées (robinet en position d’urgence, c.-à.-d. ouvert à 20%), la LED 2 clignote en rouge et vert alternativement. Les clignotements sont encore visibles à travers la fenêtre même avec le couvercle du boîtier monté. 1. Enlever le couvercle du boîtier en appuyant sur les deux pattes de déblocage et en retirant dans le même temps le couvercle. 2. Enlever les piles usées. Le moteur peut être tourné pour permettre un accès facile au compartiment des piles. Moteur Aktor MH CON B Pattes de déblocage Fenêtre LED 2 Couvercle du boîtier 3. Appuyer sur la touche d’apprentissage/ ajustage (A) après avoir enlevé les piles pour décharger l’électronique. 4. Insérer les nouvelles piles. Les deux LED clignotent en vert (voir codes de clignotement). Ne pas utiliser de piles rechargeables! ... -
Page 36: Réactivation Des Réglages D'usine
été réinsérée. 3. Relâcher la touche d’apprentissage/ ajustage (A) – la tige du moteur est remise en position de montage. Deux clignotements des LED (rouge/vert alterné, voir codes de clignotement) signalent que les réglages d’usines ont été réactivés). 8. Elimination Ce produit ne doit pas être éliminé avec les déchets ménagers mais séparément comme déchet électro- nique. Contacter les autorités locales concernant la gestion des déchets dans le respect de l’environne- ment. Sous réserve de modifi cations techniques. 115076580 10/2016 (V1.0) Vous trouverez une vue d’ensemble des interlocuteurs dans le monde entier sur www.oventrop.de 12/12...