Table des Matières

Publicité

Les langues disponibles

Les langues disponibles

Liens rapides

Gebrauchsanweisung
DEU
Instructions For Use
ENG
Mode d'emploi
FRA
Istruzioni per l'uso
ITA
TANEO
SAR(K)L 12/24/36 (A)R
Systemleuchte
System Luminaire
Luminaire pour poste de travail modulaire
Apparecchio d´illuminazione per posto di lavoro modulare

Publicité

Table des Matières
loading

Sommaire des Matières pour Waldmann TANEO SARL 12 R

  • Page 1 Gebrauchsanweisung Instructions For Use Mode d‘emploi Istruzioni per l‘uso TANEO SAR(K)L 12/24/36 (A)R Systemleuchte System Luminaire Luminaire pour poste de travail modulaire Apparecchio d´illuminazione per posto di lavoro modulare...
  • Page 2 Willkommen bei Waldmann Vielen Dank, dass Sie sich für ein Produkt der Marke Waldmann entschieden haben. Höchste Produktqualität sowie ein kundenfreundlicher Service sind die Basis für den weltweit expandierenden Erfolg der Waldmann-Produkte. Falls Sie unseren Service in Anspruch nehmen möchten, ist unser Service-Team für Sie...
  • Page 3 Benvenuto a Waldmann La ringraziamo per aver acquistato un prodotto Waldmann. Il successo crescente dei prodotti Waldmann in tutto il mondo si basa sull‘eccellente qualità dei nostri prodotti ed il nostro servizio orientato ai clienti. Nel caso in cui si desideri prendere contatto con il nostro servizio di assistenza, il nostro team di assistenza è...
  • Page 4: Table Des Matières

    Inhaltsverzeichnis Zu Ihrer Sicherheit ....................5 Bestimmungsgemäßer Gebrauch ...............5 Sicherheitshinweise ..................5 Warnstufen ....................6 Modellübersicht ....................7 Montieren ......................8 Anbindungsarten ..................8 Leuchte mit fester Anbindung montieren ...........8 Leuchte mit Schwenkarm montieren ............9 Anschließen ....................... 10 Erdungskabel anschließen ................. 10 Leuchte an Netzspannung anschließen ............. 10 Leuchte an 24 V-Versorgungsspannung anschließen (SELV) .....
  • Page 5: Zu Ihrer Sicherheit

    Zu Ihrer Sicherheit Zu Ihrer Sicherheit Gefahr durch elektrischen Strom Unsachgemäßer Betrieb und fehlerhaftes Die Leuchte ist nach dem Stand der Tech- Arbeiten an der Leuchte können zu Verlet- nik entwickelt und aus hochwertigen Mate- zungen und Sachschäden führen. rialien mit größter Sorgfalt hergestellt und geprüft.
  • Page 6: Warnstufen

    Zu Ihrer Sicherheit Warnstufen GEFAHR Warnung vor Gefahren, die bei Missachtung der Maßnahmen unmittelbar zu Tod oder schweren Verletzungen führen. WARNUNG Warnung vor Gefahren, die bei Missachtung der Maßnahmen zu Tod oder schweren Verletzungen führen können. VORSICHT Warnung vor Gefahren, die bei Missach- tung der Maßnahmen zu Verletzungen führen können.
  • Page 7: Modellübersicht

    Modellübersicht Modellübersicht Um die Leuchte optimal montieren und nutzen zu können, müssen Sie das Leuchten- modell identifizieren. Dazu benötigen Sie die Modellnummer der Leuchte. HINWEIS: Die Modellnummer finden Sie an der Leuchte. X Prüfen Sie, welche Modellnummer die Leuchte hat. X Bestimmen Sie anhand der folgenden Tabelle das Leuchtenmodell, siehe Tab.
  • Page 8: Montieren

    Montieren Montieren Leuchte mit fester Anbindung montieren VORSICHT Verletzungsgefahr durch herunterfal- lende Leuchte. Personen- und Sachschaden. X Befestigungselemente ordnungs- gemäß montieren. ACHTUNG Abmessung SARL 24 (A)R 455 mm Sachschaden durch Beschädigen der Anschlussleitung. SARL 36 R 634 mm Beschädigung der Leuchte. SARL 24 (A)R 479 mm X Anschlussleitung sicher verlegen.
  • Page 9: Leuchte Mit Schwenkarm Montieren

    Montieren Fig. 2: Leuchte mit fester Anbindung aus- Fig. 4: Leuchte mit Schwenkarm montieren. richten. X Montieren Sie die Leuchte mit geeig- X Richten Sie die Leuchte so aus, dass der neten Schrauben an die Montageflä- Arbeitsbereich optimal beleuchtet wird. che und ziehen Sie die Schrauben fest, siehe Fig.
  • Page 10: Anschließen

    Dieses Kapitel gilt nur für EPA geeig- ƒ nete Leuchten. Geeignete Erdungskabel finden Sie im ƒ Zubehörangebot von Waldmann. X Verbinden Sie ein geeignetes Erdungs- kabel mit dem M5-Gewindestift an der Anbindung der Leuchte. X Verbinden Sie das andere Ende des Erdungskabels mit einem Erdungskon- taktpunkt.
  • Page 11: Leuchte An 24 V-Versorgungsspannung Anschließen (Selv)

    Funktionen der Leuchte Funktionen der Leuchte Leuchte an 24 V-Versorgungs- spannung anschließen (SELV) Je nach Leuchtenmodell hat die Leuchte unterschiedliche Funktionen. Wenn Sie ACHTUNG bestimmen möchten, welche Funktionen Sachschaden durch falsche Anschluss- die Leuchte hat, siehe Kapitel 2 „Modell- spannung. übersicht“...
  • Page 12: Bedienen

    Bedienen Bedienen Fig. 6: Taste. Ein- und Ausschalten X Drücken Sie die Taste, siehe Fig. 6. Dimmen X Drücken Sie die Taste und halten Sie diese Taste gedrückt, siehe Fig. 6. Nach ungefähr einer Sekunde verändert die Leuchte ihre Helligkeit. Wenn der maximale oder minimale Dimmwert erreicht ist, blinkt die LED in der Taste.
  • Page 13: Was Tun Wenn

    Servicetechniker oder von einer vergleichbar qualifizierten Person ersetzen lassen. Falls Sie unseren Service in Anspruch nehmen möchten, ist unser Service-Team für Sie erreichbar: Service-Hotline: +49 (0) 77 20 / 6 01 - 170 Service-E-Mail: service@waldmann.com Tab. 5: Was tun wenn?
  • Page 14: Wartung

    Service-Team für Sie erreichbar: Service-Hotline: +49 (0) 77 20 / 6 01 - 170 X Reparaturen nur vom Hersteller oder von einem vom Hersteller beauf- Service-E-Mail: service@waldmann.com tragten Servicetechniker durchfüh- ESD-Sicherheit prüfen ren lassen. Voraussetzung: Die Leuchte ist für den X Nur vom Hersteller freigegebene Einsatz in elektrostatisch geschützten...
  • Page 15: Technische Daten

    Technische Daten 12. Technische Daten 12.3 Klassifizierungen Bezeichnung Wert HINWEIS: Es gelten die Angaben auf dem Leistungsschild der Leuchte, das Sie an der Schutzklasse Leuchte: Leuchte finden. Leuchte + 12.1 Abmessungen Betriebsgerät: Bezeichnung Wert SARKL 12 R: II SARKL 12 (A)R 449 x 136 x 52 mm SARKL 12 AR: I SARL 24 (A)R...
  • Page 16 Table of Contents For your safety ....................17 Designated use ..................17 Safety instructions..................17 Warning levels ................... 18 Model overview ....................19 Mounting ......................20 Mounting types ..................20 Mounting the luminaire of mounting type “Fixed mounting” ....20 Mounting the luminaire with swivel arm ...........21 Connection ......................22 Connection of the grounding cable ............22 Connecting the luminaire to the mains voltage .........22...
  • Page 17: For Your Safety

    For your safety For your safety Danger due to electric current Improper use and faulty work on the lumi- The luminaire has been designed in accord- naire may result in injuries and material ance with state-of-the-art standards, manu- damage. factured with utmost care using high-quality materials, and tested.
  • Page 18: Warning Levels

    For your safety Warning levels DANGER Warnings against hazards that result directly in serious injuries or death in case of non-observance. WARNING Warnings against hazards that may result in serious injuries or death in case of non- observance. CAUTION Warning against hazards that may result in injuries in case of non-observance.
  • Page 19: Model Overview

    Model overview Model overview For optimum installation and use of the luminaire, you have to identify the luminaire model. To do so, you will require the model number of the luminaire. NOTE: The model number can be found on the luminaire. X Check which model number the luminaire has.
  • Page 20: Mounting

    Mounting Mounting Mounting the luminaire of mounting type “Fixed mount- CAUTION ing” Risk of injury caused by a falling luminaire. Personal injury and material damage. X Mount fastening elements correctly. NOTICE Material damage caused by damaging Dimension the connecting cable. SARL 24 (A)R 455 mm Damage to the luminaire.
  • Page 21: Mounting The Luminaire With Swivel Arm

    Mounting Fig. 2: Aligning the luminaire of mounting Fig. 4: Mounting the luminaire with swivel type “Fixed mounting” . arm. X Align the luminaire such that the work X Mount the luminaire on the mount- area is optimally lighted. ing surface using suitable screws and tighten the screws, see Fig.
  • Page 22: Connection

    This chapter applies only to luminaires ƒ suitable for EPA. Suitable grounding cables can be ƒ found in the Waldmann range of accessories. X Connect a suitable grounding cable to the mounting of the luminaire using an M5 set screw.
  • Page 23: Connecting The Luminaire To The 24 V Supply Voltage (Selv)

    Functions of the luminaire Functions of the luminaire Connecting the luminaire to the 24 V supply voltage Depending on the luminaire model, the (SELV) luminaire has different functions. If you want to find out which functions the lumi- NOTICE naire has, see chapter 2 “Model overview” , Material damage caused by wrong page 19.
  • Page 24: Operation

    Operation Operation Fig. 6: Key. Switch-on and switch-off X Press the key, see Fig. 6. Dimming X Press the key and keep it depressed, see Fig. 6. After about one second, the luminaire will change its brightness. As soon as the maximum or minimum dimming value is reached, the LED in the switch will flash.
  • Page 25: What To Do If

    If you want to make use of our service, our service team can be reached at: Service Hotline: +49 (0) 77 20 / 6 01 - 170 Service E-Mail: service@waldmann.com Tab. 5: What to do if?
  • Page 26: Maintenance

    X Have repairs performed only by the Service Hotline: +49 (0) 77 20 / 6 01 - 170 manufacturer or skilled personnel trained by the manufacturer. Service E-Mail: service@waldmann.com X Only spare parts released by the Checking ESD safety manufacturer may be used as spare Prerequisite: The luminaire is suitable for parts.
  • Page 27: Technical Data

    Technical data 12. Technical data 12.3 Classifications Designation Value NOTE: The data given on the rating plate attached to the luminaire apply. Protection class Luminaire: 12.1 Dimensions Luminaire+ Designation Value operating unit: SARKL 12 (A)R 449 x 136 x 52 mm SARKL 12 R: II SARKL 12 AR: I SARL 24 (A)R...
  • Page 28 Sommaire Pour votre sécurité ....................29 Utilisation normale ..................29 Consignes de sécurité ................29 Niveaux d’avertissement ................30 Aperçu des modèles ..................31 Monter le luminaire ...................32 Types de montage ..................32 Montage d’un luminaire avec le type de montage « Montage fixe »..32 Montage d’un luminaire avec un bras pivotant .........33 Raccorder le luminaire ..................34 Raccorder le câble de mise à...
  • Page 29: Pour Votre Sécurité

    Pour votre sécurité Pour votre sécurité Danger provoqué par le courant L ’utilisation inappropriée du luminaire et le Le luminaire est conçu selon l’état de la travail incorrect sur celui-ci peut entraîner technique, fabriqué avec la plus grande des blessures et des dommages matériels. minutie à...
  • Page 30: Niveaux D'avertissement

    Pour votre sécurité Risque de corrosion Niveaux d’avertissement L ’utilisation du luminaire dans des locaux DANGER humides peut entraîner des dommages Avertissement relatif à des dangers entraî- matériels. nant immédiatement la mort ou des bles- X L ’utiliser uniquement dans des locaux sures graves en cas de non-application des secs.
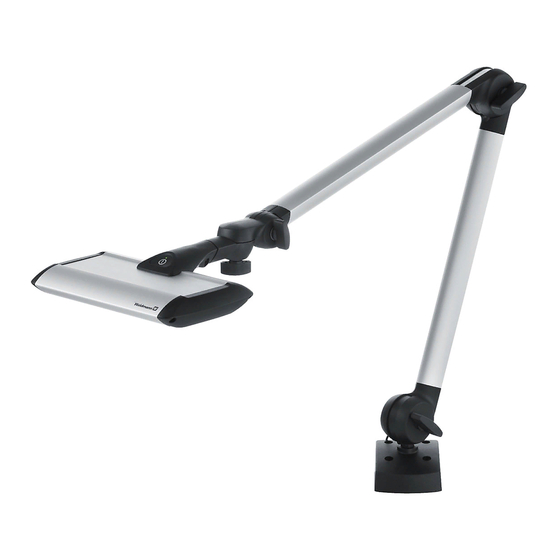
  • Page 31: Aperçu Des Modèles

    Aperçu des modèles Aperçu des modèles Pour pouvoir monter et utiliser le luminaire de manière optimale, vous devez identifier le modèle de luminaire. Pour cela, vous avez besoin du numéro de modèle de luminaire. REMARQUE : Vous trouverez le numéro du modèle sur le luminaire. X Vérifier le numéro de modèle de luminaire.
  • Page 32: Monter Le Luminaire

    Monter le luminaire Monter le luminaire Montage d’un luminaire avec le type de montage « Mon- ATTENTION tage fixe » Risque de blessures en cas de chute du luminaire. Dommages physiques et matériels. X Monter correctement les éléments de fixation. AVIS N°...
  • Page 33: Montage D'un Luminaire Avec Un Bras Pivotant

    Monter le luminaire Fig. 2: Orientation d’un luminaire avec le Fig. 4: Montage d’un luminaire avec un bras type de montage « Montage fixe ». pivotant. X Orientez le luminaire de sorte que la X Montez le luminaire sur la surface de luminosité...
  • Page 34: Raccorder Le Luminaire

    Vous trouverez les câbles de mise à la ƒ terre appropriés dans l’offre d’acces- soires de Waldmann. X Raccordez un câble de mise à la terre approprié à la vis sans tête M5 située sur la surface de montage fixe du lumi- naire.
  • Page 35: Raccorder Le Luminaire À La Tension D'alimentation De 24 V (Selv)

    Fonctions du luminaire Fonctions du luminaire Raccorder le luminaire à la tension d’alimentation de Selon le modèle de luminaire, le luminaire a 24 V (SELV) différentes fonctions. Si vous voulez déter- miner les fonctions du luminaire, voir cha- AVIS pitre 2 « Aperçu des modèles », page 31. Dommages matériels dus à...
  • Page 36: Utiliser Le Luminaire

    Utiliser le luminaire Utiliser le luminaire Fig. 6: Touche. Allumer et éteindre X Appuyez sur la touche, voir Fig. 6. Varier l’intensité de la lumière X Appuyez sur la touche et tenez-la appuyée, voir Fig. 6. Le luminaire modifie sa luminosité env. une seconde plus tard.
  • Page 37: Que Faire Si

    En cas de besoin, contacter notre équipe du service après-vente : Service Hotline : +49 (0) 77 20 / 6 01 - 170 Service-E-Mail : service@waldmann.com Tab. 5: Que faire si...?
  • Page 38: Maintenance

    Service Hotline : +49 (0) 77 20 / 6 01 - 170 technicien du service après-vente mandaté par celui-ci. Service-E-Mail : service@waldmann.com X Seul l’emploi de pièces de rechange Vérifiér la protection contre agréées par le fabricant est autorisé.
  • Page 39: Données Techniques

    Données techniques 12. Données techniques 12.3 Classifications Désignation Valeur REMARQUE : Les indications figurant sur la plaque signalétique que vous trouverez Classe Luminaire: sur le luminaire sont valables. de protection Luminaire + 12.1 Dimensions appareillage: Désignation Valeur SARKL 12 R: II SARKL 12 (A)R 449 x 136 x 52 mm SARKL 12 AR: I...
  • Page 40 Indice Per la Sua sicurezza ...................41 Uso conforme allo scopo d’impiego ............41 Avvertenze per la sicurezza ...............41 Livelli di pericolo ..................42 Panoramica modelli ..................43 Montaggio ......................44 Tipi di attacco ....................44 Montaggio dell’apparecchio d’illuminazione con attacco fisso ....44 Montaggio dell’apparecchio d’illuminazione con braccio orientabile ..45 Collegamento .....................46 Collegamento del cavo di messa a terra ...........46 Collegamento dell’apparecchio alla tensione di rete .........46...
  • Page 41: Per La Sua Sicurezza

    Per la Sua sicurezza Per la Sua sicurezza Rischio dovuto alla corrente elettrica L ’uso inappropriato e scorretto dell’apparec- L’apparecchio d’illuminazione è svilup- chio può provocare lesioni e danni materiali. pato secondo lo stato della tecnica, realiz- zato in materiali pregiati e controllato con X Assicurarsi che la tensione di rete corri- estrema cura.
  • Page 42: Livelli Di Pericolo

    Per la Sua sicurezza Livelli di pericolo PERICOLO Pericoli che, in caso di mancata osservanza delle misure, causano immediatamente gravi lesioni oppure anche la morte. AVVERTENZA Pericoli che, in caso di mancata osser- vanza delle misure, possono causare gravi lesioni oppure anche la morte. ATTENZIONE Pericoli che, in caso di mancata osservanza delle misure, possono causare lesioni.
  • Page 43: Panoramica Modelli

    Panoramica modelli Panoramica modelli Al fine di poter montare e utilizzare l’apparecchio d’illuminazione in modo ottimale, è necessario identificare il modello. A tale scopo è necessario il numero di modello dell’ap- parecchio d’illuminazione. NOTA: Il numero di modello si trova sull’apparecchio d’illuminazione. X Controllare il numero di modello dell’apparecchio d’illuminazione.
  • Page 44: Montaggio

    Montaggio Montaggio Montaggio dell’apparecchio d’illuminazione con attacco ATTENZIONE fisso La caduta dell’apparecchio d’illumi- nazione può causare lesioni. Danni personali e materiali. X Montare correttamente gli ele- menti di fissaggio. AVVISO Dimensioni Danni materiali causati dal danneggia- SARL 24 (A)R 455 mm mento del cavo di collegamento.
  • Page 45: Montaggio Dell'apparecchio D'illuminazione Con Braccio Orientabile

    Montaggio Fig. 2: Orientamento dell’apparecchio d’illu- Fig. 4: Montaggio dell’apparecchio d’illumi- minazione con attacco fisso. nazione con braccio orientabile. X Orientare l’apparecchio d’illuminazione X Montare l’apparecchio d’illuminazione in modo tale che l’area di lavoro venga con viti idonee sulla superficie di mon- illuminata in modo ottimale.
  • Page 46: Collegamento

    ƒ apparecchi d’illuminazione EPA. Cavi di messa a terra idonei si trovano ƒ nell’offerta di accessori di Waldmann. X Collegare un cavo di messa a terra ido- neo con il perno filettato M5 sull’attacco dell’apparecchio d’illuminazione. X Collegare l’altra estremità del cavo di...
  • Page 47: Collegamento Dell'apparecchio Alla Tensione Elettrica Di 24 V (Selv)

    Funzioni dell’apparecchio d’illuminazione Funzioni dell’apparecchio Collegamento dell’apparec- chio alla tensione elettrica di d’illuminazione 24 V (SELV) Le funzioni dell’apparecchio d’illuminazione AVVISO si distinguono a seconda del modello. Se si desidera definire le funzioni dell’apparec- Danni materiali dovuti a tensione di chio d’illuminazione, vedi capitolo 2 «Pano- collegamento errata.
  • Page 48: Comando

    Comando Comando Fig. 6: Tasto. Accensione e spegnimento X Premere il tasto, vedi Fig. 6. Dimmerazione X Premere il tasto e tenerlo premuto, vedi Fig. 6. Dopo circa un secondo cambia la lumi- nosità dell’apparecchio d’illuminazione. Una volta raggiunto il valore di dimme- razione max.
  • Page 49: Cosa Fare Se

    Nel caso in cui si desideri prendere contatto con il nostro servizio di assistenza, il nostro team di assistenza è reperibile ai seguenti recapiti: Servizio hotline: +49 (0) 77 20 / 6 01 - 170 Servizio Email: service@waldmann.com Tab. 5: Cosa fare se...
  • Page 50: Manutenzione

    Servizio hotline: +49 (0) 77 20 / 6 01 - 170 assistenza incaricato dal costruttore. Servizio Email: service@waldmann.com X Utilizzare esclusivamente le parti di ricambio autorizzate dal costruttore! Verifica della sicurezza ESD Requisito: l’apparecchio d’illuminazione è...
  • Page 51: Dati Tecnici

    Dati tecnici 12. Dati tecnici 12.3 Classificazioni Denominazione Valore NOTA: Valgono le informazioni riportate sulla targhetta dell’apparecchio d’illumi- Classe di isolamento nazione che si trova sull’apparecchio d’il- Apparecchio luminazione. d’illuminazione SARKL 12 R: II Classe di isolamento 12.1 Dimensioni Apparecchio SARKL 12 AR: I d’illuminazione + Denominazione...
  • Page 52 Herbert Waldmann GmbH & Co. KG Peter-Henlein-Straße 5 D-78056 Villingen-Schwenningen Telefon +49 (0) 77 20 / 601 - 0 Telefax +49 (0) 77 20 / 601 - 290 www.waldmann.com info@waldmann.com...

Table des Matières