Télécharger Imprimer la page

Publicité

Les langues disponibles

Les langues disponibles

Liens rapides

DE | EN | FR
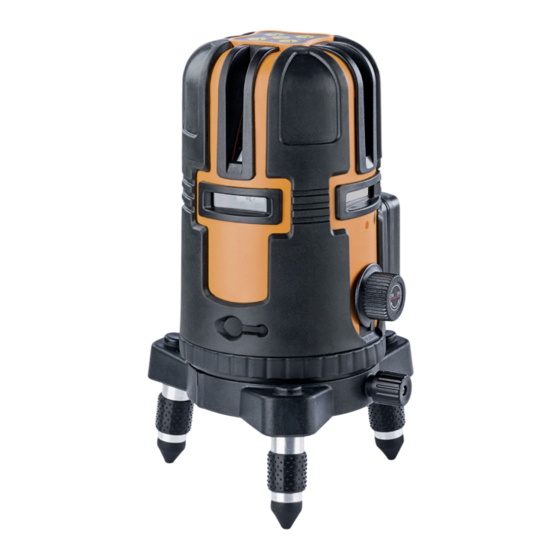
FL 69 HP
BEDIENUNGSANLEITUNG
USER MANUAL
MODE D'EMPLOI
www.geo-fennel.de
www.geo-fennel.com
www.geo-fennel.fr

Publicité

loading

Sommaire des Matières pour geo-FENNEL FL 69 HP

  • Page 1 DE | EN | FR FL 69 HP BEDIENUNGSANLEITUNG USER MANUAL MODE D‘EMPLOI www.geo-fennel.de www.geo-fennel.com www.geo-fennel.fr...
  • Page 2: Table Des Matières

    Sehr geehrter Kunde, vielen Dank für das Vertrauen, welches Sie uns beim Erwerb Ihres neuen geo-FENNEL-Gerätes ent- gegengebracht haben. Dieses hochwertige Qualitätsprodukt wurde mit größter Sorgfalt produziert und qualitätsgeprüft. Die beigefügte Anleitung wird Ihnen helfen, das Gerät sachgemäß zu bedienen. Bitte lesen Sie ins- besondere auch die Sicherheitshinweise vor der Inbetriebnahme aufmerksam durch.
  • Page 3 MERKMALE • 5 Laserkreuze • 4 vertikale Linien im 90°-Winkel zueinander • 360° Horizontallinie • Laserkreuz an der Decke • Lotpunkt zum Boden • 8 Laserpunkte • Selbstnivellierfunktion kann ausgeschaltet werden • Einsatz mit Empfänger FR 55 zur Verlängerung des Arbeitsbereiches Technische Daten Selbstnivellierbereich ±3°...
  • Page 4: Bedienelemente

    BEDIENELEMENTE 1. Tastatur 2. Laseraustrittsfenster 3. Laseraustrittsfenster 4. AN/AUS-Knopf 5. Dosenlibelle 6. Seitenfeintrieb 7 . Batteriefach 8. Batteriefachverschluß 9. Justierbares Stativbein 10. 5/8“-Adapter BEDIENFELD 1. AN / AUS-LED 2. Vertikale Linie V2 mit Laserpunkt 3. Empfängerbetrieb / MANUELL -Funktion 4. LED MANUELL -Funktion 5.
  • Page 5: Stromversorgung

    STROMVERSORGUNG Der Laser kann mit Li-Ion-Akku und alternativ mit handelsüblichen Alkaline-Einwegbatterien betrieben werden. Li-Ion-Akkupack Anzeige Der Laser ist mit einem wiederaufladbaren Li-Ion-Akkupack ausgestattet. Ladezustand Ladegerät mit Netz und Ladebuchse am Akkupack verbinden. Der Ladezustand wird an der kleinen Lampe neben der Lade- Li-Ion-Akkupack buchse angezeigt: Permanentes rotes Licht zeigt an, dass der Akkupack geladen wird.
  • Page 6: Bedienung

    Gerätes einwandfrei arbeitet. Dosenlibelle (5) mit Hilfe der der justierbaren Stativbeine einspielen. Dosen- libelle VERSTELLBARER 360°-TEILKREIS UND FEINTRIEB Der FL 69 HP ist mit einem 360°-Teilkreis ausgerüstet. Das Gerät kann grob per Hand gedreht werden oder fein mit dem Seitenfeintrieb (6).
  • Page 7 EINSCHALTEN AN- / AUS-Knopf in Position ON drehen. Das Gerät ist nun betriebsbereit. Die Linien können jetzt einzeln oder zusammen geschaltet werden (siehe Zeichnung). Steht das Gerät zu schräg (außerhalb des Selbstnivellierbereiches), ertönt ein akustisches Warnsignal. Die eingeschalteten Laserlinien blinken als zusätzliche Warnung. Zum Ausschalten AN- / AUS-Knopf wieder in Position OFF drehen.
  • Page 8 Die MANUELL - Funktion ist nur möglich, wenn der AN- / AUS-Knopf in OFF - Position und somit der Kompensator geklemmt ist (da andernfalls Kompensatoralarm ausgelöst würde). Dazu MANUELL - Taste (3) drücken (MAN-LED blinkt) und dann die gewünschten Linien schalten. Nun kann der FL 69 HP in Schrägpositionen angewendet werden.
  • Page 9 ANWENDUNGSBEISPIELE...
  • Page 10 WICHTIG – den Empfänger langsam auf und ab bewegen, um den Laserstrahl zu empfangen. FL 69 HP und FR 55 arbeiten mit einer anderen Technik, als Sie es eventuell von Rotationslasern kennen. Daher muss der Empfänger wesentlich sensibler geführt werden.
  • Page 11 Der Empfänger kann in Verbindung mit der Halteklammer an einer Nivellierlatte oder anderen Gegenständen befestigt werden. EINSCHALTEN Knopf (3) drücken (Kontrollleuchte leuchtet rot). Beim FL 69 HP Pulsfunktion einschalten. Zum Empfangen des Laserstrahls den Empfänger langsam auf und ab bewegen. Empfang des Laserstrahls und entsprechende Anzeige durch die LEDs (Vorder-, Rückseite, Seite): A Empfänger nach unten bewegen...
  • Page 12: Sicherheitshinweise

    SICHERHEITSHINWEISE BESTIMMUNGSGEMÄSSE VERWENDUNG Das Gerät sendet einen sichtbaren Laserstrahl aus, um z.B. folgende Messaufgaben durchzuführen: Ermittlung von Höhen; rechten Winkeln, Ausrichtung von horizontalen und vertikalen Bezugsebenen sowie Lotpunkten (je nach Gerät). UMGANG UND PFLEGE Messinstrumente generell sorgsam behandeln. Nach Benutzung mit weichem Tuch reinigen (ggfs. Tuch in etwas Wasser tränken).
  • Page 13 Sicherheitsmassnahmen eingesetzt werden. Das Auge ist bei zufälligem, kurzzei- tigem Hineinsehen in den Laserstrahl durch den Lidschlussreflex geschützt. Laserwarnschilder der Klasse 2 sind gut sichtbar am Gerät angebracht. www.geo-fennel.de GER MANY Laser IEC 60825-1:2014 P ≤ 1 mW @ 635 - 670 nm...
  • Page 14 Dear Customer, Thank you for your confidence in us, having purchased a geo-Fennel instrument. For the optimum performance of the instrument, please read this manual carefully and keep it in a convenient place for future reference. This manual contains important safety information that should be read and understood before use.
  • Page 15 FEATURES • 5 laser crosses • 4 vertical lines at 90° to each other • 360° horizontal line • Laser cross to the ceiling • Plumb down beam • 8 laser dots • Self-levelling function can be switched off for manual use •...
  • Page 16 FEATURES 1. Keypad 2. Laser emitting window 3. Laser emitting window 4. ON/OFF knob 5. Circular bubble 6. Fine adjustment screw 7 . Battery case 8. Battery case lock 9. Adjustable tripod leg 10. 5/8“ adapter KEYPAD LAYOUT 1. Power ON/OFF LED 2.
  • Page 17 Both the standard Li-Ion battery or 4 x AA alkaline batteries can be used. Li-Ion battery pack Charging status indication FL 69 HP comes with Li-Ion rechargeable battery pack. Connect the charger with the battery pack and the the socket. Permanent red light (at the charger) indicates that the batteries Li-Ion battery box are being charged.
  • Page 18 If necessary centre the ciruclar bubble (5) by means of the height adjustable tripod legs. Circular bubble ROTATABLE CIRCLE AND TANGENT SCREW The FL 69 HP is equipped with a 360° rotatable circle. The laser can be rotated by hand or carefully by use of the tangent screw (6).
  • Page 19 POWER ON Turn the ON / OFF knob to position „ON“ and the instrument is ready for use. The laser lines can now be switched on and off independently of each other or altoghether (see the drawing). A visible (blinking lines) and audible alarm indicates if the instrument is set up outside of the self- levelling range.
  • Page 20 The FL 69 HP can now be used in slope mode. USE WITH RECEIVER FR 55 To extend the working range or for use in unfavourable light conditions the FL 69 HP can be used with receiver FR 55.
  • Page 21 APPLICATION DIAGRAMS...
  • Page 22 IMPORTANT – move the receiver FR 55 up and down carefully to detect the laser beam. FL 69 HP and FR 55 are working with another technology than rotating laser levels. Because of this the receiver FR 55 must be moved much more slowly.
  • Page 23 INSTALLATION OF BATTERIES •Open the battery compartment cover (14). •Insert 1 x 9 V AA battery according to the installation symbol (ensure correct polarity!) and close the cover. •In order to save battery power the receiver will automatically turn off if it has not received a laser scanning signal for 10 minutes.
  • Page 24 SAFETY NOTES INTENDED USE OF INSTRUMENT The instrument emits a visible laser beam in order to carry out the following measuring tasks (depen- ding on instrument): Setting up heights, horizontal and vertical planes, right angles and plumbing points. CARE AND CLEANING Handle measuring instruments with care.
  • Page 25 The instrument is a laser class 2 laser product according to DIN IEC 60825-1:2014. It is allowed to use the unit without further safety precautions. The www.geo-fennel.de GE RMA NY eye protection is normally secured by aversion responses and the Laser blink reflex.
  • Page 26 5. Opération 6. Consignes de sécurité LIVRÉ COMME SUIT Art.-Nr. 581500: Art.-Nr. 581500: • Ultra-Liner FL 69 HP • Ultra-Liner FL 69 HP • Trépied de sol • Cellule de réception FR 55 avec support • Accu Li-Ion et chargeur •...
  • Page 27 CARACTÉRISTIQUES • 5 croix laser • 4 lignes laser disposées en angle à 90° • Ligne horizontale de 360° • Croix laser au plafond • Point d‘aplomb au sol • 8 points laser • Possibilité de travailler en manuel • Cellule de réception pour allonger la portée à 60 m Données techniques Plage d‘autonivellement ±3°...
  • Page 28 DESCRIPTION DE L‘APPAREIL 1. Clavier 2. Vitres protection du laser 3. Vitres protection du laser 4. Bouton MARCHE / ARRÊT 5. Nivelle sphérique 6. Vis de réglage fin 7 . Compartiment piles 8. Fixation du compartiment de piles 9. Pied réglable du trépied 10.
  • Page 29 ALIMENTATION EN COURANT Le laser peut fonctionner avec accu Li-Ion, comme alternative, aussi avec des piles alcalines. Accu Li-Ion Indication Le laser est équipé d’un pack accu Li-Ion rechargeable. Relier le chargeur au état de charge réseau électrique et à la douille de charge du pack accu. La phase de charge est indiquée par le petit voyant situé...
  • Page 30 Nivelle spérique CERCLE GRADUE 360° RÉGLABLE ET RÉGLAGE MICROMÉTRIQUE Le FL 69 HP est équipé d’un cercle gradué de 360°. On peut tourner grossièrement l’instrument à la main ou à l’aide du dispositif de réglage micrométrique (6).
  • Page 31 MISE EN MARCHE L ‘ APPAREIL Mettre le bouton MARCHE / ARRÊT en position „ON“ . Le laser est prêt à fonctionner (la LED marche / arrêt est allumée). Pour la connection des lignes voir en dessous. Le laser émettra un bip sonore qui vous signalera qu’il est dehors de sa plage de compensation automatique de ±...
  • Page 32 Pour l’allongement de la plage de travail ou pour l’emploi dans des conditions de luminosité intense, il est possible d’utiliser le FL 69 HP avec la cellule FR 55. La cellule est livrée avec la réf. 581510 et livrable en option avec la réf. 581500.
  • Page 33 EXEMPLES D‘APPLICATION...
  • Page 34 IMPORTANT – Pour capter le faisceau laser, faire monter et descendre lentement la cellule. FL 69 HP et FR 55 fonctionnent avec une technique différente de celle des lasers rotatifs que vous connaissez éventuellement. De ce fait, il faut guider la cellule avec davantage de sensibilité.
  • Page 35 MISE EN MARCHE Pressez bouton (3) (voyant lumineux de contrôle brille rouge). Mettre en marche le mode récepteur du FL 69 HP . Pour capter le faisceau laser, faire monter et descendre lentement la cellule. Réception du faisceau laser et affichage correspondant à l‘écran (avant, derrière-, latéral) A Déplacer la cellule vers le bas...
  • Page 36 CONSIGNES DE SÉCURITÉ UTILISATION CONFORME AUX PRESCRIPTIONS Le niveau projette un faisceau laser visible, pour effectuer p. ex. les travaux de mesures suivants: détermination de hauteurs, tracé d’angles droits, pointage de plans de référence horizontaux et verti- caux ainsi qu’obtention de points d’aplomb (dépendant de l‘instrument). NETTOYAGE / REMISAGE (à...
  • Page 37 à la norme DIN EN 60825-1:2014. De ce fait, l’instrument peut être utilisé sans avoir recours à d’autres mesures de sécurité. Au cas où l’utilisateur a regardé un court instant le faisceau laser, les www.geo-fennel.de G ERMA NY yeux sont tout de même protégés par le réflexe de fermeture des Laser paupières.
  • Page 40 GmbH Technische Änderungen vorbehalten. Kupferstraße 6 All instruments subject to technical changes. D-34225 Baunatal Sous réserve de modifications techniques. Tel. +49 561 / 49 21 45 +49 561 / 49 72 34 info@geo-fennel.de 01/2016 www.geo-fennel.de Precision by tradition.