
Manuels Connexes pour geo-FENNEL FL 260VA


Sommaire des Matières pour geo-FENNEL FL 260VA
- Page 1 DE | EN | FR FL 260VA FLG 260VA-Green BEDIENUNGSANLEITUNG USER MANUAL MODE D‘EMPLOI www.geo-fennel.de www.geo-fennel.com www.geo-fennel.fr...
- Page 2 Sehr geehrter Kunde, vielen Dank für das Vertrauen, welches Sie uns beim Erwerb Ihres neuen geo-FENNEL-Gerätes ent- gegengebracht haben. Dieses hochwertige Qualitätsprodukt wurde mit größter Sorgfalt produziert und qualitätsgeprüft. Die beigefügte Anleitung wird Ihnen helfen, das Gerät sachgemäß zu bedienen. Bitte lesen Sie ins- besondere auch die Sicherheitshinweise vor der Inbetriebnahme aufmerksam durch.
- Page 3 Temperaturbereich -10°C - +50°C Laserdiode 635 nm Laserklasse Staub-/Wasserschutz IP 66 Abweichende technische daten für FL 260VA (Klasse 3R) Reichweite mit FR 45 Ø 1000 m Scanning ohne FR 45 60 m* Rotieren ohne FR 45 Ø 60 m* Laserdiode / Laserklasse 635 nm / 3R Abweichende technische daten für FLG 260VA-Green (Klasse 2)
-
Page 4: Stromversorgung
Wenn die POWER-LED am Gerät während des Betriebs zu blinken beginnt, muss der Akku geladen werden. Das Ladegerät kann bei eingesetztem Akkupack auch als Netzgerät verwendet werden. 3 x 1,5 V olt C Alkaline Einwegbatterien Der FL 260VA / FLG 260VA-Green kann alternativ mit Alkalinebatterien betrieben werden. -
Page 5: Gerät Einschalten
23. Neigungseinstellung ab GERÄT EINSCHALTEN Taste (8) drücken, um den FL 260VA / FLG 260VA-Green einzuschalten. Die POWER-LED (9) leuchtet permanent. Taste (8) erneut drücken, um das Gerät wieder auszuschaten. Wenn die POWER-LED (9) zu blinken beginnt, muss der Akku geladen werden. -
Page 6: Tilt-Funktion
Zum Verlassen der TILT-Funktion Taste (11) drücken. Bei deaktivierter TILT-Funktion stellt sich der FL 260VA / FLG 260VA-Green bei Lageveränderungen automatisch nach. Bei einer grossen Lageveränderung (z.B. unbeabsichtigtes Verstellen eines Stativ- beines) kommt es zu einer Veränderung der Bezugshöhe. Dies wird durch die TILT-Funktion verhin- dert –... - Page 7 NEIGUNGSFUNKTION Neigungen können manuell bis ± 5° (± 9%) eingestellt werden. Mit Taste (5) die jeweilige Neigungsfunktion auswählen. Nach einmaligem Drücken befindet sich das Gerät im SLOPE-Modus. Taste (5) drücken, um zwischen MAN- und SLOPE-Modus zu wechseln. Die Auswahl der Achsen erfolgt mit Taste (20) der Fernbedienung. SLOPE Horizontalbetrieb Eine Achse (X oder Y) kann manuell geneigt werden, die jeweils andere Achse nivelliert sich selbst.
-
Page 8: Bedienung
BEDIENUNG Gerät auf eine einigermaßen ebene Fläche setzen oder auf einem Stativ befestigen. Zum Einschalten Taste (8) drücken. Direkt nach dem Einschalten beginnt der Laser automatisch, sich selbst zu nivellieren. Der Laserpunkt und die TILT-LED (12) blinken während dieses Prozesses. Wenn die Selbstnivellierung abgeschlossen ist, beginnt sich der Rotorkopf mit 800 U/Min. -
Page 9: Bedienelemente
EMPFÄNGER FR 45 / FRG 45-GREEN BEDIENELEMENTE Libelle (2) 2. Display 3. Referenzmarke 4. Empfangsfenster 5. AN- / AUS-Schalter 6. Lautsprecher Batteriefach (Rückseite) 8. Ton an / aus 9. Genauigkeit grob / normal / fein 10. Beleuchtung an / aus 11. -
Page 10: Einlegen Der Batterie
GENAUIGKEITSEINSTELLUNG GROB / NORMAL / FEIN Der FR 45 / FRG 45-Green ist mit drei Genauigkeitsstufen ausgestattet. Zur Auswahl Taste (9) drücken: Genauigkeit grob ± 10 mm Displaysymbol: leeres Feld Genauigkeit normal ± 4 mm Displaysymbol: Genauigkeit fein ± 2 mm Displaysymbol: EINLEGEN DER BATTERIE •... -
Page 11: Sicherheitshinweise
SICHERHEITSHINWEISE BESTIMMUNGSGEMÄSSE VERWENDUNG Das Gerät sendet einen sichtbaren Laserstrahl aus, um z.B. folgende Messaufgaben durchzuführen: Ermittlung von Höhen; rechten Winkeln, Ausrichtung von horizontalen und vertikalen Bezugsebenen sowie Lotpunkten (je nach Gerät). UMGANG UND PFLEGE Messinstrumente generell sorgsam behandeln. Nach Benutzung mit weichem Tuch reinigen (ggfs. Tuch in etwas Wasser tränken). -
Page 12: Warn- Und Sicherheitshinweise
HAFTUNGSAUSSCHLUSS Der Benutzer dieses Produktes ist angehalten, sich exakt an die Anweisungen der Bedienungsan- leitung zu halten. Alle Geräte sind vor der Auslieferung genauestens überprüft worden. Der Anwen- der sollte sich trotzdem vor jeder Anwendung von der Genauigkeit des Gerätes überzeugen. Der Hersteller und sein Vertreter haften nicht für fehlerhafte oder absichtlich falsche Verwendung sowie daraus eventuell resultierende Folgeschäden und entgangenen Gewinn. - Page 13 WARN- UND SICHERHEITSHINWEISE · Richten Sie den Laserstrahl nicht auf Personen oder Tiere und blicken Sie nicht selbst in den Laser- strahl. · Das Messwerkzeug sollte nur von Personen bedient werden, die im Umgang mit Lasergeräten ver- traut sind. Laut IEC 60825-1:2008-05 gehört dazu u.a. die Kenntnis über die biologische Wirkung des Lasers auf das Auge und die Haut sowie die richtige Anwendung des Laserschutzes zur Abwendung von Gefahren.
- Page 14 Dear customer, Thank you for your confidence in us having purchased a geo-FENNEL instrument. This manual will help you to operate the instrument appropriately. Please read the manual carefully - particularly the safety instructions. A proper use only guarantees a longtime and reliable operation.
-
Page 15: Technical Data
-10°C - +50°C Laser diode 635 nm Laser class Dust / water protection IP 66 Varying technical data for FL 260VA (class 3R) Working range with FR 45 1000 m Scanning w/o FR 45 Ø 60 m* Rotating w/o FR 45 Ø... -
Page 16: Functions
• Integrated floor mount with datum point FLG 260VA-Green • Same functions as FL 260VA, but with green laser diode • Ideally suited for indoor applications • Improved visibility of laser beam. Especially useful in bright surroundings and over longer distances. -
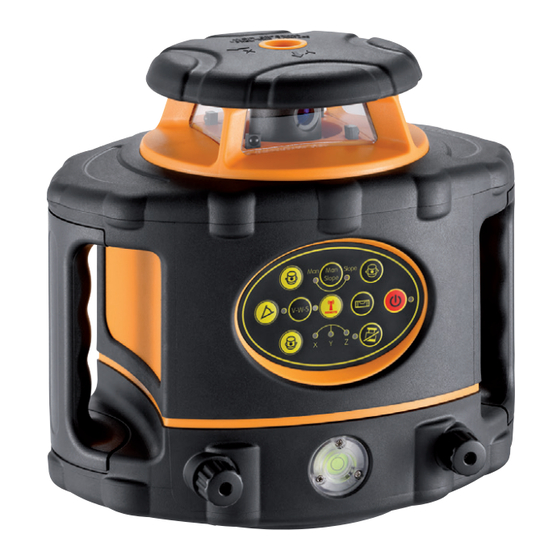
Page 17: Control Panel
CONTROL PANEL Scanning function button 2. Scan / point clockwise orientation button 3. Scan / point rotate anti-clockwise orientation button 4. MAN LED 5. MAN / SLOPE selection button 6. SLOPE LED Rotating speed button 8. ON / OFF button 9. -
Page 18: Scanning Mode
TILT ALARM FUNCTION After POWER ON the laser automatically activates the TILT function. The TILT LED (12) is flashing duri- ng the activation procedure. When it is completed (after 90 sec. approx.) the LED is illuminated. If the laser is disturbed rotation stops and the laser beam and TILT LED (12) will flash.The laser will not re-level automatically. -
Page 19: Self-Levelling Function
SLOPE MODE Slopes can be set manually up to 5° (± 9 %). Press button (5) to enter the SLOPE function. The SLOPE LED (6) is illuminated. Press button (5) once more to switch to the MAN function. The MAN LED is illuminated. Choose the relevant axis (X, Y, Z) by pressing button (20) of the remote control. - Page 20 OPERATION Set-up the laser on a flat and even surface or mount onto a tripod. Press the ON/OFF button (8) to powe on the laser. After POWER ON the laser automatically self-levels. The laser beam and the TILT LED (12) flash indi- cating that the automatic self-levelling procedure is activated.
- Page 21 RECEIVER FR 45 / FRG 45-GREEN FEATURES Vial (2) 2. Display 3. Reference rabbet 4. Receiving window 5. ON / OFF button 6. Loudspeaker Battery compartment (back side) 8. Sound on / off 9. Accuracy coarse / normal / fine 10.
- Page 22 ACCURACY COARSE / NORMAL / FINE The FR 45 / FRG 45-Green is equipped with three precision modes. They can be chosen by pressing button (9): Accuracy coarse ± 10 mm Symbol on display: without symbol Accuracy normal ± 4 mm Symbol on display: Accuracy fine ±...
-
Page 23: Safety Notes
SAFETY NOTES INTENDED USE OF INSTRUMENT The instrument emits a visible laser beam in order to carry out the following measuring tasks (depen- ding on instrument): Setting up heights, horizontal and vertical planes, right angles and plumbing points. CARE AND CLEANING Handle measuring instruments with care. -
Page 24: Safety Instructions
EXCEPTIONS FROM RESPONSIBILITY The user of this product is expected to follow the instructions given in the user manual. Although all instruments left our warehouse in perfect condition and adjustment the user is expected to carry out periodic checks of the product’s accuracy and general performance. The manufacturer, or its representatives, assumes no responsibility of results of a faulty or intentional usage or misuse including any direct, indirect, consequential damage, and loss of profits. - Page 25 SAFETY INSTRUCTIONS · Do not operate the laser without first reading and understanding all the safety and technical data in the user manual. · Do not stare into the laser beam or point it towards people or animals. · Do not aim the beam at reflective surfaces such as windows or mirrors as reflected beams can be dangerous.
-
Page 26: Table Des Matières
3. Clavier 4. Opération 5. Cellule 6. Notices de sécurité LIVRÉ COMME SUIT • Laser rotatif FL 260VA / FLG 260VA-Green • Cellule avec son support • Télécommande • Accu et chargeur • Support de sol intégré • Cible magnétique •... -
Page 27: Données Techniques
Diode de laser 635 nm Classe de laser Étanche aux poussières / eaux IP 66 Données techniques divergentes pour FL 260VA (classe 2) Portée avec FR 45 Ø 1000 m Fonction de scan (sans FR 45) 60 m* Par rotation (sans FR 45) Ø... -
Page 28: Alimentation En Courant
• Plaque de sol avec pointe à tracer intégrée FLG 260VA-Green • Toutes les fonctions identiques à FL 260VA, mais avec diode à laser de couleur verte • Avantages réels pour aménagements intérieurs • Visibilité plus élevée du faisceau laser dans des conditions d’emploi difficiles (environnement clair, longues distances, surface mesurée sombre) -
Page 29: Clavier
CLAVIER Fonction Scan 2. Fonction Scanning à droite 3. Fonction Scanning à gauche 4. LED manuel 5. Commutation sur manuel / inclinaison 6. Diode LED d’inclinaison Réglage vitesse de rotation 8. MARCHE / ARRÊT 9. LED puissance 10. Autonivellement 11. Fonction TILT 12. -
Page 30: Fonction De Tilt
Mise hors circuit de la fonction de basculement en pressant à nouveau la touche (11). En fonction de TILT désactivée, le FL 260VA / FLG 260-Green se règle lui-même en autonivellement s’il change de position. Mais si cette variation de position est importante (déplacement involontaire d‘un pied du trépied), il en résulte un changement de la hauteur de référence. -
Page 31: Fonction D'inclinaison
FONCTION D‘INCLINAISON On peut régler manuellement les inclinaisons jusqu’à ± 5° (± 9%). Choisir la fonction d’inclinaison momentanée avec la touche (5). Après une première pression l’appareil se trouve en mode SLOPE. Presser de de nouveau la touche (5) pour passer du mode SLOPE au mode MAN et inversement. -
Page 32: Opération
OPÉRATION Placer l’appareil sur une surface à peu près plane ou l’installer sur le trépied. Presser le bouton (8) pour mettre l’appareil en marche. Dès la mise en marche, le laser commence à s‘autoniveler (le point de laser clignote). Lorsque le nivellement est achevé... - Page 33 CELLULE FR 45 / FRG 45-GREEN DESCRIPTION Nivelle (2) 2. Écran 3. Hauteur de référence 4. Fenêtre de réception 5. Bouton marche / arrêt 6. Haut-parleur Logement de piles 8. Son marche / arrêt 9. Précision fine / normale / grossière 10.
-
Page 34: Support De Cellule Pour Mire De Nivellement
RÉGLAGE DE LA PRÉCISION FINE / NORMALE / GROSSIÈRE Le FR 45 / FRG 45-Green est équipé de trois niveaux de précision. Pour choisir, presser le bouton (9): Précision grossière ± 10 mm Symbole sur l‘écran: champ vide Précision normale ±... -
Page 35: Notices De Sécurité
NOTICES DE SÉCURITÉ UTILISATION CONFORME AUX PRESCRIPTIONS Le niveau projette un faisceau laser visible, pour effectuer p. ex. les travaux de mesures suivants: détermination de hauteurs, tracé d’angles droits, pointage de plans de référence horizontaux et verti- caux ainsi qu’obtention de points d’aplomb (dépendant de l‘instrument). NETTOYAGE / REMISAGE (à... -
Page 36: Exclusion De La Responsabilité
EXCLUSION DE LA RESPONSABILITÉ 1. L ‘utilisateur de ce produit est tenu de respecter ponctuellement les instructions du mode d‘emploi. Tous les instruments ont été très soigneusement vérifiés avant leur livraison. Toutefois, l‘utilisateur devra s‘assurer de la précision de ce niveau avant chaque emploi. 2. - Page 37 INDICATIONS D’ A VERTISSEMENT ET DE SÉCURITÉ Strictement réservée à une utilisation par un professionnel ATTENTION · Ne pas regarder le faisceau laser dans les yeux. · Le laser doit être mis en station au-dessous ou au-dessus de la hauteur des yeux. ·...
- Page 38 GmbH Technische Änderungen vorbehalten. Kupferstraße 6 All instruments subject to technical changes. D-34225 Baunatal Sous réserve de modifications techniques. Tel. +49 561 / 49 21 45 +49 561 / 49 72 34 info@geo-fennel.de 05/2014 www.geo-fennel.de Precision by tradition.