Publicité

Les langues disponibles

Les langues disponibles

Liens rapides

DE | EN | FR
Geo3X HP
BEDIENUNGSANLEITUNG
USER MANUAL
MODE D'EMPLOI
www.geo-fennel.de
www.geo-fennel.com
www.geo-fennel.fr

Publicité

Chapitres

Table des Matières
loading

Sommaire des Matières pour geo-FENNEL Geo3X HP

  • Page 1 DE | EN | FR Geo3X HP BEDIENUNGSANLEITUNG USER MANUAL MODE D‘EMPLOI www.geo-fennel.de www.geo-fennel.com www.geo-fennel.fr...
  • Page 2: Table Des Matières

    Sehr geehrter Kunde, vielen Dank für das Vertrauen, welches Sie uns beim Erwerb Ihres neuen geo-FENNEL-Gerätes ent- gegengebracht haben. Dieses hochwertige Qualitätsprodukt wurde mit größter Sorgfalt produziert und qualitätsgeprüft. Die beigefügte Anleitung wird Ihnen helfen, das Gerät sachgemäß zu bedienen. Bitte lesen Sie ins- besondere auch die Sicherheitshinweise vor der Inbetriebnahme aufmerksam durch.
  • Page 3: Bedienelemente

    Technische Daten Selbstnivellierbereich ±3° Genauigkeit ±3 mm / 10 m Arbeitsbereich • ohne Empfänger 20 m* (Radius) • mit Empfänger (optional) 60 m (Radius) Stromversorgung 3 x AA Alkalinebatterien Betriebsdauer (alle Linien an) 12 h Staub-/Wasserschutz IP 54 Laserdiode / Laserklasse 635 nm / 2 Temperaturbereich -10°C bis +45°C...
  • Page 4: Bedienfeld

    7 . Arretierung zur Höhenverstellung der Konsole 8. Öffnung zum Aufhängen 9. Magnete 10. Schlitze für Befestigungsriemen 11. 5/8“-Gewinde für Stativ 12. 1/4“-Gewinde für Stativ BEDIENFELD 1. Pulsfunktion an / aus 2. Linie V1 an / aus 3. AN / AUS LED 4.
  • Page 5: Stromversorgung

    STROMVERSORGUNG BATTERIE EINLEGEN Batteriefachdeckel öffnen und 3 x AA Alkalinebatterien einlegen (korrekte Polarität beachten!). BEDIENUNG GERÄT AUFSTELLEN • direkt auf dem Boden • auf die im Lieferumfang enthaltene Halterung aufschrauben und auf einem Stativ befestigen • mit den Magneten der Halterung an einer magnetischen Fläche befestigen •...
  • Page 6 Linie V2 Alle Linien EMPFÄNGERBETRIEB Der Geo3X HP kann zur Verlängerung des Arbeitsbereiches oder bei Einsatz unter ungünstigen Lichtverhältnissen mit einem Empfänger eingesetzt werden. Der Empfänger ist optional erhältlich (nicht im Lieferumfang enthalten). Bei Verwendung des Empfängers Taste „P“ am Gerät drücken (Kontrolllampe neben der Taste leuchtet).
  • Page 7: Anwendungsbeispiele

    Die MANUELL - Funktion ist nur möglich im OFF - Zustand des Gerätes (da andernfalls Kompensator- alarm ausgelöst würde). Dazu MANUELL - Taste (8) drücken und dann die gewünschten Linien schalten. Nun kann der Geo3X HP in Schrägpositionen angewendet werden. ANWENDUNGSBEISPIELE...
  • Page 8: Sicherheitshinweise

    SICHERHEITSHINWEISE BESTIMMUNGSGEMÄSSE VERWENDUNG Das Gerät sendet einen sichtbaren Laserstrahl aus, um z.B. folgende Messaufgaben durchzuführen: Ermittlung von Höhen; rechten Winkeln, Ausrichtung von horizontalen und vertikalen Bezugsebenen sowie Lotpunkten (je nach Gerät). UMGANG UND PFLEGE Messinstrumente generell sorgsam behandeln. Nach Benutzung mit weichem Tuch reinigen (ggfs. Tuch in etwas Wasser tränken).
  • Page 9: Warn- Und Sicherheitshinweise

    Sicherheitsmassnahmen eingesetzt werden. Das Auge ist bei zufälligem, kurzzei- tigem Hineinsehen in den Laserstrahl durch den Lidschlussreflex geschützt. Laserwarnschilder der Klasse 2 sind gut sichtbar am Gerät angebracht. www.geo-fennel.de GERM ANY Laser IEC 60825-1:2014 P ≤ 1 mW @ 635 - 670 nm...
  • Page 10 Dear Customer, Thank you for your confidence in us, having purchased a geo-Fennel instrument. For the optimum performance of the instrument, please read this manual carefully and keep it in a convenient place for future reference. This manual contains important safety information that should be read and understood before use.
  • Page 11: Features

    Technical Data Self-levelling range ±3° Accuracy ±3 mm / 10 m Working range • without receiver 20 m* (radius) • with receiver (optional) 60 m (radius) Power supply 3 x AA Alkaline batteries Operating time (all lines switched on) 12 h Dust / water protection IP 54 Laser diode / laser class...
  • Page 12: Keypad Layout

    7 . Elevating table clamp 8. Keyhole slot 9. Magnets 10. Slot for strap attachment 11. 5/8“ thread for tripod 12. 1/4“ thread for tripod KEYPAD LAYOUT 1. Pulse mode on / off 2. Vertical line (V1) on / off 3.
  • Page 13: Battery And Charger

    BATTERY AND CHARGER INSERT BATTERY Open the battery compartment cover and insert 3 x AA Alkaline batteries (ensure correct polarity). OPERATION SET UP OPTIONS • on any flat surface • on a tripod either with or without the multi-functional mount •...
  • Page 14 All Lines USE WITH A RECEIVER To extend the working range or for use in unfavourable light conditions the Geo3X HP can be used with a receiver. The receiver is optional (not included in the kit) Press button „P“ (pulse mode LED (6) will illuminate) to change from normal to receiver mode. The receiver can now detect the Geo3X HP laser lines (the visibility of the laser lines are weaker in this mode).
  • Page 15: Manual Function

    The MANUAL function is only available with the power ON / OFF knob set to „OFF“ (otherwise the visible and audible alarm would be activated). Press the MANUAL button (8) and choose the desired laser lines. The Geo3X HP can be used in slope mode. APPLICATION DIAGRAMS...
  • Page 16: Safety Notes

    SAFETY NOTES INTENDED USE OF INSTRUMENT The instrument emits a visible laser beam in order to carry out the following measuring tasks (depen- ding on instrument): Setting up heights, horizontal and vertical planes, right angles and plumbing points. CARE AND CLEANING Handle measuring instruments with care.
  • Page 17: Safety Instructions

    The instrument is a laser class 2 laser product according to DIN IEC 60825-1:2014. It is allowed to use the unit without further safety precautions. The www.geo-fennel.de GERM ANY eye protection is normally secured by aversion responses and the Laser blink reflex.
  • Page 18: Livré Comme Suit

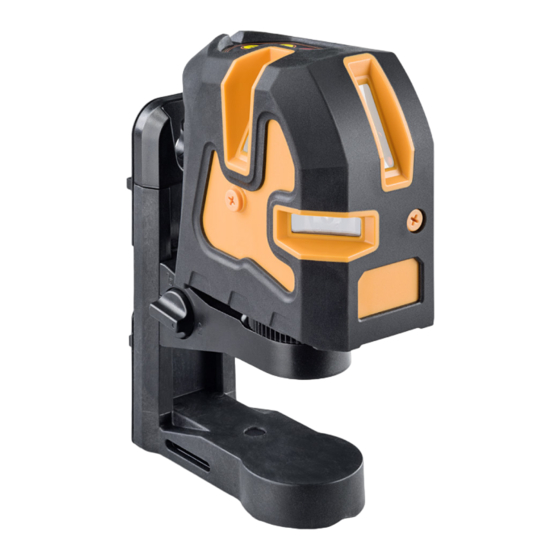
    2. Description de l‘appareil 3. Écran 4. Alimentation en courant 5. Opération 6. Consignes de sécurité LIVRÉ COMME SUIT • Laser à lignes Geo3X HP • Support multi-fonctions • 3 x AA piles alcalines • Sacoche rembourré • Mode d‘emploi CARACTÉRISTIQUES •...
  • Page 19: Données Techniques

    Données techniques Plage d‘autonivellement ±3° Précision ±3 mm / 10 m Portée • sans détecteur 20 m* (rayon) • avec détecteur (en option) 60 m (rayon) Alimentation en courant 3 x AA piles alcalines Autonomie 12 h Étanche au poussières / eau IP 54 Diode laser / classe laser 635 nm/ 2...
  • Page 20 7 . Bouton rotatif pour mouvement de la console 8. Fixation au mur avec une vis 9. Aimants 10. Fixation avec des lanières 11. Filetage 5/8“ 12. Filetage 1/4“ ÉCRAN 1. Marche / arrêt en mode récepteur 2. Ligne V1 marche / arrêt 3.
  • Page 21: Alimentation En Courant

    ALIMENTATION EN COURANT Mettre 3 x AA piles alcalines dans le compartiment de piles (4) (attention à la polarité) et fermer le compartiment. APPLICATION MISE EN PLACE DE L ‘ APPAREIL • sur le sol • fixer l‘instrument sur le support multi-fonctions et puis sur le trépied •...
  • Page 22: Marche En Mode Récepteur

    GEO3X HP avec un détecteur. Lors de l’emploi du détecteur, presser la touche P du GEO3X HP (le voyant de contrôle situé à côté de la touche s’allume). L ‘instrument marche alors en mode récepteur / la marche à impulsions est commutée hors service.
  • Page 23: Fonction Manuelle

    Le fonctionnement MANUEL n’est possible que lorsque l’appareil est à l’état d’ ARRET (car dans le cas contraire cela déclencherait l’alarme du compensateur). Pour ce faire, presser la touche MANUELLE - soit la touche (7) – puis mettre en circuit les lignes désirées. L ’appareil GEO3X HP peut alors être utilisé dans les positions inclinées.
  • Page 24: Consignes De Sécurité

    CONSIGNES DE SÉCURITÉ UTILISATION CONFORME AUX PRESCRIPTIONS Le niveau projette un faisceau laser visible, pour effectuer p. ex. les travaux de mesures suivants: détermination de hauteurs, tracé d’angles droits, pointage de plans de référence horizontaux et verti- caux ainsi qu’obtention de points d’aplomb (dépendant de l‘instrument). NETTOYAGE / REMISAGE (à...
  • Page 25: Exclusion De La Responsabilité

    à la norme DIN EN 60825-1:2014. De ce fait, l’instrument peut être utilisé sans avoir recours à d’autres mesures de sécurité. Au cas où l’utilisateur a regardé un court instant le faisceau laser, les www.geo-fennel.de GE RMA NY Laser yeux sont tout de même protégés par le réflexe de fermeture des...
  • Page 28 GmbH Technische Änderungen vorbehalten. Kupferstraße 6 All instruments subject to technical changes. D-34225 Baunatal Sous réserve de modifications techniques. Tel. +49 561 / 49 21 45 +49 561 / 49 72 34 info@geo-fennel.de 01/2016 www.geo-fennel.de Precision by tradition.

Table des Matières