Dorman 03662 Manuel D'instructions
Les langues disponibles
Les langues disponibles
Liens rapides
INSTRUCTIONS
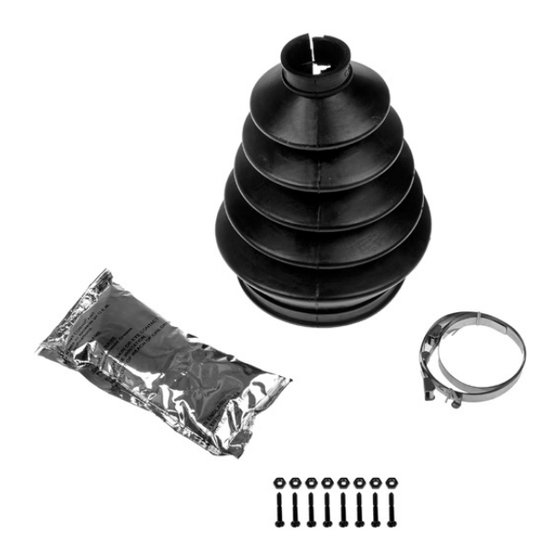
CV JOINT BOLTED
SPLIT BOOT KIT
OUTER
03662
BEFORE YOU BEGIN:
• Always wear proper safety
equipment when performing repairs.
• Ensure at your point of purchase
that this part fits your exact
vehicle configuration.
• Reference the appropriate service
manual for your vehicle. If you do
not have a service manual, and do
not have the training or experience
to perform the necessary
procedures correctly, seek the
services of a qualified technician.
NEED HELP?
Please call our Technical Support
team for assistance from our team of
certified automotive experts.
1-866-933-2911
© 2024 No reproduction in whole or in part without prior written approval.
03662_Instructions
NOTE: This CV boot kit is for outer
CV joints only.
First aid response for contact with
supplied grease:
Contact with eyes: Rinse with water
for several minutes. Remove contact
lenses, if present. If eye irritation
persists, seek medical attention.
Contact with skin: Wash with soap
and water. If skin irritation occurs,
seek medical attention. Remove
contaminated clothing and wash
before reuse.
If inhaled: Remove exposed person
to fresh air. If dizziness, nausea
or breathing problems occur, seek
medical attention.
INSTRUCTIONS
STEP 1:
Raise and support vehicle.
NOTE: Drive axle must remain
straight and level during installation
to prevent damage to this
replacement CV boot. If jack stands
are used, support vehicle under lower
control arm to keep axle straight.
STEP 2:
Using side-cutting pliers, remove large and
small end CV boot clamps by twisting/
cutting crimped ears.
NOTE:
Some GM vehicles use additional
boot retaining rings. If this is the case,
use a small pry bar to lever the ring
inward toward small end of the CV joint.
Allow ring to hang from shaft during boot
replacement. Pull the old boot from the
retaining ring and discard the boot.
NOTE:
Some full-size GM trucks require
the portion of the old boot under the large
end clamp to be reused as a spacer for the
replacement boot. For these vehicles, cut
away the old boot except for the portion
under the large end clamp.
Dorman Products, Inc. Corporate Office and Customer Service: 1-800-523-2492.
Disclaimer: It is impossible in these instructions to account for all possible circumstances or situations that you may experience when at-
tempting to install this product. Please consult with a qualified auto technician before attempting to perform any work you are not qualified to
do. Automobiles can be hazardous to work on; be sure to take all necessary safety precautions. Failure to do so may result in property damage
or personal injury. Certain motor vehicle standards and performance requirements may apply to your motor vehicle (such as Federal Motor
Vehicle Safety Standards by the National Highway Traffic Safety Administration). Be sure that your work is performed in accordance with such
standards and that you do not disable any motor vehicle safety feature.
STEP 3:
For all applications except some GM trucks,
cut away and discard the old boot.
STEP 4:
Using a wire brush, clean the CV axle shaft
and external joint area.
STEP 5:
Wipe away the old grease from inside and
around the joint. If the grease feels gritty,
use solvent to clean the CV joint of all old
grease, dirt, and other contamination. (Grit
often means that the joint is permanently
damaged.) After cleaning, allow joint to air
dry completely before proceeding. Do not
use compressed air to dry joint. Inspect
joint for signs of wear and damage before
proceeding. If joint is suitable for reuse,
repack with new grease.
STEP 6:
If no grit was found in Step 5, simply wipe
away all old grease and completely repack
CV joint cage and balls with included grease.
Do not fill the new boot with grease.
STEP 7:
Using a small amount of included grease,
wipe the boot seam to aid sealing.
STEP 8:
Enclose split boot around joint housing.
Install included hardware through boot
seam mounting holes and tighten. Ensure
that the boot seam is completely closed.
PAGE 1 OF 6

Manuels Connexes pour Dorman 03662


Sommaire des Matières pour Dorman 03662
-
Page 5: Avant De Commencer
1-866-933-2911 Dorman Products, Inc. Siège social et service à la clientèle : 1 800 523-2492. Avis de non-responsabilité : Il est impossible dans ces instructions de tenir compte de toutes les circonstances ou situations possibles que vous pourriez rencontrer en essayant de monter ce produit. Veuillez consulter un technicien automobile qualifié avant d’effectuer des travaux pour lesquels vous n’êtes pas habilité. - Page 6 (La graisse Grande pince est disponible sous les numéros de pièce Dorman 03618 et 614-066. Les pinces sont Enroulez la grande pince incluse autour du disponibles sous les numéros de pièce soufflet, comme illustré. Assurez-vous que le joint Dorman 614-067, 614-068, 614-069, 03637, d’étanchéité...