Chapitres
Table des Matières

Manuels Connexes pour AEG 96901K-MN


Sommaire des Matières pour AEG 96901K-MN
- Page 1 96901K-MN Ceramic glass hob Table de cuisson vitrocéramique Glaskeramische kookplaat Installation and Operating Instructions Instructions de montage et mode d’emploi Montage- en gebruiksaanwijzing...
-
Page 2: Environmental Information
Dear Customer, Please read these user instructions carefully and keep them to refer to later. Please pass the user instructions on to any future owner of the appli- ance. The following symbols are used in the text: Safety instructions Warning! Information that affects your personal safety. Important! Information that prevents damage to the appliance. -
Page 3: Table Des Matières
Contents Operating Instructions ........Safety instructions. -
Page 4: Operating Instructions
Operating Instructions 1 Safety instructions Please comply with these instructions. If you do not, any damage re- sulting is not covered by the warranty. This appliance conforms with the following EU Directives: – 73/23/EEC dated 19.02.1973 Low Voltage Directive – 89/336/EEC dated 03.05.1989 EMC Directive inclusive of Amending Directive 92/31/EEC –... -
Page 5: Safety During Use
Safety during use • Remove stickers and film from the glass ceramic. • There is the risk of burns from the appliance if used carelessly. • Cables from electrical appliances must not touch the hot surface of the appliance or hot cookware. •... -
Page 6: Description Of The Appliance
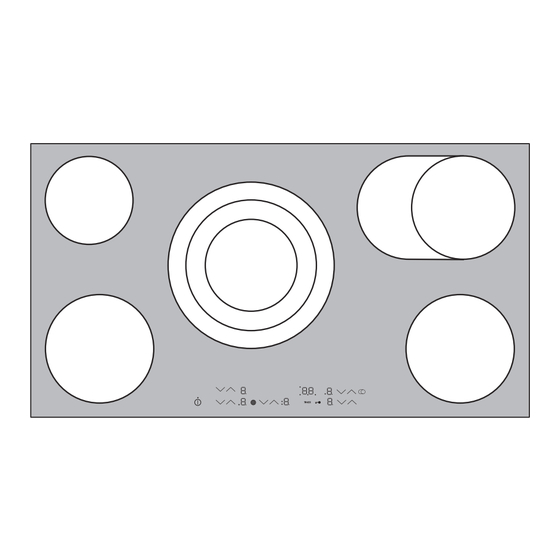
Description of the Appliance Cooking surface layout Singlecooking zone Multi-purpose zone 1200W 1400/2200W Triple ring cooking zone 1050/1950/2700W Single cooking zone Control panel Single cooking zone 1800W 1800W Control panel layout ....On/Off Cooking zone indicators Heat setting selection with power indicator Timer function Outside/middle ring Timer display... -
Page 7: Touch Control Sensor Fields
Touch Control sensor fields The appliance is operated using Touch Control sensor fields. Functions are controlled by touching sensor fields and confirmed by displays and acoustic signals. Touch the sensor fields from above, without covering other sensor fields. Sensor field Function On / Off To switch the appliance on and... -
Page 8: Displays
Displays Display Description ¾ Cooking zone is switched off Keep warm setting Keep warm setting/STOP+GO function is set ¿ Ç Heat settings Heat setting is set Heating setting plus Intermediate heat setting is set decimal point Automatic warm up Automatic warm-up function is function activated Fault... -
Page 9: Operating The Appliance
Operating the appliance Switching the appliance on and off Control panel Display Pilot light ¾ Switch on Touch for 2 seconds lights up Switch off Touch for 1 second / none goes out After switching on, within approx. 10 seconds a heat setting or a func- tion must be set, otherwise the appliance automatically switches itself off. -
Page 10: Switching The Outside Ring On And Off
Switching the outside ring on and off By switching the outside rings on or off, the effective heating surface can be matched to the size of the cookware. Before an outside ring can be switched on, the inside ring must be switched on. -
Page 11: Using The Automatic Warm-Up Function
Using the automatic warm-up function All cooking zones are equpped with an automatic warm up function ¾ When setting a heat setting using , when starting from , the cook- ing zone switches to full power for a certain amount of time and then automatically switches back to the heat setting set. -
Page 12: Locking/Unlocking The Control Panel
Locking/unlocking the control panel The control panel, with the exception of the “On/Off” sensor field, can be locked at any time in order to prevent the settings being changed e.g. by wiping over the panel with a cloth. Control panel Display Switch on Touch... -
Page 13: Using The Timer
Overriding the child safety device The child safety device can be released in this way for a single cooking session; it remains activated afterwards. Step Control panel Display/Signal Switch on the appliance ¾ Touch at the same time / acoustic signal Until the appliance is next switched off, it can used as normal. -
Page 14: Selecting A Cooking Zone
Selecting a cooking zone Step Control panel Indicator Touch TIMER 1x Pilot light for the first cooking zone flashes Touch TIMER 1x Pilot light for the sec- ond cooking zone flash- Touch TIMER 1x Pilot light for the third cooking zone flashes Touch TIMER 1x Pilot light for the fourth cooking zone... -
Page 15: Changing The Time
Switching off the timer function Step Control panel field Display TIMER Select cook- Pilot light of the cooking zone select- ing zone ed flashes faster The time remaining is displayed Touch for the The time remaining counts down to cooking zone select- The pilot light goes out. -
Page 16: Safety Cut-Out
Switching off the acoustic signal Step Control panel field Acoustic signal Touch TIMER Acoustic signal to acknowledge. Acoustic signal stops. Safety cut-out Cooking surface • If after switching on the cooking surface, a heat setting is not set for a cooking zone within approx. 10 seconds, the cooking surface auto- matically switches itself off. -
Page 17: Power-Management
Power-Management The three cooking zones front left, front right and back right together have a maximum possible power available to them. If it looks like the maximum power of all three cooking zones is going to be exceeded, for example by turning on an additional cooking zone or by turning up a heat setting, the Power Management automat- ically reduces the power of another cooking zone. -
Page 18: Tips On Cooking And Frying
Tips on Cooking and Frying Information on acrylamides According to the latest scientific knowledge, intensive browning of food, especially in products containing starch, can constitute a health risk due to acrylamides. Therefore we recommend cooking at the lowest possible temperatures and not browning foods too much. Cookware •... -
Page 19: Examples Of Cooking Applications
Examples of cooking applications The information given in the following table is for guidance only. Heat Cooking- Cooking set- suitable for Tips/Hints process time ting Off position Keeping Keeping cooked foods food as required Cover warm warm Hollandaise sauce, Melting melting butter, chocolate, 5-25 mins. -
Page 20: Cleaning And Care
Cleaning and Care Take care! Risk of burns from residual heat. Let the appliance cool down. Warning! Sharp objects and abrasive cleaning materials will damage the appliance. Clean with water and washing up liquid. Warning! Residues from cleaning agents will damage the appliance. Remove residues with water and washing up liquid. -
Page 21: What To Do If
What to do if … Problem Possible cause Remedy The cooking zones will not More than 10 seconds have Switch the appliance on switch on or are not func- passed since the appliance again. tioning was switched on The child safety device is Deactivate the child safety switched on device (See the section... -
Page 22: Disposal
Problem Possible cause Remedy is lit Overheating protection for Switch off the cooking the cooking zone has been zone. Switch the cooking triggered zone on again and number are dis- Electronics fault Disconnect the appliance played from the electrical supply for a few minutes (Take the fuse out of the house’s wir- ing system) -
Page 23: Installation Instructions
Installation Instructions Safety instructions The laws, ordinances, directives and standards in force in the country of use are to be followed (safety regulations, proper recycling in accord- ance with the regulations, etc.) Installation may only be carried out by a qualified electrician. The minimum distances to other appliances are to be observed. -
Page 24: Guarantee/Customer Service
In diesen Ländern gelten die Garantiebedingungen der örtlichen Part- ner. Diese können dort eingesehen werden. Further after-sales service agencies overseas In these countries our AEG agents’ own guarantee conditions are appli- cable. Please obtain further details direct. Autres agences étrangères assurant le service après-vente Dans ces pays, les conditions de garantie des concessionnaires de la ré-... - Page 25 Fax: 905 829 3985 Tel.: 25355 Tel.: 2024181719 Australia Korea (South) Namibia The Andi-Co Group Core Incorp. AEG NAMIBIA (PTY) 1 Stamford Road 3/F Chewoo Bldg. LIMITED-Jeppe Street Oakleigh VIC 3166 200 Nonhyun-Dong Northern Industrial Area Tel.: (03) 9569 1255...
- Page 26 143-006 Tokyo Tel.: 0120-13-7117 Fax: 03-3790-5257 Thailand Slovakia Rep. South Africa Olympia Thai Tower, 444 Electrolux Slovakia S.R.O. AEG (Pty) Ltd. Rachadapiser Road Seberiniho 1 55, 12th Road Samsennok- Huaykwang 821 03 Bratislava P.O. Box 1 02 64 10320 Bangkok Tel.: 02 4333 4322, 4355...
-
Page 27: Service
Service In the event of technical faults, please first check whether you can remedy the problem yourself with the help of the operating instruc- tions (section “What to do if…”). If you were not able to remedy the problem yourself, please contact the Customer Care Department or one of our service partners. - Page 28 Lors de sa fabrication, cet appareil a été construit selon des normes, di- rectives et/ou décrets pour une utilisation sur le territoire français. Pour la sécurité des biens et des personnes ainsi que pour le respect de l'environnement, vous devez d'abord lire impérativement les préconisations suivantes avant toute utilisation de votre appareil.
- Page 29 Chère cliente, cher client, Veuillez lire attentivement la notice d’utilisation dans son intégralité et la conserver pour pouvoir la consulter ultérieurement. Veuillez la transmettre à l’éventuel propriétaire ultérieur de l’appareil. Les symboles suivants sont utilisés dans ce document : Consignes de sécurité Avertissement : conseils pour votre sécurité...
- Page 30 Sommaire Sécurité ............31 Description de l'appareil.
-
Page 31: Sécurité
Notice d'utilisation 1 Sécurité Pour ne pas perdre le bénéfice de la garantie en cas de panne, veuillez observer ces recommandations. Cet appareil est conforme aux directives CE suivantes : – directive 73/23/CEE du 19.02.1973 basse tension – directive 89/336/CEE du 03.05.1989 relative à la compatibilité élec- tromagnétique (CEM) y compris la directive de révision 92/31/CEE –... -
Page 32: Précautions De Nettoyage
Précautions d’utilisation. • Retirer les étiquettes et les films protecteurs de la vitrocéramique. • Attention aux risques de brûlures lors de l’utilisation de l’appareil. • S’assurer que les câbles d’appareils électriques n’entrent pas en con- tact avec les surfaces brûlantes de l’appareil ou les récipients brû- lants. -
Page 33: Description De L'appareil
Description de l'appareil Equipement du plan de cuisson Zone de cuisson Zone de rôtissage 1200W 1400/2200W Foyer à triple circuit 1050/1950/2700W Zone de cuisson un circuit Bandeau de Zone de cuisson un circuit 1800W commande 1800W Bandeau de commande ....Marche/Arrêt Indicateurs zones de cuisson Sélection du niveau... -
Page 34: Touche Sensitive "Touch Control
Touche sensitive “Touch Control” Les touches sensitives Touch Control permettent de commander l’appa- reil. Une pression sur les touches sensitives permet d’activer les fonc- tions et le fonctionnement de ces dernières est confirmé par des voyants ou par des signaux sonores. Appuyez sur les touches sensitives par un mouvement de haut en bas, en évitant de recouvrir les autres touches. -
Page 35: Voyants
Voyants Voyant Description ¾ La zone de cuisson est désactivée Position de maintien au La fonction de maintien au chaud chaud/STOP+GO est activée ¿ Ç Niveaux de cuisson Le niveau de cuisson est sélection- né Niveaux de cuisson avec Le niveau intermédiaire est activé point décimal Commande de démarra- La commande de démarrage auto-... -
Page 36: Utilisation De L'appareil
Utilisation de l’appareil Mettre l’appareil sous/hors tension Bandeau de com- Affichage Voyant de con- mande trôle ¾ Activer Appuyez sur pen- s’allume dant 2 secondes Désactiver Appuyez sur pen- / aucun s’éteint dant 1 seconde Après la mise sous tension, il est nécessaire d’activer un niveau de cuis- son ou une fonction dans les 10 secondes environ qui suivent dans le cas contraire l’appareil se déconnecte automatiquement. -
Page 37: Activer Et Désactiver La Fonction De Maintien Au Chaud
Zone de cuisson à Touche sensitive Voyant de contrôle triple zone Activation de la zone Si vous effleurez pen- de cuisson intermé- un voyant de contrôle s’allume dant 1-2 secondes diaire Désactivation de la Si vous effleurez pen- 2 voyants de contrôle s’allu- zone de cuisson exté- dant 1-2 secondes ment... -
Page 38: Utilisation De La Commande De Démarrage Automatique De La Cuisson
Utilisation de la commande de démarrage automatique de la cuisson Toutes les zones de cuisson sont dotées d’une commande automatique de démarrage de la cuisson. Lors de la sélection d’un niveau de cuisson ¾ avec à partir de , la zone de cuisson se met en marche à pleine puissance pendant un certain temps puis s’enclenche automatiquement sur le niveau de cuisson sélectionné. -
Page 39: Verrouiller/Déverrouiller Le Bandeau De Commande
Niveau de Durée du démarrage Niveau Durée du cuisson automatique de la intermé- démarrage automa- cuisson [min : sec] diaire tique de la cuisson [min : sec] 2:00 2:30 3:30 4:30 Verrouiller/déverrouiller le bandeau de commande Il est possible à tout moment de verrouiller le bandeau de commande à l’exception de la touche sensitive „Marche/Arrêt“, ce qui permet d’éviter de modifier une sélection, par ex. -
Page 40: Désactiver La Sécurité Enfants
Désactiver la sécurité enfants Etape Bandeau de commande Voyant/Signal Mettre l’appareil sous tension Appuyez sur jusqu’à ce que le Signal sonore signal retentisse Appuyez sur L’appareil se déconnecte. La sécurité enfants est désactivée. Brider la sécurité enfants Cette touche permet de désactiver la sécurité enfants le temps d’une cuisson seulement, elle reste active ensuite. -
Page 41: Sélectionner Une Zone De Cuisson
La désactivation d’une zone de cuisson entraîne la désactivation de la fonction Minuteur. Lorsqu’un niveau de cuisson est sélectionné en plus du minuteur pour cette même zone de cuisson, cette dernière se désactive après écoule- ment de la durée programmée. Sélectionner une zone de cuisson Etape Bandeau de com-... -
Page 42: Réglage De La Durée
Réglage de la durée Etape Bandeau de com- Affichage mande TIMER sélection Le voyant de contrôle de la zone de d’une zone de cuis- cuisson sélectionnée clignote 00 jusqu’à 99 minutes Appuyez sur de la zone de cuisson sélectionnée Après quelques secondes, le clignotement du voyant de contrôle ra- lentit La durée est sélectionnée. -
Page 43: Modification De La Durée
Modification de la durée Etape Bandeau de com- Affichage mande TIMER sélection Le voyant de contrôle de la zone de d’une zone de cuis- cuisson sélectionnée clignote plus ra- pidement Le temps restant s’affiche 01 jusqu’à 99 minutes Appuyez sur de la zone de cuisson sélectionnée Après quelques secondes, le clignotement du voyant de contrôle ra-... -
Page 44: Désactivation De Sécurité
Désactivation de sécurité Table de cuisson • Si, après activation de la table de cuisson, une zone de cuisson ou un niveau de cuisson n’est pas sélectionné dans les 10 secondes environ qui suivent, la table de cuisson se désactive automatiquement. •... -
Page 45: Gestion De La Fonction Puissance
Gestion de la fonction Puissance Les trois zones de cuisson avant gauche, avant droite et arrière droi- te peuvent offrir une puissance maximale si elles sont combinées. Si la puissance maximale des trois zones de cuisson est dépassée, par le fonctionnement d’une zone de cuis- son ou par un niveau de cuisson plus élevé, la gestion du niveau de puissance réduit automatiquement... -
Page 46: Economie D'énergie
Economie d’énergie Il est impératif de placer les plats de cuisson avant d’activer la zone de cuisson. Si possible, recouvrez toujours les récipients avec leur couvercle. Eteignez la zone de cuisson avant la fin de la cuisson afin de bénéficier de la chaleur résiduelle. - Page 47 Niveau Type de adapté à Durée Remarques/conseils cuisson cuisson Utilisez juste un peu d’eau, par ex. max. Faire cuire des pommes de ¼ 20-60 min l d’eau pour terre à l’étuvée 750 g de pommes de Cuire à terre l’eau Faire cuire des quantités assez importantes 60-150...
-
Page 48: Nettoyage Et Entretien
Nettoyage et entretien Attention ! Risque de brûlure dû à la chaleur résiduelle. Laissez refroidir l’appareil. Attention ! Les produits de nettoyage agressifs ou abrasifs endomma- gent l’appareil. Nettoyez l’appareil avec de l’eau et de la lessive. Attention ! Les restes de produits de nettoyage endommagent l’appa- reil. -
Page 49: Que Faire Si
Nettoyez les salissures tenaces à l’aide d’un produit de nettoyage pour vitrocéramique ou acier inoxydable. Même s’il n’est plus possible de faire disparaître les égratignures ou les taches sombres sur la vitrocéramique, cela n’a aucune influence sur le fonctionnement de l’appareil. Que faire si …... - Page 50 Symptôme Cause possible Solution La commande de démarra- La zone de cuisson est en- Laissez refroidir la zone de core chaude h ge automatique de la cuis- cuisson son ne s’enclenche pas Le niveau de cuisson ma- Le niveau de cuisson maxi- mimum est activé...
-
Page 51: Protection De L'environnement
Protection de l’environnement Elimination du matériel d’emballage Les matériaux d’emballage sont écologiques et recyclables. Les matières plastiques portent un signe distinctif, par ex. >PE<, >PS<, etc. Eliminez les matériaux d’emballage en fonction de leur signe distinctif dans les containeurs prévus à cet effet sur le site de collecte de votre commune. Appareils usagés Le symbole sur le produit ou son emballage indique que ce produit... - Page 52 Avertissement! Danger de blessure due au courant électrique. • La borne de raccordement est sous tension. • Isolez la borne de raccordement au secteur. • Respectez le schéma de raccordement. • Respectez les régles de sécurité électrotechniques. • Assurez vous lors de l’installation qu’il n’y ait pas de possibilité de contact.
-
Page 53: Garantie
Garantie France Conformément à la Législation en vigueur, votre Vendeur est tenu, lors de l'acte d'achat de votre appareil, de vous communiquer par écrit les conditions de garantie et sa mise en œuvre appliquées sur celui-ci. Sous son entière initiative et responsabilité, votre Vendeur répondra à toutes vos questions con- cernant l'achat de votre appareil et les garanties qui y sont attachées. -
Page 54: Si Vous Devez Nous Contacter
Si vous devez nous contacter France Pour tenir nos engagements, nous écoutons les Consommateurs Info Conso Electrolux est le lien privilégié entre la marque et ses Consommateurs. Il assure en permanence une double mission : satisfaire au mieux vos exigences et tirer parti de cette proximi- té... -
Page 55: Service Après-Vente
Service après-vente En cas d’anomalie de fonctionnemet vérifiez d’abord si vous ne pouvez pas remédier vous-même au dysfonctionnement à l’aide de la notice d’utilisation (chapitre “Que faire, si...“). Si vous ne parvenez pas à remédier au dysfonctionnement, veuillez contacter votre vendeur ou à défaut le Centre Contact Consommateurs qui vous communiquera l’adresse service après-vente. - Page 56 Geachte klant, Lees deze gebruiksaanwijzing zorgvuldig door en bewaar de gebruiks- aanwijzing zodat deze later kan worden geraadpleegd. Geef deze gebruiksaanwijzing door aan een eventuele volgende eige- naar van het apparaat. De volgende symbolen worden in de tekst gebruikt: Veiligheidsvoorschriften Waarschuwing! Aanwijzingen ten behoeve van uw persoonlijke veilig- heid.
-
Page 57: Montage
Inhoud Gebruiksaanwijzing ........58 Veiligheidsvoorschriften . -
Page 58: Gebruiksaanwijzing
Gebruiksaanwijzing 1 Veiligheidsvoorschriften Neem deze aanwijzingen in acht, omdat anders bij eventuele schade het recht op garantie vervalt. Dit apparaat is in overeenstemming met de volgende EG-richtlijnen: – 73/23/EEG van 19.02.1973 Laagspanningsrichtlijn – 89/336/EEG van 03.05.1989 EMC-richtlijn inclusief aangepaste richt- lijn 92/31/EEG –... -
Page 59: Veiligheid Tijdens Het Gebruik
Veiligheid tijdens het gebruik • Verwijder stickers en folies van het glaskeramiek. • Wanneer u onoplettend bent tijdens het werken met het apparaat, bestaat er risico op verbranding. • De snoeren van elektrische apparaten mogen niet tegen het hete ap- paraatoppervlak resp. -
Page 60: Beschrijving Van Het Apparaat
Beschrijving van het apparaat Uitrusting kookplaat Eénkringskookzone Braadzone 1200W 1400/2200W Driekrings-kookzone 1050/1950/2700W Eénkringskookzone Bedieningsveld Eénkringskookzone 1800W 1800W Uitrusting bedieningsveld ....Kookzone-indicaties Aan/uit Kookstandkeuze met controlelampje Timerfunctie Buitenste/middelste kring Timer-indicatie Indicatie Aan/uit Buiten- Controlelampje STOP+GO ste kring tweekring aan/uit Controlelampje Vergrendeling driekrings-zone... -
Page 61: Touch-Control-Sensorvelden
Touch-control-sensorvelden Het apparaat wordt bediend door middel van touch-control-sensorvel- den. Functies worden door het aanraken van de sensorvelden gestuurd en door indicaties en akoestische signalen bevestigd. De sensorvelden moeten van bovenaf worden aangeraakt, zonder ande- re sensorvelden te bedekken. Sensorveld Functie Aan/uit Apparaat in- en uitschakelen... -
Page 62: Restwarmte-Indicatie
Indicatie Beschrijving Kinderbeveiliging Vergrendeling/kinderbeveiliging is ingeschakeld Veiligheidsuitschakeling Veiligheidsuitschakeling is actief Restwarmte-indicatie Waarschuwing! Verbrandingsgevaar door restwarmte. Na het uitscha- kelen duurt het nog enige tijd voordat de kookzones zijn afgekoeld. Let op de restwarmte-indicatie. Restwarmte kan worden gebruikt voor het smelten en warmhouden van gerechten. -
Page 63: Buitenste Verwarmingskringen In- En Uitschakelen
Buitenste verwarmingskringen in- en uitschakelen Door de buitenste verwarmingskringen in of uit te schakelen kunnen de verwarmingsvlakken worden aangepast aan de grootte van de pannen. Voordat een van de buitenste verwarmingskringen kan worden inge- schakeld, moet altijd eerst de binnenste verwarmingskring zijn inge- schakeld. -
Page 64: Stop+Go-Functie In- En Uitschakelen
STOP+GO-functie in- en uitschakelen De STOP+GO-functie schakelt alle ingeschakelde kookzones tegelijk in de warmhoudstand in en weer in de eerder ingestelde kookstand. Deze functie is geschikt voor een kortstondige onderbreking en voortgang van het kookproces, bijv. om een telefoongesprek te voeren. Bedieningsveld Indicatie Inschakelen... -
Page 65: Bedieningsveld Vergrendelen / Ontgrendelen
Kookstand Duur van de Tussen- Duur van de kookactivering stand kookactivering [min:sec] [min:sec] 0:30 1:00 1:40 2:40 4:50 5:30 6:30 8:10 10:10 12:20 2:00 2:30 3:30 4:30 Bedieningsveld vergrendelen / ontgrendelen Het bedieningsveld kan met uitzondering van het sensorveld ”Aan/Uit“ op ieder gewenst moment worden vergrendeld, bijv. -
Page 66: Kinderbeveiliging Gebruiken
Kinderbeveiliging gebruiken De kinderbeveiliging voorkomt ongewenst gebruik van het apparaat. Kinderbeveiliging inschakelen Stap Bedieningsveld Indicatie/signaal ¾ apparaat inschakelen (geen kookstand instellen) aanraken tot het signaal akoestisch signaal klinkt aanraken Apparaat wordt uitgeschakeld. Kinderbeveiliging is ingeschakeld. Kinderbeveiliging uitschakelen Stap Bedieningsveld Indicatie/signaal apparaat inschakelen aanraken tot het signaal akoestisch signaal... -
Page 67: Timer Gebruiken
Timer gebruiken Alle kookzones kunnen tegelijk een van de beide Timerfuncties gebrui- ken. Functie Vereisten Resultaat na verloop van de tijd Automatische uit- bij een ingestelde akoestisch signaal schakeling kookstand knippert kookzone wordt uit- geschakeld Kookwekker bij niet gebruikte akoestisch signaal kookzones knippert Als een kookzone wordt uitgeschakeld, dan wordt tevens de ingestelde... - Page 68 Kookzone kiezen Stap Bedieningsveld Indicatie TIMER 1xaanraken Controlelampje van de eerste kookzone knip- pert TIMER 1xaanraken Controlelampje van de tweede kookzone knip- pert TIMER 1xaanraken Controlelampje van de derde kookzone knip- pert TIMER 1xaanraken Controlelampje van de vierde kookzone knip- pert TIMER 1xaanraken Controlelampje van de...
-
Page 69: Tijd Instellen
Tijd instellen Stap Bedieningsveld Indicatie TIMER kookzone se- Controlelampje van de geselecteerde lecteren kookzone knippert van de minuten geselecteerde kook- zone aanraken Na een aantal seconden knippert het controlelampje langzamer. De tijd is ingeschakeld. De tijd geeft de resterende tijd aan (loopt terug). Timerfunctie uitschakelen Stap Bedieningsveld... -
Page 70: Tijd Wijzigen
Tijd wijzigen Stap Bedieningsveld Indicatie TIMER kookzone se- Controlelampje van de geselecteerde lecteren kookzone knippert sneller Resterende tijd wordt aangegeven van de ge- minuten selecteerde kookzo- ne aanraken Na een aantal seconden knippert het controlelampje langzamer. De tijd is ingeschakeld. De tijd geeft de resterende tijd aan (loopt terug). -
Page 71: Veiligheidsuitschakeling
Veiligheidsuitschakeling Kookplaat • Als na het inschakelen van de kookplaat niet binnen ca. 10 seconden bij een kookzone een kookstand wordt ingesteld, schakelt de kook- plaat automatisch uit. • Als een of meerdere sensorvelden langer dan ca. 10 seconden worden afgedekt, bijv. -
Page 72: Power-Management
Power-Management De drie kookzones links voor, rechts voor en rechts achter beschikken te- zamen over een maximaal vermogen. Als het maximale vermogen van alle drie de kookzones overschreden dreigt te worden, bijv. door het extra inschakelen van een kook- stand of het hoger instellen van een kookstand, reduceert het Power- Management automatisch het vermogen van een andere kookzone. -
Page 73: Tips Voor Koken En Braden
Tips voor koken en braden Aanwijzing met betrekking tot acrylamide Volgens de laatste wetenschappelijke inzichten kan een intensieve brui- ning van levensmiddelen, met name bij zetmeelhoudende producten, een gevaar voor de gezondheid door acrylamide veroorzaken. Om die reden adviseren wij levensmiddelen zoveel mogelijk bij lage temperatu- ren te bereiden en de gerechten niet te veel te bruinen. -
Page 74: Toepassingsvoorbeelden Voor Het Koken
Toepassingsvoorbeelden voor het koken De gegevens in de volgende tabel dienen slechts als richtlijn. Kook- Kook- Geschikt voor Duur Aanwijzingen/tips stand proces uit-stand Warm Warm houden van gare Naar be- Afdekken houden gerechten hoefte Hollandaisesaus, Smelten smelten van boter, 5-25 min. Tussendoor omroeren chocolade, gelatine Schuimomelet, bouillon... -
Page 75: Reiniging En Onderhoud
Reiniging en onderhoud Voorzichtig! Verbrandingsgevaar door restwarmte. Laat het apparaat afkoelen. Let op! Bijtende en schurende schoonmaakmiddelen beschadigen het apparaat. Schoonmaken met water en handafwasmiddel. Let op! Resten van schoonmaakmiddelen beschadigen het apparaat. Verwijder resten met water en handafwasmiddel. Reinig het apparaat na ieder gebruik 1. -
Page 76: Wat Is Er Aan De Hand Als
Wat is er aan de hand als … Storing Mogelijke oorzaak Oplossing De kookzones kunnen niet Na het inschakelen van het Apparaat nogmaals inscha- ingeschakeld worden of apparaat zijn meer dan 10 kelen functioneren niet seconden verstreken De kinderbeveiliging is in- Kinderbeveiliging deactive- geschakeld ren (zie het hoofdstuk... - Page 77 Storing Mogelijke oorzaak Oplossing en nummer wordt aan- Fout in de elektronica Apparaat een aantal minu- gegeven ten van de voeding schei- den (zekering uit de huisinstallatie nemen) Als na het inschakelen de fout nogmaals wordt aangegeven, contact opne- men met de servicedienst Wanneer u de storing niet kunt verhelpen met de hierboven gege- ven aanwijzingen, neem dan contact op met uw vakhandel of met onze service-afdeling.
-
Page 78: Afvalverwerking
Afvalverwerking Verpakkingsmateriaal De verpakkingsmaterialen zijn niet schadelijk voor het milieu en her- bruikbaar. De kunststoffen hebben de volgende aanduidingen, bijv. >PE<, >PS<, enz. Verwijder de verpakkingsmaterialen in overeenstem- ming met de aanduiding bij de gemeentelijke inzamelplaatsen in de daarvoor bestemde containers. Oud apparaat verwijderen Het symbool op het product of op de verpakking wijst erop dat dit... -
Page 79: Montageaanwijzing
Montageaanwijzing Veiligheidsvoorschriften De in het land van gebruik geldende wetten, verordeningen, richtlijnen en normen moeten in acht worden genomen (veiligheidsvoorschriften, vakkundige recycling volgens de voorschriften, enzovoort). De montage mag alleen worden uitgevoerd door een vakman. De minimale afstanden tot andere apparaten moeten worden aange- houden. -
Page 80: Service
In de elektrische installatie moet een inrichting worden aangebracht, die het mogelijk maakt het apparaat met een contactopeningswijdte van min. 3 mm met alle polen van het net te scheiden. Geschikte scheidingsinrichtingen zijn bijv. automatische zekeringen (schroefzekeringen moeten uit de fitting geschroefd worden), aardlek- schakelaar en veiligheidsschakelaars. -
Page 81: Assembly
Assembly/Montage/Montage... -
Page 83: Rating Plate
Rating Plate Plaque signalétique Typeplaatje... - Page 84 USD 14 billion in more than 150 countries around the world. AEG Hausgeräte GmbH Postfach 1036 D-90327 Nürnberg http://www.aeg.hausgeraete.de © Copyright by AEG Subject to change without notice Sous réserve de modifications 822 925 194-A-161204-01 Wijzigingen voorbehouden...