AEG 66030K-MN Instructions De Montage Et Mode D'emploi

AEG 66030K-MN Instructions De Montage Et Mode D'emploi

Masquer les pouces Voir aussi pour 66030K-MN:
Table des Matières

Publicité

Les langues disponibles

Les langues disponibles

Liens rapides

All manuals and user guides at all-guides.com
66030K-MN
Ceramic glass hob
Table de cuisson vitrocéramique
Glaskeramische kookplaat
Installation and Operating Instructions
Instructions de montage et mode d'emploi
Montage- en gebruiksaanwijzing

Publicité

Table des Matières
loading

Sommaire des Matières pour AEG 66030K-MN

  • Page 1 All manuals and user guides at all-guides.com 66030K-MN Ceramic glass hob Table de cuisson vitrocéramique Glaskeramische kookplaat Installation and Operating Instructions Instructions de montage et mode d’emploi Montage- en gebruiksaanwijzing...
  • Page 2 All manuals and user guides at all-guides.com Dear customer, Please read these operating instructions carefully. Pay particular attention to the section “Safety information” on the first few pages. Please retain these operating instructions for later refer- ence. Pass them on to possible new owners of the appliance. The following symbols are used in the text: Safety instructions Warning: Information concerning your personal safety.
  • Page 3 All manuals and user guides at all-guides.com Contents Operating Instructions ........Safety .
  • Page 4 All manuals and user guides at all-guides.com Installation Instructions ........28 Regulations, Standards, Directives .
  • Page 5: Electrical Safety

    All manuals and user guides at all-guides.com Operating Instructions 1 Safety The safety aspects of this appliance comply with accepted technical standards and the German Appliance Safety Law. However, as manufac- turers we also believe it is our responsibility to familiarise you with the following safety instructions.
  • Page 6: Safety During Use

    All manuals and user guides at all-guides.com Safety During Use • This appliance may only be used for normal cooking and frying in the home. It is not designed for commercial or industrial purposes. • Do not use the hob to heat the room. •...
  • Page 7: Disposing Of The Packaging Material

    All manuals and user guides at all-guides.com 2 Disposal Disposing of the packaging material All materials used can be fully recycled. Plastics are marked as follows: • >PE< for polyethylene, as used for the outer wrapping and the bags inside. •...
  • Page 8: Description Of The Appliance

    All manuals and user guides at all-guides.com Description of the Appliance Cooking zones and control panel Single ring cooking zone Single ring cooking zone 1200W 1800W Single ring cooking zone Control panel Single ring cooking zone 2300W 1200W „Block“ sensor panel “Timer”...
  • Page 9: Digital Displays

    All manuals and user guides at all-guides.com Digital displays The four display panels that belong to the four cooking zones indicate: – ¾ after having been switched on, – u when a keep warm setting has been selected, – ¿ to Ç, depending on the cooking setting selected, –...
  • Page 10: Before Using For The First Time

    All manuals and user guides at all-guides.com Before Using for the first time Initial Cleaning Wipe the ceramic glass surface with a damp cloth. Important: Do not use any caustic, abrasive cleaners! The surface could be damaged. Operating the hob Touch control sensor panels To operate the touch control sensor panels, touch the desired panel with the tip of your pointed finger until the relevant displays illuminate...
  • Page 11: Switching Off The Appliance

    All manuals and user guides at all-guides.com Switching off the appliance To completely switch off the appliance, actuate the “On/Off” sensor panel I. Touch the “On/Off” sensor panel for approx. one second. After switching off a single cooking zone or the entire cooking surface, the existing residual warmth will be displayed in the digital displays of the corresponding cooking zones in the form of h (for “hot”).
  • Page 12: Switching Off A Cooking Zone

    All manuals and user guides at all-guides.com Switching off a cooking zone 1. To switch off a cooking zone touch the heat setting selector sensor panel simultaneously, or return the setting to zero using the heat setting selector sensor panel Residual Heat Indicator When an individual cooking zone or the entire hob is switched off, any residual heat is shown with an h (for...
  • Page 13: Cooking Using The Automatic Warm Up Function

    All manuals and user guides at all-guides.com Cooking using the automatic warm up function All of the cooking surface’s four cooking zones can be adjusted to any of nine settings, and are equipped with an automatic warm up func- tion: –...
  • Page 14: Cooking Without The Automatic Warm Up Function

    All manuals and user guides at all-guides.com Cooking without the automatic warm up function If you wish to use the cooking zones without the automatic warm up function, select the desired heat setting using the heat setting selector sensor panel 1.
  • Page 15 All manuals and user guides at all-guides.com 2. Touch any heat setting sensor field l will appear in the displays, and the child safety lock is activated. The appliance will switch itself off automatically after a few seconds. Overriding the child safety lock The child safety lock can be overridden in order to use the appliance (until the appliance is switched off again).
  • Page 16 All manuals and user guides at all-guides.com An acoustic signal will sound as confirmation. The child safety device has been overridden until the appliance is switched off, and the cook- ing surface can be used as normal. Switching off the child safety lock 1.
  • Page 17: Safety Cut-Out

    All manuals and user guides at all-guides.com Timer There are two ways to use the timer: – as a safety cut-out function. Set a cooking period for a cooking zone, and after this time has elapsed the cooking zone will automati- cally switch itself off.
  • Page 18 All manuals and user guides at all-guides.com The safety cut-out function will be activated after several minutes The control lamp will now flash more slowly and the remaining cooking time will be shown in the display as it elapses. If the safety cut-out function has been set for more than one cooking zone, the time dis- played will be that for the cooking zone with the shortest period of cooking time remaining.
  • Page 19: Countdown Timer

    All manuals and user guides at all-guides.com Switching off the safety cut-out function before it has come to an end There are two ways to switch off the safety cut-out function before it has come to an end. Switch off the cooking zone and timer simultaneously 1.
  • Page 20: Blocking/Unblocking The Control Panel

    All manuals and user guides at all-guides.com Blocking/unblocking the control panel At any stage of the cooking process the control panel, with the excep- tion of the “On/Off” sensor panel, can be blocked in order to prevent the settings being changed e.g. by wiping over the panel with a cloth. 1.
  • Page 21: Uses, Tables And Tips

    All manuals and user guides at all-guides.com Uses, Tables and Tips Pans • You can recognise good pans by their bases. The base should be as thick and flat as possible. • Pay particular attention when buying new pans to the diameter of the base.
  • Page 22: Advice On Cooking With And Without Automatic Warm Up

    All manuals and user guides at all-guides.com Advice on Cooking with and without Automatic Warm up The automatic warm up function is suitable for: • dishes that start off cold, are heated up at high power and do not need to be continually watched when cooking on the selected heat setting, •...
  • Page 23: Settings For Cooking On The Zones

    All manuals and user guides at all-guides.com Settings for Cooking on the Zones The figures in the following table are benchmark figures. The switch setting required for a certain cooking method depends on the quality of the pans and the type and amount of food. Automatic Switch warm up func-...
  • Page 24: Cleaning And Care

    All manuals and user guides at all-guides.com Cleaning and Care Important: Cleaning agents must not come into contact with the hot ceramic glass surface! All cleaning agents must be removed with plenty of clean water after cleaning because they can have a caustic effect when the rings are next heated! Do not use any aggressive cleaners such as grill or oven sprays, coarse scourers or abrasive pan cleaners.
  • Page 25: Hob Frame

    All manuals and user guides at all-guides.com Problem Dirt 1. Remove burnt-on sugar, melted plas- tic, aluminium foil or other meltable materials with a glass scraper imme- diately and while still hot. Important: There is a risk of burning yourself when the glass scraper is used on a hot cooking zone! 2.
  • Page 26: Rectifying Faults

    All manuals and user guides at all-guides.com What to do if … Rectifying faults It is possible that faults have been caused by a minor error, which you can correct yourself with the help of the following instructions. Do not attempt any further repairs if the following instructions do not help in each specific case.
  • Page 27 All manuals and user guides at all-guides.com … after having switched off the cooking zones, no h for residual warmth is indicated in the display. Check whether – the cooking zone was only briefly used and therefore did not become hot enough.
  • Page 28: Installation Instructions

    All manuals and user guides at all-guides.com Installation Instructions Important! The new appliance may only be installed and connected by qualified personnel. Please observe this instruction, otherwise the warranty will not cover any damage that may occur. Regulations, Standards, Directives This appliance meets the following standards: •...
  • Page 29: Safety Instructions For The Installer

    All manuals and user guides at all-guides.com Safety Instructions for the Installer • A device must be provided in the electrical installation which allows the appliance to be disconnected from the mains at all poles with a contact opening width of at least 3 mm. Suitable isolation devices include line protecting cut-outs, fuses (screw type fuses are to be removed from the holder), earth leakage trips and contactors.
  • Page 30: Electrical Connection

    All manuals and user guides at all-guides.com Electrical Connection Before connecting, check that the nominal voltage of the appliance, that is the voltage stated on the rating plate, corresponds to the avail- able supply voltage. The rating plate is located on the lower casing of the hob.
  • Page 31: Guarantee Conditions

    All manuals and user guides at all-guides.com Guarantee Conditions Belgium DECLARATION OF GUARANTEE TERMS. Our appliances are produced with the greatest of care. However, a defect may still occur. Our con- sumer services department will repair this upon request, either during or after the guarantee peri- od.
  • Page 32 In diesen Ländern gelten die Garantiebedingungen der örtlichen Part- ner. Diese können dort eingesehen werden. Further after-sales service agencies overseas In these countries our AEG agents’ own guarantee conditions are appli- cable. Please obtain further details direct. Autres agences étrangères assurant le service après-vente Dans ces pays, les conditions de garantie des concessionnaires de la ré-...
  • Page 33: Customer Service Centres

    Tel.: 29917/31634 Fax: 905 829 3985 Tel.: 25355 Australia Korea (South) Namibia The Andi-Co Group Core Incorp. AEG NAMIBIA (PTY) 1 Stamford Road 3/F Chewoo Bldg. LIMITED-Jeppe Street Oakleigh VIC 3166 200 Nonhyun-Dong Northern Industrial Area Tel.: (03) 9569 1255...
  • Page 34 Tel.: 0120-13-7117 Fax: 03-3790-5257 Thailand Slovakia Rep. South Africa OLYMPIA Thai Ltd. Electrolux Slovakia S.R.O. AEG (Pty) Ltd. 44 Ratchadapisek Road Seberiniho 1 55, 12th Road 10320 Bangkok 821 03 Bratislava P.O. Box 1 02 64 Tel.: 2 513 6111 Tel.: 02 4333 4322, 4355...
  • Page 35 All manuals and user guides at all-guides.com Service In the event of technical faults, please first check whether you can remedy the problem yourself with the help of the operating instruc- tions (section “What to do if…”). If you were not able to remedy the problem yourself, please contact the Customer Care Department or one of our service partners.
  • Page 36 All manuals and user guides at all-guides.com Lors de sa fabrication, cet appareil a été construit selon des normes, di- rectives et/ou décrets pour une utilisation sur le territoire français. Pour la sécurité des biens et des personnes ainsi que pour le respect de l'environnement, vous devez d'abord lire impérativement les préconisations suivantes avant toute utilisation de votre appareil.
  • Page 37 All manuals and user guides at all-guides.com Chère cliente, cher client, veuillez lire attentivement le présent mode d'emploi. Tenez surtout compte du chapitre «Consignes de sécurité» aux premiè- res pages. Veuillez conserver ce mode d'emploi en vue d'une consulta- tion ultérieure. Transmettez-le à un éventuel nouvel utilisateur de l’appareil.
  • Page 38 All manuals and user guides at all-guides.com Sommaire Notice d'utilisation ......... 40 Sécurité...
  • Page 39 All manuals and user guides at all-guides.com Instructions d'installation ....... . . 63 Règlements, normes, directives .
  • Page 40: Sécurité Électrique

    All manuals and user guides at all-guides.com Notice d'utilisation 1 Sécurité La sécurité de cet appareil est conforme aux règles reconnues de la technique et à la législation portant sur la sécurité des appareils. En tant que fabricant, nous nous sentons cependant obligés d'attirer votre attention sur les indications supplémentaires de sécurité...
  • Page 41: Sécurité Lors Du Nettoyage

    All manuals and user guides at all-guides.com • Les huiles et graisses surchauffées s'enflamment facilement. Si vous préparez des aliments dans la graisse ou l'huile (pommes frites p. ex.), nous vous recommandons de rester à proximité pour surveiller la cuisson. •...
  • Page 42: Elimination

    All manuals and user guides at all-guides.com 2 Elimination Eliminer le matériel d'emballage Tous les matériaux utilisés peuvent être réutilisés sans limites. Les matières plastiques sont identifiées de la manière suivante: • >PE< pour le polyéthylène, par ex. l'enveloppe extérieure et les sa- chets à...
  • Page 43: Description De L'appareil

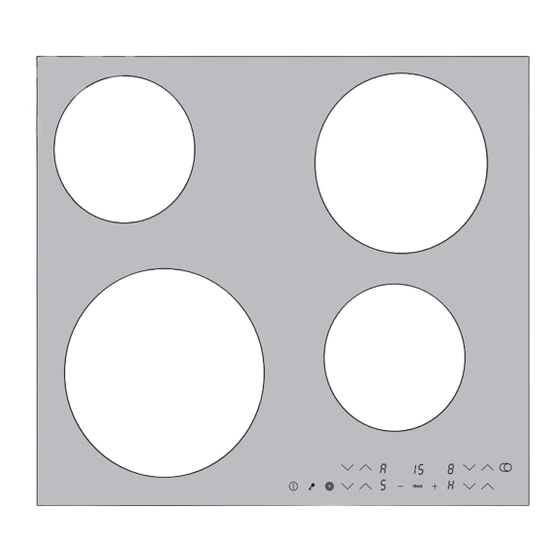
    All manuals and user guides at all-guides.com Description de l'appareil Equipement de la table de cuisson et de commande Zone de cuisson un circuit Zone de cuisson un circuit 1200W 1800W Zone de cuisson un circuit Bandeau Zone de cuisson un circuit 2300W de commande 1200W...
  • Page 44: Affichages Numériques

    All manuals and user guides at all-guides.com Affichages numériques Les quatre affichages numériques dont sont pourvus les zones de cuis- son indiquent : – ¾ Après la mise en marche, – u Lors de la sélection de la fonction de maintien au chaud, –...
  • Page 45: Avant La Première Utilisation

    All manuals and user guides at all-guides.com Avant la première utilisation Premier nettoyage Essuyez le plan de cuisson vitrocéramique humide. Attention: N'utilisez pas d'agents de nettoyage agressifs ou abrasifs ! La surface pourrait être endommagée. Utilisation de la table de cuisson Touches sensitives Pour activer les touches sensitives, appuyez sur la touche désirée jus- qu'à...
  • Page 46: Mettre L'appareil À L'arrêt

    All manuals and user guides at all-guides.com Mettre l'appareil à l'arrêt Pour mettre l'ensemble de l'appareil hors service, appuyez sur la touche « Marche/Arrêt » I. Appuyez sur la touche « Marche/Arrêt » pendant environ une seconde. Lorsqu'une seule zone ou l'intégralité de la table de cuisson est mis hors service, la présence de chaleur résiduelle est signalée par l'indicateur h dans les écrans d'affichage des zones de cuisson correspondantes.
  • Page 47: Position De Maintien Au Chaud

    All manuals and user guides at all-guides.com Position de maintien au chaud La fonction de maintien au chaud u peut être sélectionnée sur les 4 zones de cuisson. Sélectionnez à l'aide de la touche de sélection la fonction de main- tien au chaud u.
  • Page 48: Cuisson Avec La Fonction De Saisie Automatique

    All manuals and user guides at all-guides.com Cuisson avec la fonction de saisie automatique Les zones de cuisson de la table sont réglables sur neuf niveaux de cuis- son et sont équipées d'une fonction de saisie automatique. : – ¿, niveau de cuisson minimum –...
  • Page 49: Sécurité Enfants

    All manuals and user guides at all-guides.com 1. Après avoir mis l'appareil en fonctionnement et sélectionné la zone de cuisson souhaitée avec les touches de sélection des zones de cuisson, appuyez sur la touche de sélection pour sélectionner un niveau de cuisson(entre Ç...
  • Page 50 All manuals and user guides at all-guides.com 2. Appuyez sur la touche d'une zone de cuisson . Le symbole l s’affiche, la sécurité enfants est activée. L’appareil se dé- connecte automatiquement au bout de quelques secondes. Brider la sécurité enfants Pour une unique utilisation de l’appareil (jusqu’à...
  • Page 51 All manuals and user guides at all-guides.com 2. Sélectionner au choix deux niveaux de cuisson à l’aide des touches sen- sitives Un signal sonore confirme la manipulation. La sécurité enfants est bri- dée jusqu’à ce que l’appareil soit désactivé et la plaque de cuisson peut être utilisée normalement.
  • Page 52: Déconnexion Automatique

    All manuals and user guides at all-guides.com 3. Appuyez sur la touche d'une zone de cuisson.. Les voyants s’éteignent, la sécurité enfants est désactivée. L’appareil se déconnecte automatiquement au bout de quelques secondes. Minuteur Le minuteur est doté de deux fonctions : : –...
  • Page 53 All manuals and user guides at all-guides.com En appuyant une fois sur la touche Minuteur on sélectionne une pre- mière zone de cuisson et le voyant de contrôle correspondant clignote rapidement. Par exemple, le voyant de contrôle arrière gauche corres- pond à...
  • Page 54: Anticiper La Désactivation De La Déconnexion Automatique

    All manuals and user guides at all-guides.com 3. Appuyez sur la touche Minuteur pour désactiver le signal. Pour un réglage plus rapide, appuyez sur l'une des touches Minuteur + et - jusqu'à ce que la valeur souhaitée soit sélectionnée. Si la touche de réglage Minuteur - est activée en premier, le décompte commence à...
  • Page 55: Verrouiller/Déverrouiller Le Bandeau De Commande

    All manuals and user guides at all-guides.com Verrouiller/déverrouiller le bandeau de commande Pour éviter une modification du réglage, on peut, à tout moment au cours du processus de cuisson, verrouiller le bandeau de commande par exemple pour le nettoyer avec un chiffon, en ne touchant pas la tou- che sensitive “Marche/Arrêt”.
  • Page 56: Application, Tableaux, Conseils

    All manuals and user guides at all-guides.com Application, tableaux, conseils Récipients de cuisson • Vous reconnaissez les bonnes batteries de cuisine au fond des casse- roles. Le fond doit être aussi épais et aussi plan que possible. • Faites attention au diamètre du fond du récipient lors de l'achat de nouvelles casseroles et poêles.
  • Page 57: Cuisson Pour Cuire Avec Et Sans La Fonction De Saisie

    All manuals and user guides at all-guides.com Cuisson pour cuire avec et sans la fonction de saisie automatique La fonction de saisie automatique de la cuisson convient pour: • les aliments froids qui sont chauffés à forte puissance et qui n'ont pas besoin d'être surveillés pendant qu'ils mijotent, •...
  • Page 58: Valeurs Indicatives De Cuisson

    All manuals and user guides at all-guides.com Valeurs indicatives de cuisson Les valeurs indiquées dans le tableau suivant sont indicatives. Les puis- sances recommandées dans ce tableau pour la cuisson dépendent de la nature du récipient et, du type et du volume des aliments à cuire Durée de cuisson en Type de cuis-...
  • Page 59: Nettoyage Et Entretien

    All manuals and user guides at all-guides.com Nettoyage et entretien Table de cuisson Attention: Les produits de nettoyage ne doivent pas entrer en contact avec la surface vitrocéramique chaude! Tous les produits de nettoyage doivent être rincés avec suffisamment d'eau claire après le nettoyage, sinon ils pourraient avoir une action agressive lors du chauffage! N'employez pas de produits de nettoyage agressifs, tels que p.
  • Page 60: Salissures Tenaces

    All manuals and user guides at all-guides.com Salissures tenaces 1. Pour enlever les aliments ayant dé- bordé ou les éclaboussures cuites, utilisez un grattoir à lame de rasoir. 2. Tenez la lame du grattoir en oblique sur la surface vitrocéramique. 3.
  • Page 61: En Cas D'anomalie De Fonctionnement

    All manuals and user guides at all-guides.com Que faire si … En cas d'anomalie de fonctionnement En cas de dysfonctionnement, il se peut que l'anomalie constatée ne soit pas grave et que vous puissiez y remédier vous-même à l'aide des indications suivantes.
  • Page 62 All manuals and user guides at all-guides.com ... l’indicateur de chaleur résiduelle retombe soudainement à h Vérifier si – la touche Marche/Arrêt n’a pas été actionnée par mégarde. – les zones de commande ne sont pas partiellement recouvertes par un chiffon humide, par du liquide ou par autre chose.
  • Page 63: Règlements, Normes, Directives

    All manuals and user guides at all-guides.com Instructions d'installation Les opérations d'installation et de branchement de votre appareil doi- vent être effectuées par une personne qualifiée et selon les normes en vigueur. Règlements, normes, directives Cet appareil est conforme aux normes suivantes: •...
  • Page 64: Conseils De Sécurité Pour L'installateur

    All manuals and user guides at all-guides.com Conseils de sécurité pour l'installateur • Au niveau de l'installation électrique, prévoir un dispositif qui per- mette de couper cet appareil du secteur sur tous les pôles avec une ouverture des contacts d'au moins 3 mm. Des dispositifs de protection appropriés sont par exemple les disjonc- teurs, les fusibles (les fusibles vissés doivent être retirés de leur socle), les disjoncteurs différentiels et les contacteurs.
  • Page 65: Raccordement Électrique

    All manuals and user guides at all-guides.com Raccordement électrique Avant le branchement, il convient de vérifier si la tension nominale de l'appareil, c'est-à-dire la tension indiquée sur la plaque signalétique, concorde avec la tension du secteur. La plaque signalétique est située sur le revêtement inférieur du plan de cuisson.
  • Page 66: Garantie

    All manuals and user guides at all-guides.com Garantie France Conformément à la Législation en vigueur, votre Vendeur est tenu, lors de l'acte d'achat de votre appareil, de vous communiquer par écrit les conditions de garantie et sa mise en œuvre appliquées sur celui-ci.
  • Page 67 All manuals and user guides at all-guides.com 9. Ne sont pas couvertes par la garantie, les défectuosités qui proviennent de réparations ou d' inter- ventions pratiquées par des personnes non qualifiées ou incompétentes, ou qui ont pour cause l'adjonction d'accessoires ou de pièces de rechange non d'origine. 10.
  • Page 68: Si Vous Devez Nous Contacter

    All manuals and user guides at all-guides.com Si vous devez nous contacter France Pour tenir nos engagements, nous écoutons les Consommateurs Info Conso Electrolux est le lien privilégié entre la marque et ses Consommateurs. Il assure en permanence une double mission : satisfaire au mieux vos exigences et tirer parti de cette proximi- té...
  • Page 69: Pièces Détachées, Accessoires Et Produits D'entretien

    Pièces détachées, accessoires et produits d'entretien Pour la Belgique: vous pouvez commander des pièces détachées, acces- soires et consommables online à l'adresse http://www.aeg-home.be/fr Service après-vente En cas de problèmes techniques, vérifiez d’abord s’il ne vous est pas possible de réparer vous-même le dysfonctionnement à l’aide de la no- tice d’utilisation (chapitre „Que faire, si...“).
  • Page 70 All manuals and user guides at all-guides.com Geachte klant, Lees deze gebruiksaanwijzing aandachtig door. Let vooral op hoofdstuk “Veiligheid” op de eerste pagina's. Bewaar deze gebruiksaanwijzing zodat u nog eens iets kunt nalezen. Geef het boekje door aan een eventuele volgende eigenaar van het apparaat. In de tekst worden de volgende symbolen gebruikt: Aanwijzingen m.b.t.
  • Page 71 All manuals and user guides at all-guides.com Inhoud Gebruiksaanwijzing ........73 Veiligheid .
  • Page 72 All manuals and user guides at all-guides.com Montageaanwijzing ........96 Doel, normen, richtlijnen .
  • Page 73: Elektrische Veiligheid

    All manuals and user guides at all-guides.com Gebruiksaanwijzing 1 Veiligheid De veiligheid van dit apparaat voldoet aan de Europese en Nederlandse normen. Toch zien wij ons als fabrikant genoodzaakt u met onderstaan- de aanwijzingen m.b.t. de veiligheid vertrouwd te maken. Elektrische veiligheid •...
  • Page 74 All manuals and user guides at all-guides.com Veiligheid bij het reinigen U moet het apparaat uitschakelen voordat u het gaat reinigen. Het rei- nigen van het apparaat met een stoomstraal- of hogedrukreiniger is om veiligheidsredenen verboden. Zo wordt schade aan het apparaat voorkomen •...
  • Page 75: Afvalverwerking

    All manuals and user guides at all-guides.com 2 Afvalverwerking Verpakkingsmateriaal verwijderen Alle gebruikte materialen kunnen onbeperkt worden hergebruikt. De kunststoffen hebben de volgende aanduidingen: • >PE< voor polyethyleen, bijv. bij de buitenste verpakking en de zakjes binnenin. • >PS< voor geschuimd, cfk-vrij polystyreen, bijv. bij de hoekbescher- mers.
  • Page 76: Beschrijving Van Het Apparaat

    All manuals and user guides at all-guides.com Beschrijving van het apparaat Uitvoering kookplaat en bedieningsveld Eenkrings-kookzone Eenkrings-kookzone 1200W 1800W Eenkrings-kookzone Bedieningsveld Eenkrings-kookzone 2300W 1200W Sensorveld “vergrendelen“ “Timer“ met Sensorveld Kookstandkeuze Kookstandkeuze controle-indicaties “aan/uit“ Indicatie voor kookstand/restwarmte...
  • Page 77 All manuals and user guides at all-guides.com Digitale indicaties De vier indicatievelden die aan de vier kookzones toebehoren, geven het volgende aan: – ¾ na het inschakelen, – u bij het kiezen van de warmhoudstand, – ¿ tot Ç, afhankelijk van de gekozen kookstand, –...
  • Page 78: Voor Het In Gebruik Nemen

    All manuals and user guides at all-guides.com Voor het in gebruik nemen Reinigen De glaskeramische kookplaat met een vochtige doek afnemen. Attentie: Gebruik geen scherpe, schurende reinigingsmiddelen! De op- pervlakte kan beschadigd worden. Bediening van de kookplaat Touch-control-sensorvelden Om de touch-control-sensorvelden te bedienen, drukt u met de punt van uw vingertop op het gewenste veld tot de betreffende indicaties gaan branden of uitgaan of tot de gewenste functie wordt uitgevoerd.
  • Page 79: Apparaat Uitschakelen

    All manuals and user guides at all-guides.com Apparaat uitschakelen U kunt het complete apparaat uitschakelen door op het sensorveld “aan/uit” I te drukken. Raak het sensorveld “aan/uit” ca. één seconde aan. Na het uitschakelen van een enkele kookzone of van de gehele kook- plaat wordt de aanwezige restwarmte met h (zoals in “heet”) in de di- gitale indicaties van de betreffende kookzones aangegeven.
  • Page 80: Kookzone Uitschakelen

    All manuals and user guides at all-guides.com Kookzone uitschakelen 1. Om de kookzone uit te schakelen, raakt u de sensorvelden kookstandse- lectie tegelijk aan. U kunt de kookzone ook met sensorveld kookstandselectie terugzetten op nul. Restwarmte-indicatie Na het uitschakelen van een kookzone of van de gehele kookplaat wordt nog aanwezige restwarmte met h (van ”heet”) in de digitale indicaties van de betreffende kookzones aangegeven.
  • Page 81 All manuals and user guides at all-guides.com Koken met de kookautomatiek Alle vier kookzones van de kookplaat hebben negen kookstanden en zijn uitgerust met een kookautomatiek: – ¿, laagste kookstand – Ç, hoogste kookstand – a, aan de kook brengen. Wanneer u de door u gewenste kookstand met het sensorveld kook- standselectie kiest, werkt de kookzone gedurende een bepaalde tijd...
  • Page 82 All manuals and user guides at all-guides.com Koken zonder kookautomatiek Wanneer u de kookzone wilt gebruiken zonder kookautomatiek, kiest u de gewenste kookstand met het sensorveld kookstandselectie 1. Raak het sensorveld kookstandselectie aan om de gewenste kook- stand Ç tot ¿ in te stellen. U kunt de kookstand met de sensorvelden kookstandselectie op elk moment wijzigen.
  • Page 83 All manuals and user guides at all-guides.com 2. Raak een willekeurig sensorveld kookstandselectie aan. In de indicaties verschijnt l. De kinderbeveiliging is geactiveerd. Het apparaat wordt na enkele seconden automatisch uitgeschakeld. Kinderbeveiliging tijdelijk uitschakelen U kunt de kinderbeveiliging voor éénmalig gebruik van het apparaat (tot u het apparaat uitschakelt) tijdelijk uitschakelen.
  • Page 84 All manuals and user guides at all-guides.com 2. Raak tegelijk twee willekeurige sensorvelden kookstandselectie aan. Er klinkt een signaaltoon ter bevestiging. De kinderbeveiliging is tot u het apparaat uitschakelt tijdelijk uitgeschakeld. U kunt de kookplaat normaal gebruiken. Kinderbeveiliging uitschakelen 1. Schakel het apparaat in. Wanneer de kinderbeveiliging is geactiveerd, wordt l aangegeven.
  • Page 85: Automatische Uitschakeling

    All manuals and user guides at all-guides.com 3. Raak een willekeurig sensorveld kookstandselectie aan. De indicaties worden donker. De kinderbeveiliging is uitgeschakeld. Het apparaat wordt na enkele seconden automatisch uitgeschakeld. Timer U kunt de timer op twee manieren gebruiken: – als automatische uitschakeling. U stelt voor een kookzone een kooktijd in.
  • Page 86 All manuals and user guides at all-guides.com Door het sensorveld timer één keer aan te raken, selecteert u met de klok mee de eerste actieve kookzone. Het betreffende controlelampje knippert snel. Het controlelampje linksachter bijvoorbeeld komt daarbij overeen met de kookzone linksachter. In de timer-indicatie verschijnt Door het sensorveld timer nogmaals aan te raken, selecteert u de vol- gende actieve kookzone.
  • Page 87 All manuals and user guides at all-guides.com Als u eerst drukt op het sensorveld timer-instelling -, dan begint de instelling van de tijd bij 99 minuten. Als u eerst drukt op het sensorveld timer-instelling +, dan begint de instelling van de tijd bij 1 minuut. Automatische uitschakeling voortijdig beëindigen U kunt de automatische uitschakeling op twee manieren voortijdig uit- schakelen:...
  • Page 88: Bedieningspaneel Vergrendelen/Ontgrendelen

    All manuals and user guides at all-guides.com Bedieningspaneel vergrendelen/ontgrendelen U kunt het bedieningspaneel, met uitzondering van het sensorveld AAN / UIT, op elk willekeurig moment van het kookproces vergrendelen. Hiermee voorkomt u dat de instellingen worden gewijzigd als u bijvoor- beeld met een doek over het bedieningspaneel wrijft.
  • Page 89 All manuals and user guides at all-guides.com Toepassingen, tabellen, tips Pannen • Goede pannen herkent u aan de bodem. De bodem moet zo dik en vlak mogelijk zijn. • Let bij het kopen van pannen op de diameter van de bodem. Fabri- kanten geven vaak de diameter van de bovenste rand van de pan aan.
  • Page 90 All manuals and user guides at all-guides.com Tips voor het koken met en zonder kookautomatiek De automatische aankookfunctie is geschikt voor: • gerechten die koud worden opgezet, op hoog vermogen verhit en op de doorkookstand niet voortdurend in de gaten hoeven te worden gehouden.
  • Page 91 All manuals and user guides at all-guides.com Richttijden bij het koken De gegevens in de volgende tabel dienen slechts als richtlijnen. De kwa- liteit van de pannen en de soort en hoeveelheid voedingsmiddelen be- palen welke schakelstand u moet gebruiken. Tijd die nodig is voor het aan Schakel-...
  • Page 92: Reiniging En Onderhoud

    All manuals and user guides at all-guides.com Reiniging en onderhoud Kookplaat Attentie: Reinigingsmiddelen mogen niet op de hete glaskeramische plaat terechtkomen! Alle reinigingsmiddelen moeten na het schoonma- ken met ruim schoon water worden verwijderd, omdat ze bij het weer opwarmen etsend kunnen werken! Gebruik geen agressieve reinigingsmiddelen, zoals grill- of ovensprays, grove schuurmiddelen of krassende pannenreinigers.
  • Page 93: Speciale Verontreinigingen

    All manuals and user guides at all-guides.com Speciale verontreinigingen 1. Ingebrande suiker, gesmolten kunst- stof, aluminiumfolie of andere ma- terialen die kunnen smelten direct, als ze nog heet zijn, met een glas- schraper verwijderen. Attentie: Bij het gebruik van de glasschraper op een hete kookzone bestaat verbrandingsgevaar! 2.
  • Page 94: Hulp Bij Storingen

    All manuals and user guides at all-guides.com Wat is er aan de hand als … Hulp bij storingen Misschien gaat het om een kleine storing die u aan de hand van de vol- gende aanwijzingen zelf kunt oplossen. Voer zelf verder geen werk- zaamheden uit, als onderstaande informatie u niet verder helpt.
  • Page 95 All manuals and user guides at all-guides.com … de indicatie bij h voor restwarmte plotseling wordt uitgescha- keld? Controleer of – u per ongeluk op de aan-/uit-toets hebt gedrukt. – er een vochtige doek, vloeistof of iets dergelijks ligt op een gedeelte van de sensorvelden.
  • Page 96: Doel, Normen, Richtlijnen

    All manuals and user guides at all-guides.com Montageaanwijzing Attentie! Montage en aansluiting van het nieuwe apparaat mogen al- leen door een erkend elektro-installateur worden uitgevoerd. Volg deze aanwijzing op, omdat anders bij schade de aanspraak op ga- rantie vervalt. Doel, normen, richtlijnen Dit apparaat voldoet aan de volgende normen: •...
  • Page 97: Veiligheidsaanwijzingen Voor De Installateur

    All manuals and user guides at all-guides.com Veiligheidsaanwijzingen voor de installateur • In de elektrische installatie moet een inrichting worden aangebracht, die het mogelijk maakt het apparaat met een contactopeningswijdte van min. 3 mm met alle polen van het net te scheiden. Geschikte scheidingsinrichtingen zijn bijv.
  • Page 98: Elektrische Aansluiting

    All manuals and user guides at all-guides.com Elektrische aansluiting Voordat u het apparaat aansluit moet u controleren of de nominale spanning (de op het typeplaatje aangegeven spanning) overeenkomt met de aanwezige netspanning. Het typeplaatje bevindt zich onderop de kookplaat. De spanning van het verwarmingselement bedraagt AC230V~. Ook bij oudere stroomnetten met AC220V~ werkt het apparaat onberispelijk.
  • Page 99: Garantievoorwaarden

    All manuals and user guides at all-guides.com Garantievoorwaarden Nederland Onze producten worden met de grootst mogelijke zorgvuldigheid geproduceerd. Desondanks kan het voorkomen dat er een defect optreedt. Onze servicedienst zal dit op verzoek herstellen, zowel binnen als buiten de garantietermijn. De levensduur van het product wordt daardoor niet negatief beïnvloed.
  • Page 100 All manuals and user guides at all-guides.com Ook na afloop van de garantietermijn staat onze servicedienst u ter beschikking. Adres Servicedienst: Electrolux Service Vennootsweg 1 2404 CG ALPHEN AAN DEN RIJN Reparatievoorwaarden Onze reparatievoorwaarden zijn conform de afspraak tussen de Consumentenbond en Vle- han*.
  • Page 101 All manuals and user guides at all-guides.com België WAARBORGVOORWAARDEN Onze toestellen worden met de grootst mogelijke zorgvuldigheid geproduceerd. Desondanks kan het voorkomen dat er een defect optreedt. Onze klantendienst zal dit op verzoek herstellen, zowel binnen als buiten de waarborgtermijn. De levensduur van het toestel wordt daardoor niet negatief beïnvloed.
  • Page 102: Adres Service-Afdeling

    België Telefon Telefax Electrolux Home Products Belgium Consumer services 02/363.04.44 02/363.04.00 ELECTROLUX SERVICE 02/363.04.60 Bergensesteenweg 719 1502 Lembeek E-mail: consumer.services@electrolux.be Onderdelen, toebehoren en verbruiksprodukten Voor België: U kan onderdelen, toebehoren en verbruiksprodukten onli- ne bestellen op adres http://www.aeg-home.be...
  • Page 103 All manuals and user guides at all-guides.com Service Controleer bij technische storingen eerst of u met behulp van de ge- bruiksaanwijzing (hoofdstuk ”Wat u moet doen als…“) het probleem zelf kunt oplossen. Wanneer u het probleem niet kunt oplossen, neemt u contact op met onze klantenservice of met een van onze servicepartners.
  • Page 104 All manuals and user guides at all-guides.com Assembly Montage Montage...
  • Page 105 All manuals and user guides at all-guides.com...
  • Page 106 All manuals and user guides at all-guides.com Rating Plate Plaque signalétique Typeplaatje...
  • Page 107 All manuals and user guides at all-guides.com...
  • Page 108 USD 14 billion in more than 150 countries around the world. AEG Hausgeräte GmbH Postfach 1036 D-90327 Nürnberg http://www.aeg.hausgeraete.de © Copyright by AEG Subject to change without notice Sous réserve de modifications 925 007-A-210904-01 Wijzigingen voorbehouden...

Table des Matières