AEG 66300 K-IN Instructions De Montage Et Mode D'emploi

AEG 66300 K-IN Instructions De Montage Et Mode D'emploi

Table de cuisson vitrocéramique
Table des Matières

Publicité

Les langues disponibles

Les langues disponibles

Liens rapides

All manuals and user guides at all-guides.com
66300 K-IN
Ceramic glass hob
Table de cuisson vitrocéramique
Glaskeramische kookplaat
Installation and Operating Instructions
Instructions de montage et mode d'emploi
Montage- en gebruiksaanwijzing

Publicité

Table des Matières
loading

Sommaire des Matières pour AEG 66300 K-IN

  • Page 1 All manuals and user guides at all-guides.com 66300 K-IN Ceramic glass hob Table de cuisson vitrocéramique Glaskeramische kookplaat Installation and Operating Instructions Instructions de montage et mode d’emploi Montage- en gebruiksaanwijzing...
  • Page 2 All manuals and user guides at all-guides.com Dear Customer, Please read these user instructions carefully and keep them to refer to later. Please pass the user instructions on to any future owner of the appli- ance. The following symbols are used in the text: Safety instructions Warning! Information that affects your personal safety.
  • Page 3: Table Des Matières

    All manuals and user guides at all-guides.com Contents Operating Instructions ........Safety instructions.
  • Page 4: Operating Instructions

    All manuals and user guides at all-guides.com Operating Instructions 1 Safety instructions Please comply with these instructions. If you do not, any damage re- sulting is not covered by the warranty. This appliance conforms with the following EU Directives: – 73/23/EEC dated 19.02.1973 Low Voltage Directive –...
  • Page 5: Safety During Use

    All manuals and user guides at all-guides.com Safety during use • Remove stickers and film from the glass ceramic. • There is the risk of burns from the appliance if used carelessly. • Cables from electrical appliances must not touch the hot surface of the appliance or hot cookware.
  • Page 6: Description Of The Appliance

    All manuals and user guides at all-guides.com Description of the Appliance Cooking zones and control panel Single ring cooking zone Casserole zone 1200W 2400W Triple ring cooking zone Control panel Single ring cooking zone 2300W 1200W Three-ring sensor panel Browning zone sensor panel „Block“...
  • Page 7: Digital Displays

    All manuals and user guides at all-guides.com Digital displays The four display panels that belong to the four cooking zones indicate: – ¾ after having been switched on, – u when a keep warm setting has been selected, – ¿ to Ç, depending on the cooking setting selected, –...
  • Page 8: Operating The Hob

    All manuals and user guides at all-guides.com Operating the hob Touch control sensor panels To operate the touch control sensor panels, touch the desired panel with the tip of your pointed finger until the relevant displays illuminate or go out, or until the desired function is carried out. Ensure that you are only touching one sensor panel when operating the appliance.
  • Page 9: Switching Off The Appliance

    All manuals and user guides at all-guides.com Switching off the appliance To completely switch off the appliance, actuate the “On/Off” sensor panel I. Touch the “On/Off” sensor panel for approx. one second. After switching off a single cooking zone or the entire cooking surface, the existing residual warmth will be displayed in the digital displays of the corresponding cooking zones in the form of h (for “hot”).
  • Page 10: Switching The Triple Ring Zone On And Off

    All manuals and user guides at all-guides.com Switching the triple ring zone on and off According to the size of the saucepan or frying pan, when using the tri- ple ring cooking zone you can switch from a smaller cooking zone to a larger cooking zone using the “triple ring zone”...
  • Page 11: Switching The Casserole Zone On And Off

    All manuals and user guides at all-guides.com 3. Touch the “triple ring” sensor panel to activate the outer heating ring. The upper control lamp will illuminate. 4. To switch off the outer heating ring, touch the “triple ring” sensor pan- el, and the heating ring that is outermost at the time will switch off.
  • Page 12: Switching Off A Cooking Zone

    All manuals and user guides at all-guides.com Switching off a cooking zone 1. To switch off a cooking zone touch the heat setting selector sensor panel simultaneously, or return the setting to zero using the heat setting selector sensor panel Residual Heat Indicator When an individual cooking zone or the entire hob is switched off, any residual heat is shown with an h (for...
  • Page 13: Cooking Using The Automatic Warm Up Function

    All manuals and user guides at all-guides.com Cooking using the automatic warm up function All of the cooking surface’s four cooking zones can be adjusted to any of nine settings, and are equipped with an automatic warm up func- tion: –...
  • Page 14: Cooking Without The Automatic Warm Up Function

    All manuals and user guides at all-guides.com Cooking without the automatic warm up function If you wish to use the cooking zones without the automatic warm up function, select the desired heat setting using the heat setting selector sensor panel 1.
  • Page 15: Child Safety Lock

    All manuals and user guides at all-guides.com Child safety lock You can use the child safety lock to safeguard against unwanted use of the cooking surface. Switching on the child safety lock To be able to switch on the child safety lock the appliance must be switched on, but all the cooking zones must be switched off.
  • Page 16 All manuals and user guides at all-guides.com Overriding the child safety lock The child safety lock can be overridden in order to use the appliance (until the appliance is switched off again). When the appliance is switched on again the child safety device is activated once again. 1.
  • Page 17 All manuals and user guides at all-guides.com Switching off the child safety lock 1. Switch on the appliance. When the child safety device has been activated, l will be displayed. 2. Touch the sensor field for approx. three seconds. An acoustic signal will sound as confirmation. 3.
  • Page 18: Timer

    All manuals and user guides at all-guides.com Timer There are two ways to use the timer: – as a safety cut-out function. Set a cooking period for a cooking zone, and after this time has elapsed the cooking zone will automati- cally switch itself off.
  • Page 19 All manuals and user guides at all-guides.com 2. While the control lamp is flashing rapidly, use the + or - timersetting sensor panels to set the desired period of time for this cooking zone up until the point where it automatically switches itself off (e.g. 15 minutes).
  • Page 20: Countdown Timer

    All manuals and user guides at all-guides.com Switching off the safety cut-out function before it has come to an end There are two ways to switch off the safety cut-out function before it has come to an end. Switch off the cooking zone and timer simultaneously 1.
  • Page 21: Blocking/Unblocking The Control Panel

    All manuals and user guides at all-guides.com Blocking/unblocking the control panel At any stage of the cooking process the control panel, with the excep- tion of the “On/Off” sensor panel, can be blocked in order to prevent the settings being changed e.g. by wiping over the panel with a cloth. 1.
  • Page 22: Uses, Tables And Tips

    All manuals and user guides at all-guides.com Uses, Tables and Tips Pans • You can recognise good pans by their bases. The base should be as thick and flat as possible. • Pay particular attention when buying new pans to the diameter of the base.
  • Page 23: Advice On Cooking With And Without Automatic Warm Up

    All manuals and user guides at all-guides.com Advice on Cooking with and without Automatic Warm up The automatic warm up function is suitable for: • dishes that start off cold, are heated up at high power and do not need to be continually watched when cooking on the selected heat setting, •...
  • Page 24: Settings For Cooking On The Zones

    All manuals and user guides at all-guides.com Settings for Cooking on the Zones The figures in the following table are benchmark figures. The switch setting required for a certain cooking method depends on the quality of the pans and the type and amount of food. Automatic Switch warm up func-...
  • Page 25: Cleaning And Care

    All manuals and user guides at all-guides.com Cleaning and Care Take care! Risk of burns from residual heat. Let the appliance cool down. Warning! Sharp objects and abrasive cleaning materials will damage the appliance. Clean with water and washing up liquid. Warning! Residues from cleaning agents will damage the appliance.
  • Page 26: What To Do If

    All manuals and user guides at all-guides.com What to do if … Rectifying faults It is possible that faults have been caused by a minor error, which you can correct yourself with the help of the following instructions. Do not attempt any further repairs if the following instructions do not help in each specific case.
  • Page 27: Disposal

    All manuals and user guides at all-guides.com … after having switched off the cooking zones, no h for residual warmth is indicated in the display. Check whether – the cooking zone was only briefly used and therefore did not become hot enough.
  • Page 28: Installation Instructions

    All manuals and user guides at all-guides.com Installation Instructions Safety instructions The laws, ordinances, directives and standards in force in the country of use are to be followed (safety regulations, proper recycling in accord- ance with the regulations, etc.) Installation may only be carried out by a qualified electrician. The minimum distances to other appliances are to be observed.
  • Page 29 All manuals and user guides at all-guides.com • In order to facilitate access if servicing is required, there must be a space the size of the cut-out section in the worktop and 150mm high under the hob. Anything installed in this area, e.g. anti-shock protec- tion, must be easily removable.
  • Page 30: Built-In Installation

    All manuals and user guides at all-guides.com Built-in installation • Clean the rabbet in the work surface. • Stick the one-sided self-adhesive sealing tape supplied onto the up- per surface of the rabbet along the edges of the cut-out section. –...
  • Page 31: Service

    All manuals and user guides at all-guides.com Service In the event of technical faults, please first check whether you can remedy the problem yourself with the help of the operating instruc- tions (section “What to do if…”). If you were not able to remedy the problem yourself, please contact the Customer Care Department or one of our service partners.
  • Page 32 All manuals and user guides at all-guides.com Chère cliente, cher client, Veuillez lire attentivement la notice d’utilisation dans son intéralité et la conserver pour pouvoir le consulter ultérieurement. Veuillez la transmettre à l’éventuel propriétaire ultérieur de l’appareil. Les symboles suivants sont utilisés dans ce document : Consignes de sécurité...
  • Page 33 All manuals and user guides at all-guides.com Sommaire Notice d'utilisation ......... 34 Sécurité...
  • Page 34: Notice D'utilisation

    All manuals and user guides at all-guides.com Notice d'utilisation 1 Sécurité Pour ne pas perdre le bénéfice de la garantie en cas de panne, veuillez observer ces recommandations. Cet appareil est conforme aux directives CE suivantes : – directive 73/23/CEE du 19.02.1973 basse tension –...
  • Page 35: Précautions De Nettoyage

    All manuals and user guides at all-guides.com • En cas de panne de l’appareil ou de dommages à la vitrocéramique (cassures, fêlures ou déchirures), mettre l’appareil hors et débran- chez-le pour éviter un éventuel choc électrique. • Le montage et le branchement de l’appareil sont du ressort exclusif de spécialistes agréés.
  • Page 36: Description De L'appareil

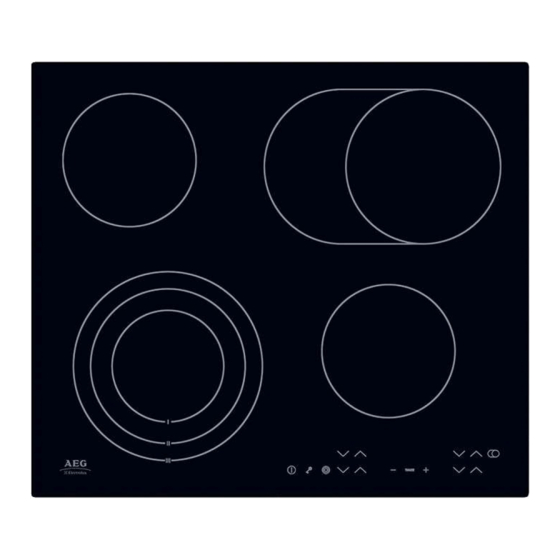
    All manuals and user guides at all-guides.com Description de l'appareil Equipement de la table de cuisson et de commande Zone de cuisson Zone extensible 1200W 2400W Foyer à triple zone Bandeau de commande Zone de cuisson 2300W 1200W Touche triple zone Touche szone extensible Touche “Verrouillage“...
  • Page 37: Affichages Numériques

    All manuals and user guides at all-guides.com Affichages numériques Les quatre affichages numériques dont sont pourvus les zones de cuis- son indiquent : – ¾ Après la mise en marche, – u Lors de la sélection de la fonction de maintien au chaud, –...
  • Page 38: Utilisation De La Table De Cuisson

    All manuals and user guides at all-guides.com Utilisation de la table de cuisson Touches sensitives Pour activer les touches sensitives, appuyez sur la touche désirée jus- qu'à ce que l'indicateur correspondant s'allume ou s'éteigne ou que la fonction désirée soit activée. Assurez-vous lors de cette action que vous ne touchez qu’une seule touche sensitive.
  • Page 39: Mettre L'appareil À L'arrêt

    All manuals and user guides at all-guides.com Mettre l'appareil à l'arrêt Pour mettre l'ensemble de l'appareil hors service, appuyez sur la touche « Marche/Arrêt » I. Appuyez sur la touche « Marche/Arrêt » pendant environ une seconde. Lorsqu'une seule zone ou l'intégralité de la table de cuisson est mis hors service, la présence de chaleur résiduelle est signalée par l'indicateur h dans les écrans d'affichage des zones de cuisson correspondantes.
  • Page 40: Position De Maintien Au Chaud

    All manuals and user guides at all-guides.com Position de maintien au chaud La fonction de maintien au chaud u peut être sélectionnée sur les 4 zones de cuisson. Sélectionnez à l'aide de la touche de sélection la fonction de main- tien au chaud u.
  • Page 41: Mettre En Fonctionnement Et À L'arrêt La Zone De Cuisson Extensible

    All manuals and user guides at all-guides.com 3. Appuyez de nouveau sur la touche « foyer à triple zone » pour activer la zone extérieure. Le voyant de contrôle supérieur s'allume. 4. Pour éteindre la zone extérieure, appuyez sur la touche « foyer à triple zone »...
  • Page 42: Désactiver Les Zones De Cuisson

    All manuals and user guides at all-guides.com Désactiver les zones de cuisson 1. Pour désactiver les zones de cuisson, appuyez simultanément sur les touches de sélection appuyez sur la touche de sélection pour atteindre le niveau O. Indicateur de chaleur restante Après avoir mis à...
  • Page 43: Cuisson Avec La Fonction De Saisie Automatique

    All manuals and user guides at all-guides.com Cuisson avec la fonction de saisie automatique Les zones de cuisson de la table sont réglables sur neuf niveaux de cuis- son et sont équipées d'une fonction de saisie automatique. : – ¿, niveau de cuisson minimum –...
  • Page 44: Cuisson Sans La Fonction De Saisie Automatique

    All manuals and user guides at all-guides.com Cuisson sans la fonction de saisie automatique Pour utiliser une zone de cuisson sans la fonction de saisie automati- que, sélectionnez le niveau de cuisson désiré à l'aide de la touche de sé- lection 1.
  • Page 45: Sécurité Enfants

    All manuals and user guides at all-guides.com Sécurité enfants La sécurité enfants permet d'éviter l'utilisation non autorisée de la ta- ble de cuisson. Activation de la sécurité enfants L'activation de la sécurité enfants suppose que l'appareil soit en fonc- tionnement. En revanche aucune zone de cuisson ne doit fonctionner. 1.
  • Page 46 All manuals and user guides at all-guides.com Brider la sécurité enfants Pour une unique utilisation de l’appareil (jusqu’à la désactivation), il est possible de brider la sécurité enfants. Lors de la prochaine mise en mar- che de l’appareil, la sécurité enfants est de nouveau automatiquement activée.
  • Page 47 All manuals and user guides at all-guides.com Désactiver la sécurité enfants 1. Mettez l'appareil en fonctionnement. Le symbole l s’affiche si la sécurité enfants est active. 2. Appuyez sur la touche pendant environ trois secondes. Un signal sonore confirme la manipulation. 3.
  • Page 48: Minuteur

    All manuals and user guides at all-guides.com Minuteur Le minuteur est doté de deux fonctions : : – une fonction de déconnexion automatique Lorsque la durée de cuisson sélectionnée pour une zone de cuisson est écoulée, celle-ci s’éteint automatiquement. Cette fonction peut s’appliquer simultané- ment à...
  • Page 49 All manuals and user guides at all-guides.com 2. Tandis que le voyant de contrôle clignote rapidement, appuyez sur les touches de réglage Minuteur + et - pour sélectionner la durée après laquelle cette zone de cuisson se déconnectera automatiquement (par exemple 15 minutes)..
  • Page 50: Anticiper La Désactivation De La Déconnexion Automatique

    All manuals and user guides at all-guides.com Anticiper la désactivation de la déconnexion auto- matique Il existe deux manières d’anticiper la déconnexion automatique : En déconnectant simultanément la zone de cuisson et le minuteur 1. A l'aide des touches de réglage du niveau de cuisson , affichez 0 pour la zone de cuisson souhaitée: la zone de cuisson et le minuteur se déconnectent.
  • Page 51: Verrouiller/Déverrouiller Le Bandeau De Commande

    All manuals and user guides at all-guides.com Verrouiller/déverrouiller le bandeau de commande Pour éviter une modification du réglage, on peut, à tout moment au cours du processus de cuisson, verrouiller le bandeau de commande par exemple pour le nettoyer avec un chiffon, en ne touchant pas la tou- che sensitive “Marche/Arrêt”.
  • Page 52: Application, Tableaux, Conseils

    All manuals and user guides at all-guides.com Application, tableaux, conseils Récipients de cuisson • Vous reconnaissez les bonnes batteries de cuisine au fond des casse- roles. Le fond doit être aussi épais et aussi plan que possible. • Faites attention au diamètre du fond du récipient lors de l'achat de nouvelles casseroles et poêles.
  • Page 53: Cuisson Pour Cuire Avec Et Sans La Fonction De Saisie Automatique

    All manuals and user guides at all-guides.com Cuisson pour cuire avec et sans la fonction de saisie automatique La fonction de saisie automatique de la cuisson convient pour: • les aliments froids qui sont chauffés à forte puissance et qui n'ont pas besoin d'être surveillés pendant qu'ils mijotent, •...
  • Page 54: Valeurs Indicatives De Cuisson

    All manuals and user guides at all-guides.com Valeurs indicatives de cuisson Les valeurs indiquées dans le tableau suivant sont indicatives. Les puis- sances recommandées dans ce tableau pour la cuisson dépendent de la nature du récipient et, du type et du volume des aliments à cuire Durée de cuisson en Type de cuis-...
  • Page 55: Nettoyage Et Entretien

    All manuals and user guides at all-guides.com Nettoyage et entretien Attention ! Risque de brûlure dû à la chaleur résiduelle. Laissez refroidir l’appareil. Attention ! Les produits de nettoyage agressifs ou abrasifs endomma- gent l’appareil. Nettoyez l’appareil avec de l’eau et de la lessive. Attention ! Les restes de produits de nettoyage endommagent l’appa- reil.
  • Page 56: Que Faire Si

    All manuals and user guides at all-guides.com Même s’il n’est plus possible de faire disparaître les égratignures ou les taches sombres sur la vitrocéramique, cela n’a aucune influence sur le fonctionnement de l’appareil. Que faire si … En cas d'anomalie de fonctionnement En cas de dysfonctionnement, il se peut que l'anomalie constatée ne soit pas grave et que vous puissiez y remédier vous-même à...
  • Page 57 All manuals and user guides at all-guides.com ... l’indicateur de chaleur résiduelle retombe soudainement à h Vérifier si – la touche Marche/Arrêt n’a pas été actionnée par mégarde. – les zones de commande ne sont pas partiellement recouvertes par un chiffon humide, par du liquide ou par autre chose.
  • Page 58: Protection De L'environnement

    All manuals and user guides at all-guides.com Protection de l’environnement Elimination du matériel d’emballage Les matériaux d’emballage sont écologiques et recyclables. Les matières plastiques portent un signe distinctif, par ex. >PE<, >PS<, etc. Eliminez les matériaux d’emballage en fonction de leur signe distinctif dans les containeurs prévus à...
  • Page 59: Instructions D'installation

    All manuals and user guides at all-guides.com Instructions d'installation Sécurité L’utilisateur est tenu de respecter la législation, la réglementation, les lignes directrices et les normes en vigueur dans son pays de résidence (dispositions relatives à la sécurité, recylage conforme et réglementaire, etc.).
  • Page 60: Montage Intégré

    All manuals and user guides at all-guides.com • Pour faciliter l’accès à l’appareil en cas d’intervention, il est impératif de laisser un espace libre sous le plan de travail équivalent à la di- mension de la table de cuisson et d’une hauteur de 150mm. Faites en sorte que tous les éléments situés dans cet espace, comme par ex.
  • Page 61: Service Après-Vente

    All manuals and user guides at all-guides.com Service après-vente En cas d’anomalie de fonctionnemet vérifiez d’abord si vous ne pouvez pas remédier vous-même au dysfonctionnement à l’aide de la notice d’utilisation (chapitre “Que faire, si...“). Si vous ne parvenez pas à remédier au dysfonctionnement, veuillez contacter votre vendeur ou à...
  • Page 62 All manuals and user guides at all-guides.com Geachte klant, Lees deze gebruiksaanwijzing zorgvuldig door en bewaar de gebruiks- aanwijzing zodat deze later kan worden geraadpleegd. Geef deze gebruiksaanwijzing door aan een eventuele volgende eige- naar van het apparaat. De volgende symbolen worden in de tekst gebruikt: Veiligheidsvoorschriften Waarschuwing! Aanwijzingen ten behoeve van uw persoonlijke veilig- heid.
  • Page 63 All manuals and user guides at all-guides.com Inhoud Gebruiksaanwijzing ........64 Veiligheidsvoorschriften .
  • Page 64: Gebruiksaanwijzing

    All manuals and user guides at all-guides.com Gebruiksaanwijzing 1 Veiligheidsvoorschriften Neem deze aanwijzingen in acht, omdat anders bij eventuele schade het recht op garantie vervalt. Dit apparaat is in overeenstemming met de volgende EG-richtlijnen: – 73/23/EEG van 19.02.1973 Laagspanningsrichtlijn – 89/336/EEG van 03.05.1989 EMC-richtlijn inclusief aangepaste richt- lijn 92/31/EEG –...
  • Page 65: Veiligheid Tijdens Het Gebruik

    All manuals and user guides at all-guides.com Veiligheid tijdens het gebruik • Verwijder stickers en folies van het glaskeramiek. • Wanneer u onoplettend bent tijdens het werken met het apparaat, bestaat er risico op verbranding. • De snoeren van elektrische apparaten mogen niet tegen het hete ap- paraatoppervlak resp.
  • Page 66: Beschrijving Van Het Apparaat

    All manuals and user guides at all-guides.com Beschrijving van het apparaat Uitvoering kookplaat en bedieningsveld Eenkrings-kookzone Braadzone 1200W 2400W Driekrings-kookzone Bedieningsveld Eenkrings-kookzone 2300W 1200W Sensorveld driekring Sensorveld braadzone Sensorveld Controlelampjes driekring Controlelampje braadzone “vergrendelen“ Timer met Sensorveld Kookstandselectie Kookstandselectie controle-indicaties “aan/uit”...
  • Page 67: Digitale Indicaties

    All manuals and user guides at all-guides.com Digitale indicaties De vier indicatievelden die aan de vier kookzones toebehoren, geven het volgende aan: – ¾ na het inschakelen, – u bij het kiezen van de warmhoudstand, – ¿ tot Ç, afhankelijk van de gekozen kookstand, –...
  • Page 68: Bediening Van De Kookplaat

    All manuals and user guides at all-guides.com Bediening van de kookplaat Touch-control-sensorvelden Om de touch-control-sensorvelden te bedienen, drukt u met de punt van uw vingertop op het gewenste veld tot de betreffende indicaties gaan branden of uitgaan of tot de gewenste functie wordt uitgevoerd. Raak niet meer dan één sensorveld tegelijk aan bij het bedienen.
  • Page 69: Apparaat Uitschakelen

    All manuals and user guides at all-guides.com Apparaat uitschakelen U kunt het complete apparaat uitschakelen door op het sensorveld “aan/uit” I te drukken. Raak het sensorveld “aan/uit” ca. één seconde aan. Na het uitschakelen van een enkele kookzone of van de gehele kook- plaat wordt de aanwezige restwarmte met h (zoals in “heet”) in de di- gitale indicaties van de betreffende kookzones aangegeven.
  • Page 70: Driekrings-Kookzone In- En Uitschakelen

    All manuals and user guides at all-guides.com Driekrings-kookzone in- en uitschakelen Afhankelijk van de afmetingen van een pan kan bij de driekrings-kook- zone met het sensorveld “driekrings-zone” naast de kleinere kookzone ook nog de bijbehorende grotere verwarmingskring worden ingescha- keld. U kunt deze grotere verwarmingskringen alleen inschakelen wanneer u voor de kleinere verwarmingskring al een kookstand hebt ingesteld.
  • Page 71: Braadzone In- En Uitschakelen

    All manuals and user guides at all-guides.com 3. Door het sensorveld “driekring” opnieuw aan te raken, wordt de buiten- ste verwarmingskring geactiveerd. Het bovenste controlelampje gaat aan. 4. Om de buitenste verwarmingskring uit te schakelen, raakt u het sensor- veld “driekring” aan. De bijbehorende buitenste verwarmingskring wordt uitgeschakeld.
  • Page 72: Kookzone Uitschakelen

    All manuals and user guides at all-guides.com Kookzone uitschakelen 1. Om de kookzone uit te schakelen, raakt u de sensorvelden kookstandse- lectie tegelijk aan. U kunt de kookzone ook met sensorveld kookstandselectie terugzetten op nul. Restwarmte-indicatie Na het uitschakelen van een kookzone of van de gehele kookplaat wordt nog aanwezige restwarmte met h (van ”heet”) in de digitale indicaties van de betreffende kookzones aangegeven.
  • Page 73: Koken Met De Kookautomatiek

    All manuals and user guides at all-guides.com Koken met de kookautomatiek Alle vier kookzones van de kookplaat hebben negen kookstanden en zijn uitgerust met een kookautomatiek: – ¿, laagste kookstand – Ç, hoogste kookstand – a, aan de kook brengen. Wanneer u de door u gewenste kookstand met het sensorveld kook- standselectie kiest, werkt de kookzone gedurende een bepaalde tijd...
  • Page 74: Koken Zonder Kookautomatiek

    All manuals and user guides at all-guides.com Koken zonder kookautomatiek Wanneer u de kookzone wilt gebruiken zonder kookautomatiek, kiest u de gewenste kookstand met het sensorveld kookstandselectie 1. Raak het sensorveld kookstandselectie aan om de gewenste kook- stand Ç tot ¿ in te stellen. U kunt de kookstand met de sensorvelden kookstandselectie op elk moment wijzigen.
  • Page 75: Kinderbeveiliging

    All manuals and user guides at all-guides.com Kinderbeveiliging Met de kinderbeveiliging kunt u de kookplaat tegen ongewenst gebruik beveiligen. Kinderbeveiliging inschakelen Om de kinderbeveiliging in te schakelen moet het apparaat zijn inge- schakeld. Er mag echter geen kookzone zijn ingeschakeld. 1.
  • Page 76 All manuals and user guides at all-guides.com Kinderbeveiliging tijdelijk uitschakelen U kunt de kinderbeveiliging voor éénmalig gebruik van het apparaat (tot u het apparaat uitschakelt) tijdelijk uitschakelen. Wanneer u het apparaat weer inschakelt wordt de kinderbeveiliging weer automatisch geactiveerd. 1. Schakel het apparaat in. Wanneer de kinderbeveiliging is geactiveerd, wordt l aangegeven.
  • Page 77 All manuals and user guides at all-guides.com Kinderbeveiliging uitschakelen 1. Schakel het apparaat in. Wanneer de kinderbeveiliging is geactiveerd, wordt l aangegeven. 2. Raak het sensorveld ca. drie seconden aan. Er klinkt een signaaltoon ter bevestiging. 3. Raak een willekeurig sensorveld kookstandselectie aan.
  • Page 78: Timer

    All manuals and user guides at all-guides.com Timer U kunt de timer op twee manieren gebruiken: – als automatische uitschakeling. U stelt voor een kookzone een kooktijd in. Na het verstrijken van de kooktijd wordt de kookzone au- tomatisch uitgeschakeld. U kunt deze functie voor meerdere kookzo- nes tegelijk gebruiken.
  • Page 79 All manuals and user guides at all-guides.com 2. Stel de gewenste tijdsduur tot de automatische uitschakeling (bijvoor- beeld 15 minuten) voor deze kookzone in met de sensorvelden timer- instelling + of - terwijl het controlelampje snel knippert. Na enkele seconden wordt de automatische uitschakeling geactiveerd. Het controlelampje knippert nu langzamer en de resterende kooktijd wordt tijdens het verloop in het display aangegeven.
  • Page 80 All manuals and user guides at all-guides.com Automatische uitschakeling voortijdig beëindigen U kunt de automatische uitschakeling op twee manieren voortijdig uit- schakelen: Kookzone en timer gelijktijdig uitschakelen 1. Stel de gewenste kookzone met het sensorveld kookstandselectie op nul: Kookzone en timer worden uitgeschakeld. Timer uitschakelen - kookzone blijft actief 1.
  • Page 81: Bedieningspaneel Vergrendelen/Ontgrendelen

    All manuals and user guides at all-guides.com Bedieningspaneel vergrendelen/ontgrendelen U kunt het bedieningspaneel, met uitzondering van het sensorveld AAN / UIT, op elk willekeurig moment van het kookproces vergrendelen. Hiermee voorkomt u dat de instellingen worden gewijzigd als u bijvoor- beeld met een doek over het bedieningspaneel wrijft.
  • Page 82: Toepassingen, Tabellen, Tips

    All manuals and user guides at all-guides.com Toepassingen, tabellen, tips Pannen • Goede pannen herkent u aan de bodem. De bodem moet zo dik en vlak mogelijk zijn. • Let bij het kopen van pannen op de diameter van de bodem. Fabri- kanten geven vaak de diameter van de bovenste rand van de pan aan.
  • Page 83: Tips Voor Het Koken Met En Zonder Kookautomatiek

    All manuals and user guides at all-guides.com Tips voor het koken met en zonder kookautomatiek De automatische aankookfunctie is geschikt voor: • gerechten die koud worden opgezet, op hoog vermogen verhit en op de doorkookstand niet voortdurend in de gaten hoeven te worden gehouden.
  • Page 84: Richttijden Bij Het Koken

    All manuals and user guides at all-guides.com Richttijden bij het koken De gegevens in de volgende tabel dienen slechts als richtlijnen. De kwa- liteit van de pannen en de soort en hoeveelheid voedingsmiddelen be- palen welke schakelstand u moet gebruiken. Tijd die nodig is voor het aan Schakel-...
  • Page 85: Reiniging En Onderhoud

    All manuals and user guides at all-guides.com Aanwijzing met betrekking tot acrylamide Volgens de laatste wetenschappelijke inzichten kan een intensieve brui- ning van levensmiddelen, met name bij zetmeelhoudende producten, een gevaar voor de gezondheid door acrylamide veroorzaken. Om die reden adviseren wij levensmiddelen zoveel mogelijk bij lage temperatu- ren te bereiden en de gerechten niet te veel te bruinen.
  • Page 86 All manuals and user guides at all-guides.com Verwijder verontreinigingen 1. Plaats een glasschraper schuin op het glaskeramische vlak. 2. Verwijder verontreinigingen door de schraper over het oppervlak te la- ten glijden. 3. Maak het apparaat schoon met een vochtige doek en een klein beetje handafwasmiddel.
  • Page 87: Wat Is Er Aan De Hand Als

    All manuals and user guides at all-guides.com Wat is er aan de hand als … Hulp bij storingen Misschien gaat het om een kleine storing die u aan de hand van de vol- gende aanwijzingen zelf kunt oplossen. Voer zelf verder geen werk- zaamheden uit, als onderstaande informatie u niet verder helpt.
  • Page 88 All manuals and user guides at all-guides.com … na het uitschakelen van de kookzones geen h voor restwarmte in de indicatie verschijnt? Controleer of – de kookzone alleen kort in gebruik is geweest en daarom nog niet heet genoeg is. Als de kookzone heet is, neem dan contact op met de service-afdeling.
  • Page 89: Afvalverwerking

    All manuals and user guides at all-guides.com Afvalverwerking Verpakkingsmateriaal De verpakkingsmaterialen zijn niet schadelijk voor het milieu en her- bruikbaar. De kunststoffen hebben de volgende aanduidingen, bijv. >PE<, >PS<, enz. Verwijder de verpakkingsmaterialen in overeenstem- ming met de aanduiding bij de gemeentelijke inzamelplaatsen in de daarvoor bestemde containers.
  • Page 90: Montageaanwijzing

    All manuals and user guides at all-guides.com Montageaanwijzing Veiligheidsvoorschriften De in het land van gebruik geldende wetten, verordeningen, richtlijnen en normen moeten in acht worden genomen (veiligheidsvoorschriften, vakkundige recycling volgens de voorschriften, enzovoort). De montage mag alleen worden uitgevoerd door een vakman. De minimale afstanden tot andere apparaten moeten worden aange- houden.
  • Page 91: Montage Geïntegreerd

    All manuals and user guides at all-guides.com • Voor de toegankelijkheid tijdens de servicebeurt is onder de kookeen- heid een vrije ruimte met een afmeting gelijk aan de uitsnijding van het werkvlak en een hoogte van 150mm vereist. Inbouwdelen die zich in dit gebied bevinden, zoals bijv.
  • Page 92: Service

    All manuals and user guides at all-guides.com Service Controleer bij technische storingen eerst of u met behulp van de ge- bruiksaanwijzing (hoofdstuk „Wat te moet doen als…“) het probleem zelf kunt oplossen. Wanneer u het probleem niet kunt oplossen, neemt u contact op met onze service-afdeling.
  • Page 93 All manuals and user guides at all-guides.com Assembly / Montage...
  • Page 94 All manuals and user guides at all-guides.com...
  • Page 95 All manuals and user guides at all-guides.com Rating Plate / Plaque signalétique / Typeplaatje...
  • Page 96 USD 14 billion in more than 150 countries around the world. AEG Hausgeräte GmbH Postfach 1036 D-90327 Nürnberg http://www.aeg.hausgeraete.de © Copyright by AEG Subject to change without notice Sous réserve de modifications 822 925 170-A-220904-01 Wijzigingen voorbehouden...

Table des Matières