Télécharger Imprimer la page

Publicité

Les langues disponibles
  • FR

Les langues disponibles

Liens rapides

All manuals and user guides at all-guides.com
®
D27105
1

Publicité

loading

Sommaire des Matières pour DeWalt D27105

  • Page 1 All manuals and user guides at all-guides.com ® D27105...
  • Page 2 All manuals and user guides at all-guides.com Dansk Deutsch English Español Français...
  • Page 3 All manuals and user guides at all-guides.com 13 17...
  • Page 4 All manuals and user guides at all-guides.com 35 36 38 37...
  • Page 5 All manuals and user guides at all-guides.com...
  • Page 6 All manuals and user guides at all-guides.com...
  • Page 7 All manuals and user guides at all-guides.com 68 67 77 78...
  • Page 8 All manuals and user guides at all-guides.com...
  • Page 9 All manuals and user guides at all-guides.com 102 101 3-8mm...
  • Page 10 All manuals and user guides at all-guides.com...
  • Page 11 All manuals and user guides at all-guides.com...
  • Page 12 All manuals and user guides at all-guides.com...
  • Page 13 All manuals and user guides at all-guides.com 90° 45° 0°-45°...
  • Page 14 All manuals and user guides at all-guides.com...
  • Page 15 All manuals and user guides at all-guides.com D A N S K FLIP-OVER-SAV D27105 EU-overensstemmelseserklæring D27105 WALT erklærer, at disse værktøjer er konstrueret i henhold til Tekniske data EU-direktiverne: 98/37/EEC, 89/336/EEC, 73/23/EEC, EN 61029-1, D27105 EN 61029-2-11, EN 55014, EN 55014-2, EN 61000-3-2 & EN 61000-3-3.
  • Page 16 All manuals and user guides at all-guides.com D A N S K Sikkerhedsanvisninger 14 Kontrollér værktøjet for beskadigede dele Når man anvender faststående elværktøj skal de lokale Kontrollér omhyggeligt værktøjet og netkablet for beskadigelser, før det sikkerhedsbestemmelser altid overholdes for at nedsætte riskoen for tages i brug.
  • Page 17 • Brug aldrig saven hvis ikke de øverste og underste klingebeskyttere er på plads. Din D27105 flip-over savmaskine er konstrueret til at blive brugt som • Sørg for at holde hænderne væk fra savklingen. geringssav eller bænksav, der kan udføre fire hovedsavfunktioner, •...
  • Page 18 All manuals and user guides at all-guides.com D A N S K 15 Ben Udpakning af maskinen og dens dele 16 Sokkel 17 Smiglåsehåndtag Når maskinen flyttes, skal der altid være flere om det. Maskinen er for tung at håndtere for én person. 17 Smiglåsehåndtag •...
  • Page 19 All manuals and user guides at all-guides.com D A N S K Samling til geringssavsmode Sørg for at holde skærmbeslaget nede, og spænd skruerne på skærmbeslaget godt til, når klingen er monteret. Montering af underbordets skærm (fig. E) Justeringer i geringssavsmode Underbordets beskyttelsesskærm (63) monteres på...
  • Page 20 All manuals and user guides at all-guides.com D A N S K Styresporet (92) kan blive tilstoppet af savsmuld. Brug en pind Den rigtige stilling er opnået, når spalteknivens top er højst 2 mm under eller lavtryksluft til at rense styresporet med. klingens højeste tand, og kroppens radius er maks.
  • Page 21 All manuals and user guides at all-guides.com D A N S K Montering og indstilling af geringsanslaget (fig. Q1 - Q4) Pladen fungerer også som en nødstopsknap, der er “let at finde”, da et Geringsanslaget (D271052) kan leveres som tilbehør. Geringsanslaget (41) tryk på...
  • Page 22 All manuals and user guides at all-guides.com D A N S K • Løsn anslagets klemmeknap (89), og skub den øverste del af Udvendigt hjørne sideanslaget så langt mod venstre som muligt. - Venstre side • Løsn smigklemmeknappen (17), og indstil smigvinklen efter ønske. •...
  • Page 23 All manuals and user guides at all-guides.com D A N S K • Montér forlængerbordet på højre side af maskinen, for at Skub ikke på den frie eller afskårne del af arbejdsemnet og hold ikke fast i dette. afstandsskalaen fortsætter på begge borde. Brug altid en skubbepind ved kløvning af små...
  • Page 24 All manuals and user guides at all-guides.com D A N S K • Sæt holdepladen på plads, og spænd skruerne. GARANTI • Drej maskinen i geringssavsmode. Check den kraft der skal til for at skære i gering. Gentag ovenstående procedure, hvis den kraft, der er •...
  • Page 25 All manuals and user guides at all-guides.com D E U T S C H TISCH-, KAPP- UND GEHRUNGSSÄGE D27105 EG-Konformitätserklärung D27105 WALT erklärt hiermit, daß diese Elektrowerkzeuge konstruiert wurden gemäß: 98/37/EEC, 89/336/EEC, 73/23/EEC, EN 61029-1, EN 61029-2-11, EN 55014, EN 55014-2, EN 61000-3-2 & EN 61000-3-3.
  • Page 26 All manuals and user guides at all-guides.com D E U T S C H Sicherheitshinweise Mit dem richtigen Werkzeug erzielen Sie eine optimale Qualität und Beim Gebrauch von stationären Elektrowerkzeugen sind zum Schutz gewährleisten Ihre persönliche Sicherheit. Überlasten Sie das Werk- gegen elektrischen Schlag, Verletzungs- und Feuergefahr die zeug nicht.
  • Page 27 All manuals and user guides at all-guides.com D E U T S C H • Vergewissern Sie sich, daß das Sägeblatt sich in die richtige Richtung • Lassen Sie den Schiebestock immer in seiner Lage, wenn dieser nicht dreht. Achten Sie darauf, daß das Sägeblatt scharf ist. benötigt wird.
  • Page 28 All manuals and user guides at all-guides.com D E U T S C H Gerätebeschreibung (Abb. A1 - A10) Ihre D27105 Tisch-, Kapp- und Gehrungssäge wurde für den Einsatz als 40 Rollentisch (DE3497) Gehrungssäge oder als Tischkreissäge entwickelt. Sie erlaubt das leichte, genaue und sichere Durchführen der vier Grundsägeschnitte: Längs-...
  • Page 29 All manuals and user guides at all-guides.com D E U T S C H • Bringen Sie die Standbeine wie unter beschrieben an. Seien Sie sich • Schieben Sie den Freigabehebel (69) nach hinten, während der Säge- darüber im Klaren, daß die vorderen und die hinteren Standbeine kopf unten gehalten wird, bis die federunterstützte Lagereinheit (70) jeweils unterschiedliche Längen haben.
  • Page 30 All manuals and user guides at all-guides.com D E U T S C H • Schwenken Sie den Drehtisch, bis die Verriegelung ihn in der Die Führungsnut (92) kann mit Sägemehl verstopfen. Verwen- den Sie ein Stäbchen oder Druckluft, um die Führungsnut zu 0°-Gehrungsposition hält.
  • Page 31 All manuals and user guides at all-guides.com D E U T S C H Spaltkeileinstellung (Abb. N1 & N2) • Schieben Sie das Anschlagsprofil (113) aus dem Spannhalter heraus. • Drehen Sie den Spannhalter (114) um und bringen Sie die Sicherungs- Müssen Einstellungen am Spaltkeil (20) vorgenommen werden, knöpfe wieder an.
  • Page 32 All manuals and user guides at all-guides.com D E U T S C H • Drücken Sie die Säge beim Arbeiten nur leicht an und üben Sie - Durch Zusammendrücken des Schutzvorrichtungs-Freigabehebels wird nie seitlichen Druck auf das Sägeblatt aus. der Sägekopf entriegelt.
  • Page 33 All manuals and user guides at all-guides.com D E U T S C H Außenwinkel Falls der Schnittwinkel für jeden Schnitt unterschiedlich ist, vergewissern Sie sich, daß der Neigungsfeststellknopf und der - links Gehrungsfeststellknopf fest angezogen sind. Diese Knöpfe •Legen Sie die Unterseite des Werkstückes an den Anschlag. müssen nach jeder Änderung der Neigung oder Gehrung •Sichern Sie die rechte Schnittseite des Werkstückes.
  • Page 34 All manuals and user guides at all-guides.com D E U T S C H • Denken Sie daran - verwenden Sie in Sägeblattnähe immer einen • Verwenden Sie die neigbare Werkstückauflage (34) für das Quer- Schiebestock (23). schneiden von 210 mm breiten Brettern (15 mm stark). •...
  • Page 35 All manuals and user guides at all-guides.com D E U T S C H • Drehen Sie die Einstellnocke mit einer Spitzzange. GARANTIE • Halten Sie die Einstellnocke mit der Zange fest und ziehen Sie die Schraube an. • 30 TAGE GELD ZURÜCK GARANTIE • •...
  • Page 36 All manuals and user guides at all-guides.com E N G L I S H FLIP-OVER SAW D27105 EC-Declaration of conformity D27105 WALT declares that these power tools have been designed in Technical data compliance with: 98/37/EEC, 89/336/EEC, 73/23/EEC, EN 61029-1, D27105 EN 61029-2-11, EN 55014, EN 55014-2, EN 61000-3-2 &...
  • Page 37 All manuals and user guides at all-guides.com E N G L I S H Safety instructions Ensure that the tool will operate properly and perform its intended When using stationary power tools, always observe the safety function. Do not use the tool if any part is damaged or defective. regulations applicable in your country to reduce the risk of fire, Do not use the tool if the switch does not turn it on and off.
  • Page 38 • Do not apply lubricants to the blade when it is running. • Do not reach around behind the saw blade. Your D27105 flip-over sawing machine has been designed to operate as a • Always keep the push stick in its place when not in use.
  • Page 39 All manuals and user guides at all-guides.com E N G L I S H 16 Foot Voltage Amperes Cable rating (Amperes) 17 Bevel clamp handle 0 - 2.0 2.1 - 3.4 3.5 - 5.0 17 Bevel clamp handle 5.1 - 7.0 18 Height adjuster 7.1 - 12.0 19 Saw bench table...
  • Page 40 All manuals and user guides at all-guides.com E N G L I S H Folding the legs (fig. C3) • Install the saw blade (76) onto the shoulder (77) provided on the inside The legs can be folded into the base to make the machine suitable for use arbor collar (78), making sure that the teeth at the bottom edge of the on a workbench.
  • Page 41 All manuals and user guides at all-guides.com E N G L I S H • If the bevel pointer (88) does not indicate zero on the bevel scale (89), The blade should not foul the lower blade guard. loosen the screw (90) that secures the pointer and move the pointer as necessary (fig.
  • Page 42 All manuals and user guides at all-guides.com E N G L I S H The fence is reversible: the workpiece can be guided along the 75 mm or Switching on and off (fig. R1 - R3) along the 11 mm face to allow the use of a push stick when ripping thin This machine has two independent switching systems.
  • Page 43 All manuals and user guides at all-guides.com E N G L I S H Vertical mitre cross-cut (fig. S2) • Loosen the mitre knob (79) and depress the mitre latch (80). Move the SQUARE BOX rotating table left or right to the required angle. •...
  • Page 44 All manuals and user guides at all-guides.com E N G L I S H Optional attachments - Right side • Bottom of the moulding against the fence. • Mitre left. • Save the left side of the cut. Prior to assembling any accessories always unplug the machine. Outside corner Dust extraction kit (fig.
  • Page 45 All manuals and user guides at all-guides.com E N G L I S H • Lift the machine by the legs. GUARANTEE When carrying the machine, always seek assistance. • 30 DAY NO RISK SATISFACTION GUARANTEE • The machine is too heavy for one person to handle. If you are not completely satisfied with the performance of your WALT machine, simply return it within 30 days, complete as Maintenance...
  • Page 46 D27105 y EN 61000-3-3. Voltaje V 230 Potencia absorbida W 2.000 Para información más detallada, contacte a DeWALT, véase abajo o Consumo de potencia W 1.700 consulte el dorso de este manual. Velocidad máxima de la hoja 4.100 Diámetro de la hoja mm 300 - 305 Nivel de presión acústica de acuerdo con las normas 86/188/CEE...
  • Page 47 All manuals and user guides at all-guides.com E S P A Ñ O L Instrucciones de seguridad Atención! El uso de otros accesorios, adaptadores, o la propia Al utilizar herramientas eléctricas, observe las reglas de seguridad en utilización de la herramienta en cualquier forma que no sea la vigor en su país, a fin de reducir el riesgo de descarga eléctrica, de recomendada en este manual de instrucciones puede presentar riesgo lesiones y de incendio.
  • Page 48 • Mantenga siempre la varilla de empuje en su posición original cuando no esté en uso. La sierra D27105 de doble modalidad ha sido diseñada para utilizarse • No se sitúe encima de la unidad. como ingletadora o sierra de banco y para realizar las cuatro principales •...
  • Page 49 All manuals and user guides at all-guides.com E S P A Ñ O L Modalidad de sierra de banco Girada sobre su eje central, la sierra puede utilizarse para realizar cortes 43 Mesa corredera (D271055) longitudinales normales y serrar piezas anchas que se empujan Varillas empujadoras (DE3454) (no se muestran) manualmente contra la hoja.
  • Page 50 All manuals and user guides at all-guides.com E S P A Ñ O L • Pase un perno de rosca (57) desde el exterior a través de los orificios • Apriete la palanca de desbloqueo del cabezal (9) para soltar el en el bastidor y las patas.
  • Page 51 All manuals and user guides at all-guides.com E S P A Ñ O L Ajuste del indicador de inglete (fig. H1 & H4) • Afloje el pomo de sujeción de bisel (17) (fig. I1) y, teniendo el tope de • Afloje el pomo de ingletes (79) y apriete el enganche de ingletes (80) posición de bisel intermedio (93) dado la vuelta, mueva el brazo de la para soltar la mesa giratoria (5) (fig.
  • Page 52 All manuals and user guides at all-guides.com E S P A Ñ O L • Baje el protector sobre el abridor (20), asegurándose que el eje del • Coloque una escuadra (82) contra la guía (41) y la hoja (76). perno entre en la hendidura.
  • Page 53 All manuals and user guides at all-guides.com E S P A Ñ O L Esta placa también sirve de botón de parada de emergencia «fácil de Corte transversal oblicuo (fig. S3) localizar», ya que la presión sobre la parte delantera de la placa Los ángulos oblicuos se pueden establecer desde 2°...
  • Page 54 All manuals and user guides at all-guides.com E S P A Ñ O L Ángulo interno • Ajuste la guía paralela a la distancia necesaria. - Lado izquierdo • Sujete la pieza de trabajo sobre la mesa y contra la guía. Mantenga la •...
  • Page 55 All manuals and user guides at all-guides.com E S P A Ñ O L Conexión - modalidad de sierra de banco (fig. W2) • Proceda como para la modalidad de ingletadora, conecte únicamente la manguera desde el protector de debajo de la mesa al protector de la Lubricación hoja de sierra (21).
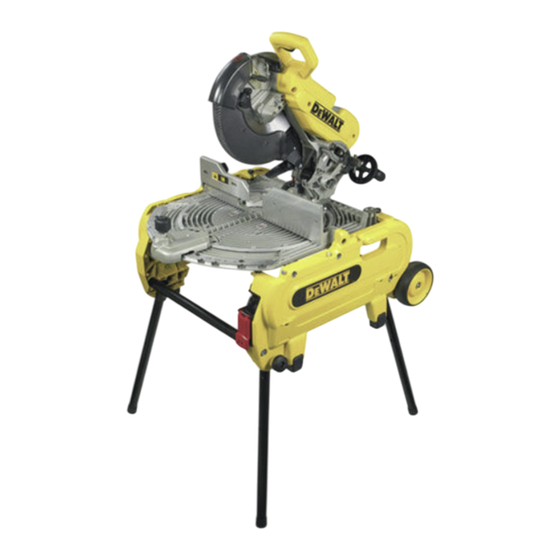
  • Page 56 All manuals and user guides at all-guides.com F R A N Ç A I S SCIE CULBUTABLE D27105 Déclaration CE de conformité D27105 WALT déclare que ces outils ont été mis au point en conformité avec Caractéristiques techniques les normes 98/37/CEE, 89/336/CEE, 73/23/CEE, EN 61029-1, D27105 EN 61029-2-11, EN 55014, EN 55014-2, EN 61000-3-2 &...
  • Page 57 All manuals and user guides at all-guides.com F R A N Ç A I S Consignes de sécurité Attention ! L’utilisation d’accessoires ou la réalisation de travaux Afin de réduire le risque d’électrocution, de blessure et d’incendie autres que ceux recommandés dans ce manuel pourrait entraîner un lors de l’utilisation d’outils électriques immobiles, respectez toujours risque de blessure corporelle.
  • Page 58 • Pour le transport, assurez-vous que la partie supérieure de la lame de scie est recouverte, par exemple par le protecteur. Votre scie culbutable D27105 a été conçue pour fonctionner comme une • Ne prenez pas la machine par le protecteur pour la déplacer ou pour la scie à...
  • Page 59 All manuals and user guides at all-guides.com F R A N Ç A I S Mode d’établi de sciage Pivotée sur son axe central, la scie est utilisée pour exécuter des travaux 43 Table coulissante (D271055) de coupe en long standard et pour scier de larges pièces introduites Poussoirs à...
  • Page 60 All manuals and user guides at all-guides.com F R A N Ç A I S • Placez une patte de fixation (58) et une vis d’arrêt (59) sur les vis à bois. • Enfoncez le levier de déverrouillage de la tête (9) pour relâcher le carter •...
  • Page 61 All manuals and user guides at all-guides.com F R A N Ç A I S Réglage de l’index d’onglet (fig. H1 & H4) • Desserrez la molette de verrouillage d’inclinaison (17) (fig. I1) et, avec la • Desserrez le bouton d’onglet (79) et enfoncez le verrou d’onglet (5) butée de position d’inclinaison intermédiaire (93) repositionnée, pour libérer la table rotative (5) (fig.
  • Page 62 All manuals and user guides at all-guides.com F R A N Ç A I S • Desserrez l’écrou papillon (105). • Desserrez le bouton de verrouillage (115) et écartez le guide de chaîne • Tout en maintenant le carter de protection vertical, alignez l’encoche (116) (fig.
  • Page 63 All manuals and user guides at all-guides.com F R A N Ç A I S - protection contre la surcharge du moteur : en cas de surcharge du Pour assembler par onglet l’extrémité d’une pièce de bois en effectuant une petite découpe, positionner la pièce de telle moteur, son alimentation électrique est coupée.
  • Page 64 All manuals and user guides at all-guides.com F R A N Ç A I S Coin intérieur - Côté gauche • Haut du moulurage contre le guide. BOITE • Onglet à droite. CARREE • Conservez le côté gauche de la coupe. - Côté...
  • Page 65 All manuals and user guides at all-guides.com F R A N Ç A I S Coupe transversale chanfreinée Carter de protection d’établi de sciage • Ajustez l’angle de biseautage souhaité. Ce protecteur est livré de série dans les pays où un protecteur de type •...
  • Page 66 All manuals and user guides at all-guides.com F R A N Ç A I S GARANTIE • 30 JOURS D’ENGAGEMENT SATISFACTION • Si, pour quelque raison que ce soit, votre machine D WALT ne vous donne pas entière satisfaction, il suffit de la retourner avec tous ses accessoires dans les 30 jours suivant son achat à...