DeWalt D24000 Guide D'utilisation

DeWalt D24000 Guide D'utilisation

Masquer les pouces Voir aussi pour D24000:
Table des Matières

Publicité

Les langues disponibles

Les langues disponibles

Liens rapides

IF YOU SHOULD EXPERIENCE A PROBLEM WITH YOUR DEWALT PURCHASE,
Before returning this product call
CALL 1-800-4 DEWALT
IN MOST CASES, A D
WALT REPRESENTATIVE CAN RESOLVE YOUR
E
1-800-4-D
WALT
PROBLEM OVER THE PHONE.
E
IF YOU HAVE A SUGGESTION OR COMMENT, GIVE US A CALL.
YOUR FEEDBACK IS VITAL TO THE SUCCESS OF D
WALT'S QUALITY
E
IMPROVEMENT PROGRAM.
Questions? See us on the World Wide Web at www.dewalt.com
INSTRUCTION MANUAL
See the Quick Start Guide
GUIDE D'UTILISATION
on page 4!
MANUAL DE INSTRUCCIONES
Se reporter en page 17
du Guide de démarrage !
INSTRUCTIVO DE OPERACIÓN, CENTROS DE SERVICIO
¡Vea la Guía de referencia rápida
Y PÓLIZA DE GARANTÍA. ADVERTENCIA: LÉASE ESTE
en la página 31!
INSTRUCTIVO ANTES DE USAR EL PRODUCTO.
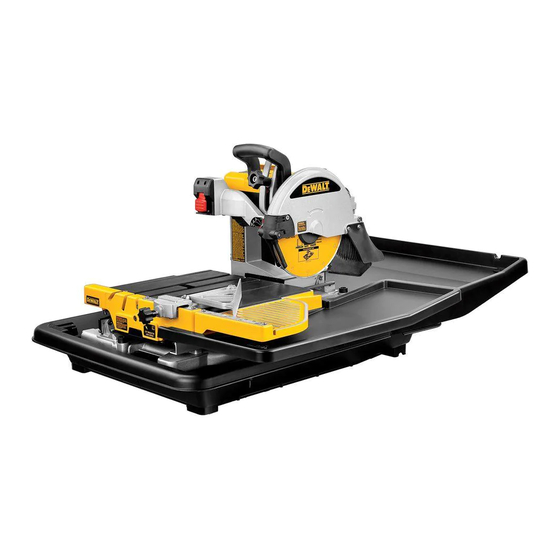
D24000 Wet Tile Saw
Coupe-tuile à l'eau D24000
Sierra de corte húmedo D24000

Publicité

Table des Matières
loading

Sommaire des Matières pour DeWalt D24000

  • Page 1 IF YOU SHOULD EXPERIENCE A PROBLEM WITH YOUR DEWALT PURCHASE, Before returning this product call CALL 1-800-4 DEWALT IN MOST CASES, A D WALT REPRESENTATIVE CAN RESOLVE YOUR 1-800-4-D WALT PROBLEM OVER THE PHONE. IF YOU HAVE A SUGGESTION OR COMMENT, GIVE US A CALL.
  • Page 2 IF YOU HAVE ANY QUESTIONS OR COMMENTS ABOUT THIS OR ANY D WALT TOOL, CALL US TOLL FREE AT: 1-800-4-DEWALT (1-800-433-9258) This product is covered under U.S. Patent No. D486,165 and other patents pending. WALT… BUILT JOBSITE TOUGH WALT high performance industrial tools are made for America’s toughest industrial and construction applications.
  • Page 3: Table Des Matières

    TABLE OF CONTENTS IMPORTANT SAFETY INSTRUCTIONS FOR ALL TOOLS ........2 CLEANING....................10 GROUNDING INSTRUCTIONS ................2 LUBRICATION ....................10 ADDITIONAL SAFETY RULES FOR WET TILE SAWS ........3 REPAIRS ....................10 QUICK START GUIDE ....................4 ACCESSORIES......................10 FEATURES ......................6 WARRANTY ......................10 ASSEMBLY ......................6 TROUBLESHOOTING GUIDE ................11 SPECIFICATIONS ....................7 OPERATION ......................7 TOOL PLACEMENT ..................7...
  • Page 4: Important Safety Instructions For All Tools

    Important Safety Instructions for All Tools 3. Press reset button for use. Do not use if above test fails. CAUTION: WHEN SERVICING USE ONLY IDENTICAL REPLACEMENT PARTS. WARNING: For your own safety, read the instruction manual before Repair or replace damaged cords. Always replace cord with a GFCI cord. operating the wet tile saw.
  • Page 5: Additional Safety Rules For Wet Tile Saws

    • CHECK DAMAGED PARTS. Before further use of the tool, a guard or other part that • DON’T - Use cutting wheels rated less than 5000 R.P.M. is damaged should be carefully checked to determine that it will operate properly and •...
  • Page 6: Quick Start Guide

    (do not remove) the screw on the Quick Start Guide first. Install and tighten the other two side of the cutting wheel cover. Pull the rub- D24000 Wet Tile Saw screws. ber side flap back and lift the cover toward the rear of the saw.
  • Page 7 Step 4 Step 3 4. The outer rim of the cutting 3. Attach the cutting cart to the rails. wheel should always be at For further details, refer to least 3/16" (5mm) below the Assembly in the cart surface. Push cart entirely 3/16"...
  • Page 8: Features

    FIG. 2 FIG. 1 FEATURES (Fig. 2–4) The motor arm assembly comes assembled. Open the box and lift the assembly out, as shown in Figure 1. A On/Off switch I. Cutting cart water B. Motor arm assembly attachment C. Plunge handle J.
  • Page 9: Specifications

    receptacle (Fig. 6). The “drip loop” is that part of the cord cutting wheel cover. Press the spindle lock button (U) FIG. 6 below the level of the receptacle, or the connector if an while tightening the cutting wheel nut. extension cord is used, to prevent water traveling along 4.
  • Page 10: Locking The Cutting Cart

    3. Pull up the on/off switch (A) to turn the saw on. Wait FIG. 12 FIG. 15 until the stream of water from the water pump com- pletely covers the cutting wheel. NOTE: Cutting tile without water will damage the cut- ting wheel.
  • Page 11: Adjustments

    safe distance from the cutting wheel, lower the head of with supplied wrench until the cutting wheel is 90˚ to FIG.16 the saw slowly into the tile. Cut into the tile up to the the cart surface. edge of the mark without overcutting. 3.
  • Page 12: Maintenance

    For further detail of war- ranty coverage and warranty repair information, visit 1. Insert the water pump into a bucket of clean water and www.dewalt.com or call 1-800-4-D WALT (1-800-433- pump the water through the hose system.
  • Page 13: Troubleshooting Guide

    Troubleshooting Guide BE SURE TO FOLLOW SAFETY RULES AND INSTRUCTIONS MANY COMMON PROBLEMS CAN BE SOLVED EASILY BY UTILIZING THE CHART BELOW. FOR MORE SERIOUS OR PERSISTENT PROBLEMS, CONTACT A D WALT SERVICE CENTER OR CALL 1-(800)-4-D WALT. TROUBLE! SAW WILL NOT START WHAT’S WRONG? WHAT TO DO…...
  • Page 14 SI VOUS AVEZ DES QUESTIONS OU VOUS VOULEZ NOUS FAIRE PART DE VOS COMMENTAIRES CONCERNANT CET OUTIL OU TOUT AUTRE OUTIL D WALT, COMPOSEZ SANS FRAIS LE : 1 800 433-9258 (1-800-4-DEWALT) Ce produit est couvert sous le brevet américain no D486,165 et autres brevets en instance.
  • Page 15 TABLE DES MATIÈRES NETTOYAGE ....................23 CONSIGNES DE SÉCURITÉ IMPORTANTES CONCERNANT TOUS LES OUTILS....................14 LUBRIFICATION ..................23 DIRECTIVES CONCERNANT LA MISE À LA TERRE .........14 RÉPARATIONS...................23 CONSIGNES DE SÉCURITÉ ADDITIONNELLES CONCERNANT LE COUPE-TUILE À L’EAU ..................15 ACCESSOIRES......................24 GUIDE DE DÉMARRAGE..................17 GARANTIE......................24 COMPOSANTS ......................19 GUIDE DE DÉPANNAGE..................25 ASSEMBLAGE .......................19 CARACTÉRISTIQUES TECHNIQUES..............20...
  • Page 16: Consignes De Sécurité Importantes Concernant Tous Les Outils

    Consignes de sécurité importantes concernant tous AVERTISSEMENT : La pompe à eau doit être enfichée dans une prise protégée par un les outils disjoncteur de fuite de terre. REMARQUE : Ne pas faire fonctionner la pompe à sec. AVERTISSEMENT : Afin de travailler en toute sécurité et d’éviter les AVERTISSEMENT : Effectuer un essai du disjoncteur de fuite de terre avant chaque risques de blessure ou d’endommager sérieusement la scie, lire attentive- utilisation en :...
  • Page 17: Consignes De Sécurité Additionneiles Concernant Le Coupe-Tuile À L'eau

    ordinaires protègent uniquement les yeux contre les chocs et ne sont PAS des lunettes • ON NE DOIT PAS couper à sec. Si la lame n’est pas refroidie à l’eau, on risque de de protection. causer des dommages sérieux puisque la coupe à sec augmente l’exposition aux par- ticules de poussière aéroportées nocives.
  • Page 18: Sur La Colonne

    • le plomb dans les peintures à base de plomb, NE PAS METTRE LES MAINS DERRIÈRE LA LAME. • la silice cristalline dans les briques, le ciment, les tuiles, les pierres naturelles et autres produits de NE JAMAIS CROISER LES BRAS DEVANT LA maçonnerie, LAME.
  • Page 19: Guide De Démarrage

    Guide de démarrage livraison. Ouvrir la boîte, puis Coupe-tuile à l’eau D24000 soulever et retirer l’ensemble, tel AVERTISSEMENT : Pour votre sécurité, avant qu’illustré à toute utilisation du coupe-tuile à l'eau, lire son la figure 1.
  • Page 20 Étape 4 Étape 3 4. Le bord externe de la lame doit 3. Fixer l’établi de coupe aux mon- toujours se trouver à au moins tants. 5 mm (3/16") au-dessous de la Pour plus de détails, se référer 3/16" (5 MM) surface de l’établi de coupe.
  • Page 21: Composants

    COMPOSANTS (fig. 2 à 4) FIG. 2 L’ensemble du bras moteur est déjà assemblé au moment de la livraison. Ouvrir la boîte, puis soulever et retirer l’ensemble, tel qu’illustré à la figure 1. FIG. 1 A Interrupteur marche-arrêt I. Plateau d’eau de B.
  • Page 22: Caractéristiques Techniques

    2. Enfoncer le bouton de verrouillage de la broche et nale égale ou supérieure à celle du produit. FIG. 6 retirer l’écrou de la lame (S) au moyen de la clé à six • Ne pas utiliser une rallonge endommagée; l’examiner pans fournie.
  • Page 23: Réalisation D'une Coupe

    FIG. 12 ure dans l’indicateur de coupe (AA). Voir la section Si la hauteur de la lame n’est pas réglée, voir la section « Réglages » du présent manuel. Sinon, on risque de « Réglages » afin d’obtenir plus d’information. causer des dommages ou des blessures.
  • Page 24: Réglages

    bouchon de vidange. Retirer le bouchon et laisser l’eau 2. Relâcher l’organe de coupe en desserrant son bouton FIG. 15 s’écouler dans le seau. de verrouillage (D). 3. Régler le bouton de réglage de la profondeur de coupe Réglages (fig. 15 à 17) (BB) situé...
  • Page 25: Entretien

    RÉSISTANCE AU ROULEMENT DE L’ÉTABLI Transport et rangement FIG. 18 (RÉGLAGE DU MONTANT) Le plateau d’eau arrière (G), le plateau d’eau de l’établi de 1. Desserrer les quatre vis de réglage de hauteur du coupe (I) et la cuvette d’eau (K) peuvent s’emboîter l’un montant (KK).
  • Page 26: Accessoires

    été causée par une usure normale ou l’usage abusif de l’outil. Pour obtenir de plus amples renseigne- ments sur les pièces ou les réparations couvertes par la présente garantie, visiter le site www.dewalt.com ou com- poser le 1 800 433-9258 (1 800 4-D WALT). Cette garantie ne s’applique pas aux accessoires et ne vise pas...
  • Page 27: Guide De Dépannage

    Guide de dépannage S’ASSURER DE SUIVRE TOUTES LES DIRECTIVES, Y COMPRIS LES CONSIGNES DE SÉCURITÉ PLUSIEURS PROBLÈMES COURANTS PEUVENT TRE FACILEMENT RÉGLÉS EN CONSULTANT LE TABLEAU CI-DESSOUS. PAR CONTRE, EN PRÉSENCE D’UN PROBLÈME PLUS GRAVE OU PERSISTANT, ON DOIT COMMUNIQUER AVEC UN CENTRE DE SERVICE D WALT OU COMPOSER LE 1 800 433-9258 (1 800 4-D WALT).
  • Page 28 Este producto está cubierto por la patente No. D486,165 en los EE.UU. y otras patentes pendientes. DEWALT…PARA TRABAJOS PESADOS Las herramientas industriales D WALT de alto rendimiento están fabricadas para las aplicaciones industriales y de construcción más duras. El diseño de cada herramienta de esta línea, de taladros a lijadoras y esmeriladoras, es el resultado de...
  • Page 29 ÍNDICE ACCESORIOS ......................38 INSTRUCCIONES DE SEGURIDAD IMPORTANTES PARA TODA HERRAMIENTA ....................28 GARANTÍA .........................38 INSTRUCCIONES DE CONEXIÓN A TIERRA ............28 GUÍA DE RESOLUCIÓN DE PROBLEMAS ............39 REGLAS DE SEGURIDAD ADICIONALES PARA SIERRAS DE CORTE HÚMEDO ....................29 GUÍA DE REFERENCIA RÁPIDA ................31 CARACTERÍSTICAS ....................33 ENSAMBLAJE ......................33 ESPECIFICACIONES....................33...
  • Page 30: Instrucciones De Seguridad Importantes Para

    Instrucciones de seguridad importantes para toda ADVERTENCIA: La bomba de agua debe ser enchufada a una toma de corriente pro- herramienta tegida por un GFCI. NOTA: No haga funcionar la bomba en seco. ADVERTENCIA: Para su propia seguridad, lea el manual de instruc- ADVERTENCIA: Pruebe el GFCI antes de cada uso: ciones antes de operar la sierra de corte húmedo.
  • Page 31: Reglas De Seguridad Adicionales Para Sierras De Corte Húmedo

    • Apague la herramienta y espere a que el disco de corte se detenga por completo antes • NUNCA USE UN CALENTADOR O NINGÚN TIPO DE FUENTE DE CALOR PARA CALENTAR EL AGUA. Podría resultar en daños a la herramienta, incendios o lesiones de mover la pieza de trabajo o de cambiar las configuraciones.
  • Page 32 • Evite el contacto prolongado con polvo procedente SIEMPRE REGRESE EL DISCO DE CORTE A LA del lijado, serrado, esmerilado y taladrado eléctri- POSICIÓN DEBIDA ANTES DE ENCENDER LA cos, así como de otras actividades del sector de la SIERRA. construcción.
  • Page 33: Guía De Referencia Rápida

    Guía de referencia rápida ella la unidad, como lo muestra Sierra de corte húmedo D24000 la Figura 1. ADVERTENCIA: Para su propia seguridad, lea el manual de instrucciones antes de operar la sierra de corte húmedo. El no respetar estas advertencias puede resultar en lesiones corporales y daños serios a la sierra.
  • Page 34 Paso 3 Paso 4 3. Conecte el carro de corte a los 4. El borde exterior del disco de rieles. corte debería estar siempre a Para mayores detalles, refiérase al menos 5 mm (3/16 pulg.) a Ensamblaje en el debajo de la superficie del 3/16"...
  • Page 35: Características

    CARACTERÍSTICAS (Fig. 2–4) FIG. 2 FIG. 1 La unidad del brazo motriz viene ensamblada. Abra la caja y retire de ella la unidad, como lo muestra la Figura 1. A. Conmutador de encendido I. Accesorio de y apagado agua para el B.
  • Page 36: Operación

    FIG. 6 2. Presione el botón de bloqueo del eje. Retire la tuerca • No utilice alargadores dañados. Revise del disco de corte (S) con la llave hexagonal incluida. alargadores antes de utilizarlos y cámbielos si están Retire la pestaña exterior (T). dañados.
  • Page 37: Profundidad Del Disco De Corte

    FIG. 12 Profundidad del disco de corte de desecho de cerámica para asegurarse de sentirse cómodo cortando. Empuje el carro más allá del disco de (Fig. 11) corte antes de encender la sierra. Asegúrese que el disco El borde exterior del disco de corte debería estar siempre de corte esté...
  • Page 38: Ajustes

    FIG. 15 CORTES DE ORIFICIO Antes de mover la sierra, asegúrese de drenar el depósi- to de agua poniendo un balde de aproximadamente 18,9 Los cortes de orificio se utilizan cuando se desea quitar litros (5 galones) debajo del tapón de la sierra. Retire el una pieza en el medio de la pieza de cerámica para poner tapón y deje que el agua se vacíe en el balde.
  • Page 39: Mantenimiento

    FIG. 18 FIG. 19 Desenchufe la herramienta, retire la tapa de las escobillas (OO) y extraiga la unidad de escobillas para revisar las escobillas de carbón en forma regular. Mantenga las esco- billas limpias y pudiendo desplazarse libremente en sus guías.
  • Page 40: Reparaciones

    SAN LUIS POTOSI, SLP Porcelana DW4762 visítenos en www.dewalt.com o llámenos al 1 800 433- Av. Universidad 1525 - Col. San Luis (444) 814 2383 Si necesita ayuda para encontrar un accesorio para su 9258 (1-800-4-D WALT).
  • Page 41: Guía De Resolución De Problemas

    Guía de resolución de problemas ASEGÚRESE DE SEGUIR LAS REGLAS E INSTRUCCIONES DE SEGURIDAD MUCHOS PROBLEMAS HABITUALES SE PUEDEN SOLUCIONAR FÁCILMENTE MEDIANTE EL CUADRO SIGUIENTE. PARA PROBLEMAS MÁS SERIOS O PERSISTENTES, CONTACTE AL CENTRO DE SERVICIO D WALT O LLAME AL 1-800-433-9258 (1-800-4-D WALT).
  • Page 42 WALT Industrial Tool Co., 701 East Joppa Road, Baltimore, MD 21286 (SEP04) Form No. 627715-00 D24000 Copyright © 2004 D WALT The following are trademarks for one or more D WALT power tools: the yellow and black color scheme; the “D” shaped air intake grill; the array of pyramids on the handgrip; the...

Table des Matières