Husqvarna AUTOMOWER 105 Manuel D'utilisation
Masquer les pouces Voir aussi pour AUTOMOWER 105:
Table des Matières

Publicité

Les langues disponibles

Les langues disponibles

Liens rapides

Operator's manual
Bedienungsanweisung
Manuel d'utilisation
Manuale dell'operatore
®
HUSQVARNA AUTOMOWER
105/305/310/315/315X/420/430X/
EN, English
(2-29)
440/450X
DE, Deutsch
Read the operator's manual carefully and make sure that you
(30-58)
understand the instructions before you use the product.
FR, Français
Lesen Sie die Bedienungsanweisung sorgfältig durch und
(59-87)
machen Sie sich mit dem Inhalt vertraut, bevor Sie das Gerät
benutzen
IT, Italiano
Lisez attentivement le manuel d'utilisation et assurez-vous que
(88-116)
vous en comprenez le contenu avant d'utiliser la machine.
Prima di usare la macchina, leggere attentamente il manuale
dell'operatore e accertarsi di averne compreso il contenuto.

Publicité

Chapitres

Table des Matières
loading

Sommaire des Matières pour Husqvarna AUTOMOWER 105

  • Page 1 Operator's manual Bedienungsanweisung Manuel d'utilisation Manuale dell'operatore ® HUSQVARNA AUTOMOWER 105/305/310/315/315X/420/430X/ EN, English (2-29) 440/450X DE, Deutsch Read the operator's manual carefully and make sure that you (30-58) understand the instructions before you use the product. FR, Français Lesen Sie die Bedienungsanweisung sorgfältig durch und (59-87) machen Sie sich mit dem Inhalt vertraut, bevor Sie das Gerät...
  • Page 2: Table Des Matières

    PIN code: The serial number is on the product rating plate and on the product carton. • Use the serial number to register your product on www.husqvarna.com. 1.2 Support growth and moisture of the grass. The shape of the yard is also significant.
  • Page 3: Working Method

    When the product is started for the first time, a start-up sequence begins which includes a number of To do the basic settings important basic settings, refer to in the complete Operator’s Manual on Husqvarna’s website. 1.6 Finding the charging station ®...
  • Page 4 ® 1.7 Product overview Automower The numbers in the figure represent: 14. Charging plates 15. Keypad Body 16. Display Hatch to display, keypad and cutting height 17. Loop wire for boundary loop and guide wire adjustment 18. Connectors for the loop wire Stop button 19.
  • Page 5 27. Alarm decal 28. Rating plate (incl. product identification code) ® 1.8 Product overview Automower The numbers in the figure represent: 15. Cutting height adjustment 16. Maintenance tool Body 17. Cutting system Hatch to keypad, display and cutting height 18. Chassis box with electronics, battery and motors adjustment 19.
  • Page 6 30. Alarm decal ® 1.9 Product overview Automower 310/315/315X The numbers in the figure represent: 16. Chassis box with electronics, battery and motors 17. Handle Body 18. Main switch Hatch to cutting height adjustment 19. Blade disc Hatch to display and keypad 20.
  • Page 7 31. Alarm decal ® 1.10 Product overview Automower 420/430X/440/450X Automower 420/440 Automower 430X Automower 450X The numbers in the figure represent: 16. Blade disc 17. Skid plate Body 18. Contact plates Hatch to display and keypad 19. LED for operation check of the charging station Stop button and boundary wire Front wheels...
  • Page 8: Symbols On The Product

    29. Couplers for the loop wire The chassis contains components which 30. Loop wire for boundary loop and guide wire are sensitive to electrostatic discharge 31. Stakes (ESD). The chassis must also be resealed in a professional manner. For these 32.
  • Page 9: Safety Definitions

    2 Safety 2.1 Safety definitions CAUTION: Used if there is a risk of Warnings, cautions and notes are used to point out damage to the product, other materials or specially important parts of the manual. the adjacent area if the instructions in the manual are not obeyed.
  • Page 10 electrolyte, flush with water/neutralizing agent. Seek medical help if it comes in contact with the eyes. Use only original batteries recommended by the manufacturer. Product safety cannot be guaranteed with other than original batteries. Do not use non-rechargeable batteries. The appliance must be disconnected from the supply mains when removing the battery.
  • Page 11: Connecting The Power Supply

    Use the Schedule function so the product and sprinkler never run simultaneously. • Husqvarna does not guarantee full compatibility between the product and other types of wireless systems such as remote controls, radio transmitters, hearing loops, underground electric animal fencing or similar.
  • Page 12: Control Panel

    For more instructions on how to do a proper installation, refer to chapter Installation in the complete Operator's supply must be changed or tampered with. manual on Husqvarna's website www.husqvarna.com. The low voltage cable must not be shortened or extended. 3.2 Control panel...
  • Page 13 product is not allowed to mow due to a timer number of GPS satellites. Symbol (A) blinks during setting. the first days the product is working, as it is collecting GPS information about the installation. MENU text illustrates that the main menu can •...
  • Page 14: Browse Between Menus

    3.9 Submenus • The START button is used to activate the product. This is normally the last button to be pushed There are a number of submenus under each option. before closing the hatch. You can access all the functions to set the product •...
  • Page 15: Operation

    ® Automower Connect or Automower Installation Connect@Home. Contact your local Husqvarna representative for information This menu function is used to customize on what accessories are available for your the installation. For many work areas product. there is no need to alter the factory 4 Operation 4.1 To switch on, stop and switch off...
  • Page 16: Automower ® Connect

    pause operation, e.g. for temporary irrigation or for games on the lawn. Start with schedule: The product stays in the • charging station until the next schedule setting permits operation. This operating mode is suitable if one wishes to cancel an ongoing mowing cycle and allow the product to stay in the charging station until the next day.
  • Page 17: Adjusting The Cutting Height

    AppStore or GooglePlay. Once you have downloaded the app, you can specify an e-mail address and a password to create an account. You will receive a validation e-mail to the e-mail address you specified. Follow the instructions in the e-mail within 24 hours to validate your account.
  • Page 18: Maintenance

    We recommend you to use a special cleaning and • The operating time for the product is shorter than maintenance kit. Speak to your local Husqvarna normal between charges. This leads to more representative for more information. charging cycles than normal, which increases the risk of tracks forming near the charging station.
  • Page 19: To Replace The Blades

    Refer to the complete Operator’s manual on Husqvarna’s website (www.husqvarna.com). 1418 - 007 - 17.09.2020...
  • Page 20: Transportation, Storage And Disposal

    For a fully functional installation, the indicator lamp in the charging station must emit a solid or flashing green light. If something else appears, follow the troubleshooting guide below. There is more help on www.husqvarna.com. If you still need help, please contact your local Husqvarna representative.
  • Page 21: Winter Storage

    You can also hang the product on a For disassembly of the battery see the complete Husqvarna original wall hanger. Contact your Husqvarna Operator's manual on Husqvarna’s website. representative for more information about available wall hangers.
  • Page 22 ® ® Electrical system Automower Automower Battery, Lithium-Ion 18.5 V/2.1 Ah Art. No. 586 57 62-02 Battery, Lithium-Ion 18 V/2.0 Ah Art. No. 586 57 62-03, 586 57 62-05 590 21 42-02, 590 21 42-04 Battery, Lithium-Ion 18.25 V/2.0 Ah Art. No. 586 57 62-04 590 21 42-03 Power supply (28V DC), V AC...
  • Page 23 ® ® Mowing Automower Automower Cutting system 3 pivoted cutting blades Blade motor speed, rpm 2900 2200 Power consumption during cutting, W +/- 20 Cutting height, cm / in 2-5 / 0.8-2.0 2-5 / 0.8-2.0 Cutting width, cm / in 17 / 6.7 22 / 8.7 Narrowest possible passage, cm / in...
  • Page 24 ® ® ® Electrical system Automower Automower Automower 315X Battery, Lithium-Ion 18.5 V/2.1 Ah Art. No. 584 85 28-01, 584 85 28-02 Battery, Lithium-Ion 18 V/2.0 Ah Art. No. 584 85 28-03, 590 21 42-02, 593 11 40-01, 593 11 40-02, 590 21 42-04, 584 85 28-05 Battery, Lithium-Ion 18.25 V/2.0 Ah Art.
  • Page 25 ® ® ® Mowing Automower Automower Automower 315X Cutting system 3 pivoted cutting blades Blade motor speed, rpm 2300 2300 2300 Power consumption during cutting, W +/- 20 % Cutting height, cm / in 2-6 / 0.8-2.4 2-6 / 0.8-2.4 2-6 / 0.8-2.4 Cutting width, cm / in 22 / 8.7...
  • Page 26 ® ® ® ® Electrical system Automower Automower Automower Automower 430X 450X Battery, Lithium-Ion 18.5 V/3.0 Ah Art. No. 580 68 33-01 Battery, Lithium-Ion 18.5 V/4.0 Ah Art. No. 580 68 33-02 Battery, Lithium-Ion 18 V/4.0 Ah Art. No. 580 68 33-03, 593 11 41-02, 593 11 42-01, 593 11 41-04...
  • Page 27 ® ® ® ® Boundary wire antenna Automower Automower Automower Automower 430X 450X Operating Frequency Band, Hz 100-80000 100-80000 100-80000 100-80000 Maximum magnetic field, dBuA/m Maximum Radio-frequency power , mW <25 <25 <25 <25 @60m ® ® ® ® Noise emissions measured in the environ- Automower Automower Automower...
  • Page 28: Registered Trademarks

    Connect 4G Power Class 3 23 dBm Husqvarna AB does not guarantee full compatibility between the product and other types of wireless systems such as remote controls, radio transmitters, hearing loops, underground electric animal fencing or similar. Introduction The products are made in England or the Czech Republic. See information on the rating plate. Refer to on page 2 8.4 Registered trademarks...
  • Page 29: Ec Declaration Of Conformity

    Husqvarna customer service. 10 EC Declaration of Conformity 10.1 EC Declaration of Conformity • ETSI EN 301 511 V12.5.1 • ETSI EN 301 908-1 V13.1.1 Husqvarna AB, SE-561 82 Huskvarna, Sweden, tel: • ETSI EN 301 908-13 V11.1.2 +46-36-146500, declares that the robotic lawn mowers: •...
  • Page 30 Seriennummer: PIN-Code: Die Seriennummer findet sich auf dem Typenschild und auf dem Karton des Geräts. • Verwenden Sie die Seriennummer, um Ihr Gerät auf www.husqvarna.com zu registrieren. 11.2 Support 11.3 Kapazität Wenden Sie sich an Ihren Husqvarna Servicehändler, Die Größe der Fläche, die das Gerät bearbeiten kann, um Support für das Gerät zu erhalten.
  • Page 31: Suchen Der Ladestation

    Begrenzungskabel nähert, dreht es um und schlägt eine vornehmen“ in der vollständigen Bedienungsanleitung neue Richtung ein. Mittels Sensoren vorne und hinten auf der Husqvarna Website. erkennt das Gerät, wenn es sich dem Begrenzungskabel nähert. Die Vorderseite des Geräts ragt vor dem Drehen immer etwas über das 11.6 Suchen der Ladestation...
  • Page 32 ® 11.7 Geräteübersicht Automower Die Zahlen in der Darstellung stehen für: 14. Ladeplatten 15. Tastatur Gehäuse 16. Display Abdeckung für Display, Tastatur und 17. Schleifenkabel für Begrenzungskabel und Schnitthöheneinstellung Leitkabel Stopptaste 18. Verbinder für das Schleifenkabel Kontaktbleche 19. Haken LED für Funktionsprüfung der Ladestation, des 20.
  • Page 33 27. Alarm-Aufkleber 28. Typenschild (inkl. Geräteidentifikationscode) ® 11.8 Geräteübersicht Automower Die Zahlen in der Darstellung stehen für: 15. Schnitthöheneinstellung 16. Wartungswerkzeug Gehäuse 17. Schneidsystem Abdeckung für Tastatur, Display und 18. Chassisgehäuse mit Elektronik, Akku und Motoren Schnitthöheneinstellung 19. Griff Stopptaste 20.
  • Page 34 30. Alarm-Aufkleber ® 11.9 Geräteübersicht Automower 310/315/315X Die Zahlen in der Darstellung stehen für: 16. Chassisgehäuse mit Elektronik, Akku und Motoren 17. Griff Gehäuse 18. Hauptschalter Abdeckung für Schnitthöheneinstellung 19. Klingenteller Abdeckung für Display und Tastatur 20. Gleitplatte Stopptaste 21. Netzteil (Aussehen kann je nach Markt variieren) Abnehmbare Abdeckung 22.
  • Page 35 31. Alarm-Aufkleber ® 11.10 Geräteübersicht Automower 420/430X/440/450X Automower 420/440 Automower 430X Automower 450X Die Zahlen in der Darstellung stehen für: 16. Klingenteller 17. Gleitplatte Gehäuse 18. Kontaktbleche Abdeckung für Display und Tastatur 19. LED für Funktionsprüfung von Ladestation und Stopptaste Begrenzungskabel Vorderräder 20.
  • Page 36: Symbole Auf Dem Gerät

    30. Schleifenkabel für Begrenzungskabel und Es ist nicht zulässig, dieses Gerät über Leitkabel den normalen Hausmüll zu entsorgen. 31. Haken Stellen Sie sicher, dass das Gerät in 32. Verbinder für das Schleifenkabel Übereinstimmung mit den örtlich geltenden Regelungen entsorgt wird. 11.11 Symbole auf dem Gerät Diese Symbole befinden sich auf dem Gerät.
  • Page 37 GROSSBUCHSTABEN und kursiver Schrift • Text in gibt die verschiedenen für das Gerät verfügbaren Betriebsmodi an. 12 Sicherheit 12.1 Sicherheitsdefinitionen Tod des Bedieners oder anderer Personen besteht. Warnungen, Vorsichtsmaßnahmen und Hinweise werden verwendet, um auf besonders wichtige Teile der Bedienungsanleitung hinzuweisen. ACHTUNG: Wird verwendet, wenn bei Nichtbeachtung der Anweisungen in diesem...
  • Page 38 gelten gesetzlich vorgeschriebene Altersbeschränkungen für den Bediener. Reinigung und Wartung dürfen von Kindern nicht ohne Aufsicht durchgeführt werden. Schließen Sie das Netzteil niemals an eine Steckdose an, wenn Stecker oder Kabel beschädigt sind. Abgenutzte oder beschädigte Kabel erhöhen das Risiko für elektrische Schläge. Laden Sie die Akkus nur in der mitgelieferten Ladestation auf.
  • Page 39 12.2 Verwendung Hauptschalter oder der Taste ON/OFF aus, bevor Sie eine Blockierung entfernen. Prüfen Sie das • Das Gerät darf nur mit der vom Hersteller Gerät auf Schäden, bevor Sie es wieder in Betrieb empfohlenen Ausstattung verwendet werden. nehmen. Andere Verwendungsarten sind nicht zulässig. Die Anweisungen des Herstellers hinsichtlich Betrieb, Wartung und Reparatur sind genau einzuhalten.
  • Page 40: Anschließen Des Netzteils

    Schäden am Gerät führen. Zeitplan -Funktion, damit Rasensprenger und 12.3 Sicherheit im Umgang mit Akkus Gerät nicht gleichzeitig in Betrieb sind. • Husqvarna übernimmt keine Garantie für die WARNUNG: vollständige Kompatibilität zwischen dem Gerät Lithium-Ionen-Akkus und anderen kabellosen Systemen wie können explodieren oder Feuer...
  • Page 41 Kapitel • Mit der START-Taste (A) können Sie den Betrieb Bedienungsanleitung auf der Website des Geräts starten. www.husqvarna.com von Husqvarna. • Mit den drei Auswahltasten (B) können Sie die 13.2 Bedienfeld Funktionen auswählen, die auf dem Display oberhalb der Tasten angezeigt werden.
  • Page 42 BEREIT , MÄHEN , • Betriebsinformationen, z. B. GEPARKT oder ZEITPLAN . Befindet sich das Gerät nicht in einem bestimmten Betriebsmodus, z. B. wenn das Gerät gerade eingeschaltet wurde, BEREIT angezeigt. Wird die Taste STOP wird gedrückt, zeigt das Gerät an, welche Aufgabe es ®...
  • Page 43: Zwischen Den Menüs Blättern

    13.11 Hauptmenü Zeitplan Timer anwendbar für Automower ® Um ein optimales Mähergebnis zu erzielen, sollte der Rasen nicht zu oft gemäht werden. Infolgedessen ist es wichtig, die Betriebszeit mit dieser Funktion zu begrenzen, wenn der Umfang des Arbeitsbereichs geringer als die Arbeitskapazität des Geräts ist.
  • Page 44 Connect oder ® Automower Connect@Home. Wenden Einstellungen Sie sich an Ihren Husqvarna Händler vor Hier können Sie Änderungen an den Ort, wenn Sie Informationen darüber allgemeinen Einstellungen des Geräts, benötigen, welches Zubehör für Ihr Gerät wie zum Beispiel Datum und Zeit, verfügbar ist.
  • Page 45: Automower ® Connect

    Startet in 3 Stunden wieder: Das Gerät bleibt für • drei Stunden in der Ladestation und wechselt dann automatisch wieder in den Normalbetrieb. Dieser Betriebsmodus ist geeignet für ein Pausieren des Betriebs, z. B. wegen zwischenzeitlicher Bewässerung oder Freizeitbeschäftigungen auf dem Rasen.
  • Page 46: Einstellen Der Schnitthöhe

    jede Woche gesenkt werden, bis die Hinweis: ® Automower Connect@Home verfügt über gewünschte Schnitthöhe erreicht ist. ähnliche, aber nicht so umfassende Funktionen wie ® Automower Connect und wird mit der gleichen App ® 14.6.1 Automower gesteuert. Die Schnitthöhe kann zwischen MIN und MAX eingestellt werden.
  • Page 47 Bürste oder fließendem Wasser aus einem Verwenden Sie ausschließlich Wasserschlauch. wiederaufladbare Batterien (Akkus). Wir empfehlen Ihnen, ein spezielles Reinigungs- und Wartungskit zu verwenden. Bitte setzen Sie sich für weitere Informationen mit Ihrem Husqvarna-Vertreter vor Ort in Verbindung. 1418 - 007 - 17.09.2020 Wartung - 47...
  • Page 48: Austausch Der Klingen

    Bei Betriebsstörungen wird eine Meldung im Display eingeblendet. Genauere Informationen zu Meldungen finden Sie in der vollständigen Bedienungsanleitung auf der Husqvarna-Website (www.husqvarna.com). Wenn dieselbe Meldung häufiger angezeigt wird und Sie die Fehlerursache nicht finden, nehmen Sie Kontakt mit Ihrem Husqvarna-Händler vor Ort auf.
  • Page 49: Transport, Lagerung Und Entsorgung

    Leuchtet die Anzeigelampe an der Ladestation dauerhaft oder blinkt grün, weist dies auf eine vollständige und betriebsfähige Installation hin. Sollte die Lampe nicht dauerhaft grün leuchten, ziehen Sie die Fehlersuche zu Rate. Weitere Hilfestellungen finden Sie auf www.husqvarna.com. Sollten Sie trotz allem Hilfe benötigen, setzen Sie sich mit Ihrem Husqvarna-Händler vor Ort in Verbindung.
  • Page 50: Lagerung Im Winter

    Halten Sie dabei das Gerät am Griff an der Wandhalterungen erhalten Sie bei Ihrem Husqvarna- Unterseite stets so, dass der Klingenteller vom Händler. Körper entfernt ist. 17.2.2 Die Ladestation Lagern Sie die Ladestation und das Netzteil am besten im Haus. Das Begrenzungskabel und das Leitkabel können im Boden verbleiben.
  • Page 51 ® ® Elektrisches System Automower Automower Akku, Lithium-Ionen 18,5 V/2,1 Ah Art.-Nr. 586 57 62-02 Akku, Lithium-Ionen 18 V/2,0 Ah Art.-Nr. 586 57 62-03, 586 57 62-05 590 21 42-02, 590 21 42-04 Akku, Lithium-Ionen 18,25 V/2,0 Ah Art.-Nr. 586 57 62-04 590 21 42-03 Netzteil (28 V DC), V AC 100-240...
  • Page 52 ® ® Mähen Automower Automower Schneidsystem 3 rotierende Klingen Drehzahl Klingenmotor, U/min 2.900 2.200 Stromverbrauch beim Mähen, W +/- 20 % Schnitthöhe, cm/Zoll 2-5/0,8-2,0 2-5/0,8-2,0 Schnittbreite, cm/Zoll 17/6,7 22/8,7 Kleinste Breite, cm/Zoll 60/24 60/24 Maximaler Winkel für Arbeitsbereich, % Maximaler Winkel für Begrenzungskabel, % Maximale Länge des Begrenzungskabels, 400/1.300 800/2.600...
  • Page 53 ® ® ® Elektrisches System Automower Automower Automower 315X Akku, Lithium-Ionen 18,5 V/2,1 Ah Art.-Nr. 584 85 28-01, 584 85 28-02 Akku, Lithium-Ionen 18 V/2,0 Ah Art.-Nr. 584 85 28-03, 590 21 42-02, 593 11 40-01, 593 11 40-02, 590 21 42-04, 584 85 28-05 Akku, Lithium-Ionen 18,25 V/2,0 Ah Art.-Nr.
  • Page 54 ® ® ® Mähen Automower Automower Automower 315X Schneidsystem 3 rotierende Klingen Drehzahl Klingenmotor, U/min 2.300 2.300 2.300 Stromverbrauch beim Mähen, W +/- 20 % Schnitthöhe, cm/Zoll 2–6/0,8–2,4 2–6/0,8–2,4 2–6/0,8–2,4 Schnittbreite, cm/Zoll 22/8,7 22/8,7 22/8,7 Kleinste Breite, cm/Zoll 60/24 60/24 60/24 Maximaler Winkel für Arbeitsbereich, % Maximaler Winkel für Begrenzungskabel, %...
  • Page 55 ® ® ® ® Elektrisches System Automower Automower Automower Automower 430X 450X Akku, Lithium-Ionen 18,5 V/3,0 Ah Art.-Nr. 580 68 33-01 Akku, Lithium-Ionen 18,5 V/4,0 Ah Art.-Nr. 580 68 33-02 Akku, Lithium-Ionen 18 V/4,0 Ah Art.-Nr. 580 68 33-03, 593 11 41-02, 593 11 42-01, 593 11 41-04 Akku, Lithium-Ionen 18,25 V/4,0 Ah Art.-Nr.
  • Page 56 ® ® ® ® Begrenzungskabelantenne Automower Automower Automower Automower 430X 450X Betriebsfrequenzband, Hz 100-80.000 100-80.000 100-80.000 100-80.000 Maximales Magnetfeld, dBuA/m Maximale Funkfrequenz-Leistung , mW bei < 25 < 25 < 25 < 25 60 m ® ® ® ® Geräuschemissionen in der Umgebung, als Automower Automower Automower...
  • Page 57: Eingetragene Marken

    Connect 4G Leistungsklasse 3 23 dBm Husqvarna AB übernimmt keine Garantie für die vollständige Kompatibilität zwischen dem Gerät und anderen kabellosen Systemen wie Fernbedienungen, Sendern, im Boden verlegten elektrischen Umzäunungen von Viehweiden o. ä. Die Geräte werden in England oder Tschechien hergestellt. Siehe Informationen auf dem Typenschild. Siehe Einleitung auf Seite 30 18.4 Eingetragene Marken...
  • Page 58: Eg-Konformitätserklärung

    Eingriffe in das Gerät oder Netzteil. aufnehmen. Die Klingen und Räder sind Verschleißteile und fallen nicht unter den Geltungsbereich dieser Garantie. Sollten Sie eine Störung Ihres Husqvarna-Geräts feststellen, setzen Sie sich bitte mit dem Husqvarna- 20 EG-Konformitätserklärung 20.1 EU-Konformitätserklärung • ETSI EN 301 908-1 V13.1.1 •...
  • Page 59 Code PIN : Le numéro de série se trouve sur la plaque signalétique et sur le carton du produit. • Utilisez le numéro de série pour enregistrer votre produit sur www.husqvarna.com. 21.2 Assistance 21.3 Capacité Pour obtenir de l'aide concernant le produit, contactez La taille de la zone de couverture du produit dépend...
  • Page 60: Méthode De Travail

    Réglages de base du manuel d'utilisation complet sur le périphérique. L'avant passe toujours le câble site Web d'Husqvarna. périphérique à une distance spécifique avant que le produit tourne. La distance peut être modifiée pour s'adapter à...
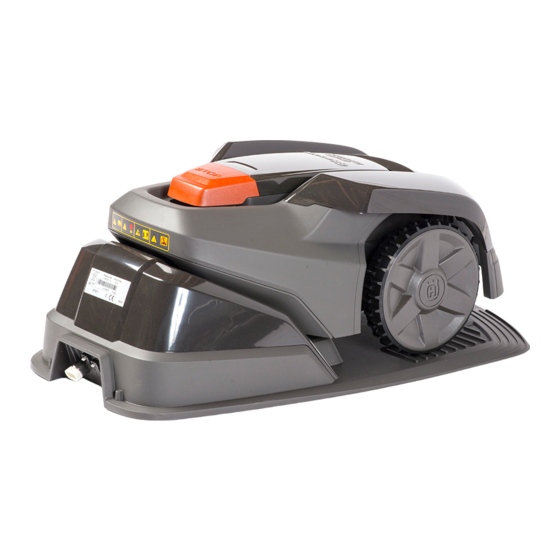
  • Page 61: Présentation Du Produit Automower

    ® 21.7 Présentation du produit Automower Les numéros sur la figure représentent : 13. Roue arrière 14. Plaques de charge Carrosserie 15. Clavier Capot de l'écran d'affichage, du clavier et du 16. Écran d'affichage réglage de la hauteur de coupe 17.
  • Page 62 26. Câble basse tension 28. Plaque signalétique (y compris code d'identification du produit) 27. Autocollant d'alarme ® 21.8 Présentation du produit Automower Les numéros sur la figure représentent : 14. Plaque signalétique (y compris code d'identification du produit) Carrosserie 15. Réglage de la hauteur de coupe Capot d'accès au clavier, écran d'affichage et 16.
  • Page 63 26. Règle d'aide à la pose du câble périphérique (la 29. Câble basse tension règle est à détacher de la boîte) 30. Autocollant d'alarme 27. Manuel d'utilisation et Guide d'installation rapide 28. Lames supplémentaires ® 21.9 Présentation du produit Automower 310/315/315X Les numéros sur la figure représentent : 13.
  • Page 64 25. Connecteurs de la boucle de câble 29. Lames supplémentaires 26. Vis pour fixation de la station de charge 30. Câble basse tension 27. Règle d'aide à la pose du câble périphérique (la 31. Autocollant d'alarme règle est à détacher de la boîte) 28.
  • Page 65: Symboles Concernant Le Produit

    21. Alimentation électrique (l'aspect peut varier en Utilisez une alimentation fonction du marché) électrique amovible, telle que 22. Marqueurs de câbles définie sur la plaque signaléti- 23. Règle d'aide à la pose du câble périphérique (la que à côté du symbole. règle est à...
  • Page 66: Instructions Générales Du Manuel

    21.13 Instructions générales du manuel • Le texte en gras fait référence aux boutons du produit. Le système suivant est utilisé dans le manuel LETTRES MAJUSCULES et en italique • Le texte en d'utilisation pour un usage plus simple : fait référence aux différents modes de italique correspond à...
  • Page 67 nettoyage et les opérations d'entretien ne doivent pas être réalisés par des enfants sans surveillance. Ne connectez jamais l'alimentation électrique à une prise si la fiche ou le fil est endommagé. Les fils usés ou endommagés augmentent le risque de choc électrique. Ne chargez la batterie que dans la station de charge incluse.
  • Page 68 réparations doivent être minutieusement respectées. • Des panneaux d'avertissement doivent être placés autour de la zone de travail du produit s'il est utilisé dans des espaces publics. Les panneaux doivent comporter le texte suivant : Attention ! Tondeuse automatique ! Maintenez les enfants à distance de la machine ! Surveillez les enfants ! •...
  • Page 69: Consignes De Sécurité Relatives À L'utilisation De La Batterie

    22.3 Consignes de sécurité relatives à • Husqvarna ne garantit en aucun cas la compatibilité totale entre le produit et d'autres l'utilisation de la batterie types de dispositif sans fil comme des télécommandes, des transmetteurs radio, des AVERTISSEMENT: Les batteries boucles d'écoute, des clôtures électrifiées...
  • Page 70: Panneau De Commande

    23.4 Clavier Automower d'installation correcte, reportez-vous au chapitre Installation du manuel d'utilisation complet sur le site Utilisez le clavier du produit pour naviguer dans le Web www.husqvarna.com d'Husqvarna. menu. Pour accéder au clavier, appuyez sur le bouton STOP. 23.2 Panneau de commande •...
  • Page 71 • Le réglage de la hauteur s'affiche sous forme de valeur numérique/d'échelle. ® • Pour Automower Connect@Home (reportez-vous ® Automower Connect@Home à la page 74 ) : à Une icône pour les communications sans fil Bluetooth ® s'affiche sur l'écran du produit lorsque la connexion avec votre appareil mobile est établie.
  • Page 72: Structure Du Menu

    Pour un résultat de tonte optimal, ne tondez pas trop souvent votre pelouse. Il est par conséquent important de limiter le temps de fonctionnement à l'aide de la fonction Minuterie si la zone de travail est inférieure à la capacité de travail du produit.
  • Page 73: Utilisation

    Connect ou Automower les réglages généraux du produit, tels que Connect@Home. Contactez votre la date et l'heure. Vous pouvez également représentant Husqvarna local pour savoir mode ECO et la activer ou désactiver le quels accessoires sont disponibles pour Tonte en spirale ou enregistrer vos votre produit.
  • Page 74: Connectivité

    soit vide. Lorsque la batterie est chargée, le produit sort Cette option ne s'affiche pas si aucun réglage de de la station de charge et s'arrête. Le produit est minuterie n'a été fait. maintenant prêt pour commencer l'opération, mais doit 24.5 Connectivité...
  • Page 75: Appairer Avec Automower ® Connect

    avez spécifiée. Suivez les instructions contenues dans l'e-mail dans les 24 heures pour valider votre compte. Passé ce délai, vous devrez recréer votre compte. Une fois le compte créé dans l'application, vous pouvez appairer le produit avec votre smartphone. ® 24.5.4 Appairer avec Automower Connect Accessoires >...
  • Page 76: Nettoyage De Automower

    Nous vous recommandons d'utiliser un kit spécial de complètement chargée, cela pourrait nettoyage et d'entretien. Pour plus d'informations, l'endommager ou la rendre inutilisable. contactez votre représentant local Husqvarna. REMARQUE: Le temps de charge peut varier, entre autres, en N'utilisez pas de fonction de la température ambiante.
  • Page 77: Remplacement Des Lames

    En cas de dysfonctionnement, un message d'erreur s'affiche à l'écran. Pour des informations plus détaillées sur les messages, reportez-vous au manuel d'utilisation complet sur le site Web de Husqvarna (www.husqvarna.com). Si le même message s'affiche fréquemment ou que vous ne parvenez toujours pas à trouver l'origine du problème, contactez votre représentant Husqvarna local.
  • Page 78: Voyant De La Station De Charge

    Le voyant de la station de charge doit émettre une lumière verte fixe ou clignotante pour indiquer que l'installation est totalement fonctionnelle. Si ce n'est pas le cas, suivez le guide de dépannage ci-dessous. Vous trouverez une aide plus approfondie sur www.husqvarna.com. Si vous avez besoin d'une aide supplémentaire, contactez votre représentant Husqvarna local.
  • Page 79: Remisage Hivernal

    à l'abri du gel, de préférence dans son emballage d'origine. Vous pouvez également accrocher le produit sur un support mural Husqvarna d'origine. Contactez votre représentant Husqvarna pour plus d'informations sur les supports muraux.
  • Page 80 ® ® Système électrique Automower Automower Batterie lithium-ion, 18,5 V/2,1 Ah N° 586 57 62-02 Batterie lithium-ion, 18 V/2,0 Ah N° 586 57 62-03, 586 57 62-05 590 21 42-02, 590 21 42-04 Batterie lithium-ion, 18,25 V/2,0 Ah N° 586 57 62-04 590 21 42-03 Alimentation (28 V CC), V CA 100-240...
  • Page 81 ® ® Tonte Automower Automower Système de coupe 3 trois lames de coupe pivotan- Vitesse du moteur de coupe, tr/min 2 900 2 200 Consommation d'énergie pendant la coupe, W +/- 20 % Hauteur de coupe, cm (po) 2-5 / 0,8 - 2,0 2-5 / 0,8 - 2,0 Largeur de coupe, cm (po) 17 / 6,7...
  • Page 82 ® ® ® Système électrique Automower Automower Automower 315X Batterie lithium-ion, 18,5 V/2,1 Ah N° 584 85 28-01, 584 85 28-02 Batterie lithium-ion, 18 V/2,0 Ah N° 584 85 28-03, 590 21 42-02, 593 11 40-01, 593 11 40-02, 590 21 42-04, 584 85 28-05 Batterie lithium-ion, 18,25 V/2,0 Ah N°...
  • Page 83 ® ® ® Tonte Automower Automower Automower 315X Système de coupe 3 trois lames de coupe pivotantes Vitesse du moteur de coupe, tr/min 2 300 2 300 2 300 Consommation d'énergie pendant la coupe, W +/- 20 % Hauteur de coupe, cm (po) 2-6 / 0,8 - 2,4 2-6 / 0,8 - 2,4 2-6 / 0,8 - 2,4...
  • Page 84 ® ® ® ® Système électrique Automower Automower Automower Automower 430X 450X Batterie lithium-ion, 18,5 V/3,0 Ah N° 580 68 33-01 Batterie lithium-ion, 18,5 V/4,0 Ah N° 580 68 33-02 Batterie lithium-ion, 18 V/4,0 Ah N° 580 68 33-03, 593 11 41-02, 593 11 42-01, 593 11 41-04 Batterie lithium-ion, 18,25 V/4,0 Ah N°...
  • Page 85 ® ® ® ® Antenne du câble périphérique Automower Automower Automower Automower 430X 450X Bande de fréquence d'exploitation, Hz 100-80000 100-80000 100-80000 100-80000 Champ magnétique maximal, dBuA/m Puissance de radiofréquence maximale <25 <25 <25 <25 mW à 60 m ® ®...
  • Page 86: Marques Déposées

    Classe de puissance 3 23 dBm Husqvarna AB ne garantit en aucun cas la compatibilité totale entre le produit et d'autres types de dispositifs sans fil comme des télécommandes, des transmetteurs radio, des boucles d'écoute, des clôtures électrifiées enterrées pour animaux ou autres.
  • Page 87: Déclaration De Conformité Ce

    • Dommages provoqués par l'utilisation d'une Si une erreur survient avec votre produit Husqvarna, batterie qui ne serait pas d'origine Husqvarna. contactez le service clientèle Husqvarna pour de plus • Dommages provoqués par l'utilisation de pièces de amples instructions.
  • Page 88 Codice PIN: Il numero di serie si trova sulla targhetta dati di funzionamento del prodotto e sulla confezione del prodotto. • Utilizzare il numero di serie per registrare il prodotto sul sito Web www.husqvarna.com. 31.2 Supporto 31.3 Capacità Per assistenza sul prodotto, contattare il centro di Le dimensioni dell'area che il prodotto può...
  • Page 89: Metodo Di Lavoro

    Web di Husqvarna. Quando il prodotto incontra un ostacolo o si avvicina al Nota:...
  • Page 90 ® 31.7 Panoramica del prodotto Automower I numeri in figura rappresentano: 13. Ruota posteriore 14. Lamelle di carica Scocca 15. Tastiera Portello del display, tastiera e regolazione 16. Display dell'altezza di taglio 17. Rotolo per cavo perimetrale e cavo guida Pulsante Stop 18.
  • Page 91 26. Cavo a bassa tensione 28. Targhetta dati di funzionamento (incl. codice di identificazione del prodotto) 27. Decalcomania allarme ® 31.8 Panoramica del prodotto Automower I numeri in figura rappresentano: 14. Targhetta dati di funzionamento (incl. codice di identificazione del prodotto) Scocca 15.
  • Page 92 27. Manuale operatore e Guida rapida 30. Decalcomania allarme 28. Lame extra 29. Cavo a bassa tensione ® 31.9 Panoramica del prodotto Automower 310/315/315X I numeri in figura rappresentano: 14. Tastiera 15. Apparato di taglio Scocca 16. Scatola telaio con elettronica, batteria e motori Portello per la regolazione dell'altezza di taglio 17.
  • Page 93 27. Astina di misurazione per l'installazione del cavo 29. Lame extra perimetrale (l'astina di misurazione è separabile 30. Cavo a bassa tensione dalla confezione) 31. Decalcomania allarme 28. Manuale operatore e Guida rapida ® 31.10 Panoramica del prodotto Automower 420/430X/440/450X Automower 420/440 Automower 430X Automower 450X...
  • Page 94: Simboli Riportati Sul Prodotto

    26. Decalcomania allarme 27. Lame extra Non è consentito smaltire questo prodotto 28. Cavo a bassa tensione come normale rifiuto domestico. 29. Giunti per cavi perimetrali Accertarsi che il prodotto sia riciclato nel 30. Rotolo per cavo perimetrale e cavo guida rispetto dei requisiti di legge locali.
  • Page 95: Definizioni Di Sicurezza

    MAIUSCOLO e in corsivo fa riferimento • Il testo in alle diverse modalità di funzionamento disponibili sul prodotto. 32 Sicurezza 32.1 Definizioni di sicurezza ATTENZIONE: Utilizzato se è presente un rischio di danni al prodotto, ad Le avvertenze, le precauzioni e le note sono utilizzate altri materiali oppure alla zona adiacente nel per evidenziare le parti importanti del manuale.
  • Page 96 Non collegare mai l'alimentatore a una presa di corrente se la spina o il cavo sono danneggiati. I cavi danneggiati o usurati aumentano il rischio di scosse elettriche. Caricare la batteria solo nella stazione di ricarica in dotazione. L'utilizzo errato può causare scosse elettriche, surriscaldamento o perdite di liquido corrosivo dalla batteria.
  • Page 97 Programma in modo che il prodotto e la funzione l'irrigatore non funzionino mai contemporaneamente. • Husqvarna non garantisce la completa compatibilità tra il prodotto e altri tipi di sistemi wireless, quali telecomandi, trasmettitori radio, apparecchi acustici, recinzioni elettriche interrate per animali o simili.
  • Page 98: Collegamento Dell'alimentatore

    Protezione dalla luce diretta del sole. AVVERTENZA: il prodotto deve essere utilizzato solo con un alimentatore fornito da Husqvarna. Quando si collega l'alimentatore, utilizzare solo una min 30 cm / 12” presa a muro collegata a un interruttore differenziale (RCD).
  • Page 99: Pannello Di Comando

    STOP. manuale dell'operatore completo sul sito Web • Utilizzare il pulsante START (A) per avviare il Husqvarnawww.husqvarna.com. funzionamento del prodotto. 33.2 Pannello di comando • Utilizzare i 3 pulsanti a scelta multipla (B) per selezionare le funzioni visualizzate sul display Tutti i comandi e le impostazioni del prodotto avvengono sopra i pulsanti.
  • Page 100 satelliti GPS. Il simbolo (B) viene visualizzato quando il prodotto non rileva un numero sufficiente di satelliti GPS. Il simbolo (A) lampeggia durante i primi giorni di funzionamento del prodotto, poiché sta raccogliendo informazioni GPS sull'installazione. • Il pulsante START viene utilizzato per attivare il prodotto.
  • Page 101: Struttura Dei Menu

    305/315/315X/420/430X/440/450X). taglio deve essere impostata su MAX per Husqvarna consiglia di lasciare attiva la evitare di danneggiare il cavo. Dopo Modalità ECO per risparmiare energia ed questo periodo, l'altezza di taglio può essere ridotta gradualmente ogni 1418 - 007 - 17.09.2020...
  • Page 102: Accensione E Spegnimento Del Prodotto

    ® ® Automower Connect o Automower Connect@Home. Contattare il rivenditore Husqvarna locale per informazioni sugli accessori adatti al proprio prodotto. 34 Utilizzo 34.1 Accensione e spegnimento del MAN , si ricaricherà ricaricato in modalità...
  • Page 103 ® Taglio a spot: (non applicabile per il modello locali specifici. Il servizio a vita Automower • Automower ® 310). Il prodotto segue un percorso a Connectincluso è applicabile solo se nell'area operativa spirale per tagliare l'erba nella zona dove questa è è...
  • Page 104: Regolazione Dell'altezza Di Taglio

    ® 34.5.5 Abbinamento con Automower ® 34.6.2 Automower 305/310/315/315X Connect@Home È possibile regolare l'altezza di taglio da MIN a MAX in 9 Attivare la comunicazione wireless Bluetooth ® sullo passaggi. Accessori > smartphone. Selezionare la funzione Premere il pulsante STOP per arrestare il prodotto Connect@Home >...
  • Page 105 Una stagione lunga e un utilizzo di molte ore al acqua corrente. giorno riducono gli intervalli di sostituzione della batteria. ATTENZIONE: Non utilizzare Contattare il rappresentante locale Husqvarna per dispositivi di lavaggio ad alta pressione per sostituire la batteria. 1418 - 007 - 17.09.2020 Manutenzione - 105...
  • Page 106: Sostituzione Delle Lame

    In caso di malfunzionamento, il display visualizzerà un messaggio d’errore. Per ulteriori informazioni sui messaggi, fare riferimento al Manuale operatore completo sul sito web Husqvarna (www.husqvarna.com). Se non è possibile trovare il motivo del guasto o se lo stesso messaggio viene visualizzato più volte, contattare il rivenditore locale Husqvarna.
  • Page 107: Trasporto, Stoccaggio E Smaltimento

    Per indicare che l'impianto funziona correttamente, la spia della stazione di ricarica deve emettere una luce verde fissa o lampeggiante. Se la luce della spia è diversa, attenersi alla seguente guida di ricerca dei guasti. Ulteriori informazioni sono disponibili sul sito www.husqvarna.com. Per ulteriore assistenza, contattare il rappresentante locale Husqvarna.
  • Page 108: Rimessaggio Invernale

    37.3 Informazioni di carattere danneggiarsi e in alcuni casi divenire ambientale inutilizzabile. Il simbolo sul prodotto Husqvarna o sul Collocare il prodotto nella stazione di ricarica con il relativo imballaggio indica che il prodotto portello aperto finché l'icona della batteria sul display non può...
  • Page 109 ® ® Impianto elettrico Automower Automower Batteria agli ioni di litio, 18,5 V/2,1 Ah n. art. 586 57 62-02 Batteria agli ioni di litio, 18 V/2,0 Ah n. art. 586 57 62-03, 586 57 62-05 590 21 42-02, 590 21 42-04 Batteria agli ioni di litio, 18,25 V/2,0 Ah n.
  • Page 110 ® ® Taglio Automower Automower Apparato di taglio 3 lame di taglio pivottanti Velocità motore lame, giri/min 2900 2200 Consumo di potenza durante il taglio, W +/- Altezza di taglio, cm / poll. 2-5 / 0,8-2,0 2-5 / 0,8-2,0 Larghezza di taglio, cm / poll. 17 / 6,7 22 / 8,7 Passaggio più...
  • Page 111 ® ® ® Impianto elettrico Automower Automower Automower 315X Batteria agli ioni di litio, 18,5 V/2,1 Ah n. art. 584 85 28-01, 584 85 28-02 Batteria agli ioni di litio, 18 V/2,0 Ah n. art. 584 85 28-03, 590 21 42-02, 593 11 40-01, 593 11 40-02, 590 21 42-04, 584 85 28-05 Batteria agli ioni di litio, 18,25 V/2,0 Ah n.
  • Page 112 ® ® ® Taglio Automower Automower Automower 315X Apparato di taglio 3 lame di taglio pivottanti Velocità motore lame, giri/min 2300 2300 2300 Consumo di potenza durante il taglio, W +/- Altezza di taglio, cm / poll. 2-6 / 0,8-2,4 2-6 / 0,8-2,4 2-6 / 0,8-2,4 Larghezza di taglio, cm / poll.
  • Page 113 ® ® ® ® Impianto elettrico Automower Automower Automower Automower 430X 450X Batteria agli ioni di litio, 18,5 V/3,0 Ah n. art. 580 68 33-01 Batteria agli ioni di litio, 18,5 V/4,0 Ah n. art. 580 68 33-02 Batteria agli ioni di litio, 18 V/4,0 Ah n. art. 580 68 33-03, 593 11 41-02, 593 11 42-01,...
  • Page 114 ® ® ® ® Antenna cavo perimetrale Automower Automower Automower Automower 430X 450X Banda di frequenza operativa, Hz 100-80000 100-80000 100-80000 100-80000 Campo magnetico massimo, dBuA/m. Potenza a radiofrequenza massima , mW <25 <25 <25 <25 @60m ® ® ® ®...
  • Page 115: Marchi Registrati

    Classe di alimentazione 3 23 dBm Husqvarna AB non garantisce la completa compatibilità fra il prodotto e altri tipi di sistemi wireless, quali telecomandi, trasmettitori radio, apparecchi acustici, recinzioni elettriche interrate per animali o simili. I prodotti sono realizzati in Inghilterra o nella Repubblica Ceca. Consultare le informazioni sulla targhetta dati di Introduzione alla pagina 88 funzionamento.
  • Page 116: Dichiarazione Di Conformità Ce

    In caso di guasto al proprio prodotto Husqvarna, scontrino e il numero di serie del prodotto quando si contattare l’assistenza clienti Husqvarna per ulteriori contatta l’assistenza clienti Husqvarna. istruzioni. Accertarsi di avere a portata di mano lo 40 Dichiarazione di conformità CE 40.1 Dichiarazione di conformità...
  • Page 117 1418 - 007 - 17.09.2020 Dichiarazione di conformità CE -...
  • Page 118 118 - Dichiarazione di conformità CE 1418 - 007 - 17.09.2020...
  • Page 119 1418 - 007 - 17.09.2020 Dichiarazione di conformità CE -...
  • Page 120 AUTOMOWER ® is a trademark owned by Husqvarna AB. © Copyright 2020 HUSQVARNA. All rights reserved. www.husqvarna.com Original instructions Originalanweisungen Instructions d’origine Istruzioni originali 1142325-39 2020-09-18...

Table des Matières