Masquer les pouces Voir aussi pour AUTOMOWER 105:
Table des Matières

Publicité

Les langues disponibles

Les langues disponibles

Liens rapides

HUSQVARNA AUTOMOWER
Read the operator's manual carefully and make sure that you understand the instructions before
Lesen Sie die Bedienungsanweisung sorgfältig durch und machen Sie sich mit dem Inhalt vertraut,
Lisez attentivement le manuel d'utilisation et assurez-vous que vous en comprenez le contenu
Prima di usare la macchina, leggere attentamente il manuale dell'operatore e accertarsi di averne
Questo manuale d'istruzione è fornito da trovaprezzi.it. Scopri tutte le offerte per
AUTOMOWER 430X
o cerca il tuo prodotto tra le
®
105/310/315/315X/420/430X/
migliori offerte di Macchine Giardinaggio
Operator's manual
Bedienungsanweisung
Manuel d'utilisation
Manuale dell'operatore
440/450X
you use the product.
bevor Sie das Gerät benutzen
avant d'utiliser la machine.
compreso il contenuto.
Husqvarna
English (2-23)
Deutsch (24-49)
Français (50-75)
Italiano (76-101)

Publicité

Table des Matières
loading

Sommaire des Matières pour Husqvarna AUTOMOWER 105

  • Page 1 Macchine Giardinaggio Operator's manual Bedienungsanweisung Manuel d'utilisation Manuale dell'operatore ® HUSQVARNA AUTOMOWER 105/310/315/315X/420/430X/ English (2-23) 440/450X Deutsch (24-49) Read the operator's manual carefully and make sure that you understand the instructions before Français (50-75) you use the product.
  • Page 2: Table Des Matières

    9.1 Guarantee terms..........22 1.6 Movement pattern..........4 1.7 Finding the charging station........4 10 EC Declaration of Conformity 1.8 Product overview Automower 105......5 10.1 EC Declaration of Conformity......23 1.9 Product overview Automower 310/315/315X..6 1.10 Product overview Automower 420/430X/ 440/450X..............7...
  • Page 3: Introduction

    Dealer's telephone number: If the robotic lawnmower is stolen, it is important to notify Husqvarna of this. Contact your local Husqvarna represen- tative and provide the robotic lawnmower's serial number so that it can be registered as stolen in an international database.
  • Page 4: Movement Pattern

    The robotic lawnmower automatically combines these 3 search methods to locate the charging station as fast as possible but also to avoid as much tracks forming as possible. Automower 105 always follows the guide wire to the charging station. 4 - Introduction...
  • Page 5: Product Overview Automower 105

    1.8 Product overview Automower 105 The numbers in the figure represent: 16. Display 17. Loop wire for boundary loop and guide wire 1. Body 18. Connector for connecting the loop wire to the 2. Hatch to display, keypad and cutting height...
  • Page 6: Product Overview Automower 310/315/315X

    1.9 Product overview Automower 310/315/315X The numbers in the figure represent: 18. Main switch 19. Blade disc 1. Body 20. Skid plate 2. Hatch to cutting height adjustment 21. Power supply (the appearance of the power supply 3. Hatch to display and keypad may differ depending on market) 4.
  • Page 7: Product Overview Automower 420/430X/440/450X

    1.10 Product overview Automower 420/430X/440/450X Automower 420/440 Automower 430X Automower 450X The numbers in the figure represent: 19. LED for operation check of the charging station and boundary wire 1. Body 20. Charging station 2. Hatch to display and keypad 21.
  • Page 8: Symbols On The Product

    1.11 Symbols on the product The chassis contains components which are sensitive to electrostatic discharge These symbols can be found on the robotic lawnmower. (ESD). The chassis must also be resealed Study them carefully. in a professional manner. For these WARNING: Read the user in- reasons the chassis shall only be opened structions before operating...
  • Page 9: Safety

    2 Safety 2.1 General safety instructions • Text written in bold is one of the buttons on the robotic lawnmower’s keypad. The following system is used in the Operator’s Manual UPPERCASE and italics refer to the • Text written in to make it easier to use: position of the main switch and the different italics is a text that is shown on the...
  • Page 10 Use the timer function so the mower and sprinkler never run simultaneously. • Husqvarna does not guarantee full compatibility between the robotic lawnmower and other types of wireless systems such as remote controls, radio 10 - Safety...
  • Page 11: Installation

    For more instructions on how to do a proper installation, see chapter Installation in the complete Operator's Take the following into consideration when planning manual on Husqvarna's website www.husqvarna.com. where to place the power supply: 3.2 Control panel • Close to the charging station •...
  • Page 12: Display Automower 310/315/315X/420/430X/ 440/450X

    If the mower is not allowed to mow due to 3.7 Menu structure timer , symbol (B) is shown. If the operation mode The main menu for Automower 105 offers 4 options. Override timer is chosen, symbol (C) is shown. Automower 310 has 6 options and Automower 315/315X has 7 options.
  • Page 13: Submenus

    3.9 Browse between menus Browse through the main menu and submenus with the Weather timer help of the multichoice buttons (Automower 105) or the arrow keys (Automower 310/315/315X/420/430X/ Applicable for Automower 315/315X/ 440/450X). Enter values and times using the number...
  • Page 14: Operation Selection Automower 105

    4 Operation 4.1 Operation selection Automower 105 to cut the grass where it has been mown less than in other parts of the garden. By consecutively pressing the Operation selection button many times, one can choose between three Spot Cutting function is activated with the different operation modes.
  • Page 15: Adjusting The Cutting Height

    Please, contact your local Husqvarna 4.5.1 Automower 105 representative for more information. The cutting height can be varied from MIN (2) to MAX (5). To adjust the cutting height: 4.4.2 Automower Connect@Home Included in Automower 310/315/420/440. 1. Press the STOP button to stop the robotic lawnmower and open the hatch.
  • Page 16: Cleaning

    Contact your local Husqvarna representative to replace exposed to greater wear and tear. For better operating the battery.
  • Page 17: Troubleshooting

    For a fully functional installation, the indicator lamp in the charging station must emit a solid or flashing green light. If something else appears, follow the troubleshooting guide below. There is more help on www.husqvarna.com. If you still need help, please contact your local Husqvarna representative.
  • Page 18: Transportation, Storage And Disposal

    You can also hang the Always secure the product when transporting it. robotic lawnmower on a Husqvarna original wall hanger. Contact your local Husqvarna representative for more 7.1.1 How to lift and move the robotic lawnmower information about available wall hangers.
  • Page 19: Technical Data

    8 Technical data 8.1 Automower 105/310/315/315X Dimensions Automower Automower Automower Automower 315X Length, cm Width, cm Height, cm Weight, kg 10.1 Electrical system Automower Automower Automower Automower 315X Battery, Lithium-Ion 18 V/2.1 Ah Art. No. 586 57 62-01, 584 85 28-01,...
  • Page 20: Automower 420/430X/440/450X

    IPX4 IPX4 IPX4 IPX4 Husqvarna AB does not guarantee full compatibility between the robotic lawnmower and other types of wireless systems such as remote controls, radio transmitters, hearing loops, underground electric animal fencing or similar. 8.2 Automower 420/430X/440/450X Dimensions Automower...
  • Page 21 IPX4 IPX4 Husqvarna AB does not guarantee full compatibility between the robotic lawnmower and other types of wireless systems such as remote controls, radio transmitters, hearing loops, underground electric animal fencing or similar. Maximum active output power to antennas in the frequency band in which the radio equipment operates.
  • Page 22: Warranty

    The blades are seen as disposable and are not covered by the guarantee. If an error occurs with your Husqvarna robotic lawnmower, please contact your local Husqvarna representative for further instructions. Please have the receipt and the robotic lawnmower’s serial number at...
  • Page 23: Ec Declaration Of Conformity

    ® For Husqvarna Automower 310, Husqvarna Auto- ® ® mower 315, Husqvarna Automower 420 and Husq- Husqvarna AB, SE-561 82 Huskvarna, Sweden, tel: ® varna Automower 440 also: +46-36-146500, declares that the Robotic lawnmovers ® ® Husqvarna Automower 105, Husqvarna Automower •...
  • Page 24 420/430X/440/450X........... 34 14.7 Menüstruktur............35 14.8 Untermenüs............35 14.9 Zwischen den Menüs blättern......35 14.10 Hauptmenü............35 15 Betrieb 15.1 Auswahl des Betriebs für Automower 105..37 15.2 Betriebsauswahl Start Automower 310/315/315X/420/430X/440/450X......37 15.3 Betriebsart Parken Automower 310/315/315X/420/430X/440/450X......37 15.4 Konnektivität............37 15.5 Einstellen der Schnitthöhe......... 38 16 Wartung 16.1 Reinigung............
  • Page 25: Einleitung

    Händler: Telefonnummer des Händlers: Bei einem Diebstahl des Mähroboters sollten Sie Husqvarna umgehend informieren. Setzen Sie sich mit Ihrem örtli- chen Husqvarna-Händler in Verbindung und geben Sie die Seriennummer des Mähroboters an. Auf diese Weise kann das Gerät in einer internationalen Datenbank als gestohlen registriert werden. Dies ist eine wichtige Maßnahme zum Diebstahlschutz, die dem Kauf und Verkauf gestohlener Mähroboter entgegenwirken soll.
  • Page 26: Bewegungsmuster

    Mähroboter anzuhalten, wenn zu finden und dabei unnötige Spurenbildung zu er in Betrieb ist. Wenn die STOP-Taste gedrückt wird, vermeiden. Automower 105 folgt immer dem Suchkabel öffnet sich die Abdeckung, unter der sich das Bedienfeld zur Ladestation.
  • Page 27: Produktübersicht Automower 105

    12.8 Produktübersicht Automower 105 Die Zahlen in der Darstellung stehen für: 16. Display 17. Schleifenkabel für Begrenzungskabel und 1. Gehäuse Suchkabel 2. Abdeckklappe für Display, Tastatur und 18. Verbinder zum Anschließen des Schleifenkabels an Schnitthöheneinstellung die Ladestation 3. Stopptaste 19. Haken 4.
  • Page 28: Produktübersicht Automower 310/315/315X

    12.9 Produktübersicht Automower 310/315/315X Die Zahlen in der Darstellung stehen für: 18. Hauptschalter 19. Messerteller 1. Gehäuse 20. Gleitplatte 2. Abdeckung für Schnitthöheneinstellung 21. Netzkabel (das Aussehen des Netzkabels kann sich 3. Abdeckung für Display und Tastatur je nach Markt unterscheiden) 4.
  • Page 29: Produktübersicht Automower 420/430X/440/450X

    12.10 Produktübersicht Automower 420/430X/440/450X Automower 420/440 Automower 430X Automower 450X Die Zahlen in der Darstellung stehen für: 19. LED für die Anzeige von Funktion und Fehlern bezüglich der Ladestation und des 1. Gehäuse Begrenzungskabels 2. Abdeckung für Display und Tastatur 20.
  • Page 30: Symbole Auf Dem Produkt

    12.11 Symbole auf dem Produkt Das Chassis enthält Bauteile, die empfindlich gegenüber elektrostatischer Die folgenden Symbole befinden sich auf dem Entladung (electrostatic discharge = ESD) Mähroboter. Schauen Sie sich diese genau an. sind. Das Chassis muss fachmännisch WARNUNG: Lesen Sie die neu versiegelt werden.
  • Page 31: Sicherheit

    13 Sicherheit 13.1 Allgemeine Sicherheitshinweise • Fett gedruckter Text steht für die Tasten der Mähroboter-Tastatur. Um das Lesen dieser Bedienungsanleitung zu GROSSBUCHSTABEN und kursiver Schrift • Text in erleichtern, haben wir die Darstellung der Texte wie folgt gibt die Position des Hauptschalters und die gewählt: verschiedenen, für den Mähroboter verfügbaren kursiv dargestellt sind, werden entweder...
  • Page 32 Stellen Sie sicher, dass sich keine Steine, Äste, Mähroboter nicht gleichzeitig in Betrieb sind. Werkzeuge, Spielzeuge oder andere Gegenstände • Husqvarna übernimmt keine Garantie für die auf dem Rasen befinden, welche die Klingen vollständige Kompatibilität zwischen dem beschädigen. Der Mähroboter kann an Mähroboter und anderen kabellosen Systemen wie...
  • Page 33: Installation

    • Keine direkte Sonneneinstrahlung. Installation in der vollständigen Kapitel Das Netzgerät muss an einem gut belüfteten Standort Bedienungsanleitung auf der Husqvarna Website platziert und überdacht werden. Achten Sie beim www.husqvarna.com. Anschluss des Netzkabels an Steckdosen im 14.2 Bedienfeld Freibereich darauf, dass diese für den Betrieb im Freien zugelassen sind.
  • Page 34: Bedienfeld Automower 105

    14.4 Bedienfeld Automower 105 Die Tastatur besteht aus vier Tastenblöcken: • Das ECO-Symbol wird angezeigt, wenn sich der ECO-Modus befindet. Mähroboter im • Das schwarze Uhrensymbol (A) wird angezeigt, • Mit der START-Taste wird der Mähroboter wenn der Mäher aufgrund der Timer-Einstellung eingeschaltet.
  • Page 35: Menüstruktur

    Schnitthöhe erreicht ist. oder die Fahrtrichtung aus der Ladestation heraus. 14.7 Menüstruktur Sicherheit Das Hauptmenü für den Automower 105 umfasst vier In diesem Menü können Einstellungen Auswahlmöglichkeiten. Automower 310 verfügt über bezüglich der Sicherheit und der sechs und Automower 315/315X über sieben Verbindung zwischen dem Mähroboter...
  • Page 36 In diesem Menü werden die Einstellungen für Mähroboter-Zubehör vorgenommen, zum Beispiel für Automower Connect oder Automower Connect@Home. Wenden Sie sich an Ihren Husqvarna Händler vor Ort, wenn Sie Informationen darüber benötigen, welches Zubehör für Ihren Mähroboter verfügbar ist. 36 - Installation...
  • Page 37: Betrieb

    15 Betrieb 15.1 Auswahl des Betriebs für Automower 105 TIMER AUSSCHALTEN . Alle Timereinstellungen • können kurzzeitig durch Wahl von Timer Sie können durch mehrmaliges Drücken der Taste zur ausschalten aufgehoben werden. Sie können den Auswahl des Betriebs zwischen drei unterschiedlichen überschreiben .
  • Page 38: Einstellen Der Schnitthöhe

    Neuinstallation muss die Schnitthöhe auf MAX spezifischen zellularen Systemen. Bitte setzen Sie sich eingestellt werden, damit das Schleifenkabel mit Ihrem Husqvarna Händler vor Ort für weitere nicht beschädigt wird. Danach kann die Informationen in Verbindung. Schnitthöhe schrittweise jede Woche gesenkt werden, bis die gewünschte Schnitthöhe...
  • Page 39 15.5.3 Automower 420/430X/440/450X Die Schnitthöhe kann zwischen MIN und MAX in 9 Stufen eingestellt werden. 1. Drücken Sie die STOP-Taste, um den Mähroboter anzuhalten und die Abdeckung zu öffnen. 2. Drücken Sie die MENÜ-Taste, um das Hauptmenü aufzurufen. 3. Bewegen Sie den Cursor mit den Pfeiltasten nach Schnitthöhe auszuwählen.
  • Page 40: Reinigung

    WARNUNG: Verwenden Sie grundsätzlich immer Klingen und Schrauben des richtigen Der Hauptschalter muss sich während aller Typs. Husqvarna kann nur bei der Verwendung Arbeiten am Chassis des Mähroboters, wie von Originalklingen die Sicherheit garantieren. Reinigung oder Austauschen der Klingen in der Wenn nur die Klingen ausgetauscht werden und 0 befinden.
  • Page 41 2. Drehen Sie den Mähroboter um. Legen Sie den Mähroboter auf eine weiche, saubere Oberfläche, um so Beschädigungen des Gehäuses und der Abdeckung zu vermeiden. 3. Drehen Sie die Gleitplatte, bis deren Löcher über den Schrauben für die Messer stehen. 4.
  • Page 42: Fehlersuche

    Leuchtet die Anzeigelampe an der Ladestation dauerhaft oder blinkt grün, weist dies auf eine vollständige und betriebsfähige Installation hin. Sollte die Lampe nicht dauerhaft grün leuchten, die Fehlersuche zu Rate ziehen. Weitere Hilfestellungen finden Sie auf www.husqvarna.com. Sollten Sie trotz allem Hilfe benötigen, setzen Sie sich mit Ihrem Husqvarna Händler vor Ort in Verbindung.
  • Page 43: Transport, Lagerung Und Entsorgung

    Wenn eine mittlere oder hohe ebenfalls an einer Wandhalterung von Husqvarna Sicherheitsstufe eingestellt wurde (siehe hängend lagern. Wenden Sie sich an Ihren Husqvarna Vollständige Bedienungsanleitung auf Seite 25 ), Händler vor Ort für weitere Informationen zu muss der PIN-Code eingegeben werden. Der PIN- verfügbaren Wandhalterungen.
  • Page 44: Umweltinformationen

    18.3 Umweltinformationen Das Symbol auf dem Husqvarna Mähroboter weist darauf hin, dass dieses Produkt nicht über den Hausmüll entsorgt werden darf. Übergeben Sie es zur Entsorgung stattdessen an eine entsprechende Recyclinganlage für elektrische und elektronische Geräte. Die Batterie muss entfernt werden, bevor das Produkt entsorgt wird.
  • Page 45: Technische Daten

    19 Technische Daten 19.1 Automower 105/310/315/315X Abmessungen Automower Automower Automower Automower 315X Länge, cm Breite, cm Höhe, cm Gewicht, kg 10,1 Elektrisches System Automower Automower Automower Automower 315X Batterie, Lithium-Ionen 18 V/2,1 Ah Art.-Nr. 586 57 62-01, 584 85 28-01,...
  • Page 46: Automower 420/430X/440/450X

    IPX1 Stromversorgung IPX4 IPX4 IPX4 IPX4 Husqvarna AB übernimmt keine Garantie für die vollständige Kompatibilität zwischen dem Mähroboter und anderen kabellosen Systemen wie Fernbedienungen, Sendern, im Boden verlegten elektrischen Umzäunungen von Viehweiden o. Ä. 19.2 Automower 420/430X/440/450X Abmessungen Automower Automower...
  • Page 47 IPX4 IPX4 IPX4 IPX4 Husqvarna AB übernimmt keine Garantie für die vollständige Kompatibilität zwischen dem Mähroboter und anderen kabellosen Systemen wie Fernbedienungen, Sendern, im Boden verlegten elektrischen Umzäunungen von Viehweiden o. Ä. Maximale Ausgangsleistung zu den Antennen im Betriebsfrequenzbereich. Die Geräuschemissionserklärung entspricht der Norm EN 50636-2-107:2015. Umweltbelastende Geräusche- missionen, gemessen als Schallleistung (L ) gemäß...
  • Page 48: Gewährleistung

    Die Klingen sind Verschleißteile und fallen nicht unter den Geltungsbereich dieser Garantie. Sollten Sie eine Störung Ihres Husqvarna Mähroboters feststellen, setzen Sie sich bitte mit Ihrem Husqvarna- Händler vor Ort in Verbindung, um weitere Informationen zur Lösung des Problems zu erhalten .
  • Page 49: Eg-Konformitätserklärung

    21 EG-Konformitätserklärung 21.1 EG-Konformitätserklärung ® Automower Connect Modul ausgestattet sind, gelten zudem: Husqvarna AB, SE-561 82 Huskvarna, Schweden, Tel.: +46-36-146500, versichert hiermit, dass die Mähroboter • EN 301 489-52 V1.1.1 ® der SerienHusqvarna Automower 105, Husqvarna • EN 301 511 V9.0.2 (Funkspektrumseffizienz) ®...
  • Page 50 30.2 Automower 420/430X/440/450X......72 23.6 Trajectoire de déplacement........52 23.7 Retour à la station de charge......52 31 Garantie 23.8 Présentation du produit Automower 105....53 31.1 Conditions de garantie........74 23.9 Présentation du produit Automower 310/315/315X.............54 32 Déclaration de conformité CE 23.10 Présentation du produit Automower...
  • Page 51: Introduction

    Numéro de téléphone du reven- deur : En cas de vol de votre robot tondeuse, il est important d'en informer Husqvarna. Contactez votre représentant Husq- varna local et fournissez-lui le numéro de série du robot tondeuse afin qu'il soit enregistré comme produit volé dans la base de données internationale.
  • Page 52: Trajectoire De Déplacement

    START rend le démarrage alors rapidement que possible mais en évitant également impossible. autant que possible la formation de traînées. L'Automower 105 suit toujours le câble guide jusqu'à la station de charge. 52 - Introduction 247 - 005 - 01.09.2017...
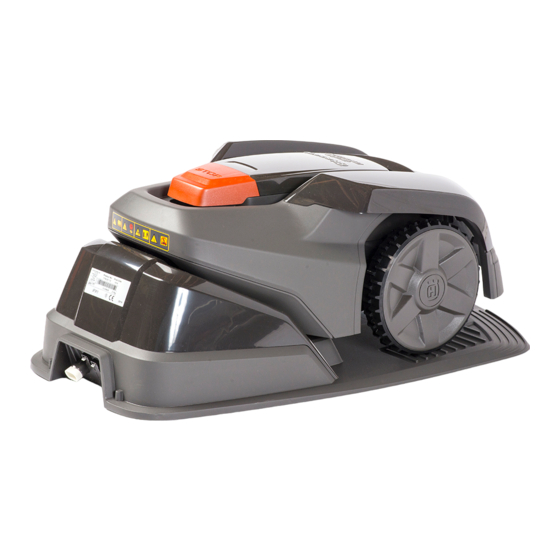
  • Page 53: Présentation Du Produit Automower 105

    23.8 Présentation du produit Automower 105 Les numéros sur la figure représentent : 16. Écran d'affichage 17. Boucle de câble pour le câble périphérique et le 1. Carrosserie câble guide 2. Capot de l'écran d'affichage, du clavier et du réglage 18.
  • Page 54: Présentation Du Produit Automower 310/315/315X

    23.9 Présentation du produit Automower 310/315/315X Les numéros sur la figure représentent : 17. Poignée 18. Interrupteur principal 1. Carrosserie 19. Disque de coupe 2. Capot de réglage de la hauteur de coupe 20. Disque de protection 3. Capot d'accès à l'écran et au clavier 21.
  • Page 55: Présentation Du Produit Automower 420/430X/440/450X

    23.10 Présentation du produit Automower 420/430X/440/450X Automower 420/440 Automower 430X Automower 450X Les numéros sur la figure représentent : 18. Contacts de charge station 19. Voyant de fonctionnement de la station de charge et 1. Carrosserie du câble périphérique 2. Capot d'accès à l'écran et au clavier 20.
  • Page 56: Symboles Concernant Le Produit

    23.11 Symboles concernant le produit Le châssis contient des composants qui sont sensibles aux décharges Ces symboles peuvent figurer sur le robot de tonte. électrostatiques (ESD). Le châssis doit Étudiez-les attentivement. également être scellé de manière AVERTISSEMENT : lisez at- professionnelle.
  • Page 57: Sécurité

    24 Sécurité 24.1 Instructions générales de sécurité • Le texte écrit en gras fait référence aux touches du clavier du robot de tonte. Le système suivant est utilisé dans le manuel LETTRES MAJUSCULES et en • Le texte écrit en d'utilisation pour une utilisation plus simple : italique fait référence à...
  • Page 58 à vos risques et périls. • Husqvarna ne garantit en aucun cas la compatibilité • Vérifiez qu'aucun objet tel que des pierres, des totale entre le robot de tonte et d'autres types de branches, des outils ou des jouets ne se trouve sur dispositif sans fil comme des télécommandes, des...
  • Page 59: Installation

    Aucune pièce de l'alimentation électrique ne doit être 25.3 Écran d'affichage Automower 105 changée ou modifiée. Par exemple, le câble basse tension ne doit pas être raccourci ni rallongé. Les câbles Si le bouton STOP est actionné...
  • Page 60: Clavier Automower 105

    • principal en appuyant sur le bouton à choix multiples situé sous le texte. 25.4 Clavier Automower 105 Le clavier est composé de 4 groupes de touches : • Le symbole ECO s'affiche si le robot de tonte est en mode ECO .
  • Page 61: Structure Du Menu

    25.7 Structure du menu éviter d'endommager la boucle du câble. La hauteur de coupe peut ensuite être Le menu principal du modèle Automower 105 propose réduite progressivement toutes les 4 options. L'Automower 310 dispose de 6 options et semaines jusqu'à ce que la hauteur l'Automower 315/315X en a 7.
  • Page 62 Ce menu gère les paramètres des accessoires du robot de tonte, par exemple Automower Connect ou Automower Connect@Home. Contactez votre représentant Husqvarna local pour savoir quels accessoires sont disponibles pour votre robot de tonte. 62 - Installation 247 - 005 - 01.09.2017...
  • Page 63: Utilisation

    26.1 Sélection du mode de fonctionnement suspendus en sélectionnant Suspendre la minuterie. Il est possible de suspendre la minuterie pendant Automower 105 24 h ou 3 jours. Appuyez plusieurs fois sur le bouton du mode de POINT DE TONTE (non disponible pour •...
  • Page 64: Réglage De La Hauteur De Coupe

    Automower Connect en ensuite être réduite progressivement toutes les raison des systèmes cellulaires spécifique à chaque semaines jusqu'à ce que la hauteur souhaitée région. Contactez votre représentant Husqvarna local soit atteinte. pour de plus amples informations. 26.4.2 Automower Connect@Home 26.5.1 Automower 105...
  • Page 65 26.5.3 Automower 420/430X/440/450X La hauteur de coupe peut varier de MIN à MAX en 9 étapes. 1. Appuyez sur le bouton STOP pour arrêter le robot tondeuse, puis ouvrez le capot. 2. Appuyez sur le bouton MENU pour accéder au menu principal.
  • Page 66: Nettoyage

    AVERTISSEMENT: Utilisez toujours des lames de la station de charge (alimentation électrique, câble et des vis adaptées. Husqvarna ne garantit la périphérique et câbles guides) en cas de risque d'orage. sécurité que pour l'utilisation des lames d'origine.
  • Page 67 5. Retirez chaque lame et vis. 6. Fixez les nouvelles lames et vis. 7. Vérifiez que les lames bougent librement. 247 - 005 - 01.09.2017 Entretien - 67...
  • Page 68: Voyant De La Station De Charge

    Le voyant de la station de charge doit émettre une lumière verte fixe ou clignotante pour indiquer que l'installation est totalement fonctionnelle. Si ce n'est pas le cas, suivez le guide de dépannage ci-dessous. Vous trouverez une aide plus approfondie sur www.husqvarna.com. Si vous avez besoin d'une aide supplémentaire, contactez votre représentant Husqvarna local.
  • Page 69: Transport, Entreposage Et Mise Au Rebut

    51 ) vous devez saisir le code PIN. Composé de Husqvarna d'origine. Contactez votre représentant quatre chiffres, le code PIN est défini lors de la Husqvarna local pour plus d'informations sur les première mise en marche du robot tondeuse. supports muraux.
  • Page 70 Pour le démontage de la batterie, consultez le manuel d'utilisation complet sur le site Web d'Husqvarna. En prenant correctement soin de ce produit, vous contribuez à compenser l'éventuel effet négatif sur l'environnement et les personnes, qui autrement pourrait être engendré par la mauvaise gestion de la mise au rebut du produit.
  • Page 71: Caractéristiques Techniques

    30 Caractéristiques techniques 30.1 Automower 105/310/315/315X Dimensions Automower Automower Automower Automower 315X Longueur, cm Largeur, cm Hauteur, cm Poids, kg 10,1 Système électrique Automower Automower Automower Automower 315X Batterie lithium-ion, 18 V/2,1 Ah N° 586 57 62-01, 584 85 28-01,...
  • Page 72: Automower 420/430X/440/450X

    IPX4 IPX4 Husqvarna AB ne garantit en aucun cas la compatibilité totale entre le robot de tonte et d'autres types de dispositif sans fil comme des télécommandes, des transmetteurs radio, des boucles d'écoute, des clôtures électrifiées enterrées pour animaux ou autres.
  • Page 73 IPX4 IPX4 Husqvarna AB ne garantit en aucun cas la compatibilité totale entre le robot de tonte et d'autres types de dispositif sans fil comme des télécommandes, des transmetteurs radio, des boucles d'écoute, des clôtures électrifiées enterrées pour animaux ou autres.
  • Page 74: Garantie

    Les lames sont considérées comme des éléments consommables et ne sont pas couvertes par la garantie. Si une erreur survient avec le robot de tonte Husqvarna, contactez votre représentant Husqvarna local pour de plus amples instructions. Gardez le reçu et le numéro de série du robot de tonte à...
  • Page 75: Déclaration De Conformité Ce

    32 Déclaration de conformité CE 32.1 Déclaration de conformité CE ® equipés du module Automower Connect également : Nous, Husqvarna AB, SE-561 82 Huskvarna, Suède, tél. : +46-36-146500, déclarons que les robots de tonte • EN 301 489-52 V1.1.1 ® ®...
  • Page 76 34.5 Metodo di lavoro..........77 41.2 Automower 420/430X/440/450X......98 34.6 Movimento tipico..........78 34.7 Individuazione della stazione di ricarica.....78 42 Garanzia 34.8 Panoramica del prodotto Automower 105..79 42.1 Termini di garanzia...........100 34.9 Panoramica del prodotto Automower 310/315/315X.............80 43 Dichiarazione di conformità CE 34.10 Panoramica del prodotto Automower...
  • Page 77: Introduzione

    Se il robot rasaerba viene rubato, è importante informare Husqvarna dell'accaduto. Contattare il rappresentante lo- cale Husqvarna e fornire il numero matricola del robot rasaerba perché venga registrato come rubato in un database internazionale. Si tratta di una fase importante della procedura di protezione dai furti dei robot rasaerba che perme- tte di scoraggiare la compravendita di robot rasaerba rubati.
  • Page 78: Movimento Tipico

    Automower 105 segue sempre il cavo guida per trovare la stazione di ricarica.. 78 - Introduzione 247 - 005 - 01.09.2017...
  • Page 79: Panoramica Del Prodotto Automower 105

    34.8 Panoramica del prodotto Automower 105 I numeri in figura rappresentano: 16. Display 17. Rotolo di cavo per cavo perimetrale e cavo guida 1. Scocca 18. Connettore per il collegamento del cavo con la 2. Coperchio per display, tastiera e regolazione...
  • Page 80: Panoramica Del Prodotto Automower 310/315/315X

    34.9 Panoramica del prodotto Automower 310/315/315X I numeri in figura rappresentano: 18. Interruttore principale 19. Disco lame 1. Scocca 20. Piastra sottodisco libera 2. Portello per la regolazione dell'altezza di taglio 21. Alimentatore (l'aspetto dell'alimentatore può essere 3. Portello per display e tastiera diverso a seconda del mercato) 4.
  • Page 81: Panoramica Del Prodotto Automower 420/430X/440/450X

    34.10 Panoramica del prodotto Automower 420/430X/440/450X Automower 420/440 Automower 430X Automower 450X I numeri in figura rappresentano: 19. LED per il controllo del funzionamento della stazione di ricarica e del cavo perimetrale 1. Scocca 20. Stazione di ricarica 2. Portello per display e tastiera 21.
  • Page 82: Simboli Riportati Sul Prodotto

    34.11 Simboli riportati sul prodotto Il telaio contiene componenti sensibili alle scariche elettrostatiche (ESD). Il telaio Questi simboli sono reperibili sul robot rasaerba. deve inoltre essere richiuso in modo Osservarli attentamente. professionale. Per questi motivi, il telaio AVVERTENZA: Leggere le is- può...
  • Page 83: Sicurezza

    35 Sicurezza 35.1 Istruzioni di sicurezza generali • Le parole scritte in grassetto si riferiscono ai pulsanti presenti sulla tastiera del robot rasaerba. Per facilitare la consultazione, nel manuale operatore MAIUSCOLO e in corsivo fanno • Le parole scritte in vengono adottate le convenzioni tipografiche seguenti: riferimento alle posizioni dell'interruttore principale e corsivo indica messaggi riportati sul...
  • Page 84 • Non è consentito modificare il design originale del • Husqvarna non garantisce la completa compatibilità robot rasaerba. Tutte le modifiche sono a rischio e fra il robot rasaerba e altri tipi di sistemi wireless, pericolo dell'utente.
  • Page 85: Installazione

    GFCI (RCD) con involucro resistente alle lingua scelta. intemperie con l'accessorio cappuccio inserito o 36.3 Display Automower 105 rimosso. Quando è stato premuto il pulsante STOP e viene aperto il portello, viene visualizzata la finestra operativa Non modificare o manomettere alcuna parte contenente l'orologio, la modalità...
  • Page 86: Display Automower 310/315/315X/420/430X/ 440/450X

    • Il simbolo dell'orologio nero (A) viene visualizzato quando il rasaerba non può tagliare l'erba a causa delle impostazioni del timer. Il simbolo (B) viene visualizzato se il rasaerba non può essere utilizzato Timer stagionale . Se si sceglie la a causa del Non considerare il timer , modalità...
  • Page 87: Struttura Dei Menu

    36.9 Esplorazione dei menu Timer stagionale Navigare nel menu principale e nei sottomenu con Applicabile per Automower 315/315X/ l'aiuto dei tasti a scelta multipla (Automower 105) o dei 420/430X/440/450X tasti freccia (Automower 310/315/315X/420/430X/ 440/450X). Immettere valori e orari con i tasti numerici e...
  • Page 88 Accessori Applicabile per Automower 310/315/315X/ 420/430X/440/450X Questo menu gestisce le impostazioni per gli accessori del robot rasaerba, ad es. Automower Connect o Automower Connect@Home. Contattare il Husqvarnarivenditore locale per informazioni sugli accessori adatti per il proprio robot rasaerba. 88 - Installazione 247 - 005 - 01.09.2017...
  • Page 89: Funzionamento

    37.1 Selezione della modalità operativa NON CONSIDERARE IL TIMER . Tutte le • impostazioni effettuate del timer possono essere Automower 105 temporaneamente ignorate selezionando Non Premendo più volte consecutivamente il pulsante di escludere il timer considerare il timer. È possibile selezione della modalità...
  • Page 90: Regolazione Dell'altezza Di Taglio

    Dopo questo periodo, Connect a causa di sistemi cellulari specifici per la l'altezza di taglio può essere ridotta regione. Contattare il rappresentante locale Husqvarna gradualmente ogni settimana fino a raggiungere per ulteriori informazioni. l'altezza di taglio desiderata.
  • Page 91 37.5.3 Automower 420/430X/440/450X È possibile regolare l'altezza di taglio da MIN a MAX in 9 fasi. 1. Premere il pulsante STOP per arrestare il robot rasaerba e aprire il portello. 2. Premere il pulsante MENU per accedere al menu principale. 3.
  • Page 92: Pulizia

    (alimentazione, cavo perimetrale e cavi guida) in caso di AVVERTENZA: Utilizzare sempre le lame e le rischio di temporali. viti del tipo giusto. Husqvarna può solo garantire sicurezza quando si utilizzano lame originali. Se AVVERTENZA: Quando il robot rasaerba è...
  • Page 93 7. Controllare che le lame possano muoversi liberamente. 247 - 005 - 01.09.2017 Manutenzione - 93...
  • Page 94: Anomalie Di Funzionamento

    In caso di malfunzionamento, il display visualizzerà un messaggio d’errore. Per ulteriori informazioni sui messaggi, consultate il Manuale operatore completo sul sito web delHusqvarna(www.husqvarna.com. Se non è possibile trovare il motivo del guasto o se lo stesso messaggio viene visualizzato più volte, contattare il rivenditore.
  • Page 95: Trasporto, Stoccaggio E Smaltimento

    40.1.1 Come Sollevare e spostare il robot rasaerba preferibilmente nell'imballaggio originale. È inoltre Per spostarlo in modo sicuro fuori o all'interno dell'area possibile appendere il robot rasaerba ad un Husqvarna di lavoro, procedere come segue: supporto a muro originale. Contattare il rappresentante locale per Husqvarna ulteriori informazioni sulla 1.
  • Page 96 sull'ambiente e sulle persone che può altrimenti sortire da una gestione impropria del prodotto come rifiuto. Per informazioni più dettagliate sul riciclaggio di questo prodotto, contattare l'autorità municipale, il servizio rifiuti domestici o il punto vendita in cui è stato acquistato. 96 - Trasporto, stoccaggio e smaltimento 247 - 005 - 01.09.2017...
  • Page 97: Dati Tecnici

    41 Dati tecnici 41.1 Automower 105/310/315/315X Dimensioni Automower Automower Automower Automower 315X Lunghezza, cm Larghezza, cm Altezza, cm Peso, kg 10,1 Impianto elettrico Automower Automower Automower Automower 315X Batteria agli ioni di litio, 18 V/2,1 Ah n. art. 586 57 62-01,...
  • Page 98: Automower 420/430X/440/450X

    Alimentatore IPX4 IPX4 IPX4 IPX4 Husqvarna AB non garantisce la completa compatibilità fra il robot rasaerba e altri tipi di sistemi wireless, quali telecomandi, trasmettitori radio, apparecchi acustici, recinti elettrici interrati per animali o simili. 41.2 Automower 420/430X/440/450X Dimensioni Automower...
  • Page 99 IPX4 IPX4 Husqvarna AB non garantisce la completa compatibilità fra il robot rasaerba e altri tipi di sistemi wireless, quali telecomandi, trasmettitori radio, apparecchi acustici, recinti elettrici interrati per animali o simili. Massima potenza attiva per le antenne nella banda di frequenza in cui funziona l'apparecchiatura radio.
  • Page 100: Garanzia

    • Danni causati dall'utilizzo di batterie non originali Husqvarna. • Danni causati dall'utilizzo di ricambi e accessori non originali Husqvarna quali lame e materiale di installazione. • Danni al cavo. • Danni causati da modifiche non autorizzate o manomissione del prodotto o dell'alimentazione.
  • Page 101: Dichiarazione Di Conformità Ce

    43 Dichiarazione di conformità CE 43.1 Dichiarazione CE di conformità • EN 301 511 V9.0.2 (efficienza dello spettro radio) Husqvarna AB, SE-561 82 Huskvarna, Svezia, tel.: +46-36-146500, dichiara con la presente che i robot ® Per Husqvarna Automower 310, Husqvarna Auto- ®...
  • Page 102 102 - Dichiarazione di conformità CE 247 - 005 - 01.09.2017...
  • Page 103 247 - 005 - 01.09.2017 Dichiarazione di conformità CE - 103...
  • Page 104 AUTOMOWER is a trademark owned by Husqvarna AB. ® Copyright 2017 HUSQVARNA. All rights reserved. © AUTOMOWER ist ein von Husqvarna eingetragenes Warenzeichen. ® Copyright 2017 HUSQVARNA. All rights reserved. © AUTOMOWER est une marque déposée par Husqvarna AB. ®...

Table des Matières