Hitachi RAF-25NH5 Instructions De Service
Les langues disponibles
Les langues disponibles
Liens rapides
SERVICE MANUAL
ECHNICAL INFORMA ION
INFORMA IONS ECHNIQUES
FOR SERVICE PERSONNEL ONLY
RESERVE AU PERSONNEL
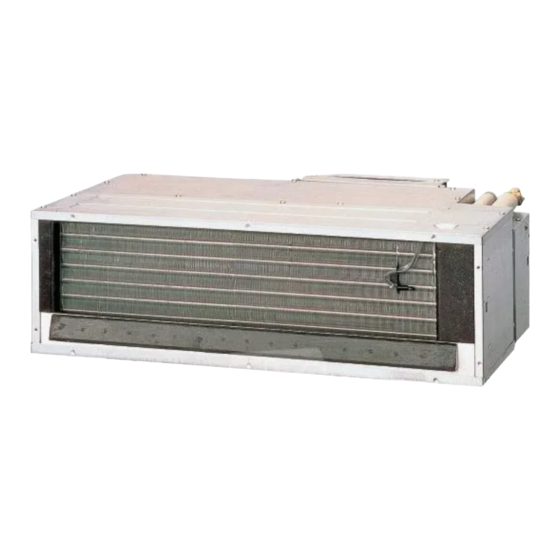
RAF-25NH5
RAF-35NH5
RAF-50NH5
RAI-25NH5
RAI-35NH5
RAI-50NH5
SPECIFICA IONS
CARAC ERIS IQUES GENERALES
TYPE
TYPE
MODEL
MODéLE
POWER OURCE
PHA E/TEN ION/FREQUENCE
TOTAL INPUT
PUI ANCE AB ORBEE TOTALE (W)
TOTAL AMPERE
AMPERE TOTAUX
COOLING
RƒFRIGƒRATION
CAPACITY
CAPACITE
TOTAL INPUT
PUI ANCE AB ORBEE TOTALE
HEATING
TOTAL AMPERE
AMPERE TOTAUX
CHAUFFAGE
CAPACITY
CAPACITE
DIMEN ION
DIMEN ION
NET WEIGHT
POID NET
SPECIFICA IONS AND PAR S ARE SUBJEC
LES SPECIFICA IONS E PIECES DE ACHEES PEUVEN CHANGER POUR E RE AMELIOREES.
ROOM AIR CONDI IONER
ROOM AIR CONDI IONER
DECEMBER 2005
All manuals and user guides at all-guides.com
RAD-25NH5
RAD-35NH5
RAK-18NH5
RAK-25NH5
RAK-35NH5
RAK-50NH5
RAM-80QH5
DC INVERTER TRIPLE AND QUADRUPLE Y TEM MULTI
RAF-25NH5
RAF-35NH5
RAF-50NH5
(A)
(kW)
(B.T.U./h)
(W)
(A)
(kW)
(B.T.U./h)
W, L
750
600
(mm)
H, H
D, P
215
15
(kg)
O CHANGE FOR IMPROVEMEN
INDOOR UNI + OU DOOR UNI
Hitachi Home & Life Solutions, Inc.
C NO. 0771EF
RAF-25NH5,RAF-35NH5,RAF-50NH5
RAD-25NH5,RAD-35NH5
RAK-18NH5,RAK-25NH5,RAK-35NH5
RAK-50NH5
RAI-25NH5,RAI-35NH5,RAI-50NH5
REFER O HE FOUNDA ION MANUAL
REPOR EZ-VOUS AU MANUEL DE BASE
TABLE DE MATIERE
PECIFICATION
‥‥‥‥‥‥‥‥‥‥‥‥‥‥‥‥‥‥‥‥‥‥
CARACTERI TIQUE GENERALE
FEATURE
‥‥‥‥‥‥‥‥‥‥‥‥‥‥‥‥‥‥‥‥‥‥‥‥‥
CARACTƒRI TIQUE
HOW TO U E
‥‥‥‥‥‥‥‥‥‥‥‥‥‥‥‥‥‥‥‥‥‥‥
UTILI ATION
IN TALLATION
‥‥‥‥‥‥‥‥‥‥‥‥‥‥‥‥‥‥‥‥‥‥‥
IN TALLATION
CON TRUCTION AND DIMEN IONAL DIAGRAM
DIMEN ION DE UNITƒ
MAIN PART COMPONENT
PRINCIPAUX COMPO ANT
WIRING DIAGRAM
‥‥‥‥‥‥‥‥‥‥‥‥‥‥‥‥‥‥‥‥‥
CHƒMA ƒLECTRIQUE
WIRING DIAGRAM OF THE PRINTED WIRING BOARD
CHƒMA ƒLECTRIQUE DU CIRCUIT IMPRIMƒ
BLOCK DIAGRAM
‥‥‥‥‥‥‥‥‥‥‥‥‥‥‥‥‥‥‥‥‥
ORGANIGRAMME DE CONTROLE
BA IC MODE
‥‥‥‥‥‥‥‥‥‥‥‥‥‥‥‥‥‥‥‥‥‥‥
MODE DE BA E
REFRIGERATING CYCLE DIAGRAM
CHƒMA DU CYCLE DE RƒFRIGƒRATION
AUTO WING FUNCTION
‥‥‥‥‥‥‥‥‥‥‥‥‥‥‥‥‥‥
FONCTION BALAYAGE AUTOMATIQUE
DE CRIPTION OF MAIN CIRCUIT OPERATION
DE CRIPTION DU FONCTTONNEMENT DU CIRCUIT PRINCIPAL
ERVICE CALL Q&A
‥‥‥‥‥‥‥‥‥‥‥‥‥‥‥‥‥‥‥
MODE OPERATOIRE DE DEPANNAGE
TROUBLE HOOTING
‥‥‥‥‥‥‥‥‥‥‥‥‥‥‥‥‥‥‥
DETECTION DE PANNE
PART LI T AND DIAGRAM
LI TE DE PIƒCE DE RECHANGE ET DIAGRAMME
Y TéME DE TRIPLE ET QUADRUPLE ONDULEUR CC MULTI
INDOOR UNIT
UNITƒ INTƒRIEURE
RAD-25NH5
RAK-18NH5
RAI-25NH5
RAD-35NH5
RAK-25NH5
RAI-35NH5
RAK-35NH5
RAI-50NH5
RAK-50NH5
1¿, 230V, 50Hz
REFER TO THE PECIFICATION PAGE 11.
REPORTEZ-VOU AUX PECIFICATION DE LA PAGE 13.
750
780
235
280
400
210
14
9.5
After installation
※
RAM-80QH5
(MUL IZONE 80H)
CONTENT
22
38
126
130
‥‥‥‥‥‥‥
140
‥‥‥‥‥‥‥‥‥‥‥‥‥‥‥‥
144
153
‥‥‥‥‥‥
175
187
237
‥‥‥‥‥‥‥‥‥‥‥‥
238
240
‥‥‥‥‥‥‥
312
320
382
‥‥‥‥‥‥‥‥‥‥‥‥‥‥‥‥
OUTDOOR UNIT
UNITƒ EXTƒRIEURE
RAM-80QH5
580
850
285
830
580
390
20
79
Aprs installation
8

Manuels Connexes pour Hitachi RAF-25NH5


Sommaire des Matières pour Hitachi RAF-25NH5
- Page 188 All manuals and user guides at all-guides.com onctionnement de base ÒMODE CHAUDÒ Δtd TempŽrature de chauffage de consigne (tempŽrature rŽglŽe avec la tŽlŽcommande SHIFTW) 18℃ PŽriode d'activitŽ intense Vitesse de ventilation rŽglŽe sur ÒautoÒ Thermo Interrupteur marche / arrt Arrt Arrt Marche Arrt...
- Page 189 All manuals and user guides at all-guides.com eating Sleep Operation Set to 7 hours Sleep key Operation lamp Timer lamp [SLEEP] on the remote controller is lit Indoor fan See basic Silent operation Sleep See basic operation Outdoor fan Vertical air Facing up deflector Horizontal...
- Page 190 All manuals and user guides at all-guides.com onctionnement en mode sommeil et chauffage CalŽ sur 7 heures Touche de mode sommeil Lampe tŽmoin de fonctionnement La lampe tŽmoin de fonctionnement [SLEEP] de la tŽlŽcommande est allumŽe. Lampe tŽmoin de minuterie Ventilateur intŽrieur Silencieux Voir le fonctionnement de base...
- Page 191 All manuals and user guides at all-guides.com ODEL RA -80QH5 Expansion valves ◇ ¥ The expansion valves are initialized when power is supplied. The valve for unit 1 is fully closed (520 pulses), and then that for unit 2 is fully opened (480 pulses). When the valve for unit 1 is fully closed (0 pulse), start-up is possible.
-
Page 192: Vanne D'expansions
All manuals and user guides at all-guides.com MODéLE RAM-80Q 5 Vanne d'expansions ◇ ¥ Les vannes d'expansion sont actionnŽes ds que le systme est mis sous tension. La vanne de l'unitŽ est compltement farmŽe (520 impulsions) puis la vanne de l'unitŽ 2 est compltement ouverte (480 impulsions). Lorsque la vanne de l'unitŽ... - Page 193 All manuals and user guides at all-guides.com EFROST Reversing valve defrost system is employed: it consists of balancing period reversing cycle period balancing period. ・ → → (1) efrost start condition When all the following conditions are established, defrost is executed: ・...
- Page 194 All manuals and user guides at all-guides.com ƒGIVRAGE ¥ Un systme de dŽgivrage ˆ soupape d'inversion est employŽ : il se compose d'une pŽriode d'Žquilibrage une pŽriode → de cycle d'inversion une pŽriode d'Žquilibrage. → (1) Conditions de dŽmarrage du dŽgivrage ¥...
- Page 195 All manuals and user guides at all-guides.com Time chart when executing defrost (both unit 1 and unit 2 operated) Defrosting signal Unit 1 Unit 2 Unit 1 Unit 2 Unit 1 Defrosting request Unit 2 Defrosting request 30sec. Turns on for cooling Cooling output Heating output...
- Page 196 All manuals and user guides at all-guides.com ¥ Diagramme des temps pendant l'exŽcution du dŽgivrage (les deux unitŽ 1 et unitŽ 2 en fonction) ignal de dŽgivrage UnitŽ 1 UnitŽ 2 UnitŽ 1 UnitŽ 2 UnitŽ 1 Demande de dŽgivrage UnitŽ...
- Page 197 All manuals and user guides at all-guides.com AUTO-FRESH EFROST ¥ uring heating operation is stopped, and when auto-fresh condition is established, defrost operation will be performed while operation is stopped. Auto-fresh consists of balancing period at start of defrost for [T F414] seconds Reverse cycle period for MAX 12 →...
- Page 198 All manuals and user guides at all-guides.com ƒGIVRAGE AUTO-FRESH ¥ Pendant que l'opŽration de chauffage est interrompue et lorsque les conditions de fonctionnement en mode Auto-fresh sont rŽunies, le dŽgivrage se dŽroulera pendant l'interruption du fonctionnement. Le mode Auto-fresh est constituŽ de la pŽriode d'Žquilibrage au moment du dŽmarrage du dŽgivrage pendant [T F414] secondes la pŽriode de cycle inverse pendant 12 minutes maximum.
- Page 199 All manuals and user guides at all-guides.com ORCED COOLING ¥ In order to accumulate refrigerant, units operate in cooling cycle. Execution condition and operation status are shown below. [Execution condition] ¥ With neither indoor unit 1 and 2 not operated, when forced cooling switch is turned ON, forced cooling will be performed. ¥...
-
Page 200: Alimentation
All manuals and user guides at all-guides.com EF OIDISSEMENT FO Cƒ ¥ Pour accumuler le rŽfrigŽrant, les appareils fonctionnent en cycle de refroidissement. Les conditions d'exŽcution et l'Žtat de fonctionnement sont indiquŽs ci-dessous. [Conditions d'exŽcution] ¥ Si ni l'appareil intŽrieur 1 ni l'appareil 2 ne fonctionnent, lorsque le commutateur de refroidissement forcŽ est rŽglŽ sur ON, le refroidissement forcŽ... - Page 201 All manuals and user guides at all-guides.com PROCESSING AT OVERHEAT THERMISTOR (OH) HIGH TEMPERATURE Restriction Start Conditions ◇ ¥ If any expansion valve is operated at 480 pulses and the OH temperature > [NDOWN_ON], the compressor speed will be reduced at a rate of 100 min /30 seconds.
- Page 202 All manuals and user guides at all-guides.com HAUTE TEMPƒRATURE TRAITEMENT LORS D'UNE SURCHAUFFE DE THERMISTANCE (OH) Limitations relatives aux conditions de mise en route ◇ ¥ Si l'un des dŽtendeurs est actionnŽ sous 480 impulsions et que la tempŽrature OH est > [NDOWN_ON], la vitesse de fonctionnement du compresseur sera rŽduite suivant un taux de 100 min /30 secondes.
- Page 203 All manuals and user guides at all-guides.com ORCED COOLING nits can be operated in a cooling cycle to collect refrigerant. ・ The conditions for execution and operation status are as follows: [Conditions for execution] ¥Forced cooling operation will be executed when the forced cooling switch is turned ON and there is no record that all indoor units 1-4 have been operated.
- Page 204 All manuals and user guides at all-guides.com EF IGE ATION FO CEE es unitŽs peuvent fonctionner en cycle de rŽfrigŽration pour recueillir le rŽfrigŽrant. ・ es conditions d'exŽcution et de fonctionnement sont les suivantes: [Conditions d'exŽcution] ¥ e fonctionnement en rŽfrigŽration forcŽe est exŽcutŽ lorsque l'interrupteur correspondant est en position marche (ON) et que les unitŽs 1-4 sont ˆ...
- Page 205 All manuals and user guides at all-guides.com FORCED COOLING The following shows the operation state of forced cooling. Power Service switch Unit 1 Forced cooling request Balancing request Unit 2 Forced cooling request Balancing request Heating output Cooling output Turns on for cooling Turns on for heating...
- Page 206 All manuals and user guides at all-guides.com REFRIGERATION FORCEE Le diagramme ci-dessours montre les opŽrations qui sont effectuŽes lors de la rŽfrigŽration forcŽe. Alimentation Interrupteur de service UnitŽ 1 Demande de rŽfrigŽration forcŽe Demande d'Žquilibrage UnitŽ 2 Demande de rŽfrigŽration forcŽe Demande d'Žquilibrage Sortie chauffage Sortie rŽfrigŽration...
- Page 207 All manuals and user guides at all-guides.com EF IGE ATING CYCLE DIAG AM SCHEMA F IGO IFIQUE RAF-25NH5,RAF-35NH5,RAF-50NH5 ODEL RAD-25NH5,RAD-35NH5 RA -80QH5 ODéLES RAK-18NH5,RAK-25NH5,RAK-35NH5,RAK-50NH5 RAI-25NH5,RAI-35NH5,RAI-50NH5 Indoor unit No.1 UnitŽ intŽrieure N¼1 Indoor unit No.2 UnitŽ intŽrieure N¼2 Indoor unit No.3 UnitŽ...
- Page 208 All manuals and user guides at all-guides.com - 238 -...
- Page 209 All manuals and user guides at all-guides.com - 239 -...
-
Page 210: Power Circuit
All manuals and user guides at all-guides.com ESCRIPTION OF MAIN CIRCUIT OPERATION MODEL RAF-25NH5, RAF-35NH5, RAF-50NH5 . Power circuit FAN-MOTOR DC/DC POWER-SUPPLY CONVERTER CONTROL CIRCUIT CN 0 CJ 0 XA-5P-TOP(RED) INDOOR UPPER FAN MOTOR CJ 02 C 33 + +... -
Page 211: Escription U Fonctionnement U Circuit Principal
All manuals and user guides at all-guides.com ESCRIPTION U FONCTIONNEMENT U CIRCUIT PRINCIPAL RAF-25NH5, RAF-35NH5, RAF-50NH5 . Circuit de lÕalimentation CIRCUIT DE CONTROLE DE CONVERTISSEUR DC/DC LÕALIMENTATION DU MOTEUR VENTILATEUR CN 0 CJ 0 XA-5P-TOP (ROUGE) MOTEUR DE VENTILATEUR (SUPERIEUR) - Page 212 All manuals and user guides at all-guides.com . Reset Circuit MODEL RAF- 5NH5, RAF-35NH5, RAF-50NH5 Reset Microcomputer IC5 1 Fig. -1 Timing chart Voltage 5.0V pin of IC5 1 supply voltage ② RES detecting voltage RES canceling voltage 4.4V 4. V Voltage pin of IC5 1 output voltage ①...
- Page 213 All manuals and user guides at all-guides.com . Circuit de remise ˆ zŽro MODéLES RAF- 5NH5, RAF-35NH5, RAF-50NH5 Remise ˆ zŽro Microprocesseur IC5 1 Fig. -1 Chronogramme Tension 5,0V broche de tension IC5 1 ② RES dŽtection tension RES coupure tension 4,4V 4, V Tension...
- Page 214 All manuals and user guides at all-guides.com 3. Room Temperature Thermistor Circuit ODEL RAF-25NH5, RAF-35NH5, RAF-50NH5 A room temperature thermistor circuit is shown in Fig. 3-1. According to room temperature, the voltage of point becomes as it is shown in Fig.3-2.
- Page 215 All manuals and user guides at all-guides.com 3. Circuit rŽsistance thermique tempŽrature pice MODéLES R F-25NH5, R F-35NH5, R F-50NH5 La Figure 3-1 montre un circuit de rŽsistance thermique de tempŽrature dÕune pice. Selon la tempŽrature de la pice, la tension du point est la mme que celle montrŽe sur la Figure 3-2.
- Page 216 All manuals and user guides at all-guides.com 6. Fan Motor Drive Circuit CN10 MODEL RAF 25NH5, RAF 35NH5, RAF 50NH5 35V line Micro computer 5V line No of Fan Motor rotation output R751 C751 No of rotation detect R631 C631 Fig.
-
Page 217: Circuit De Fonctionnement Moteur Ventilateur
All manuals and user guides at all-guides.com 6. Circuit de fonctionnement moteur ventilateur MODéLES RAF-25NH5, RAF-35NH5, RAF-50NH5 CN10 Ligne 35V Microprocesseur Ligne 5V Nombre de sorties rotation MOTEUR VENTILATEUR R751 C751 Nombre de dŽtections R631 rotation C631 Fig. 6-1 La forme dÕonde de... - Page 218 All manuals and user guides at all-guides.com amper control MODEL RAF-25NH5, RAF-35NH5, RAF-50NH5 1. Precondition The damper has 2-directional output and realizes OPEN/CLOSE using a stepping motor. Damper control functions only when the Air outlet SW is set to Ò...
-
Page 219: Fonctionnement Initial
All manuals and user guides at all-guides.com ontr™le dŽflecteur MODéLES RAF-25NH5, RAF-35NH5, RAF-50NH5 1. onditions requises Le dŽflecteur a 2 sorties directionnelles et se met sur OPEN/CLOSE en utilisant un moteur pas ˆ pas. Le contr™le du dŽflecteur ne fonctionne que quand le tuyau dÕair SW est mis sur 2. - Page 220 All manuals and user guides at all-guides.com ● Thermo intermittence ain Power Remote control l e r operati o n Operation starts Thermo OFF Thermo ON Operating condition Stop Normal operation Normal operation Operation lamp Upper fan 10sec. Setting fan speed Lo Ul t ra-Lo Setting fan speed Lower fan...
- Page 221 All manuals and user guides at all-guides.com ¥ hermo intermittence Alimentation Principale Fonctionnement tŽlŽcommande Mise en route hermo OFF hermo ON Stop Fonctionnement normal Fonctionnement normal Conditions de fonctionnement Ampoule Fonctionnement 10sec. Ventilateur supŽrieur RŽglage vitesse ventilateur Bas Ultra Bas RŽglage vitesse ventilateur Ventilateur infŽrieur 10sec.
- Page 222 All manuals and user guides at all-guides.com ooling mode The damper opens at cool dash (excluding smell prevention) and closes at the completion of cool dash. The damper also closes at the moment the Air outlet SW is set to Ò...
- Page 223 All manuals and user guides at all-guides.com ode Refroidissement Le dŽflecteur sÕouvre avec une projection froide (pour empcher les mauvaises odeurs) et se ferme lorsque la projection froide est terminŽe. Le dŽflecteur se ferme Žgalement au moment ou le tuyau dÕair SW est mis sur Ò...
- Page 224 All manuals and user guides at all-guides.com ODEL RAD-25NH5, RAD-35HN5, RAI-25NH5, RAI-35HN5, RAI-50HN5, RAK-18HN5, RAK-25HN5, RAK-35HN5, RAK-50HN5 . Reset Circuit Reset icro computer R522 IC521 Fig.1-1 Timing chart Voltage 5.0V pin of IC521 supply voltage ② RES detecting voltage RES canceling voltage 4.4V 4.2V Voltage...
- Page 225 All manuals and user guides at all-guides.com ODéLES RAD-25NH5, RAD-35HN5, RAI-25NH5, RAI-35HN5, RAI-50HN5, RAK-18HN5, RAK-25HN5, RAK-35HN5, RAK-50HN5 . Circuit de remise ˆ zŽro Remise ˆ zŽro icroprocesseur R522 IC521 Fig. 1-1 Chronogramme Tension 5,0V broche de tension IC521 ② RES dŽtection tension RES coupure tension 4,4V 4,2V...
- Page 226 All manuals and user guides at all-guides.com . Receiver Circuit MODEL RAD-25NH5, RAD-35NH5 Wireless input R419 R611 Light receiving unit C405 C611 Micro computer Fig. 2-1 The Light receiving unit receives an infrared signal from the wireless remote control. The receiver amplifies and shapes the signal and outputs it.
- Page 227 All manuals and user guides at all-guides.com . Circuit de rŽcepteur MODéLES RAD-25NH5, RAD-35NH5 R419 R611 Module de EntrŽe signal rŽception de tŽlŽcommande lumire C405 C611 Microprocesseur ig. 2-1 Le rŽcepteur reoit les signaux infrarouges transmis par la tŽlŽcommande. Le rŽcepteur amplifie et conforme le signal et le dŽlivre.
- Page 228 All manuals and user guides at all-guides.com . Buzzer Circuit ODEL RAD-25NH5, RAD-35NH5, RAI-25NH5, RAI-35NH5, RAI-50NH5 R722 icrocomputer Buzzer output Q722 Fig. 3-1 Buzzer Circuit When the buzzer sounds, an approx. 3.9kHz square signal is output from buzzer output pin of the microcomputer.
- Page 229 All manuals and user guides at all-guides.com . Circuit de sonnerie ODéLES RAD-25NH5, RAD-35NH5, RAI-25NH5, RAI-35NH5, RAI-50NH5 R722 icroprocesseur Sortie de Q722 sonnerie Fig. 3-1 Circuit de sonnerie Lorsque la sonnerie retentit, un signal d'approximativement 3,9 kHz de type carrŽ est dŽlivrŽ...
- Page 230 All manuals and user guides at all-guides.com . Auto Sweep Motor Circuit MODEL RAD-25NH5, RAD-35NH5, RAK-18NH5, RAK-25NH5, RAK-35NH5, RAK-50NH5 Auto sweep motor for hirizontal air deflectors Micro Computer Rotor IC711 Fig.4-1 Auto Sweep Motor Circuit (Horizontal air deflectors) Fig.4-1 shows the Auto sweep Motor drive cicuit; the signals shown in Fig.4-2 are output from pins of the micro computer.
-
Page 231: Circuit De Moteur De Balayage Automatique
All manuals and user guides at all-guides.com . Circuit de moteur de balayage automatique ODéLES RAD-25NH5, RAD-35NH5, RAK-18NH5, RAK-25NH5, RAK-35NH5, RAK-50NH5 oteur de balayage automatique poul le dŽflecteur horizontal icroprocesseur Rotor IC711 Fig. 4-1 Circuit du moteur de balayage automatique (dŽflecteur d'air horizontal) ¥... - Page 232 All manuals and user guides at all-guides.com ODEL RAI-25NH5, RAI-35NH5, RAI-50NH5 D712 Auto sweep motor for horizontal air deflector Rotor R711 AUTO SWEEP Q711 OTOR Q712 R712 C712 icro computer IC711 9 AUTO SWEEP OTOR AUTO SWEEP OTOR P.W.B. AIN Fig.4-3 Fig.
- Page 233 All manuals and user guides at all-guides.com ODéLES RAI-25NH5, RAI-35NH5, RAI-50NH5 D712 oteur de balayage automatique de dŽflecteur d'air horizontal Rotor R711 OTEUR DE BALAYAGE AUTO ATIQUE Q711 Q712 R712 C712 icroprocesseur IC711 9 OTEUR DE BALAYAGE AUTO ATIQUE OTEUR DE BALAYAGE AUTO ATIQUE CARTE DE CIRCUIT I PRI ƒ...
- Page 234 All manuals and user guides at all-guides.com . Room Temperature Thermistor Circuit ODEL RAD-25NH5, RAD-35NH5, RAK-18NH5, RAK-25NH5, RAK-35NH5, RAK-50NH5, RAI-25NH5, RAI-35NH5, RAI-50NH5 The Voltage at depends on the room temperature as shown in Fig. 5-2 Fig. 5-1 shows the room temperature thermistor circuit.
- Page 235 All manuals and user guides at all-guides.com . Circuit de thermistance de la tempŽrature de la pice ODéLES RAD-25NH5, RAD-35NH5, RAK-18NH5, RAK-25NH5, RAK-35NH5, RAK-50NH5, RAI-25NH5, RAI-35NH5, RAI-50NH5 La tension en dŽpend de la tempŽrature de la pice, comme le montre la figure 5-2. La figure 5-1 reprsente le circuit de la thermistance de tempŽrature de la pice.
- Page 236 All manuals and user guides at all-guides.com . Initial Setting Circuit (IC401) MODEL RAD-25NH5, RAD-35NH5, RAK-18NH5, RAK-25NH5, RAK-35NH5, RAK-50NH5, RA -25NH5, RA -35NH5, RA -50NH5 ¥ When power is supplied, the micro computer reads the data in C401 (E PROM) and sets the preheating activation value and the rating and maximum speed of the compressor, etc.
-
Page 237: Interrupteur Auxiliaire
All manuals and user guides at all-guides.com . Circuit de rŽglage initial (IC401) MODéLES RAD-2 NH , RAD-3 NH , RAK-18NH , RAK-2 NH , RAK-3 NH , RAK- 0NH , RAI-2 NH , RAI-3 NH , RAI- 0NH ¥ A la mise sous tension, le microprocesseur lit les donnŽes de IC401 (E PROM) et rglr la valeur de prŽchauffage, la vitesse nominale et la vitesse maximale du compresseur, etc., ˆ... - Page 238 All manuals and user guides at all-guides.com 0. Drain pump trial run switch ODEL RAD-25NH5, RAD-35NH5, RAI-25NH5, RAI-35NH5, RAI-50NH5 R533 R534 Drain pump icro computer trial run SW (normally, Hi) ¥ This switch forcibly turns the drain pump on. When the drain pump trial run switch is turned on, the timer indicator will blink seven times, and no remote signal will be accepted.
-
Page 239: Interrupteur D'essai De Fonctionnement De Pompe De Purge
All manuals and user guides at all-guides.com 0. Interrupteur d'essai de fonctionnement de pompe de purge ODéLES RAD-25NH5, RAD-35NH5, RAI-25NH5, RAI-35NH5, RAI-50NH5 R533 R534 icroprocesseur Interrupteur d'essai de fonctionnement de pompe de purge (normalement sur Hi) ¥ Cet interrupteur oblige la pompe de purge ˆ se mettre en marche. Lorsque l'interruteur d'essai de fonctionnement de pompe de purge est mis en fonction, l'indicateur de minuterie clignote sept fois de suite de telle sorte qu'aucun signal de tŽlŽcommande n'est acceptŽ. - Page 240 All manuals and user guides at all-guides.com 2. DC Fan Motor Drive Circuit ODEL RAD-25NH5, RAD-35NH5, RAK-18NH5, RAK-25NH5, RAK-35NH5, RAK-50NH5, RAI-25NH5, RAI-35NH5, RAI-50NH5 ¥ Fig. 12-1 shows the indoor DC fan motor drive circuit. L101 ICP2 L901 Q901 (Terminal board C) R912 Q902 Micro computer...
-
Page 241: Circuit De Commande Du Moteur Cc De Ventilateur
All manuals and user guides at all-guides.com 2. Circuit de commande du moteur CC de ventilateur MODéLES RAD-25NH5, RAD-35NH5, RAK-18NH5, RAK-25NH5, RAK-35NH5, RAK-50NH5, RAI-25NH5, RAI-35NH5, RAI-50NH5 La figure 12-1 prŽsente le circuit de commande du moteur CC de ventilateur intŽrieur. L101 ICP2 L901... - Page 242 All manuals and user guides at all-guides.com 3. High static-pressure switch (Full duct type and semi duct type) MODEL RAD-25NH5, RAD-35NH5 Main P.W.B. Buzzer Micro computer Static pressure sw Normal High Drain pump test drive sw ig. 13-1 ¥ or full duct type and semi duct type, set the high to HIGH STATIC-PRESSURE. ¥...
-
Page 243: Interrupteur De Haute Pression Statique (Type ˆ Canalisation Entiere Et Type ˆDemie Canalisation)
All manuals and user guides at all-guides.com 3. Interrupteur de haute pression statique (Type ˆ canalisation entiere et type ˆdemie canalisation) ODéLES RAD-25NH5, RAD-35NH5 Ž principal Circuit imprim Vibreur Microprocesseur Interrupter de pression statique Normal Haute Commande de l'essais de la pompe de vidange Fig. - Page 244 All manuals and user guides at all-guides.com RAM-80QH5 POWER SUPPLY CIRCUIT The power supply circuit consists of the circuit (A cycle) corresponds to the indoor units and 2, and the circuit (B cycle) corresponds to the indoor units 3 and 4. REACTOR A REACTOR B SYSTEM POWER...
- Page 245 All manuals and user guides at all-guides.com RAM-80QH5 CIRCUIT DÕALIMENTATION Le circuit dÕalimentation est composŽ dÕun circuit (cycle A) qui correspond aux unitŽs intŽrieures et 2, et dÕun circuit (cycle B) qui correspond aux unitŽs intŽrieures 3 et 4. REACTEUR A REACTEUR B MODULE DÕALIMENTATION MODULE DÕALIMENTATION...
- Page 246 All manuals and user guides at all-guides.com Functions of Main Parts ● (1)System Power Module (SPM) < Reference > In the case of malfunction or defective connection: ( he module was a new type which joined ● Immediately after the compressor starting, it may stop together old type AC and POWER modules) due to "Abnormal low speed"...
- Page 247 All manuals and user guides at all-guides.com omposantes Principales ● < RŽfŽrence > (1)Module de puissance du systme (MPS) En cas de mauvais fonctionnement ou de connection ( e module relie lÕancien modle de A T et les ● dŽfectueuse : modules de Puissance) ImmŽdiatement aprs la mise en marche du compresseur, il peut Le module A T...
- Page 248 All manuals and user guides at all-guides.com ※ 5) C001-C014, NF COIL 1 Be sure to make an earth line for the outdoor unit. If not, the These coils absorb electrical noises generated during noise filter circuit does not work normally. the compressor is operating and invasive noises ※...
- Page 249 All manuals and user guides at all-guides.com ※ 5) C001-C014, NF BOBINE 1 Assurez vous de faire la mise ˆ la terre de lÕunitŽ extŽrieure. Ces bobines absorbent les bruits gŽnŽrŽs par le Sinon, le circuit de filtrage des bruits ne fonctionne pas fonctionnement du compresseur et les bruits parasites correctement.
- Page 250 All manuals and user guides at all-guides.com . Interface Circuit The function of the interface circuit is to perform: ● Communications between the indoor and outdoor units by mean of superimposing an A.C. signal (f=38kHz, amplitude 1V) on the 35V D.C. line supplied from the outdoor unit to the indoor unit. The circuit consists of three small circuits and one part as below.
- Page 251 All manuals and user guides at all-guides.com . Circuit dÕinterface Le circuit dÕinterface communique entre les unitŽs intŽrieure et extŽrieure au moyen dÕun signal CA (f=38kHz, amplitude ● 1V) superposŽ ˆ la ligne CC de 35V qui relie les deux unitŽs. Le circuit consiste en un ÒCircuit dÕoscillationÓ...
- Page 252 All manuals and user guides at all-guides.com - 282 -...
- Page 253 All manuals and user guides at all-guides.com - 283 -...
- Page 254 All manuals and user guides at all-guides.com Example of checking> Explaining an example of checking for table 2- 1 ※ (A) : Communication error 1 (LD 303A or LD 303B one time blink) In the case of the indoor unit 1 (or 3) is in the communication error and the indoor unit 2 (or 4) is normal: At first, check the connections of the in/outdoor connecting cables in the indoor and outdoor units (wrong connection, poor insertion etc).
- Page 255 All manuals and user guides at all-guides.com Exemple de vŽrification > Expliquer un exemple de verification du tableau 2-1 ※ (A) : Erreur de communication 1 (LD 303A ou LD 303D clignote 1 fois) LorsquÕune erreur de communication de est prŽsente sur lÕunitŽ intŽrieure 1 (ou 3) et lÕunitŽ intŽrieure 2 (ou 4 ) fonctionne normalement: Contr™ler en premier les connexions des c‰bles de liaison intŽrieurs et extŽrieurs des appareils intŽrieurs et extŽrieurs (mauvaise connexion, insertion insuffisante, etc.).
- Page 256 All manuals and user guides at all-guides.com . Power Module Circuit C503 C502 C501 C009(C012) R001 - 286 -...
- Page 257 All manuals and user guides at all-guides.com . Circuit de module de puissance C503 C502 C501 C006 - 287 -...
- Page 258 All manuals and user guides at all-guides.com C 320-360V is input to power module and power module switches power supply current according to rotation ● position of magnet rotor. The switching order is as shown in Fig. 3-2. At point E: U + is ON, V - is ON (circuit in Fig. 3-1) ...
- Page 259 All manuals and user guides at all-guides.com C 320-260V est envoyŽ au module de puissance et le module de puissance commute sur le courant dÕalimentation en ● fonction de la position de rotation du rotor aimantŽ. LÕordre de commutation est celui montrŽ sur la Figure 3-2. Au point E : U + est sur On, V - est sur On (circuit de Figure 3-1) Au point F : U + est coupŽ...
- Page 260 All manuals and user guides at all-guides.com ystem Power module 2 260-330V DC compressor motor U coil Ð Ð Ð V coil Ð W coil DC current (Id) detection resistor Fig. 3-4 Power module circuit (U + is ON, V - is ON) only when U + transistor is ON, the current waveform at point ince current flows at point becomes...
- Page 261 All manuals and user guides at all-guides.com Module dÕalimentation du systme 2 260-330V Moteur compresseur DC bobine Ð Ð Ð V bobine Ð W bobine RŽsistance dŽtection courant (Id) DC Fig. 3-4 Circuit de module de puissance ( + est sur ON, V - est sur ON) Comme le courant ne circule vers le point B que quand le transistor + est sur ON, la forme dÕonde du courant au point B ●...
- Page 262 All manuals and user guides at all-guides.com 4. P.W.B. Power Supply Circuit (Switching Power Circuit) R E A C T O RC B L U B L U Y E L Y E L (S P I R A L) (S...
- Page 263 All manuals and user guides at all-guides.com . Carte imprimŽe du circuit dÕalimentation (Circuit dÕalimentation ˆ dŽcoupage) R E A C T E U RC B L U B L U Y E L Y E L (S P I R A L E ) (S...
- Page 264 All manuals and user guides at all-guides.com 1) Switching power supply circuit for outdoor control P.W.B. SW transformer 1 Input voltage 230V AC Approx. 325V DC Fig. 4-2 Switching power supply circuit for outdoor control P.W.B. Fig. 4-2 shows the switching power supply for the outdoor control P.W.B. The switching power supply for the outdoor control P.W.B.
- Page 265 All manuals and user guides at all-guides.com 1) Circuit d'alimentation ˆ dŽcoupage pour la carte imprimŽe de la commande extŽrieure. SW transformateur 1 Tension dÕentrŽe 230V CA Approx. 325V CC Fig. 4-2 Circuit d'alimentation ˆ dŽcoupage pour la carte imprimŽe de la commande extŽrieure. La figure 4-2 montre l'alimentation ˆ...
- Page 266 All manuals and user guides at all-guides.com 2) Switching power supply for indoor unit Fig. 4-3 shows the switching power supply circuit for the indoor units. SW transformer 2 3A, fuse Input voltage after rectification, approx. 325V DC ※ It is supplied via CN1 from control P.W.B.
- Page 267 All manuals and user guides at all-guides.com 2) Alimentation ˆ dŽcoupage de l'unitŽ intŽrieure La figure 4-3 montre le circuit de l'alimentation ˆ dŽcoupage des unitŽs intŽrieures. SW transformateur 2 3A, TB fusible Tension dÕentrŽe aprs redressement, environ 325 V CC. Fournie par le circuit de redressement de la carte imprimŽe de...
- Page 268 All manuals and user guides at all-guides.com Reference> If the 3A fuse has broken , the switching power circuit is defective. Replace the SW-D-P.W.B.. ● In the case of that the 5A fuse in the control P.W.B has broken. ● (1) If the varistor 3 has broken, the terminal board L/N was supplied a excessive voltage.
- Page 269 All manuals and user guides at all-guides.com RŽfŽrence> Si le fusible 3A fond, le circuit dÕalimentation de mise en marche et dÕinterruption est dŽfectueux: remplacer le SW-D-circuit ● impreimŽ. Le fusible 5A de la commande circuit impreimŽ fond. ● (1) Dans ce cas de figure, si la varistance 3 fond, cÕest que la plaque ˆ bornes L/N a ŽtŽ soumise ˆ une tension excessive. Dans ce cas, le circuit dÕalimentation de mise en marche et dÕinterruption est normal.
- Page 270 All manuals and user guides at all-guides.com . Overload control ciricuit (OVL control circuit) ¥ Overload control is to decrease the speed of the compressor and reduce the load when the load on the air conditioner increases to an overload state, in order to protect the compressor, electronic components and power breaker. ¥...
- Page 271 All manuals and user guides at all-guides.com . Circyit de commande de surcharge (Circuit de commande OVL) ¥ La commande de surcharge apour r™le de rŽduire la vitesse du compresseur et la charge lorsque la charge du climatiseur augmente suffisamment pour atteindre la valeur de surcharge, cela de manire ˆ protŽger le compresseur, les composants Žlectroniques et le disjoncteur.
- Page 272 All manuals and user guides at all-guides.com . Temperature Detection Circuit The outdoor unit (this model) provides with the outdoor temperature thermistor, DEF (defrost) thermistor, OH (overheat) ● thermistor and electric expansion valve thermistor so that they detect the temperatures of the unit and control the system. The circuit of the thermistors is shown as Fig.
- Page 273 All manuals and user guides at all-guides.com . Circuit de dŽtection des tempŽratures Le module externe de ce modle est fourni avec une thermistance pour la tempŽrature extŽrieure, une thermistance DEF ● (dŽgivrage), une thermistance OH (surchauffe) et une thermistance pour le dŽtendeur Žlectrique destinŽes ˆ dŽtecter les tempŽratures du module et ˆ...
- Page 274 All manuals and user guides at all-guides.com Table 6-1 Name and Role of each thermistor Name Connector No Measuring Point Role If the temperature of the compressor OH thermistor A CN4A A cycle compressor head rises abnormally (118¡C), the compressor will be stopped. The OH thermistor B CN4B B cycle compressor head...
- Page 275 All manuals and user guides at all-guides.com ableau 6-1 Nom et fonction de chaque thermistance N¡ du connecteur Point de mesure Fonction Si la tempŽrature du compresseur hermistance OH A CN4A te de compresseur s'Žlve anormalement (118¡C), ce cycle A dernier cesse de fonctionner.
- Page 276 All manuals and user guides at all-guides.com When the connectors of the thermistors are disconnected or the thermistors is open or short, LD301A (red) lights and ● LD302A (orange) blinks so that they indicate troubled parts. Combinations of LD301A and LD302A, LD301B and LD302B are set up for indicating troubled thermistors of A cycle and B cycle each.
- Page 277 All manuals and user guides at all-guides.com Lorsque les connecteurs des thermistances sont dŽbranchŽs ou que les thermistances sont ouvertes ou quasi ouvertes, la ● diode LD301 (rouge) s'allume et la diode LD302A clignote pour indiquer le dysfonctionnement de certaines pices. L'activation combinŽe de LD301A et LD302A, LD301B et LD302B est prŽvue pour signaler un dysfonctionnement des thermistances tant du cycle A que du cycle B.
- Page 278 All manuals and user guides at all-guides.com . Power Factor Control Circuit ower factor is controlled by almost 100%. (Effective use of power) With IC in ACT module, control is performed so that input current waveform will be similar to waveform of input voltage.
- Page 279 All manuals and user guides at all-guides.com . Circuit de contr™le facteur de puissance e facteur puissance est contr™lŽ ˆ presque 100%. (Utilisation effective de la puissance) Avec lÕIC dans le module ACT, le contr™le est effectuŽ de manire ˆ ce que la forme dÕonde du courant en entrŽe soit semblable ˆ...
- Page 280 All manuals and user guides at all-guides.com (1) Boosting and varying DC voltage Vd t boosts the DC voltage to the valve corresponds to the rotation speed with a detected DC voltage by the micro computer. ts component is basically made of a boosting chopper circuit. ACT element Reactor Ð...
- Page 281 All manuals and user guides at all-guides.com (1) ElŽvation et variation de la tension continue Vd DŽtecter la tension continue ˆ lÕaide dÕun microprocesseur et Žlever la tension continue ˆ la valeur correspondant ˆ la vitesse de rotation. ll sÕagit essentiellement dÕun circuit dÕinterruption pŽriodique par suralimentation. ElŽment ACT REACTEUR Ð...
-
Page 282: Cooling Mode
All manuals and user guides at all-guides.com ERVICE CALL Q&A COOLING MODE The compressor has stopped Check if indoor heat If the air conditioner operates suddenly during cooling exchanger is frosted. in cooling mode when it is operation. Wait for 3-4 minutes until cold, the evaporator may get it is defrosted. -
Page 283: Ode Operatoire De Depannage
All manuals and user guides at all-guides.com ODE OPERATOIRE DE DEPANNAGE ODE REFRIGERATION Le compresseur s'est Assurez-vous que Si le cimatiseur fonctionne en subitement arrtŽ pendant la l'Žchangeur de chaleur mode de rŽfrigŽration uand il rŽfrigŽration. intŽrieur n'est pas giveŽ. fait froid, i'Žvaporateur peut Attendez 3 - 4 minutes, le givrer. - Page 284 All manuals and user guides at all-guides.com UTO FRESH DEFROSTING After the ON/OFF button is pressed to Auto Fresh Defrosting is carried out : the system stop heating, the outdoor unit is still checks the outdoor heat exchanger and defrosts it working with the OPERATION lamp as necessary before stopping operation.
-
Page 285: Egivrage Automatique A Froi
All manuals and user guides at all-guides.com EGIVRAGE AUTOMATIQUE A FROI Aprs avoir appuyŽ sur la touche Le dŽgivrage ˆfoid a lieu: le systme contr™le ON/OFF pour arrter le chauffage, l'Žchangeur de chaleur extŽrieur et dŽgivre si I'unitŽ extŽrieure fonctionne encore et nŽcessaire avant de cesser de fonctionner. - Page 286 START/STOP button is not pressed. (RAF-25NH5, 35NH5, 50NH5) This is because the preheating device is working. When the heating operation is It will not start to drive the fan until the started, the indoor fan does not refrigerating cycle warms up and warm air blows.
- Page 287 START/STOP. (RAF-25NH5, 35NH5, 50NH5) Cela tient ˆ ce que le prŽchauffage fonctionne. Le uand le mode de chauffage est...
- Page 288 All manuals and user guides at all-guides.com Air does not flow immediately after Preliminary operation is performed for one minute operation is started. when the power switch is turned on and heating or dehumidifying is set. The operation lamp blinks during this time for heating.
- Page 289 All manuals and user guides at all-guides.com L'air ne souffle pas immŽdiate ment Aprs la mise sous tension et le choic du mode aprs la mise en marche. de chauffage ou de dŽshumidification, des opŽrations prŽliminaires sont effectuŽes pendant une minute. Dans le cas du mode chauffage, le tŽmoin de fonctionnement clignote pendant cette pŽriode.
-
Page 290: Rouble Shoo Ing
All manuals and user guides at all-guides.com ROUBLE SHOO ING MODEL RAM-80QH5 PRECAUTIONS FOR CHECKING Power source V, 50Hz φ, 230 ◯ DANGER Remem er that the Compressor motor 0V line is iased to 190V in reference to (0V) ◯ the ground level. -
Page 291: Precautions A Prendre
All manuals and user guides at all-guides.com ETECTION ES PANNES MODéLES RAM-80QH5 PRECAUTIONS A PRENDRE Source d'alimentation 230V, 50Hz φ, ◯ DANGER N'ou liez pas que la Moteur du ligne 0V est portŽe ˆ compresseur 190V par rapport au (0V) ◯... - Page 292 All manuals and user guides at all-guides.com DI CHARGING CAPACITOR Turn off the indoor unit's power switch or unplug the power cord, and wait for a minute or so. Open the cover of the electric parts compartment. Discharge electricity from smoothing capacitors (330µF x 3pcs.) by connecting the leads of a soldering iron of 30-75W to the terminals provided for this purpose.
- Page 293 All manuals and user guides at all-guides.com ESCHARGE ES CON ENSATEURS Mettez l'unitŽ intŽrieure hors tension au moyen de l'interrupteur d'alimentation, ou dŽbranchez la fiche du cordon d'alimentation et attendez environ une minute. Ouvrez le couvercle du logement des composants Žlectriques. Žchargez les condensateurs de lissage (3 x 330µF) en branchant les conducteurs d'un fer ˆ...
- Page 294 All manuals and user guides at all-guides.com NSPECT NG EXTERNAL ELECTR CAL PARTS Check to see that the LED is either on or blinking. LEDs are divided between those for A cycle and those for B cycle. This is determined by either an A or a B appearing in the circuit code, for example LD301A or LD301B.
- Page 295 All manuals and user guides at all-guides.com NSPECTER LES P éCES ƒLECTR QUES EXTERNES ¥ VŽrifier que la DEL est allumŽe ou en train de clignoter. ¥ Les DELs sont partagŽes entre le cycle A et le cycle B Cela est dŽterminŽ par le A ou le B qui appara”t dans le code du circuit, par exemple LD301A ou LD301B.
- Page 296 All manuals and user guides at all-guides.com nspection method 1 LED on nsert the power source, and check to see that the Follow " nspecting external electrical parts" and check LED is on. the cause of the problem. LED off Connect a commercial-use 230V power source s AC230V flowing to the L/N terminal? to the L/N terminal.
- Page 297 All manuals and user guides at all-guides.com Žthode dÕinspection 1 DEL allumŽe nsŽrer la source de puissance et vŽrifier que la Suivre Òinspection des pices Žlectriques externesÓ et DEL est allumŽe. vŽrifier la cause du problme. DEL Žteinte Brancher une source de courant disponible dans le Est ce que le CA 230V arrive au terminal L/N? commerce de 230V au terminal L/N.
- Page 298 All manuals and user guides at all-guides.com nspection method 2 Check the number of times LD301 blinks. LD301: Blinks once he power source or some other reason may have caused the microcomputer Reset stop to reset. Replace the control P.W.B. if the LED blinks once and then stops frequently during operation.
- Page 299 All manuals and user guides at all-guides.com Žthode dÕinspection 2 VŽrifier le nombre de fois que LD301 clignote. source d'alimentation autre raison peut avoir provoquŽ rŽ- LD301: Clignote une fois enclenchement du micro ordinateur. Remplacer le circuit imprimŽ de commande si la DEL clignote une fois puis s'arrte frŽquemment pendant le fonctionnement.
- Page 300 All manuals and user guides at all-guides.com External fan Burnt out rotates LD301: Blinks five times Insert the power source and operate, and he FM P.W.B. is broken. Check to see that the 2A fuse of the FM then check to see that the external fan is Overload stop Replace the FM P.W.B.
- Page 301 All manuals and user guides at all-guides.com Le ventilateur externe tourne GrillŽ LD301: Clignote cinq fois nsŽrer source dÕalimentation faire La carte de circuit imprimŽ FM est cassŽe. VŽrifier pour voir si le fusible de 2A de la carte fonctionner, puis vŽrifier que le ventilateur Arrt de surcharge Remplacer la carte de circuit imprimŽ...
- Page 302 All manuals and user guides at all-guides.com AC196V-265V LD301: Blinks ten times Check the power source voltage Check the wiring (diode stack (terminal board, L/N terminal) Power source voltage blue/yellow/gray/red CN13) abnormally abnormally noise AC196V or less or AC265V or more Danger! Quickly turn off the power Less than AC196V Power source abnormally.
- Page 303 All manuals and user guides at all-guides.com A196V-265V LD301: lignote dix fois VŽrifier la tension de la source VŽrifier le c‰blage (rangŽe de dÕalimentation (plaque ˆ borne, Dysfonctionnement de la diode bleu/jaune/gris/rouge N13) terminal L/N) tension de la source dÕalimentation Bruit de dysfonctionnement A196V ou moins, Moins de A196V...
- Page 304 All manuals and user guides at all-guides.com nspection method 3 heck the on status of LD301 and the blinking of LD302. LD301A:On LD301B: On A cycle thermistor abnormally. B cycle thermistor abnormally LD302A: Blinking LD302B: Blinking LD302A: Blinks once LD302B: Blinks once Replace OH Replace OH OH thermistor B...
- Page 305 All manuals and user guides at all-guides.com Žthode dÕinspection 3 Žrifier l'Žtat de marche de LD301 et le clignotement de LD302. Dysfonctionnement de la thermistance. LD301A: ActivŽ LD301B: ActivŽ Dysfonctionnement de la Dysfonctionnement de la LD302A: Clignotant LD302B: Clignotant thermistance du cycle A. thermistance du cycle B.
- Page 306 All manuals and user guides at all-guides.com nspection method 4 heck the number of times LD303 blinks. ommunications abnormally between microcomputers. LD303A blinks LD303B blinks LD303A blinks once heck the internal P.W.B. connected External microcomputer to the internal unit in question. *1 A Ð...
- Page 307 All manuals and user guides at all-guides.com Žthode dÕinspection 4 Žrifier le nombre de fois que LD303 clignote. Panne de communication entre microprocesseur. LD303A clignote. LD303B clignote LD303A clignote une fois Žrifier que la carte de circuit imprimŽ interne Erreur des communications est connectŽ...
- Page 308 All manuals and user guides at all-guides.com * 1 Example of indoor P.W.B. checking method (when indoor unit 1 is displayed as broken) einsert the connecting cord of indoor unit 1 (the indoor unit with a communications error) and indoor unit 2 (the indoor unit where communications are possible) (turn off the power source before disconnecting and reinserting the connecting cord) indoor unit 2 communications error indoor unit 1 communications error...
- Page 309 All manuals and user guides at all-guides.com * 1 Exemple dÕune mŽthode de vŽrification du circuit imprimŽ interne (lorsque lÕunitŽ interne 1 est affichŽe comme cassŽe.) ŽinsŽrer le corde se reliante de lÕunitŽ interne 1 (LÕunitŽ interne qui annonce lÕerreur de communication) et lÕunitŽ interne 2 (lÕunitŽ...
- Page 310 All manuals and user guides at all-guides.com OW TO OPERATE USING T E SERVICE SWITC T E OUTDOOR UNIT ODEL RA -80QH5 1. Turn the Power switch off and then turn on again. 2. Remove the electrical parts cover. 3. Press the service switch for one second or more (wait for at least 20 seconds after turning the power source switch on).
- Page 311 All manuals and user guides at all-guides.com OMMENT A TIVER LE FON TIONNEMENT EN UTILISANT L'INTERRUPTEUR DE L'UNITE EXTERIEURE ODéLE RA -80QH5 1. Positionner l'interrupteur sur OFF puis rallumer. 2. DŽposer le couvercle des pices Žlectriques. 3. Appuyer sur lÕinterrupteur secteur pour une seconde ou plus (attendre au moins 20 secondes aprs avoir mis lÕinterrupteur dÕalimentation sur marche).
- Page 312 All manuals and user guides at all-guides.com IGHTING MODE OF THE SE F-DIAGNOSIS AMP MODEL RAM-80QH5 INSTA ATION POSITION OF SE F-DIAGNOSIS AMP Positions of self-diagnosis lamps (LEDs) COMPRESSOR COMPRESSOR STRIP SIDE SIDE ROOMS MULTI MODEL HAVE ...
-
Page 313: Positions Des Voyants D'auto Diagnostic (Dels)
All manuals and user guides at all-guides.com ODE DÕECLAIRAGE DU VOYANT DÕAUTO DIAGNOSTIC MODéLE RAM-80QH5 POSITION DÕINSTALLATION DU VOYANT DÕAUTO DIAGNOSTIC Positions des voyants d'auto diagnostic (DELs) COTE B DU COTE A DU COMPRESSEUR. COMPRESSEUR. BANDES EN SPIRALE LE MODELE MULTIPLE 3 PIECES POSSEDE ... - Page 314 All manuals and user guides at all-guides.com LIGHTING ODE OF THE SELF-DIAGNOSIS LA P ODEL RA -80QH5 DANGER ( DC360V ) DANGER ( COURANT CONTINU DE 360V ) WAIT FOR FIFTEEN- INUTES ( IN.) EVER ATTENDRE QUINZE INUTES ( IN. ) ËPRES AVOIR CO UTƒ ●...
- Page 315 All manuals and user guides at all-guides.com MODE DÕECLAIRAGE DU VOYANT DÕAUTO DIAGNOSTIC MODéLE RAM-80QH5 DANGER ( DC360V ) DANGER ( COURANT 360V ) CONTINU WAIT FOR FIFTEEN-MINUTES (MIN.) EVER ATTENDRE QUINZE MINUTES ( MIN. ) ËPRES AVOIR COMMUTƒ ●...
- Page 316 All manuals and user guides at all-guides.com ROUBLE SHOO ING OF HE SYS EM POWER MODULE GT15J31IS COLLECTOR GATE ELE ENT CIRCUIT E ITTER INTERNAL CIRCUIT OF THE ODULE TER INAL SY BOL OF SYSTE POWER ODULE SEE NEXT PAGE FOR VALUES EASURED BY TESTER.
- Page 317 All manuals and user guides at all-guides.com EPANNAGE U MO ULE ÕALIMENTATION U SYSTEME GT15J31IS COLLECTEUR CIRCUIT PORTE LOGIQUE ELE ENT E ETTEUR CIRCUIT INTERNE DU ODULE SY BOLE DU TER INAL DU ODULE DÕALI ENTATION DU SYSTE E CONSULTER LA PAGE SUIVANTE POUR LES VALEURS...
- Page 318 All manuals and user guides at all-guides.com OW TO C ECK POWER MODULE Checking power module using tester et tester to resistance range ( 100) × If indicator does not swing in the following conductivity check, the power module is normal. (In case of digital tester, since built-in battery is set in reverse direction, + and - terminals are reversed.) CAUTION If inner circuit of power module is disconnected (open), the indicator of tester will not swing and this may...
- Page 319 All manuals and user guides at all-guides.com OMMENT VERIFIER LE MODULE DÕALIMENTATION DU SYSTEME VŽrifier le module dÕalimentation en utilisant un testeur Žgler le testeur pour le niveau de rŽsistance (x100) Si lÕindicateur ne bouge pas pendant la vŽrification de conductivitŽ suivante, le module dÕalimentation est normal. Dans le cas dÕun testeur numŽrique, comme la batterie est rŽglŽe dans le sens inverse, les terminaux sont rensversŽs.
- Page 320 All manuals and user guides at all-guides.com ROUBLESHOO ING WHEN HE IMER LAMP BLINKS MODEL RAF-25NH5, RAF- 5NH5, RAF-50NH5 Perform troubleshooting according to the number of times the timer lamp on the display of the indoor unit blinks. Lamp blinking mode...
-
Page 321: Epannage Lorsque Le Temoin E Minuterie Clignote
All manuals and user guides at all-guides.com EPANNAGE LORSQUE LE TEMOIN E MINUTERIE CLIGNOTE ODéLES RAF-25NH5, RAF-35NH5, RAF-50NH5 Effectuer le depannage en suivant le nombre de fois que le voyant de la minuterie sur lÕaffichage de lÕunitŽ interieure clignote. ode clignotant du voyant Conducteur principal deficient 2 sec. - Page 322 All manuals and user guides at all-guides.com HE KING THE INDOOR UNIT ELE TRI AL PARTS [Model : RAF-25NH5, RAF-35NH5, RAF-50NH5] . Power does not come on (no operation) Check the indoor/outdoor unit Is 35V DC being generated Is 230V AC being generated...
-
Page 323: Ontrole Pie Es Ele Triques Unite Interne
All manuals and user guides at all-guides.com ONTROLE PIE ES ELE TRIQUES UNITE INTERNE [Modle : RAF-25NH5, RAF-35NH5, RAF-50NH5] . Pas de tension (pas de fonctionnement) Contr™ler le c‰ble de connexion entre les Est-ce que le 35V CC est gŽnŽrŽ... - Page 324 All manuals and user guides at all-guides.com 2. Only indoor fan does not operate (others are normal) Is 5V DC being generated Is 25-35V DC being generated Replace the indoor fan motor. between blue and yellow of C 10, between blue and red of C 10, C 15? C 15 in the "Hi"...
- Page 325 All manuals and user guides at all-guides.com 2. Seul le ventilateur de l'unitŽ intŽrieure ne fonctionne pas (les autres ŽlŽments sont normaux). Une tension de 5V CC est Remplacez le moteur du Une tension de 25-35V CC est prŽsente entre les bleue et ventilateur de l'unitŽ...
- Page 326 All manuals and user guides at all-guides.com 4. All systems stop from several seconds to several minutes after operation is started (all indicators are also off) et to the ÒHiÓ fan mode. The operation lamp lights once and goes out in 5-10 seconds.
- Page 327 All manuals and user guides at all-guides.com 4. Tous les systmes s' a rrtent de quelques decondes ˆ quelques minutes aprs la mise en fonctionnement (et aucun indicateur ne fonctionne) Žglez le mode de ventilation sur "Hi". le tŽmoin de fonctionnement s'allume une fois puis s'Žteint aprs 5 ˆ...
- Page 328 All manuals and user guides at all-guides.com ROUBLESHOO ING WHEN HE IMER LAMP BLINKS MODEL RAD-25NH5, RAD-35NH5, RAI-25NH5, RAI-35NH5, RAI-50NH5 Perform troubleshooting according to the number of times the timer lamp on the display of the indoor unit blinks. Lamp blinking mode Main defective Lamp blinking mode Main defective...
- Page 329 All manuals and user guides at all-guides.com EPANNAGE LORSQUE LE TEMOIN E MINUTERIE CLIGNOTE ODéLES RAD-25NH5, RAD-35NH5, RAI-25NH5, RAI-35NH5, RAI-50NH5 Effectuer le depannage en suivant le nombre de fois que le voyant de la minuterie sur lÕaffichage de lÕunitŽ interieure clignote. ode clignotant du voyant Conducteur principal deficient ode clignotant du voyant...
- Page 330 All manuals and user guides at all-guides.com HE KING THE INDOOR UNIT ELE TRI AL PARTS MODEL RAD-25NH5, RAD-35NH5, RAI-25NH5, RAI-35NH5, RAI-50NH5 . Power does not come on (no operation) Check the indoor/outdoor unit Is 35V DC being generated Is 230V AC being generated connecting cord, and correct any between terminals C and D on between terminals L and N on...
-
Page 331: Pas De Tension (Pas De Fonctionnement)
All manuals and user guides at all-guides.com ONTROLE PIE ES ELE TRIQUES UNITE INTERNE MODéLES RAD-25NH5, RAD-35NH5, RAI-25NH5, RAI-35NH5, RAI-50NH5 . Pas de tension (pas de fonctionnement) Contr™ler le c‰ble de connexion entre les Est-ce que le 35V CC est gŽnŽrŽ Est-ce que le 230V AC est gŽnŽrŽ... - Page 332 All manuals and user guides at all-guides.com 2. Only indoor fan does not operate (others are normal) Is 5V DC being generated Is 25-35V DC being generated Replace the indoor fan motor. between blue and yellow of C 10? between blue and red of C 10 in the "Hi"...
- Page 333 All manuals and user guides at all-guides.com 2. Seul le ventilateur de l'unitŽ intŽrieure ne fonctionne pas (les autres ŽlŽments sont normaux). Une tension de 5V CC est Remplacez le moteur du Une tension de 25-35V CC est prŽsente entre les bleue et ventilateur de l'unitŽ...
- Page 334 All manuals and user guides at all-guides.com 4. All systems stop from several seconds to several minutes after operation is started (all indicators are also off) et to the ÒHiÓ fan mode. The operation lamp lights once and goes out in 5-10 seconds.
- Page 335 All manuals and user guides at all-guides.com 4. Tous les systmes s' a rrtent de quelques decondes ˆ quelques minutes aprs la mise en fonctionnement (et aucun indicateur ne fonctionne) Žglez le mode de ventilation sur "Hi". le tŽmoin de fonctionnement s'allume une fois puis s'Žteint aprs 5 ˆ...
- Page 336 All manuals and user guides at all-guides.com AK-18NH5, AK-25NH5, AK-35NH5, AK-50NH5 AK-18NH5, AK-25NH5, AK-35NH5, AK-50NH5 - 372 -...
- Page 337 All manuals and user guides at all-guides.com EPANNAGE LORSQUE LE TEMOIN E MINUTERIE CLIGNOTE ODéLES RAK-18NH5, RAK-25NH5, RAK-35NH5, RAK-50NH5 ExŽcuter le dŽpannage conformŽment au nombre de fois que la lampe de minuterie intŽrieure et LD301 extŽrieure clignote. ODE D'ALLU AGE EN AUTO-DIAGNOSTIC ODéLES RAK-18NH5, RAK-25NH5, RAK-35NH5, RAK-50NH5 Clignotement de lampe de minuterie...
- Page 338 All manuals and user guides at all-guides.com - 374 -...
-
Page 339: Controle Pieces Electriques Unite Interne
All manuals and user guides at all-guides.com CONTROLE PIECES ELECTRIQUES UNITE INTERNE . Pas de tension (pas de fonctionnement) Est-ce que le 35V CC est gŽnŽrŽ Est-ce que le 230V AC est gŽnŽrŽ VŽrifier la prise d'alimentation ˆ courant entre les bornes C et D sur le entre les bornes L et N sur le alternatif et le disjoncteur puis rŽparer tableau de bornes? - Page 340 All manuals and user guides at all-guides.com - 376 -...
- Page 341 All manuals and user guides at all-guides.com . Seul le ventilateur intŽrieur ne fonctionne pas (les autres fonctionnent normalement) La sortie de modulation de Le ventilateur peut-il tre arrtŽ largeur d'impulsions de Remplacer le microprocesseur. avec par la tŽlŽcommande ? ventilateur de microprocesseur (broche) est sur ÒHiÓ.
- Page 342 All manuals and user guides at all-guides.com - 378 -...
- Page 343 All manuals and user guides at all-guides.com . VŽrifier la carte de circuit imprimŽ principale (circuit d'alimentation) Y a-t-il une tension Le circuit ICP2 est-il normal ? Remplacer le circuit ICP2. continue de 3 V prŽsente Il est normal si la tension infŽrieure VŽrifier si un court-circuit s'est entre la cathode et l'anode ˆ...
- Page 344 All manuals and user guides at all-guides.com CHECKING THE REMOTE CONTROLLER Is battery polarity correct? Install the battery in the correct polarity. Is the battery check sign + Ð Replace the battery. flashing? urn on an AM radio, bring the remote control switch within 15 cm of the radio, and press the ON/OFF button.
- Page 345 All manuals and user guides at all-guides.com VƒRIFICATION DE LA TƒLƒCOMMANDE La polaritŽ de la pile est-elle normale ? Introduire une pile selon la polaritŽ indiquŽe. Le signe de vŽrification + Ð de la pile Remplacer la pile. clignote-t-il ? Mettre un rŽcepteur radio PO en marche, approcher le commutateur de tŽlŽcommande dans les limites...