Worx WG116 Mode D'emploi

Worx WG116 Mode D'emploi

Taille-bordure/coupe-bordure électrique de 4 amp

Publicité

Les langues disponibles

Les langues disponibles

Liens rapides

4 AMP Electric Grass Trimmer/Edger
Taille-bordure/Coupe-bordure électrique de 4 AMP
Recortadora/Bordeadora eléctrica de 4 AMP
All manuals and user guides at all-guides.com
EN
P07
F
P12
ES
P17
WG1 16

Publicité

Table des Matières
loading

Sommaire des Matières pour Worx WG116

  • Page 1 All manuals and user guides at all-guides.com 4 AMP Electric Grass Trimmer/Edger Taille-bordure/Coupe-bordure électrique de 4 AMP Recortadora/Bordeadora eléctrica de 4 AMP WG1 16...
  • Page 2 All manuals and user guides at all-guides.com...
  • Page 3 All manuals and user guides at all-guides.com...
  • Page 4 All manuals and user guides at all-guides.com...
  • Page 5 All manuals and user guides at all-guides.com...
  • Page 6: Technical Data

    All manuals and user guides at all-guides.com 1. AUXILIARY HANDLE 2. ON/OFF SWITCH 3. EXTENSION CORD RETAINER 4. SAFETY GUARD 5. CUTTING HEAD ASSEMBLY 6. FLOWER GUARD 7. LINE CUTTER TECHNICAL DATA Voltage 120V~60Hz Rated current No load speed 9000/min Cutting diameter 12”...
  • Page 7: Important Safety Instructions

    All manuals and user guides at all-guides.com IMPORTANT SAFETY clothing or jewelry. They can be caught in moving parts. Use of protective INSTRUCTIONS gloves and substantial footwear is WARNING: When using electric recommended when working outdoors. Wear protective hair covering to contain gardening appliances, basic safety long hair.
  • Page 8 All manuals and user guides at all-guides.com disconnect from receptacle. Keep cord Table 1 from heat, oil, and sharp edges. Minimum gauge for extension cords Don’t grasp the exposed cutting blades or cutting edges when Volts Total length of cord in feet picking up or holding the appliance.
  • Page 9: Assembly & Operation

    All manuals and user guides at all-guides.com SYMBOLES ASSEMBLY & OPERATION Action Figure Warning Assembling The Main Handle See Fig. A Assembling The Safety Guard See Fig. B Read the manual Assembling The Flower Guard See Fig. C Assembling The Auxiliary See Fig.
  • Page 10 All manuals and user guides at all-guides.com Then fit the spool as described above in “Replacing the Trimmer Line And Spool”. MAINTENANCE After use, disconnect the machine from the mains and check for damage. Your power tool requires no additional lubrication or maintenance.
  • Page 11: Données Techniques

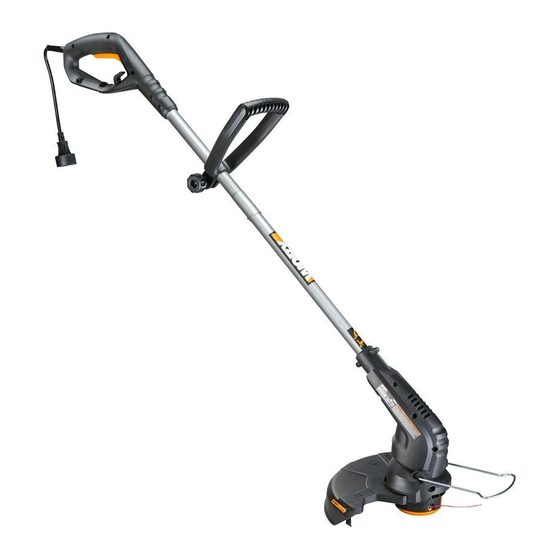
    All manuals and user guides at all-guides.com 1. POIGNÉE AUXILIAIRE 2. INTERRUPTEUR MARCHE/ARRÊT 3. SUPPORT DE RALLONGE 4. GARDE DE SÉCURITÉ 5. MONTAGE DE LA TÊTE DE TONTE 6. PROTECTION DES FLEURS 7. COUPEUR DE CORDON DE COUPE DONNÉES TECHNIQUES Tension 120V~60Hz Courant assigné...
  • Page 12: Consignes De Sécurité

    All manuals and user guides at all-guides.com CONSIGNES DE SÉCURITÉ rallonge électrique, de quelque façon que ce soit. AVERTISSEMENT! Lors de GARDEZ CES INSTRUCTIONS l’utilisation d’appareils électriques de jardinage, des précautions de base doivent 2. POUR TOUS LES APPAREILS être observées afin de réduire les risques de a) Évitez les environnements feu, choc électrique, et blessure grave, dangereux.
  • Page 13 All manuals and user guides at all-guides.com puissance et une surchauffe. Le tableau faire l’entretien, lors du changement 1 montre le calibre approprié en fonction d’accessoires tels que lames, et autres de la longueur de la rallonge électrique accessoires du même genre. q) Entreposez à...
  • Page 14 All manuals and user guides at all-guides.com SYMBOLES Ampérage supporté (A) Avertissement 6-10 10-12 Lisez le manuel 12-16 Déconseillé Figure 1 Un protecteur oculaire et Méthode pour sécuriser la rallonge électrique CORDON ÉLECTRIQUE RALLONGE DE L’APPAREIL ÉLECTRIQUE Portez une protection auditive (A) ATTACHEZ LA RALLONGE ÉLECTRIQUE TEL QU’ILLUSTRÉ...
  • Page 15: Assemblage & Fonctionnement

    All manuals and user guides at all-guides.com ASSEMBLAGE & 2. POUR EMBOBINER LE CORDON DE COUPE MANUELLEMENT (Voir Fig. L, M, FONCTIONNEMENT N, O) Prenez approximativement 16 pieds (5m) de Action Schéma cordon de coupe et insérez 8/5 po (15mm) de cordon de coupe dans un des trous situés à...
  • Page 16: Datos Técnicos

    All manuals and user guides at all-guides.com 1. MANGO AUXILIAR 2. INTERRUPTOR DE ENCENDIDO/APAGADO 3. SOPORTE DEL CABLE DE EXTENSIÓN 4. GUARDA PROTECTORA DE SEGURIDAD 5. CONJUNTO DEL CABEZAL DE CORTE 6. GUARDA PARA FLORES 7. CUCHILLA DEL HILO DATOS TÉCNICOS Voltaje 120V~60Hz Corriente Nominal...
  • Page 17: Instrucciones De Seguridad

    All manuals and user guides at all-guides.com INSTRUCCIONES DE 2. PARA TODAS LAS HERRAMIENTAS a) Evite ambientes peligrosos. No utilice SEGURIDAD las herramientas en lugares húmedos o ¡ADVERTENCIA! Cuando se emplean mojados. b) No trabaje bajo la lluvia. herramientas eléctricas para jardinería, c) Mantenga alejados a los niños.
  • Page 18 All manuals and user guides at all-guides.com duda, utilice el tamaño mayor siguiente. para la lubricación y el cambio de Cuanto menor es el calibre, mayor accesorios. Examine periódicamente es la capacidad del cable. A fin de el cable de la herramienta y si está evitar la desconexión del cable de la dañado hágalo reparar por un agente herramienta del prolongador durante el...
  • Page 19 All manuals and user guides at all-guides.com SÍMBOLOS Figura 1 Método para asegurar el cable prolongador CABLE CABLE DE LA HERRAMIENTA PROLONGADOR Advertencia (A) ATE LOS CABLES Lea el manual COMO SE MUESTRA Emplee protección ocular (B) CONECTE EL ENCHUFE Y EL RECEPTÁCULO Emplee protección auditiva CORTADORA DE CÉSPED...
  • Page 20 All manuals and user guides at all-guides.com ENSAMBLE & 2. PARA ENROLLAR MANUALMENTE EL HILO (Véase L, M, N, O) FUNCIONAMIENTO Tome aproximadamente 5 metros de hilo e inserte 15 mm dentro de uno de los orificios Acción Figura de la parte superior de la bobina. (Véase L) Enrolle el hilo en la dirección de las flechas Consulte la Armado del mango principal...
  • Page 21 All manuals and user guides at all-guides.com www.worx.com Copyright © 2014, Positec. All Rights Reserved. 2GGT15BPK11000A0...

Table des Matières