Télécharger Imprimer la page

Publicité

Les langues disponibles
  • FR

Les langues disponibles

Liens rapides

COMMANDER
/
2
H2N / H2N
+
+
DE
DE Bedienungsanleitung
Bedienungsanleitung
EN Operating instructions
FR Mode d'emploi
NL Gebruiksanwijzing
ES
Manual de instrucciones

Publicité

loading

Sommaire des Matières pour Nedo Primus2 H2N

  • Page 1 COMMANDER H2N / H2N DE Bedienungsanleitung Bedienungsanleitung EN Operating instructions FR Mode d‘emploi NL Gebruiksanwijzing Manual de instrucciones...
  • Page 2 DE Impressum Version: PRIMUS 2 H2N/H2N+ 062709_14.09.2021 Copyright: NEDO GmbH & Co. KG Hochgerichtstraße 39 – 43 72280 Dornstetten Deutschland Tel.: +49 74432401-0 Fax: +49 74432401-45 E-Mail: info@nedo.com Internet: www.nedo.com Weitergabe sowie Vervielfältigung dieses Dokuments, Verwertung und Mitteilung seines Inhalts sind verboten, soweit nicht ausdrücklich gestattet. Zuwiderhandlungen verpflichten zu Schadenersatz. Alle Rechte sind für den Fall der Patent-, Gebrauchsmuster- oder Geschmacksmus- tereintragung vorbehalten. Diese Bedienungsanleitung wurde mit Sorgfalt erstellt. Die NEDO GmbH & Co. KG übernimmt jedoch für even- tuelle Irrtümer in dieser Bedienungsanleitung und deren Folgen keine Haftung. Ebenso wird keine Haftung für di- rekte Schäden oder Folgeschäden übernommen, die sich aus einem unsachgemäßen Gebrauch des Lasers ergeben. Bei der Anwendung des Lasers sind die landesspezifi- schen Sicherheitsvorschriften und Arbeitsschutzbestim- mungen sowie die Vorgaben dieser Bedienungsanleitung zu beachten. Alle verwendeten Produktbezeichnungen und Marken- namen sind Eigentum der Inhaber und nicht explizit als solche gekennzeichnet. Inhaltliche Änderungen vorbehalten.
  • Page 3 DE Inhaltsverzeichnis 1 Über diese Bedienungsanleitung 1.1 In dieser Bedienungsanleitung verwendete Symbole ........4 2 Sicherheitsinformationen 2.1 Dokumentation .................... 5 2.2 Laserstrahlung ....................5 2.3 Bestimmungsgemäßer Gebrauch ..............6 2.4 Transport und Lagerung ................6 2.5 Umwelt ......................6 3 Beschreibung PRIMUS 2 H2N/H2N+ 3.1 Allgemeine Produktbeschreibung ..............7 3.2 Technische Daten ..................7 3.3 Lieferumfang ....................7 4 Bedienelemente PRIMUS 2 H2N/H2N+ 4.1 Tasten des Bedienfeldes .
  • Page 4 Allgemeine Hinweise Über diese Bedienungsanleitung Diese Bedienungsanleitung enthält alle wichtigen Informationen für den Umgang mit dem vollautomatischen Rotationslaser PRIMUS 2 H2N/ H2N+ und dem COMMANDER 2 H2N/H2N+. Ebenso werden die Bedie- nung, die Wartung und Pflege sowie die Warn- und Fehlermeldungen beschrieben. • Setzen Sie die Geräte nicht ein, bevor Sie diese Bedienungsanleitung voll- ständig gelesen und verstanden haben. • Diese Bedienungsanleitung immer bei den Geräten aufbewahren. 1.1 In dieser Bedienungsanleitung verwendete Symbole Das Beachten der Sicherheits- und Gefahrenhinweise ist Grundvoraussetzung für den sicheren Einsatz des PRIMUS 2 H2N/H2N+ und des COMMANDER 2 H2N/H2N+. Die verschiedenen Hinweise sind durch entsprechende Symbole gekennzeichnet. WARNUNG! Dieses Piktogramm mit dem Hinweis „WARNUNG!“ weist auf eine drohende Gefährdung hin, die eine schwere Körperverletzung zur Folge haben kann, wenn sie nicht vermieden wird.
  • Page 5 Sicherheitshinweise Sicherheitsinformationen 2.1 Dokumentation Das Beachten der folgenden Sicherheitshinweise sowie der landesspezifischen Sicherheitsvorschriften und Arbeitsschutzbestimmungen ist Voraussetzung für einen störungsfreien und gefahrlosen Einsatz des Lasers. Lesen Sie deshalb bitte diese Bedie- nungsanleitung und alle Hinweise sorgfältig durch und befolgen Sie diese bei der Arbeit mit dem Laser.
  • Page 6 2.4 Transport und Lagerung Der Laser ist ein empfindliches, hochgenaues Instrument und ist mit ent- sprechender Sorgfalt zu behandeln. Transportieren und lagern Sie den PRIMUS 2 H2N/H2N+, den COMMANDER 2 H2N/H2N+ und das Zubehör immer im Transportkoffer. 2.5 Umwelt Produktspezifische Informationen zur Entsorgung des Lasers können unter www.nedo.com heruntergeladen werden. Batterien und Akkus sind Sondermüll und dürfen nicht in den Hausmüll gelangen. Sie müssen den jeweils gültigen Länderrichtlinien entsprechend fachgerecht entsorgt werden.
  • Page 7 DE Bedienungsanleitung Beschreibung PRIMUS 2 H2N/H2N+ 3.1 Allgemeine Produktbeschreibung Die Laser PRIMUS 2 H2N/H2N+ sind vollautomatische Rotationslaser mit Zweiachs-Neigung für horizontalen Betrieb. Beim PRIMUS 2 H2N+ wird zusätzlich die Neigung überwacht (siehe 8.3)! Das innovative Shock-Protec- tion-System und das robuste, wasser- und staubgeschützte Gehäuse schützen den High-Power-Laser unter nahezu allen Einsatzbedingungen im Innen- und Außenbereich. 1 Rotationslaser 2 Tragegriff, gummiert 3 Libelle 4 Bedienfeld mit Tasten und Display 5 5/8“-Gewindebuchse (Boden) 6 Akkufach 7 Tragegriff, gummiert 3.2 Technische Daten Vollautomatischer Rotationslaser PRIMUS 2 H2N/H2N+ Selbstnivellierbereich ±5°, motorisch mit automatischer Überwachung Nivelliergenauigkeit besser als ±0,05mm/m Einstellbare Neigung (X-/Y-Achse) ±10 %...
  • Page 8 DE Bedienungsanleitung Bedienelemente PRIMUS 2 H2N/H2N+ 4.1 Tasten des Bedienfeldes Die Bedienung des Lasers erfolgt über das Bedienfeld. Warn-LED Achsen NEIGEN aktivieren/ Prozentwerteingabe Display bestätigen Wert erhöhen, siehe Komfort- Funktionen Seite 15 Wert verringern, siehe Komfort- Funktionen Seite 15 Laser EIN/AUS Betriebsart MANUELL aktivie- 4.2 Displayanzeigen ren/deaktivieren Symbol Beschreibung C00 – C03 Warnmeldung ERR1 – 12 Fehleranzeige X-Achse ausgewählt (Symbol blinkt, Einstellen von Werten möglich) Y-Achse ausgewählt (Symbol blinkt, Einstellen von...
  • Page 9 DE Bedienungsanleitung Erstinbetriebnahme PRIMUS 2 H2N/H2N+ 5.1 Sicherheitshinweise Stromversorgung WARNUNG! Zerstörung! Explosionsgefahr! f Nur Ladegerät des Lieferumfangs verwenden. f Batterien nicht in Akku-Pack einlegen und mit Ladegerät laden. VORSICHT! Beschädigung! f Leere und volle Batterien nicht mischen. f Akkus und Batterien nicht auf Heizungen oder in der Sonne lagern. 5.2 Allgemeine Hinweise Stromversorgung Das Ladegerät nur in trockenen Räumen verwenden.
  • Page 10 DE Bedienungsanleitung Inbetriebnahme des PRIMUS 2 H2N/H2N+ 6.1 Laser für Einsatz montieren bzw. aufstellen Der Laser lässt sich in horizontaler Lage montieren bzw. aufstellen. Horizontal auf Stativ Horizontal aufgestellt Laser auf Arbeitshöhe einrichten Laserprojektion HORIZONTAL Laser mit integrierter Libelle aus- richten VORSICHT! Unebenheiten, weiche Untergründe oder Erschütterungen beeinträchtigen die Standfes- tigkeit des Lasers bzw. des Stativs. f Bei der Montage/Aufstellen des Lasers auf einen sicheren und festen Stand achten. HINWEIS Die Kappe mit den Dioptern und den Achs- angaben ist abnehmbar und kann gegen...
  • Page 11 DE Bedienungsanleitung PRIMUS 2 H2N/H2N+ einschalten Die Betriebsart AUTOMATIK ist nach jedem Einschalten die Standard- einstellung. HINWEIS Trotz sorgfältigem Aufbau können durch äußere Einflüsse und starke Erschütterungen in der Betriebsart AUTOMATIK im Display des Lasers Warn- und Fehlermeldungen erscheinen. Beschreibung und Abhilfemaßnahmen siehe Kapitel 15. 7.1 Betriebsart AUTOMATIK In der Betriebsart AUTOMATIK horizontiert sich der Laser in einem Bereich von ±5° automatisch und regelt kleine Erschütterungen aus.
  • Page 12 DE Bedienungsanleitung 7.2 Betriebsart MANUELL In der Betriebsart MANUELL erkennt der Laser keine Erschütterungen und horizontiert sich nicht. Betriebsart Betriebsart Handsymbol AUTOMATIK ist MANUELL ein- wird angezeigt aktiv stellen HINWEIS Mit der Taste kann direkt nach dem Einschalten in die Betriebsart MANUELL gewechselt werden. Die Betriebsart MANUELL ist aktiv. Folgende Funktionen können aufgerufen werden: Mit der Taste in die Betriebsart AUTOMATIK (Kapitel 7.1) wechseln. Der Laser horizontiert sich neu. Mit der Taste die Betriebsart beenden, Laser ausschalten.
  • Page 13 DE Bedienungsanleitung Funktionen des PRIMUS 2 H2N/H2N+ 8.1 X-Achse/Y-Achse NEIGEN Bei der Funktion Achsen NEIGEN können die Achsen unabhängig voneinan- der in einem Bereich von ±10 % geneigt werden. Beim Primus 2 H2N+ wird zusätzlich die Neigungseinstellung überwacht! X-Achse Die nebenstehende Abbildung zeigt die Neigung bei der Einstellung eines positiven Prozentwertes. Y-Achse Die nebenstehende Abbildung zeigt die Neigung bei der Einstellung eines positiven Prozentwertes. X- und Y-Achse Die nebenstehende Abbildung zeigt die Nei- gung bei der Einstellung positiver Prozentwerte (X-Achse +5 %, Y-Achse +8 %). HINWEIS Zur Einstellung großer Neigungen ist es hilfreich bzw. erforderlich, den Laser innerhalb der Horizontierungstoleranz von ±5° (8,8 %) in die entsprechende Richtung »vorzu- neigen«.Wird der Laser bei großen Neigungen nicht »vorgeneigt«, kann der Laserkopf die eingestellte Neigung aus technischen Gründen nicht anfahren.
  • Page 14 DE Bedienungsanleitung Eingestellten Symbol Y-Achse Wert 0.00 % mit der Taste Wert für X-Achse und Neigung übernehmen oder einen Wert, z. B. mit Taste werden blinkend +8 %, für Y-Achse mit den Komfort- bestätigen angezeigt Funktionen der Tasten (siehe Seite 15) einstellen Eingestellten Der Laser hori- Die eingegebenen Prozentwerte für Wert für Y-Achse zontiert sich die X- und Y-Achse werden einge- mit Taste stellt übernehmen HINWEIS Nach 30 Sekunden ist die Funktion TILT-Alarm eingeschaltet. Der Laser erkennt eine grobe Erschütterung und löst die Warnmeldung C01 aus. Beim Primus 2 H2N+ werden kleine Erschütterungen von der Automatik erkannt und nachgeregelt, so dass die eingestellte Neigung auch über einen längeren Zeitraum exakt beibehalten wird.
  • Page 15 DE Bedienungsanleitung 8.2 Komfort-Funktionen der Tasten Feineinstellung (0,01 %-Schritte) Schneller Vor- und Rücklauf Taste 1x/ Taste 1x/ Schneller Schneller mehrmals mehrmals Vorlauf: Taste Rücklauf: Taste drücken drücken gedrückt halten gedrückt (+0,01 % (–0,01 % halten Schritt) Schritt) Grobeinstellung (1,00 %-Schritte) Eingabe positiver Werte Taste loslassen, Taste gedrückt Taste gedrückt halten bis Sollwert halten...
  • Page 16 DE Bedienungsanleitung 8.3 Neigungsüberwachung Der Primus 2 H2N verfügt über keine Neigungsüberwachung. Der Primus 2 H2N+ verfügt über eine Neigungsüberwachung d.h. die tatsächliche Neigung der Laserebene wird ständig mit dem Vorgabewert (siehe 8.1) verglichen. Bei Bedarf wird die Neigung nachgeregelt, so daß die tatsächliche Neigung jederzeit mit der Vorgabe übereinstimmt. Die Nachrege- lung erfolgt im Rahmen der angegebenen Toleranz (siehe 3.2) Beschreibung COMMANDER 2 H2N/H2N+ 9.1 Allgemeine Produktbeschreibung Der COMMANDER 2 H2N/H2N+ ist ein robustes Kombigerät aus La- serempfänger und Fernbedienung für den professionellen Einsatz im Innen- und Außenbereich. Die Funkfernbedienung des COMMANDER 2 H2N/ H2N+ erlaubt das Steuern des PRIMUS 2 H2N/H2N+ in einem Radius von maximal 150 Metern. 9.2 Technische Daten Laserempfänger / Fernbedienung COMMANDER 2 H2N/H2N+ Bestell-Nr.:...
  • Page 17 DE Bedienungsanleitung 10 Geräteaufbau COMMANDER 2 H2N/H2N+ 10.1 Vorderseite Tastatur LCD-Anzeige für Fernbedienung LCD-Anzeige für Laserempfänger Libelle zum Ausrichten bei Markierarbeiten LED-Laserhöhenanzeige Sollniveau-Mittenmarkierung (50 mm von Gehäuseoberkante) Laser-Empfangsfeld (70mm) 10.2 Rückseite Batteriefach Halteklammer-Fixierung Gewinde M6 Kegelförmige Klammerführung Tonsignal - Ausgang LCD-Anzeige für Fernbedienung LCD-Anzeige für Laserempfänger LED-Laserhöhenanzeige...
  • Page 18 DE Bedienungsanleitung 11 Fernbedienung COMMANDER 2 H2N/H2N+ 11.1 Anzeige - und Bedienelemente der Fernbedienung X/Y Neigungswert verringern Achsen NEIGEN aktivieren/ Prozentwerteingabe bestätigen X/Y Neigungswert erhöhen Warnsymbol (blinkt) Betriebsart MANUELL Akku-/Batteriezustand des Lasers Modus ROTATION (blinkt bei Horizontierung) Drehzahl des Lasers (600 rpm) NEIGUNG Y-Achse Anzeige in Prozentwerten NEIGUNG X-Achse Anzeige in Prozentwerten Funktion NEIGUNG (Symbol blinkt bei Eingabe) Die Bedienelemente auf der Fernbedienung haben die gleiche Funktion wie die des PRIMUS 2 H2N/H2N+ und sind in den Kapiteln 7 und 8 ausführlich beschrieben.
  • Page 19 DE Bedienungsanleitung 11.2 Zusatzfunktionen der Fernbedienung Bedienschritt Anzeige Hinweise PRIMUS 2 H2N/H2N+ Um die Betriebsart über die Fernbedienung in MANUELL wieder die Betriebsart MANUELL zu verlassen und schalten. in die Betriebsart AUTOMATIK zu 1. Laserempfänger wechseln, Tasten einschalten. und nochmals gleichzeitig drücken. 2. Tasten und gleichzeitig drücken. Betriebsart MANUELL PRIMUS 2 H2N/H2N+ Um den SLEEP- über die Fernbedienung Modus wieder zu in den SLEEP - Modus verlassen, die Taste schalten: nochmals 3 sec. drücken. Taste 3 sec. drücken.
  • Page 20 DE Bedienungsanleitung 12 Laserempfänger COMMANDER 2 H2N/H2N+ 12.1 Anzeige - und Bedienelemente des Laserempfängers LCD-Anzeige BATTERIE Anzeige leuchtet auf: begrenzte Restlaufzeit (Batterie ca. 5h / Akku ca. 0,5h). Anzeige blinkt: Abschaltung steht kurz bevor, Akkus/Batterien ersetzen! LCD-Anzeige TIEFER Leuchtet auf, wenn sich die Laserlinie innerhalb des Sensorfensters, aber unterhalb der Nulllinie befin- det. Zusätzlich leuchtet die rote LED neben dem Empfangsfeld und es ertönt zudem eine langsame Tonfolge. LCD-Anzeige ZIEL Leuchtet auf, wenn sich die Laserlinie auf Höhe der Nulllinie befindet. Zusätzlich leuchtet die grüne LED neben dem Empfangsfeld und es ertönt zudem ein Dauerton. LCD-Anzeige HÖHER Leuchtet auf, wenn sich die Laserlinie innerhalb des Sensorfensters, aber oberhalb der Nulllinie befin- det. Zusätzlich leuchtet die gelbe LED neben dem Empfangsfeld und es ertönt zudem eine schnelle Tonfolge. LCD-Anzeige AUFLÖSUNG DETEKTORFELD Zeigt die aktuell eingestellte Auflösung an: 4=±4mm / 2=±2mm / 1=±1mm / 0=±0.5mm LCD-Anzeige SIGNALTON...
  • Page 21 Achtung: Das Batterieband darf nicht zwischen Batteriefach-Klappe und Dichtung liegen, da sonst die Dichtigkeit des Gehäuses nicht mehr gewährleistet ist. 14 Wartung/Pflege 14.1 Wartung Der PRIMUS 2 H2N/H2N+ und der COMMANDER 2 H2N/H2N+ sind war- tungsfreie Geräte. Ist der PRIMUS 2 H2N/H2N+ oder der COMMANDER 2 H2N/H2N+ durch interne Fehler (Fehlermeldungen Err9-Err11) oder Beschä- digung nicht mehr funktionsfähig, die Geräte zur Reparatur einschicken an: NEDO GmbH & Co. KG Service-Abteilung Hochgerichtstraße 39 – 43 72280 Dornstetten / Germany 14.2 Pflege Die Laserdiode des Rotationslasers ist durch Glasscheiben geschützt. Zum einwandfreien Betrieb die Scheiben regelmäßig mit einem weichen Lap- pen reinigen. Kratzer in den Glasscheiben vermeiden. Verschmutzungen des Laserempfangsfeldes am COMMANDER 2 H2N/H2N+ beeinflussen die Emp- fangsqualität und Reichweite des Laserempfängers. Das staub- und wasser- dichte, teilweise gummierte Gehäuse mit üblichen Reinigungsmitteln reinigen.
  • Page 22 ≤ 3 mm ist! HINWEIS Die Prüfschritte 1 und 2 müssen nun für die Y-Achse wie beschrieben durchgeführt werden. Liegt der Wert von H außerhalb der Toleranz, muss der Primus 2 von einem autorisierten Kundendienst oder von Nedo justiert werden.
  • Page 23  Lage. HINWEIS Die Schwelle der TILT-Alarm Funktion kann von NEDO oder einem Servicepartner zwischen GROB, FEIN und AUS umgeschaltet werden. Es ist somit möglich, den TILT- Alarm zu deaktivieren. Standardmäßig ist die Schwelle GROB eingestellt. 15.2 Fehlermeldungen PRIMUS 2 H2N/H2N+...
  • Page 24 EN Imprint Version: PRIMUS 2 H2N/H2N+ Copyright: NEDO GmbH & Co. KG Hochgerichtstraße 39 – 43 72280 Dornstetten Germany Tel.: +49 74432401-0 Fax: +49 74432401-45 E-Mail: info@nedo.com Internet: www.nedo.com Transmission, reproduction and use of this document or its contents are prohibited unless expressly permitted in writing. Offenders will be liable for damages. All rights reserved, especially those created by the granting of a patent, utility model or registered design. These operating instructions have been drawn up with due care. However, NEDO GmbH & Co. KG does not accept any liability for possible errors in these operating instructions and their consequences. Equally, it does not accept any liability for direct losses or consequential losses resulting from improper use of the laser. The specific national safety regulations and health & safety provisions as well as the specifications in these operating instructions must be noted and complied with when using the laser. All product and brand names used are the property of the holder and are not explicitly labelled as such. Contents subject to change without notice.
  • Page 25 EN Contents 1 About these operating instructions 1.1 Symbols used in these operating instructions ..........26 2 Safety information 2.1 Documentation ..................27 2.2 Laser radiation ................... 27 2.3 Intended use ....................28 2.4 Transport and storage ................28 2.5 The environment ..................28 3 Description PRIMUS 2 H2N/H2N+ 3.1 General product description ............... 29 3.2 Specifications ..................... 29 3.3 Scope of Delivery ..................29 4 Controls PRIMUS 2 H2N/H2N+ 4.1 Control panel buttons.................
  • Page 26 General Notes About these operating instructions These operating instructions contain all the important information necessary for handling the PRIMUS 2 H2N/H2N+ fully automatic rotating laser and COMMANDER 2 H2N/H2N+. Operation, maintenance and care of the laser as well as the warnings and error messages are also described. • Do not use the equipment until you have completely read and understood these operating instructions. • Keep these operating instructions together with the equipment at all times. 1.1 Symbols used in these operating instructions Compliance with the safety instructions and warnings is the basic requirement for safe use of the PRIMUS 2 H2N/H2N+ and COMMANDER 2 H2N/H2N+. The various instructions and warnings are labelled with corresponding sym- bols. WARNING! This pictogram with the word "WARNING!" indicates an imminent danger, which could result in severe physical injuries if it is not avoided.
  • Page 27 Safety instructions Safety information 2.1 Documentation Compliance with the following safety instructions and the specific national safety regu- lations and health & safety provisions is a basic requirement for trouble-free and safe use of the laser. Therefore, please read carefully through these operating instructions and all notes and follow them while working with the laser.
  • Page 28 Warning signs on the laser are for your safety. f Never remove the warning signs! Laser exit openings 2.3 Intended use The PRIMUS 2 H2N/H2N+ fully automatic rotating laser is suitable for level- ling and for plotting slopes. The laser can be used indoors and outdoors. Repairs may only be carried out by NEDO or an authorised customer service agent. 2.4 Transport and storage The laser is a sensitive, high-precision instrument and must be handled with appropriate care. Always transport and store the PRIMUS 2 H2N/H2N+, the COMMANDER 2 H2N/H2N+ and the accessories in the transportation case. 2.5 The environment Product-specific information on disposal of the laser can be downloaded from www.nedo.com.
  • Page 29 EN Operating instructions Description PRIMUS 2 H2N/H2N+ 3.1 General product description The PRIMUS 2 H2N/H2N+ lasers are fully-automatic dual slope rotating laser for horizontal use. With the PRIMUS 2 H2N+ the tilt is also monitored (see 8.3)! The innovative shock protection system and the robust, water and dust- proof housing protects the high power laser under virtually all indoor and out- door operating conditions. 1 Rotating laser 2 Handle, rubberised 3 Spirit level 4 Control panel with buttons and display 5 5/8" threaded bushing (bottom) 6 Rechargeable battery compartment 7 Handle, rubberised 3.2 Specifications Fully-automatic rotating laser PRIMUS 2 H2N/H2N+ Self-levelling range ±5°, motorised with automatic monitoring Levelling accuracy better than ±0,05mm/m Adjustable tilt (X/Y axis)
  • Page 30 EN Operating instructions Controls PRIMUS 2 H2N/H2N+ 4.1 Control panel buttons The laser is operated using the control panel. Warning LED Activate TILT axes/ confirm percentage Display value input Increase value, see Comfort func- tions, Page 37 reduce value, see Comfort functions, Page 37 Laser ON/OFF Activate/deactivate MANUAL operating mode 4.2 Displays Symbol Description C00 – C03 Warning ERR1 – 12 Error display X axis selected (symbol flashes, values can be set) Y axis selected (symbol flashes, values can be set) TILT function (symbol flashes during input)
  • Page 31 EN Operating instructions Initial Startup PRIMUS 2 H2N/H2N+ 5.1 Power supply safety instructions WARNING! Destruction! Explosion risk! f Use charger included in the scope of delivery only. f Do not insert batters in the rechargeable battery pack and charge with the charger. CAUTION! Damage! f Do not mix dead and fully charged batteries.
  • Page 32 EN Operating instructions Starting up the laser PRIMUS 2 H2N/H2N+ 6.1 Install or set up laser for use The laser can be installed or set up in a horizontal position. Horizontal on tripod Set up horizontally Set laser to working height HORIZONTAL laser projection Use integrated spirit level to align laser CAUTION! Unevenness, soft surfaces and vibrations impair the stability of the laser or tripod. f When installing/setting up the laser, ensure it has a safe, firm foothold. NOTE The cap with the viewfinders and axis markings is removable and can be replaced...
  • Page 33 EN Operating instructions Switch on the PRIMUS 2 H2N/H2N+ AUTOMATIC operating mode is the default setting each time the laser is swit- ched on. NOTE Despite careful setting up, warnings and error messages can appear in the display in AUTOMATIC operating mode due to external influences and strong vibrations. For description and remedies, see Chapter 15. 7.1 AUTOMATIC operating mode In AUTOMATIC operating mode, the laser automatically levels itself horizon- tally within a range of ±5° and compensates for minor vibrations.
  • Page 34 EN Operating instructions 7.2 MANUAL operating mode In MANUAL operating mode the laser does not detect any vibrations and does not level itself horizontally. AUTOMATIC opera- Set MANUAL opera- The hand symbol is ting mode is active ting mode displayed NOTE Use the button to switch to MANUAL operating mode immediately after switching MANUAL operating mode is active. The following functions can be invoked: Use the button to switch to AUTOMATIC operating mode (Chapter 7.1). The laser re-levels itself horizontally. Use the button to exit the operating mode, switch off the laser.
  • Page 35 EN Operating instructions The PRIMUS 2 H2N/H2N+ functions 8.1 TILT X axis/Y axis The TILT axes function can be used to tilt the axes independently of each other within a range of ±10 %. With the Primus 2 H2N+ the tilt setting is also monitored! X axis The figure to the right shows the tilt if a positive percentage value is set. Y axis The figure to the right shows the tilt if a positive percentage value is set. X and Y axis The figure to the right shows the tilt if positive per- centage values are set (X-axis +5 %, Y axis +8 %). NOTE To set larger tilts it is helpful or rather it is necessary to »pre-tilt« the laser in the appro- priate direction within the horizontal levelling tolerance of ±5°...
  • Page 36 EN Operating instructions Y axis and tilt symbols Use button to Accept 0.00 % value with the button or set are displayed flashing confirm set value for a value, e.g. +8 %, for Y axis using the comfort X axis functions of the buttons (see Page 37) The laser levels itself The percentage values entered for the X and Y Use button to horizontally axis are set adopt set value for Y axis During and for 30 seconds after the horizontal levelling the laser detects vib- rations, horizontally levels itself again and sets the default percentage values. NOTE The TILT alarm function is switched on after 30 seconds. The laser detects a large vibration and triggers the warning message C01.
  • Page 37 EN Operating instructions 8.2 Comfort functions of the buttons Fine adjustment (0.01 % increments) Fast forwards and backwards Fast forward: Keep Fast backwards: Press button 1x/ Press button 1x/ button pressed Keep button several times several times pressed (+0.01 % increment) (–0.01 % increment) Rough setting (1.00 % increments) Enter positive values Release button, Keep button keep button pressed until tar-...
  • Page 38 EN Operating instructions 8.3 Tilt monitoring The Primus 2 H2N does not include tilt monitoring. The Primus 2 H2N+ includes tilt monitoring, i.e. the actual tilt of the laser plane is continuously compared with the specified value (see 8.1). If neces- sary, the tilt is readjusted, so that the actual tilt is always the same as the spe- cified tilt. The readjustment is made within the scope of the given tolerance (see 3.2) Description COMMANDER 2 H2N/H2N+ 9.1 General product description The COMMANDER 2 H2N/H2N+ is a robust combined unit consisting of a laser receiver and remote control for professional indoor and outdoor use. The radio remote control of the COMMANDER 2 H2N/H2N+ enables the PRIMUS 2 H2N/H2N+ to be controlled within a maximum radius of 150 metres. 9.2 Specifications Laser receiver / remote control COMMANDER 2 H2N/H2N+ Ref. No. 430371 / 430374 Weight approx. 340 g (incl. batteries) Dimensions (L/W/H)
  • Page 39 EN Operating instructions 10 Equipment configuration COMMANDER 2 H2N/H2N+ 10.1 Front Keypad LCD display for remote control LCD display for laser receiver Spirit level for aligning for marking work LED laser level indicator Setpoint level middle marking (50 mm from top of housing) Laser reception field (70mm) 10.2 Back Battery compartment Fixing clip fixing M6 thread Conical clip guide Sound signal - output LCD display for remote control LCD display for laser receiver LED laser level indicator...
  • Page 40 EN Operating instructions 11 Remote control COMMANDER 2 H2N/H2N+ 11.1 Displays and controls of the remote control Reduce X/Y tilt value Activate TILT axes / Confirm percentage value input Increase X/Y tilt value Warning symbol (flashes) MANUAL operating mode Rechargeable battery/battery state of the laser ROTATION mode (flashes during automatic levelling) Speed of the laser (600 rpm) TILT Y-axis display as percentage values TILT X-axis display as percentage values TILT function (symbol flashes during input) Controls on COMMANDER 2 H2N/H2N+ have the same function as on PRIMUS 2 H2N/H2N+ - they are described in detail in chapters 7 and 8.
  • Page 41 EN Operating instructions 11.2 Additional functions of the remote control Operating step Display Details Switch PRIMUS 2 H2N/ To exit MANUAL H2N+ to MANUAL mode mode and switch to via the remote control. AUTOMATIC mode, simultaneously press 1. Switch on laser rceiver. the and buttons again. 2. Simultaneously press and buttons. MANUEL- mode Switch PRIMUS 2 H2N/ To exit SLEEP mode H2N+ to SLEEP mode via again, press the the remote control: again for 3 sec. Press button for 3 sec. SLEEP- mode...
  • Page 42 EN Operating instructions 12 Laser receiver COMMANDER 2 H2N/H2N+ 12.1 Displays and controls of the laser receiver LCD display BATTERY Display lights up: limited remaining life (battery approx. 5h / rechargeable approx. 0,5h) LCD display LOWER Lights up if the laser line is within the sensor win- dow but below the zero line. In addition, the red LED next to the reception field lights up and also a slow melody sounds. LCD display TARGET Lights up if the laser line is located at the level of the zero line. In addition, the green LED next to the reception field lights up and a continuous melody sounds. LCD Display HIGHER Lights up if the laser line is within the sensor window but above the zero line. In addition, the yellow LED next to the reception field lights up and also a fast melody sounds.
  • Page 43 Check that the battery tape is not positioned between the battery compartment flap and the seal, as otherwise the housing tightness is no longer ensured. 14 Maintenance/Care 14.1 Maintenance The PRIMUS 2 H2N/H2N+ and the COMMANDER 2 H2N/H2N+ are mainte- nance free units. If the PRIMUS 2 H2N/H2N+ or the COMMANDER 2 H2N/ H2N+ no longer function due to an internal error (error messages Err9-Err11) or damage, send them for repair to: NEDO GmbH & Co. KG Service-Abteilung Hochgerichtstraße 39 – 43 72280 Dornstetten / Germany 14.2 Care The laser diode of the rotating laser is protected by glass covers. Use a soft cloth to regularly clean the glass covers and ensure correct operation. Avoid scratches in the glass covers. Dirt on the laser reception field of the COM- MANDER 2 H2N/H2N+ affects the reception quality and range of the laser receiver.Use standard cleaning agents to clean the dustproof and watertight,...
  • Page 44 NOTE Steps 1 and 2 now have to be repeated as described for the Y-axis. If the value of H is outside the tolerance, the Primus 2 must be adjusted by an autho- rised customer service agent or by Nedo.
  • Page 45 NOTE The threshold of the TILT alarm function can be switched between COARSE, FINE and OFF by NEDO or a service partner. It is therefore possible to deactivate the TILT alarm. By default, the COARSE threshold is set. 15.2 Error messages PRIMUS 2 H2N/H2N+...
  • Page 46 FR Mentions légales Version : PRIMUS 2 H2N/H2N+ Copyright : NEDO GmbH & Co. KG Hochgerichtstraße 39 – 43 72280 Dornstetten Allemagne Tél. : +49 74432401-0 Fax : +49 74432401-45 E-mail : info@nedo.com Internet : www.nedo.com La diffusion ou la reproduction de ce document, l'exploitation et la communication de son contenu sont interdits sans autorisation expresse préalable. Des infrac- tions entraînent des dommages et intérêts. Tous droits réservés en cas d'enregistrement de modèle breveté, industriel ou d'utilité. Ce mode d'emploi a été élaboré avec soin. NEDO GmbH & Co. KG décline cependant toute responsabilité en cas d'erreurs éventuelles contenues dans ce mode d'emploi et de ses conséquences. Il en va de même pour les dommages directs ou indirects, résultant d'une utilisation inappropriée du laser. Les prescriptions en matière de sécurité spécifiques au pays, les dispositions en matière de protection du travail et les directives de ce mode d'emploi doivent être respec- tées lors de l'utilisation du laser. Toutes les désignations de produits et noms de marques utilisés appartiennent à leur propriétaire et ne sont pas indiqués explicitement comme tels. Sous réserve de modifications de contenu.
  • Page 47 FR Table des matières 1 A propos de ce mode d'emploi 1.1 Symboles utilisés dans ce mode d'emploi........... 48 2 Informations de sécurité 2.1 Documentation ..................49 2.2 Rayonnement laser ..................49 2.3 Usage conventionnel .................. 50 2.4 Transport et entreposage ................50 2.5 Environnement ..................50 3 Description PRIMUS 2 H2N/H2N+ 3.1 Description générale du produit ..............51 3.2 Caractéristiques techniques................ 51 3.3 Etendue de livraison ................... 51 4 Eléments de commande PRIMUS 2 H2N/H2N+ 4.1 Touches du panneau de commande .
  • Page 48 Remarques générales A propos de ce mode d'emploi Ce mode d'emploi contient toutes les informations importantes relatives à la manipulation du laser rotatif automatique PRIMUS 2 H2N/H2N+ et du COM- MANDER 2 H2N/H2N+. La commande, la maintenance et l'entretien ainsi que les messages d'avertissement et d'erreur sont également mentionnés. • N'utilisez pas les appareils avant d'avoir complètement lu et compris ce mode d'emploi. • Toujours conserver ce mode d’emploi à proximité des appareils. 1.1 Symboles utilisés dans ce mode d'emploi Le respect des conseils de sécurité et mentions de danger constitue la condi- tion de base d'une utilisation sécurisée du PRIMUS 2 H2N/H2N+ et du COM- MANDER 2 H2N/H2N+. Les différents conseils sont caractérisés par des sym- boles correspondants. ATTENTION ! Ce pictogramme « ATTENTION! » renvoie à un danger imminent, pouvant entraîner de graves blessures corporelles s'il n'est pas évité.
  • Page 49 Conseils de sécurité Informations de sécurité 2.1 Documentation Le respect des conseils de sécurité suivants et des prescriptions en matière de sécurité spécifiques au pays et directives en matière de protection du travail constitue la condition préalable à une utilisation sans perturbations et sans danger du laser. Veuillez donc lire ce mode d'emploi ainsi que toutes les remarques avec soin et les respecter lorsque vous utiliserez le laser.
  • Page 50 2.5 Environnement Des informations spécifiques au produit concernant l'élimination du laser peuvent être téléchargées sous www.nedo.com. Les piles et accus sont des déchets spéciaux à collecter séparément; ne pas les jeter avec les ordures ménagères. Les éliminer de façon appropriée, conformément aux...
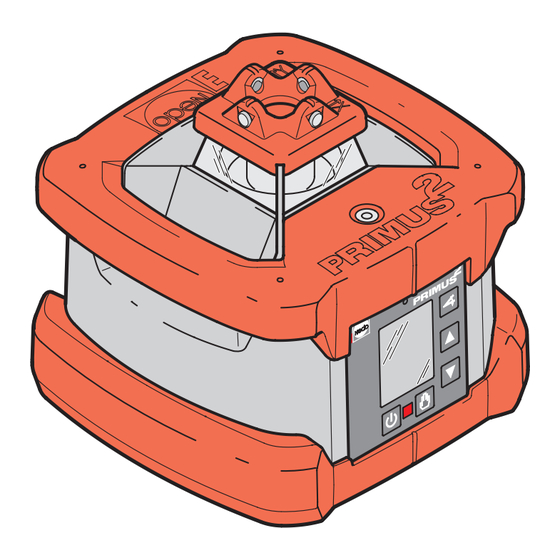
  • Page 51 FR Mode d'emploi Description PRIMUS 2 H2N/H2N+ 3.1 Description générale du produit Le laser PRIMUS 2 H2N/H2N+ est un laser double pente automatique pour une exploration horizontale. Chez le PRIMUS 2 H2N+, l’inclinaison est égale- ment surveillée (voir 8.3)! Le système de protection antichoc innovant et le boîtier solide, résistant à l'eau et à la poussière protègent le laser haute puis- sance dans quasiment toutes les conditions d'utilisation dans les zones intéri- eures et extérieures. 1 Laser rotatif 2 Poignée de manutention, caoutchoutée 3 Nivelle 4 Panneau de commande avec touches et écran 5 Douille filetée 5/8“ (sol) 6 Logement des accumulateurs 7 Poignée de manutention, caoutchoutée 3.2 Caractéristiques techniques Laser rotatif automatique PRIMUS 2 H2N/H2N+ Plage de nivellement automatique ±5°, motorisée avec surveillance automatique Précision de nivellement...
  • Page 52 FR Mode d'emploi Eléments de commande PRIMUS 2 H2N/H2N+ 4.1 Touches du panneau de commande La commande du laser a lieu via le panneau de commande. LED d'avertissement Activer INCLINAISON axes/ confirmer l'entrée Ecran de pourcentages Augmenter la valeur, voir fonctions con- fort, page 59 Diminuer la valeur, voir fonctions con- Laser fort, page 59 MARCHE/ ARRET Activer/désactiver le mode d'exploitation MANUEL 4.2 Affichages à l'écran Symbole Description C00 –...
  • Page 53 FR Mode d'emploi Première mise en service PRIMUS 2 H2N/H2N+ 5.1 Conseils de sécurité alimentation ATTENTION ! Déterioration ! Risque d'explosion ! f Utiliser uniquement le chargeur de l'étendue de livraison. f Ne pas insérer les piles dans le pack d'accus et charger avec le chargeur. PRUDENCE ! Endommagement ! f Ne pas mélanger les piles vides et pleines.
  • Page 54 FR Mode d'emploi Mise en marche du PRIMUS 2 H2N/H2N+ 6.1 Monter ou poser le laser en vue de son utilisation Le laser peut être monté ou posé dans une position horizontale. Horizontal sur trépied Posé à l'horizontale Orienter le laser à hauteur de travail Projection laser HORIZONTALE Orienter le laser avec nivelle intégrée PRUDENCE ! Des inégalités du sol, des sous-sols mous ou des vibrations peuvent nuire à la stabilité du laser ou du trépied.
  • Page 55 FR Mode d'emploi Mettre le PRIMUS 2 H2N/H2N+ en marche Le mode d'exploitation AUTOMATIQUE constitue le réglage standard après chaque mise en marche. REMARQUE Malgré un montage soigné, des messages d'avertissement ou d'erreur peuvent appa- raître à l'écran du laser, en raison d'influences extérieures et de fortes vibrations dans le mode AUTOMATIQUE. Description et mesures de remède voir chapitre 15. 7.1 Mode d'exploitation AUTOMATIQUE Dans le mode d'exploitation AUTOMATIQUE, le laser s'oriente horizontale- ment dans une plage de ±5° automatiquement et règle parfaitement les peti-...
  • Page 56 FR Mode d'emploi 7.2 Mode d'exploitation MANUEL En mode d'exploitation MANUEL, la laser ne détecte pas de vibrations et n'effectue aucun ajustement d'horizon. Le mode Régler le mode Le symbole « main » d'exploitation d'exploitation s'affiche AUTOMATIQUE est MANUEL actif REMARQUE La touche permet de passer directement après la mise en marche en mode d'exploitation MANUEL. Le mode d'exploitation MANUEL est actif. Les fonctions suivantes peuvent être appelées : Passer en mode d'exploitation AUTOMATIQUE (chapitre 7.1) avec la touche . Le laser effectue un nouvel ajustement à l'horizontale. Mettre fin au mode d'exploitation avec la touche , mettre le laser hors marche.
  • Page 57 FR Mode d'emploi Fonctions du PRIMUS 2 H2N/H2N+ 8.1 Axe X/Axe Y INCLINAISON Avec la fonction INCLINAISON axes, les axes peuvent être inclinés indépen- damment les uns des autres dans une plage de ±10 %. Chez le Primus 2 H2N+, le réglage de l’inclinaison est également surveillé ! Axe X L'illustration ci-contre affiche l'inclinaison lors du réglage d'un pourcentage positif. Axe Y L'illustration ci-contre affiche l'inclinaison lors du réglage d'un pourcentage positif. Axe X et Y L'illustration ci-contre affiche l'inclinaison lors du réglage positif (axe X +5 %, axe Y +8 %). REMARQUE Pour le réglage de grandes inclinaisons, il est utilise ou nécessaire d'»incliner au préalable«...
  • Page 58 FR Mode d'emploi Confirmer la valeur Le symbole axe Y et Appliquer la valeur 0.00 % avec la touche régler pour l'axe X l'inclinaison clignotent ou régler une valeur, par ex. +8 %, pour l'axe avec la touche à l'affichage Y avec les fonctions confort des touches (voir page 59) Confirmer la valeur Le laser s'ajuste à Le pourcentage entré pour l'axe X et Y est réglé régler pour l'axe Y l'horizontale avec la touche Pendant l'ajustement d'horizon et pendant les 30 secondes qui suivent, le la- ser détecte des secousses, effectue un nouvel ajustement à l'horizontale ainsi qu'un réglage des pourcentages prescrits. REMARQUE Après 30 secondes, la fonction alarme TILT est enclenchée. Le laser détecte une secousse grossière et déclenche le message d'avertissement C01. Le système automa- tique du Primus 2 H2N+ détecte de petites secousses et les réajuste de manière à...
  • Page 59 FR Mode d'emploi 8.2 Fonctions confort des touches Réglage précis (pas de 0,01 %) Avant et arrière rapide Presser 1x/plusieurs Presser 1x/plusieurs Avant rapide : Tenir Arrière rapide : Tenir fois la touche fois la touche la touche pressée la touche pressée (pas de +0,01 %) (pas de -0,01 %) Réglage grossier (pas de 1,00 %) Entrée Valeurs positives Relâcher la touche Presser la touche , maintenir la jusqu'à ce que touche pressée la valeur de consi-...
  • Page 60 FR Mode d'emploi 8.3 Surveillance de l’inclinaison Le Primus 2 H2N ne dispose d’aucune surveillance de l’inclinaison. Le Primus 2 H2N+ dispose d’une surveillance d’inclinaison, c’est-à-dire que l’inclinaison réelle du niveau du laser est comparé en permanence avec la va- leur prescrite (voir 8.1). Au besoin, l'inclinaison est réajustée de manière à ce que l'inclinaison réelle concorde à tout moment avec la prescription. Le réa- justement a lieu dans le cadre de la tolérance indiquée (voir 3.2) Description COMMANDER 2 H2N/H2N+ 9.1 Description générale du produit Le COMMANDER 2 H2N/H2N+ est un appareil combiné robuste se compo- sant d’un récepteur laser et d’une télécommande pour une utilisation pro- fessionnelle dans les zones intérieures et extérieures. La télécommande radio du COMMANDER 2 H2N/H2N+ permet la commande du PRIMUS 2 H2N/ H2N+ dans un rayon de 150 mètres au maximum. 9.2 Caractéristiques techniques Récepteur laser / télécommande COMMANDER 2 H2N/H2N+ Réf.: 430371 / 430374 Poids env. 340 g (piles incl.) Dimensions (L/l/H)
  • Page 61 FR Mode d'emploi 10 Structure de l’appareil COMMANDER 2 H2N/H2N+ 10.1 Avant Clavier Affichage LCD pour télécommande Affichage LCD pour récepteur laser Nivelle d’ajustement pour travaux de marquage Affichage de hauteur de laser LED Marquage central niveau théorique (50 mm du bord supérieur du boîtier) Champ de réception laser (70mm) 10.2 Arrière Logement des piles Fixation de l’étrier de retenue Filetage M6 Etrier conique Signal sonore - sortie Affichage LCD pour télécommande Affichage LCD pour récepteur laser Affichage de hauteur de laser LED...
  • Page 62 FR Mode d'emploi 11 Télécommande COMMANDER 2 H2N/H2N+ 11.1 Eléments d’affichage et de commande de la télécommande Diminuer la valeur d’inclinaison Activer INCLINAISON axes/ Confirmer l’entrée de pourcen- tages Augmenter la valeur d’inclinaison Symbole d'avertissement (clig- notant) Mode d'exploitation MANUEL Etat des accus/piles du laser Mode ROTATION (clignote lors de l’ajustement horizontal) Vitesse du laser (600 rpm) Affichage INCLINAISON axe Y en pourcentages Affichage INCLINAISON axe X en pourcentages Fonction INCLINAISON (le sym- bole clignote lors de l‘entrée) Les éléments de commande sur la télécommande ont la même fonction que ceux du PRIMUS 2 H2N/H2N+ et sont décrits en détails aux chapitres 7 et 8.
  • Page 63 FR Mode d'emploi 11.2 Fonctions supplémentaires de la télécommande Etape de commande Affichage Remarques Mettre le PRIMUS 2 H2N/ Pour quitter à nouveau H2N+ via la télécomman- le mode d’exploitation de en mode MANUEL. MANUEL et retourner au mode AUTOMA- 11. Mettre le récepteur TIQUE, presser à laser en marche. nouveau les touches et simultané- 2. Presser simultanément ment. les touches et Mode MANUELL marche Mettre le PRIMUS 2 H2N/ Pour quitter à nouveau H2N+ via la télécomman- le mode SLEEP, de en mode SLEEP. presser à nouveau la touche pendant Presser la touche...
  • Page 64 FR Mode d'emploi 12 Récepteur laser COMMANDER 2 H2N/H2N+ 12.1 Eléments d’affichage et de commande du récepteur laser Affichage LCD PILE L’affichage s’allume : durée résiduelle limitée (pile env. 5h / accu env. 0,5h). L’affichage clignote : L’arrêt est imminent, remplacer les accus/piles ! Affichage LCD PLUS BAS S'allume lorsque la ligne laser se trouve dans la fenêtre de détection mais au dessous de la ligne zéro. La LED rouge s’allume également à côté du champ de réception et une suite de tonalités lente retentit. Affichage LCD OBJECTIF S'allume lorsque la ligne laser se trouve à hauteur de la ligne zéro. La LED verte s’allume également à côté du champ de réception et une tonalité continue retentit. Affichage LCD PLUS HAUT S'allume lorsque la ligne laser se trouve dans la fenêtre de détection mais au-dessus de la ligne zéro. La LED jaune s’allume également à côté du champ de réception...
  • Page 65 La bande de la pile ne doit pas être située entre le cache du comparti- ment des piles et le joint, afin de garantir l’étanchéité du boîtier. 14 Maintenance/Entretien 14.1 Maintenance Le PRIMUS 2 H2N/H2N+ et le COMMANDER 2 H2N/H2N+ sont des ap- pareils qui ne nécessitent aucune maintenance. Si le PRIMUS 2 H2N/H2N+ ou le COMMANDER 2 H2N/H2N+ n’est plus fonctionnel en raison d’une er- reur interne (messages d’erreur Err9-Err11) ou d’un endommagement, envo- yer les appareils à réparer à: NEDO GmbH & Co. KG Département service Hochgerichtstraße 39 – 43 72280 Dornstetten / Allemagne 14.2 Entretien A diode laser du laser rotatif est protégée par des vitres en verre. Pour une exploitation parfaite, nettoyer régulièrement les vitres à l'aide d'un chiffon souple. Eviter des rayures des vitres en verre. Des encrassements du champ de réception du laser sur le COMMANDER 2 H2N/H2N+ influencent la qua- lité de réception et la portée de la réception laser. Nettoyer le boîtier en par-...
  • Page 66 Les étapes 1 et 2 doivent à présent être effectuées pour l’axe Y comme décrit. Si la valeur de H est située en dehors de la tolérance, le Primus 2 doit être ajusté par un atelier de service après-vente autorisé ou par Nedo.
  • Page 67  REMARQUE Le seuil de la fonction alarme TILT peut être commuté par NEDO ou un partenaire de service entre FAIBLE, ÉLEVÉ et OFF. Il est ainsi possible de désactiver l’alarme TILT. Le seuil est réglé par défaut sur FAIBLE 15.2 Messages d'erreur PRIMUS 2 H2N/H2N+...
  • Page 68 NL Impressum Versie: PRIMUS 2 H2N/H2N+ Copyright: NEDO GmbH & Co. KG Hochgerichtstraße 39 – 43 D-72280 Dornstetten Duitsland Tel.: +49 74432401-0 Fax: +49 74432401-45 E-mail: info@nedo.com Internet: www.nedo.com Overhandiging aan derden of vermenigvuldiging van dit document, evenals het te gelde maken of mededelingen over de inhoud zijn verboden, tenzij hiervoor uitdrukke- lijk toestemming werd verleend. Bij overtreding bent u verplicht tot schadevergoeding. Alle rechten zijn in geval van inschrijving van patenten evenals van gebruiks- of smaakmonster voorbehouden. Deze gebruiksaanwijzing werd met uiterste zorg samen- gesteld. NEDO GmbH & Co. KG kan echter niet aanspra- kelijk worden gesteld voor eventuele vergissingen in deze gebruiksaanwijzing en de gevolgen ervan. Evenzo kan NEDO niet aansprakelijk worden gesteld voor directe of vervolgschade, die als gevolg van ondeskundig gebruik van laser ontstaat. Bij het gebruik van de laser moeten de landspecifieke veiligheidsvoorschriften en wettelijke bepalingen ter be- scherming van werknemers, evenals de informatie in deze gebruiksaanwijzing in acht worden genomen. Alle gebruikte productbenamingen en merknamen zijn eigendom van de eigenaar en worden niet expliciet als zodanig aangeduid. Technische wijzigingen voorbehouden.
  • Page 69 NL Inhoudsopgave 1 Over deze gebruiksaanwijzing 1.1 In deze gebruiksaanwijzing gebruikte symbolen ......... 70 2 Veiligheidsinformatie 2.1 Documentatie .................... 71 2.2 Laserstraling ....................71 2.3 Reglementair gebruik ................. 72 2.4 Transport en opslag ................... 72 2.5 Milieu ......................72 3 Beschrijving PRIMUS 2 H2N/H2N+ 3.1 Algemene productbeschrijving ..............73 3.2 Technische specificaties ................73 3.3 Inhoud ....................... 73 4 Bedieningselementen PRIMUS 2 H2N/H2N+ 4.1 Toetsen van het bedieningspaneel .
  • Page 70 Algemene aanwijzingen Over deze gebruiksaanwijzing Deze gebruiksaanwijzing bevat alle belangrijke informatie voor de omgang met de volautomatische rotatielaser PRIMUS 2 H2N/H2N+ en de COMMAN- DER 2 H2N/H2N+. Tevens worden de bediening en het onderhoud evenals de waarschuwingsen foutmeldingen beschreven. • Gebruik het instrument niet, voordat u deze gebruiksaanwijzing volledig heeft gelezen en begrepen. • Deze gebruiksaanwijzing altijd bij de instrumenten bewaren. 1.1 In deze gebruiksaanwijzing gebruikte symbolen Basisvoorwaarde voor een veilig gebruik van de rotatielaser PRIMUS 2 H2N/ H2N+ en de COMMANDER 2 H2N/H2N+ is de inachtneming van alle veilig- heids- en gevarenaanduidingen. De verschillende aanwijzingen worden door dienovereenkomstige symbolen aangeduid. Dit pictogram met de aanduiding „WAARSCHUWING!” duidt op een dreigend gevaar, WAARSCHUWING! dat ernstig lichamelijk letsel tot gevolg kan hebben, indien het niet wordt voorkomen. f Deze pijl duidt op een dienovereenkomstige maatregel, om een dreigend gevaar af te wenden.
  • Page 71 Veiligheidsvoorschriften Veiligheidsinformatie 2.1 Documentatie Het opvolgen van de veiligheidsvoorschriften evenals de landspecifieke veiligheidsvoor- schriften en de bepalingen ter bescherming van de medewerkers is een voorwaarde voor een storingsvrije werking zonder gevaren van de laser. Lees daarom deze gebru- iksaanwijzing en alle aanwijzingen zorgvuldig door en volg deze bij het werken met de laser nauwgezet op.
  • Page 72 2.5 Milieu Productspeficieke informatie over de afvalverwerking van de laser kan onder www.nedo.com worden gedownload. Batterijen en accu’s zijn chemisch afval en mogen niet bij het huishoudelijk afval terecht komen. Deze moeten overeenkomstig de voor het desbetreffende land geldende...
  • Page 73 NL Gebruiksaanwijzing Beschrijving PRIMUS 2 H2N/H2N+ 3.1 Algemene productbeschrijving De rotatielasers PRIMUS 2 H2N/H2N+ zijn volautomatische twee assige hel- lingslaser voor horizontaal gebruik. Bij de PRIMUS 2 H2N+ wordt tevens de hellingshoek bewaakt (zie 8.3)! Het innovatieve Shock-Protection-systeem en de robuuste, water- en stofdichte behuizing beschermen de high-power-laser onder vrijwel alle gebruiksomstandigheden zowel binnen als buiten. 1 Rotatielaser 2 Draaggreep, rubber 3 Libel 4 Bedieningspaneel met toetsen en display 5 5/8“-draadbus (onderkant) 6 Accuvak 7 Draaggreep, rubber 3.2 Technische specificaties Volautomatische rotatielaser PRIMUS 2 H2N/H2N+ Bereik voor zelfnivellering ±5°, motorisch met automatische bewaking Nivelleernauwkeurigheid beter dan ±0,05mm/m Instelbare hellingshoek (X-/Y-as) ±10 %...
  • Page 74 NL Gebruiksaanwijzing Bedieningselementen PRIMUS 2 H2N/H2N+ 4.1 Toetsen van het bedieningspaneel De bediening van de laser gebeurt via het bedieningspaneel. Waarschuwings-LED Assen ONDER HOEK activeren/ invoer van pro- Display centuele waarden bevestigen Waarde verhogen, zie comfortfuncties op pagina 81 Waarde verlagen, zie comfortfuncties op pagina 81 Laser AAN/UIT Werkingswijze MANUEEL active- ren/deactiveren 4.2 Registratie via display Symbool Beschrijving C00 – C03 Waarschuwingsmelding ERR1 –...
  • Page 75 NL Gebruiksaanwijzing Eerste inbedrijfstelling PRIMUS 2 H2N/H2N+ 5.1 Veiligheidsvoorschriften voedingsspanning WAARSCHUWING! Onherstelbare beschadiging! Explosiegevaar! f Alleen de meegeleverde oplader gebruiken. f Batterijen niet in accupack leggen en met de oplader opladen. VOORZICHTIG! Beschadiging! f Nooit lege en volle batterijen door elkaar gebruiken. f Accu's en batterijen nooit op verwarmingen of in de zon leggen.
  • Page 76 NL Gebruiksaanwijzing Inbedrijfstelling van de laser PRIMUS 2 H2N/H2N+ 6.1 Laser voor gebruik monteren c.q. opstellen De laser kan in horizontale stand gemonteerd of opgesteld worden. Horizontaal op statief Horizontaal opgesteld Laser op werkhoogte instellen Laserprojectie HORIZONTAAL Laser met geïntegreerde libelle uitlijnen VOORZICHTIG! Oneffenheden, een zachte ondergrond of trillingen hebben een nadelige invloed op de stabiliteit van de laser c.q. het statief. f Bij de montage/opstelling van de laser op een veilige en stabiele stand letten.
  • Page 77 NL Gebruiksaanwijzing Laser inschakelen PRIMUS 2 H2N/H2N+ Na inschakeling wordt de laser standaard in de werkingswijze AUTOMAAT gestart. OPMERKING Ondanks een zorgvuldige opbouw kunnen door externe invloeden en hevige trillingen in de werkingswijze AUTOMAAT op het display van de laser waarschuwingen of foutmeldingen verschijnen. Zie hoofdstuk 15 voor een beschrijving en bijbehorende maatregelen.
  • Page 78 NL Gebruiksaanwijzing 7.2 Werkingswijze MANUEEL In de werkingswijze MANUEEL herkent de laser geen trillingen en wordt niet waterpas uitgelijnd. De werkingswijze De werkingswijze Het hand-symbool AUTOMAAT is actief. MANUEEL instellen wordt weergegeven OPMERKING Met de toets kan direct na het inschakelen naar de werkingswijze MANUEEL worden gewisseld. De werkingswijze MANUEEL is actief. De volgende functies kunnen worden opgeroepen: Met de toets naar de werkingswijze AUTOMAAT (hoofdstuk 7.1) wisselen. De laser wordt opnieuw waterpas uitgelijnd. De werkingswijze met de toets beëindigen en de laser uitschakelen.
  • Page 79 NL Gebruiksaanwijzing Functies van de laser PRIMUS 2 H2N/H2N+ 8.1 X-as/Y-as ONDER HOEK Bij de functie assen ONDER HOEK kunnen de assen onafhankelijk van elkaar in een bereik van ±10% onder een hoek worden gezet. Bij de PRIMUS 2 H2N+ wordt tevens de instelling van de hellingshoek bewaakt! X-as Op de afbeelding hiernaast wordt de hellingshoek bij instelling van een positieve procentuele waarde weergegeven. Y-as Op de afbeelding hiernaast wordt de hellingshoek bij instelling van een positieve procentuele waarde weergegeven. X- en Y-as Op de afbeelding hiernaast wordt de hellingshoek bij instelling van een positieve procentuele waar- de weergegeven (X-as +5 %, Y-as +8 %). OPMERKING Voor de instelling van grotere hoeken is het handig of noodzakelijk om de laser binnen de horizontale tolerantie van ±5°...
  • Page 80 NL Gebruiksaanwijzing Ingestelde waarde Symbool Y-as en de Waarde 0.00 % met de toets overnemen voor de X-as met de hoek worden knippe- of een waarde, bijv. +8 %, voor de Y-as met toets bevestigen rend weergegeven de comfortfuncties van de toetsen (zie pagina 81) instellen Ingestelde waarde Laser wordt waterpas De ingevoerde procentuele waarden voor de voor de Y-as met de uitgelijnd X- en Y-as worden ingesteld toets overnemen Tijdens en 30 seconden na het waterpas uitlijnen herkent de laser trillingen, wordt opnieuw waterpas uitgelijnd en stelt de aangegeven percentages in. De functie X-/Y-as ONDER HOEK is actief. De volgende functies kunnen wor- den opgeroepen: OPMERKING Na 30 seconden wordt de functie TILT-alarm ingeschakeld. De laser herkent een grote trilling en activeert de waarschuwing C01.
  • Page 81 NL Gebruiksaanwijzing 8.2 Comfortfuncties van de toetsen Fijninstelling (stappen van 0,01 %) Sneller vooruit of terug Sneller vooruit: De Sneller terug: De Toets 1x/meer- Toets 1x/meer- toets ingedrukt toets ingedrukt maals indrukken maals indrukken houden houden (stap van +0,01 %) (stap van –0,01 %) Grove instelling (stappen van 1,00 %) Invoer van positieve waarden De toets los- De toets laten, de toets ingedrukt houden...
  • Page 82 NL Gebruiksaanwijzing 8.3 Bewaking van de hellingshoek Bij de Primus 2 H2N wordt de hellingshoek niet bewaakt. De Primus 2 H2N+ is voorzien van een bewaking van de hellingshoek d.w.z. dat de daadwerkelijke hellingshoek op laserniveau continu met de vooraf ingestelde waarde (zie 8.1) wordt vergeleken. De hellingshoek wordt even- tueel bijgesteld, zodat de daadwerkelijke hellingshoek te allen tijde overeen- komt met de aangegeven hoek. De bijstelling gebeurt binnen de aangegeven tolerantie (zie 3.2) Beschrijving COMMANDER 2 H2N/H2N+ 9.1 Algemene productbeschrijving De COMMANDER 2 H2N/H2N+ is een robuust combi-instrument van lase- rontvanger en afstandsbediening voor professioneel gebruik, voor zowel bin- nen als buiten. De radiografische afstandsbediening van de COMMANDER 2 H2N/H2N+ maakt het aansturen van de PRIMUS 2 H2N/H2N+ binnen een straal van maximaal 150 meter mogelijk. 9.2 Technische specificaties Laserontvanger / afstandsbediening COMMANDER 2 H2N/H2N+ Bestelnr.:: 430371 / 430374 Gewicht ca. 340 g (incl. batterijen) Afmetingen (lxbxh) 168 mm / 95 mm / 27 mm...
  • Page 83 NL Gebruiksaanwijzing 10 Instrumentopbouw COMMANDER 2 H2N/H2N+ 10.1 Voorzijde Toetsen LCD-weergave voor de afstandsbediening LCD-weergave voor de laserontvanger Libelle voor het uitlijnen bij markeer- werkzaamheden LED-laserhoogteaanduiding Middenmarkering gewenst niveau (50 mm van bovenkant behuizing) Laser-ontvangstveld (70 mm) 10.2 Achterzijde Batterijvak Fixatie bevestigingsklem Schroefdraad M6 Conusvormige klemgeleiding Geluidssignaal - uitgang LCD-weergave voor de afstandsbediening LCD-weergave voor de laserontvanger LED-laserhoogteaanduiding...
  • Page 84 NL Gebruiksaanwijzing 11 Afstandsbediening COMMANDER 2 H2N/H2N+ 11.1 Weergave- en bedieningselementen van de afstandsbediening X/Y hellingshoek verminderen Assen ONDER HOEK activeren/ Invoer van procentuele waarde bevestigen X/Y hellingshoek verhogen Waarschuwingssymbool (knip- pert) Werkingswijze MANUEEL Accu-/batterijtoestand van de laser Modus ROTATIE (knippert bij waterpas uitlijnen) Toerental van de laser (600 omw/ min) HELLINGSHOEK Y-as aanduiding in procenten HELLINGSHOEK X-as aanduiding in procenten Functie HELLINGSHOEK (symbool knippert bij invoer) De bedieningselementen op de afstandsbediening hebben dezelfde func- tie als de PRIMUS 2 H2N/H2N+ en worden uitvoerig beschreven in de hoof- dstukken 7 en 8.
  • Page 85 NL Gebruiksaanwijzing 11.2 Extra functies van de afstandsbediening Bedieningsstap Anzeige Opmerking PRIMUS 2 H2N/H2N+ Om de werkingswi- met de afstandsbedie- jze MANUEEL weer ning in de werkingswijze te verlaten en naar MANUEEL schakelen. de werkingswijze AUTOMAAT te gaan, 1. Laserontvanger de toetsen en inschakelen. nogmaals gelijktijdig indrukken. 2. Toetsen en gelijktijdig indrukken. werkingswijze MANUEEL PRIMUS 2 H2N/H2N+ Om de SLAAP- modus met de afstandsbedie- weer te verlaten, de ning in de SLAAP-modus toets nogmaals 3 schakelen: sec. indrukken. Toets 3 sec. indruk- ken.
  • Page 86 NL Gebruiksaanwijzing 12 Laserontvanger COMMANDER 2 H2N/H2N+ 12.1 Weergave- en bedieningselementen van de laserontvanger LCD-weergave BATTERIJ Aanduiding gaat branden: beperkte resterende gebru- iksduur (batterij ca. 5 uur/accu ca. 0,5 uur). Knippert: shutdown handen is, vervang de batterijen! LCD-weergave LAGER Gaat branden indien de laserlijn binnen het sensorvens- ter, maar onder de nullijn valt. Bovendien brandt de rode LED naast het ontvangstveld en er klinkt een langzame toonvolgorde. LCD-weergave DOEL Brandt, indien de laserlijn exact op de hoogte van de nullijn valt. Bovendien brandt de groene LED naast het ontvangstveld en er klinkt een permanente toon. LCD-weergave HOGER Gaat branden indien de laserlijn binnen het sensorvens- ter, maar boven de nullijn valt. Bovendien brandt de gele LED naast het ontvangstveld en er klinkt een snelle toonvolgorde. LLCD-weergave RESOLUTIE DETECTORVELD Geeft de actueel ingestelde resolutie aan: 4 = ±4 mm/2 = ±2 mm/1 = ±1 mm/0 = ±0,5 mm LCD-weergave SIGNAALTOON...
  • Page 87 De batterijband mag niet tussen het batterijvakdeksel en de afdichting liggen, omdat dan de dichtheid van de behuizing niet meer gegarandeerd wordt. 14 Onderhoud/Verzoging 14.1 Onderhoud De PRIMUS 2 H2N/H2N+ en de COMMANDER 2 H2N/H2N+ zijn onder- houdsvrije instrumenten. Indien de PRIMUS 2 H2N/H2N+ of de COMMAN- DER 2 H2N/H2N+ door interne fouten (storingsmeldingen Err9-Err11) of beschadiging niet meer correct functioneert, het instrument ter reparatie opsturen naar: NEDO GmbH & Co. KG Serviceafdeling Hochgerichtstraße 39 – 43 D-72280 Dornstetten Germany 14.2 Verzorging De laserdiode van de rotatielaser wordt beschermd door een glasplaatje. Voor een correcte werking moet het glasplaatje regelmatig met een zachte doek worden gereinigd. Krassen op het glas vermijden. Verontreiniging van het laserontvangstveld op de COMMANDER 2 H2N/H2N+ is van invloed op de ontvangstkwaliteit en reikwijdte van de laserontvanger. De stofen waterdichte,...
  • Page 88 ≤ 3 mm bedraagt! OPMERKING De controlestappen 1 en 2 moeten vervolgens, zoals beschreven, voor de Y-as worden uitgevoerd. Wanneer de waarde H buiten de tolerantie ligt, moet de Primus 2 door een geautori- seerde klantenservice of door Nedo worden afgesteld.
  • Page 89  OPMERKING De drempel van de TILT-alarm-functie kan door NEDO of een servicepartner worden gewijzigd in GROF, FIJN en UIT. Zo is het dus mogelijk om het TILT-alarm uit te schakelen. Standaard is de drempel van het alarm ingesteld op GROF.
  • Page 90 ES Pie de imprenta Versión: PRIMUS 2 H2N/H2N+ Copyright: NEDO GmbH & Co. KG Hochgerichtstraße 39 – 43 D-72280 Dornstetten Alemania Tel.: +49 74432401-0 Fax: +49 74432401-45 E-Mail: info@nedo.com Internet: www.nedo.com La entrega a terceros o la reproducción de este documen- to, valorización y comunicación de su contenido están prohibido, siempre que no hayan sido expresamente autorizados. Las transgresiones obligan a indemnización por daños y perjuicios. Todos los derechos para el caso de registro de patentes, modelos de construcción o modelo estético están reservados. Este manual de instrucciones fue confeccionado con esmero. NEDO GmbH & Co. KG sin embargo no asume ninguna responsabilidad por eventuales errores en este manual de instrucciones y sus consecuencias. Asimismo no se asume ninguna responsabilidad por daños directos o colaterales que resulten de un uso indebido del láser. Para la utilización del aparato se deben observar las normas de seguridad y disposiciones de protección de trabajo específicas del país, así como las especificaciones de este manual de instrucciones. Todas las denominaciones de productos y marcas em- pleados son de propiedad de sus propietarios y no están explícitamente identificados como tales. Modificaciones del contenido reservadas.
  • Page 91 ES Índice de contenidos 1 Sobre este manual de instrucciones 1.1 Símbolos empleados en este manual de instrucciones ........ 92 2 Informaciones de seguridad 2.1 Documentación ..................93 2.2 Radiación láser ................... 93 2.3 Uso reglamentario ..................94 2.4 Transporte y almacenaje ................94 2.5 Medio ambiente ..................94 3 Descripción PRIMUS 2 H2N/H2N+ 3.1 Descripción general del producto ............... 95 3.2 Datos técnicos ................... 95 3.3 Volumen de suministro ................
  • Page 92 Indicaciones generales Sobre este manual de instrucciones Este manual de instrucciones contiene todas las informaciones importantes para la manipulación con el láser rotatorio totalmente automático PRIMUS 2 H2N/H2N+ y el COMMANDER 2 H2N/H2N+. Asimismo se describen, el manejo, el mantenimiento, la conservación así como los mensajes de adver- tencia y de error. • No emplee los aparatos antes de haber leído y comprendido completa- mente este manual de instrucciones. • Conservar este manual de instrucciones siempre junto a los aparatos. 1.1 Símbolos empleados en este manual de instrucciones La observación de las indicaciones de seguridad y peligros es una condición fundamental para un empleo seguro del PRIMUS 2 H2N/H2N+ y del COM- MANDER 2 H2N/H2N+. Las diversas indicaciones están identificadas a través de símbolos adecuados. ¡ADVERTENCIA! Este pictograma con la indicación "¡ADVERTENCIA!" hace referencia a una amenaza de peligro, que de no ser evitada puede tener como consecuencia graves lesiones físicas.
  • Page 93 Indicaciones de seguridad Informaciones de seguridad 2.1 Documentación La observación de las siguientes indicaciones de seguridad así como las normas de seguridad y disposiciones de protección de trabajo específicas del país, son condición previa para un empleo exento de anomalías y de peligros del láser. Por esta razón lea por favor cuidadosamente este manual de instrucciones y todas las indicaciones, y cumpla las mismas al trabajar con el láser.
  • Page 94 2.5 Medio ambiente Informaciones específicas de producto para la eliminación del láser, pueden ser descar- gadas bajo www.nedo.com. Las pilas/los acumuladores son residuos especiales y no deben acabar en los residuos domésticos. Deben ser desechados de acuerdo con las directivas del país vigentes de...
  • Page 95 ES Manual de instrucciones Descripción PRIMUS 2 H2N/H2N+ 3.1 Descripción general del producto Los láser rotativo PRIMUS 2 H2N/H2N+ son basculante biaxial totalmente automático láser para servicio horizontal. ¡En el PRIMUS 2 H2N+ se supervisa adi- cionalmente la inclinación (véase 8.3)! El innovador Shock-Protection-System para protección contra golpes y la robusta carcasa protegida contra agua y polvo pro- tegen el High-Power-Laser bajo casi todas las condiciones de aplicación en áreas interiores y exteriores. 1 Láser rotatorio 2 Asa de transporte, engomada 3 Nivel de burbuja 4 Panel de mando con teclas y display 5 Casquillo roscado 5/8" (suelo) 6 Compartimiento para pilas recargables 7 Asa de transporte, engomada 3.2 Datos técnicos Láser rotatorio totalmente automático PRIMUS 2 H2N/H2N+ Área de autonivelación ±5°, motriz con supervisión automática...
  • Page 96 ES Manual de instrucciones Elementos de manejo PRIMUS 2 H2N/H2N+ 4.1 Teclas del panel de mando El manejo del láser se realiza a través del panel de mando. LED-Advertencia Activar Ejes INCLINAR/ Confirmar intro- Display ducción de valores porcentuales Incrementar valor, véase funciones de confort página 103 Reducir valor, véase funciones de confort página 103 Láser ON/OFF Activar/desactivar el modo de servicio MANUAL 4.2 Indicaciones del display Símbolo Descripción C00 –...
  • Page 97 ES Manual de instrucciones Primera puesta en servicio PRIMUS 2 H2N/H2N+ 5.1 Indicaciones de seguridad para la alimentación ¡ADVERTENCIA! ¡Destrucción! ¡Peligro de explosión! f Emplear únicamente el cargador del volumen de suministro. f No colocar la pilas en el Pack de acumulador y cargarlas con el cargador. ¡PRECAUCIÓN! ¡Daños! f No mezclar pilas cargadas y descargadas.
  • Page 98 ES Manual de instrucciones Puesta en servicio del PRIMUS 2 H2N/H2N+ 6.1 Montar o bien instalar el láser para su empleo El láser permite ser montado o bien instalado en posición horizontal. Horizontal sobre Instalado horizontal- trípode mente Preparar el láser a la altura útil Proyección de láser HORIZONTAL Nivelar el láser con el nivel de burbuja integrado ¡PRECAUCIÓN! Desniveles, sustratos blandos o vibraciones afectan la estabilidad del láser o bien del trípode.
  • Page 99 ES Manual de instrucciones Conectar el PRIMUS 2 H2N/H2N+ El modo de servicio AUTOMÁTICO, es la configuración estándar tras cada conexión. NOTA A pesar de una instalación cuidadosa, pueden presentarse en el modo de servicio AUTOMÁTICO debido a influencias externas o intensas vibraciones, mensajes de error o advertencia en el display del láser. Véase la descripción y las medidas de solución en el capítulo 15.
  • Page 100 ES Manual de instrucciones 7.2 Modo de servicio MANUAL En el modo de servicio MANUAL el láser no reconoce ninguna vibración y no se horizontaliza. El modo de servicio Ajustar modo de Se muestra el símbolo AUTOMÁTICO está servicio MANUAL de la mano activo NOTA Con la tecla se puede cambiar directamente tras la conexión al modo de servicio MANUAL. El modo de servicio MANUAL está activo Se pueden llamar las siguientes funciones: Con la tecla cambiar al modo de servicio AUTOMÁTICO (capítulo 7.1). El láser se horizontaliza nuevamente. Con la tecla finalizar el modo de servicio, desconectar el láser.
  • Page 101 ES Manual de instrucciones Funciones del PRIMUS 2 H2N/H2N+ 8.1 Eje X/Eje Y INCLINAR En la Función Ejes INCLINAR, los ejes pueden ser inclinados independiente- mente entre sí en un rango de ±10 %. ¡En el PRIMUS 2 H2N+ se supervisa adicionalmente el ajuste de la inclinación. Eje - X La ilustración a un lado muestra la inclinación en el ajuste de un valor porcentual positivo. Eje - Y La ilustración a un lado muestra la inclinación en el ajuste de un valor porcentual positivo. Eje X e Y La ilustración a un lado muestra la inclinación en el ajuste de valores porcentuales positivos (Eje-X +5 %, eje-Y +8 %). NOTA Para el ajuste de inclinaciones mayores es de ayuda o bien necesario inclinar el láser dentro de la tolerancia de horizontalización de ±5°...
  • Page 102 ES Manual de instrucciones Confirmar el valor El símbolo de eje Y y Asumir el valor 0.00 % con la tecla o ajustado para eje X la inclinación se mu- ajustar un valor, p.ej. +8 %, para eje Y con las con tecla estran intermitentes funciones de confort de las teclas (véase página 103) Aceptar el valor El láser se horizontaliza Se ajustan los valores porcentuales introducidos ajustado para eje Y para el eje X e Y con tecla NOTA Tras 30 segundos está conectada la función TILT-Alarm. El láser reconoce una vibración basta y activa el aviso de advertencia C01. En el Primus 2 H2N+ se detectan y ajustan pequeñas vibraciones, de manera tal que la inclinación ajustada también se conserva exactamente durante un periodo de tiempo más prolongado.
  • Page 103 ES Manual de instrucciones 8.2 Funciones de confort de las teclas Ajuste de precisión (pasos de 0,01 %) Avance y retroceso rápidos Oprimir 1 vez/varias Oprimir 1 vez/varias Avance rápido: Retroceso rápido: veces la tecla veces la tecla Mantener oprimida Mantener oprimida (Paso +0,01 %) (Paso –0,01 %) la tecla la tecla Ajuste basto (pasos de 1,00 %) Introducción valores positivos Mantener oprimida Soltar la tecla ,...
  • Page 104 ES Manual de instrucciones 8.3 Supervisión de inclinación El Primus 2 H2N no dispone de ninguna supervisión de inclinación. El Primus 2 H2N+ dispone de una supervisión de inclinación esto es, la inc- linación efectiva del nivel láser se compara permanentemente con el valor especificado (véase 8.1). En caso necesario la inclinación se ajusta, de manera que la inclinación efectiva coincide en todo momento con la especificación. La regulación posterior se realiza dentro del marco de las tolerancias (véase 3.2) Descripción COMMANDER 2 H2N/H2N+ 9.1 Descripción general del producto El COMMANDER 2 H2N/H2N+ es un robusto aparato combinado de recep- tor láser y mando a distancia para el empleo profesional en áreas interiores y exteriores. El mando a distancia inalámbrico del COMMANDER 2 H2N/H2N+ permite el control del PRIMUS 2 H2N/H2N+ en un radio de máximo 150 me- tros. No necesita existir un contacto visual entre el mando a distancia y el lá- ser rotatorio. 9.2 Datos técnicos Receptor láser / Mando a distancia COMMANDER 2 H2N/H2N+ Artículo Nº: 430371 / 430374 Peso...
  • Page 105 ES Manual de instrucciones 10 Estructura del aparato COMMANDER 2 H2N/H2N+ 10.1 Lado frontal Teclado Indicación LCD para mando a dis- tancia Indicación LCD para receptor láser Nivel de aire para alineación en tareas de marcación Indicación de altura láser LED Nivel nominal-Marcación central (50 mm del canto superior de la carcasa) Campo de recepción láser (70mm) 10.2 Lado posterior Compartimento para pilas Fijación por pinza de sujeción Rosca Guía de fijación cónica Salida de señal acústica Indicación LCD para mando a distancia Indicación LCD para receptor láser Indicación de altura láser LED...
  • Page 106 ES Manual de instrucciones 11 Mando a distancia COMMANDER 2 H2N/H2N+ 11.1 Elementos de indicación y manejo del mando a distancia X/Y Reducir el valor de inclina- ción Activar ejes INCLINAR / Confirmar introducción de valor porcentual X/Y Incrementar el valor de inclinación Símbolo de advertencia (intermi- tente) Modo de servicio MANUAL Estado de pilas/pilas recargables del láser Modo ROTACIÓN (parpadea ante horizontalización) Revoluciones del láser (600 rpm) INCLINACIÓN Eje-Y Indicación en valores porcentuales INCLINACIÓN Eje-X Indicación en valores porcentuales Función INCLINACIÓN (El símbolo parpadea durante la introducción)
  • Page 107 ES Manual de instrucciones 11.2 Funciones adicionales del mando a distancia Paso de manejo Indicación Indicaciones Conmutar el PRIMUS 2 Para abandonar H2N/H2N+ al modo de nuevamente el servicio MANUAL median- modo de servicio te el mando a distancia. MANUAL y cambiar al modo de servicio 1. Conectar receptor láser. AUTOMÁTICO, op- rimir nuevamente de 2. Oprimir simultánea- forma simultánea las mente las teclas teclas Modo de servicio MANUAL conectado Conmutar el PRIMUS Para abandonar nueva- 2 H2N/H2N+ al modo mente el modo SLEEP SLEEP (suspensión) medi- oprimir nuevamente la ante el mando a distancia: tecla 3 seg.
  • Page 108 ES Manual de instrucciones 12 Receptor láser COMMANDER 2 H2N/H2N+ 12.1 Elementos de indicación y manejo del receptor láser Indicador LCD PILAS Se enciende la indicación: tiempo de marcha rema- nente limitado (Pilas aprox. 5h / Pilas recargables aprox. 0,5h). La indicación parpadea: ¡La desconexión es inminente, sustituir pilas/pilas recargables! Indicador LCD MAS BAJO Se enciende, cuando la línea láser se encuentra dentro de la ventana del sensor, pero por debajo de la línea cero. Adicionalmente se enciende el LED rojo junto al campo de recepción y suena además una secuencia de tonos lenta. Indicador LCD DESTINO Se enciende, cuando la línea láser se encuentra a la altura de la línea cero. Adicionalmente se enciende el LED rojo junto al campo de recepción y suena además un tono continuo.
  • Page 109 4. Para cerrar, presionar la tapa hacia abajo hasta que encastre con un clic audible. ¡PRECAUCIÓN! La cinta de las pilas no puede quedar entre la tapa del portapilas y la junta, debido a que en ese caso ya no está garantizada la hermeticidad de la carcasa. 14 Mantenimiento/Conservación 14.1 Mantenimiento El PRIMUS 2 H2N/H2N+ y el COMMANDER 2 H2N/H2N+ son aparatos exentos de mantenimiento. En caso que el PRIMUS 2 H2N/H2N+ o el COM- MANDER 2 H2N/H2N+ ya no tenga capacidad funcional debido a fallos inter- nos (Mensajes de error Err9-Err11) o daños, enviar los aparatos para su repa- ración a: NEDO GmbH & Co. KG Service-Abteilung Hochgerichtstraße 39 – 43 72280 Dornstetten / Germany 14.2 Conservación El diodo láser del láser rotatorio está protegido por placas de cristal. Para un servicio impecable limpiar regularmente las placas con un paño suave. Evitar rayaduras en las placas de cristal. Suciedad del campo de recepción láser en el COMMANDER 2 H2N/H2N+ influyen la calidad de recepción y el alcance del receptor láser. Limpiar la carcasa estanca al polvo y al agua en parte engo- mada con productos de limpieza habituales. Eliminar ensuciamientos intensos con abundante ¡PRECAUCIÓN! No sumergir el PRIMUS 2 H2N/H2N+ and COMMANDER 2 H2N/ H2N+ en agua.
  • Page 110 Los pasos de comprobación 1 y 2 deben ahora ser ejecutados como descrito para el eje Y. Si el valor de H se encuentra fuera de tolerancia, el Primus 2 tiene que ser ajustado por un servicio técnico autorizado o por Nedo.
  • Page 111   NOTA El umbral de la función TILT-Alarm puede ser conmutada por NEDO o un servicio técnico autorizado entre BASTO, FINO y OFF. De esta manera es posible desactivar TILT-Alarm. Como estándar, el umbral está ajustado en BASTO. 15.2 Avisos de error PRIMUS 2 H2N/H2N+ Indicación del display Descripción del aviso de error...
  • Page 116 NEDO GmbH & Co. KG Hochgerichtstraße 39 – 43 72280 Dornstetten Deutschland www.nedo.com info@nedo.com Art.-Nr. 062709 Technische Änderungen vorbehalten...

Ce manuel est également adapté pour:

Primus2 h2n+Commander2 h2n