Table des Matières
Publicité
Les langues disponibles
Les langues disponibles
Liens rapides
Betriebsanleitung Präzisionswaagen
Operating instruction Precision balances
Mode d'emploi Balance de précision
KERN PFB
Typ PFB_A
Version 4.1
2017-10
KERN & Sohn GmbH
Ziegelei 1
D-72336 Balingen
E-Mail: info@kern-sohn.com
Tel: +49-[0]7433- 9933-0
Fax: +49-[0]7433-9933-149
Internet: www.kern-sohn.com
PFB-BA-def-1741
Publicité
Chapitres
Table des Matières

Manuels Connexes pour KERN and SOHN PFB 120-3A


Sommaire des Matières pour KERN and SOHN PFB 120-3A
- Page 1 KERN & Sohn GmbH Ziegelei 1 Tel: +49-[0]7433- 9933-0 D-72336 Balingen Fax: +49-[0]7433-9933-149 E-Mail: info@kern-sohn.com Internet: www.kern-sohn.com Betriebsanleitung Präzisionswaagen Operating instruction Precision balances Mode d'emploi Balance de précision KERN PFB Typ PFB_A Version 4.1 2017-10 PFB-BA-def-1741...
- Page 2 Weitere Sprachversionen finden Sie online unter www.kern-sohn.com/manuals Další jazykové verze najdete na webu pod adresou www.kern-sohn.com/manuals Más versiones de idiomas se encuentran online bajo www.kern-sohn.com/manuals Vous trouverez d’autres versions de langue online sous www.kern-sohn.com/manuals Muut kieliversiot löytyvät osoitteesta www.kern-sohn.com/manuals Further language versions you will find online under www.kern-sohn.com/manuals Trovate altre versioni di lingue online in www.kern-sohn.com/manuals Bijkomende taalversies vindt u online op www.kern-sohn.com/manuals Encontram-se online mais versões de línguas em www.kern-sohn.com/manuals...
-
Page 3: Table Des Matières
KERN PFB Typ PFB_A Version 4.1 2017-10 Betriebsanleitung Präzisionswaage Inhaltsverzeichnis Technische Daten ..................4 Konformitätserklärung .................. 7 Geräteübersicht ..................... 8 Tastaturübersicht ........................8 Anzeigenübersicht ........................9 Grundlegende Hinweise (Allgemeines) ............10 Bestimmungsgemäße Verwendung ..................10 Sachwidrige Verwendung ......................10 Gewährleistung ......................... 10 Prüfmittelüberwachung ...................... - Page 4 Menü ......................29 10.1 Navigation im Menü ........................29 10.2 Einstieg ins Technikmenü......................30 10.3 Übersicht........................... 31 Schnittstellen ....................33 11.1 RS 232 ............................33 11.1.1 Technische Daten ........................ 33 11.1.2 Drucker Betrieb (RS 232) ..................... 34 11.1.3 Ausgabeprotokoll (Kontinuierliche Ausgabe) ............... 35 11.2 Fernsteuerbefehle ........................
-
Page 5: Technische Daten
1 Technische Daten KERN (Typ) PFB 120-3A PFB 200-3A PFB 300-3A Markenbezeichnung PFB 120-3 PFB 200-3 PFB 300-3 Ablesbarkeit (d) 0,001 g 0,001 g 0,001 g Wägebereich (Max) 120 g 200 g 300 g Reproduzierbarkeit 0,001 g 0,002 g 0,002g Linearität... - Page 6 PFB 2000-2A KERN (Typ) PFB 600-2A PFB 1200-2A Markenbezeichnung PFB 600-3 PFB 1200-2 PFB 2000-2 Ablesbarkeit (d) 0,01 g 0,01 g 0,01 g Wägebereich (Max) 600 g 1200 g 2000 g Reproduzierbarkeit 0,01g 0,01 g 0,02 g Linearität ±0,03 g ±0,03 g ±0,05 g Kleinstes Teilegewicht bei...
- Page 7 PFB 3000-2A PFB 6000-1A PFB 6000-2A KERN (Typ) Markenbezeichnung PFB 3000-2 PFB 6000-1 PFB 6000-2 Ablesbarkeit (d) 0,01 g 0,1 g 0,05 g Wägebereich (Max) 3000 g 6000 g 6000 g Reproduzierbarkeit 0,02 g 0,1 g 0,05 g Linearität ±0,05 g ±...
-
Page 8: Konformitätserklärung
2 Konformitätserklärung Die aktuelle EG/EU-Konformitätserklärung finden Sie online unter: www.kern-sohn.com/ce PFB-BA-d-1741... -
Page 9: Geräteübersicht
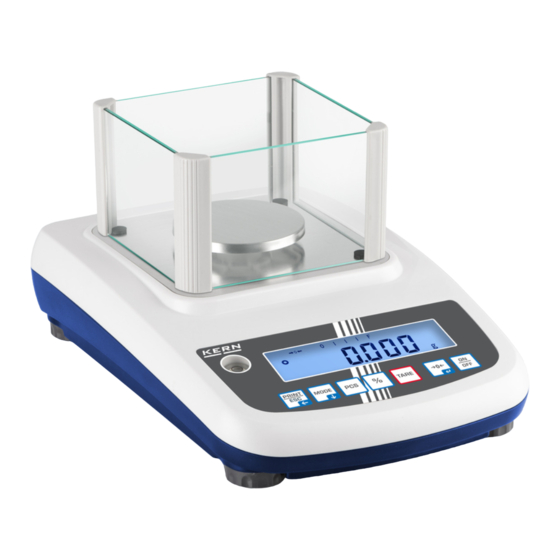
3 Geräteübersicht 3.1 Tastaturübersicht Taste Tasten- Funktion Bezeichnung Ein-/Ausschalten ON/OFF Nullstellen ZERO Tarieren TARE Prozentbestimmung aktivieren Im Prozentbestimmungsmodus zurück in den Wägemodus Stückzählen aktivieren Im Stückzählmodus zurück in den Wägemodus Wägeeinheitenumschaltung MODE ... -
Page 10: Anzeigenübersicht
3.2 Anzeigenübersicht Anzeige Beschreibung Nullanzeige Anzeige Netto-Gewichtswerte ο Stabilitätsanzeige Applikation Stückzählen Applikation Prozentbestimmung Applikation Toleranzwägen Kapazitätsanzeige Die Kapazitätsanzeige läuft von links nach rechts und schreitet in gleichem Maße voran, wie die Waage belastet wird. Seine volle Breite erreicht er bei Höchstlast. Damit wird die aktuelle Belegung des Wägebereiches analog angezeigt. -
Page 11: Grundlegende Hinweise (Allgemeines)
4 Grundlegende Hinweise (Allgemeines) 4.1 Bestimmungsgemäße Verwendung Die von Ihnen erworbene Waage dient zum Bestimmen des Wägewertes von Wägegut. Sie ist zur Verwendung als „nichtselbsttätige Waage“ vorgesehen, d.h. das Wägegut wird manuell, vorsichtig und mittig auf die Wägeplatte aufgebracht. Nach Erreichen eines stabilen Wägewertes kann der Wägewert abgelesen werden. -
Page 12: Prüfmittelüberwachung
4.4 Prüfmittelüberwachung Im Rahmen der Qualitätssicherung müssen die messtechnischen Eigenschaften der Waage und eines eventuell vorhandenen Prüfgewichtes in regelmäßigen Abständen überprüft werden. Der verantwortliche Benutzer hat hierfür ein geeignetes Intervall sowie die Art und den Umfang dieser Prüfung zu definieren. Informationen bezüglich der Prüfmittelüberwachung von Waagen sowie der hierfür notwendigen Prüfgewichte sind auf der KERN- Homepage (www.kern-sohn.com) verfügbar. -
Page 13: Auspacken, Aufstellung Und Inbetriebnahme
Arbeitsplatz aufstellen. Überprüfen, ob alle Teile des Lieferumfangs vorhanden und unbeschädigt sind. Lieferumfang / Serienmäßiges Zubehör: • Waage • Wägeplatte • Netzgerät • Betriebsanleitung • Windschutz (nur Modelle PFB 120-3A, PFB 200-3 A, PFB 300-3 A, PFB 1200-2A, PFB 2000-2A, PFB 3000-2A) PFB-BA-d-1741... -
Page 14: Aufstellen
Wägeplatte installieren Die Waage ist so aufzustellen, dass die Wägeplatte genau waagrecht steht. Windschutz installieren (nur Modelle PFB 120-3A, PFB 200-3 A, PFB 300-3 A, PFB 1200-2A, PFB 2000-2A, PFB 3000-2A) Nivellieren Eine exakte Ausrichtung und stabile Installation sind Voraussetzungen für wiederholbare Ergebnisse. -
Page 15: Netzanschluss
7.3 Netzanschluss Länderspezifischen Netzstecker auswählen und am Netzgerät einstecken. Kontrollieren, ob die Spannungsaufnahme der Waage richtig eingestellt ist. Die Waage darf nur an das Stromnetz angeschlossen werden, wenn Angaben an der Waage (Aufkleber) und die ortsübliche Netzspannung identisch sind. Nur KERN-Originalnetzgeräte verwenden. Die Verwendung anderer Fabrikate bedarf der Zustimmung von KERN. -
Page 16: Justierung
7.6 Justierung Da der Wert der Erdbeschleunigung nicht an jedem Ort der Erde gleich ist, muss jede Waage – gemäß dem zugrundeliegenden physikalischen Wägeprinzip – am Aufstellort auf die dort herrschende Erdbeschleunigung abgestimmt werden (nur wenn die Waage nicht bereits im Werk auf den Aufstellort justiert wurde). Dieser Justiervorgang muss bei der ersten Inbetriebnahme, nach jedem Standortwechsel sowie bei Schwankungen der Umgebungstemperatur durchgeführt werden. -
Page 17: Linearisierung
7.7 Linearisierung Die Linearität gibt die größte Abweichung der Gewichtsanzeige einer Waage zum Wert des jeweiligen Prüfgewichts nach Plus und Minus über den gesamten Wägebereich an. Wird bei der Prüfmittelüberwachung eine Linearitätsabweichung festgestellt, kann diese durch eine Linearisierung verbessert werden. •... - Page 18 Durchführung: Waage einschalten und während des Selbsttests MODE-Taste drücken, „F1 Unt“ wird angezeigt MODE-Taste wiederholt drücken, bis ‚“tECH“ erscheint. Mit ZERO-Taste bestätigen. Nacheinander drücken, „P1 Lin“ wird angezeigt ZERO-Taste erneut drücken, „Pin“ wird erneut angezeigt. ...
- Page 19 Drittes Justiergewicht auflegen. Nach erfolgter Stillstandskontrolle ertönt ein Signalton, „LoAd 4“ wird angezeigt. Justiergewicht abnehmen. Viertes Justiergewicht (Max) auflegen. Nach erfolgter Stillstandskontrolle ertönt ein Signalton, „LoAd 0“ wird angezeigt. Justiergewicht abnehmen. Darauf achten, dass sich keine Gegenstände auf der Wägeplatte befinden. Nach erfolgter Stillstandskontrolle ertönt ein Signalton, „LoAd 4“...
-
Page 20: Basisbetrieb
8 Basisbetrieb 8.1 Einschalten ON/OFF-Taste drücken, die Anzeige leuchtet auf. Die Waage führt einen Anzeigetest durch. Sobald die Gewichtsanzeige erscheint, ist die Waage wägebereit. 8.2 Ausschalten ON/OFF-Taste drücken, die Anzeige erlischt. 8.3 Nullstellen Nullstellen korrigiert den Einfluss leichter Verschmutzungen auf der Wägeplatte. ... -
Page 21: Wägeeinheit Umschalten
8.5 Wägeeinheit umschalten Wägeeinheiten aktivieren: Waage einschalten und während des Selbsttests MODE-Taste drücken, „F1 Unt“ wird angezeigt ZERO-Taste drücken, die erste Wägeeinheit mit der aktuellen Einstellung wird angezeigt. Mit der MODE-Taste die Wägeeinheit aktivieren [on] / deaktivieren [off]. ... -
Page 22: Wägen Mit Tara
8.6 Wägen mit Tara Wägebehälter auflegen. Nach erfolgter Stillstandskontrolle TARE-Taste drücken. Die Nullanzeige und der Indikator erscheinen. Das Gewicht des Gefäßes ist nun intern gespeichert. Wägegut einwiegen, das Nettogewicht wird angezeigt. • Die Waage kann immer nur einen Tarawert speichern. •... -
Page 23: Applikationen
9 Applikationen Prozentbestimmung Das Prozentwägen ermöglicht die Gewichtsanzeige in Prozent, bezogen auf ein Referenzgewicht. Sollgewicht setzen Sollgewicht (Referenzgewicht, das 100 % entspricht) auflegen. Stabilitätsanzeige abwarten, dann %-Taste drücken. 100% wird angezeigt. Prozentwägen / Umschalten Wägegut auflegen. Das Gewicht des Wägeguts wird in Prozent, bezogen auf das Sollgewicht angezeigt. -
Page 24: Stückzählen
9.2 Stückzählen Bevor die Waage Teile zählen kann, muss sie das durchschnittliche Stückgewicht, die so genannte Referenz kennen. Dazu muss eine bestimmte Anzahl der zu zählenden Teile aufgelegt werden. Die Waage ermittelt das Gesamtgewicht und teilt es durch die Anzahl der Teile, die so genannte Referenzstückzahl. Auf Basis des berechneten durchschnittlichen Stückgewichts wird anschließend die Zählung durchgeführt. -
Page 25: Summieren
9.3 Summieren 9.3.1 Manuelles Summieren Mit dieser Funktion werden die einzelnen Wägewerte durch Drücken der PRINT- Taste in den Summenspeicher addiert und bei Anschluss eines optionalen Druckers ausgegeben. • Menüeinstellungen, s. Kap. 10.3: „F3 COM“ „S 232“ „P Prt“ „F4 Acc“... - Page 26 Wägegut B auflegen, z. B. 200 g. Stabilitätsanzeige abwarten, dann PRINT-Taste drücken. Der Gewichtswert wird in den Summenspeicher addiert und ausgegeben. Die Anzahl Wägungen gefolgt vom Gesamtgewicht werden 2 s lang angezeigt. Danach wird der aktuelle Gewichtswert angezeigt. Nach Bedarf weiteres Wägegut wie vorhergehend beschrieben summieren. Darauf achten, dass das Wägesystem zwischen den einzelnen Wägungen entlastet werden muss.
- Page 27 Summe „Total“ anzeigen und ausgeben: Bei entlasteter Waage (Nullanzeige) PRINT-Taste drücken, die Anzahl Wägungen gefolgt vom Gesamtgewicht werden 2 sec. lang angezeigt und bei Anschluss eines optionalen Druckers ausgegeben Summenspeicher löschen: Bei entlasteter Waage (Nullanzeige) PRINT-Taste drücken, dann bei Anzeige „Gesamtgewicht““...
-
Page 28: Automatisches Summieren
9.3.2 Automatisches Summieren Mit dieser Funktion werden die einzelnen Wägewerte ohne Drücken von automatisch beim Entlasten der Waage in den Summenspeicher addiert und bei Anschluss eines optionalen Druckers ausgegeben. • Menüeinstellungen, Kap.10.3: „F3 COM“ „S 232 „P AUto“ „F4 Acc“... - Page 29 Wägegut abnehmen. Der Wägewert wird in den Summenspeicher addiert und bei Anschluss eines optionalen Druckers ausgegeben. Die Anzahl Wägungen gefolgt vom Gesamtgewicht werden 2 sec. lang angezeigt. Nach Bedarf weiteres Wägegut wie vorhergehend beschrieben summieren. Darauf achten, dass das Wägesystem zwischen den einzelnen Wägungen entlastet werden muss.
-
Page 30: Menü
10 Menü 10.1 Navigation im Menü Waage einschalten und während des Selbsttests Menü aufrufen drücken. Der erste Menüpunkt „F1 Unt„ wird angezeigt. Menüpunkt anwählen Mit lassen sich die einzelnen Menüpunkte der Reihe nach anwählen. Einstellung anwählen Ausgewählten Menüpunkt mit bestätigen. -
Page 31: Einstieg Ins Technikmenü
10.2 Einstieg ins Technikmenü Der Zugang zum Technikmenü „tECH“ ist mit der Tastenkombination gesperrt. PFB-BA-d-1741... -
Page 32: Übersicht
10.3 Übersicht Werkseinstellungen sind mit * gekennzeichnet. Menüblock Menüpunkt Verfügbare Einstellungen / Erklärung F1 Unt g, ct, lb, oz, d, yn, ozt, dwt, mom, tl h, tl c, tl t, t, bt, n Wägeeinheiten Automatische Hinterleuchtung nur bei Belastung EL AU* der Wägeplatte oder Tastendruck. - Page 33 P ASK Fernsteuerbefehle Auswahl mit bestätigen b 600 Baudrate 600, 1200, 2400, 4800, 9600*wählbar. b 9600* Auswahl mit bestätigen Standarddruckereinstellung LP 50 Nicht dokumentiert Auswahl mit bestätigen Eng* Standardeinstellung Englisch. wird nur bei Einstellung „LP 50“ angezeigt Nicht dokumentiert Acc on Summierfunktion aktiviert F4 Acc...
-
Page 34: Technische Daten
11 Schnittstellen Über die Schnittstellen können Wägedaten mit angeschlossenen Peripheriegeräten ausgetauscht werden. RS 232 Schnittstelle USB-Schnittstelle für PC-Anschluss Menüeinstellung, s. Kap.10.1: Menüeinstellung, s. Kap. 10.1:: „F3 COM“ „S 232“ „F3 COM“ „USB“ Geeignete Peripheriegeräte: Geeignete Peripheriegeräte: • Drucker •... -
Page 35: Drucker Betrieb (Rs 232)
11.1.2 Drucker Betrieb (RS 232) Ausdruckbeispiele (KERN YKB-01N) 1. Menüeinstellungen F3 COM <P Prt> / F4 <Acc of> Wägemodus 300.00 g Prozentbestimmung 50.01 % Stückzählen 20 PCS 5.00027g /P 100 g 100.00 g N Summieren 200.00 g N - - - - - - - - - - - - - - - - - - - 1-2: 300.00 g C 2. -
Page 36: Ausgabeprotokoll (Kontinuierliche Ausgabe)
11.1.3 Ausgabeprotokoll (Kontinuierliche Ausgabe) HEADER1: ST = Stabil, US = Instabil HEADER2: N = Netto, G = Brutto 11.2 Fernsteuerbefehle Befehl Funktion Stabiler Wägewert für das Gewicht wird über die Schnittstelle gesendet Wägewert für das Gewicht (stabil oder instabil) wird über die Schnittstelle gesendet Es werden keine Daten gesendet, die Waage führt die Tara-Funktion aus. -
Page 37: Bluetooth (Factoryoption)
11.3 Bluetooth (Factoryoption) Rechtliche Hinweise Bluetooth ist ein eingetragener und geschützter Name der Bluetooth SIG,Inc. ® ® Die Wortmarke und die Logos sind Eigentum der Bluetooth SIG,Inc. ® Die Verwendung derartiger Marken ist durch KERN lizensiert. Andere Marken und Markennamen gehören ihrem jeweiligen Eigentümer. 11.3.1 Gerät hinzufügen ... - Page 38 „Kopplungscode des Gerätes eingeben“ anklicken Code 1234 eingeben Schließen anklicken PFB-BA-d-1741...
-
Page 39: Com Port Nummer Ermitteln
11.3.2 COM Port Nummer ermitteln Bluetooth-Netzwerkgeräte anzeigen Doppelklick, der COM Port wird angezeigt PFB-BA-d-1741... -
Page 40: Wartung, Instandhaltung, Entsorgung
12 Wartung, Instandhaltung, Entsorgung Vor allen Wartungs-, Reinigungs- und Reparaturarbeiten das Gerät von der Betriebsspannung trennen. 12.1 Reinigen Keine aggressiven Reinigungsmittel (Lösungsmittel o.ä.) benutzen, sondern nur ein mit milder Seifenlauge angefeuchtetes Tuch. Darauf achten, dass keine Flüssigkeit in das Gerät eindringt. Mit einem trockenen, weichen Tuch nachreiben. Lose Probenreste/Pulver können vorsichtig mit einem Pinsel oder Handstaubsauger entfernt werden. -
Page 41: Kleine Pannenhilfe
14 Kleine Pannenhilfe Bei einer Störung im Programmablauf sollte die Waage kurz ausgeschaltet und vom Netz getrennt werden. Der Wägevorgang muss dann wieder von vorne begonnen werden. Hilfe: Störung Mögliche Ursache Die Gewichtsanzeige leuchtet nicht. • Die Waage ist nicht eingeschaltet. •... - Page 42 KERN PFB Type PFB_A Version 4.1 2017-10 Operating manual Precision balance Contents Technical data ....................4 Declaration of conformity ................7 Appliance overview ..................8 Keyboard overview ........................8 Overview of display ........................9 Basic Information (General) ................ 10 Proper use ..........................10 Improper Use ..........................
- Page 43 Menu ......................29 10.1 Navigation in the menu ......................29 10.2 Access to technology menu...................... 30 10.3 Overview ........................... 31 Interfaces ...................... 33 11.1 RS232 ............................33 11.1.1 Technical data ........................33 11.1.2 Printer operation (RS 232) ....................34 11.1.3 Output log (continuous output) .....................
-
Page 44: Technical Data
1 Technical data KERN (Type) PFB 120-3A PFB 200-3A PFB 300-3A Trademark PFB 120-3 PFB 200-3 PFB 300-3 Readability (d) 0,001 g 0,001 g 0,001 g Weighing range (max) 120 g 200 g 300 g Reproducibility 0,001 g 0,002 g... - Page 45 PFB 2000-2A KERN (Type) PFB 600-2A PFB 1200-2A Trademark PFB 600-3 PFB 1200-2 PFB 2000-2 Readability (d) 0,01 g 0,01 g 0,01 g Weighing range (max) 600 g 1200 g 2000 g Reproducibility 0,01g 0,01 g 0,02 g Linearity ±0,03 g ±0,03 g ±0,05 g Smallest part weight for...
- Page 46 PFB 3000-2A PFB 6000-1A PFB 6000-2A KERN (Type) Trademark PFB 3000-2 PFB 6000-1 PFB 6000-2 Readability (d) 0,01 g 0,1 g 0,05 g Weighing range (max) 3000 g 6000 g 6000 g Reproducibility 0,02 g 0,1 g 0,05 g Linearity ±0,05 g ±...
-
Page 47: Declaration Of Conformity
2 Declaration of conformity The current EC/EU Conformity declaration can be found online in: www.kern-sohn.com/ce PFB-BA-e-1741... -
Page 48: Appliance Overview
3 Appliance overview 3.1 Keyboard overview Button Function designation Turn on/off ON/OFF Zeroing ZERO Taring TARE Enable calculation of percentage Returning to weighing mode from calculation of percentage mode Enable parts counting In the piece count mode back to weighing mode ... -
Page 49: Overview Of Display
3.2 Overview of display Display Description Zero indicator Net weight value display ο Stability display Parts counting application Calculation of percentage application Tolerance weighing application Capacity display The capacity display moves from the left to the right and proceeds equally to the weight loaded onto the weighing balance. Its full width is reached at maximum load. -
Page 50: Basic Information (General)
4 Basic Information (General) 4.1 Proper use The balance you purchased is intended to determine the weighing value of material to be weighed. It is intended to be used as a “non-automatic balance”, i.e. the material to be weighed is manually and carefully placed in the centre of the weighing pan. -
Page 51: Monitoring Of Test Resources
4.4 Monitoring of Test Resources In the framework of quality assurance the measuring-related properties of the balance and, if applicable, the testing weight, must be checked regularly. The responsible user must define a suitable interval as well as type and scope of this test. Information is available on KERN’s home page (www.kern-sohn.com with regard to... -
Page 52: Unpacking, Setup And Commissioning
Scope of delivery / serial accessories: • Balance • Weighing pan • Mains adapter • Operating manual • Wind shield (only models PFB 120-3A, PFB 200-3 A, PFB 300-3 A, PFB 1200-2A, PFB 2000-2A, PFB 3000-2A) PFB-BA-e-1741... -
Page 53: Placing
The balance must be installed in a way that the weighing plate is exactly in horizontal position. Install wind shield (only models PFB 120-3A, PFB 200-3 A, PFB 300-3 A, PFB 1200-2A, PFB 2000-2A, PFB 3000-2A) Levelling Exact alignment and stable installation are an essential requirement for repeatable results. -
Page 54: Mains Connection
7.3 Mains connection Select a country-specific power plug and insert it in the power unit. Check, whether the voltage acceptance on the scales is set correctly. Do not connect the scales to the power grid unless the information on the scales (sticker) matches the local mains voltage. Only use KERN original mains adapter. -
Page 55: Adjustment
7.6 Adjustment As the acceleration value due to gravity is not the same at every location on earth, each balance must be coordinated - in compliance with the underlying physical weighing principle - to the existing acceleration due to gravity at its place of location (only if the balance has not already been adjusted to the location in the factory). -
Page 56: Linearization
7.7 Linearization Linearity shows the greatest deviation of a weight display on the scale to the value of the respective test weight according to plus and minus over the entire weighing range. If linearity deviation is discovered during a monitoring of test resources, you can improve this by means of linearization. - Page 57 Procedure: Switch on weighing scales and press and hold the MODE key during the self-test until “F1 Unt“ is shown on the screen. Press the MODE key repeatedly until “tECH“ is shown on the screen. Confirm with ZERO button. ...
- Page 58 Put on the third adjustment weight. An audio sound will follow after stability control and „LoAd 4“ will be shown. Take away adjustment weight. Place the fourth adjustment weight (max). An audio sound will follow after stability control and „LoAd 0“ will be shown. Take away adjustment weight. ...
-
Page 59: Basic Operation
8 Basic Operation 8.1 Start-up Press the ON/OFF key to light up the display. The balance will carry out a display test. As soon as the weight display appears, the balance is ready for weighing. 8.2 Switching Off Press ON/OFF button, the display disappears 8.3 Zeroing Resetting to zero corrects the influence of light soiling on the weighing plate. -
Page 60: Switch-Over Weighing Unit
8.5 Switch-over weighing unit How to enable weighing units: Switch on weighing scales and press and hold the MODE key during the self-test until “F1 Unt“ is shown on the screen. Press the ZERO key, the first weighing unit with the current setting will be displayed. -
Page 61: Weighing With Tare
8.6 Weighing with tare Deposit weighing vessel. After successful stability control press the TARE button. Zero display and indicator appear. The weight of the container is now internally saved. Weigh the material, the net weight will be indicated. •... -
Page 62: Applications
9 Applications 9.1 Percent determination Percent weighing allows to display weight in percent, in relation to a reference weight. Put the nominal weight Place the nominal weight (reference weight which corresponds to 100 %). Wait for stability display, then press the % button 100% is displayed. Percent weighing /commutation ... -
Page 63: Parts Counting
9.2 Parts counting Before the balance can count parts, it must know the average part weight (i.e. reference). Proceed by putting on a certain number of the parts to be counted. The balance determines the total weight and divides it by the number of parts, the so- called reference quantity. -
Page 64: Totalization
9.3 Totalization 9.3.1 Manual totalizing With this function the individual weighing values are added into the summation memory by pressing the PRINT key and edited when an optional printer is connected. • For menu settings, see chapter 10.3: „F3 COM“ „S 232“ „P Prt“ „F4 Acc“... - Page 65 Place item to be weighed B, e.g. 200 g. Wait for stability display, then press the PRINT key. The weight value will be added to the summation memory and edited. Number of weighings, followed by the total weight will be displayed for 2 sec. After that the current weighing value is displayed.
- Page 66 Display and edit sum „Total“: When the balance is unloaded (zero display) press the PRINT key, the number of weighings, followed by the total weight will be shown for 2 sec and printed if an optional printer is connected. Delete sum memory: ...
-
Page 67: Automatic Adding-Up
9.3.2 Automatic adding-up With this function the individual weighing values are automatically added into the summation memory when the balance is unloaded without pressing and edited, when an optional printer is connected. • Menu settings, chap. 10.3: „F3 COM“ „S 232 „P AUto“ „F4 Acc“... - Page 68 Remove the weighed good. The weighing value is added to the summation memory and printed if an optional printer is connected. Number of weighings, followed by the total weight will be displayed for 2 sec. Add more weighed goods as described before. Please note that the weighing system must be unloaded between the individual weighing procedures.
-
Page 69: Menu
10 Menu 10.1 Navigation in the menu Call up menu Switch-on balance and during the selftest press The first menu item „F1 Unt„ is displayed. Select menu item With help of , the individual menu items can be selected one after the other. -
Page 70: Access To Technology Menu
10.2 Access to technology menu The access to the technology menu „tECH“ is locked by the key combination PFB-BA-e-1741... -
Page 71: Overview
10.3 Overview Factory settings are marked by *. Menu block Menu item Available settings / explanation F1 Unt g, ct, lb, oz, d, yn, ozt, dwt, mom, tl h, tl c, tl t, t, bt, n Weighing Units Automatic background illumination on when EL AU* F2 bl weighing pate is loaded or key pressed. - Page 72 P ASK Remote control instructions Acknowledge selection by b600 Available Baudrate: 600, 1200, 2400, 4800, 9600* b 9600* Acknowledge selection by Standard printer setting LP 50 Not documented Acknowledge selection by Eng* Standard stetting English. only displayed for setting „LP 50“ Not documented Acc on Summation function enabled...
-
Page 73: Interfaces
11 Interfaces Via the interfaces weighing data may be exchanged with connected peripheral devices. RS 232 interface USB interface for PC connection Menu setting, see chapter 10.1: Menu setting, see chapter 10.1: „F3 COM“ „S 232“ „F3 COM“ „USB“ Suitable peripheral devices: Suitable peripheral devices: •... -
Page 74: Printer Operation (Rs 232)
11.1.2 Printer operation (RS 232) Printout examples (KERN YKB-01N): 1. Menu settings F3 COM <P Prt> / F4 <Acc of> Weighing mode 300.00 g Percent determination 50.01 % Parts counting 20 PCS 5.00027g /P 100 g 100.00 g N Totalization 200.00 g N - - - - - - - - - - - - - - - - - - - 1-2:... -
Page 75: Output Log (Continuous Output)
11.1.3 Output log (continuous output) HEADER1: ST = stable, US = instable HEADER2: N = net, G = gross 11.2 Remote control instructions Comman Function Stable weighing value for the weight is sent via the interface Weighing value for the weight (stable or unstable) is sent via the interface No data are sent, the balance carries out the tare function. -
Page 76: Bluetooth (Factory Option)
11.3 Bluetooth (Factory option) Legal notices Bluetooth is a registered and protected trademark of Bluetooth SIG,Inc. ® ® The wordmark and logos are the property of Bluetooth SIG,Inc. ® The use of such trademarks is licensed by KERN. Other trademarks and brand names are the property of their respective owners. - Page 77 Click on "Enter pairing code of the device" Enter code 1234 Click on „Close“ PFB-BA-e-1741...
-
Page 78: Determine Com Port Number
11.3.2 Determine COM Port number Display Bluetooth network appliances Double-click to display the COM Port PFB-BA-e-1741... -
Page 79: Servicing, Maintenance, Disposal
12 Servicing, maintenance, disposal Before any maintenance, cleaning and repair work disconnect the appliance from the operating voltage. 12.1 Cleaning Please do not use aggressive cleaning agents (solvents or similar agents), but a cloth dampened with mild soap suds. Ensure that no liquid penetrates into the device. Polish with a dry soft cloth. - Page 80 KERN PFB Typ PFB_A Version 4.1 2017-10 Notice d’utilisation Balance de précision Table des matières Caractéristiques techniques ................. 4 Déclaration de conformité ................7 Aperçu de l’appareil ..................8 Vue d’ensemble du clavier ......................8 Vue d’ensemble des affichages ....................9 Indications fondamentales (généralités) ...........
- Page 81 Menu ......................29 10.1 Navigation dans le menu ......................29 10.2 Accès au menu technique ......................30 10.3 Aperçu ............................31 Interfaces ...................... 33 11.1 RS232 ............................33 11.1.1 Caractéristiques techniques ....................33 11.1.2 Fonctionnement de l’imprimante (RS 232) ................34 11.1.3 Protocole d’édition (édition en continu) ................
-
Page 82: Caractéristiques Techniques
1 Caractéristiques techniques KERN (Type) PFB 120-3A PFB 200-3A PFB 300-3A Désignation marque PFB 120-3 PFB 200-3 PFB 300-3 Lisibilité (d) 0,001 g 0,001 g 0,001 g Plage de pesée (max) 120 g 200 g 300 g Reproductibilité 0,001 g... - Page 83 PFB 2000-2A KERN (Type) PFB 600-2A PFB 1200-2A Désignation marque PFB 600-3 PFB 1200-2 PFB 2000-2 Lisibilité (d) 0,01 g 0,01 g 0,01 g Plage de pesée (max) 600 g 1200 g 2000 g Reproductibilité 0,01g 0,01 g 0,02 g Linéarité...
- Page 84 PFB 3000-2A PFB 6000-1A PFB 6000-2A KERN (Type) Désignation marque PFB 3000-2 PFB 6000-1 PFB 6000-2 Lisibilité (d) 0,01 g 0,1 g 0,05 g Plage de pesée (max) 3000 g 6000 g 6000 g Reproductibilité 0,02 g 0,1 g 0,05 g Linéarité...
-
Page 85: Déclaration De Conformité
2 Déclaration de conformité Vous pouvez trouver la déclaration UE/CE en ligne sur: www.kern-sohn.com/ce PFB-BA-f-1741... -
Page 86: Aperçu De L'appareil
3 Aperçu de l’appareil 3.1 Vue d’ensemble du clavier Touche Désignation Fonction touches Mise en marche / arrêt ON/OFF Remise à zéro ZERO Tarage TARE Activation définition pourcents Revenir du mode de définition pourcents vers mode pesage ... -
Page 87: Vue D'ensemble Des Affichages
3.2 Vue d’ensemble des affichages Afficheur Description Affichage du zéro Affichage valeurs pondérales nettes ο Affichage de la stabilité Application comptage de pièces Application détermination du pourcentage Application pesage tolérance Affichage de capacité L’affichage de capacité s’effectue de gauche à droite et évolue en même temps que la balance est chargée. -
Page 88: Indications Fondamentales (Généralités)
4 Indications fondamentales (généralités) 4.1 Application conforme aux prescriptions La balance que vous avez achetée sert à la détermination de la valeur de pesée de matières devant être pesées. Elle est conçue pour être utilisée comme „balance non automatique“, c´à d. que les matières à peser seront posées manuellement et avec précaution au milieu du plateau de pesée. -
Page 89: Vérification Des Moyens De Contrôle
4.4 Vérification des moyens de contrôle Les propriétés techniques de mesure de la balance et du poids de contrôle éventuellement utilisé doivent être contrôlées à intervalles réguliers dans le cadre des contrôles d´assurance qualité. A cette fin, l´utilisateur responsable doit définir un intervalle de temps approprié... -
Page 90: Déballage, Installation Et Mise En Service
Etendue de la livraison / accessoires de série : • Balance • Plateau de pesée • Bloc d'alimentation • Notice d’utilisation • Brise-vent (seul les modèles PFB 120-3A, PFB 200-3 A, PFB 300-3 A, PFB 1200-2A, PFB 2000-2A, PFB 3000-2A) PFB-BA-f-1741... -
Page 91: Implantation
La balance doit être installée de manière à ce que le plateau de pesée soit placé exactement à l´horizontale. Installer le brise-vent (seul les modèles PFB 120-3A, PFB 200-3 A, PFB 300-3 A, PFB 1200-2A, PFB 2000-2A, PFB 3000-2A) Niveller Une orientation exacte et une installation stable sont les conditions pour obtenir des résultats reproductibles. -
Page 92: Branchement Secteur
7.3 Branchement secteur Sélectionner une fiche secteur spécifique au pays et l'enficher dans la boîte d'alimentation. Vérifiez si l’alimentation en tension de la balance est correctement réglée. La balance ne peut être branchée au réseau électrique uniquement si les données au niveau de la balance (auto-collant) et la tension du réseau électrique courant local sont identiques. -
Page 93: Ajustage
7.6 Ajustage Etant donné que la valeur d´accélération de la pesanteur varie d´un lieu à l´autre sur la terre, il est nécessaire d´adapter chaque balance – conformément au principe physique fondamental de pesée – à l´accélération de la pesanteur du lieu d´installation (uniquement si la balance n´a pas déjà... -
Page 94: Linéarisation
7.7 Linéarisation La linéarité indique le plus grand écart possible pour l’affichage du poids sur une balance par rapport à la valeur du poids de contrôle respectif tant en valeurs positives que négatives sur toute l’étendue de pesage. Si un écart de linéarité est constaté lors d’une vérification des moyens de contrôle, celui-ci peut être amélioré... - Page 95 Exécution : Allumer la balance et appuyer pendant l’autotest sur la touche MODE, „F1 Unt“ est affiché Appuyez plusieurs fois sur la touche MODE jusqu’à e que “tECH“ apparaît. Confirmer sur la touche ZERO. Appeler successivement les touches , „P1 Lin“...
- Page 96 Mettre le troisième poids d’ajustage. Après le contrôle d’arrêt effectué, un son de signal retentit, „LoAd 4“ est affiché. Oter le poids d’ajustage. Poser le quatrième poids d'ajustage (Max). Après le contrôle d’arrêt effectué, un son de signal retentit, „LoAd 0“ est affiché. Oter le poids d’ajustage. ...
-
Page 97: Opérations De Base
8 Opérations de base 8.1 Mise en route Appuyer sur la touche ON/OFF, l’affichage s‘allume. La balance réalise un autocontrôle. Dès que l’affichage du poids apparaît la balance est prête à peser. 8.2 Mettre à l’arrêt Appelez la touche ON/OFF, l’affichage s’éteint 8.3 Remise à... -
Page 98: Commutation De L'unité De Pesée
8.5 Commutation de l’unité de pesée Activer les unités de pesée : Allumer la balance et appuyer pendant l’autotest sur la touche MODE, „F1 Unt“ est affiché Appuyer sur la touche ZERO, la première unité de pesage avec le réglage actuel est affichée. -
Page 99: Pesée Avec Tare
8.6 Pesée avec tare Déposer le récipient de pesée. Après contrôle de la stabilité, appuyez sur la touche TARE. L’affichage du zéro et l’indicateur apparaissent. Ceci indique que l’enregistrement interne du poids du récipient a eu lieu. Peser les matières à peser, le poids net est affiché. •... -
Page 100: Applications
9 Applications Détermination du pourcentage Le mode pesée à pourcentage permet l’affichage du poids en pourcent, rapporté à un poids de référence. Fixer le poids de gouverne Poser le poids de gouverne (poids de référence, qui correspond à 100 %). ... -
Page 101: Comptage De Pièces
9.2 Comptage de pièces La balance, avant de pouvoir compter les pièces, doit connaître le poids unitaire moyen ce qu’il est convenu d’appeler la référence. A cet effet il faut mettre en chantier une certaine quantité des pièces à compter. La balance détermine le poids total et le divise par le nombre de pièces ce qu’il est convenu d’appeler la quantité... -
Page 102: Totalisation
9.3 Totalisation 9.3.1 Totalisation manuelle Par cette fonction sont additionnées les valeurs de pesées individuelles par appel de la touche PRINT dans la mémoire totalisatrice et éditées sur une imprimante raccordée en option. • Réglages du menu, voir chap. 10.3: „F3 COM“... - Page 103 Poser sur la balance le produit à peser B, p. ex. 200 g. Attendre l’affichage de la stabilité, puis appuyer sur la touche PRINT. La valeur pondérale est ajoutée à la mémoire totalisatrice et éditée. Le nombre de pesées suivi du poids total s’affiche pendant 2 sec.
- Page 104 Afficher et éditer la somme „Total“: Appuyez sur la touche PRINT lorsque la balance est délestée (affichage zéro), le nombre de pesées suivi du poids total s’affiche pendant 2 sec. et est édité sur une imprimante en option. Effacer la mémoire de sommes: ...
-
Page 105: Totalisation Automatique
9.3.2 Totalisation automatique Par cette fonction sont automatiquement additionnées les valeurs de pesées individuelles sans appel de dans la mémoire totalisatrice lors du délestage de la balance et éditées sur une imprimante raccordée en option. • Réglages du menu, chap. 10.3: „F3 COM“... - Page 106 Retirez l’objet à peser. La valeur pondérale est additionnée à la mémoire totalisatrice et éditée en cas de branchement d’une imprimante en option. Le nombre de pesées suivi du poids total s’affiche pendant 2 sec. Le cas échéant ajoutez pour la totalisation d’autres objets à peser comme décrit précédemment.
-
Page 107: Menu
10 Menu 10.1 Navigation dans le menu Mettre en marche la balance et pendant le test Appel du menu automatique appuyer sur Le premier point de menu „F1 Unt“ est affiché. Appeler point de Sur menu peuvent être appelés successivement les différents points de menu. -
Page 108: Accès Au Menu Technique
10.2 Accès au menu technique L’accès au menu technique „tECH“ est bloqué par la combinaison de touches PFB-BA-f-1741... -
Page 109: Aperçu
10.3 Aperçu Les réglages d’usine sont caractérisés par *. Bloc de menu Point du menu Réglages disponibles / Explication F1 Unt g, ct, lb, oz, d, yn, ozt, dwt, mom, tl h, tl c, tl t, t, bt, n Unités de pesage Eclairage automatique du fond de l’écran EL AU* uniquement en cas de chargement de la plaque... - Page 110 P ASK Commandes à distance Confirmer la sélection sur b600 Le taux de bauds peut être sélectionné à 600, 1200, 2400, 4800, 9600* bauds. b 9600* Confirmer la sélection sur Réglage standard de l’imprimante LP50: Non documenté Confirmer la sélection sur Eng* Réglage standard anglais.
-
Page 111: Interfaces
11 Interfaces Par le truchement des interfaces peuvent être échangées les données de pesée au moyen des appareils de périphérie raccordés. Interface USB pour le branchement d’un Interface RS 232 Réglage du menu, voir chap. 10.1: Réglage du menu, voir chap. 10.1: „F3 COM“... -
Page 112: Fonctionnement De L'imprimante (Rs 232)
11.1.2 Fonctionnement de l’imprimante (RS 232) Exemples d’éditions (KERN YKB-01N) 1. Réglages de menu F3 COM <P Prt> / F4 <Acc of> Mode de pesage 300.00 g Détermination du 50.01 % pourcentage Comptage de pièces 20 PCS 5.00027g /P 100 g 100.00 g N Totalisation 200.00 g N... -
Page 113: Protocole D'édition (Édition En Continu)
11.1.3 Protocole d’édition (édition en continu) HEADER1: ST = Stable, US = Instable HEADER2: N = Net, G = Brut 11.2 Commandes à distance Ordre Fonction La valeur de pesée stable pour le poids est émise par l’interface La valeur de pesée pour le poids (stable ou instable) est émise par l’interface Aucune donnée n’est émise, la balance exécute la fonction de tarage. -
Page 114: Bluetooth (En Option Usine)
11.3 Bluetooth (en option usine) Remarques d’ordre juridique Bluetooth est un nom enregistré et protégé de Bluetooth SIG,Inc. ® ® La marque de mots et les logos sont la propriété de Bluetooth SIG,Inc. ® L’utilisation de marques similaires est mise sous licence par KERN. D’autres marques et noms de marque appartiennent aux propriétaires respectifs. - Page 115 Cliquer sur „saisie du code d’accouplement de l‘appareil“ Saisir le code 1234 Cliquer sur clôturer PFB-BA-f-1741...
-
Page 116: Déterminer Le Numéro De Port Com
11.3.2 Déterminer le numéro de port COM Afficher périphériques réseaux du Bluetooth En double-cliquant, le port COM est affiché PFB-BA-f-1741... -
Page 117: Maintenance, Entretien, Élimination
12 Maintenance, entretien, élimination Avant tout travail de maintenance, de nettoyage et de réparation couper la tension de régime de l‘appareil. 12.1 Nettoyage N´utiliser pas de produits de nettoyage agressifs (dissolvants ou produits similaires) mais uniquement un chiffon humidifié de lessive douce de savon. Veillez à ce qu’aucun liquide ne pénètre au sein de l’appareil. -
Page 118: Aide Succincte En Cas De Panne
14 Aide succincte en cas de panne En cas d´anomalie dans le déroulement du programme, la balance doit être arrêtée pendant un court laps de temps et coupée du secteur. Le processus de pesée doit alors être recommencé depuis le début. Aide: Panne Cause possible...