Table des Matières
Publicité
Les langues disponibles
Les langues disponibles
Liens rapides
Publicité
Chapitres
Table des Matières

Manuels Connexes pour KERN and SOHN PNJ


Sommaire des Matières pour KERN and SOHN PNJ
- Page 1 KERN & Sohn GmbH Ziegelei 1 Tel: +49-[0]7433- 9933-0 D-72336 Balingen Fax: +49-[0]7433-9933-149 E-Mail: info@kern-sohn.com Internet: www.kern-sohn.com Betriebsanleitung Operating instruction Mode d’emploi KERN PNJ / PNS Version 1.2 04/2016 PNJ_PNS-BA-def-1612...
- Page 2 Weitere Sprachversionen finden Sie online unter www.kern-sohn.com/manuals Další jazykové verze najdete na webu pod adresou www.kern-sohn.com/manuals Más versiones de idiomas se encuentran online bajo www.kern-sohn.com/manuals Vous trouverez d’autres versions de langue online sous www.kern-sohn.com/manuals Muut kieliversiot löytyvät osoitteesta www.kern-sohn.com/manuals Further language versions you will find online under www.kern-sohn.com/manuals Trovate altre versioni di lingue online in www.kern-sohn.com/manuals Bijkomende taalversies vindt u online op www.kern-sohn.com/manuals Encontram-se online mais versões de línguas em www.kern-sohn.com/manuals...
-
Page 3: Table Des Matières
6.6.2 Modelle PNS ..........................24 Anschluss von Peripheriegeräten ..................... 24 Justierung ..........................25 6.8.1 Justierung mit internem Gewicht (nur Modelle PNJ) ..............26 6.8.2 Justierung mit externem Gewicht (nur Modelle PNS) .............. 27 Eichung ............................. 28 Basisbetrieb ....................30 Einschalten ..........................30 In den Standby-Modus schalten .................... - Page 4 Allgemeines ..........................62 11.2 Druckerbetrieb .......................... 65 11.2.1 ISO/GLP/GMP-konformes Justierprotokoll ausgeben (nur Modelle PNJ) ......65 11.2.2 Protokollausgabe mit aktuellem Datum / Uhrzeit (nur Modelle PNJ) ........66 11.3 Datenausgabe .......................... 68 11.3.1 Datenübertragungsformat ....................68 11.3.2 Beschreibung der Daten ...................... 70 11.3.3...
-
Page 5: Technische Daten
1 Technische Daten KERN PNJ 600-3M PNJ 3000-2M PNJ 12000-1M Wägebereich (Max) 620 g 3200 g 12000 g Ablesbarkeit (d) 0,001 g 0,01 g 0,1g Mindestlast (Min) 0,2 g 0,5 g Eichwert (e) 0,01 g 0,1g Eichklasse Reproduzierbarkeit 0,001 g... - Page 6 KERN PNS 600-3 PNS 3000-2 PNS 12000-1 Wägebereich (Max) 620 g 3200 g 12000 g Ablesbarkeit (d) 0,001 g 0,01 g 0,1 g Reproduzierbarkeit 0,001 g 0,01g 0,1 g Linearität ±0,004 g ±0,02 g ±0,2 g Empf. Justiergewicht, nicht 600 g (F1) 3 kg (F1) 12 kg (F1) beigegeben (Klasse)
-
Page 7: Abmessungen
1.1 Abmessungen Modelle d = 0,001g: Modelle d = 0,01g / 0,1 g: PNJ_PNS-BA-d-1612... -
Page 8: Geräteübersicht
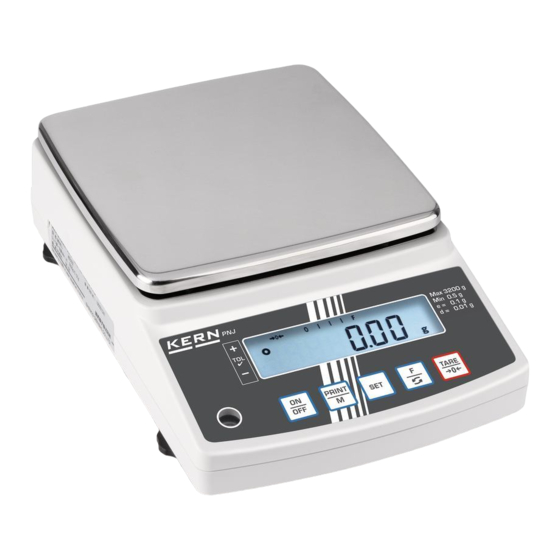
2 Geräteübersicht Modelle d = 0,001g: Modelle d = 0,01g / 0,1 g: Pos. Bezeichnung Pos. Bezeichnung Windschutz Fußschrauben Wägeplatte Befestigungspunkt für Diebstahlsicherung Anzeige Schnittstelle RS232 Libelle Anschluss Netzgerät Bedienungstasten PNJ_PNS-BA-d-1612... -
Page 9: Tastaturübersicht
2.1 Tastaturübersicht Taste Funktion Ein-/Ausschalten Wägedaten über Schnittstelle übermitteln Menü verlassen / zurück in den Wägemodus Einstellungen speichern / zurück in den Wägemodus Wägeeinheit umschalten Menü aufrufen (langer Tastendruck) Im Menü vorwärts blättern ... -
Page 10: Anzeigenübersicht
2.2 Anzeigenübersicht Anzeige Beschreibung Wägeeinheit „Gramm“ Nullanzeige Anzeige Netto-Gewichtswerte Anzeige stabiler Werte Waage befindet sich im Standbymodus Leuchtet während Datenübertragung Applikations-Icon für Stückzählen Applikations-Icon für Prozentbestimmung Toleranzmarke beim Kontrollwägen Wägeeinheit „Momme“ Der Waagenprozessor arbeitet gerade eine Funktion ab. Leuchtet und blinkt während eines Justiervorganges Klammer zur Kennzeichnung nicht geeichter Stellen (nur geeichte Modelle) Kapazitätsanzeige... -
Page 11: Grundlegende Hinweise
3 Grundlegende Hinweise 3.1 Bestimmungsgemäße Verwendung Die von Ihnen erworbene Waage dient zum Bestimmen des Wägewertes von Wägegut. Sie ist zur Verwendung als „nichtselbsttätige Waage“ vorgesehen, d.h. das Wägegut wird manuell, vorsichtig und mittig auf die Wägeplatte aufgebracht. Nach Erreichen eines stabilen Wägewertes kann der Wägewert abgelesen werden. 3.2 Sachwidrige Verwendung Waage nicht für dynamische Verwiegungen verwenden. -
Page 12: Prüfmittelüberwachung
3.4 Prüfmittelüberwachung Im Rahmen der Qualitätssicherung müssen die messtechnischen Eigenschaften der Waage und eines eventuell vorhandenen Prüfgewichtes in regelmäßigen Abständen überprüft werden. Der verantwortliche Benutzer hat hierfür ein geeignetes Intervall sowie die Art und den Umfang dieser Prüfung zu definieren. Informationen bezüglich der Prüfmittelüberwachung von Waagen sowie der hierfür notwendigen Prüfgewichte sind auf der KERN- Homepage (www.kern-sohn.com) verfügbar. -
Page 13: Auspacken, Aufstellen Und Inbetriebnahme
6 Auspacken, Aufstellen und Inbetriebnahme 6.1 Aufstellort, Einsatzort Die Waagen sind so konstruiert, dass unter den üblichen Einsatzbedingungen zuverlässige Wägeergebnisse erzielt werden. Exakt und schnell arbeiten Sie, wenn Sie den richtigen Standort für Ihre Waage wählen. Beachten Sie deshalb am Aufstellort folgendes: •... -
Page 14: Lieferumfang / Serienmäßiges Zubehör
6.2.1 Lieferumfang / Serienmäßiges Zubehör: Waage Netzadapter und Steckerset Runde Wägeplatte Eckige Wägeplatte (Modelle d = 0,001g) (Modelle d = 0,01g / 0,1 g) Träger für runde Wägeplatte Träger für eckige Wägeplatte (Modelle d = 0,001g) (Modelle d = 0,01g / 0,1 g) Windschutz (Modelle d = 0,001g) Betriebsanleitung Montage s. -
Page 15: Windschutz Zusammenbauen (Nur Modelle D = 0,001G)
6.3 Windschutz zusammenbauen (nur Modelle d = 0,001g) Teileübersicht: Menge Menge Führungsrahmen Frontplatte (mit 3 Löchern) Rückwand Innenplatte Griff Seitenwand Befestigungsschraube “Griff” Grundrahmen Abdeckung Frontkappe Halterung Innenplatte M4 Schrauben PNJ_PNS-BA-d-1612... - Page 16 Montage: Verriegelung an der Rückwand lösen Rückwand auf dem Grundrahmen mit zwei Schrauben (M4) fixieren Halterungen für die Innenplatte lt. Abb. anbringen. PNJ_PNS-BA-d-1612...
- Page 17 Frontplatte befestigen. Darauf achten, dass der Befestigungspunkt am Rahmen im Loch der Frontplatte platziert ist. Frontplatte mit dem Führungsrahmen vorübergehend gegen Herausfallen sichern. PNJ_PNS-BA-d-1612...
- Page 18 Seitenwände von hinten nach vorne in den Führungsrahmen schieben. Darauf achten, dass die Löcher in Richtung Frontplatte zeigen. Griffe mit den Befestigungsschrauben fixieren. Befestigungsschraube Griff Griff Befestigungsschraube Führungsrahmen mit zwei Schrauben (M4) fixieren. PNJ_PNS-BA-d-1612...
- Page 19 Abdeckungen und Frontkappen anbringen Abdeckungen Frontkappen Innenplatte installieren. Dazu die Platte durch die zwei Halterungen zu schieben. PNJ_PNS-BA-d-1612...
- Page 20 Obere Glasscheibe anbringen und den Griff mit der Befestigungsschraube fixieren. Griff Loch Befestigungsschraube PNJ_PNS-BA-d-1612...
-
Page 21: Aufbauen, Aufstellen Und Nivellieren
6.4 Aufbauen, Aufstellen und nivellieren Zur Genauigkeit der Wägeresultate von hochauflösenden Präzisionswaagen trägt der richtige Standort entscheidend bei (s. Kap. 6.1). Wägeplattenträger lt. Abb. platzieren und z.B. mit einer Münze vorsichtig fixieren. Wägeplatte auflegen Modelle d = 0,001g Modelle d = 0,01g / 0,1 g ... - Page 22 Windschutz vorsichtig auf die Waage setzen und ausrichten. Zur Sicherung die Verriegelung an der Rückwand schließen. Die Waage mit Fußschrauben nivellieren, bis sich die Luftblase in der Libelle im vorgeschriebenen Kreis befindet. Fußschrauben Nivellierung regelmäßig überprüfen PNJ_PNS-BA-d-1612...
-
Page 23: Netzanschluss
6.5 Netzanschluss Länderspezifischen Netzstecker auswählen und am Netzgerät montieren. Kontrollieren, ob die Spannungsaufnahme der Waage richtig eingestellt ist. Die Waage darf nur an das Stromnetz angeschlossen werden, wenn die Angaben an dem Instrument (Aufkleber) und die ortsübliche Netzspannung identisch sind. Nur KERN-Originalnetzgeräte verwenden. -
Page 24: Erstinbetriebnahme
6.6 Erstinbetriebnahme 6.6.1 Modelle PNJ Sobald die Waage über das Netzgerät mit Strom versorgt ist, wird der Indikator [ ] angezeigt. Zum Einschalten ON/OFF-Taste drücken. Alle Symbole der Anzeige leuchten kurz auf. Die Waage führt einen Selbsttest durch. Das Motorengeräusch des Ladesystems für das interne Justiergeweicht ist hörbar. -
Page 25: Modelle Pns
6.6.2 Modelle PNS Sobald die Waage über das Netzgerät mit Strom versorgt ist, wird der Indikator [ ] angezeigt. Zum Einschalten ON/OFF-Taste drücken. Alle Symbole der Anzeige leuchten kurz auf. Warten bis die Gewichtsanzeige erscheint, danach ist die Waage wägebereit. Per Fingerdruck die Reaktion der Gewichtsanzeige überprüfen. -
Page 26: Justierung
• Bei Drücken der PRINT-Taste während des Justiervorgangs, wird [STOP] angezeigt und die Justierung abgebrochen. Die Waage kehrt in den Wägemodus zurück. • Bei Modellen mit internem Justiergewicht (KERN PNJ) ist eine Justierung mit externem Gewicht nicht möglich. • Während der Justierung können folgende Fehlermeldungen angezeigt werden. -
Page 27: Justierung Mit Internem Gewicht (Nur Modelle Pnj)
6.8.1 Justierung mit internem Gewicht (nur Modelle PNJ) Mit dem internen Justiergewicht kann die Justierung jederzeit per Tastendruck gestartet werden. F-Taste drücken und solange gedrückt halten bis „Aut.CAL“ angezeigt wird. Bei gedrückter TARE-Taste die F-Taste drücken, dann beide Tasten gleichzeitig loslassen. -
Page 28: Justierung Mit Externem Gewicht (Nur Modelle Pns)
6.8.2 Justierung mit externem Gewicht (nur Modelle PNS) Justierung möglichst nahe an der Höchstlast der Waage durchführen (erforderliches Justiergewicht s. Kap. 1). Infos zu Justiergewichten finden Sie im Internet unter: http://www.kern-sohn.com F-Taste drücken und solange gedrückt halten bis „CAL“ angezeigt wird. Bei gedrückter TARE-Taste die F-Taste drücken, dann beide Tasten gleichzeitig loslassen. -
Page 29: Eichung
6.9 Eichung Allgemeines Nach der EU-Richtlinie 90/384/EWG oder 2009/23EG müssen Waagen geeicht sein, wenn sie wie folgt verwendet werden (gesetzlich geregelter Bereich): a) Im geschäftlichen Verkehr, wenn der Preis einer einer Ware durch Wägung bestimmt wird. b) Bei der Herstellung von Arzneimitteln in Apotheken sowie bei Analysen im medizinischen und pharmazeutischen Labor. - Page 30 Position Siegelmarken und Eichschalter Vor der Eichung muss der Eichschalter in Eichposition verschoben werden. In dieser Stellung erscheint im Display eine Klammer um die letzte Anzeigenstelle. Nach dem Eichvorgang wird die Waage an den markierten Positionen versiegelt. Modelle d = 0,001g Modelle d = 0,01g / 0,1 g Schalterabdeckung / Position Eichschalter Selbstzerstörende Siegelmarke...
-
Page 31: Basisbetrieb
7 Basisbetrieb 7.1 Einschalten Sobald die Waage über das Netzgerät mit Strom versorgt ist, wird der Indikator [ ] angezeigt. Zum Einschalten ON/OFF-Taste drücken. Alle Symbole der Anzeige leuchten kurz auf. Warten bis die Gewichtsanzeige erscheint, danach ist die Waage wägebereit. 7.2 In den Standby-Modus schalten ON/OFF-Taste drücken, die Anzeige erlischt. -
Page 32: Nullstellen
7.3 Nullstellen Um optimale Wägerergebnisse zu erreichen, vor dem Wägen die Waage nullstellen. Waage entlasten. TARE-Taste drücken. Warten bis die Nullanzeige und der Indikator a erscheinen. Während der Nullstell-Prozedur wird ein blinkendes „M“ angezeigt. 7.4 Einfaches Wägen Wägegut auflegen. Stabilitätsanzeige abwarten. -
Page 33: Einheitenwechsel
7.5 Einheitenwechsel Durch wiederholtes Drücken der F-Taste kann der Gewichtswert werksseitig in folgende Einheiten umgeschaltet werden. Änderungen sind im Menü (Funktion 81.s.u – 85.s.u.) einstellbar. Funktion Beschreibung 81.s.u Einstellung der ersten Wägeeinheit, in der die Waage das Wägeergebnis angezeigen soll. 82.s.u Einstellung der zweiten Wägeeinheit, in der die Waage das Wägeergebnis angezeigen soll. - Page 34 Funktion aufrufen: F-Taste wiederholt drücken bis „81.Su.“ mit der aktuellen Einstellung angezeigt wird. Mit der F-Taste die zu ändernde Wägeeinheit z.B. „82.s.u“ wählen. Einstellung ändern: z. B. Funktion „82.s.u“ [ct] in [lb]: Um die aktuelle Einstellung von [Karat] „82.Su.14“ z.B. in [Pfund] zu ändern, TARE-Taste wiederholt drücken bis „82.Su.16“...
-
Page 35: Wägen Mit Tara
7.6 Wägen mit Tara 7.6.1 Tarieren Das Eigengewicht beliebiger Wägebehälter lässt sich auf Knopfdruck wegtarieren, damit bei nachfolgenden Wägungen das Nettogewicht des Wägegutes angezeigt wird. Waage nullstellen Leeren Wägebehälter auflegen. Das Gewicht wird angezeigt. Stabilitätsanzeige abwarten, dann TARE-Taste drücken. Das Gewicht des Gefäßes ist nun intern gespeichert. -
Page 36: Mehrfach-Tara
7.6.2 Mehrfach-Tara Der Tariervorgang kann beliebige Male wiederholt werden, beispielsweise beim Einwiegen von mehreren Komponenten zu einer Mischung (Zuwiegen). Die Grenze ist dann erreicht, wenn der Tarierbereich ausgelastet ist. Erstes Wägegut auflegen. Das Gewicht wird angezeigt. Stabilitätsanzeige abwarten, dann TARE-Taste drücken. -
Page 37: Menü
8 Menü 8.1 Menü [Function] 8.1.1 Navigation im Menü Einstieg ins Menü Im Wägemodus F-Taste gedrückt halten, bis [FWnm] in der Anzeige erscheint. Taste loslassen. Der erste Menüpunkt mit der aktuellen Einstellung wird angezeigt. Menüpunkte anwählen Mit der F-Taste lassen sich die einzelnen Menüpunkte mit den aktuellen Einstellungen der Reihe nach anwählen. -
Page 38: Menü-Übersicht
Einstellungen speichern und Menü verlassen S-Taste drücken, die Waage kehrt in den Wägemodus zurück. oder F-Taste wiederholt drücken, bis die Waage in den Wägemodus zurück kehrt. Alle Änderungen werden gespeichert. Abbrechen PRINT-Taste kurz drücken, die Waage kehrt in den Wägemodus zurück. - Page 39 ��� Anzeige- Einstellung für Dosierung u�RE. 0� geschwindigkeit Sehr ruhige und stabile Umgebung. Die ��� Waage arbeitet sehr schnell, ist aber s. Kap. 10.2 1� empfindlich gegen äußere Einflüsse. ��� 2� Normale Umgebung. Die Waage arbeitet 3� mit mittlerer Geschwindigkeit. ���...
- Page 40 0 Nein Justierprotokoll ausgeben 0.�GLP s. Kap. 11.2.1 1 Ja ��� Datenausgabe Datenausgabe deaktiviert 1� geeichter Modellen Musterprotokoll: (Einstellungen nur im ungeeichten Zustand 2 Datenausgabe aktiviert +0075.55 G S verfügbar) A.�PRF Musterprotokoll: Datenausgabe aktiviert. Nicht geeichter Wert 3� +0075.5/5 G S durch „/“...
-
Page 41: Menü [Function2]
8.2 Menü [Function2] 8.2.1 Navigation im Menü Einstieg ins Menü Im Wägemodus F-Taste und TARE-Taste gleichzeitig drücken und gedrückt halten bis „Func2“ angezeigt wird. Beim Loslassen wird der erste Menüpunkt „1.CrC. 0.“ angezeigt. Menüpunkte anwählen, Einstellungen ändern und übernehmen s. Kap. 8.1.1 8.2.2 Menü-Übersicht Werkseinstellung ist mit gekennzeichnet. -
Page 42: Applikationen
9 Applikationen 9.1 Stückzählen Bevor die Waage Teile zählen kann, muss sie das durchschnittliche Stückgewicht, die so genannte Referenz kennen. Dazu muss eine bestimmte Anzahl der zu zählenden Teile aufgelegt werden. Die Waage ermittelt das Gesamtgewicht und teilt es durch die Anzahl der Teile, die so genannte Referenzstückzahl. Auf Basis des berechneten durchschnittlichen Stückgewichts wird anschließend die Zählung durchgeführt. - Page 43 4. Referenzstückzahl ändern Mit TARE-Taste gewünschte Referenzstückzahl wählen, z.B. 30 Stück. Wählbar Wichtig: Je höher die Referenzstückzahl, desto größer die Zählgenauigkeit. 5. Referenzteile einwägen So viele Zählteile auflegen, wie die eingestellte Referenzstückzahl verlangt. Mit SET-Taste bestätigen 6. Referenzoptimierung Zur Referenzoptimierung erneut gleich viele Zählteile auflegen.
- Page 44 Mit SET-Taste bestätigen. Bei jeder Referenzoptimierung wird das Referenzgewicht neu berechnet. Da die zusätzlichen Teile die Basis für die Berechnung vergrößern, wird auch die Referenz genauer. Zur weiteren Referenzoptimierung erneut weitere Zählteile auflegen (ca. 1/2 bis 1/5 des Zählguts). Durchführung siehe Schritt 5. 7.
-
Page 45: Prozentbestimmung
9.2 Prozentbestimmung Die Prozentbestimmung ermöglicht die Gewichtsanzeige in Prozent, bezogen auf ein Referenzgewicht, das 100 % entspricht. 1. Applikation aufrufen F-Taste wiederholt drücken bis „%“ angezeigt wird. Werkseinstellung 2. Nullstellen /Tarieren TARE-Taste drücken, um die Waage auf Null zu stellen bzw. - Page 46 Referenzgewicht (= 100 %) auflegen und mit PRINT-Taste bestätigen. 4. Prozentbestimmung Wägegut auflegen. Das Gewicht der Probe wird in Prozent, bezogen auf das Referenzgewicht, angezeigt. Musterprotokoll 5. Drucken (KERN YKB-01N) Bei Anschluss eines optionalen Druckers wird nach Drücken der PRINT-Taste (Werkseinstellung) der +00033.33 % S Anzeigenwert ausgegeben.
-
Page 47: Wägen Mit Toleranzbereich
9.3 Wägen mit Toleranzbereich Mit der Applikation „Wägen mit Toleranzbereich“ können Sie einen oberen und unteren Grenzwert festlegen und damit sicherstellen, dass das eingewogene Wägegut innerhalb der festgelegten Toleranzgrenzen liegt. Grenzwerteingaben sind bei den Funktionen Wägen, Stückzählen und Prozent- bestimmung möglich. Die Toleranzgrenzen können auf zwei unterschiedliche Arten eingestellt werden: 1. -
Page 48: Funktion Aktivieren / Einstellungen Im Menü
9.3.1 Funktion aktivieren / Einstellungen im Menü Menü aufrufen: F-Taste drücken und gedrückt halten bis „Func“ angezeigt wird. Beim Loslassen der Taste wird die erste Funktion „1.b.G. “ mit der aktuellen Einstellung angezeigt. Funktion für Toleranzwägen „2.SEL. 1“ aktivieren: F-Taste drücken bis „2.SEL.“... - Page 49 Mit der TARE-Taste gewünschte Einstellung wählen „22.Li. 0“ Toleranzmarke wird nur oberhalb des Nullpunktbereiches (> 5 d) angezeigt. „22.Li. 1“ Toleranzmarke wird im gesamten Bereich angezeigt. Mit der F-Taste nächsten Menüpunkt“23.Pi. zur Einstellung der Anzahl von Grenzpunkten wählen. Mit der TARE-Taste gewünschte Einstellung wählen 1- Grenzpunkt (OK / -) „23.Pi.
-
Page 50: Toleranzkontrolle Nach Einstellen Der Grenzwerte Durch Wägung
9.3.2 Toleranzkontrolle nach Einstellen der Grenzwerte durch Wägung SET-Taste drücken und gedrückt halten bis die Anzeige zur Einstellung des unteren Grenzwertes „L.SET“ angezeigt wird. Die aktuelle Einstellung blinkt. Sollgewicht (z.B. 95 g) für den unteren Grenzwert auflegen und mit PRINT-Taste bestätigen. Bei Menüeinstellung „23.Pi. - Page 51 Toleranzkontrolle starten Falls nötig, leeren Behälter auf die Waage stellen und tarieren. Wägegut auflegen. Anhand der Toleranzmarke [ ] prüfen, ob das Wägegut unter, innerhalb oder über der vorgegebenen Toleranz liegt. Anzeigenbeispiele: Wägegut unter vorgegebener Toleranz Wägegut innerhalb vorgegebener Toleranz Wägegut über vorgegebener Toleranz Drucken Bei Anschluss eines optionalen Druckers wird...
-
Page 52: Toleranzkontrolle Nach Numerischer Eingabe Der Grenzwerte
9.3.3 Toleranzkontrolle nach numerischer Eingabe der Grenzwerte SET-Taste drücken und gedrückt halten bis die Anzeige zur Einstellung des unteren Grenzwertes „L.SET“ angezeigt wird. Die aktuelle Einstellung z.B. „70.00 g“ blinkt. Zur numerischen Eingabe des Sollgewichts (z.B. 95 g) für den unteren Grenzwert TARE-Taste drücken. - Page 53 Bei Menüeinstellung „23.Pi. 2“ warten bis die Anzeige „H.SET“ zur Einstellung des oberen Grenzwertes erscheint. Die aktuelle Einstellung blinkt. Zur numerischen Eingabe des Sollgewichts (z.B. 105 g) für den oberen Grenzwert TARE-Taste drücken. Die letzte Stelle blinkt. Numerische Eingabe siehe Schritt 2. Eingabe mit speichern.
-
Page 54: Allgemeine Funktionen
10 Allgemeine Funktionen 10.1 Zero-tracking Mit dieser Funktion werden kleine Gewichtsschwankungen automatisch tariert. Werden kleine Mengen vom Wägegut entnommen oder zugeführt, so können durch die in der Waage vorhandene „Stabilitätskompensation“ falsche Wägeergebnisse angezeigt werden! (z.B. langsames herausfliesen von Flüssigkeiten aus einem auf der Waage befindlichen Behälter, Verdampfungsprozesse). -
Page 55: Stabilitäts- Und Reaktionseinstellungen
10.2 Stabilitäts- und Reaktionseinstellungen Es besteht die Möglichkeit, die Stabilität der Anzeige und den Reaktionsgrad der Waage auf die Anforderungen bestimmter Anwendungen oder die Umgebungsbedingungen abzustimmen. Beachten Sie, dass grundsätzlich eine auf höhere Stabilität ausgerichtete Datenverarbeitung eine Verlangsamung der Reaktionszeiten bewirkt, während sich eine Beschleunigung der Reaktionszeiten zu Lasten der Stabilität auswirkt. -
Page 56: Softwarestand Anzeigen (Nur Modelle Pnj)
10.3 Softwarestand anzeigen (nur Modelle PNJ) F-Taste und TARE-Taste gleichzeitig drücken und gedrückt halten bis „Func2“ angezeigt wird. Beim Loslassen wird „1.CrC. 0.“ angezeigt. Mit der TARE-Taste die Einstellung „1.CrC. 1.“ wählen. F-Taste drücken. Warten bis der Softwarestand der Waage angezeigt wird. -
Page 57: Hinterleuchtung Der Anzeige Automatisch Abschalten (Nur Modelle Pnj)
10.4 Hinterleuchtung der Anzeige automatisch abschalten (nur Modelle PNJ) Bei aktivierter Funktion wird die Hinterleuchtung der Anzeige nach 1 Minute ohne Lastwechsel oder Bedienung automatisch abgeschaltet. Menü aufrufen: F-Taste drücken und gedrückt halten bis „Func“ angezeigt wird. Beim Loslassen der Taste wird die erste Funktion „1.b.G. -
Page 58: Datum / Uhrzeit Einstellen (Nur Modelle Pnj)
10.5 Datum / Uhrzeit einstellen (nur Modelle PNJ) 10.5.1 Uhrzeit einstellen F-Taste und TARE-Taste gleichzeitig drücken und gedrückt halten bis „Func2“ angezeigt wird. Beim Loslassen wird „1.CrC. 0.“ angezeigt. F-Taste wiederholt drücken bis „3.d.St.0“ angezeigt wird. Mit der TARE-Taste „3.d.St.1“ wählen. - Page 59 Zum Ändern der Uhrzeit SET-Taste drücken, die erste Stelle blinkt. Zum Ändern einer Ziffer TARE-Taste drücken. Mit der F-Taste Ziffer anwählen. Die ausgewählte Ziffer blinkt. Eingabe speichern. Die Anzeige wechselt zum aktuell eingestellten Datum. Entweder Datum wie oben beschrieben ändern oder mit F-Taste zurück in den Wägemodus.
-
Page 60: Datum Einstellen
10.5.2 Datum einstellen F-Taste und TARE-Taste gleichzeitig drücken und gedrückt halten bis „Func2“ angezeigt wird. Beim Loslassen wird „1.CrC. 0.“ angezeigt. F-Taste wiederholt drücken bis „3.d.St.0“ angezeigt wird. Mit der TARE-Taste „3.d.St.1“ wählen. F-Taste drücken. „tiME“ wird angezeigt, gefolgt von der aktuell eingestellten Uhrzeit. - Page 61 F-Taste drücken. „dAtE“ wird angezeigt, gefolgt vom aktuell eingestellten Datum. Zum Ändern des Datums SET-Taste drücken, die erste Stelle blinkt. Zum Ändern einer Ziffer TARE-Taste drücken. Mit der F-Taste Ziffer anwählen. Die ausgewählte Ziffer blinkt. Eingabe speichern. Die Waage kehrt zurück in den Wägemodus PNJ_PNS-BA-d-1612...
-
Page 62: Datumsformat Einstellen (Nur Modelle Pnj)
10.6 Datumsformat einstellen (nur Modelle PNJ) F-Taste drücken und gedrückt halten bis „Func“ angezeigt wird. Beim Loslassen der Taste wird die erste Funktion „1.b.G. “ mit der aktuellen Einstellung angezeigt. F-Taste wiederholt drücken bis „b.dAt“ mit der aktuellen Einstellung angezeigt wird. -
Page 63: Rs232C-Schnittstelle
11 RS232C-Schnittstelle 11.1 Allgemeines Für den Anschluss eines Peripheriegeräts (Drucker, Computer) ist die Waage serienmäßig mit einer RS232C-Schnittstelle ausgestattet. Für die Kommunikation zwischen Waage und Peripheriegeräte müssen folgende Bedingungen erfüllt sein: • Waage mit einem geeigneten Kabel mit der Schnittstelle des Peripheriegerätes verbinden. - Page 64 Schnittstellenkabel: • Waage - PC 9-polig Waage D-SUB9P D-SUB9P Technische Daten 1. Baud-Rate 1200*/2400/4800/9600/19200 bps 2. Übertragungscode ASCII codes (8/7 bits) 3. Bit-Einstellung Start bit 1 bit Data bits 8 bits Parity bit 0* / 1 bit Stop bits 1 bit 4.
- Page 65 Schnittstellenparameter Die verfügbaren Schnittstellenparameter werden nur bei aktivierter Funktion [7�K.F1] oder [7�K.F2]angezeigt. Werkseinstellungen sind mit gekennzeichnet. Beschreibung Menüpunkt Ausgabebedingung 71. Q.m.� Keine Datenausgabe 1� Ständige Datenausgabe Ständige Datenausgabe stabilber 2� Wägewerte Ausgabe stabiler und instabiler Wägewerte * 3� nach Drücken der PRINT-Taste Eine Ausgabe bei stabilem Wägewert, nach 4�...
-
Page 66: Druckerbetrieb
Druckers verbunden ist und die Kommunikationsparameter (Baudrate, Bits und Parität) von Waage und Drucker übereinstimmen. 11.2.1 ISO/GLP/GMP-konformes Justierprotokoll ausgeben (nur Modelle PNJ) In Qualitätssicherungs-Systemen werden Ausdrucke von Wägeergebnissen sowie der korrekten Waagenjustierung unter Angabe von Datum und Uhrzeit sowie der Waagen-Identifikation verlangt. -
Page 67: Protokollausgabe Mit Aktuellem Datum / Uhrzeit (Nur Modelle Pnj)
TIME: 10:27 *CAL.END NAME: ********************************* 11.2.2 Protokollausgabe mit aktuellem Datum / Uhrzeit (nur Modelle PNJ) F-Taste drücken und gedrückt halten bis „Func“ angezeigt wird. Beim Loslassen der Taste wird die erste Funktion „1.b.G. “ mit der aktuellen Einstellung angezeigt. - Page 68 Speichern / zurück in den Wägemodus: Einstellung mit SET-Taste bestätigen. Die Waage kehrt zurück in den Wägemodus. Musterprotokolle (KERN YKB-01N) „C.t.o. 0“ „C.t.o. 1“ „C.t.o. 2“ +0075.55 G S 09:48:39 17.09.2015 +0075.55 G S 09:48:39 +0075.55 G S PNJ_PNS-BA-d-1612...
-
Page 69: Datenausgabe
11.3 Datenausgabe 11.3.1 Datenübertragungsformat Im Menü kann das Format der Datenübertragung (6- oder 7-stellig) an Ihre Bedürfnisse angepasst werden. F-Taste drücken und gedrückt halten bis „Func“ angezeigt wird. Beim Loslassen der Taste wird die erste Funktion „1.b.G. “ mit der aktuellen Einstellung angezeigt. F-Taste wiederholt drücken bis „7.I.F.“... - Page 70 6-stelliges Datenformat, bestehend aus 14 Zeichen, einschließlich der Endezeichen; CR=0DH, LF=0AH (CR=Wagenrücklauf / LF=Zeilenvorschub). 7-stelliges Datenformat, bestehend aus 15 Zeichen, einschließlich der Endezeichen; CR=0DH, LF=0AH (CR=Wagenrücklauf / LF=Zeilenvorschub). Ein Paritäts Bit kann angehängt werden. 6-stelliges Datenformat geeichter Modelle, bestehend aus 15 Zeichen, einschließlich der Endezeichen;...
-
Page 71: Beschreibung Der Daten
11.3.2 Beschreibung der Daten Vorzeichen [P1] (1 Zeichen) Code Bedeutung 2 B H Daten sind 0 oder positiv 2 D H Daten sind negativ Zahlenwert des Wägewerts [D 1 bis D7(D 8)] (7 oder 8 Zeichen D 1 bis D 8 Code Bedeutung 0 - 9... - Page 72 Toleranzwägen [S1] (1 Zeichen) Code Bedeutung Bemerkungen 1- oder 2 Wägegut unter vorgegebener Toleranz Grenzpunkte Wägegut innerhalb vorgegebener Toleranz Wägegut oberhalb oberer Toleranzgrenze Kein Bewertungsergebnis / Leerzeichen (SP) 20 H Status der Daten [S2] (1 Zeichen) Code Bedeutung 53 H Daten stabilisiert * 55 H Daten nicht stabilisiert (schwanken) *...
-
Page 73: Ausgabe-Beispiele
11.3.3 Ausgabe-Beispiele Beispiele 6-stelliges Datenformat: Stabiler Wägewert [3000.1g] (SP) (SP) Instabiler Wägewert [-10.05 mom] (SP) Beispiele 7-stelliges Datenformat: Stabiler Wägewert [3000.1g] (SP) (SP) Instabiler Wägewert [-10.05 mom] (SP) PNJ_PNS-BA-d-1612... -
Page 74: Fernsteuerbefehle
11.4 Fernsteuerbefehle Allgemeines Befehlsformat: Bestehend aus 4 Zeichen, einschließlich der Endezeichen (CR, LF). Nachfolgende Befehle werden von der Waage erkannt. 1. Datenausgabe Code (C1) Code (C2) Funktion Antwort Keine Datenausgabe Ständige Datenausgabe Ständige Datenausgabe stabilber Wägewerte Ausgabe stabiler und instabiler Wägewerte nach Drücken der PRINT-Taste Eine Ausgabe bei stabilem... - Page 75 2. Tarieren / Nullstellen Code (C1) Code (C2) Funktion Antwort Tarieren (>1,5 % Max) A00: Fehlerfrei (SP) Nullstellen (<1,5 % Max) E01: Fehlermeldung A00: Fehlerfrei Tarieren E01: Fehlermeldung E04: Tarierbereich überschritten A00: Fehlerfrei E01: Fehlermeldung (SP) Nullstellen E04: Nullstellbereich überschritten 3.
-
Page 76: Wartung, Instandhaltung, Entsorgung
12 Wartung, Instandhaltung, Entsorgung Vor allen Wartungs-, Reinigungs- und Reparaturarbeiten das Gerät von der Betriebsspannung trennen. 12.1 Reinigen Keine aggressiven Reinigungsmittel (Lösungsmittel o.ä.) benutzen, sondern nur ein mit milder Seifenlauge angefeuchtetes Tuch. Darauf achten, dass keine Flüssigkeit in das Gerät eindringt. Mit einem trockenen, weichen Tuch nachreiben. Lose Probenreste/Pulver können vorsichtig mit einem Pinsel oder Handstaubsauger entfernt werden. -
Page 77: Kleine Pannenhilfe
13 Kleine Pannenhilfe Bei einer Störung im Programmablauf sollte die Waage kurz ausgeschaltet und vom Netz getrennt werden. Der Wägevorgang muss dann wieder von vorne begonnen werden. Hilfe: Störung Mögliche Ursache Die Gewichtsanzeige • Die Waage ist nicht eingeschaltet. leuchtet nicht. •... -
Page 78: Fehlermeldungen
14 Fehlermeldungen Fehler- Mögliche Ursache meldung o-Err Wägebereich überschritten u-Err Zu geringe Vorlast, z. B. fehlende Wägeplatte 1-Err Falsches Justiergewicht (< 50% Max) 2-Err Abweichung zur letzten externen Justierung > 1% 3-Err Wägeplatte während Justierung belastet 4-Err Abweichung zur letzten internen Justierung >... -
Page 79: Konformitätserklärung
15 Konformitätserklärung Die aktuelle EG/EU-Konformitätserklärung finden Sie online unter: www.kern-sohn.com/ce Bei geeichten Waagen (= konformitätsbewerteten Waagen) ist die Konformitätserklärung im Lieferumfang enthalten. PNJ_PNS-BA-d-1612... - Page 80 Models PNS ..........................24 Connection of peripheral devices ..................... 24 Adjustment ..........................25 6.8.1 Adjustment with internal weight (only models PNJ) ..............26 6.8.2 Adjustment with external weight (only models PNS) ..............27 Verification ..........................28 Basic Operation ................... 30 Start-up .............................
- Page 81 Settings for Stability and Response ..................54 10.3 Show software status (only models PNJ) ................. 55 10.4 Switch-off background illumination of the display automatically (only models PNJ) ....56 10.5 Setting date / time (only models PNJ) ..................57 10.5.1 Setting time ..........................
-
Page 82: Technical Data
1 Technical data KERN PNJ 600-3M PNJ 3000-2M PNJ 12000-1M Weighing range (max) 620 g 3200 g 12000 g Readability (d) 0.001 g 0.01 g 0.1g Minimum load (Min) 0.2 g 0.5 g Verification value (e) 0.01 g 0.1g Verification class Reproducibility 0.001 g... - Page 83 KERN PNS 600-3 PNS 3000-2 PNS 12000-1 Weighing range (max) 620 g 3200 g 12000 g Readability (d) 0.001 g 0.01 g 0.1 g Reproducibility 0.001 g 0.01g 0.1 g Linearity ± 0.004 g ± 0.02 g ± 0.2 g Recommended adjustment 600 g (F1) 3 kg (F1)
-
Page 84: Dimensions
1.1 Dimensions Models d = 0.001g: Models d = 0.01g / 0.1 g: PNJ_PNS-BA-e-1612... -
Page 85: Appliance Overview
2 Appliance overview Models d = 0.001g: Models d = 0.01g / 0.1 g: Pos. Designation Pos. Designation Windshield Footscrews Weighing pan Fastening point for anti-theft protection Display Interface RS232 Bubble level Terminal power supply unit Operator keys PNJ_PNS-BA-e-1612... -
Page 86: Keyboard Overview
2.1 Keyboard overview Button Function Turn on/off Transfer weighing data via interface Exit menu / back to weighing mode. Save settings/back to weighing mode Switch-over weighing unit Menu access (longer pressing of the button) ... -
Page 87: Overview Of Display
2.2 Overview of display Display Description Weighing unit “gram” Zero indicator Display net weight values Display of stable values The balance is in stand-by mode Illuminated during data transfer Application icon for piece counting Application icon for percentage determination Tolerance mark during check weighing Weighing unit „Momme“... -
Page 88: Basic Instructions
3 Basic instructions 3.1 Intended use The balance you purchased is intended to determine the weighing value of material to be weighed. It is intended to be used as a “non-automatic balance”, i.e. the material to be weighed is manually and carefully placed in the centre of the weighing pan. -
Page 89: Monitoring Of Test Resources
3.4 Monitoring of Test Resources In the framework of quality assurance the measuring-related properties of the balance and, if applicable, the testing weight, must be checked regularly. The responsible user must define a suitable interval as well as type and scope of this test. Information is available on KERN’s home page (www.kern-sohn.com) with regard to the monitoring of balance test substances and the test weights required for this. -
Page 90: Unpacking, Setup And Commissioning
6 Unpacking, Setup and Commissioning 6.1 Installation Site, Location of Use The balances are designed in a way that reliable weighing results are achieved in common conditions of use. You will work accurately and fast, if you select the right location for your balance. Therefore, observe the following for the installation site: •... -
Page 91: Scope Of Delivery / Serial Accessories
6.2.1 Scope of delivery / serial accessories: Balance Net adapter and plug set Round weighing pan Angular weighing pan (models d = 0.001g) (models d = 0.01g / 0.1 g) Carrier for round weighing pan Carrier for angular weighing pan (models d = 0.001g) (models d = 0.01g / 0.1 g) Windshield (models d = 0.001g) -
Page 92: Assemble Windshield (Only Models D = 0.001G)
6.3 Assemble windshield (only models d = 0.001g) Parts overview: Quantit Quanti Guide frame Front plate (with 3 bore holes) Rear wall Inner plate Handle Side wall Fastening screw “Handle” Base frame Cover Front cap Support inner plate M4 screws PNJ_PNS-BA-e-1612... - Page 93 Assembly: Loosen locking system at the back panel Fix the back panel on the ground frame with two screws (M4) Assemble the supports for the inner plate acc. to fig. PNJ_PNS-BA-e-1612...
- Page 94 Fasten the front plate. Make sure that the fastening point is placed at the frame in the bore hole of the front plate. Secure the front plate with the guide frame temporarily against falling out. PNJ_PNS-BA-e-1612...
- Page 95 Push the side panels from the rear to the front into the guide frame. Make sure that the bore holes point towards the front plate. Fix the handles with the fastening screws. Fastening screw Handle Handle Fastening screw ...
- Page 96 Attach the covers and the front caps Covers Front caps Install inner plate. For this purpose push the plate through the two supports. PNJ_PNS-BA-e-1612...
- Page 97 Attach the upper glass pane and fix the handles with the fastening screws. Handle Bore Fastening screw PNJ_PNS-BA-e-1612...
-
Page 98: Assembly, Placing And Levelling
6.4 Assembly, placing and levelling The right place is decisive for the accuracy of the weighing results of high-resolution precision balances (see chap. 6.1). Place the weighing pan carrier acc. to fig. and fix it carefully e.g. with a coin. ... - Page 99 Place the windshield carefully on the balance and align. For safeguarding close the locking system at the back panel. Level balance with foot screws until the air bubble of the water balance is in the prescribed circle. Footscrews ...
-
Page 100: Mains Connection
6.5 Mains connection Select a country-specific net plug and mount it on the mains adapter. Check, whether the voltage acceptance on the scales is set correctly. Do not connect the scales to the power grid unless the information on the instrument (sticker) matches the local mains voltage. Only use KERN original mains adapter. -
Page 101: Initial Commissioning
6.6 Initial Commissioning 6.6.1 Models PNJ As soon as the balance is supplied with energy, the indicator [ ] is displayed. To switch on press the ON/OFF button. All symbols of the display light up shortly. The balance will carry out a self-test The motor noise of the loading system for the internal adjustment weight can be heard. -
Page 102: Models Pns
6.6.2 Models PNS As soon as the balance is supplied with energy, the indicator [ ] is displayed. To switch on press the ON/OFF button. All symbols of the display light up shortly. The balance is ready for weighing when the weight display appears. -
Page 103: Adjustment
The balance returns to weighing mode. • At the models with internal adjustment weight (KERN PNJ) the adjustment with external weight is not possible. • The following error messages may be displayed during adjustment. -
Page 104: Adjustment With Internal Weight (Only Models Pnj)
6.8.1 Adjustment with internal weight (only models PNJ) The internal adjustment weight is available at all times for starting adjustment via keyboard stroke. Press the F-key and keep pressed until „Aut.CAL“ is displayed. With pressed TARE key, press the F-key, then release both keys at the same time. -
Page 105: Adjustment With External Weight (Only Models Pns)
6.8.2 Adjustment with external weight (only models PNS) Carry out adjustment as near as possible to the balance’s maximum weight (recommended adjustment weight see chap. 1). Info about adjustment weights can be found on the Internet at: http://www.kern-sohn.com Press the F-key and keep pressed until „CAL“ is displayed. -
Page 106: Verification
6.9 Verification General hints According to EU directive 90/384/EEC or 2009/23EG balances must be officially verified if they are used as follows (legally controlled area): a) For commercial transactions if the price of goods is determined by weighing. b) For the production of medicines in pharmacies as well as for analyses in the medical and pharmaceutical laboratory. - Page 107 Position seals and verification switch Prior to verification, the verification switch must be moved into the verification position. In this position the display shows a bracket around the last display point. After verification the balance is sealed at the indicated positions. Models d = 0.001g Models d = 0.01g / 0.1 g Switch cover / Position verification switch...
-
Page 108: Basic Operation
7 Basic Operation 7.1 Start-up As soon as the balance is supplied with energy, the indicator [ ] is displayed. To switch on press the ON/OFF button. All symbols of the display light up shortly. The balance is ready for weighing when the weight display appears. -
Page 109: Zeroing
7.3 Zeroing In order to obtain optimal weighing results, reset to zero the balance before weighing. Unload the balance. Press the TARE key. Wait until the zero display and the indicator a will appear. During the zeroing procedure a flashing „M“ will be displayed. 7.4 Simple weighing Place goods to be weighed on balance. -
Page 110: Unity Change
7.5 Unity change By repeated pressing of the F-key the weight value can be switched over by factory into the following units. Changes can be set in the menu (function 81.s.u – 85.s.u). Function Description 81.s.u Adjustment of the first weighing unit where the balance has to display the weighing result. - Page 111 Call function: Press repeatedly the F-button until „81.Su.“ with the current setting is displayed. Use the F-key to select the weighing unit to be changed e.g. „82.s.u“. Change settings: e.g. function „82.s.u“ [ct] in [lb]: In order to change the current setting of [Karat] „82.Su.14“...
-
Page 112: Weighing With Tare
7.6 Weighing with tare 7.6.1 Taring The dead weight of any weighing container may be tared away by pressing a button, so that the following weighing procedures show the net weight of the goods to be weighed. Set balance to zero Deposit empty weighing container. -
Page 113: Multiple Tare
7.6.2 Multiple tare The taring process can be repeated any number of times, e.g. when adding several components for a mixture (adding). The limit is reached when the taring range capacity is full. Place first good to be weighed on balance. The result is ... -
Page 114: Menu
8 Menu 8.1 Menu [function] 8.1.1 Navigation in the menu Access to menu In weighing mode keep the F-key pressed down until [FWnm] appears on the display. Release button. The first menu item showing the current setting will be displayed. ... -
Page 115: Menu Overview
How to save settings and to exit the menu Press the S-key; balance will return to weighing mode. Press the F-key repeatedly until the weighing balance returns to weighing mode. All changes will be saved. Cancel Press the PRINT-key briefly; balance will return to weighing mode. - Page 116 ��� Display speed Setting for dosage u�RE. 0� Very quiet and stable environment. see chap. 10.2 ��� The balance works very fast but is sensitive 1� to outside influences. ��� 2� Normal conditions. Weighing balance 3� working at medium speed. ���...
- Page 117 0 No Edit adjustment log see ch 11.2.1 0.�GLP 1 Yes ��� Data output of verified Data output disabled 1� models Sample protocol: (settings only available in a non 2 Data output enabled +0075.55 G S verified status) A.�PRF Sample protocol: Data output enabled.
-
Page 118: Menu [Function2]
8.2 Menu [Function2] 8.2.1 Navigation in the menu Access to menu In weighing mode press the F-key and the TARE-key at the same time and keep it pressed until „Func2“ will be displayed. When released, the first menu item „1.CrC. 0.“ is displayed. -
Page 119: Applications
9 Applications 9.1 Parts counting Before the balance can count parts, it must know the average part weight (i.e. reference). Proceed by putting on a certain number of the parts to be counted. The balance determines the total weight and divides it by the number of parts, the so- called reference quantity. - Page 120 4. Change reference quantity Select the desired reference quantity using the TARE- key, e.g. 30 items. You can choose Important: The higher the reference quantity the higher the counting exactness. 5. Weigh-in reference parts Place as many pieces to add-up as required by the set reference piece number.
- Page 121 Use the SET key to confirm. At every reference optimisation, the reference weight is calculated anew. As the additional pieces increase the base for the calculation, the reference also becomes more exact. For further reference optimisation place more counted pieces (approx. 1/2 to 1/5 of the counted material). Execution see step 5.
-
Page 122: Percent Determination
9.2 Percent determination Percentage calculation facilitates weight display in percent related to a reference weight equivalent to 100 %. 1. Call application Press the F-button repeatedly until „%“ is displayed. Factory setting 2. Zeroing/taring Press the TARE-button to set the balance to zero or to tare when using a weighing container. - Page 123 Place the reference weight (= 100 %) and confirm by pressing the PRINT-key. 4. Percent determination Place goods to be weighed on balance. The weight of the sample is displayed in percentage in terms of the reference weight. Sample protocol 5.
-
Page 124: Weighing With Tolerance Range
9.3 Weighing with tolerance range Using the application „Weighing with tolerance range“ you can set an upper or lower limit value and thus ensure that the weighed load remains exactly within the set tolerance limits. Limit value inputs are possible at the functions weighing, parts counting and percentage determination. -
Page 125: Enable Function / Settings In Menu
9.3.1 Enable function / settings in menu Call up menu: Press the F-key and keep pressed until „Func“ is displayed. When releasing the button, the first function „1.b.G.„ is displayed with the current setting. Enable function for tolerance weighing „2.SEL. 1“: Press the F-key until „2.SEL.“... - Page 126 Use the TARE-key to select the desired setting „22.Li. 0“ The tolerance mark is only displayed above zero range (> 5 d). „22.Li. 1“ Tolerance marker is displayed for the whole range. Use the F-key to select the next menu item “23.Pi. for setting the number of limit points.
-
Page 127: Tolerance Check After Setting The Limit Values By Weighing
9.3.2 Tolerance check after setting the limit values by weighing Press the SET-key and keep it pressed until the display for setting the lower limit value „L.SET“ appears. The current setting flashes. Place the nominal weight (e.g. 95 g) for the lower limit value and confirm with PRINT-key. - Page 128 Start tolerance check If necessary, place an empty container on the balance and tare it. Place goods to be weighed on balance. With the help of the tolerance mark [ ] check if the weighed goods are under, inside or over the default tolerance.
-
Page 129: Tolerance Check After Numeric Input Of The Limit Values
9.3.3 Tolerance check after numeric input of the limit values Press the SET-key and keep it pressed until the display for setting the lower limit value „L.SET“ appears. The current setting e.g. „70.00 g“ flashes. For numeric input of the nominal weight (e.g. 95 g) press the TARE-key for the lower limit value. - Page 130 For menu setting „23.Pi. 2“ wait until the display „H.SET“ for setting the upper limit value appears. The current setting flashes. For numeric input of the nominal weight (e.g. 105 g) press the TARE-key for the upper limit value. The last digit flashes. Numeric input see step 2.
-
Page 131: General Functions
10 General functions 10.1 Zero-tracking This function is used to tare small variations in weight automatically. In the event that small quantities are removed or added to the material to be weighed, incorrect weighing results can be displayed due to the “stability compensation“. -
Page 132: Settings For Stability And Response
10.2 Settings for Stability and Response Exists the possibility to tune the stability of the display and the degree of reaction of the balance to the requirements of certain applications or the environmental conditions. Please note that in general slowing down reaction times result in higher stability of the set data handling, while speeding up reaction times have an influence on the stability deterioration. -
Page 133: Show Software Status (Only Models Pnj)
10.3 Show software status (only models PNJ) Press the F-key and the TARE-key at the same time and keep them pressed until „Func2“ will be displayed. When released, „1.CrC. 0.“ is displayed. Use the TARE-key to select the setting „1.CrC. 1.“... -
Page 134: Switch-Off Background Illumination Of The Display Automatically (Only Models Pnj)
10.4 Switch-off background illumination of the display automatically (only models PNJ) When function is enabled background illumination of display will automatically switch off after 1 minute during which there was no change of load or activity. Call up menu: Press the F-key and keep pressed until „Func“ is displayed. -
Page 135: Setting Date / Time (Only Models Pnj)
10.5 Setting date / time (only models PNJ) 10.5.1 Setting time Press the F-key and the TARE-key at the same time and keep them pressed until „Func2“ will be displayed. When released, „1.CrC. 0.“ is displayed. Press F-key repeatedly until „3.d.St.0“ is displayed. - Page 136 To change the time press the SET-key, the first digit flashes. To change a digit press the TARE-key. Press the F-key to select a digit. The selected digit is flashing. Store entry. The display changes to the currently set date. ...
-
Page 137: Setting Date
10.5.2 Setting date Press the F-key and the TARE-key at the same time and keep them pressed until „Func2“ will be displayed. When released, „1.CrC. 0.“ is displayed. Press F-key repeatedly until „3.d.St.0“ is displayed. Use the TARE-key to select „3.d.St.1“. Press F-key. - Page 138 Press F-key. „dAtE“ is displayed, followed by the currently set date. To change the date press the SET-key, the first digit flashes. To change a digit press the TARE-key. Press the F-key to select a digit. The selected digit is flashing. Store entry The balance returns to weighing mode PNJ_PNS-BA-e-1612...
-
Page 139: Set Date Format (Only Models Pnj)
10.6 Set date format (only models PNJ) Press the F-key and keep pressed until „Func“ is displayed. When releasing the button, the first function „1.b.G.„ is displayed with the current setting. Press repeatedly the F-button until „b.dAt“ appears with the current setting. -
Page 140: Rs232C-Interface
11 RS232C-interface 11.1 General hints For the connection of a peripheral device (printer, computer) the balance is as per series equipped with a RS232C-interface. The following conditions must be met to provide successful communication between the weighing balance and the peripheral devices. •... - Page 141 Interface cable: • Balance – PC 9-pole Balance D-SUB9P D-SUB9P Technical data 1. Baud rate 1200*/2400/4800/9600/19200 bps 2. Transmission code ASCII codes (8/7 bits) 3. Bit setting Start bit 1 bit Data bits 8 bits Parity bit 0* / 1 bit Stop bits 1 bit 4.
- Page 142 Interface parameters The available interface parameters are only shown when function [7�K.F1] or [7�K.F2� is enabled. Factory settings are marked by *. Description Menu item Output condition 71. Q.m.� No data output Continuous data output Continuous data output stable weighing values Output of stable and instable weighing values after pressing PRINT key...
-
Page 143: Printer Operation
(baud rate, bits and parity) of balance and printer are matching. 11.2.1 Edit an ISO/GLP/GMP-conform adjustment log (only models PNJ) Quality assurance systems require printouts of weighing results as well as of correct adjustment of the balance stating date and time and balance identification. The easiest way is to have a printer connected. -
Page 144: Protocol Output With Current Date / Time (Only Models Pnj)
TIME: 10:27 *CAL.END NAME: ********************************* 11.2.2 Protocol output with current date / time (only models PNJ) Press the F-key and keep pressed until „Func“ is displayed. When releasing the button, the first function „1.b.G.„ is displayed with the current setting. - Page 145 Save / back to weighing mode Confirm setting with SET-key. The balance returns to weighing mode. Sample protocols (KERN YKB-01N) „C.t.o. 0“ „C.t.o. 1“ „C.t.o. 2“ +0075.55 G S 09:48:39 17.09.2015 +0075.55 G S 09:48:39 +0075.55 G S PNJ_PNS-BA-e-1612...
-
Page 146: Data Output
11.3 Data output 11.3.1 Data transmission format You can adapt the format of data transfer (6 or 7 digits) to your requirements in the menu. Press the F-key and keep pressed until „Func“ is displayed. When releasing the button, the first function „1.b.G.„ is displayed with the current setting.. - Page 147 6-digit data format, consisting of 14 characters, including terminator; CR=0DH, LF=0AH (CR=weighing balance reverse / LF=line indent). 7-digit data format, consisting of 15 characters, including terminator; CR=0DH, LF=0AH (CR=weighing balance reverse / LF=line indent). A parity bit can be appended. 6-digit data format of verified models, consisting of 15 characters, including terminator;...
-
Page 148: Description Of Data
11.3.2 Description of data Signs [P1] (1 character) Code Significance 2 B H Data is 0 or positive 2 D H Data is negative Numeric value of weighing value [D 1 to D7(D 8)] (7 or 8 characters D 1 to D 8 Code Significance 0 - 9... - Page 149 Tolerance weighing [S1] (1 character) Code Significance Remarks 1- or 2 end points Load below specified tolerance Load within specified tolerance Goods to be weighed above tolerance limit (SP) 20 H No evaluation result / space character Data status [S2] (1 character) Code Significance Data stabilized *...
-
Page 150: Output Examples
11.3.3 Output examples Examples 6-digit data format: Stable weighing value [3000.1g] (SP) (SP) Instable weighing value [-10.05 mom] (SP) Examples 7-digit data format: Stable weighing value [3000.1g] (SP) (SP) Instable weighing value [-10.05 mom] (SP) PNJ_PNS-BA-e-1612... -
Page 151: Remote Control Instructions
11.4 Remote control instructions General order format: Consisting of 4 characters including the terminators (CR, LF). Subsequent commands will be detected by the weighing scale. 1. Data output Code (C1) Code (C2) Function Response No data output Continuous data output Continuous data output stable weighing values Output for stable and instable... - Page 152 2. Taring / Setting to zero Code (C1) Code (C2) Function Response Taring (>1,5 % Max) A00: Free from error (SP) Zero setting (< 1,5 % E01: Error message Max) A00: Free from error Taring E01: Error message E04: Taring range exceeded A00: Free from error (SP) Zeroing...
-
Page 153: Servicing, Maintenance, Disposal
12 Servicing, maintenance, disposal Before any maintenance, cleaning and repair work disconnect the appliance from the operating voltage. 12.1 Cleaning Please do not use aggressive cleaning agents (solvents or similar agents), but a cloth dampened with mild soap suds. Ensure that no liquid penetrates into the device. Polish with a dry soft cloth. -
Page 154: Instant Help
13 Instant help In case of an error in the program process, briefly turn off the balance and disconnect from power supply. The weighing process must then be restarted from the beginning. Help: Fault Possible cause The displayed weight does •... -
Page 155: Error Messages
14 Error messages Error Possible cause message o-Err Weighing range exceeded u-Err Insufficient preload, e. g. missing weighing pan 1-Err Wrong adjustment weight (< 50% max) 2-Err Divergence last external adjustment > 1% 3-Err Weighing pan loaded during adjustment 4-Err Divergence from last internal adjustment >... -
Page 156: Declaration Of Conformity
15 Declaration of conformity To view the current EC/EU Declaration of Conformity go to: www.kern-sohn.com/ce The scope of delivery for verified weighing balances (= conformity- rated weighing balances) includes a Declaration of Conformity. PNJ_PNS-BA-e-1612... - Page 158 Modèles PNS ..........................24 Raccordement d’appareils périphériques ................. 24 Ajustage ............................ 25 6.8.1 Ajustage avec poids interne (seulement modèles PNJ) ............26 6.8.2 Ajustage avec poids externe (seulement modèles PNS) ............27 Etalonnage ..........................28 Opérations de base ..................30 Mise en route ..........................
- Page 159 Fonctionnement de l’imprimante ....................65 11.2.1 Editer un protocole d’ajustage conforme à ISO/GLP/GMP (uniquement les modèles PNJ) 65 11.2.2 Emission des protocoles avec la date / heure actuelle (uniquement les modèles PNJ) ..66 11.3 Edition de données ........................68 11.3.1 Format de transfert des données ..................
-
Page 160: Caractéristiques Techniques
1 Caractéristiques techniques KERN PNJ 600-3M PNJ 3000-2M PNJ 12000-1M Plage de pesée (max) 620 g 3200 g 12000 g Lisibilité (d) 0,001 g 0,01 g 0,1g Charge minimale (Min) 0,2 g 0,5 g Echelon d’étalonnage (e) 0,01 g 0,1g Classe d’étalonnage... - Page 161 KERN PNS 600-3 PNS 3000-2 PNS 12000-1 Plage de pesée (max) 620 g 3200 g 12000 g Lisibilité (d) 0,001 g 0,01 g 0,1 g Reproductibilité 0,001 g 0,01g 0,1 g Linéarité ± 0,004 g ± 0,02 g ± 0,2 g Poids d’ajustage recommandé...
-
Page 162: Dimensions
1.1 Dimensions Modèles d = 0,001g: Modèles d = 0,01g / 0,1 g: PNJ_PNS-BA-f-1612... -
Page 163: Aperçu De L'appareil
2 Aperçu de l’appareil Modèles d = 0,001g: Modèles d = 0,01g / 0,1 g: Pos. Désignation Pos. Désignation Pare-brise Pieds à vis Plateau de pesée Point de fixation pour sécurisation anti-vol Afficheur Interface RS232 Bulle d’air Branchement du bloc d’alimentation secteur Touches de commandes PNJ_PNS-BA-f-1612... -
Page 164: Vue D'ensemble Du Clavier
2.1 Vue d’ensemble du clavier Touche Fonction Mise en marche / arrêt Rechercher les données de pesée par l’interface Quitter le menu / rentrer dans le mode de pesée Enregistrer les réglages / retour en mode de pesée ... -
Page 165: Vue D'ensemble Des Affichages
2.2 Vue d’ensemble des affichages Afficheur Description Unité de pesée “Grammes“ Affichage du zéro Affichage valeurs pondérales nettes Affichage de valeurs stables La balance se trouve se trouve en mode standby Illuminé pendant le transfert de données Icon d’application pour comptage de pièces Icon d’application pour détermination du pourcentage ... -
Page 166: Remarques Fondamentales
3 Remarques fondamentales 3.1 Utilisation conforme aux prescriptions La balance que vous avez achetée sert à la détermination de la valeur de pesée de matières devant être pesées. Elle est conçue pour être utilisée comme „balance non automatique“, c´à d. que les matières à peser seront posées manuellement et avec précaution au milieu du plateau de pesée. -
Page 167: Vérification Des Moyens De Contrôle
3.4 Vérification des moyens de contrôle Les propriétés techniques de mesure de la balance et du poids de contrôle éventuellement utilisé doivent être contrôlées à intervalles réguliers dans le cadre des contrôles d´assurance qualité. A cette fin, l´utilisateur responsable doit définir un intervalle de temps approprié... -
Page 168: Déballage, Installation Et Mise En Service
6 Déballage, installation et mise en service 6.1 Lieu d´installation, lieu d´utilisation La balance a été construite de manière à pouvoir obtenir des résultats de pesée fiables dans les conditions d´utilisation d´usage. Vous pouvez travailler rapidement et avec précision à condition d´installer votre balance à... -
Page 169: Etendue De La Livraison / Accessoires De Série
6.2.1 Etendue de la livraison / accessoires de série : Balance Adaptateur réseau et set de fiches Plateau de pesée rond Plateau de pesée à angles (modèles d = 0,001g) (modèles d = 0,01g / 0,1 g) Support pour plateau de pesée rond Support pour plateau de pesée à... -
Page 170: Monter Le Brise-Vent (Seulement Modèles D = 0,001G)
6.3 Monter le brise-vent (seulement modèles d = 0,001g) Tableau synoptique des pièces: Quantité Quantité Cadre de guidage Panneau frontal (à 3 trous) Paroi arrière Panneau intérieur Poignée Paroi latérale Vis de fixation „Poignée“ Cadre de base Capot Calotte frontale Support panneau intérieur Vis M4 PNJ_PNS-BA-f-1612... - Page 171 Montage: Desserrer le verrouillage de la paroi arrière Fixer la paroi arrière sur le cadre de base à l’aide de deux vis (M4) Monter les supports du panneau intérieur selon l’illustration. PNJ_PNS-BA-f-1612...
- Page 172 Fixer le panneau frontal. Veiller à ce que le point de fixation soit placé sur le cadre dans le trou du panneau frontal. Assurer le panneau frontal temporairement avec le cadre de guidage contre tomber. PNJ_PNS-BA-f-1612...
- Page 173 Pousser les panneaux latéraux de l’arrière vers avant dans le cadre de guidage. Veiller à ce que les trous soient orientés vers le panneau frontal. Fixer les poignées à l’aide des vis de fixation. Vis de fixation Poignée Poignée Vis de fixation ...
- Page 174 Monter les couvertures et les calottes frontales Recouvrements Calottes frontales Installer le panneau intérieur. A cette fin pousser le panneau à travers les deux supports. PNJ_PNS-BA-f-1612...
- Page 175 Monter la vitre supérieure et fixer la poignée à l’aide de la vis de fixation. Poignée Trou Vis de fixation PNJ_PNS-BA-f-1612...
-
Page 176: Installer, Mettre En Place Et Niveler
6.4 Installer, mettre en place et niveler La précision des résultats de pesée sur des balances de précision à haute définition dépend de façon décisive du lieu d’implantation correct (cf. au chap. 6.1). Placer le support du plateau de pesée selon l’illustration et fixer avec soin p.ex. à... - Page 177 Mettre le brise-vent avec précaution sur la balance et orienter. Pour sécuriser fermer le verrouillage sur la paroi arrière. Procéder à la mise à niveau de la balance à l´aide des vis des pieds, jusqu´à ce que la bulle d´air du niveau se trouve dans le cercle prescrit. Pieds à...
-
Page 178: Branchement Secteur
6.5 Branchement secteur Choisir la fiche secteur spécifique du pays et la monter sur le bloc secteur. Vérifiez si l’alimentation en tension de la balance est correctement réglée. La balance ne peut être branchée au réseau électrique uniquement si les données au niveau de l’instrument (auto-collant) et la tension du réseau électrique courant local sont identiques. -
Page 179: Première Mise En Service
6.6 Première mise en service 6.6.1 Modèles PNJ L’indicateur [ ] est affiché dès que la balance est alimentée en courant par le bloc secteur. Pour mettre la balance en circuit, appeler la touche ON/OFF. Tous les symboles de l’affichage s’allument brièvement. -
Page 180: Modèles Pns
6.6.2 Modèles PNS L’indicateur [xx] est affiché dès que la balance est alimentée en courant par le bloc secteur. Pour mettre la balance en circuit, appeler la touche ON/OFF. Tous les symboles de l’affichage s’allument brièvement. Attendre jusqu'à ce que l’affichage du poids apparaît, après la balance est prête à... -
Page 181: Ajustage
[STOP] est affiché et l’ajustage est interrompu. La balance revient automatiquement en mode de pesée. • S’il s’agit de modèles avec un poids d’ajustage interne (KERN PNJ), l’ajustage avec poids externe n’est pas possible. • Pendant l’ajustage les suivants messages d’erreur peuvent être affichés. -
Page 182: Ajustage Avec Poids Interne (Seulement Modèles Pnj)
6.8.1 Ajustage avec poids interne (seulement modèles PNJ) Le poids d'ajustage interne permet de démarrer l'ajustage à tout moment par pression d'une touche. Appuyer sur la touche F et la tenir enfoncée jusqu’à ce que „Aut.CAL“ soit affiché. La touche TARE étant enclenchée, appeler la touche F brièvement, puis relâcher les deux au même temps. -
Page 183: Ajustage Avec Poids Externe (Seulement Modèles Pns)
6.8.2 Ajustage avec poids externe (seulement modèles PNS) Réalisation de l’ajustage le plus près possible de la charge maximale de la balance (poids d’ajustage nécessaire voir au chap. 1). Vous trouverez de plus amples informations sur les poids d’ajustage sur le site internet: http://www.kern-sohn.com Appuyer sur la touche F et la tenir enfoncée jusqu’à... -
Page 184: Etalonnage
6.9 Etalonnage Généralités D´après la directive UE 90/384/CEE ou 2009/23CE, les balances doivent faire l´objet d´un étalonnage officiel lorsqu´elles sont utilisées tel qu´indiqué ci-dessous (domaine régi par la loi): a) Dans le cadre de relations commerciales, lorsque le prix d´une marchandise est déterminé... - Page 185 Position du timbre et de l’interrupteur d‘ajustage Avant l’étalonnage, l’interrupteur d’étalonnage doit être déplacé à la position d’étalonnage. Dans cette dernière, une parenthèse apparaît à l’écran de visualisation autour de la dernière position d’affichage. Après l’opération d’étalonnage, la balance est scellée au niveau des positions repérées.
-
Page 186: Opérations De Base
7 Opérations de base 7.1 Mise en route L’indicateur [ ] est affiché dès que la balance est alimentée en courant par le bloc secteur. Pour mettre en circuit, appeler la touche ON/OFF. Tous les symboles de l’affichage s’allument brièvement. Attendre jusqu'à... -
Page 187: Remise À Zéro
7.3 Remise à zéro Afin d’obtenir des résultats de pesage optimales, mettre la balance à zéro avant de peser. Délester la balance. Appuyez sur la touche TARE Attendre que l’affichage zéro et l’indicateur a apparaissent. Pendant la procédure de zérotage un „M“ clignotant est affiché. 7.4 Pesage simple Mettre en place le produit pesé. -
Page 188: Changement Des Unités
7.5 Changement des unités Par pression répétée sur la touche F la valeur pondérale peut être commutée à l’usine dans les unités activées. On peut régler les modifications dans le menu (fonction 81.s.u – 85.s.u.). Fonction Description 81.s.u Réglage de la première unité de pesée, où la balance doit afficher le résultat de pesage. - Page 189 Appel de la fonction Appeler la touche F de façon répétée jusqu’à ce que „81.Su.“ avec son réglage actuel est affiché. Sur la touche F sélectionner l’unité de pesage à modifier p.ex. „82.s.u“. Modifier le réglage: p.ex. fonction „82.s.u“ [ct] dans [lb]: Afin de changer le réglage actuel de [Carat] „82.Su.14“...
-
Page 190: Pesée Avec Tare
7.6 Pesée avec tare 7.6.1 Tarage Le poids propre d’un quelconque récipient de pesage peut être saisi par la tare sur simple pression d’un bouton, afin que le pesage consécutif affiche le poids net de l’objet pesé. Mettre la balance à zéro ... -
Page 191: Tare Multiple
7.6.2 Tare multiple La procédure de tarage peut être répétée à volonté, par exemple pour le pesage de plusieurs composants constituant un mélange (ajout). La limite est atteinte, lorsque toute la gamme de tarage est sollicitée à pleine capacité. Mettre en place le premier produit pesé. Le poids est ... -
Page 192: Menu
8 Menu 8.1 Menu [Fonction] 8.1.1 Navigation dans le menu Entrée au menu Dans le mode de pesée laisser enfoncée la touche F, jusqu’à ce que [FWnm] apparaît dans l’affichage. Relâcher la touche. Le premier point de menu avec le réglage actuel est affiché. -
Page 193: Aperçu Des Menus
Mémoriser les réglages et quitter le menu Appeler la touche S une nouvelle fois, la balance retourne en mode de comptage. Appeler la touche F de façon répétée jusqu’à ce que la balance retourne en mode de pesée. Toutes les modifications sont enregistrées. - Page 194 ��� Vitesse d’affichage Réglage pour le dosage u�RE. 0� Environnement très calme et stable La voir chap. 10.2 ��� balance fonctionne très vite, mais elle est 1� sensible aux influences extérieures. ��� 2� Environnement normal. La balance travaille 3� à...
- Page 195 0 Non Editer le protocole 0.�GLP d’ajustage 1 Oui voir chap. 11.2.1 ��� Emission de données Edition des données désactivée 1� des modèles étalonnés Protocole modèle: Edition des données (les réglages ne sont activée +0075.55 G S disponibles qu’en état A.�PRF non étalonné) Edition des données...
-
Page 196: Menu [Fonction2]
8.2 Menu [Fonction2] 8.2.1 Navigation dans le menu Entrée au menu En mode de pesée appuyer sur la touche F et TARE au même temps et la tenir enfoncée jusqu’à ce que „Func2“ est affiché. En relâchant, le premier point de menu „1.CrC. 0.“ est affiché. -
Page 197: Applications
9 Applications 9.1 Comptage de pièces La balance, avant de pouvoir compter les pièces, doit connaître le poids unitaire moyen ce qu’il est convenu d’appeler la référence. A cet effet il faut mettre en chantier une certaine quantité des pièces à compter. La balance détermine le poids total et le divise par le nombre de pièces ce qu’il est convenu d’appeler la quantité... - Page 198 4. Modifier le nombre de pièces de référence Choisir le nombre de pièces de référence désiré sur la touche TARE, par ex. 30 pièces. A sélectionner Important: Plus grande est la quantité de pièces de référence, plus grande est ici la précision de comptage. 5.
- Page 199 Confirmez sur la touche SET. Lors de chaque optimisation de référence, le poids de référence est calculé à nouveau. Les pièces additionnelles élargissant la base pour l’extrapolation, la référence s’en trouve plus précise. Pour une autre optimisation de référence poser de nouveau plus pièces de comptage (env.
-
Page 200: Détermination Du Pourcentage
9.2 Détermination du pourcentage La détermination du pourcentage permet d’afficher le poids en pourcent, rapporté à un poids de référence à 100 %. 1. Appeler l'application Appeler la touche F de façon répétée jusqu’à ce que „%“ est affiché. Réglage à l’usine ... - Page 201 Poser le poids de référence (= 100 %) et confirmer sur la touche PRINT. 4. Détermination du pourcentage Mettre en place le produit pesé. Le poids de l’échantillon est indiqué en pourcent, en relation au poids de référence. Protocole modèle 5.
-
Page 202: Pesée Avec Gamme De Tolérance
9.3 Pesée avec gamme de tolérance Avec l’application „Pesage dans la plage de tolérance“ vous pouvez définir une valeur-seuil supérieure et inférieure afin de vous assurer que les matières pesées se trouvent entre les seuils de tolérance établis. Il est possible de saisir des valeurs seuil dans les fonctions Pesage, Comptage de pièces et Détermination du pourcentage. -
Page 203: Activer La Fonction / Réglages Dans Le Menu
9.3.1 Activer la fonction / réglages dans le menu Appel du menu: Appuyer sur la touche F et la tenir enfoncée jusqu’à ce que „Func“ est affiché. En relâchant la touche, la première fonction „1.b.G. „ avec le réglage actuel est affichée. Fonction pour pesée de tolérance „2.SEL. - Page 204 Sélectionner le réglage voulu sur la touche TARE „22.Li. 0“ La marque de tolérance ne s’affiche qu’au-dessus de la plage de point zéro (> 5 d). „22.Li. 1“ La marque de tolérance est affichée pour l’ensemble du domaine. Sur la touche F sélectionner le prochain point de menu “23.Pi.
-
Page 205: Contrôle De Tolérance Après Réglage Des Valeurs Seuil À L'aide De Pesée
9.3.2 Contrôle de tolérance après réglage des valeurs seuil à l’aide de pesée Appuyer sur la touche SET et la tenir enfoncée jusqu’à ce que l’affichage pour le réglage de la valeur seuil inférieure „L.SET“ apparaît. Le réglage actuel clignote. Poser le poids nominal (par ex. - Page 206 Démarrer le contrôle de la tolérance Si besoin, placer le récipient vide sur la balance et le tarer. Mettre en place le produit pesé. Contrôler à l’aide de la marque de tolérance [ ], si l’objet à peser se trouve en dessous, à l’intérieur ou au- delà...
-
Page 207: Contrôle De Tolérance Après Saisie Numérique Des Valeurs Seuil
9.3.3 Contrôle de tolérance après saisie numérique des valeurs seuil Appuyer sur la touche SET et la tenir enfoncée jusqu’à ce que l’affichage pour le réglage de la valeur seuil inférieure „L.SET“ apparaît. Le réglage actuel par ex. „70.00 g“ clignote. ... - Page 208 Dans réglage de menu „23.Pi. 2“ attendre jusqu’à ce que l’affichage „H.SET“ pour le réglage de la valeur seuil supérieure apparaît. Le réglage actuel clignote. Pour la saisie numérique du poids nominal (par ex. 105 g) pour la valeur seuil supérieure appuyer sur la touche TARE.
-
Page 209: Fonctions Générales
10 Fonctions générales 10.1 Zero-tracking Cette fonction permet d’équilibrer automatiquement de petites fluctuations de poids. Dans le cas où de petites quantités des matières à peser sont retirées ou ajoutées, le dispositif de “compensation de stabilité“ intégré dans la balance peut provoquer l´affichage de résultats de pesée erronés. -
Page 210: Paramétrage De La Stabilité Et De La Réponse
10.2 Paramétrage de la stabilité et de la réponse Il y a possibilité d’adapter la stabilité de l’affichage et le degré de réaction de la balance aux exigences de certaines applications ou aux conditions de l’environnement. Notez qu’en général, le traitement de données pour une stabilité plus élevée réduit le temps de réponse et le traitement de données pour une réponse plus courte réduit la stabilité. -
Page 211: Afficher Le Statut Du Logiciel (Uniquement Les Modèles Pnj)
10.3 Afficher le statut du logiciel (uniquement les modèles PNJ) Appuyer sur la touche F et TARE au même temps et les tenir enfoncées jusqu’à ce que „Func2“ est affiché. En relâchant, „1.CrC. 0.“ est affiché. Sur la touche TARE, choisir le réglage „1.CrC. 1.“ . -
Page 212: Eteigner L'éclairage De Fond De L'affichage Automatiquement (Uniquement Les Modèles Pnj)
10.4 Eteigner l’éclairage de fond de l’affichage automatiquement (uniquement les modèles PNJ) Lorsque la fonction est activée, l’éclairage d'arrière-plan de l’affichage est coupé après une minute en l’absence de changement de charge ou d’une quelconque manipulation. Appel du menu: Appuyer sur la touche F et la tenir enfoncée jusqu’à ce que „Func“... -
Page 213: Régler Date / Heure (Uniquement Les Modèles Pnj)
10.5 Régler date / heure (uniquement les modèles PNJ) 10.5.1 Réglage de l’heure Appuyer sur la touche F et TARE au même temps et les tenir enfoncées jusqu’à ce que „Func2“ est affiché. En relâchant, „1.CrC. 0.“ est affiché. ... - Page 214 Pour changer l’heure, appuyer sur la touche SET, la première position clignote. Afin de changer un chiffre appuyer sur la touche TARE. Sélectionner le chiffre sur la touche F. Le chiffre sélectionné clignote. Enregistrer la saisie. L’affichage passe à la date actuellement réglée.
-
Page 215: Réglage De La Date
10.5.2 Réglage de la date Appuyer sur la touche F et TARE au même temps et les tenir enfoncées jusqu’à ce que „Func2“ est affiché. En relâchant, „1.CrC. 0.“ est affiché. Appuyer sur la touche F de façon répétée jusqu’à ce que „3.d.St.0“... - Page 216 Appuyez sur la touche F. „dAtE“ est affiché, suivi par la date actuellement réglée. Pour changer la date, appuyer sur la touche SET, la première position clignote. Afin de changer un chiffre appuyer sur la touche TARE. Sélectionner le chiffre sur la touche F. Le chiffre sélectionné...
-
Page 217: Régler Le Format De La Date (Uniquement Les Modèles Pnj)
10.6 Régler le format de la date (uniquement les modèles PNJ) Appuyer sur la touche F et la tenir enfoncée jusqu’à ce que „Func“ soit affiché. En relâchant la touche, la première fonction „1.b.G. „ avec le réglage actuel est affichée. -
Page 218: Interface Rs232C
11 Interface RS232C 11.1 Généralités Pour la connexion d’un appareil périphérique (imprimante, ordinateur) la balance est équipée en série d’une interface RS232C. Les conditions suivantes doivent être réunies pour la communication entre la balance et les appareils périphériques: • Relier la balance par un câble approprié à l’interface de l’appareil périphérique. - Page 219 Câble d'interface • Balance - PC à 9 pôles Balance D-SUB9P D-SUB9P Caractéristiques techniques 1. Taux de baud 1200*/2400/4800/9600/19200 bps 2. Code de transmission Codes ASCII (8/7 bits) 3. Réglage des bits Start bit 1 bits Bits de 8 bits données Bit de parité...
- Page 220 Paramètres d’interfaces Les paramètres d’interface disponibles ne sont affichés qu’avec la fonction [7�K.F1] ou [7�K.F2] activé. Les réglages d’usine sont caractérisés par *. Description Point du menu Condition 71. Q.m.� Aucune émission de données d’émission 1� Emission de données en continu 2�...
-
Page 221: Fonctionnement De L'imprimante
11.2.1 Editer un protocole d’ajustage conforme à ISO/GLP/GMP (uniquement les modèles PNJ) Les systèmes de suivi de la qualité prescrivent des impressions des résultats de pesée ainsi que de l’ajustage correct de la balance avec indication de la date et de l’heure ainsi que de l’identification de la balance. -
Page 222: Emission Des Protocoles Avec La Date / Heure Actuelle (Uniquement Les Modèles Pnj)
Protocole modèle (KERN YKB-01N) CALIBRATION KERN & SOHN MODEL: PNJ 3000-2M 190001833 ID : DATE: 15.09.2015 TIME: 10:27 *CAL.END NAME: ********************************* 11.2.2 Emission des protocoles avec la date / heure actuelle (uniquement les modèles PNJ) Appuyer sur la touche F et la tenir enfoncée jusqu’à ce que „Func“... - Page 223 Enregistrer / retour en mode de pesée: Confirmer le réglage sur la touche SET. La balance revient automatiquement en mode de pesée. Protocoles modèle (KERN YKB-01N) „C.t.o. 0“ „C.t.o. 1“ „C.t.o. 2“ +0075.55 G S 09:48:39 17.09.2015 +0075.55 G S 09:48:39 +0075.55 G S PNJ_PNS-BA-f-1612...
-
Page 224: Edition De Données
11.3 Edition de données 11.3.1 Format de transfert des données Dans le menu le format de la transmission de données (6 ou 7 positions) peut être adapté à vos exigences. Appuyer sur la touche F et la tenir enfoncée jusqu’à ce que „Func“... - Page 225 Format de données à 6 décades, consistant dans 14 caractères, y compris les symboles de fin; CR=0DH, LF=0AH (CR=retour du chariot / LF=changement des lignes). Format de données à 7 décades, consistant dans 15 caractères, y compris les symboles de fin; CR=0DH, LF=0AH (CR=retour du chariot / LF=changement des lignes).
-
Page 226: Description Des Données
11.3.2 Description des données Signe [P1] (1 caractère) Code Acception 2 B H Données supérieures ou égales à 0 2 D H Les données sont négatives Valeur numérique de la valeur pondérale [D 1 jusqu’à D7(D 8)] (7 ou 8 caractères D 1 à... - Page 227 Pesée de tolérance [S1] (1 caractère) Code Acception Commentaires 1 ou 2 points seuil L’objet à peser est en dessous de la tolérance préétablie L’objet à peser est à l’intérieur de la tolérance préétablie Le produit pesé est au-delà du seuil de tolérance supérieur (SP) 20 H...
-
Page 228: Exemples D'émission
11.3.3 Exemples d’émission Exemples format de données à 6 chiffres: Valeur pondérale stable [3000.1g] (SP) (SP) Valeur pondérale instable [-10.05 mom] (SP) Exemples format de données à 7 chiffres: Valeur pondérale stable [3000.1g] (SP) (SP) Valeur pondérale instable [-10.05 mom] (SP) PNJ_PNS-BA-f-1612... -
Page 229: Commandes À Distance
11.4 Commandes à distance Format de commande général: consistant dans 4 caractères, y compris les symboles de fin (CR, LF). Les ordres suivants sont reconnus par la balance 1. Edition de données Code (C1) Code (C2) Fonction Réponse Aucune émission de données Emission de données en continu Emission permanente de valeurs stables de pesée... - Page 230 2. Tarage / mise à zéro Code (C1) Code (C2) Fonction Réponse Tarage (>1,5 % max) A00: Correct (SP) Mise à zéro (< 1,5 % Max) E01: Message d’erreur A00: Correct E01: Message d’erreur Tarage E04: Gamme d’étalonnage dépassée A00: Correct E01: Message d’erreur Syst (SP)
-
Page 231: Maintenance, Entretien, Élimination
12 Maintenance, entretien, élimination Avant tout travail de maintenance, de nettoyage et de réparation couper la tension de régime de l‘appareil. 12.1 Nettoyage N´utiliser pas de produits de nettoyage agressifs (dissolvants ou produits similaires) mais uniquement un chiffon humidifié de lessive douce de savon. Veillez à ce qu’aucun liquide ne pénètre au sein de l’appareil. -
Page 232: Aide Succincte En Cas De Panne
13 Aide succincte en cas de panne En cas d´anomalie dans le déroulement du programme, la balance doit être arrêtée pendant un court laps de temps et coupée du secteur. Le processus de pesée doit alors être recommencé depuis le début. Aide: Panne Cause possible... -
Page 233: Messages D'erreur
14 Messages d’erreur Message Cause possible d’erreur o-Err Domaine de pesage dépassé u-Err Précontrainte trop faible, p. ex. absence du plateau de pesée 1-Err Poids d’ajustage incorrect (< 50% Max) 2-Err Ecart par rapport au dernier ajustage externe > 1% 3-Err Plateau de pesée sous charge pendant l’ajustage 4-Err... -
Page 234: Déclaration De Conformité
15 Déclaration de conformité Vous trouvez la déclaration de conformité CE- UE actuelle online sous: www.kern-sohn.com/ce Dans le cas de balances étalonnées (= de balances à la conformité évaluée) la déclaration de conformité est comprise dans les fournitures. PNJ_PNS-BA-f-1612...