Table des Matières

Publicité

Les langues disponibles
  • FR

Les langues disponibles

Liens rapides

IT
IT
EN
EN
ES
ES
FR
FR
DE
DE
MANUALE D'ISTRUZIONE
INSTRUCTIONS MANUAL
INSTRUCTIONS MANUAL
MANUAL DE INSTRUCCIONES
MANUEL D'INSTRUCTIONS
BEDIENUNGSANLEITUNG
BEDIENUNGSANLEITUNG
INVERTER DI SALDATURA
WELDING INVERTER
WELDING INVERTER
INVERTER DE SOLDADURA
ONDULEUR DE SOUDAGE
ONDULEUR DE SOUDAGE
SCHWEISSINVERTER
SCHWEISSINVERTER
COMPACT 211 EASY AC/DC
LEGGETE LE ISTRUZIONI PRIMA DI INSTALLARE, UTILIZZARE O RIPARARE
QUESTO IMPIANTO. CONSERVATE QUESTO MANUALE.
PLEASE READ THESE INSTRUCTIONS BEFORE INSTALLING, OPERATING,
OR SERVICING THIS PRODUCT. DO NOT DESTROY THIS MANUAL.
LEAN LAS INSTRUCCIONES ANTES DE INSTALAR, UTILIZAR O REPARAR
ESTOS APARATOS. CONSERVEN ESTE MANUAL.
LIRE CES INSTRUCTIONS AVANT L'INSTALLATION, L'UTILISATION OU LA
REPARATION DE CET APPAREIL. NE PAS JETER LE PRÉSENT MANUEL.
LESEN SIE DIESE ANLEITUNG VOR DER INSTALLATION, DEM BETRIEB
ODER DER WARTUNG DIESES PRODUKTS. NICHT ZERSTÖREN SIE DIESES
HANDBUCH.

Publicité

Table des Matières
loading

Sommaire des Matières pour Helvi COMPACT 211 EASY

  • Page 1 INVERTER DE SOLDADURA ONDULEUR DE SOUDAGE ONDULEUR DE SOUDAGE SCHWEISSINVERTER SCHWEISSINVERTER COMPACT 211 EASY AC/DC COMPACT 211 EASY AC/DC LEGGETE LE ISTRUZIONI PRIMA DI INSTALLARE, UTILIZZARE O RIPARARE QUESTO IMPIANTO. CONSERVATE QUESTO MANUALE. PLEASE READ THESE INSTRUCTIONS BEFORE INSTALLING, OPERATING, OR SERVICING THIS PRODUCT.
  • Page 2: Table Des Matières

    SOMMARIO INDEX PREMESSA ............... 1 FOREWORD .............. 1 SICUREZZA ............... 2 SAFETY ..............2 AVVERTENZE ............2 WARNINGS ............. 2 PROTEZIONE PERSONALE ........2 PERSONAL PROTECTION ........2 RADIAZIONI LUMINOSE ........2 LIGHT RADIATIONS ..........2 AREA OPERATIVA..........3 WORKING AREA ............ 3 IMPIANTO ELETTRICO .........
  • Page 3 CONTENIDO CONTENU PREÁMBULO ............ES-1 AVANT-PROPOS ..........FR-1 SEGURIDAD ............ES-2 SÉCURITÉ ............FR-2 ADVERTENCIAS ..........ES-2 AVERTISSEMENT ..........FR-2 PROTECCIÓN PERSONAL .......ES-2 PROTECTION PERSONNELLE ......FR-2 RADIACIONES LUMINOSAS ......ES-2 RADIATIONS LUMINEUSES ......FR-2 AREA OPERATIVA..........ES-3 ZONE DE TRAVAIL ...........FR-3 INSTALACIÓN ELÉCTRICA ......ES-5 CIRCUIT ÉLECTRIQUE ........FR-5 PREVENCIÓN DE INCENDIOS ......ES-5 PRÉVENTION D’INCENDIE ......FR-5 GAS DE PROTECCIÓN ........ES-5 GAZ DE PROTECTION ........FR-5...
  • Page 4 INHALT VORWORT ............. D-1 SICHERHEIT ............D-2 HINWEISE ............D-2 PERSÖNLICHE SCHUTZAUSRÜSTUNG ..D-2 LICHTSTRAHLEN ..........D-2 ARBEITSBEREICH ..........D-3 ELEKTRISCHE ANLAGE ........D-5 BRANDVERHÜTUNG ........D-5 SCHUTZGAS ............D-6 GERÄUSCHENTWICKLUNG ......D-6 ERSTE HILFE............. D-6 VORSTELLUNG ............ D-6 ALLGEMEINE MERKMALE ......
  • Page 5: Premessa

    PREMESSA Attenzione: la ditta produttrice viene sollevata da ogni responsabilità in caso di modifiche non autorizzate sui Vi ringraziamo della fiducia accordataci con propri prodotti, Questi generatori di l’acquisto di uno o più apparecchi riportati nel corrente vanno utilizzati unicamente per i pro- presente libretto.
  • Page 6: Sicurezza

    SICUREZZA PROTEZIONE PERSONALE • Gli operatori e loro assistenti devono pro- AVVERTENZE teggere il proprio corpo indossando tute di Questo manuale contiene le istruzioni per protezione chiuse e non infiammabili, sen- za tasche o risvolti. Eventuali tracce di olio una corretta installazione dell’ Apparecchia- tura Elettrica Elettronica (AEE) da Voi acqui- o grasso devono essere rimosse da tutti gli indumenti prima di indossarli.
  • Page 7: Area Operativa

    • Gli operatori devono indossare casco o trasparenti, autoestinguenti e corrispondenti maschera ignifughi, progettati in modo da alla normativa EN 1598 (la scelta del colore di proteggere il collo e il viso (anche lateralmen- una tenda dipende dal processo di saldatura te) dalla luminosità...
  • Page 8 rinforzando la protezione individuale, l’i- solamento dal suolo e dal pezzo da saldare dell’operatore (Fig. 7) Fig.7 Fig.6 Il lavoratore ed i suoi assistenti non devono Qualsiasi sintomo di fastidio o dolore agli oc- toccare con nessuna parte del corpo mate- chi, al naso o alla gola può...
  • Page 9: Impianto Elettrico

    apparecchiature, linee di controllo, cavi tele- (dito di prova); fonici, ecc. l’inserimento di corpi solidi con un dia- Per altre apparecchiature elettriche nell’a- metro superiore a 12mm; rea di saldatura verificate la conformità delle una protezione contro la pioggia con in- stesse alla normativa EMC corrispondente.
  • Page 10: Rumore

    gas, in particolare: le aree di stoccaggio e d’im- PRONTO SOCCORSO. piego devono essere aperte e ventilate, suffi- Il Decreto Ministeriale n°388 del 15 Luglio 2003 cientemente lontane dalle zone operativa e da specifica le attrezzature minime di equipaggia- fonti di calore (< di 50°C). Fissate le bombole, mento e di protezione individuale che il dato- evitate gli urti e proteggete le stesse da ogni re di lavoro deve mettere a disposizione degli...
  • Page 11: Presentazione

    PRESENTAZIONE • Protezione intelligente: sovratensio- ne, sottotensione, sovracorrente e sovra- temperatura; CARATTERISTICHE GENERALI • Tecnologia PFC, ampia variazione Il vostro generatore è un’eccellente saldatrice della tensione di alimentazione da 95V a a TIG in corrente continua e alternata, pulsa- 275V 1ph ta che adotta la tecnologia inverter a controllo •...
  • Page 12: Posizionamento

    POSIZIONAMENTO COLLEGAMENTO GAS DI SALDATURA • Posare l’apparecchiatura su una base sta- Il gas di protezione dell’arco elettrico sui ge- bile ed asciutta ed evitare che la polvere sul neratori serve unicamente nel processo di basamento venga aspirata dal ventilatore. saldatura con l’elettrodo infusibile (TIG), non •...
  • Page 13: Istruzioni D'uso

    ISTRUZIONI D’USO PANNELLO ANTERIORE (FIG.11) 1. Pannello comandi 2. Manopola regolazione valori corrente e parametri saldatura 3. Display visualizzazione parametri pre-im- postati e tensione o corrente in saldatura 4. Presa negativa (-): si collega il cavo di massa o la pinza porta elettrodi in salda- tura MMA (dipende dalla polarità...
  • Page 14: Parametri Fissi

    50÷250 (Iw<70A) una luce o una fonte di calore, a seconda 50÷200 ( 70A≤Iw<100A) della lunghezza d’onda. Ad un livello im- percettibile, l’arco produce anche luce ul- 50÷150 (100A≤Iw<140A) 50÷120 (140A≤Iw<170A) tra-violetta e infra-rossa; i raggi ionizzati 50÷100 (170A≤Iw) non vengono mai percepiti. Il calore pro- dotto dall’arco è...
  • Page 15: Funzione Protezione Corto Circuito

    SALDATURA CON ELETTRODO datura potrebbe aumentare la misura dell’a- INFUSIBILE (TIG AC/DC) rea di saldatura, migliorando la capacita’ di copertura della scoria. Alla fine della saldatura lasciate raffred- La saldatura TIG in corrente continua (DC) dare il residuo prima di toglierlo, usando la si utilizzata per la saldatura degli acciai e de- spazzola con il puntale.
  • Page 16: Completamento Impianto Tig Con Torcia A Raffreddamento Naturale

    COMPLETAMENTO IMPIANTO TIG • La tabella seguente riporta le informazioni CON TORCIA A RAFFREDDAMENTO di base sulla gamma di correnti utilizzabili per NATURALE diametro elettrodo e spessore lamiera: • Collegare il cavo di massa alla presa po- sitiva (+) del generatore (pos.5) e la pinza di massa al pezzo da saldare.
  • Page 17: Operazioni Di Saldatura A 4 Tempi

    OPERAZIONI DI SALDATURA A 4 Funzione “Repeat Welding”: TEMPI - SCHEMA 1 In modalità 4T, quando si preme la seconda Premete e tenete premuto il pulsante volta per arrestare l’arco, se si preme veloce- torcia. L’elettrovalvola si apre. Il gas di prote- mente il grilletto, la corrente di uscita si riduce zione inizia ad uscire.
  • Page 18: Funzione Protezione Corto Circuito

    MANUTENZIONE ORDINARIA Assicuratevi che l’elettrodo sporga dall’u- gello almeno 4-5mm, assicuratevi anche che la sua punta sia a circa 40°-60° dal pezzo. ATTENZIONE!!! Impostate la corrente di saldatura consi- PRIMA DI OGNI INTERVENTO SCONNE- derando lo spessore del materiale da salda- TERE LA MACCHINA DALLA RETE PRI- re ed il diametro dell’elettrodo tungsteno da MARIA DI ALIMENTAZIONE.
  • Page 19: Possibili Difetti Di Saldatura

    POSSIBILI DIFETTI DI SALDATURA DIFETTO CAUSE CONSIGLI POROSITA’ Elettrodo acido su acciao ad alto Usare elettrodo basico. tenore di zolfo. Oscillazioni eccessive dell’elettrodo. Avvicinare i lembi da saldare. Distanza eccessiva tra i pezzi da Avanzare lentamente all’inizio. saldare. Pezzo in saldatura freddo. Diminuire la corrente di saldatura.
  • Page 20 INCOVENIENTE CAUSA RIMEDIO Corrente in uscita non Potenziometro di regolazione difet- Rivolgersi al centro di assistenza. corretta toso / Scheda di controllo difettosa. Tensione di alimentazione primaria Controllare la rete di distribuzione. bassa. Corrente visualizzata Sonda di corrente difettosa Sostituire la sonda di corrente. non corrisponde alla corrente reale Nessuna corrente in...
  • Page 21: Foreword

    FOREWORD Warning: the manufacturer refu- ses all responsibility in the event of Thank you for purchasing our products. When unauthorized modifications perfor- assembled and used correctly, our welding med on its products. These power generators are reliable and long-lasting and generators must only be used for the welding will help increase the productivity of your bu- procedures described above;...
  • Page 22: Safety

    SAFETY PERSONAL PROTECTION • Workers and their assistants must protect WARNINGS themselves by wearing closed, non-flamma- This manual contains instructions for the ble protection coveralls, without pockets or proper installation of the Electric Electronic rolled sleeves or legs. Any residue of oil or Equipment (EEE) you have just purchased.
  • Page 23: Working Area

    tion to the neck and face (including the sides) que screens, self-extinguishable and in ac- against the light of the electric arc (glare from cordance with regulation EN 1598 (the color the visible light and infrared and ultraviolet of the screen will depend on the welding pro- radiations).
  • Page 24 Fig.7 Workers and their assistances must never allow any parts of their bodies to come into contact with metallic materials at high tempe- Fig.6 ratures or which are moving (Fig. 8). Any symptom of discomfort or pain in the eyes, nose or throat may be caused by ina- dequate ventilation;...
  • Page 25: Electric System

    safety regulations. This means that fire extin- Caution: Access to the the working area and near the welding/cutting guishers must be installed, compatible with the operation generators is forbidden to type of fire which may happen. anyone wearing pacemakers or other such electric devices.
  • Page 26: Noise

    connecting the pressure gauge. The protection off the appliance from the power source and gases must be dispensed at the pressures re- remove all power cables from the victim using commended for the different welding/cutting a piece of dry wood or any other insulating ma- procedures.
  • Page 27: Brief Introduction

    BRIEF INTRODUCTION ring welding, the current will drop to the short circuit value to protect the electrode. Your welding machine is an excellent AC/ • Intelligent protection: over-voltage, DC pulsed TIG arc welder which adopts the low-voltage, over-current, over-heat ; latest pulse medium frequency width modu- •...
  • Page 28: Positioning

    POSITIONING WELDING GAS CONNECTION • Place the appliance on a stable, dry base The protection gas of the electric arc on these and make sure that no dust from the base is generators is only used during welding with sucked by the fan. infusible electrode (TIG).
  • Page 29: Instructions Of Use

    INSTRUCTIONS OF USE FRONT PANEL (FIG. 11) 1. Control panel 2. Regulation knob for welding current and welding parameters 3. Display showing the preset parameters, voltage or current during welding 4. Negative plug (-): Connect the ground lead or the electrode holder in case of MMA welding (depending on the polarity requested by the electrode, printed on the packaging) and the torch in case of TIG...
  • Page 30: Fix Parameters

    • Pulse frequency Connect the earth cable to the negative Unit of measure Hz pole of the inverter and the earth clamp to the Setting range 0.5—200 workpiece. Default setting 0.5 Connect the welding cable to the positive pole of the Inverter. Select MMA Welding Mode using the Welding Mode Selection Key (10) on the front panel.
  • Page 31: Short Circuit Protection Function

    SHORT CIRCUIT PROTECTION TIG welding with alternating current (AC) is FUNCTION specifically used to weld aluminum and its • In the event that the electrode touches the alloys by using pure tungsten infusible elec- workpiece during welding for more than 2s, trodes.
  • Page 32: Important

    (Note: The gas which must be used is pure CYCLE FUNCTION IN TIG WELDING argon; for further information on “PROTEC- • Up-slope: Progressive increase of the wel- TION GAS CONNECTION”, please read the ding current (limits the temperature shock of relative paragraph).
  • Page 33: 4-Stroke Welding - Diagram 1

    WELDING OPERATION “Repeat Welding” Function: In 4T mode, when torch trigger is pressed to stop the arc, if pressing is fast, the output cur- 4-STROKE WELDING - DIAGRAM 1 rent is reduced to half to allow welding with Press and hold the gun switch, Elec- few current without striking the arc again.
  • Page 34: Short Circuit Protection Function .En

    ORDINARY MAINTENANCE Set the welding current considering the thickness of the material to be welded and of CAUTION!!! the diameter of the tungsten electrode to be used. BEFORE CARRY OUT ANY MAINTENAN- Covering your face with a mask or a hel- CE, UNPLUG THE MACHINE FROM THE met, touch with the isolating nozzle the work MAINS POWER SUPPLY.
  • Page 35: Possible Welding Defects

    POSSIBLE WELDING DEFECTS DEFECT CAUSES SUGGESTIONS POROSITY Acid electrode on steel with high Use basic electrodes. sulphur content. Electrode oscillates too much. Move edges to be welded closer together. Workpieces are too far apart. Move slowly at the beginning. Workpiece being welded is cold. Lower welding current.
  • Page 36 INCONVENIENCE CAUSE REMEDY Wrong output current Defective control potentiometer / Contact after sales service centre. Control PCB. Low primary power supply Check power line. voltage. The displayed current Defective hall probe. Replace the hall probe. doesn’t match with real current. No output current in Defective secondary Contact after sales service centre.
  • Page 37: Preámbulo

    PREÁMBULO Atención: el productor se exime de responsabilidad en caso de modi- Le agradecemos la confianza demostrada ficaciones no autorizadas de sus con la compra de este aparato descrito en el productos, estos generadores de presente manual. Este aparato, montado y corriente únicamente pueden utilizarse para utilizado correctamente, es un generador de los procedimientos de soldadura descritos...
  • Page 38: Seguridad

    SEGURIDAD PROTECCIÓN PERSONAL • Los operadores y sus ayudantes deben ADVERTENCIAS proteger su cuerpo con trajes de protección cerrados y no inflamables, sin bolsillo ni do- Este manual contiene las instrucciones de in- bladillos. Las manchas de aceite y grasa de- stalación del Aparato Eléctrico y Electrónico ben limpiarse antes de ponérselos.
  • Page 39: Area Operativa

    sparentes, autoextinguibles y que cumplan la • Los operadores deben llevar casco o normativa EN 1598 (la selección del color de pantalla ignífugos, diseñados para proteger la cortina depende del proceso de soldadura el cuello y el rostro (también lateralmente) frente a la luminosidad del arco eléctrico y de las corrientes utilizadas), gafas anti-UV (deslumbramiento del arco por luz visible y...
  • Page 40 • reforzar la protección individual, el aisla- miento del operador respecto al suelo y a la pieza que se va a soldar (Fig. 7) Fig.7 Fig.6 El operario y sus ayudantes no deben to- car con ninguna parte del cuerpo materiales Una ventilación inadecuada puede producir metálicos con elevada temperatura o en mo- fastidios o dolor en los ojos, nariz o garganta;...
  • Page 41: Instalación Eléctrica

    más de 12mm de diámetro; cables telefónicos, etc. - que se filtre la lluvia, cuando su inclinación Los demás equipos eléctricos presentes en máxima respecto a la vertical no es superior a el área de soldadura deben ser conformes 15°. con la normativa EMC correspondiente.
  • Page 42: Ruido

    las zonas operativas y de fuentes de calor (< PRIMEROS AUXILIOS. di 50°C). Fije las bombonas, evite que reciban Cada país especifica el equipamiento mínimo golpes y protéjalas frente a incidentes técnicos. y de protección individual que el empleador Compruebe que la bombona y el regulador de debe a poner a disposición de los equipos de presión corresponden con el gas que se re- primeros auxilios para el personal víctima de:...
  • Page 43: Presentación

    PRESENTACIÓN la pieza, la corriente descenderá al valor de cortocircuito para proteger el electrodo. • Protección inteligente: sobretensión, TECNOLOGÍA INVERTER subtensión, sobrecorriente y sobretem- El generador que ha adquirido es una exce- peratura. lente máquina de soldar TIG de corriente •...
  • Page 44: Posicionamiento

    POSICIONAMIENTO CONEXIÓN DEL GAS DE SOLDADURA • Coloque el aparato sobre una base esta- El gas de protección del arco eléctrico del generador sirve únicamente para el proceso ble y seca, evitando que el polvo que pueda de soldadura con electrodo no consumible haber sobre el basamento sea aspirado por el ventilador.
  • Page 45: Instrucciones De Uso

    INSTRUCCIONES DE USO PANEL ANTERIOR (FIG.11) 1. Panel de mandos 2. Mando de regulación de corriente de sol- dadura y parámetros de soldadura 3. Pantalla de visualización de parámetros configurados, tensión o corriente en sol- dadura. 4. Toma negativa (-): a esta se conecta el cable de masa o la pinza porta electrodos cuando se efectúa soldadura MMA (de- pende de la polaridad requerida para el...
  • Page 46: Parámetros Fijos

    luz ultravioleta e infrarroja; los rayos 50÷150 (100A≤Iw<140A) ionizados no se perciben nunca. El ca- 50÷120 (140A≤Iw<170A) lor producido por el arco se utiliza en el 50÷100 (170A≤Iw) proceso de soldadura para fundir y unir • Frecuencia Pulsos partes de metal. La corriente eléctrica Unidad de medida Hz necesaria es suministrada por un equipo Rango de ajuste 0.5—200...
  • Page 47: Función De Protección Contra Cortocircuitos

    ¡Atención!: Tungsteno no puro (electrodos no verdes). - protejan sus ojos El extremo del electrodo no consumible se - eviten daños cuando quitan el residuo afila en forma de cono para que el arco sea con el cepillo y la puntera estable y la energía se concentre en la unión/ área a soldar.
  • Page 48: Sistema Tig Complementado Con Antorcha Con Refrigeración Natural

    SISTEMA TIG COMPLEMENTADO • La corriente configurada depende de la CON ANTORCHA CON aplicación de soldadura, del tipo de electro- REFRIGERACIÓN NATURAL do, de su diámetro y de las instrucciones del fabricante de los electrodos que figuran en • Conecte el cable de masa a la toma po- su envase.
  • Page 49: Operaciones De Soldadura De 2

    canzarse el valor de corriente de soldadura OPERACIONES DE SOLDADURA DE 2 configurado. El tiempo de la rampa de subida TIEMPOS - DIAGRAMA 2 Presione el botón de la antorcha, es de 1 seg. T3-T4 Proceso de soldadura, el botón de la manteniéndolo en esta posición.
  • Page 50: Función De Protección Contra Cortocircuitos

    quilla cerámica toque la superficie de la pieza FUNCIÓN DE PROTECCIÓN CONTRA (fig.b), presione el botón de la torcha (fig.a) CORTOCIRCUITOS El arco será iluminado por una chispa de alto En el caso de que el electrodo tungsteno voltaje (fig. c). toque la pieza durante la soldadura, la cor- riente caerá...
  • Page 51: Posibles Inconvenientes De Funcionamiento

    DEFECTO CAUSAS SUGERENCIAS ROCÍOS EXCESIVOS Electrodo demasiado inclinado. Hagan las correcciones apropiadas. DEFECTOS DE LOS Parámetros de soldadura incorrectos. Siguen los principios fundamenta- PERFILES Velocidad de desplazamiento del les y generales de soldadura. electrodo inapropiada para las exigen- cias de los parámetros operativos. ARCO INESTABLE Corriente insuficiente.
  • Page 52 PROBLEMA CAUSA CONTROL / SOLUCIÓN TIG: el arco no se Cable de soldadura incorrectamente Revise la conexión del cable de ceba, pero hay chispa conectado, o dañado, o demasiado soldadura, su estado y su longitud. de alta frecuencia largo. La distancia entre el electrodo de Reduzca la distancia entre el elec- tungsteno y la pieza es excesiva.
  • Page 53: Avant-Propos

    AVANT-PROPOS Attention : le fabricant n’assumera aucune responsabilité en cas de mo- difications non autorisées effectuées On vous remercie de la confiance accordée sur ses produits. Ces générateurs avec l’achat d’un ou plusieurs des appareils de courant doivent être utilisés uniquement figurant dans ce catalogue.
  • Page 54: Sécurité

    PROTECTION PERSONNELLE SÉCURITÉ • Les opérateurs et leurs assistants doivent protéger leur corps en endossant des combi- AVERTISSEMENT naisons de protection fermées et non inflam- Ce manuel contient les instructions relatives mables, sans poches ou revers. Les éven- à une installation correcte de l’Équipement tuelles traces d’huile ou de graisse présentes Électrique Électronique (EEE) acheté.
  • Page 55: Zone De Travail

    • Les opérateurs doivent porter un casque forte raison, ses assistants, devront être pro- ou masque ignifugés conçus de façon à pro- tégés par interposition de rideaux et d’écrans téger le cou et le visage (également sur les transparents opaques, auto-extinguibles et côtés) de la luminosité...
  • Page 56 ques non rouillées et non peintes afin d’éviter - positionner le générateur de courant hors de la formation de fumées nuisibles à la santé. la zone de travail - renforcer la protection individuelle, l’isole- ment du sol et de l’élément à souder vis-à-vis de l’opérateur (Fig.
  • Page 57: Circuit Électrique

    téléphoniques, etc. ne se situent à proximité avec haute température, en mouvement ou en des générateurs de soudage. tension; Pour les autres appareillages électriques situés - L’insertion d’objets solides d’un diamètre dans la zone de soudage, vérifier leur confor- supérieur à 12 mm; mité...
  • Page 58: Bruit

    de stockage et d’activités doivent être ouvertes PREMIERS SECOURS. et aérées, suffisamment éloignées des zones Chaque pays prescrit les équipements minimum opérationnelles et des sources de chaleur (< et de protection individuelle que l’employeur doit 50°C). Fixer les bouteilles, éviter les chocs et mettre à...
  • Page 59: Présentation

    PRÉSENTATION court-circuit pour protéger l’électrode. • Protection intelligente ; surtension, CARACTÉRISTIQUES GÉNÉRALES sous-tension, surintensité et surchauffe ; Votre générateur est un excellent poste de • Technologie PFC, ample variation de la soudage TIG en courant continu et courant tension d’alimentation de 95V à 275V 1ph. alternatif pulsé...
  • Page 60: Branchement Au Réseau Électrique .Fr

    • Le générateur doit être positionné à une di- générateurs sert uniquement pour le proces- stance minimum de 20 cm de n’importe quel sus de soudage à l’électrode infusible (TIG). Il n’est pas requis pour le processus de souda- obstacle (murs inclus) afin de ne pas limiter l’efficacité...
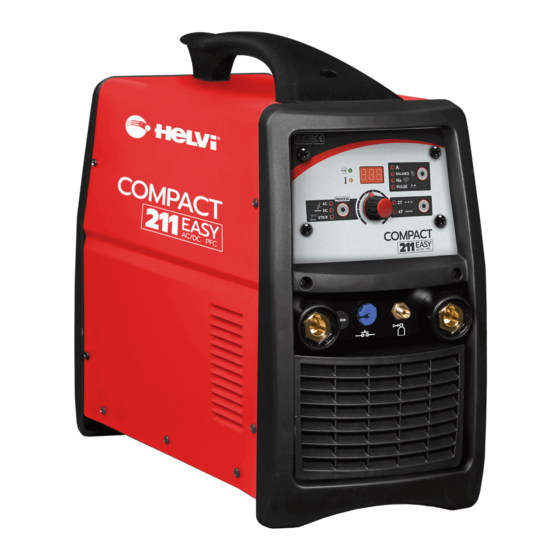
  • Page 61: Instructions D'usage

    INSTRUCTIONS D’USAGE PANNEAU ANTÉRIEUR (FIG.11) 1. Panneau de commandes 2. Molette de réglage du courant de souda- ge et des paramètres de soudage 3. Écran d’affichage des paramètres confi- gurés et de la tension ou courant en soudage. 4. Prise négative (-) : à relier au câble de masse ou à...
  • Page 62: Paramètres Fixes

    50÷250 (Iw<70A) d’onde. À un niveau imperceptible l’arc 50÷200 ( 70A≤Iw<100A) produit aussi une lumière ultraviolet- te et infrarouge; les rayons ionisés ne 50÷150 (100A≤Iw<140A) 50÷120 (140A≤Iw<170A) sont jamais perçus. La chaleur produite 50÷100 (170A≤Iw) par l’arc est utilisée dans le procédé de soudage pour fondre et assembler des •...
  • Page 63: Fonction De Protection Contre Les Courts-Circuits

    Attention: arc stable et une énergie concentrée sur le -Protéger les yeux joint/zone à souder. La longueur de l’effilage -Éviter tout dégât au moment d’enlever le rési- dépend du diamètre de l’électrode. À faible du avec la brosse et l’embout. intensité, bout pointu avec longueur d’aigui- ATTENTION! sage l = 3 x d, à...
  • Page 64: Fonction Du Cycle De Soudage Tig Fr

    • Brancher le câble de puissance de la torche à la prise négative (-) du générateur (pos. 4) • Brancher le raqccord du câble du bouton torche à la prise du générateur (pos. 7) (pin 1 et 2). • Brancher le raccord du tuyau de gaz au « 30 - 60 30 –...
  • Page 65: Schéma 1

    Amp. Min-Max dans le tableau des données - S’assurer que l’électrode dépasse de techniques). l’éjecteur d’au moins 4-5mm, et s’assurer aussi En relâchant le bouton torche, l’arc que sa pointe soit environ à 40°-60° de la pièce. s’éteint et le gaz de protection continue à sortir. - Régler le courant de soudage en con- T6-T7 Temps de Post-Gaz, de 1.0 à...
  • Page 66: Fonction De Protection Contre Les Courts-Circuits

    NOTE: a) La longueur de l’arc varie généralement de 3 à 6mm en fonction du type de joint, type et épaisseur du matériau etc. b) La torche doit avancer dans la direction de la soudure, sans mouvements latéraux, en gardant un angle de 45° avec la pièce à souder.
  • Page 67: Défauts De Soudage Possibles

    DÉFAUTS DE SOUDAGE POSSIBLES DÉFAUT CAUSE SOLUTION POROSITÉ Électrode acide sur acier à haute Utiliser une électrode basique. teneur en soufre. Oscillations excessives de l’élec- Rapprocher les bords à souder. trode. Distance excessive entre les pièces Avancer lentement au début. à...
  • Page 68 INCONVÉNIENT CAUSE REMÈDE Courant en sortie Potentiomètre de régulation défec- Contacter le service d’assistance. incorrect tueux / Carte de contrôle défec- tueuse. Tension d’alimentation principale Contrôler le réseau de distribution. trop basse. Le courant affiché ne Sonde de courant défectueuse Remplacer la sonde de courant.
  • Page 69: Vorwort

    VORWORT Achtung: der Hersteller wir im Fall von nicht genehmigten Veränderun- Wir möchten Ihnen für das uns entgegenge- gen an dessen Erzeugnissen von brachte Vertrauen danken, das Sie mit dem jeglicher Haftung enthoben. Diese Kauf eines oder mehrerer in dieser Gebrau- Stromgeneratoren dürfen ausschließlich für chsanweisung aufgeführten Geräts bewiesen die oben aufgeführten Schweißverfahren...
  • Page 70: Sicherheit

    SICHERHEIT PERSÖNLICHE SCHUTZAUSRÜSTUNG HINWEISE • Die Bediener und ihre Gehilfen müssen ih- Diese Handbuch enthält die Anweisungen für ren Körper durch Tragen von geschlossenen eine ordnungsgemäße Installation des von und nicht brennbaren Schutzanzügen ohne Ihnen erworbenen Elektro- und Elektronik- Taschen oder Umschläge schützen. Etwaige Öl- bzw.
  • Page 71: Arbeitsbereich

    • Die Schweißer müssen einen feuerfesten tige Vorhänge und Schirme, selbstlöschend Helm oder Maske tragen, die derart ausgelegt und der Norm EN 1598 entsprechend (die sind, dass sie den Hals und das Gesicht (auch Wahl der Farbe eines Vorhangs hängt vom seitlich) vor der Helligkeit des Lichtbogens Schweißverfahren und vom Wert der verwen- schützen (Blendung des sichtbaren Lichtbo-...
  • Page 72 reich) ausgeführt werden, müssen zusätzliche Vorsichtsmaßnahmen ergriffen werden, wie: - Die Verwendung von Generatoren, die mit dem Buchstaben “S” gekennzeichnet sind, - Durch Platzieren des Stromgenerators außerhalb des Arbeitsbereichs; - Durch Verbesserung des persönlichen Schutzes, der Isolierung vom Boden und des zu schweißenden Teils (Abb.
  • Page 73: Elektrische Anlage

    Prüfen Sie, dass sich in der Nähe der Teilen in Temperatur, in Bewegung oder Schweißgeneratoren keine Stromkabel an- unter Spannung; derer Geräte, Steuerleitungen, Telefonkabel, - das Einführen von Festkörpern mit ei- usw. befinden. nem Durchmesser von mehr als 12mm; Für andere Geräte im Schweißbereich über- - einen Schutz gegen Regen bei einer prüfen Sie deren Entsprechung mit der entspre- Höchstneigung zur Senkrechten von 15°.
  • Page 74: Schutzgas

    SCHUTZGAS Unter normalen Bedingungen übersteigt das Gewissenhaft die Gebrauchs- und Handha- von einem Schweiß- bzw. Schneidegene- bungsanweisungen des Gaslieferanten be- rator abgegebene Geräusch nicht 80 dBA; folgen, insbesondere: Die Lagerungs- und sollte Grund für die Annahme bestehen, dass Einsatzbereiche müssen offen und belüftet die Geräuschabgabe (Schalldruckpegel) die sein, ausreichend vom Arbeitsbereich und Schwelle von 85dBA übersteigt, muss der...
  • Page 75: Technische Daten

    PWM-Technologie mit IGBT; TECHNISCHE DATEN • Ausgezeichnete Leistung, digitale Die Datentabelle Ihres Geräts finden Sie auf der letzten Seite dieses Handbuchs. Steuerung, digitales Display; • Einfache und intuitive Regelung der Die Daten können nach dem mit der Ge- Parameter; • HF-Start;...
  • Page 76: Elektrischer Anschluss An Das Netz D

    ELEKTRISCHER ANSCHLUSS AN der “Drehknopf des Gasflussreglers” gelo- DAS NETZ ckert ist. Der gute Betrieb des Generators wird durch • Vor dem Öffnen des Hahns der Flasche einen ordnungsgemäßen Anschluss an das gründlich den Anzug des Schlauchanschlus- Stromnetz gewährleistet, der von Fachperso- ses überprüfen.
  • Page 77: Gebrauchsanleitung

    GEBRAUCHSANLEITUNG FRONTPLATTE (ABB.11A) 1. Bedientafel 2. Reglerknopf Schweißstromwerte Schweißparameter 3. Display für die Anzeige der eingestell- ten Parameter, der Spannung oder des Schweißstroms 4. Negative Buchse (-): Für den Anschluss des Massekabels oder der Elektrodenzan- ge bei MMA-Schweißen (abhängig von der, von der Elektrode geforderten Pola- rität, auf der Schachtel angegeben), dem Brenner beim WIG-Schweißen...
  • Page 78: Feste Parameter

    Einstellbereich das Werkstück beendet die Strahlung der elektromagnetischen Wellen, die als Licht 50÷250 (Iw<70A) und/oder Hitze wahrgenommen werden, 50÷200 ( 70A≤Iw<100A) je nach Wellenlänge. Auf einer nicht wahr- 50÷150 (100A≤Iw<140A) nehmbaren Ebene produziert der Bogen 50÷120 (140A≤Iw<170A) außerdem ultraviolettes infrarotes 50÷100 (170A≤Iw) Licht;...
  • Page 79: Kurzschlussschutzfunktion

    SCHWEISSEN MIT NICHT trolliert werden, indem die Elektrode leicht ABSCHMELZBARER ELEKTRODE angehoben oder gesenkt wird. Auch die (WIG AC/DC) Veränderung des Schweißwinkels kann das Schweißbad vergrößern und somit die Kapa- Das Gleichstrom-WIG-Schweißen wird be- zität der Schlackenfläche erhöhen. sonders für das Schweißen von Stahl und •...
  • Page 80: Vervollständigung Der Wig-Anlage Mit Brenner Mit Natürlicher Kühlung

    steuerung mit der Taste Pos. 8 (Led Iw blinkt) Die Zündung des Lichtbogens beim WIG- Schweißen wird durch Spitzen von hoher eingeschaltet wurde, den Schweißstrom re- geln. Spannung bei Hochfrequenz erfolgen; die- se Lösung (HF) erfordert keinen Kontakt • Der eingestellte Stromwert hängt vom der Elektrode mit dem Werkstück, um den Schweißverfahren, dem Durchmesser der schmelzfreien Elektrode und der Stärke des...
  • Page 81: Schweissvorgänge - 4-Takt-Schweissen

    SCHWEISSVORGÄNGE “Repeat Welding” Funktion : 4-TAKT-SCHWEISSEN – SCHEMA 1 Wenn Sie im 4T-Modus das zweite Mal den Brenner drücken und gedrückt halten. Brenner schnell drücken, um den Lichtbogen Das Elektroventil öffnet sich. Das Schutzgas zu stoppen, wird der Ausgangsstrom um die beginnt, zu strömen.
  • Page 82: Kurzschlussschutzfunktion

    • Vergewissern Sie sich, dass die Elektrode an KURZSCHLUSSSCHUTZFUNKTION der Gasdüse 4 - 5mm hinaussteht und stellen • Falls die Elektrode das Stück während des Sie zudem sicher, dass die Elektrode spitz mit Schweißens länger als 2 Sekunden berührt, einem Winkel von 40°-60° angeschliffen ist. fällt der Strom automatisch in 1 Sekunde auf •...
  • Page 83: Mögliche Schweissfehler

    MÖGLICHE SCHWEISSFEHLER DEFEKT URSACHEN EMPFEHLUNGEN POROSITÄT Säure; Elektrode auf Stahl mit erhöhtem Verwenden Sie die Standard-Elektro- Schwefelgehalt. den. Die Elektrode oszilliert zu sehr. Legen Sie die Kanten, die miteinander verschweißt werden sollen, näher aneinander. Werkstücke sind zu weit voneinander Zu Beginn langsam bewegen. entfernt.
  • Page 84 STÖRUNG URSACHE ABHILFE Spannungsfehler, gelbe Einschreiten des Über- Das Gerät ausschalten und einige Minuten Led leuchtet. stromschutzes warten. Danach einschalten bei leuchten- der gelben LED, an den Kundendienst wenden. Inverter-Platine defekt. Sich an den Kundendienst wenden. Der angezeigte Strom Stromsonde defekt Ersetezen Sie die Stromsonde.
  • Page 88 77613004...

Table des Matières