LG LRE6387ST Manuel Du Propriétaire
Masquer les pouces
Voir aussi pour LRE6387ST:
- Manuel d'installation (10 pages) ,
- Manuel du propriétaire (100 pages) ,
- Manuel d'installation (20 pages)
Table des Matières
Les langues disponibles
Les langues disponibles
Liens rapides
owner's manual
ELECTRIC RANGE
Please read this owner's manual thoroughly before operating
and keep it handy for reference at all times.
LRE6387ST
LRE6385ST
LRE6385SB
MFL55646611
LRE6385SW
LRE6383ST
LRE6383SB
(REV.10 180209)
Copyright © 2013 - 2018 LG Electronics Inc. All Rights Reserved.
LRE6383SW
LRE6321ST
LRE6321SW
LRE6383BD
www.lg.com
Chapitres
Table des Matières
Dépannage

Manuels Connexes pour LG LRE6387ST


Sommaire des Matières pour LG LRE6387ST
-
Page 49: Cuisinière Électrique
Veuillez lire attentivement ce manuel du propriétaire avant d’utiliser la machine et conservez-le aux fi ns de référence en tout temps. LRE6387ST LRE6385SW LRE6383SW LRE6383BD LRE6385ST LRE6383ST LRE6321ST LRE6383SB LRE6321SW LRE6385SB www.lg.com P/No.: MFL55646611 Copyright © 2013 - 2018 LG Electronics Inc. Tous droits réservés. - Page 50 TABLE DES MATIÈRES TABLE DES MATIÈRES Cuisson au four CONSIGNES DE SÉCURITÉ Cuisson par convection (sur certains modèles) IMPORTANTES Rôtissage par convection (sur certains modèles) APERÇU Grillage Grillage rapide (sur certains modèles) Accessoires Guide de cuisson au grilloir recommandée Aperçu de la cuisinière Repas d’enfants (sur certains modèles) Aperçu du panneau de commande Réchaud...
-
Page 51: Consignes De Sécurité Importantes
Communiquez toujours avec votre agent de service ou fabricant concernant les problèmes que vous ne comprenez pas. Vous pouvez télécharger le manuel du propriétaire au http://www.lg.com. Ceci est le symbole d’alerte de sécurité. Ce symbole vous alerte des dangers potentiels pouvant provoquer des dommages matériels et/ou des blessures... -
Page 52: Précautions De Sécurité
CONSIGNES DE SÉCURITÉ IMPORTANTES Support anti- Plaque murale y Retirez les tiroirs-réchaud ou de basculement stockage et inspectez visuellement La vis doit pénétrer dans le pour voir si les pattes arrières de bois ou le béton Environ 0,65 po nivellement sont bien insérées dans (16,5 mm) le support anti-basculement. -
Page 53: Enlever Le Materiel Flammable De L'appareil
CONSIGNES DE SÉCURITÉ IMPORTANTES MISE EN GARDE y NE COUVREZ PAS les parois, les grilles, le fond ou toute autre partie du four avec du papier d’aluminium ou tout autre matériau. Ceci pourrait perturber la distribution de chaleur, produire de mauvais résultats de cuisson et causer des dommages permanents à l‘intérieur du four (le papier d’aluminium fondera à... -
Page 54: Sécurité Électrique
CONSIGNES DE SÉCURITÉ IMPORTANTES y Ne stockez ou n'utilisez pas de matériaux inflammables dans le four ou à proximité ou sur la table de cuisson. Les matériaux inflammables incluent le papier, le plastique, les manches de casseroles, le linge de maison, les revêtements muraux, les rideaux, et l'essence ou autres vapeurs et liquides inflammables tels que la graisse ou l'huile de cuisson. -
Page 55: Sécurité Durant L'utilisation
CONSIGNES DE SÉCURITÉ IMPORTANTES y Utilisez un thermomètre de friture, si possible, pour prévenir la surchauffe des matières grasses au-delà du point de fumage. y Utilisez la plus petite quantité de matière grasse possible pour obtenir une friture plate ou une friture en bain efficace. Remplir la poêle de trop de matières grasses peut occasionner des déversements lorsque la nourriture est ajoutée. -
Page 56: Les Poignées Des Ustensiles Doivent Être Tournées Vers L'intérieur Et Ne
CONSIGNES DE SÉCURITÉ IMPORTANTES y Ustensiles de cuisson vernissés. Seulement certains types de verre, verre/ céramique, céramique, terre cuite, ou autres ustensiles vernissés sont convenables pour les surfaces de cuisinière sans se briser en raison d’un changement soudain de la température. y Les poignées des ustensiles doivent être tournées vers l’intérieur et ne doivent pas s’étendre à... -
Page 57: Sécurité Des Enfants
CONSIGNES DE SÉCURITÉ IMPORTANTES SÉCURITÉ DES ENFANTS AVERTISSEMENT y Gardez les enfants et les animaux loin du four. y Ne laissez jamais un enfant s’accrocher à la porte du four. y Ne laissez pas les enfants se glisser dans le four. y Les parties accessibles peuvent devenir chaudes lorsque le gril est en cours d’utilisation. - Page 58 CONSIGNES DE SÉCURITÉ IMPORTANTES y Ne cuisinez pas sur une surface de cuisson brisée. Si la surface de cuisson brisait, des solutions de nettoyage et des déversements pourraient pénétrer dans la surface de cuisson brisée et créer un risque de choc électrique. Communiquez avec un technicien qualifié...
-
Page 59: Sécurité Lors Du Nettoyage
CONSIGNES DE SÉCURITÉ IMPORTANTES y Les batteries de cuisine qui ont un fond rugueux peuvent marquer ou égratigner la surface de cuisson. y Ne glissez pas des éléments métalliques ou en verre sur la surface de cuisson. y N’utilisez pas une batterie de cuisine dont le fond est sale ou contient uneaccumulation de saletés. -
Page 60: Aperçu
Manuel d’installation REMARQUE y Contactez le Service clientèle LG si certains accessoires sont manquants. y Pour votre sécurité et la longévité du produit, utilisez exclusivement les composants autorisés. y Le fabricant décline toute responsabilité en cas de dysfonctionnement du produit ou d'accidents consécutifs à l'utilisation de pièces non autorisées et achetées de façon isolée. -
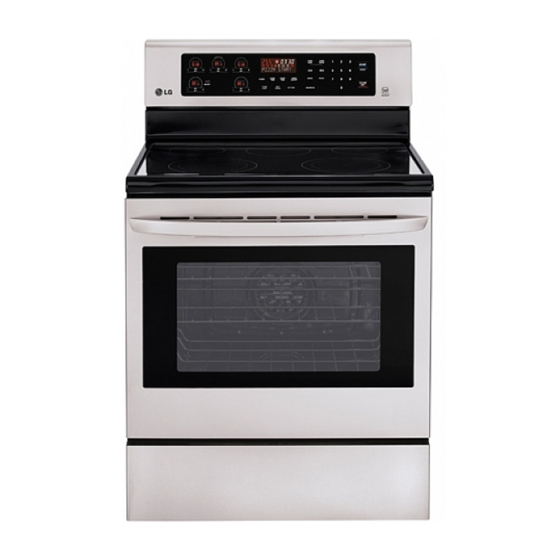
Page 61: Aperçu De La Cuisinière
APERÇU APERÇU DE LA CUISINIÈRE Assurez-vous que vous maîtrisez le nom et la fonction de chaque pièce. * Dans ce manuel, il est possible que certaines caractéristiques et l’aspect soient différents de votre modèle. Pour Modéle: LRE6387, LRE6385 Disjoncteurs Panneau de commande Prise pour aperspareils electromenagers Évent du four... - Page 62 APERÇU APERÇU DE LA CUISINIÈRE Pour Modéle: LRE6321 Disjoncteurs Panneau de commande Prise pour aperspareils electromenagers Évent du four Élément simple Élément simple Élément double Interrupteur de lampe de four automatique Verrou d’auto-nettoyage Grille standard Joint d’étanchéité Porte de four Support anti-basculement Tiroir de rangement...
-
Page 63: 5 Aperçu Du Panneau De Commande
APERÇU APERÇU DU PANNEAU DE COMMANDE Pour Modéle: LRE6387, LRE6385 Commande de l’élément Commandes Boutons de de surface de cuisson du four nombres Fonctionnalités Bouton de démarrage/ verrouillage Bouton d’annulation Bouton du tiroir-réchaud Pour Modéle: LRE6383 Pour Modéle: LRE6321 Indicateur de surface chaude HS (Hot surface) L’erreur HS s’achera lorsque l’element est eteint durant le cycle d’auto-nettoyage. -
Page 64: Fonctionnalités
FONCTIONNALITÉS FONCTIONNALITÉS RÉGLAGES Réglages minimum et maximum par défaut Toutes les fonctionnalités citées disposent d’un réglage Utilisez le bouton SETTING (RÉGLAGE) pour régler les d’heure ou de température minimum et maximum qui fonctionnalités de Convection à conversion automatique, peut être saisi dans la commande. Un bip d’acceptation Ajustement de temperature du four, Langue, Voyant de la saisie sonnera chaque fois que vous appuyez sur une d’alarme de préchauf fage, Volume de bip et pour... -
Page 65: 7 Minuterie En Marche/Arrêt
FONCTIONNALITÉS MINUTERIE EN MARCHE/ARRÊT PRÉCHAUFFAGE RAPIDE (SUR CERTAINS MODÈLES) La fonctionnalité TIMER ON/OFF (MINUTERIE EN MARCHE/ARRÊT) sert de minuterie additionnelle dans La fonctionnalité de préchauffage rapide peut préchauffer la cuisine. Elle émettra un signal sonore lorsque l’heure votre four jusqu’à 20 fois plus vite que la fonction de réglée est dépassée. -
Page 66: Ajustement De Température Du Four
FONCTIONNALITÉS AJUSTEMENT DE TEMPÉRATURE VOYANT D’ALARME DE DU FOUR PRÉCHAUFFAGE Vous pourriez trouver que votre nouveau four cuit les Lorsque le four atteint sa température de réglage, le aliments différemment que le four que vous venez de voyant d’alarme de préchauffage clignotera jusqu’à ce que remplacer. -
Page 67: Lumière Du Four
FONCTIONNALITÉS LUMIÈRE DU FOUR Pour régler le four pour un démarrage différé (exemple, pour CUIRE à 300 °F et démarrer en- La lumière intérieure du four s’allume automatiquement suite le mode cuisson à 4h30) : lorsque vous ouvrez la porte du four. La lumière du four Assurez-vous que l’horloge est réglée à... - Page 68 FONCTIONNALITÉS REMARQUE TEMPS DE CUISSON (CUISSON Pour régler la fonction CHAUFFER de sorte qu’elle MINUTÉE) démarre à la fin du cycle de cuisson minutée, répétez les étapes 1 à 4 puis appuyez sur le bouton WARM La fonction de CUISSON MINUTÉE vous permet de régler (CHAUFFER).
-
Page 69: Utilisation De La Surface De Cuisson
UTILISATION DE LA SURFACE DE CUISSON UTILISATION DE LA Indicateur de surface chaude SURFACE DE CUISSON HS (Hot surface ou Surface chaude) s’affichera une fois que l’élément est éteint ou durant le cycle d’auto- nettoyage. L’indicateur HS restera allumé jusqu’à ce ZONES DE CUISSON que la surface refroidisse à... -
Page 70: Pour Allumer La Zone Chauffante (Sur Certains Modèles)
UTILISATION DE LA SURFACE DE CUISSON Pour allumer un élément DOUBLE Pour allumer la Zone chauffante (sur certains modèles) DUAL WARM ZONE Vous pouvez régler les éléments doubles selon la grandeur de la casserole/poêle que vous utilisez. Utilisez la Zone chauffante pour garder la nourriture chaude après qu’elle ait été... -
Page 71: Conseils Pour La Mise En Conserve
UTILISATION DE LA SURFACE DE CUISSON Réglages recommandés de la surface de UTILISATION DE LA BONNE cuisson BATTERIE DE CUISINE L’utilisation de la bonne batterie de cuisine peut prévenir plus- Élément Temp. Utilisation recommandée ieurs problèmes, tels que les aliments qui prennent plus long- 8,5 - Hi y Pour faire bouillir le liquide temps à... -
Page 72: Utilisation Du Four
UTILISATION DU FOUR UTILISATION DU FOUR Placement des grilles et casseroles AVANT D'UTILISER LE FOUR REMARQUE • Lorsque vous utilisez un thermomètre de four dans la cavité du four, la température peut différer de la température que vous aurez réglée. •... -
Page 73: Commandes Du Four
UTILISATION DU FOUR COMMANDES DU FOUR CUISSON PAR CONVECTION (SUR CERTAINS MODÈLES) CUISSON AU FOUR Le système de convection utilise un ventilateur pour circuler la chaleur de façon uniforme dans le four. Cette La fonction BAKE (CUISSON AU FOUR) est utilisée pour amélioration de la distribution de chaleur permet d’obtenir préparer de la nourriture telle que des pâtisseries, .pains, une cuisson plus uniforme et d’excellents résultats lorsqu’on... -
Page 74: Rôtissage Par Convection (Sur Certains Modèles)
UTILISATION DU FOUR Conseils relatifs à la cuisson par convection REMARQUE • Les biscuits et petits gâteaux doivent être cuits sur des Le ventilateur du four fonctionnera pendant le rôtissage grilles sans bords ou à bords très bas pour permettre à l’air par convection. -
Page 75: Grillage
UTILISATION DU FOUR GRILLAGE Fumée La fonction Grillage utilise une chaleur intense provenant En raison de la chaleur intense associée au grillage, il est de l’élément chauffant supérieur pour cuire la nourriture. normal de voir de la fumée durant le processus de cuisson. La fonction GRILLAGE fonctionne mieux pour les coupes de Cette fumée est un sous-produit naturel de grillage et ne viandes tendres, le poisson et les légumes tranchés fins. - Page 76 UTILISATION DU FOUR Tableau de la cuisson au gril (Modèle gril rapide: LRE6387, LRE6385) *grille décalée Hi (Élevé) Coupe Taille/épaisseur Cuisson Réglage du Position de Temps (min) grilloir la grille Côté 1 Côté 2 Saignant Hi (Élevé) 5:00 3:00 Boeuf Filet 1 po À...
- Page 77 UTILISATION DU FOUR Tableau de la cuisson au gril (Modèle gril rapide: LRE6387, LRE6385) *grille décalée Hi (Élevé) Coupe Taille/épaisseur Cuisson Réglage du Position de Temps (min) grilloir la grille Côté 1 Côté 2 Saignant Hi (Élevé) 4:00 3:00 Boeuf Bifteck de hampe 1/2 po -3/4 po À...
-
Page 78: Conseils Pour La Cuisson Au Grilloir
UTILISATION DU FOUR Tableau de la cuisson au gril (Modèle gril conventionnel: LRE6383, LRE6321) Coupe Taille/épaisseur Cuisson Réglage Position Commentaires Temps (min) (Élevé) Côté Côté grilloir la grille Boeuf Steak de boeuf 1 à 1 1/2 lbs. Saignant Hi (Élevé) F 2 - 3 Les steaks de moins de 1”... -
Page 79: Repas D'enfant (Sur Certains Modèles)
UTILISATION DU FOUR REPAS D’ENFANT (SUR CERTAINS RÉCHAUD MODÈLES) Cette fonction conservera une température de four de 170°F. La fonction WARM (RÉCHAUD) gardera la nourriture Cette fonction est spécialement conçue pour cuisiner cuite chaude pendant 3 heures suivant la fin de sa cuisson. des repas d’enfants populaires tels que la pâte de pizza La fonction Réchaud peut être utilisée sans autres opéra- régulière, la pizza à... -
Page 80: Favoris (Sur Certains Modèles)
UTILISATION DU FOUR MODE SHABBAT REMARQUE • Pour éviter de réduire la température du four et le Le mode Shabbat est généralement utilisé pendant le prolongement du temps de fermentation, n’ouvrez pas Shabbat et les fêtes juives. Lorsque le mode Shabbat est la porte du four sans raison. -
Page 81: Tiroir-Réchaud
être utilisé avec et il doit être utilisé seulement pour ranger la batterie Réglage de la fonction WARM de cuisine fournie spécifiquement par LG avec votre cuisinière. • Ne placez pas de la nourriture ou du papier d’aluminium (RÉCHAUD): directement sur la surface ou la base du tiroir-réchaud. -
Page 82: Entretien Et Nettoyage
ENTRETIEN ET NETTOYAGE ENTRETIEN ET Résidus brûlés 1. Pendant que la surface de cuisson est encore chaude, NETTOYAGE enlevez tout dépôt de nourriture brûlée ou déversée de la surface de cuisson en verre/céramique à l’aide d’un grattoir à lame métallique approprié (similaire à un grattoir pour enlever la peinture d’un carreau de NETTOYER LA SURFACE DE vitre —... -
Page 83: Marques De Métal Et Égratignures
ENTRETIEN ET NETTOYAGE AUTO-NETTOYAGE IMPORTANT : Si du sucre ou de la nourriture contenant du sucre Le cycle d’auto-nettoyage utilise des températures (conserves de fruits, ketchup, sauce tomate, gelées, extrêmement chaudes pour nettoyer la cavité du four. fudge, bonbons, sirops, chocolat, etc.), du plastique ou Lorsque le cycle d’autonettoyage est en fonction, vous du papier d’aluminium fondent sur la surface de cuisson, pourriez remarquer de la fumée ou une odeur. -
Page 84: Réglage De La Fonction Auto-Nettoyage
ENTRETIEN ET NETTOYAGE MISE EN GARDE Durant le cycle d’auto-nettoyage, les éléments de la surface de cuisson et le tiroir-réchaud ne peuvent pas être NE forcez PAS la porte du four à rester ouverte lorsque utilisés. l’icône de verrou est affichée. La porte du four restera verrouillée jusqu’à... - Page 85 ENTRETIEN ET NETTOYAGE Durant l’auto-nettoyage Après le cycle d’auto-nettoyage y Le cycle d’auto-net toyage utilise des températures y La porte du four restera verrouillée jusqu’à ce que extrêmement chaudes pour nettoyer la cavité du four. latempérature ait refroidi. Lorsque le cycle d’auto-nettoyage est en fonction, vous y Vous pourriez voir des cendres de couleur blanche pourriez remarquer de la fumée ou une odeur.
-
Page 86: Easyclean® (Sur Certains Modèles)
EasyClean® tiennent compte des avantages du pour la saleté plus difficile et incrustée. nouvel émail LG pour aider à déloger les saletés sans produits chimiques, et elle fonctionne à l'aide d'EAU UNIQUEMENT pendant 20 minutes à basse température pour aider à déloger les saletés Les AVANTAGES d'EasyClean®... -
Page 87: Guide D'instruction Easyclean
ENTRETIEN ET NETTOYAGE GUIDE D'INSTRUCTION EasyClean® 1. Retirer les grilles et les accessoires du four. 7. Une tonalité se fera entendre à la fin du cycle de 20 minutes. Appuyez sur le bouton CLEAR OFF afin d'effacer l'affichage et la 2. -
Page 88: Nettoyage De L'extérieur
ENTRETIEN ET NETTOYAGE NETTOYAGE DE L’EXTÉRIEUR Gril lèche-frite et grille Moulure peinte et décorative Pour un nettoyage général, utilisez un chiffon avec de l’eau savonneuse chaude. Pour des saletés plus difficiles et une y Ne rangez aucun gril lèche-frite ou grille sale quelque part dans accumulation de graisse, appliquez un détergent liquide la cuisinière. -
Page 89: Retrait Et Remplacement De La Porte Du Four Et Du Tiroir
ENTRETIEN ET NETTOYAGE RETRAIT ET REMPLACEMENT DE Replacer la porte du four LA PORTE DU FOUR ET DU TIROIR 1. Tenez fermement les deux côtés de la porte vers le MISE EN GARDE haut. • Soyez prudent lorsque vous retirez et soulevez la porte. -
Page 90: Retirer Le Tiroir
ENTRETIEN ET NETTOYAGE Retirer le tiroir Replacer le tiroir AVERTISSEMENT 1. Tirez les patins de roulement en avant des patins du Déconnectez le courant électrique de la cuisinière châssis à partir du fusible principal ou du panneau des 2. Alignez le patin sur chaque côté du tiroir avec les disjoncteurs. - Page 91 Puis-je laisser mes grilles dans le four Quels types de batteries de cuisine sont pendant que le cycle d’auto-nettoyage recommandés pour utilisation avec ma fonctionne? surface de cuisson? Non. Bien que cela n’endommage pas les grilles, celles- y Les casseroles doivent avoir un fond plat et des côtés ci pourraient se décolorer et devenir difficiles à...
- Page 92 Ma cuisinière est toujours sale après avoir utilisé Est-il sécuritaire pour le brûleur du gril et le cycle EasyClean®. Qu'est-ce que je devrais l'élément chauffant soient mouillés au cours du faire d'autre? cycle EasyClean®? Le cycle EasyClean® aide uniquement à soulever la saleté Oui.
-
Page 93: Dépannage
DÉPANNAGE DÉPANNAGE AVANT DE FAIRE UNE DEMANDE DE SERVICE Problème Causes possibles/Solutions La cuisinière n’est pas à y Mauvaise installation Placez une grille du four au centre du four. Placez un palier sur niveau. la grille du four. Ajustez les pattes de mise à niveau à la base de la cuisinière jusqu’à ce que la grille du four soit à... - Page 94 DÉPANNAGE Problème Causes possibles/Solutions Le four ne fonctionne pas. y La fiche n’est pas insérée complètement dans la prise électrique. Assurez-vous que la fiche est branchée dans une prise sous tension et mise à la terre. y Un fusible dans votre maison pourrait avoir brûlé ou le disjoncteur a été déclenché. Remplacez le fusible ou réinitialisez le disjoncteur.
- Page 95 DÉPANNAGE Problème Causes possibles/Solutions La température du four est trop y Le capteur du four a besoin d’être ajusté. chaude ou trop froide. - Consultez la section de réglage de la température du four dans la section d’option. On trouve des égratignures y Les particules grosses telles que le sel ou le sable qui se trouve entre la surface de cuisson et ou abrasions sur la surface de les ustensiles peut causer des égratignures.
- Page 96 DÉPANNAGE Problème Causes possibles/Solutions Vous voyez le mot LOCKED y La porte du four est verrouillée, car la température à l’intérieur du four n’a pas chuté (VERROUILLÉ) sur l’affichage en dessous de la température de verrouillage. lorsque vous voulez cuisiner. - Appuyez sur le bouton CLEAR OFF (ANNULER).
-
Page 97: Garantie Limitée (Canada)
Couverture pour réparations à domicile, pour produit sous garantie, sera fournie si le Produit se trouve dans un rayon de 150 km du centre de service autorisé (ASC) le plus près, tel que déterminé par LG Canada. Si votre Produit est situé à l’extérieur du rayon de 150 km d’un centre de service autorisé, tel que déterminé par LG Canada, il en ira de votre responsabilité... - Page 98 être combiné ou regroupé avec un différend faisant intervenir le produit ou la réclamation d'une personne ou entité tierce. Plus précisément et sans limiter la portée de ce qui précède, sauf dans la mesure où une telle interdiction n'est pas autorisée en droit, en aucun cas un différend entre vous et LG ne peut être traité dans le cadre d'un recours collectif.
- Page 99 NOTES...