Table des Matières

Publicité

Les langues disponibles
  • FR

Les langues disponibles

  • FRANÇAIS, page 37

Liens rapides

812/00 corretto
26-09-2001 9:24
Pagina 1
I
Manuale di montaggio per apricancello
GB
Double wing gate operator assembly manual
F
Manuel de montage de l'ouvre portail double battants
SP
Manual de instrucciones de l'abre verja double puerta batiente
D
Bedienungs-und Montageanleitung für automatischer
Toröffner für Doppelflügeltore
NL
Montagehandleiding voor de poortopener
P
Manual de montagem do dispositivo para abrir portões
Ref. HC 800-800 / D
Ref. HC 412/00 - 812/00
Ref. HC 412/00/400-812/00/400

Publicité

Table des Matières
loading

Sommaire des Matières pour Ducati HC 800

  • Page 1 Manual de instrucciones de l’abre verja double puerta batiente Bedienungs-und Montageanleitung für automatischer Toröffner für Doppelflügeltore Montagehandleiding voor de poortopener Manual de montagem do dispositivo para abrir portões Ref. HC 800-800 / D Ref. HC 412/00 - 812/00 Ref. HC 412/00/400-812/00/400...
  • Page 2 812/00 corretto 26-09-2001 9:24 Pagina 2 Fig.1 Fig.2 Fig.3...
  • Page 3 812/00 corretto 26-09-2001 9:24 Pagina 3 Fig.4 Fig.5...
  • Page 4 812/00 corretto 26-09-2001 9:24 Pagina 4 Fig.6...
  • Page 5 812/00 corretto 26-09-2001 9:24 Pagina 5 Fig.7...
  • Page 6 812/00 corretto 26-09-2001 9:24 Pagina 6 Fig.8...
  • Page 7 812/00 corretto 26-09-2001 9:24 Pagina 7 Fig.9...
  • Page 8 812/00 corretto 26-09-2001 9:24 Pagina 8 Fig.10 Fig.11...
  • Page 9 812/00 corretto 26-09-2001 9:24 Pagina 9 Fig.12 Fig.13 Ref. 7853 (CTR35 / CTR35/S)
  • Page 10 812/00 corretto 26-09-2001 9:25 Pagina 10 Fig.14 7853 / CTR35 7853 / CTR35/S ref.6025 ref.7500...
  • Page 11 812/00 corretto 26-09-2001 9:25 Pagina 11 Fig.15 STOP...
  • Page 12 812/00 corretto 26-09-2001 9:25 Pagina 12 Fig.16...
  • Page 13 812/00 corretto 26-09-2001 9:25 Pagina 13 Fig.17...
  • Page 14 812/00 corretto 26-09-2001 9:25 Pagina 14 Fig.18 Fig.19 10 cm 12 cm 5 cm 5 cm...
  • Page 15 812/00 corretto 26-09-2001 9:25 Pagina 15 Fig.20 R14/96 R3/96 R37/96 R4/96 R2/96 R9/96 R28/96 R1/96 R38/96 R22/96 7853 R26/96 R8/96 R11/96 R39/96 R70/96 R15/96 R40/96 R68/96...
  • Page 16 812/00 corretto 26-09-2001 9:25 Pagina 16...
  • Page 17: Table Des Matières

    “Vi ringrazio di aver dato fiducia 2.1 Montaggio supporto anteriore alla nostra azienda.” 2.2 Fissaggio secondo attuatore 3.0 Impianto elettrico Lorenzo Ducati 3.1 Collegamenti elettrici standard 3.2 Collegamenti speciali 3.3 Regolazioni 3.4 Collegamenti elettrici speciali: fotocellule 3.5 Batteria di soccorso 3.6 Fissaggio selettore a chiave...
  • Page 18: Composizione Dei Kit Apricancelli

    N. 1 Chiave di sblocco. I N. 1 Chiave di sblocco. I N. 1 Lampeggiatore. E N. 1 Lampeggiatore. E HC 800 / D max 2.3 X 2m N. 1 Coppia fotocellule. M Uscite extra: elettroserratura12V, apertura N. 1 Antenna con cavo. N...
  • Page 19: Come Funziona L'apricancello

    812/00 corretto 26-09-2001 9:25 Pagina 19 B: Apparecchiatura di controllo. 1.4 Consigli di sicurezza - Contenitore plastico grado di protezione IP44. Provvisto di N. 3+2 Fig. 14 P2 passacavi. - Scheda controllo 7853 in versione CTR35 e/o CTR35/S Il sistema è provvisto di una sicurezza elettronica antischiacciamento - Relays da 80 amp.
  • Page 20: Montaggio Supporto Anteriore

    812/00 corretto 26-09-2001 9:25 Pagina 20 della stessa al muro. Questa operazione è di estrema importanza in del perno Fig. 1 pos H. quanto determinerà i seguenti parametri: Quindi provvedere ad installare al terreno i fermi “STOP”. 1. Velocità di apertura del cancello. - Aprire l’anta del cancello fino alla posizione desiderata.
  • Page 21: Collegamenti Elettrici Standard

    812/00 corretto 26-09-2001 9:25 Pagina 21 4: Cavo collegamento selettore a chiave(non fornito) Attenzione: Un’anta si aprirà prima dell’altra, è normale. In questo 5: Scatole di derivazione (non fornita) Altezza minima dal terreno modo si eviteranno fastidiosi problemi di accavallamento delle ante. 20 cm.
  • Page 22: Regolazioni

    812/00 corretto 26-09-2001 9:25 Pagina 22 5-6 ad un pulsante che attivera’ il solo passaggio pedonale. 1. Aprire le due ante del cancello manualmente utilizzando lo sblocco di emergenza Fig. 3. Attenzione dando un impulso al pulsante collegato ai morsetti 5-6 N.O. Attenzione: le ante dovranno essere completamente aperte.
  • Page 23: Batteria Di Soccorso

    812/00 corretto 26-09-2001 9:25 Pagina 23 Non montare mai l’apparecchio ricevitore di fronte al sole. un portalampada e lampada da 12 V 10W. Nel caso di doppio dispositivo di sicurezza alternare un Attenzione: Non oltrepassare mai questa potenza,in quanto, si ricevitore con un trasmettitore Fig.
  • Page 24: Lista Controllo 20 Punti

    812/00 corretto 26-09-2001 9:25 Pagina 24 etc. fino a 12. 1. Le dimensioni del cancello non devono superare i limiti massimi Avete 30 sec. per effettuare la programmazione, trascorsi i quali se indicati .Pag.P1 non saranno stati inseriti tutti i 12 codici, il telecomando tornerà alla 2.
  • Page 25: Aiuto

    812/00 corretto 26-09-2001 9:25 Pagina 25 4.1 Aiuto... ricerca guasti Sintomo: Causa: Soluzione: 1.Cambiare la batteria al telecomando oppure 1.0 .Dando un impulso non apre 1.Batteria telecomando scarica provvisoriamente usare il selettore a chiave. 2.Alimentazione230V mancante. 2.Controllare l’interruttore di rete 23OV oppure il fusibile 3.Codice del telecomando diverso da quello della del trasformatore A.0.8.
  • Page 26: Ricambi

    812/00 corretto 26-09-2001 9:25 Pagina 26 4.2 Ricambi 4.3 Accessori originali (vedi catalogo) RIF. DESCRIZIONE ART. DESCRIZIONE Tubo acciaio inossidabile con madrevite e forcella 7012 Coppia fotodispositivo di sicurezza Vite di traslazione con cuscinetto a sfere, ingranaggio e 5000 Selettore a chiave sistema di sblocco 7500 Lampeggiatore...
  • Page 27 2.0 Actuators assembly to k plate “Thank you for having relied 2.1 Front support assembly on our company”. 2.2 Second actuator assembly 3.0 Wiring Lorenzo Ducati 3.1 Standard electric connections 3.2 Special connections 3.3 Settings 3.4 Special electric connections: photocells 3.5 Emercency battery 3.6 Key selector...
  • Page 28: Kit Composition

    No. 1 Unlocking key. I No. 1 Blinker. E No. 1 Blinker. E HC 800 / D max 2.3 x 2 m No. 1 Pair of photocells. M Extra outputs: 12V electric lockset, pedestrian opening, temporised No. 1 Antenna with cable. N...
  • Page 29: How To Operate The Device

    812/00 corretto 26-09-2001 9:25 Pagina 29 B: System control equipment. At intervals wash the actuators with water and soap. - Plastic casing with IP44 protection degree, provided with No. 3+2 The actuator piston rod made of stainless steel has NEVER to be fairleads.
  • Page 30: For Higher Safety

    812/00 corretto 26-09-2001 9:25 Pagina 30 1. Gate opening speed 2. Actuator thrust strength The system is provided with a crushing-proof electronic safety device Fundamental elements to make this choice are the following: controlled by microprocessor. Check the perfect alignment of the gate hinge pivots for a correct adjustment.
  • Page 31: Second Actuator Assembly

    812/00 corretto 26-09-2001 9:25 Pagina 31 - Now the “H” front plate can be fixed following this scheme. 3.1 Standard electric connections - You have to have unlocked the actuator through the pawl. Fig.3 1. Open the wing till the STOP is reached. Kit Ref.
  • Page 32: Special Connections

    812/00 corretto 26-09-2001 9:25 Pagina 32 3.3 Setting: Programmer functions 7+/8- 12V dc power supply for the photocells or external radiocontrol. Fig.14 9/10 12V max 10 W external blinker 11/12 M1 (11 brown 12 blue) The software has already been programmed with the step-to-step 13/14 M2 (13 brown 14 blue) function.
  • Page 33: Special Electric Connections: Photocells

    812/00 corretto 26-09-2001 9:25 Pagina 33 The battery can be fit in the proper space inside the plastic casing containing the control unit. The programmer 7853 is provided with an 3.4 Special electric connections: photocells automatic device able to keep the battery charged. Provide for the connection of the battery to the Fig.
  • Page 34: Control List: 20 Points

    812/00 corretto 26-09-2001 9:25 Pagina 34 Caution: Firmly fix the device as vibrations may reduce the bulb How to enter the new transmitter code in the programmer: lifetime. “SELF-LEARNING” function Important: cancel the pre-set standard code keeping P1 key 3.8 Transmitter and receiver coding pressed for 15 sec.
  • Page 35: Help

    812/00 corretto 26-09-2001 9:25 Pagina 35 4.1 Help..trouble shooting Problem: Cause: Remedy: 1.0 The gare does not open when a pulse is given 1. Telecontrol battery discharged 1. Replace the telecontrol battery or temporarily use the 2. 230V power supply missing key selector 3.
  • Page 36: Spare Parts

    812/00 corretto 26-09-2001 9:25 Pagina 36 4.2 Spare parts: 7853/D Completed electronic programmer CTR35/S (R78-R72- R71) 12V Actuator(R22-R26-R39-R40-R68-R70)with upper and REF. DESCRIPTION lowerprotection Stainless steel tube with clevis and nut screw 300 mm R132 12 V 10W Bulb R1/400 Stainless steel tube with clevis and nut screw 400 mm 12/T/BAT Transmitter 12 V alkaline battery Screw provided with ball bearing, gear and unlocking...
  • Page 37 “Merci d’avoir eu confiance dans 2.1 Montage du support antérieur notre entreprise” 2.2 Fixation du second verin 3.0 Equipement électrique Lorenzo Ducati 3.1 Branchements électriques standards 3.2 Branchements spéciaux 3.3 Réglages 3.4 Branchements électriques spéciaux: photocellules 3.5 Batterie de secours 3.6 Sélecteur à...
  • Page 38: Composition Du Kit

    No. 1 Clé de déblocage. I No. 1 Clignotant. E No. 1 Clignotant. E HC 800 / D max 2,3 x 2 m No. 1 Paire de photocellules. M Sorties extra: électroserrure 12 V, ouverture piétonnière, lumière No. 1 Antenne avec câble. N jardin temporisé...
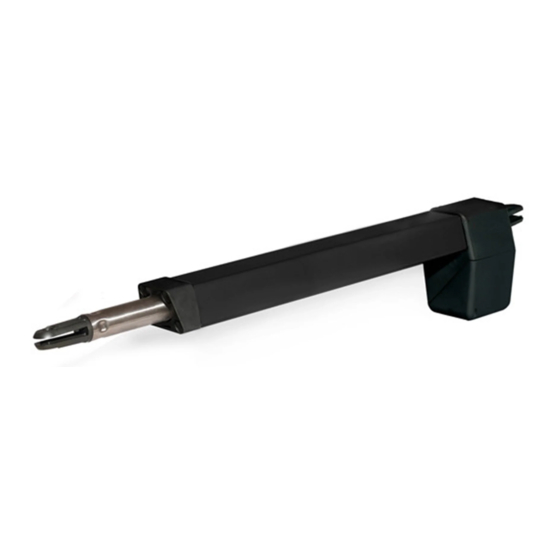
  • Page 39: Fonctionnement De L'ouvre-Portail

    812/00 corretto 26-09-2001 9:25 Pagina 39 B: Appareil de contrôle. La tige du vérin en acier inoxydable ne doit JAMAIS être lubrifiée. - Boîtier en plastique. Degré de protection IP44. Doté de No. 3+2 1.4 Conseils de sécurité passe-câbles. Fig. 14 P2 - Carte de contrôle modèle 7853 CTR35 et/ou modèle CTR35/S.
  • Page 40: Les Dimensions Du Portail (Poids/Longeur)

    812/00 corretto 26-09-2001 9:25 Pagina 40 Procéder au montage de la plaque réglable “K” et la fixer sur le mur. pivot Fig.1 pos. H. Cette opération est très importante puisqu’elle détermine les Procéder ensuite à l’installation des arrêts “STOP”. paramètres suivants: - Ouvrir le battant jusqu’à...
  • Page 41: Connexions Électriques Standards

    812/00 corretto 26-09-2001 9:25 Pagina 41 7+/8- Alimentation 12V cc pour photocellules ou radiocommande 3.1 Connexions électriques standards extérieur. 9/10 Clignotant extérieur 12V max 10 W 11/12 M1 (11 marron 12 bleu) Kit Ref. 412/812/00 appareil CTR35 13/14 M2 (13 marron 14 bleu) L’appareil électronique des nouveaux Kits HC 812/00 séries 2000 est 17/16 Photocellule contact normalement fermé, connecter si l’on pourvu d’un nouveau processeur de la Microchip de nouvelle...
  • Page 42: Réglages: Fonctions Du Programmateur

    812/00 corretto 26-09-2001 9:25 Pagina 42 Attention, avec une impulsion de la touche connecté aux bornes 5-6 2.Appuyer sur la touche P2 jusqu’à ce que le LED 2 et le clignotant normalement ouvert, on ouvrira le battant correspondant au premier sont allumés moteur M1.
  • Page 43: Sélecteur À Clé

    812/00 corretto 26-09-2001 9:25 Pagina 43 électrique. Installant une batterie de 12V 6,3 Amp. il sera possible Attention: Bien fixer le dispositif, les vibrations éventuelles d’effectuer environ 30 opérations d’émergence en absence de réseau. peuvent réduire la durée de vie de l’ampoule. La batterie pourra être placée dans l’espace prévu à...
  • Page 44: Liste Contrôle 20 Points

    812/00 corretto 26-09-2001 9:25 Pagina 44 Comment insérer le nouvel code de la télécommande dans le attention. programmateur: Fonction d’ “AUTO-APPRENTISSAGE” 5. Si on n’utilise pas les photocellules relier la borne N.17 avec la Attention: annuler le code Standard pré-établi appuyant la touche N.16 avec un pont.
  • Page 45: Aide

    812/00 corretto 26-09-2001 9:25 Pagina 45 4.1 Aide..à l’idendification des pannes Problème: Cause: Solutions: 1.0 Le portail ne s’ouvre pas après l’impulsion 1. Batterie télécommande déchargée 1. Changer la batterie de la télécommande ou bien utiliser 2. Pas d’alimentation 230V provisoirement le sélecteur à...
  • Page 46: Pièces De Rechange

    812/00 corretto 26-09-2001 9:25 Pagina 46 4.2 Pièces de rechange 4.3 Accessoires d’origine (voir catalogue) REF. DESCRIPTION REF. DESCRIPTION Tuyau en acier inoxydable avec fourche et vis 7012 Paire de photocellules de sécurité R1/400 Tuyau d’acier avec fourche et vis 400mm 5000 Sélecteur à...
  • Page 47 “ Wir danken Ihnen für das in uns 2.1 MONTAGE DER VORDEREN HALTERUNG gesetzte Vertrauen.” 2.2 BEFESTIGUNG DES ZWEITEN SCHWENARMS 3.0 ELEKTRISCHE ANLAGE Lorenzo Ducati 3.1 ELEKTRISCHE STANDARDANSCHLÜSSE 3.2 ZUSÄTZLICHE ELEKTRISCHE ANSCHLÜSSE 3.3 EINSTELLVORRICHTUNGEN 3.4 ZUSÄTZLICHE ELEKTRISCHE ANSCHLÜSSE : SICHERHEITSLICHTSCHRANKEN.
  • Page 48: Zusammensetzung Des Bausatzes

    2 Stk. Handsender mit 3 Kanälen mit eingebildeter 12 V Batterie. C 1 Stk. Entriegelungsschlüssel. I 1 Stk. Schlüsseltaster. D 1 Stk. Signalblinkanlage. E 1 Stk. Entriegelungsschlüssel. I HC 800 /D max 2.3 X 2 m 1 Stk. Signalblinkanlage. E Extra-Abgänge : 12 V Elektroschloss, Fußgängerübergang, 1 Stk. Sicherungspaar. M Zeitgartenbeleuchtung 1 Stk.
  • Page 49: Wie Funktioniert Der Flügeltoröffner

    812/00 corretto 26-09-2001 9:25 Pagina 49 1.4 RATSCHLÄGHE FÜR DIE SICHERHEIT B : Steuereinrichtung : Abb. 14 P2 - Kunststoffgehäuse, Schutzart IP 44, mit 3 + 2 Kabelführungen - Kontrollplatine 7853, CTR35 und/oder CTR35/S Ihr Antriebssystem verfügt über ein microprozessorgesteuertes - 40 A Relais zerdrückfestes Sicherheitskontrollsystem.
  • Page 50: Montage Der Befestigungsplatte K

    812/00 corretto 26-09-2001 9:25 Pagina 50 2.0 MONTAGE DER BEFESTIGUNGSPLATTE K 2.1 MONTAGE DER VORDEREN HALTERUNG Abb. 4 Setzen Sie die regulierbare Befestigungsplatte K, wie in der Abb. 4 Nachdem Sie die Befestigungsplatte K am Torpfosten befestigt haben, beschrieben, zusammen, um sie dann am Torpfeiler zu befestigen. installieren Sie den Schwenkarm mittels der Stifte.
  • Page 51: Zusätzliche Elektrische Anschlüsse

    812/00 corretto 26-09-2001 9:25 Pagina 51 1 : Anschlußkabel Motor M1 - Zweipolig, Querschnitt 1,5 mm˝ sich das Tor und bleibt geöffnet. 2 : Anschlußkabel Motor M2 - Zweipolig, Querschnitt 1,5 mm˝ Drückt man die Taste weiter, schliesst sich das Tor wieder. 3 : Anschlußkabel Signalblinkanlage (nicht mitgeliefert*) “Sie können schon ab jetzt Ihr Tor automatisch öffnen.”...
  • Page 52: Zusätzliche Elektrische Anschlüsse: Sicherheitslichtschranken

    812/00 corretto 26-09-2001 9:25 Pagina 52 3-4 an ein 12 V AC Elektroschloss für das Tor anschliessen; das Schloss wird Achtung: die Torflügel müssen komplett geöffnet sein automatisch bei jedem Ausgang aktiviert 5-6 an eine Taste anschliessen, die nur den Fussgängerzugang aktiviert Locking the wings.
  • Page 53: Akkumulator Für Die Notstromversorgung

    812/00 corretto 26-09-2001 9:25 Pagina 53 3.5 AKKUMULATOR FÜR DIE NOTSTROMVERSORGUNG Achtung: Überschreiten Sie bitte niemals diese Nennwerte, da eine zu hohe Abb. 12 Stromaufnahme zum Ausfall der Stromversorgung führen kann. Funktionsweise: Die Steuereinheit setzt die Signalblinkanlage durch einen Das Antriebssystem kann auch, UNABHÄNGIG von der Netzstromversorgung, mit Signalimpuls in Betrieb.
  • Page 54: Check-Liste, 20 Punkte

    812/00 corretto 26-09-2001 9:25 Pagina 54 Achtung: Wir raten, die eingegebene Zeichenfolge aufzuschreiben. 6. Ersetzen Sie die Sicherungen, die durch einen Montagefehler angesprochen haben könnten, durch Sicherungen mit den gleichen Nennwerten. Eingabe des neuen Codes der Fernbedienung in das Programmiergerät: 7.
  • Page 55: Fehlersuche Und Fehlerbeseitigung

    812/00 corretto 26-09-2001 9:25 Pagina 55 4.1 FEHLERSUCHE UND FEHLERBESEITIGUNG ART DER STÖRUNG: MÖG LICHE URSACHEN: BEHEBUNG: 1.0 Nach erteiltem Signalimpuls öffnet das Tor 1. Die Batterie der Fernbedienung ist leer. 1. Wechseln Sie die Batterie der Fernbedienung aus oder benutzen nicht.
  • Page 56: Mechanische Ersatzteile

    812/00 corretto 26-09-2001 9:25 Pagina 56 4.2 MECHANISCHE ERSATZTEILE 4.3 ZUSÄTZLICH ERHÄLTLICHES ORIGINAL-ZUBEHÖR (siehe Katalog) Art. Beschreibung Rohr aus rostfreiem Stahl mit Gabelstück und Schrauben Art. Beschreibung Schiebeschraube mit Kugellager, Getriebe und 7012 SICHERHEITSLICHTSCHRANKEN-SATZ Entriegelungsmechanismus 5000 SCHLÜSSELTASTER Entriegelungsstift 7500 SIGNALBLINKANLAGE Motorgehäuse aus Nylon und Glas 6025 WURFANTENNE...
  • Page 57 “Les agradezco por haber 2.1 Montaje del soporte anterior confiado en nuestra empresa”. 2.2 Fijación del segundo accionador 3.0 Instalación eléctrica Lorenzo Ducati 3.1 Conexión eléctrica standard 3.2 Conexiones especiales 3.3 Regulaciones 3.4 Conexiones eléctricas especiales: fotocélulas 3.5 Batería auxiliar 3.6 Fijación selector a llave...
  • Page 58: Características Técnicas

    N. 1 Llave de desbloqueo. I N. 1 Luz intermitente. E N. 1 Luz intermitente. E HC 800 / D máx 2.3 x 2 m N. 1 Par de fotocélulas. M Salidas extra: elettro-cerradura 12 V, apertura N. 1 Antena con cable. N peatonal, luz jardin temporizada N.
  • Page 59: Cómo Funciona El Abre Verja

    812/00 corretto 26-09-2001 9:25 Pagina 59 B: Equipo de control Lavar esporádicamente los actuadores con agua y jabón. El vástago - Contenedor plástico grado de protección IP44. Provisto con N.3+2 del actuador en acero inoxidable, NUNCA debe ser lubricado. pasacables - Tarjeta de control 7853 en versión CTR35 y/o CTR35/S 1.4 Consejos para la seguridad - Relé...
  • Page 60: Montaje Del Soporte Anterior

    812/00 corretto 26-09-2001 9:25 Pagina 60 2.0 Montaje de los accionadores de la placa “k” 2.1 Montaje del soporte anterior Fig. 4 Proceder al montaje de la placa regulable “K” y a la fijación de la Efectuada la fijación de la placa “K”, instalar el accionador por medio misma al muro.
  • Page 61: Otras Conexiones

    812/00 corretto 26-09-2001 9:25 Pagina 61 1: Cable de conexión al motor M1-Bipolar sec. 1,5 mmp. se deberá abrir y se detendrá en la posición todo abierto. 2: Cable de conexión al motor M2-Bipolar sec. 1,5 mmp. Presionando posteriormente la misma tecla, la verja se cerrará. 3: Cable de conexión a la luz relampagueante (no provisto) “Por lo tanto, desde ahora, se podrá...
  • Page 62: Conexiones Eléctricas Especiales: Fotocélulas

    812/00 corretto 26-09-2001 9:25 Pagina 62 3-4 a una electrocerradura 12 V ac que se debe conectar a la verja que Atención: las puertas deberán ser abiertas completamente. se activará en cada arranque. 5-6 a un pulsador que activará solamente el pasaje peatonal. Locking the wings.
  • Page 63: Batería Auxiliar

    812/00 corretto 26-09-2001 9:25 Pagina 63 3.5 Batería auxiliar Atención: No sobrepasar nunca esta potencia, ya que se arrie- Fig. 12 sgaría de dañar los circuitos. - Funcionamiento: la señal intermitente proviene de la central de mando. El sistema se encuentra en grado de funcionar también - La activación se produce 2 segundos antes de cada maniobra.
  • Page 64: Lista De Control 20 Puntos

    812/00 corretto 26-09-2001 9:25 Pagina 64 mismos, si no fueron introducidos los 12 códigos, el mando a distancia 4. Las conexiones eléctricas deben ser efectuadas con cuidado y regresará a la programación anterior. atención. 4) Alcanzado el duodécimo impulso, el mando a distancia relampagueará 5.
  • Page 65: Socorro

    812/00 corretto 26-09-2001 9:25 Pagina 65 4.1 Socorro... búsqueda de roturas Sintoma: Causa: Soluciones: 1.0 Dando un impulso no abre 1. Batería del control remoto descargada 1. Cambiar la batería al control remoto o provisoriamente 2. Alimentación 230V faltante usar el selector con llave 3.Codificacion transmisor 2.
  • Page 66: Repuestos

    812/00 corretto 26-09-2001 9:25 Pagina 66 4.2 Repuestos 4.3 Accesorios originales (ver catálogo) REF. DESCRIPCIÓN REF. DESCRIPCIÓN Tubo acero inoxidable con tornillo hembra y horquilla 7012 Par de fotodispositivos de seguridad Tornillo de traslación con cojinete, engranaje y sistema de 5000 Selector con llave desbloqueo...
  • Page 67 Montage van de aandrijfelementen op de bevestigingsplaat “k” “Wij danken u hartelijk voor het in Montage van de voorste steun ons bedrijf gestelde vertrouwen” Bevestiging van het tweede aandrijfelement Elektrische installatie Lorenzo Ducati Elektrische standaardaansluitingen Speciale aansluitingen Regelingen Speciale elektrische aansluitingen: fotocellen Hulpbatterij...
  • Page 68: Technische Gegevens

    1 Sleutelschakelaar D 1 Ontgrendelsleutel I 1 Ontgrendelsleutel I 1 Knipperlicht E 1 Knipperlicht E HC 800 / D max. 2,3 x 2 m 1 Set fotocellen (2) M Extra uitgangen: elektrische vergrendeling 12V (voetgangersopening, 1 Antenne met kabel N tijdgeschakelde tuinverlichting) HC 812/00 400 max.
  • Page 69: Wijze Waarop De Poortopener Functioneert

    812/00 corretto 26-09-2001 9:25 Pagina 69 B: Besturingsapparatuur: Dit systeem is ontworpen om jarenlang mee te gaan en vergt GEEN - Kunststof behuizing, beschermingsgraad: IP44, voorzien van 3+2 ENKEL ONDERHOUD. Het enige wat u hoeft te doen is de kabeldoorvoeren. aandrijfelementen af en toe met water en zeep schoon te maken.
  • Page 70: Montage Van De Aandrijfelementen Op De Bevestigingsplaat "K

    812/00 corretto 26-09-2001 9:25 Pagina 70 2.0 Montage van de aandrijfelementen op de 2.1 Montage van de voorste steun bevestigingsplaat “k” Afb. 4 Als u de bevestigingsplaat “K” heeft bevestigd moet u het aandrijfelement door middel van de pen (afb. 1, ref. H) installeren. Installeer de “STOP”- Ga over tot het monteren van de verstelbare bevestigingsplaat K en aanslagen op de grond en doe daarna het volgende: het bevestigen ervan aan de muur.
  • Page 71: Elektrische Standaardaansluitingen

    812/00 corretto 26-09-2001 9:25 Pagina 71 2: Verbindingskabel motor M2, tweepolig, doorsnede 1,5 mm moet de poort opengaan en zal de poort in de volledig geopende stand 3: Verbindingskabel knipperlicht (niet meegeleverd) stoppen. Door nogmaals op dezelfde knop te drukken zal de poort weer 4: Verbindingskabel sleutelschakelaar (niet meegeleverd) dichtgaan.
  • Page 72: Speciale Elektrische Aansluitingen: Fotocellen

    812/00 corretto 26-09-2001 9:25 Pagina 72 2. Sluit de klemmen aan: volgende handelingen te verrichten: 1-2 op een laagspanningsrelais dat op zijn beurt op de tuinverlichting 1. Doe de beide poortvleugels met de hand open door gebruik te maken aangesloten is van de noodontgrendeling (afb.
  • Page 73: Hulpbatterij

    812/00 corretto 26-09-2001 9:25 Pagina 73 u een ontvanger met een zender afwisselen (afb. 16). - Werking: Het intermitterende signaal is afkomstig van de besturingseenheid. 3.5 Hulpbatterij Afb. 12 - Het knipperlicht wordt 2 seconden vóór elke manoeuvre ingeschakeld. - Het knipperritme is traag tijdens de openingsfase en sneller in de sluitingsfase. Het systeem kan ook ZELFSTANDIG functioneren, d.w.z.
  • Page 74: Checklist (20 Punten)

    812/00 corretto 26-09-2001 9:25 Pagina 74 Hoe u de nieuwe code van de afstandsbediening in het programmeersysteem moet montage moet u ze door andere zekeringen vervangen die exact dezelfde ingeven: waarden hebben. “AUTOMATISCHE TEACH-IN” functie 7. Het vermogen moet in voldoende mate geregeld worden zodat de Let op: Wis de standaard code die van tevoren ingesteld is door de knop P1 15 poortvleugels kunnen bewegen.
  • Page 75: Opsporen Van Storingen

    812/00 corretto 26-09-2001 9:25 Pagina 75 4.1 Opsporen van storingen Storing: Oorzaak: Oplossing: 1.0 Als er een impuls wordt gegeven gaat de poort 1. De accu van de afstandsbediening is leeg. 1. Vervang de batterij van de afstandsbediening of gebruik niet open.
  • Page 76: Reserveonderdelen

    812/00 corretto 26-09-2001 9:25 Pagina 76 4.2 Reserveonderdelen 4.3 Originele accessoires (zie catalogus) REF. BESCHRIJVING REF. BESCHRIJVING Buis van roestvrij staal met moerschroef en vork 7012 Set (2) veiligheidsfotocellen Meeneemschroef met kogellager, tandwiel en ontgrendelsysteem 5000 Sleutelschakelaar Ontgrendelpen 7500 Knipperlicht Tandwielreductielichaam van nylon - glas 6025 Antenne met kabel...
  • Page 77 “Obrigado por ter tido confiança 2.1 Montagem do suporte anterior na nossa empresa” 2.2 Fixação do segundo macaco 3.0 Equipamento eléctrico Lorenzo Ducati 3.1 Normas das ligações eléctricas 3.2 Ligações especiais 3.3 Regulações ou afinações 3.4 Ligações eléctricas especiais: fotocélulas 3.5 Bateria auxiliar...
  • Page 78: Composição Do Kit

    Saídas extra : fechadura eléctrica 12v ( abertura de peão ), luz de jardim temporizada HC 800 máx. 2.3 x 2 m 1 macaco 12v com curso de 400 mm - A 2 macacos 12v com curso de 300 mm - A 1 programador 7853/CTR35/S com receptor de rádio 433.92Mhz e...
  • Page 79: Funcionamento Da Abertura Do Portão

    812/00 corretto 26-09-2001 9:25 Pagina 79 - Temperatura de exercício : - 15° + 45° O pirilampo “ E “, indicará que os portões estão em movimento . - Grau de protecção : IP44 Este sistema foi concedido para durar longos tempos e para que não B : Aparelho de Controlo necessite de nenhuma manutenção .
  • Page 80: Montagem Dos Macacos Sobre A Placa "K

    812/00 corretto 26-09-2001 9:25 Pagina 80 2.0 Montagem dos macacos sobre a placa “K“ 2.1 Montagem do suporte anterior Fig. 4 Proceder á montagem da placa regulável “ K “ e fixa-la sobre o muro . Após ter fixado a placa posterior “ K “, instalar o macaco com a ajuda Esta operação é...
  • Page 81: Normas Das Ligações Eléctricas

    812/00 corretto 26-09-2001 9:25 Pagina 81 1 - Cabo de ligação do motor M1 - cabo bipolar de secção 1.5 mm Presionando posteriormente la misma tecla, la verja se cerrará. 2 - Cabo de ligação do motor M2 - cabo bipolar de secção 1.5 mm “Por lo tanto, desde ahora, se podrá...
  • Page 82 812/00 corretto 26-09-2001 9:25 Pagina 82 que se activará en cada arranque. Atenção: las puertas deberán ser abiertas completamente. 5-6 a un pulsador que activará solamente el pasaje peatonal. Atención: dando un impulso a un pulsador conectado a los bornes 5-6 Locking the wings.
  • Page 83: Bateria Auxiliar

    812/00 corretto 26-09-2001 9:25 Pagina 83 receptor com um transmissor ( Fig. 16 ) . dotado de um porta-lâmpada de 12v 10w. 3.5 Bateria auxiliar Fig. 12 Atenção: nunca ultrapassar esta potência a fim de não danificar os circuitos. O sistema pode funcionar de maneira autónoma, isto é, sem energia Funcionamento : o sinal intermitente, provem da central dos comandos .
  • Page 84: Lista De Controlo : 20 Pontos

    812/00 corretto 26-09-2001 9:25 Pagina 84 Tienen 30 segundos para efectuar la programación, transcurridos los 2 - Os portões devem deslizar manualmente sem um esforço excessivo. mismos, si no fueron introducidos los 12 códigos, el mando a distancia 3 - Os macacos deverão ser fixos de maneira sólida e perfeitamente regresará...
  • Page 85: Ajuda

    812/00 corretto 26-09-2001 9:25 Pagina 85 4.1 Ajuda . . . na identificação dos problemas Problema: Causa: Soluções: 1. O portão não se abre após a emissão do sinal 1. Bateria do telecomando descarregada . 1. Mudar a bateria do telecomando ou utilizar pelo comando .
  • Page 86 812/00 corretto 26-09-2001 9:25 Pagina 86 4.2 Peças de reserva ou sobresselentes 4.3 Acessórios de origem REF. DESCRIÇÃO REF. DESCRIÇÃO Tubo de aço inoxidável com porca e parafuso 7012 Par de fotocélulas de segurança Parafuso de translação c/engrenagem rolamento de esferas e 5000 Selector da chave sistema de desblocagem...
  • Page 87 Certificato di conformità Certificate of conformity Ducati Automazione s.r.l. Ducati Automazione s.r.l. Via Grandi, 7 - 20060 Pessano C/B (MI) I CEE Via Grandi, 7 - 20060 Pessano C/B (MI) I EEC...
  • Page 88: Garantie

    Certificat de conformité Konformitätsbescheinigung Ducati Automazione s.r.l. CE-Konformitätsbescheinigung / Die Firma Ducati Automazioni s.r.l - Via Grandi, 7 - 20060 Pessano C/B (MI) I CEE Via Grandi, 7 - I - 20060 Pessano con Bornago (MI) déclare sous sa propre erklärt auf eigene Verantwortung,...
  • Page 89 Certificado de conformidad Conformiteitscertificaat Ducati Automazione s.r.l. Ducati Automazione s.r.l. Via Grandi, 7 - 20060 Pessano C/B (MI) I CEE Via Grandi, 7 - 20060 Pessano C/B (MI) I CEE...
  • Page 90: Declaração De Conformidade

    O Certificado de Garantia é válido somente se a data de compra e o selo do revendedor figurarem com a factura ou ticket da caixa . Declaração de Conformidade Ducati automazione srl Via Grandi,7 – 20060 Pessano C/B (MI) I CEE declara sob a sua própria responsabilidade que a máquina:...

Ce manuel est également adapté pour:

Hc 800 / dHc 412/00Hc 412/00 / 400Hc 812/00Hc 812/00 / 400

Table des Matières