Publicité
Liens rapides
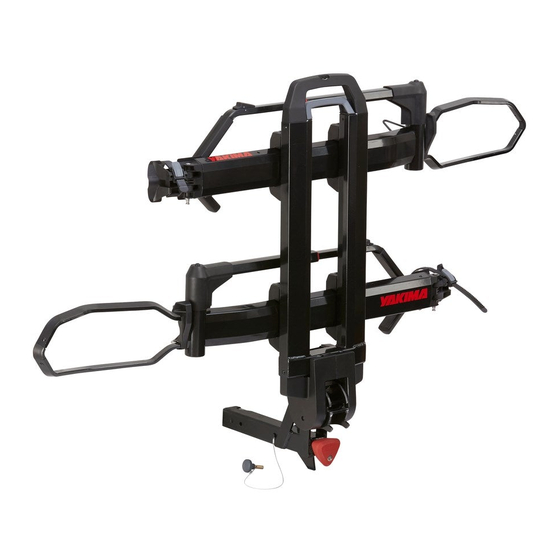
hardware bag 1X
pochette de quincaillerie (x 1)
bolsa de piezas 1X
spine 1X
cadre (x 1)
base 1X
Per Bike
Instruction #1035771C-1/10
Contents • Contenu • Contenido
wheel cup 2X
support de roue (x 2)
posarrueda 2X
Weight limits • Limites de chargement • Límites de peso
=
40lbs / 18.1kg
Available accessories • Accessoires disponibles • Accesorios disponibles
EZ+1
Yakima Part #8002475
Article Yakima no #8002475
Pieza #8002475 de Yakima
Dr.Tray
key 2X
clé (x 2)
llave 2X
wheel tray 1X
plateau (x 1)
bandeja de rueda 1X
=
Par vélo
18.1kg/40lbs
wheel tray 1X
plateau (x 1)
bandeja de rueda 1X
=
Por bicicleta
40lb/18,1kg
9ft SKS Cable
Yakima Part #8007233
#8007233
Article Yakima no
Pieza #8007233 de Yakima
Publicité

Manuels Connexes pour Yakima Dr.Tray Série


Sommaire des Matières pour Yakima Dr.Tray Série
- Page 1 18.1kg/40lbs Por bicicleta 40lb/18,1kg Available accessories • Accessoires disponibles • Accesorios disponibles EZ+1 9ft SKS Cable Yakima Part #8002475 Yakima Part #8007233 #8007233 Article Yakima no #8002475 Article Yakima no Pieza #8002475 de Yakima Pieza #8007233 de Yakima Instruction #1035771C-1/10...
- Page 2 INSTALLATION • MONTAGE • INSTALACIÓN • Insert base into hitch receiver. • The hole in the base must align to the hole in the hitch receiver. • Enfiler la base dans l’attelage. • Le trou de la base doit s’aligner avec le trou de l’attelage.
- Page 3 AttAch the wheel trAys. Mettre eN PlAce les PlAteAUX. INstAle lAs bANdejAs de rUedA. • Open levers, and slide supports into base as shown. Do not attach the trays in the wrong orientation. Use the image below as a guide. • Pivot arms must face away from vehicle exactly as shown in illustration below.
- Page 4 Attach the wheel cups by inserting the lock posts through the hole, front to back. Secure with e-clips. Installer les supports de roue. Insérer leur axe de l’avant vers l’arrière et le bloquer à l’aide de l’anneau élastique. Fije los posarruedas con las espigas de bloqueo.
- Page 5 lOAd heAVIest bIKe FIrst. chArGer le VÉlO le PlUs lOUrd eN PreMIer. cArGUe PrIMerO lA bIcIcletA MÁs PesAdA. Do not install if your bike has a flat tire, or a slow leak. Lost tire pressure after install may result in an insecure load. Ne pas employer si le pneu du vélo est à...
- Page 6 secUre reAr wheel strAP. eNFIler lA sANGle dANs lA rOUe ArrIÈre. AseGUre lA cOrreA de lA rUedA trAserA. • Rotate the wheel slightly, if necessary. • Feed the strap through the spokes of wheel. • Pull hard to tighten the wheelstrap. • Au besoin, tourner un peu la roue.
- Page 7 For additional security you can use your own locking cable. Yakima offers the 9’ SKS Cable (sold separately) Pour plus de sûreté, on peut ajouter son propre câble verrouillable. Yakima offre le câble SKS de 2,7 m (9 pi – vendu à part).
- Page 8 UNLOADING • DÉCHARGEMENT • DESCARGA SECURE pIvOT ARMS WHEN NOT IN USE. IMMOBILISER LE BRAS pIvOTANT SI UN vÉLO N'EST pAS CHARGÉ. ASEGURE LOS BRAZOS DE pIvOTE CUANDO NO SE USAN. • Rotate pivot arm down. • Slide the hook against the rear wheel cradle. • Rabattre le bras pivotant.
- Page 9 IMPOrtANt lOAd lIMIts: dr.trAy Is lIMIted tO 40 lbs. Per bIKe. Do not use with a hitch-extender. Do not use with a 1-1/4” hitch adapter. Do not install on trailers, campers, or Rvs. INstAll thIs PrOdUct Do not install if spare tire causes interference with bikes, or folded carrier. ON 2"...
- Page 10 INC. 4101 KRUSE WAY LAKE OSWEGO, OR 97035-2541 USA 888.925.4621 yAKIMA EUROpE Archimedesbaan 25 3439 ME Nieuwegein The Netherlands yAKIMA AUSTRALIA pTy. LTD 17 Hinkler Court Brendale, QLD 4500 Tel: 1800 143 548 Instruction #1035771C-10/10...