Table des Matières
Publicité
Les langues disponibles
Les langues disponibles
Liens rapides
Publicité
Chapitres
Table des Matières

Manuels Connexes pour auna NR-620 DAB


Sommaire des Matières pour auna NR-620 DAB
-
Page 3: Table Des Matières
Sehr geehrter Kunde, wir gratulieren Ihnen zum Erwerb Ihres Gerä- tes. Lesen Sie die folgenden Hinweise sorgfäl- tig durch und befolgen Sie diese, um möglichen Schäden vorzubeugen. Für Schäden, die durch Missachtung der Hinweise und unsachgemäßen Gebrauch entstehen, übernehmen wir keine Haf- tung. - Page 4 WARNUNG VORSICHT: DAS GEHÄUSE NICHT ÖFFNEN, UM EINEN STROMSCHLAG UND ERNSTE PERSONENVERLETZUNGEN ZU VERMEIDEN. IM INNEREN KEINE VOM KUNDEN ZU WARTENDEN KOMPONENTEN. WENDEN SIE SICH AUSSCHLIESSLICH AN QUALIFI- ZIERTE FACHLEUTE. WARNUNG. UM DIE GEFAHR EINES BRANDS ODER EINES STROMSCHLAGS ZU VERRINGERN, DAS GERÄT NICHT IN WASSER, REGEN ODER FEUCHTIGKEIT AUSZUSETZEN.
-
Page 5: Sicherheitshinweise
SICHERHEITSHINWEISE • Lesen Sie die Anleitung. Alle Anwendungshinweise müssen vor der Verwendung des Geräts gelesen werden. • Bewahren Sie die Bedienungsanleitung für den späteren Gebrauch auf. • Die Richtlinien für Aufmerksamkeit, Verwendung und Sicherheit müssen eingehalten werden. • Das Gerät darf nicht in der Nähe von Wasser verwendet oder mit Feuchtigkeit in Berührung gebracht werden. - Page 6 bestimmungsgemäßer Verwendung leicht zugänglich sein. • Die Batterie darf keiner übermäßigen Hitze wie Sonne, Feuer oder dergleichen ausgesetzt werden. • Übermäßiger Schalldruck von Ohrhörern und Kopfhörern kann zu Hörverlust führen. • Halten Sie Mindestabstand (8 cm) um das Gerät herum für ausreichende Belüftung ein.
-
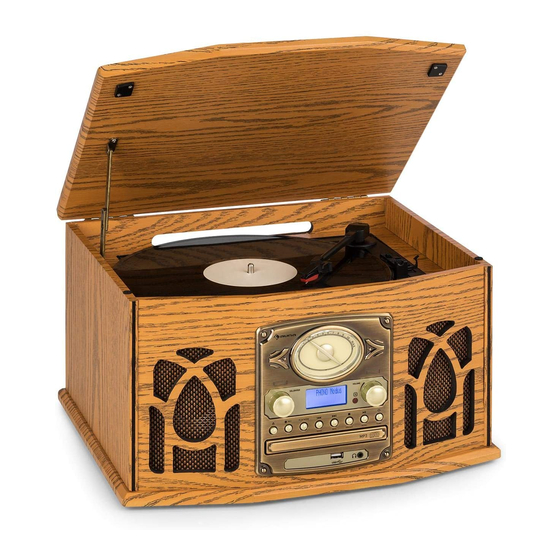
Page 7: Gerateübersicht
GERATEÜBERSICHT Drehzeiger LCD-Bildschirm Auswahl-/ Eingaberegler Titel überspringen/ zurückspulen/ Suchtaste Wiedergabetaste CD-Tür öffnen Aufnahmetaste D-Tür Lautstärkeregler 10 Fernbedienungssensor Titel überspringen/ vorspulen/ Infotaste 12 Stopp-/ Speichertaste 13 Ein-/ Ausschalten/ Funktionstaste 14 Wiedergabe-/ Pausetaste 15 USB-Anschluss 16 3,5 mm Kopfhöreranschluss 17 Kassette vorspulen/ausgeben 18 Kassettenfachklappe 19 Spindeleinsatz 20 Schallplattendrehzahlwahlscha... - Page 8 Fernbedienung Ein/ Ausschalten Drücken Sie diese Taste, um das Gerät ein-/auszuschalten. CD-Tür öffnen/ Drücken Sie im CD-Modus diese Taste, um die Tür des CD-Fachs schließen zu öffnen oder zu schließen. Aufnahme Drücken Sie diese Taste zum Aktivieren der Konvertierungs-/ Aufnahmefunktion. Titel übersprin- Wenn Sie diese Taste einmal drücken, wird der nächste Titel gen/ vorspulen...
-
Page 9: Fm-Radio
FM-RADIO Anschluss 1. Stecken Sie den Netzstecker des Netzkabels (25) in die Steckdose. 2. Drücken Sie einmal die Ein-/Ausschalttaste (13) und die Hintergrundbeleuchtung des LCD-Bildschirms (2) schaltet sich ein. 3. Drücken Sie anschließend die Funktionstaste (13), zum Aktivieren des FM-Radio-Modus. Wenn der Ton ordnungsgemäß aus dem Lautsprecher des Geräts ertönt, bedeutet dies, dass die Stromversorgung normal ist. -
Page 10: Dab-Radio
ausschließlich in Mono empfangen. • Wenn Sie auf der Fernbedienung im Radiomodus einmal auf die Wiedergabe-/Pausetaste drücken, können Sie zwischen Mono/Stereo wechseln. • Insbesondere wenn das Stereosignal schwach ist, empfiehlt es sich, Sender in Mono zu empfangen. DAB-RADIO Automatischer Sendersuchlauf 1. -
Page 11: Cd-Player
angezeigt. 4. Drücken Sie zur Auswahl des gewünschten Senders die Tasten oder der Fernbedienung. 5. Drücken Sie zum Speichern des ausgewählten Senders die Speichertaste (12). 6. Wiederholen Sie für die anderen zu speichernden Sender die Schritte 2 – 5. Gespeicherte Sender aufrufen 1. - Page 12 ein und schließen Sie anschließend die Tür des CD-Fachs. 5. Der LCD-Bildschirm zeigt nach kurzer Zeit die Anzahl der auf der CD vorhandenen Titel und die gesamte Wiedergabezeit an. Die Wiedergabe wird automatisch gestartet. CD-Wiedergabe: Wiedergabe/ Pause/ Stopp 1. Wenn Sie während der Wiedergabe der CD einmal die Taste Wiedergabe/ Pause (14) drücken, wird die Wiedergabe pausiert und der LCD-Bildschirm beginnt zu blinken.
- Page 13 ID3-Text. Anforderungen an das MP3-Titelformat: • MP3 Bit-Rate: 32 kbps ~ 256 kbps • Die Qualität der Wiedergabe von MP3-CDs hängt von der Qualität der aufgenommenen CD und der Aufnahmemethode ab. Des Weiteren dauert die Ladezeit bei MP3-CDs auf Grund des anderen Formats länger als bei normalen CDs.
- Page 14 Im MP3-Modus (2) 1 Ordner (3) Alle Ordner → → (1) Wiederholen 1 wiederholen wiederholen ↑ ↓ ← (5) Aus-Modus (4) Zufallswiedergabe Wiedergabemodus Anzeige auf dem LCD- Bildschirm Einen Titel wiederholen Rep1 Einen Ordner wiederholen RepF Alle Ordner wiederholen RepA Zufallswiedergabe Rand Aus-Modus...
-
Page 15: Wiedergabe Von Mp3 Von Usb-Datenträgern Oder Speicherkarten
werden sollen, gespeichert haben, die Taste Wiedergabe/ Pause, um die Titel in der von Ihnen gespeicherten Reihenfolge wiederzugeben. 7. Wenn Sie den Speichermodus abbrechen möchten, drücken Sie zweimal die Stopptaste. Die Anzeige „MEM“ verschwindet dann vom LCD-Bildschirm. WIEDERGABE VON MP3 VON USB-DATENTRÄGERN ODER SPEICHERKARTEN Verbinden Dieses Gerät ist dazu in der Lage, auf USB-Datenträgern oder... -
Page 16: Bt-Verbindung Und Wiedergabe
Verbindung zu BT herzustellen. 3. Schalten Sie die BT-Funktion Ihres BT-Geräts ein (z.B. ein Mobiltelefon) und wählen Sie das BT-Gerät "NR-620 DAB" zur Verbindung. 4. Wenn das BT-Gerät erfolgreich verbunden ist, blinkt der Text " bt "... -
Page 17: Abspielen Einer Schallplatte
ABSPIELEN EINER SCHALLPLATTE • Entfernen Sie den Nadelschutz. • Stellen Sie sicher, dass der Tonarm von der Tonarmhalterung genommen wird, bevor Sie das Gerät verwenden. 1. Drücken Sie die Taste Ein-/Ausschalten (13), um das Gerät einzuschalten und drücken Sie die Funktionstaste (13) zur Auswahl des Phono-Modus. -
Page 18: Line-Out-Verbindung
LINE-OUT-VERBINDUNG Sie haben die Möglichkeit, Ihr Gerät an ein Hi-Fi System anzuschließen, indem Sie den Line-Out Anschluss via RCA-Kabel (nicht im Lieferumfang enthalten) mit dem AUX-Eingang verbinden. Stummschalten (Mute)/ EQ Drücken Sie während der Wiedergabe einmal die Taste Mute auf der Fernbedienung. - Page 19 Verfügung steht). 6. Befolgen Sie zum Einlegen der CD, welche Sie konvertieren/ aufnehmen möchten, die Hinweise des entsprechenden Abschnitts und drücken Sie die Stopptaste (12), um den Stoppmodus zu aktivieren. 7. Drücken Sie während des Stoppmodus der CD die Taste Record (7).
- Page 20 5. Drücken Sie zum Beenden der Aufnahme einmal die Taste Stopp (12) und der LCD-Bildschirm zeigt dann wieder „Tape“ oder „Phono“ an. DAB/FM Konvertierung 1. Stecken Sie zum Starten der Aufnahme den USB-Stick in den USB- Anschluss des Geräts (stellen Sie sicher, dass darauf ausreichend Speicherplatz vorhanden ist).
- Page 21 4. Drücken Sie zum Löschen die Taste Delete. Auf dem Bildschirm wird dann „JA“ und „NEIN“ angezeigt. Wählen Sie mit den Tasten oder die Taste „JA“ oder „NEIN“ aus. 5. . Drücken Sie zum Bestätigen Ihrer Auswahl erneut die Taste Delete. Löschen von allen Dateien 1.
-
Page 22: Hinweise Zur Entsorgung
HINWEISE ZUR ENTSORGUNG Befindet sich die linke Abbildung (durchgestrichene Mülltonne auf Rädern) auf dem Produkt, gilt die Europäische Richtlinie 2012/19/EU. Diese Produkte dürfen nicht mit dem normalen Hausmüll entsorgt werden. Informieren Sie sich über die örtlichen Regelungen zur getrennten Sammlung elektrischer und elektronischer Gerätschaften. - Page 23 Dear Customer, Congratulations on purchasing this equipment. Please read this manual carefully and take care of the following hints to avoid damages. Any failure caused by ignoring the items and cautions men- tioned in the instruction manual are not covered by our warranty and any liability.
- Page 24 WARNINGS CAUTION RISK OF ELECTRIC SHOCK DO NOT OPEN CAUTION: TO REDUCE THE RISK OF ELECTRIC SHOCK AND SERIOUS PERSONAL INJURY, DO NOT REMOVE ANY COVER. NO USER-SERVICABLE PARTS INSIDE. REFER SERVICING TO QUALIFIED SERVICE PERSONNEL ONLY. WARNING. TO REDUCE THE RISK OF FIRE OR ELECTRICAL SHOCK, DO NOT EXPOSE THIS PRODUCT TO WATER, RAIN OR MOISTURE.
-
Page 25: Safety Instructions
SAFETY INSTRUCTIONS Read these instructions. All uses guidelines must be read before using the device. Keep the instructions for future use. • Attention, use and security guidelines must be respected. • The device must not be used near water or be put in contact with moisture. - Page 26 • Minimum distance (8 cm) around the apparatus for sufficient ventilations; • The ventilation should not be impeded by covering the ventilation opening with items such as newspaper, table-cloths, curtain etc; • No naked flame sources such as lighted candles should be placed on the apparatus;...
-
Page 27: Overview
OVERVIEW Dial pointer LCD display Select/enter knob Skip/search down/scan button Play mode button CD door open button Record button () CD door Volume knob 10 Remote sensor Skip/search up /Info button 12 Stop/Preset button 13 Power on/off / function button 14 Play/pause/menu button 15 USB socket 16 3.5 mm headphone jack... - Page 28 Remote control buttons Power On/Off Press to turn on/off the unit. CD door open / In CD mode, press to open / close the CD door. close button Record Press to active encoding or recording function. Skip/search up Press once to skip to next track, press & hold for search forward.
-
Page 29: Fm Radio
FM RADIO Connection 1. Connect the power cord (25) to AC outlet. 2. Press the Power on/off / Function button (13) once and the LCD display (2) with blue backlight on. 3. Then press the Function button (13) to FM (Tuner) mode. If sound is coming out from the speaker, it means the tpower supply is normal. -
Page 30: Dab Radio
DAB RADIO DAB radio - Auto scan 1. Switch the function to DAB mode. 2. The player will scan the DAB station automatically till receive the DAB station. 3. Press the “scan” button again to auto-search to the next available DAB station forward, or press and hold the “scan”... -
Page 31: Cd Player
Recall preset stations 1. Press the Preset button (12) once to enable recall state. 2. Press Tuner/Menu + or - button on the remote control to select the desired memory station. 3. Press Preset button (12) to confirm the recall the memory station. •... - Page 32 Skip/search mode (skip/search up / skip/search down ) 1. During CD playback mode, if Skip up button (11) is pressed. It will go to next track and display the track no. 2. During CD playback mode, if Skip down button (4) is pressed. It will go back to the beginning of the track, original track no.
- Page 33 (1) Repeat 1 → (2) Repeat all track → (3) Random → (4) off mode Play mode Indicator on LCD display Repeat single track Rep1 Repeat single folder RepF Repeat all folders RepA Random mode Rand Off mode ----------------- For MP3 disc (2) Repeat (3) Repeat →...
- Page 34 will appear on LCD display. Moreover, it will indicate program no. and digits for track no. to be programmed. 3. Select a desired track by pressing skip or buttons. 4. Press the “ Program ” button to store the track into memory. 5.
-
Page 35: Bt Connecting And Playback
Bluetooth. 3. Switch the Bluetooth function of your Bluetooth device on (such as a mobile phone) and select the Bluetooth equipment code “NR-620 DAB” to connect. 4. When the Bluetooth device has connected successfully, the text “ bt “... -
Page 36: Listening To Tape
LISTENING TO TAPE General operation Cassette playback The system will start the playback automatically after inserting of cassette tape. Stop and ejection Press the “ Tape forward / eject “ button (17) completely inwards and the tape will be ejected though the cassette door cover. -
Page 37: Phono
PHONO • Remove the stylus protector. • Be sure that the tone arm is being detached from the tone arm rest before operating and re-secured again afterwards. 1. Press the Power on/off / Function button (13) to turn on the unit and press the button again to switch the function to PHONO mode. -
Page 38: Line Out Connection
LINE OUT CONNECTION You can connect the system to your whole hi-fi system by connecting the line out socket to the auxiliary input socket with a RCA cable (not included). Mute / EQ Operation During playing mode, press Mute button on the remote control one time, the sound will not be heard from the speakers and “MUTE”... - Page 39 4. Press the “ Record “ button second time and the display will show “REC ALL”. 5. Press the “ Record “ button third time and the unit will start recording of all tracks of the CD. 6. The unit will stop record automatically after completion. And the unit will display the total track no.
- Page 40 3. After finish of recoding, press the “Stop“ button (12) once to terminate the recording Remarks: - The recording speed is 1:1 and according to the actual playing time of the Phono or Tape. - During CD recording, the recording process is on 1:1 scale and the unit will playback the song(s) during recording.
- Page 41 4. Press the “Delete “ button again to confirm the setting. Remarks : • All the files inside the USB storage media or SD card will be deleted completely after confirming to “ Yes “ mode. • Press “ Stop “ button once at remote handset to quite delete mode Removing of USB To remove the USB, turn off the power or switch the function mode to either CD, Tape or Tuner first.
-
Page 42: Disposal Considerations
DISPOSAL CONSIDERATIONS According to the European waste regulation 2012/19/EU this symbol on the product or on its packaging indicates that this product may not be treated as household waste. Instead it should be taken to the appropriate collection point for the recycling of electrical and electronic equipment. - Page 43 Chère cliente, cher client, Toutes nos félicitations pour l’acquisition de ce nouvel appareil. Veuillez lire attentivement et respecter les instructions de ce mode d’emploi afin d’éviter d’éventuels dommages. Nous ne saurions être tenus pour responsables des dom- mages dus au non-respect des consignes et à la mauvaise utilisation de l’appareil.
- Page 44 MISE EN GARDE ATTENTION : POUR RÉDUIRE LES RISQUES DE CHOCS ÉLECTRIQUES, NE DÉMION- TEZ AUCUN CACHE. L‘APPAREIL NE CONTIEN AUCUNE PIÈCE À ENTRETENIR. ADRES- SEZ-VOUS UNIQUEMENT À DES PERSONNELS QUALIFIÉS POUR LA MAINTENANCE. MISE EN GARDE / POUR RÉDUIRE LE RISQUE D'INCENDIE ET DE CHOC ÉLECTRIQUE, NE PLONGEZ PAS L'APPAREIL DANS L'EAU ET NE L'EXPOSEZ PAS À...
-
Page 45: Consignes De Sécurité
CONSIGNES DE SÉCURITÉ • Lisez le mode d'emploi. Vous devez avoir lu tous les conseils d'utilisation avant d'utiliser l'appareil. • Conservez ce mode d'emploi pour vous y référer ultérieurement. • Les consignes de prudence, d’utilisation et de sécurité doivent être respectées. - Page 46 • La batterie ne doit pas être exposée à une chaleur excessive telle que le soleil, le feu ou équivalent. • Ecouter de la musique à volume sonore excessif avec des écouteurs ou un casque peut causer une perte auditive. •...
-
Page 47: Aperçu De L'appareil
APERÇU DE L'APPAREIL Indicateur de rotation Ecran LCD Molette de sélection et de saisie Sauter un titre / rembobiner / touche de recherche Touche de lecture Pour ouvrir le lecteur CD Touche d'enregistrement Lecteur CD Réglage du volume 10 Capteur de la télécommande Sauter un titre / avancer / touche info 12 Touche stop et de mémorisation... -
Page 48: Télécommande
Télécommande Marche/arrêt Appuyez sur cette touche pour allumer ou éteindre l'appareil. Ouvrir/fermer le En mode CD, appuyez sur cette touche pour ouvrir ou fermer le lecteur CD lecteur CD. Enregistrement Appuyez sur cette touche pur activer la fonction de conversion / enregistrement. -
Page 49: Radio Fm
RADIO FM Branchement 1. Branchez le cordon d‘alimentation du cordon d‘alimentation (25) dans la prise de courant. 2. Appuyez une fois sur la touche MARCHE/ARRÊT (13) pur allumer le rétroéclairage de l‘écran LCD (2). 3. Appuyez ensuite sur la touche de fonction (13) pour activer le mode radio FM. -
Page 50: Radio Dab
la télécommande, vous pouvez basculer enter mono et stéréo. • Lorsque la qualité du signal est mauvaise en particulier, il est conseillé d’écouter les stations en mono. RADIO DAB Radio DAB : Recherche automatique de stations 1. Passez en mode radio DAB. 2. -
Page 51: Lecteur Cd
5. Pour mémoriser la station, appuyez sur la touche de mémorisation (12). 6. Répétez les étapes 2 à 5 pour les autres stations à mémoriser. Lecture des stations mémorisées 1. Appuyez une fois sur la touche de mémorisation (12) pour activer l’état de mémoire. - Page 52 Lecture de CD : Lecture / Pause/ Stop 1. Appuyez une fois sur la touche lecture/pause (14) pendant la lecture du CD pour suspendre la lecture. L’écran LCD se met à clignoter. Appuyez à nouveau sur la touche pour reprendre la lecture normalement. 2.
- Page 53 Modes de lecture (répétition/ lecture aléatoire) • Appuyez sur la touche de lecture (5) avant ou pendant la lecture pour lire un seul titre, un seul dossier (pour les fichiers MP3 uniquement) ou toutes les pistes de l’ordre suivant des fonctions. (1) Wiederholen 1 →...
- Page 54 En mode MP3 (2) répétition (3) répétition de tous → → (1) répétition 1 d'1 dossier les dossiers ↑ ↓ ← (5) Mode désactivé (4) lecture aléatoire Mode de lecture Affichage à l'écran LCD Répétition d'un titre Rep1 Répétition d'un dossier RepF Répétition de tous les dossiers RepA...
-
Page 55: Lecture De Mp3 Sur Support Usb Ou Carte Mémoire
2. Le texte "bt" clignote à l'écran, indiquant que l'appareil recherche et attend la connexion BT. 3. Activez la fonction BT de votre périphérique BT (par exemple, un téléphone portable) et sélectionnez l’appareil BT "NR-620 DAB" pour connexion. 4. Lorsque le périphérique BT est connecté avec succès, le texte "bt"... -
Page 56: Lecture De Cassettes
5. Lancez la lecture de la musique sur votre périphérique BT et écoutez la musique sur les enceintes de cet appareil. 6. Réglez le volume (9) au niveau souhaité. 7. Si vous souhaitez connecter l'appareil à un autre périphérique compatible BT après l'avoir déjà connecté, éteignez le BT sur le périphérique précédemment connecté... -
Page 57: Lectur D'un Vinyle
LECTUR D'UN VINYLE • Retirez la protection de l'aiguille. • Vérifiez que vous avez retiré le bras de lecture de son support avant d'utiliser l'appareil. 1. Appuyez sur la touche d'alimentation (13) pour allumer l'appareil, puis sur la touche de fonction (13) pour sélectionner le mode phono. 2. -
Page 58: Branchement Par Line Out
BRANCHEMENT PAR LINE OUT Vous pouvez connecter votre appareil à un système Hi-Fi en connectant la prise Line-Out à l'entrée AUX via un câble RCA (non fourni). Fonction muet (Mute)/ EQ Appuyez une fois sur la touche Muet de la télécommande pendant la lecture. - Page 59 les instructions de la section correspondante et appuyez sur la touche d'arrêt (12) pour activer le mode d'arrêt. 7. Lorsque le CD est arrêté, appuyez sur la touche d’enregistrement (7). L’écran LCD affiche d’abord "Check", puis passe à "REC USB". 8.
- Page 60 Conversion DAB/FM 1. Insérez la clé USB dans le port USB de l'appareil pour démarrer l'enregistrement (assurez-vous qu'il y a suffisamment d'espace disponible). 2. Appuyez deux fois sur la touche Enregistrer en mode de lecture DAB / FM. Le "REC USB" clignote alors sur l'écran LCD, indiquant que l'appareil a commencé...
- Page 61 5. Pour confirmer votre choix, appuyez à nouveau sur la touche Delete. Pour supprimer tous les fichiers 1. Choisissez le mode USB. 2. Maintenez la touche Delete de la télécommande pendant environ 2 – 3 secondes. L'écran LCD affiche "DEL – A. 3.
-
Page 62: Informations Sur Le Recyclage
INFORMATIONS SUR LE RECYCLAGE Vous trouverez sur le produit l’image ci-contre (une poubelle sur roues, barrée d‘une croix), ce qui indique que le produit se trouve soumis à la directive européenne 2012/19/UE. Renseignez-vous sur les dispositions en vigueur dans votre région concernant la collecte séparée des appareils électriques et électroniques. - Page 63 Gentile Cliente, La ringraziamo per aver acquistato il dispositi- vo. La preghiamo di leggere attentamente le se- guenti istruzioni per l’uso e di seguirle per evitare possibili danni tecnici. Non ci assumiamo alcuna responsabilità per danni scaturiti da una mancata osservazione delle avvertenze di sicurezza e da un uso improprio del dispositivo.
- Page 64 AVVERTIMENTO ATTENZIONE: NON APRIRE L’ALLOGGIAMENTO, IN MODO DA EVITARE FOLGORA- ZIONI E SERIE LESIONI. ALL’INTERNO NON CI SONO COMPONENTI CHE NECESSITA- NO DELLA MANUTENZIONE DA PARTE DELL’UTENTE. RIVOLGERSI ESCLUSIVAMENTE A TECNICI QUALIFICATI. AVVERTIMENTO: PER RIDURRE IL RISCHIO DI INCENDI E FOLGORAZIONI, NON ESPORRE IL DISPOSITIVO A PIOGGIA, ACQUA O UMIDITÀ.
-
Page 65: Avvertenze Die Sicurezza
AVVERTENZE DIE SICUREZZA • Leggere il manuale. Tutte le avvertenze di utilizzo devono essere lette prima di procedere all’uso del dispositivo. • Conservare il manuale per future consultazioni. • Rispettare le direttive relative ad attenzione, utilizzo e sicurezza. • Il dispositivo non deve essere utilizzato nelle vicinanze d’acqua o entrare in contatto con umidità. - Page 66 • Una pressione sonora eccessiva di auricolari o cuffie può causare la perdita dell’udito. • Tenere una distanza minima (8 cm) intorno al dispositivo per garantire una ventilazione sufficiente. • Non ostacolare la ventilazione. Non coprire le aperture di ventilazione con oggetti come giornali, tovaglie, tende, ecc.
-
Page 67: Descrizione Del Dispositivo
DESCRIZIONE DEL DISPOSITIVO Indicatore rotante Schermo LCD Manopola di selezione/ immissione Saltare titolo/tornare indietro/ tasto di ricerca Play Aprire vano CD Tasto di registrazione Sportello CD Volume 10 Sensore telecomando Saltare titolo/andare avanti/tasto informazioni 12 Stop/salva 13 On/Off/Tasto funzione 14 Play/pausa 15 Connessione USB 16 Connessione cuffie 3,5 mm 17 Mandare avanti cassetta/... - Page 68 Telecomando Accendere/Spe- Premere questo tasto per accendere e spegnere il dispositivo. gnere Aprire/chiudere In modalità CD, premere questo tasto per aprire e chiudere il il vano CD vano CD. Registrare Premere questo tasto per attivare la funzione di registrazione/ conversione. Saltare titolo/ Premendo una volta questo tasto si salta il titolo successivo.
-
Page 69: Radio Fm
RADIO FM Collegamento 1. Collegare la spina del cavo di alimentazione (25) alla presa elettrica. 2. Premere una volta On/Off (13) e l’illuminazione di fondo dello schermo LCD (2) si accende. 3. Premere dunque il tasto delle funzioni (13) per attivare la modalità FM. -
Page 70: Radio Dab
possibile cambiare tra Mono/Stereo. • In particolare quando il segnale non è buono, si consiglia di ricevere l’emittente in mono. RADIO DAB Ricerca automatica delle emittenti 1. Passare alla ricezione radio DAB. 2. Il dispositivo inizia la ricerca automatica di emittenti DAB, fino a quando riceve un’emittente DAB. -
Page 71: Lettore Cd
5. Per salvare l’emittente, premere il tasto di salvataggio (12). 6. Ripetere i passaggi 2-5 per le altre emittenti da salvare. Accedere a emittenti salvate 1. Premere una volta il tasto di salvataggio (12) per attivare lo stato di memoria. 2. - Page 72 Riproduzione di CD: saltare titolo/modalità di ricerca (saltare/andare avanti/saltare/tornare indietro) 1. Se si preme il tasto saltare/andare avanti (11) durante la riproduzione di CD, viene saltato il titolo successivo e viene mostrato il numero del titolo. 2. Se si preme il tasto saltare/tornare indietro (4) durante la riproduzione di CD, viene riprodotto dall’inizio il titolo attuale e viene mostrato il numero del titolo.
-
Page 73: Modalità Off
(1) Ripetizione 1 > (2) Ripetere tutti i titoli > (3) Riproduzione casuale > (4) Modalità off Modalità di riproduzione Indicazione sullo schermo LCD Ripetere un titolo Rep1 Ripetere cartella RepF Ripetere tutti i titoli RepA Riproduzione casuale Rand Modalità Off -----------------... - Page 74 In modalità MP3 (2) ) Ripetere → → (1) Ripetere 1 (3) Ripetere tutte le cartelle cartella ↑ ↓ ← (5) Modalità off (4) ) Riproduzione casuale Modalità di riproduzione Indicazione sullo schermo Ripetere un titolo Rep1 Ripetere cartella RepF Ripetere tutti i titoli RepA Riproduzione casuale...
-
Page 75: Riproduzione Di Mp3 Da Supporti Usb O Di Memoria
BT. 3. Accendere la funzione BT del dispositivo esterno (ad es. un telefono cellulare) e selezionare il dispositivo BT “NR-620 DAB” per la connessione. 4. Una volta connesso con successo il dispositivo BT, la scritta “bt” non... -
Page 76: Riproduzione Di Audiocassette
5. Avviare la riproduzione sul dispositivo esterno e ascoltare la musica dalle casse di questo dispositivo. 6. Regolare il volume su un livello desiderato con l’apposita manopola (9). 7. Se si desidera realizzare la connessione a un altro dispositivo BT dopo aver già... -
Page 77: Riprodurre Un Vinile
RIPRODURRE UN VINILE • Rimuovere la protezione della puntina. • Assicurarsi che il braccio del pick-up sia accolto dall’apposito supporto prima dell’utilizzo. 1. Premere On/Off (13) per accendere il dispositivo e premere il tasto delle funzioni (13) per selezionare la modalità Phono. 2. -
Page 78: Collegamento Line-Out
COLLEGAMENTO LINE-OUT Collegando Line-Out all’ingresso AUX con un cavo RCA (non incluso in consegna), è possibile connettere il dispositivo a un impianto HiFi. Muto (Mute) Durante la riproduzione, premere una volata Mute sul telecomando. Lo schermo LCD mostra “Mute”. Premendo di nuovo questo tasto o ruotando la manopola del volume si disattiva la funzione. - Page 79 9. Se si preme una terza volta Record, il dispositivo inizia a registrare tutti i titoli disponibili sul CD. 10. A registrazione conclusa, questa viene arrestata automaticamente dal dispositivo. Il dispositivo mostra automaticamente sullo schermo LCD il numero totale di titoli registrati. Avvertenza: - La velocità...
- Page 80 Avvertenze: • La velocità di registrazione è 1:1 e si orienta sull’effettiva durata di riproduzione di vinile o cassetta. • Durante la registrazione CD, la registrazione avviene in rapporto 1:1 e il dispositivo riproduce i brani durante la registrazione. • La registrazione di CD MP3 è...
- Page 81 Avvertenze : • Se si seleziona “Sì”, tutti i file sul supporto vengono completamente cancellati. • Premere Stop una volta per terminare la modalità di cancellazione. Rimuovere la chiavetta USB Prima di rimuovere la chiavetta USB, passare in modalità CD/Cassetta o Radio.
-
Page 82: Avviso Di Smaltimento
AVVISO DI SMALTIMENTO Se sul prodotto è presente la figura a sinistra (il bidone dei rifiuti con le ruote), si applica la direttiva europea 2012/19/ UE. Questi prodotti non possono essere smaltiti con i rifiuti normali. Informarsi sulle disposizioni vigenti per la raccolta di dispositivi elettrici ed elettronici. - Page 83 Estimado cliente, Le felicitamos por la adquisición de este produc- to. Lea atentamente el siguiente manual y siga cuidadosamente las instrucciones de uso con el fin de evitar posibles daños. La empresa no se responsabiliza de los daños ocasionados por un uso indebido del producto o por haber desatendi- do las indicaciones de seguridad.
- Page 84 ATENCIÓN ATENCIÓN: NO ABRA LA CARCASA PARA EVITAR DESCARGAS ELÉCTRICAS Y LESIO- NES GRAVES. EN EL INTERIOR NO HAY COMPONENTES A MANTENER POR EL CLIENTE. PÓNGASE EN CONTACTO ÚNICAMENTE CON ESPECIALISTAS CUALIFICADOS. ADVER- TENCIA. PARA REDUCIR EL RIESGO DE INCENDIO O DESCARGA ELÉCTRICA, NO EX- PONGA EL APARATO AL AGUA, LA LLUVIA O LA HUMEDAD.
-
Page 85: Instrucciones De Seguridad
INSTRUCCIONES DE SEGURIDAD • Lea las instrucciones. Todas las instrucciones de uso deben ser leídas antes de usar la unidad. • Conserve el manual de instrucciones para futuras consultas. • Deben observarse las directrices de atención, uso y seguridad. • El dispositivo no debe utilizarse cerca del agua o en contacto con la humedad. - Page 86 causar pérdida de audición. • Mantenga una distancia mínima (8 cm) alrededor de la unidad para una ventilación adecuada. • No obstruya la ventilación cubriendo la abertura de ventilación con objetos como periódicos, manteles, cortinas, etc. • No coloque llamas abiertas, como velas encendidas, sobre el aparato; •...
-
Page 87: Vista General Del Aparato
VISTA GENERAL DEL APARATO Puntero giratorio Pantalla LCD Regulador de selección / entrada Saltar título/ Retroceder título/ Botón de búsqueda Botón de reproducción Abrir la puerta del CD Botón de grabación Puerta CD Control de volumen 10 Sensor remoto Saltar título/avance rápido/tecla de información 12 Botón de parada/guardo 13 Encender/apagar/tecla de función... - Page 88 Mando a distancia Encender/ Pulse este botón para encender/apagar la unidad. apagar Abrir/cerrar la En el modo CD, púlselo para abrir o cerrar la puerta del compar- puerta del CD timento de CD. Grabación Pulse este botón para activar la función de conversión/graba- ción.
-
Page 89: Radio Fm
RADIO FM Conexión 1. Conecte la clavija del cable de alimentación (25) en el enchufe. 2. Presione el botón de encender/apagar (13) una vez y la luz de fondo de la pantalla LCD (2) se encenderá. 3. A continuación, pulse el botón de función (13) para activar el modo de radio FM. -
Page 90: Radio Dab
• Si pulsa la tecla Reproducir/Pausa del mando a distancia una vez en el modo radio, puede cambiar entre mono y estéreo. • Especialmente cuando la señal estéreo es débil, se recomienda recibir canales en mono. RADIO DAB Búsqueda automática de emisoras 1. -
Page 91: Reproductor De Cd
6. Repita los pasos 2-5 para las demás emisoras que desee almacenar. Activación de las emisoras memorizadas 1. Presione el botón de memoria (12) una vez para activar el estado de recordatorio. 2. Pulse el botón + o - del mando a distancia para seleccionar la emisora presintonizada deseada. - Page 92 2. Si presiona una vez el botón de Detener (12), la unidad entra en el modo de detenerse. Reproducción de CD: saltar pista/ modo de búsqueda (saltar/avance rápido / saltar/retroceder) 1. Cuando se pulsa el botón Saltar/Avance rápido (11) durante la reproducción del CD, se reproduce la siguiente pista y se muestra el número de pista.
- Page 93 pistas en el siguiente orden. (1) Repetir 1 → (2) Repetir todas las canciones → (3) Reproducción aleatoria → (4) Modo Apagado Modo de reproducción Visualización en la pantalla LCD Repetir un título Rep1 Repetir todas las pistas RepF Reproducción aleatoria RepA Modo apagado Rand...
-
Page 94: Reproducción De Mp3 Desde Portadores De Datos Usb O Tarjetas De Memoria
Programación CD/MP3 (con mando a distancia) Para los archivos de audio en formato CD o MP3, puede guardar hasta 20 pistas en cualquier orden y reproducirlas. Asegúrese de que la unidad esté en modo de parada antes de guardarla:- 1. Ajuste el modo CD/USB/SD y detenga la reproducción de CD/MP3. 2. -
Page 95: Conexión Bt Y Reproducción
BT. 3. Active la función BT en su dispositivo BT (p. ej. teléfono móvil) y seleccione «NR-620 DAB» en la lista de aparatos BT. 4. Cuando los dos aparatos BT se hayan conectado con éxito, el texto «bt»... -
Page 96: Reproducción
REPRODUCCIÓN Instrucciones generales de uso Reproducción de casetes Después de insertar un casete en el compartimento del casete. Parar y expulsión de Pulse el botón Fast Forward/Output Cassette casetes (17) y el compartimento del casete emitirá el casete. El botón permanece en la posición de oprimido. -
Page 97: Reproducción De Un Disco De Vinilo
REPRODUCCIÓN DE UN DISCO DE VINILO • Retire la guarda de aguja. • Asegúrese de que el brazo de la aguja se retira del soporte del brazo de la aguja antes de utilizar la unidad. 1. Pulse la tecla encender/apagar (13) para encender la unidad y pulse la tecla de función (13) para seleccionar el modo Phono. -
Page 98: Conexión De Line-Out
CONEXIÓN DE LINE-OUT Puede conectar su dispositivo a un sistema Hi-Fi conectando el conector Line-Out a la entrada AUX a través del cable RCA (no suministrado). Silenciamiento (Mute) / EQ Durante la reproducción, pulse el botón Mute del mando a distancia una vez. - Page 99 pantalla LCD mostrará primero “Check” y luego “REC USB”. 8. Si pulsa el botón Record por segunda vez, la pantalla LCD mostrará “REC ALL”. 9. Presionando el botón Record por tercera vez comenzará la grabación de todas las pistas del CD. 10.
- Page 100 unidad ha comenzado la conversión. 3. Para detener la grabación, pulse el botón Stop una vez (12). Notas: • La velocidad de grabación es de 1:1 y depende del tiempo de reproducción real del fono o de la cinta. • Durante la grabación de CD, la relación de grabación es de 1:1 y la unidad reproduce las canciones durante la grabación.
- Page 101 3. Presione el botón Borrar para borrar. En la pantalla aparecerá “ SI “ y “ NO “. Utilice los botones o para seleccionar el botón “YES” o “NO”. 4. Pulse el botón Borrar de nuevo para confirmar su selección. Notas : •...
-
Page 102: Indicaciones Sobre La Retirada Del Aparado
INDICACIONES SOBRE LA RETIRADA DEL APARADO Si el aparato lleva adherida la ilustración de la izquierda (el contenedor de basura tachado) entonces rige la normativa europea, directiva 2012/19/UE. Este producto no debe arrojarse a un contenedor de basura común. Infórmese sobre las leyes territoriales que regulan la recogida separada de aparatos eléctricos y electrónicos.