Table des Matières
Publicité
Les langues disponibles
Les langues disponibles
Liens rapides
Publicité
Table des Matières
Dépannage

Manuels Connexes pour auna Sarah Ann


Sommaire des Matières pour auna Sarah Ann
-
Page 3: Table Des Matières
Sehr geehrter Kunde, wir gratulieren Ihnen zum Erwerb Ihres Gerätes. Lesen Sie die folgenden Hinweise sorgfältig durch und befolgen Sie diese, um möglichen Schäden vorzubeugen. Für Schäden, die durch Missachtung der Hinweise und unsachgemäßen Gebrauch entstehen, übernehmen wir keine Haftung. Scannen Sie den folgenden QR-Code, um Zugriff auf die aktuellste Bedienungsanleitung und weitere Informationen rund um das Produkt zu erhalten:... -
Page 4: Sicherheitshinweise
SICHERHEITSHINWEISE Allgemeine Hinweise Wählen Sie einen sicheren Standort aus und stellen Sie das Gerät nicht in direktes Sonnenlicht oder neben eine Wärmequelle. 2. Vermeiden Sie Umgebungen, an denen das Gerät Vibrationen, übermäßigem Staub, Kälte oder Feuchtigkeit ausgesetzt ist. 3. Um Stromschläge zu vermeiden, darf das Gehäuse nicht geöffnet werden. -
Page 5: Geräteübersicht
GERÄTEÜBERSICHT Auswahl Drehzahl (wählen Sie Verriegelung aus drei Drehzahloptionen: 33, 45, 78 U/min) Abdeckhaube Tonabnehmer Adapter für 45 U/min (Puck zur Verwendung mit 45 U/min- An-/Ausschalter / Schallplatten mit Aussparung in Lautstärkeregler der Mitte) Aux-Ausgang / Tonarmhebel Kopfhörerausgang Autostopp-Schalter BT und USB/SD-Kodierung... -
Page 6: Vor Dem Ersten Betrieb
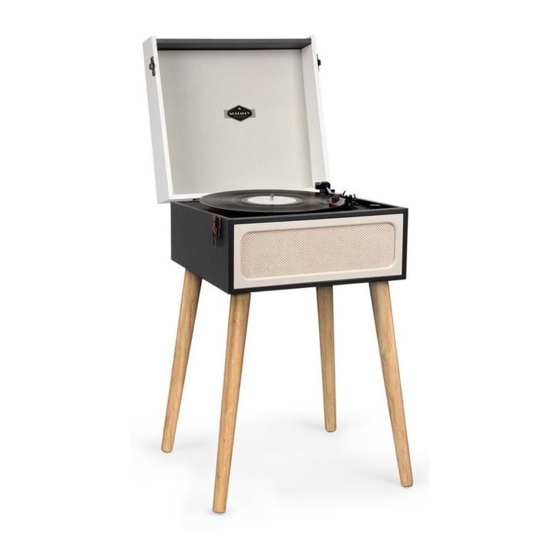
Anschlüsse 11 Gleichstrombuchse 12 Aux-Eingang 13 Line-Ausgang R 14 Line-Ausgang L VOR DEM ERSTEN BETRIEB Montage der Beine Der Plattenspieler wird mit Beinen zur freistehenden Aufstellung geliefert. Alternativ können die Beine entfernt werden und das Gerät steht auf einem Tisch oder Regalbrett. -
Page 7: Bedienung
Hinweis: Wenn Sie das Gerät auf einer Oberfläche platzieren, verwenden Sie die mitgelieferten Gummifüße Stromanschluss • Prüfen Sie vor der Benutzung die Spannung auf der Geräteplakette. Schließen Sie das Gerät nur an Steckdosen an, die der Spannung des Geräts entsprechen. •... - Page 8 BT-Steuerung Wenn sich der Tonarm auf der Stütze befindet, startet die BT-Funktion automatisch. Drücken Sie die Wahltaste für die Betriebsart, um zwischen USB, SD und BT auszuwählen. Anschluss an den Verstärker Sie können Ihren neuen Plattenspieler mit den eingebauten Lautsprechern verwenden oder Sie schließen ihn an Ihre vorhandene Hi-Fi-Anlage an.
-
Page 9: Pflege Und Wartung
Hinweis: Wenn die Platte vor Beendigung des letzten Lieds stoppt, stellen Sie den AUTOSTOPP-Schalter auf OFF. Ihre Platte wird nun bis zum Ende abgespielt, Sie müssen jedoch den Plattenteller manuell anhalten. Autostopp • Nach Beenden des Abspielens einer Platte kann sie über den Schalter Autostopp ON/OFF gesteuert werden. -
Page 10: Wechseln Der Nadel
WECHSELN DER NADEL Entriegeln Sie den Tonarm, um ihn Entfernen Sie die Kappe des freizugeben. Tonabnehmers, um die Nadel freizulegen. Trennen Sie den Tonabnehmer von Trennen Sie die Audiokabel seiner Halterung. vorsichtig vom Tonabnehmer, wobei Sie an der Verbindung ziehen und nicht am Kabel selbst. -
Page 11: Einbau Eines Neuen Tonabnehmers
EINBAU EINES NEUEN TONABNEHMERS Um einen neuen Tonabnehmer einzubauen, folgen Sie bitte Schritten 5-8. Hinweis: Bitte gehen Sie extrem vorsichtig vor, um eine Beschädigung von Tonabnehmer und Audiokabeln zu vermeiden Setzen Sie die Audiokabel Stellen Sie sicher, dass sich die vorsichtig ein. -
Page 12: Fehlerbehebung
FEHLERBEHEBUNG Problem Lösung Das Gerät schaltet sich Stellen Sie sicher, dass das Netzkabel an die nicht ein. richtige Stromquelle angeschlossen ist und die Steckdose Strom führt. Kein Ton. Drehen Sie den Knopf POWER/VOLUME im Uhrzeigersinn, um die Lautstärke zu erhöhen. Die Platte lässt sich nicht Stellen Sie sicher, dass Sie die passende abspielen. -
Page 13: Hinweise Zur Entsorgung
HINWEISE ZUR ENTSORGUNG Wenn es in Ihrem Land eine gesetzliche Regelung zur Entsorgung von elektrischen und elektronischen Geräten gibt, weist dieses Symbol auf dem Produkt oder auf der Verpackung darauf hin, dass dieses Produkt nicht im Hausmüll entsorgt werden darf. Stattdessen muss es zu einer Sammelstelle für das Recycling von elektrischen und elektronischen Geräten gebracht werden. - Page 15 Dear Customer, Congratulations purchasing this equipment. Please read this manual carefully and take care of the following hints to avoid damages. Any failure caused by ignoring the items and cautions mentioned in the instruction manual is not covered by our warranty and any liability.
-
Page 16: Safety Instructions
SAFETY INSTRUCTIONS General Hints Choose a safe location and avoid placing the unit in direct sunlight or near any heat source. 2. Avoid environments subject to vibration, excessive dust, cold or moisture. 3. Due to the risk of electrical shock, do not open the cabinet. Should a foreign object accidentally find its way into the interior of the unit, contact your local dealer. -
Page 17: Product Overview
PRODUCT OVERVIEW Speed selection (choose from Lock latch three speeds: 33, 45, 78 rpm) Dust cover Cartridge 45 RPM adapter (use this when playing 45rpm records with cut Power switch / Volume control out center) Tone arm lift lever Aux out / Headphone Blue tooth and USB/SD encoding Auto stop switch control system... -
Page 18: Before First Use
Sockets 11 DC power jack 12 Aux in 13 Line out R channel 14 Line out L channel BEFORE FIRST USE Attaching the Legs The turntable comes with its own legs so it can stand alone. Alternatively, the legs can be removed and it can sit on an existing table or shelf. -
Page 19: Operation
Note: If placing the turntable on a surface, attach the included rubber feet. Initial Set-Up • Ensure that the mains voltage of your home • corresponds to the operating voltage of the adapter. • Connect the power adapter to the wall outlet. •... - Page 20 BT CONTROL When the tone arm set to the rest position, Bluetooth function will start automatically. Then need to press the mode key to circle between USB/SD and BT. Amplifier Connection You can listen to your new turntable using the built-in speakers, or you may wish to connect it to your existing Hi-Fi system.
-
Page 21: Care And Maintenance
Note: If your record stops before the last track finishes, set the AUTO STOP switch to OFF. Your record will now play to the end, but you will have to stop the turntable rotation manually. Auto Stop • When a record finishes playing, it can be controlled by the auto-stop •... -
Page 22: Replacing The Stylus
REPLACING THE STYLUS Push the arm lock to release the Take off the cap of the cartridge to tone- expose the needle. arm. Separate the cartridge from the Gently pull the audio-lines from the cartridge holder. cartridge, taking care to pull from the terminal connector and not the wire itself. -
Page 23: Installing A New Stylus Cartridge
INSTALLING A NEW STYLUS CARTRIDGE To fit a new cartridge, perform steps 5-8 below. Note: Please take extreme care whilst performing this operation to avoid damaging the tone arm and audio wires. Carefully insert the audio-lines. Make sure the audio-lines are not touching each other. -
Page 24: Troubleshooting
TROUBLESHOOTING Problem Solution The unit will not power Make sure the unit’s power cord is connected to an appropriate electrical outlet and the wall socket is switched ON. There is no sound. Rotate the POWER/VOLUME knob clockwise to increase the volume. The vinyl record will not Make sure you have selected the correct play. -
Page 25: Disposal Considerations
DISPOSAL CONSIDERATIONS If there is a legal regulation for the disposal of electrical and electronic devices in your country, this symbol on the product or on the packaging indicates that this product must not be disposed of with household waste. Instead, it must be taken to a collection point for the recycling of electrical and electronic equipment. - Page 27 Estimado cliente: Le felicitamos por la adquisición de este producto. atentamente siguiente manual siga cuidadosamente las instrucciones de uso con el fin de evitar posibles daños. La empresa no se responsabiliza de los daños ocasionados por un uso indebido del producto o por haber desatendido las indicaciones de seguridad.
-
Page 28: Indicaciones De Seguridad
INDICACIONES DE SEGURIDAD Seleccione una ubicación segura y no coloque el aparato bajo la luz directa del sol ni junto a una fuente de calor. 2. Evite entornos en donde el aparato se pueda ver expuesto a vibraciones, demasiado polvo, frío o humedad. 3. -
Page 29: Visión General Del Aparato
VISIÓN GENERAL DEL APARATO Selección de revoluciones Cierre (escoja entre tres opciones de revoluciones: 33, 45 y 78 r/min) Tapa Cápsula Adaptador para 45 r/min Interruptor de encendido/ (estabilizador para utilizar con apagado / Regulador de vinilos de 45 r/min con orificio volumen en el centro) Palanca para el brazo del... -
Page 30: Antes Del Primer Uso
Conexiones 11 Toma para corriente continua 12 Entrada AUX 13 Salida Line R 14 Salida Line L ANTES DEL PRIMER USO Montaje de las patas El tocadiscos se entrega con patas para una colocación independiente. Como alternativa, puede desmontar las patas y colocar el aparato sobre una mesa o estantería. -
Page 31: Utilización
Nota: Si coloca el aparato sobre una superficie, utilice las patas de goma incluidas. Toma para suministro eléctrico • Antes de utilizar el aparato, compruebe la tensión en la placa técnica del mismo. Conecte el aparato solamente a tomas de corriente que se adecuen a la tensión del mismo. - Page 32 Control BT Si el brazo se encuentra sobre su soporte, la función BT se inicia automáticamente. Pulse el botón de selección para el tipo de funcionamiento para elegir entre USB, SD y BT. Conexión al amplificador Puede utilizar su nuevo tocadiscos con el altavoz integrado o conectarlo a su equipo HiFi.
-
Page 33: Cuidado Y Mantenimiento
Nota: Si el vinilo se detiene antes del final de la última pista, coloque el interruptor de DETENCIÓN AUTOMÁTICA en OFF. Su vinilo se reproducirá hasta al final, pero deberá detenerlo manualmente. Detención automática • Tras finalizar la reproducción de un vinilo, el interruptor de detención automática se puede controlar en ON/OFF. -
Page 34: Sustituir La Aguja
SUSTITUIR LA AGUJA Desbloquee el brazo para liberarlo. Retire la tapa de la cápsula para liberar la aguja. Separe la cápsula de su soporte. Desconecte el cable de audio de la cápsula con cuidado tirando de la conexión y no del propio cable. -
Page 35: Colocar Un Nueva Cápsula
COLOCAR UN NUEVA CÁPSULA Para colocar una nueva cápsula, siga los pasos 5-8. Nota: Proceda con mucho cuidado para evitar dañar la cápsula y el cable de audio. Coloque los cables de audio con Asegúrese de que los cables de cuidado. -
Page 36: Resolución De Problemas
RESOLUCIÓN DE PROBLEMAS Problema Solución El aparato no se enciende. Asegúrese de que el cable de alimentación se conecte en la fuente correcta y la toma de corriente conduzca electricidad. No hay sonido. Gire el regulador POWER/VOLUME en el sentido de las agujas del reloj para aumentar el volumen. -
Page 37: Indicaciones Sobre La Retirada Del Aparato
INDICACIONES SOBRE LA RETIRADA DEL APARATO Si en su país existe una disposición legal relativa a la eliminación de aparatos eléctricos y electrónicos, este símbolo estampado en el producto o en el embalaje advierte que no debe eliminarse como residuo doméstico. En lugar de ello, debe depositarse en un punto de recogida de reciclaje de aparatos eléctricos y electrónicos. -
Page 39: Fiche Technique
Cher client, Toutes nos félicitations pour l’acquisition de ce nouvel appareil. Veuillez lire attentivement les instructions suivantes de branchement et d’utilisation afin d’éviter d’éventuels dommages. Le fabricant ne saurait être tenu pour responsable des dommages dus au non-respect des consignes de sécurité et à la mauvaise utilisation de l’appareil. -
Page 40: Consignes De Sécurité
CONSIGNES DE SÉCURITÉ Choisissez un emplacement sûr et n‘installez pas l‘appareil à l‘ensoleillement direct ou à proximité d‘une source de chaleur. 2. Évitez les environnements où l‘appareil est sujet aux vibrations, à la poussière excessive, au froid ou à l‘humidité. 3. -
Page 41: Aperçu De L'appareil
APERÇU DE L‘APPAREIL Choix de la vitesse (choisissez Fermeture parmi trois options de rotation : 33, 45, 78 T/min) Couvercle Bras de lecture Adaptateur pour 45 T/min (Centreur à utiliser avec les 45 T/ Marche / arrêt / Volume min évidés au centre) Levier du bras de lecture Sortie Aux / sortie casque Commutateur auto stop... -
Page 42: Avant La Première Utilisation
Connexions 11 Prise d'alimentation DC 12 Entrée Aux 13 Sortie de ligne R 14 Sortie de ligne L AVANT LA PREMIÈRE UTILISATION Montage des pieds La platine est livrée avec des pieds pour une installation en pose libre. Vous pouvez également replier les pieds pour poser l‘appareil sur une table ou une étagère. -
Page 43: Utilisation
Remarque : Lorsque vous placez l‘appareil sur une surface, utilisez les pieds en caoutchouc fournis Branchement sur le secteur • Vérifiez la tension sur l‘étiquette de l‘appareil avant utilisation. • Ne branchez l‘appareil que sur des prises correspondant à la tension de l‘appareil. - Page 44 Contrôle BT Lorsque le bras de lecture est sur le support, la fonction BT démarre automatiquement. Appuyez sur le sélecteur de mode pour choisir entre USB, SD et BT. Branchement sur un amplificateur Vous pouvez utiliser votre nouvelle platine avec les enceintes intégrées ou la connecter à...
-
Page 45: Entretien Et Maintenance
Remarque : Si le disque s‘arrête avant la fin du dernier morceau, réglez le commutateur AUTOSTOP sur OFF. Votre disque sera lu jusqu‘à la fin, mais vous devez arrêter manuellement la platine. Auto stop • A la fin de la lecture d‘un disque, il est possible de le contrôler via le commutateur ON / OFF Autostop. -
Page 46: Remplacement De L'aiguille
REMPLACEMENT DE L‘AIGUILLE Débloquer la tête de lecture pour Retirez le capuchon de la tête de la libérer. lecture pour libérer l'aiguille. Débranchez la tête de lecture de Déconnectez soigneusement les son support. câbles audio du capteur, en tirant sur le connecteur, pas sur le câble lui-même. -
Page 47: Installation D'un Nouvelle Tête De Lecture
INSTALLATION D‘UN NOUVELLE TÊTE DE LECTURE Pour installer une nouvelle tête de lecture, veuillez suivre les étapes 5-8. Remarque : Veuillez faire preuve d‘une extrême prudence pour éviter d‘endommager la tête de lecture et les câbles audio Insérez les câbles audio avec soin. Assurez-vous que les câbles audio ne se touchent pas. -
Page 48: Résolution Des Problèmes
RÉSOLUTION DES PROBLÈMES Problème Solution L'appareil ne s'allume pas. Assurez-vous que le cordon d'alimentation est branché à la source d'alimentation appropriée et que la prise de courant est sous tension. Pas de son. Tournez le bouton POWER / VOLUME dans le sens des aiguilles d’une montre pour augmenter le volume. -
Page 49: Informations Sur Le Recyclage
INFORMATIONS SUR LE RECYCLAGE S‘il existe une réglementation pour l‘élimination ou le recyclage des appareils électriques et électroniques dans votre pays, ce symbole sur le produit ou sur l‘emballage indique que cet appareil ne doit pas être jeté avec les ordures ménagères. Vous devez le déposer dans un point de collecte pour le recyclage des équipements électriques et électroniques. -
Page 51: Dati Tecnici
Gentile cliente, La ringraziamo per aver acquistato il dispositivo. La preghiamo di leggere attentamente le seguenti istruzioni per l’uso e di seguirle per evitare possibili danni tecnici. Non ci assumiamo alcuna responsabilità per danni scaturiti da una mancata osservazione delle avvertenze di sicurezza e da un uso improprio del dispositivo. -
Page 52: Avvertenze Di Sicurezza
AVVERTENZE DI SICUREZZA Scegliere un luogo appropriato per posizionare il dispositivo, non nella diretta luce solare o vicino a una fonte di calore. 2. Evitare ambienti in cui il dispositivo è esposto a vibrazioni, polvere eccessiva, freddo o umidità. 3. Per evitare folgorazioni, non aprire l’alloggiamento. Se inavvertitamente un corpo estraneo dovesse finire all’interno del dispositivo, rivolgersi a un tecnico specializzato. -
Page 53: Descrizione Del Dispositivo
DESCRIZIONE DEL DISPOSITIVO Selezione dei giri (selezionare Blocco tra tre opzioni, 33, 45, 78 giri/ minuto). Copertura Pick-up Adattatore per 45 giri (puck per Interruttore On/Off e regolazione utilizzare dischi a 45 giri con volume cavità nel mezzo) Leva del braccio del pick-up Uscita Aux/Uscita cuffie Interruttore autostop Codifica BT e USB/SD... -
Page 54: Prima Del Primo Utilizzo
Connessioni 11 Connessione corrente continua 12 Ingresso Aux 13 Uscita Line R 14 Uscita Line L PRIMA DEL PRIMO UTILIZZO Montaggio delle gambe Il giradischi viene consegnato con gambe di appoggio per il posizionamento libero. In alternativa, è possibile rimuovere le gambe e posizionare il dispositivo su un tavolo o una mensola. -
Page 55: Utilizzo
Avvertenza: se si posiziona il dispositivo su una superficie, utilizzare i piedini in gomma inclusi in consegna. Collegamento alla rete elettrica • Controllare la tensione sulla targhetta del dispositivo prima dell’utilizzo. Collegare il dispositivo solo a prese elettriche con tensione corrispondente a quella del dispositivo. -
Page 56: Collegamento All'amplificatore
Controllo BT Se il braccio del pick-up si trova sull’appoggio, la funzione BT si attiva automaticamente. Premere il tasto per selezionare il tipo di funzionamento per scegliere tra USB, SD e BT. Collegamento all’amplificatore Il giradischi può essere utilizzato con gli altoparlanti integrati o è possibile collegarlo a impianti HiFi esterni. -
Page 57: Pulizia E Manutenzione
Avvertenza: se il disco si ferma prima della fine dell’ultimo brano, posizionare l’interruttore AUTOSTOP su OFF. Il disco viene riprodotto fino alla fine, ma è necessario poi fermarlo manualmente. Autostop • Dopo la fine della riproduzione di un disco, è possibile controllarlo con l’interruttore Autostop ON/OFF. -
Page 58: Sostituire La Puntina
SOSTITUIRE LA PUNTINA Sbloccare il braccio del pick-up. Togliere la copertura del pick-up per liberare la puntina. Separare il pick-up dal supporto. Separare i cavi audio dal pick-up, tirando il collegamento e non il cavo stesso. -
Page 59: Montare Un Nuovo Pick-Up
MONTARE UN NUOVO PICK-UP Per montare un nuovo pick-up, seguire i passaggi 5-8. Avvertenza: prestare estrema attenzione per evitare di danneggiare pick-up e cavo audio. Inserire i cavi audio facendo Assicurarsi che i cavi audio non so attenzione. tocchino tra loro Portare il pick-up nel suo supporto. -
Page 60: Correzione Degli Errori
CORREZIONE DEGLI ERRORI Problema Soluzione Il dispositivo non si Assicurarsi che il cavo di alimentazione sia accende. connesso alla fonte di corrente corretta e che la presa trasmetta corrente. Nessun suono. Ruotare POWER/VOLUME in senso orario per alzare il volume. Il disco non può... -
Page 61: Avviso Di Smaltimento
AVVISO DI SMALTIMENTO Se nel proprio paese si applicano le regolamentazioni inerenti lo smaltimento di dispositivi elettrici ed elettronici, questo simbolo sul prodotto o sulla confezione segnala che questi prodotti non possono essere smaltiti con i rifi uti normali e devono essere portati a un punto di raccolta di dispositivi elettrici ed elettronici.