Table des Matières

Publicité

Les langues disponibles

Les langues disponibles

Liens rapides

R255
SMSL
R255
Original Instructions
Notice originale
Instrucciones originales
GB2438285
Originally written in UK English
Date Published: 26/04/2019

Publicité

Table des Matières
loading

Sommaire des Matières pour Evolution R255 SMSL

  • Page 1 R255 SMSL R255 Original Instructions Notice originale Instrucciones originales GB2438285 Originally written in UK English Date Published: 26/04/2019...
  • Page 2: Table Des Matières

    Compound Cutting Assembly Diagrams Crown Moulding Cutting Saw Set Up Diagrams Cutting Bowed Material Saw Usage Diagrams Clearing Jammed Material Optional Evolution Accessories Assembly & Preparation Tools Needed Maintenance Environmental Protection Unlatching & Raising The Cutting Head Assembly Safety Checks...
  • Page 3: Warranty

    WEB: www.evolutionpowertools.com EMAIL: customer.services@evolutionpowertools.com WARRANTY Congratulations on your purchase (1.4) of an Evolution Power Tools Machine. Please complete your product registration ‘online’ as explained on the leaflet included with this machine. This will enable you to validate your machine’s warranty period via Evolution’s website by entering your details and thus ensure prompt service if ever needed.
  • Page 4: Machine Specifications

    www.evolutionpowertools.com MACHINE SPECIFICATIONS IMPERIAL MACHINE METRIC Motor (220-240V ~ 50 Hz) 2000W Motor (110V ~ 50 Hz) 1600W 14.5A Speed No Load 2500 min 2500 rpm Weight (Net) 15.3kg 33.7lb Dust Port Diameter 35mm 1 -3/8 In. Tool Dimensions (H x W x L) (0° / 0°) 14- 3/16 x 27-3/4 360 x 705 x 730mm x 28-47/64 In.
  • Page 5: Safety Labels & Symbols

    Contact Evolution sliding mitre saw and has been designed Power Tools for replacement labels. to be used with genuine Evolution blades rated for this machine. Only use blades Note: All or some of the following symbols designed for use in this machine and/ may appear in the manual or on the product.
  • Page 6: Safety Precautions

    www.evolutionpowertools.com SAFETY PRECAUTIONS SAVE ALL WARNINGS & ELECTRICAL SAFETY INSTRUCTIONS FOR FUTURE (1.14) REFERENCE This machine is fitted with the correct moulded plug and mains lead for the designated market. The term “power tool” in the warnings refers to If the supply cord is damaged, it must be your mains-operated (corded) power tool or replaced by a special cord or assembly available battery-operated (cordless) power tool.
  • Page 7 www.evolutionpowertools.com 3) General Power Tool Safety Warnings b) Do not use the power tool if the switch does (2.4) [Personal Safety]. not turn it on or off. Any power tool that cannot a) Stay alert, watch what you are doing and use be controlled with the switch is dangerous and must common sense when operating a power tool.
  • Page 8 www.evolutionpowertools.com a) Mitre saws are intended to cut wood or with the outside bowed face toward the fence. wood-like products, they cannot be used Always make certain that there is no gap with abrasive cut-off wheels for cutting between the workpiece, fence and table along ferrous material such as bars, rods, studs, the line of the cut.
  • Page 9: Blade Safety

    EN 847-1. practicable. It is not advisable to wear gloves • Only use genuine Evolution blades rated for when operating the mitre saw. this machine. • Do not use saw blades that are damaged or...
  • Page 10: Safe Operation

    www.evolutionpowertools.com PERFORM CUTS SAFE OPERATION (3.8) (3.7) CORRECTLY & SAFELY Always ensure that you have selected the correct Wherever practicable always secure the saw blade for the material being cut. Do not use work-piece to the saw table using the work this mitre saw to cut materials other than those clamp where provided.
  • Page 11: Getting Started Unpacking

    • Lock the cutting head in its lowest position. For instructions on how to identify the batch Ensure that the cutting head locking pin is code, please contact the Evolution Power completely engaged in its socket. Tools helpline or go to: www.evolutionpowertools.com...
  • Page 12: Additional Accessories

    ADDITIONAL ACCESSORIES (4.3) In addition to the standard items supplied with this machine the following accessories are also available from the Evolution online shop at www.evolutionpowertools.com or from your local retailer. (4.4) Description Part No RAGE Multi-Materal RAGEBLADE255MULTI TCT Blade...
  • Page 13: Items Supplied

    www.evolutionpowertools.com ITEMS SUPPLIED 4.2) UK/EU NORTH AMERICA R255SMS R255SMS+ R255SMSL R255SMS+ 052-0001A 052-0001 052-0002A Product Code 052-0002 052-0004B 052-0004A 052-0003A 052-0003 052-0011 Machine Table Extensions Double Ended Hex Key (M6 & M5) Rotary Table And Neck Cutting Head Carriage Slides Mitre Locking Knob Mains Cable Guide/Clamp Self Tapping Cap Screw...
  • Page 14: Machine Overview

    www.evolutionpowertools.com MACHINE OVERVIEW Pictured: R255SMSL (See * for R255SMS+ Parts) 1. CUTTING HANDLE 14. BLADE 2. BLADE GUARD LOCKING TRIGGER 15. LOWER BLADE GUARD 3. DUST BAG* 16. TABLE TOP 4. SLIDE LOCKING SCREW 17. ROTARY TABLE 5. DEPTH GAUGE 18.
  • Page 15 www.evolutionpowertools.com Pictured: R255SMSL 26. ON / OFF TRIGGER SWITCH 37. CABLE GRIP COMPONENT (FITTED TO THE CABLE GUIDE CLAMP) 27. LASER GUIDE ON / OFF SWITCH 38. ANTI-VIBRATION SPRING 28. DUST EXTRACTION PORT (FITTED TO ITEM ‘4’ - THE SLIDE LOCKING 29.
  • Page 16 www.evolutionpowertools.com R255SMSL Handle R255SMS+ Handle Fig. 1 Fig. 2 Fig. 3 Fig. 4 Fig. 5 Fig. 6 Fig. 7 Fig. 8 Fig. 9 Fig. 10 Fig. 11 Fig. 12...
  • Page 17 www.evolutionpowertools.com CLICK Fig. 13a Fig. 13b Fig. 14a Fig. 14b Fig. 14c Fig. 15 Fig. 16 Fig. 17 Fig. 18 Fig. 19 Fig. 20...
  • Page 18 www.evolutionpowertools.com Fig. 21 Fig. 22 Fig. 23 Fig. 24 Fig. 25 Fig. 26 Fig. 27 Fig. 28a Fig. 28b Fig. 28c Fig. 29 Fig. 30...
  • Page 19 www.evolutionpowertools.com FIT LONG FIT LONG CLAMP CLAMP (R255SMS+) (R255SMS+) Fig. 31 Fig. 32 Fig. 33 Fig. 34 Fig. 35 Fig. 36 Fig. 39 Fig. 37 Fig. 38 Fig. 40 Fig. 41a Fig. 41b...
  • Page 20 www.evolutionpowertools.com 1) Hex headed bolt 2) Spring washer 3) Flat washer 4) Mitre saw base 5) Workbench 6) Flat washer 7) Spring washer 8) Hex nut 9) Lock nut Fig. 42 Fig. 43 R255SMSL R255SMS+ 2pc Clamp 3pc Clamp Fig. 45 Fig.
  • Page 21 www.evolutionpowertools.com Fig. 53 Fig. 54 Fig. 55 Fig. 57 Fig. 58 Fig. 56 Fig. 60 Fig. 61 Fig. 59 Fig. 62 Fig. 63 Fig. 64...
  • Page 22: Assembly & Preparation

    www.evolutionpowertools.com ASSEMBLY AND PREPARATION WARNING: Do not under any circumstances (7.1) plug the cutting head into the power supply WARNING: Always disconnect the saw and try to use it as a hand held circular saw. from the power source before making any adjustments.
  • Page 23: Important

    TO FIT THE TABLE EXTENSIONS: The carriage slide should be inserted from the back ensuring that the ‘Evolution’ logo is the correct way • Carefully examine the table extension pieces to up. (Fig. 9) determine which is for the right hand side and •...
  • Page 24: Unlatching & Raising

    Note: The cable should not be tight anywhere with the machine disconnected from the along its length. (Fig. 21) mains supply. WARNING: Only use genuine Evolution Raise and lower the cutting head several times blades or those blades specifically and also operate the sliding carriage. Check...
  • Page 25: Checking & Adjusting

    www.evolutionpowertools.com Install the new blade. Make sure the rotation adjustment maybe required. arrow on the blade matches the clockwise • Loosen the bevel lock handle and tilt the rotation arrow on the upper guard. cutting head to the left. • Loosen the locknut on the Bevel Angle Note: The blade teeth should always point adjustment screw.
  • Page 26: Machine Fence Alignment

    www.evolutionpowertools.com MACHINE FENCE ALIGNMENT To use the depth stop: The Fence must be aligned at 90˚ (square) to • Deploy the depth stop ‘stop plate’ a correctly installed blade. The Rotary table (Fig. 28a) by rotating it forward from its must be set at ‘0˚’...
  • Page 27: The Laser

    • Switch on the laser beam. • Repairs to the laser module must only be • Position the work-piece on the rotary table conducted by Evolution Power Tools or their and against the fence. authorized agent. • Slide the work-piece into position until...
  • Page 28: Laser Adjustment

    Note: This machine can be attached to the • Loosen the clamping screw. (Fig.41a) Evolution Mitre Saw Stand. (Fig. 44). This will • Carefully rotate the laser module, until the line provide a safe secure, and extremely portable is parallel with the marks in the cardboard.
  • Page 29: For Portable Use

    www.evolutionpowertools.com FOR PORTABLE USE: are holes for the clamp located on both left and • Mount the saw on a 18mm thick piece of right of the base. (Fig. 46) plywood or MDF (800mm x 500mm min size recommended) using appropriate fastenings OPERATING INSTRUCTIONS (not supplied).
  • Page 30: Preparing To Make A Cut

    www.evolutionpowertools.com Place the saw on a secure stationary work • Lower the Cutting Handle downwards and surface and check the saw over carefully. cut through the work-piece. Check particularly the operation of all the • Allow the speed of the blade to do the work, machines safety features before attempting there is no need to apply undue pressure to to operate the machine.
  • Page 31: Mitre Cutting

    www.evolutionpowertools.com completely covering the blade teeth, and the The cutting head can be tilted from the normal 0˚ cutting head locked in the upper position, (perpendicular position) to a maximum angle of before releasing the Cutting Handle. 45˚ from the perpendicular to the left hand side only.
  • Page 32: Crown Moulding Cutting

    CROWN MOULDING CUTTING OPTIONAL EVOLUTION ACCESSORIES This machine is capable of cutting the mitre angles required for Crown Mouldings. DUST BAG (Supplied with R255SMS+) To configure the machine to cut Crown A Dust Bag can be fitted to the extraction port Moulding: at the rear of the machine.
  • Page 33: Maintenance

    www.evolutionpowertools.com MAINTENANCE Note: Any maintenance must be carried out with the machine switched off and disconnected from the mains/battery power supply. Check that all safety features and guards operating correctly on a regular basis. Only use this machine if all guards/safety features are fully operational.
  • Page 34: Assembly Safety Checks

    www.evolutionpowertools.com ASSEMBLY SAFETY CHECKS PART CONDITION Slides Inserted through the bevel neck and connected to the cutting head. Locating lugs successfully deployed. Mitre Handle Locking Knob Installed into mitre handle / rotary table. Slide Carriage Inserted into the threaded hole in the bevel neck. Anti-vibration locking screw spring fitted beneath the locking screw hand knob.
  • Page 35: Ec Declaration Of Conformity

    EC DECLARATION OF CONFORMITY The manufacturer of the product covered by this Declaration is: Evolution Power Tools, Venture One, Longacre Close, Holbrook Industrial Estate, Sheffield, S20 3FR. The manufacturer hereby declares that the machine as detailed in this declaration fulfils all the relevant provisions of the Machinery Directive and other appropriate directives as detailed below.
  • Page 36 www.evolutionpowertools.com Notes...
  • Page 37 www.evolutionpowertools.com Notes...
  • Page 38 Corte de moldura de techo Diagramas de configuración de la sierra 54 Corte de material arqueado Diagramas de uso de la sierra Despejar material atascado Accesorios opcionales de Evolution Montaje y preparación Herramientas necesarias Mantenimiento Protección medioambiental Desenganche y elevación de la...
  • Page 39: Correo Electrónico

    Esto le permitirá validar el periodo de garantía de su máquina a través de la página web de Evolution al introducir sus datos y, así, disponer de un servicio rápido si fuera necesario. Le estamos sinceramente agradecidos por escoger uno de nuestros productos Evolution Power Tools.
  • Page 40: Características Técnicas De La Máquina

    www.evolutionpowertools.com CARACTERÍSTICAS TÉCNICAS DE LA MÁQUINA IMPERIAL MÁQUINA MÉTRICO Motor (220-240 V ~ 50 Hz) 2000 W 9 A Velocidad sin carga 2500 min 2500 rpm Peso (neto) 15,3 kg 33,7 lb Diámetro del puerto de polvo 35 mm 1-3/8” Dimensiones de la herramienta (Al x An x L) (0°...
  • Page 41: Etiquetas Y Símbolos De Seguridad

    Póngase Norma de Australia/Nueva Zelanda en contacto con Evolution Power Tools para sustituir las etiquetas. USO PREVISTO DE Nota: todos o algunos de los siguientes símbolos ESTA HERRAMIENTA ELÉCTRICA pueden aparecer en el manual o en el producto.
  • Page 42: Precauciones De Seguridad

    www.evolutionpowertools.com supervisadas o instruidas en el uso seguro El incumplimiento de las instrucciones y del producto por una persona responsable de advertencias puede provocar una descarga su seguridad y competente en el uso seguro eléctrica, incendios y/o lesiones graves. de este. GUARDE TODAS LAS ADVERTENCIAS PRECAUCIONES DE SEGURIDAD E INSTRUCCIONES PARA PODER...
  • Page 43: La Herramienta Eléctrica

    www.evolutionpowertools.com d) No haga mal uso del cable. Nunca use el situaciones inesperadas. cable para transportar, tirar o desenchufar f) Vístase de manera adecuada. No lleve ropa la herramienta eléctrica. Mantenga el holgada ni joyas. Mantenga el pelo, la ropa cable lejos del calor, el aceite, las esquinas y los guantes alejados de las piezas móviles.
  • Page 44: Consejos Para Su Salud

    www.evolutionpowertools.com Muchos accidentes se producen debido mascarilla aprobada con filtros reemplazables a un mantenimiento deficiente de las al usar esta máquina, además de utilizar la herramientas eléctricas. unidad de extracción de polvo. f) Mantenga las herramientas de corte SEGURIDAD ESPECÍFICA DE LA limpias y afiladas.
  • Page 45 www.evolutionpowertools.com NOTA: la advertencia anterior se omite interferencia ni peligro de cortar la valla. para una sierra ingletadora simple de NOTA: la frase «bisel o» no se aplica a sierras sin brazo giratorio. ajuste de bisel. e) Nunca cruce la mano por la línea de corte l) Proporcione un soporte adecuado, como prevista, ni delante ni detrás de la hoja de extensiones de mesa, caballetes de la sierra,...
  • Page 46: Seguridad De La Hoja

    Bajo ningún concepto se puede requisitos de EN 847-1. levantar o transportar la máquina usando la • Utilice solo hojas Evolution originales protección retráctil ni ninguna otra parte de su diseñadas para esta máquina. mecanismo de funcionamiento.
  • Page 47: Realizar Cortes De Manera Correcta Y

    www.evolutionpowertools.com CONSEJOS DE SEGURIDAD Si fuera necesario usar un espaciador o anillos (3.9) ADICIONALES reductores, estos deben ser apropiados para el fin previsto y solo según lo recomendado TRANSPORTAR LA SIERRA por el fabricante. INGLETADORA Si la sierra ingletadora está equipada con un láser, no se debe sustituir por un tipo diferente.
  • Page 48: Primeros Pasos

    • Afloje el tornillo de bloqueo del ángulo de teléfono de asistencia de Evolution Power Tools o inglete. Gire la mesa a cualquiera de sus visite: www.evolutionpowertools.com ajustes máximos.
  • Page 49: Elementos Suministrados

    www.evolutionpowertools.com ELEMENTOS SUMINISTRADOS 4.2) R255SMS R255SMS+ R255SMSL R255SMS+ 052-0001A 052-0001 052-0002A Código de producto 052-0002 052-0004B 052-0004A 052-0003A 052-0003 052-0011 Extensiones de mesa de la máquina Llave hexagonal de doble extremo (M8 & M6) Cuello y mesa giratoria Cabeza de corte Correderas de la carretilla Botón de bloqueo del inglete Mordaza/guía del cable de red...
  • Page 50: Descripción General De La Máquina

    www.evolutionpowertools.com DESCRIPCIÓN GENERAL DE LA MÁQUINA MANGO DE CORTE 13. CABEZA DE CORTE PALANCA DE BLOQUEO DE LA PROTECCIÓN DE LA HOJA 14. HOJA SACO CAPTAPOLVO* 15. PROTECCIÓN INFERIOR DE LA HOJA TORNILLO DE BLOQUEO DE LA CORREDERA 16. PARTE SUPERIOR DE LA MESA GALGA DE PROFUNDIDAD 17.
  • Page 51: Gatillo Interruptor On/Off

    www.evolutionpowertools.com 26. GATILLO INTERRUPTOR ON/OFF 36. TORNILLO DE CABEZA HUECA M4 x4 27. INTERRUPTOR ON/OFF DE LA GUÍA LÁSER 37. COMPONENTE DE SUJECIÓN DEL CABLE (EQUIPADO EN LA MORDAZA DE LA GUÍA DEL CABLE) 28. PUERTO DE EXTRACCIÓN DE POLVO 38.
  • Page 52 www.evolutionpowertools.com R255SMSL Mango R255SMS+ Mango Fig. 1 Fig. 2 Fig. 3 Fig. 4 Fig. 5 Fig. 6 Fig. 7 Fig. 8 Fig. 9 Fig. 10 Fig. 11 Fig. 12...
  • Page 53 www.evolutionpowertools.com CLIC Fig. 13a Fig. 13b Fig. 14a Fig. 14b Fig. 14c Fig. 15 Fig. 16 Fig. 17 Fig. 18 Fig. 19 Fig. 20...
  • Page 54 www.evolutionpowertools.com Fig. 21 Fig. 22 Fig. 23 Fig. 24 Fig. 25 Fig. 26 Fig. 27 Fig. 28a Fig. 28b Fig. 28c Fig. 29 Fig. 30...
  • Page 55 www.evolutionpowertools.com FIT ABRAZA- FIT ABRAZA- DERA LARGA DERA LARGA (R255SMS+) (R255SMS+) Fig. 31 Fig. 32 Fig. 33 Fig. 34 Fig. 35 Fig. 36 Fig. 39 Fig. 37 Fig. 38 Fig. 40 Fig. 41a Fig. 41b...
  • Page 56 www.evolutionpowertools.com 1) Perno de cabeza hexagonal 2) Arandela elástica 3) Arandela plana 4) Base de la sierra ingletadora 5) Banco de trabajo 6) Arandela plana 7) Arandela elástica 8) Tuerca hexagonal 9) Tuerca de seguridad Fig. 42 Fig. 43 R255SMSL R255SMS+ 2pc Mordaza 3pc Mordaza...
  • Page 57 www.evolutionpowertools.com Fig. 53 Fig. 54 Fig. 55 Fig. 57 Fig. 58 Fig. 56 Fig. 60 Fig. 61 Fig. 59 Fig. 62 Fig. 63 Fig. 64...
  • Page 58: Montaje Y Preparación

    www.evolutionpowertools.com MONTAJE Y PREPARACIÓN ADVERTENCIA: No conecte bajo ninguna (7.1) circunstancia la cabeza de corte al suministro ADVERTENCIA: desconecte siempre la sierra de corriente ni intente usarla como sierra de la alimentación antes de realizar ningún circular de mano. ajuste. Se requiere algo de montaje para la puesta en servicio de esta máquina.
  • Page 59 «Evolution» esté en posición correcta hacia • Vuelva a instalar el tornillo de bloqueo arriba. (Fig. 9) deslizante y el muelle.
  • Page 60: Desenganche Y Elevación De La Cabeza De Corte

    Para liberar la cabeza de corte de la posición repuesto auténticas de Evolution y deben ser bloqueada: instaladas por un técnico competente. • Presione cuidadosamente hacia abajo el mango de la cabeza de corte.
  • Page 61: Comprobación Y Ajuste

    Instalado correctamente, este borde de hoja Asegúrese de que la cabeza de corte esté vertical, alojará de forma segura hojas Evolution que contra su tope y de que el puntero de bisel indique 0° en la escala. (Fig. 23) tengan un orificio de eje central con un diámetro...
  • Page 62: Ajuste Del Puntero Del Ángulo Del

    www.evolutionpowertools.com Ajuste del puntero del bisel de 0° • Asegúrese de que la cabeza de corte esté en Nota: el operario debe estar satisfecho con la posición bloqueada con el gancho de cerrojo hoja ajustada exactamente en perpendicular a la completamente encajado.
  • Page 63: La Sección Superior De Valla Deslizable

    Esta sección • Las reparaciones en el módulo láser solo deben se puede deslizar a la izquierda un máximo de ser realizadas por Evolution Power Tools o su aprox. 100 mm. agente autorizado. Nota: para evitar que la sección superior Nota: la guía láser puede ser un dispositivo...
  • Page 64: Ajuste Del Láser

    www.evolutionpowertools.com No altere la unidad láser. Toque la unidad solo La tapa de la lente láser (si está equipada) al realizar ajustes. Las reparaciones en el láser Si está equipada, la tapa de la lente láser es un solo pueden ser realizadas por un centro de simple empuje equipado en la parte delantera de mantenimiento autorizado.
  • Page 65: Montaje Permanente De La Sierra

    Nota: esta máquina se puede unir al soporte efectuar el corte. de sierra ingletadora Evolution. (Fig. 43). Esto proporcionará un soporte de taller seguro y Nota: El R255SMSL incluye la mordaza de 2 extremadamente portátil capaz de manejar...
  • Page 66: Instrucciones De Funcionamiento

    www.evolutionpowertools.com EL GATILLO INTERRUPTOR ON/OFF (Fig. 48) orificios en la parte delantera de la base de la sierra. Hay orificios para la mordaza situados a la El gatillo interruptor ON/OFF del motor es de izquierda y a la derecha de la base. (Fig. 46) tipo sin cerrojo.
  • Page 67: Corte Deslizante

    www.evolutionpowertools.com • Encienda el motor y permita que la hoja de la • Cuando haya terminado el corte, suelte el sierra alcance la máxima velocidad. gatillo interruptor y deje que la hoja se pare • Accione la palanca de bloqueo de la protección por completo.
  • Page 68: Corte De Bisel

    www.evolutionpowertools.com Nota: es una buena práctica apretar el botón CORTE COMPUESTO (Fig. 62) de bloqueo del inglete incluso cuando se ha Un corte compuesto es una combinación seleccionado un tope positivo y la palanca de de corte de inglete y de bisel empleados bloqueo del tope positivo está...
  • Page 69: Accesorios Opcionales De Evolution

    Compruebe con regularidad que todas las ACCESORIOS OPCIONALES DE EVOLUTION características de seguridad y las protecciones están funcionando correctamente y de forma SACO CAPTAPOLVO eficiente.
  • Page 70: Comprobaciones De Seguridad Del

    www.evolutionpowertools.com COMPROBACIONES DE SEGURIDAD DEL MONTAJE PIEZA ESTADO SÍ Correderas Instaladas a través del cuello del bisel y conectadas a la cabeza de corte. Asas de ubicación desplegadas correctamente. Botón de bloqueo del Instalado en el mango del inglete/mesa giratoria. mango del inglete Tornillo de bloqueo Insertado en el orificio roscado en el cuello del bisel.
  • Page 71: Declaración De Conformidad Ce

    DECLARACIÓN DE CONFORMIDAD DE LA CE El fabricante del producto cubierto por esta declaración es el siguiente: Evolution Power Tools, Venture One, Longacre Close, Holbrook Industrial Estate, Sheffield, S20 3FR. El fabricante declara que la máquina, tal como se detalla en la presente declaración, cumple todas las disposiciones pertinentes de la Directiva de Máquinas y otras directivas apropiadas,...
  • Page 72 Découpe des moulures de plafond Diagrammes de montage de la scie Découpe d'un matériau arqué Diagrammes d’utilisation de la scie Retrait de matériau bloqué Accessoires Evolution en option Montage et préparation Outils nécessaires Entretien Protection de l’environnement Déverrouillage et élévation de la tête de coupe Vérifications de sécurité...
  • Page 73: Garantie

    Cela vous permettra de valider la période de garantie de la machine via le site Internet d’Evolution en saisissant vos coordonnées, et garantir ainsi un service rapide si nécessaire. Nous vous remercions sincèrement d’avoir choisi un produit d’Evolution Power Tools.
  • Page 74: Spécifications De La Machine

    www.evolutionpowertools.com SPÉCIFICATIONS DE LA MACHINE IMPÉRIAL MACHINE MÉTRIQUE Moteur (220-240 V ~ 50 Hz) 2 000 W 9 A Vitesse à vide 2 500 min 2 500 tpm Poids (net) 15,3 kg 33,7 lb Diamètre du port à poussières 35 mm 1 -3/8 pouce Dimensions de l'outil (H x l x L) (0°/0°) 14- 3/16 x 27-3/4 360 x 705 x 730 mm (Remarque : dimensions relevées avec la tête de la scie...
  • Page 75: Étiquettes Et Symboles De Sécurité

    AVERTISSEMENT : Ce produit est une scie à onglets coulissante multi-matériaux conçue Symbole Description pour fonctionner avec des lames Evolution authentiques ayant été testées pour cette Volts machine. Utilisez uniquement des lames conçues pour l'utilisation avec cette machine Ampères...
  • Page 76: Mesures De Sécurité

    www.evolutionpowertools.com conçu pour être utilisé par des personnes AVERTISSEMENT : Lisez toutes les consignes (y compris les enfants) dont les capacités de sécurité avant de tenter d'utiliser ce physiques, sensorielles ou mentales sont produit et conservez ces instructions. réduites, ou dénuées d'expérience ou de connaissances, sauf si elles ont pu bénéficier, Le non-respect des avertissements et des par l'intermédiaire d’une personne...
  • Page 77 www.evolutionpowertools.com c) N’exposez pas les outils électriques ni à la d) Retirez les clés de réglage ou les clés à pluie ni à l’humidité. La pénétration d’eau dans écrous avant de mettre l’outil en marche. ces outils accroît le risque d’électrocution. Un outil ou une clé...
  • Page 78: Conseils De Santé

    www.evolutionpowertools.com e) Entretenez les outils électriques. Vérifiez L’exposition au plomb, même en faible quantité, qu’aucune pièce mobile n’est mal alignée est susceptible de provoquer des lésions ou bloquée, qu’aucune pièce n’est brisée irréversibles du cerveau ou du système nerveux. et assurez-vous qu’aucun autre problème Les jeunes enfants et les enfants à...
  • Page 79 www.evolutionpowertools.com pièce à usiner ou ne l’alimentez pas dans la i) Coupez uniquement une pièce à usiner scie « à main levée » pour quelque raison que à la fois. Il n’est pas possible de maintenir ou ce soit. Les pièces à usiner non maintenues ou d’attacher plusieurs pièces à...
  • Page 80: Sécurité De La Lame

    EN 847-1. base à deux mains (s’il s’agit d'une scie à onglets • N'utilisez que des lames Evolution adaptées coulissante, transportez-la à l’aide des poignées à cette machine.
  • Page 81: Réaliser Des Découpes

    www.evolutionpowertools.com rétractable ou toute autre pièce du mécanisme Si besoin, vous pouvez monter la scie à onglets de fonctionnement. sur une base ou un établi en bois, ou la fixer à Les personnes à proximité et vos collègues un support pour scie à onglets comme indiqué doivent rester à...
  • Page 82: Prise En Main

    équipements suivants dans la boutique en ligne d’Evolution (variation de l’éclairage, par exemple). Pour sur www.evolutionpowertools.com ou chez votre des raisons techniques, ces perturbations revendeur local.
  • Page 83 www.evolutionpowertools.com ARTICLES FOURNIS (4.2) R255SMS R255SMS+ R255SMSL R255SMS+ 052-0001A 052-0001 052-0002A Code produit 052-0002 052-0004B 052-0004A 052-0003A 052-0003 052-0011 Extensions de la table de la machine Clé hexagonale double embout (M8 et M6) Table tournante et collet Tête de coupe Glissières du chariot Bouton de verrouillage de l’onglet Guide/pince du cordon d’alimentation...
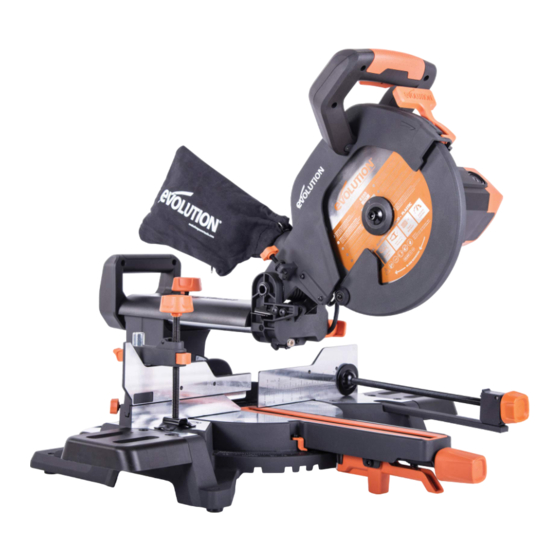
  • Page 84: Vue D'ensemble De La Machine

    www.evolutionpowertools.com VUE D’ENSEMBLE DE LA MACHINE 1. POIGNÉE DE DÉCOUPE 14. LAME 2. LEVIER DE BLOCAGE DU CARTER DE LAME 15. CARTER DE LAME INFÉRIEUR 3. SAC À POUSSIÈRE* 16. HAUT DE LA TABLE 4. VIS DE BLOCAGE DE LA GLISSIÈRE 17.
  • Page 85: Port D'aspiration Des Poussières

    www.evolutionpowertools.com 26. INTERRUPTEUR À GÂCHETTE MARCHE/ARRÊT 35. VIS AUTOTARAUDEUSE À TÊTE CYLINDRIQUE M4 x1 27. INTERRUPTEUR MARCHE/ARRÊT DU GUIDE LASER 36. VIS À TÊTE CREUSE M4 x4 28. PORT D’ASPIRATION DES POUSSIÈRES 37. COMPOSANT DU SERRE-CÂBLE (MONTÉ SUR LE 29. CÂBLE SERRE-CÂBLE DU GUIDE) 30.
  • Page 86 www.evolutionpowertools.com R255SMSL Manipuler R255SMS+ Manipuler Fig. 1 Fig. 2 Fig. 3 Fig. 4 Fig. 5 Fig. 6 Fig. 7 Fig. 8 Fig. 9 Fig. 10 Fig. 11 Fig. 12...
  • Page 87 www.evolutionpowertools.com CLIC Fig. 13a Fig. 13b Fig. 14a Fig. 14b Fig. 14c Fig. 15 Fig. 16 Fig. 17 Fig. 18 Fig. 19 Fig. 20...
  • Page 88 www.evolutionpowertools.com Fig. 21 Fig. 22 Fig. 23 Fig. 24 Fig. 25 Fig. 26 Fig. 27 Fig. 28a Fig. 28b Fig. 28c Fig. 29 Fig. 30...
  • Page 89 www.evolutionpowertools.com PINCE LONGUE PINCE LONGUE AVANT AVANT (R255SMS+) (R255SMS+) Fig. 31 Fig. 32 Fig. 33 Fig. 34 Fig. 35 Fig. 36 Fig. 39 Fig. 37 Fig. 38 Fig. 40 Fig. 41a Fig. 41b...
  • Page 90 www.evolutionpowertools.com 1) Boulon à tête hexagonale 2) Rondelle élastique 3) Rondelle plate 4) Base de la scie à onglets 5) Établi 6) Rondelle plate 7) Rondelle élastique 8) Écrou hexagonal 9) Écrou de verrouillage Fig. 42 Fig. 43 R255SMSL R255SMS+ 2pc Pince 3pc Pince Fig.
  • Page 91 www.evolutionpowertools.com Fig. 53 Fig. 54 Fig. 55 Fig. 57 Fig. 58 Fig. 56 Fig. 60 Fig. 61 Fig. 59 Fig. 62 Fig. 63 Fig. 64...
  • Page 92: Montage Et Préparation

    www.evolutionpowertools.com MONTAGE ET PRÉPARATION AVERTISSEMENT : Ne branchez en aucun cas (7.1) la tête de coupe à l’alimentation électrique AVERTISSEMENT : Débranchez toujours la pour tenter de l’utiliser comme une scie scie de l’alimentation électrique avant de circulaire manuelle. faire des réglages. La mise en service de cette machine nécessite un montage mineur.
  • Page 93: Acheminement Du Câble D'alimentation

    • Utilisez une clé hexagonale pour serrer ou La glissière du chariot doit être insérée par Remettez la vis de verrouillage de la glissière et l’arrière afin que le logo « Evolution » soit bien le ressort en place. positionné vers le haut. (Fig. 9) LES EXTENSIONS DE LA TABLE DE LA MACHINE (Fig.
  • Page 94: Déverrouillage Et Élévation De La Tête De Coupe

    • Appuyez doucement sur la poignée de la tête remplacés que par des pièces de rechange de coupe. Evolution authentiques et montés par un • Tirez sur la broche de verrouillage (étape 1) technicien compétent. et laissez la tête de coupe monter en position supérieure.
  • Page 95: Vérification Et Réglage

    0° sur la graduation. (Fig. 23) en toute sécurité aux lames Evolution dont le diamètre d’alésage de l’arbre central Placez l’équerre sur la table, un bord contre la mesure 25,4 mm.
  • Page 96: La Butée De Profondeur

    www.evolutionpowertools.com Réglage du pointeur du biseau à 0° • Placez une équerre sur la table, un bord contre Remarque : L’opérateur doit s’assurer que la le guide et l’autre contre la lame (en évitant les extrémités en TCT). (Fig. 32) lame est exactement perpendiculaire à...
  • Page 97: La Section Du Guide Coulissant Supérieur

    • Les réparations du module laser doivent être environ 100 mm maximum. réalisées uniquement par Evolution Power Tools ou leur agent agréé. Remarque : Pour éviter que la section coulissante Remarque : Le guide laser peut se révéler très supérieure ne soit entièrement retirée (au risque...
  • Page 98: Réglage Du Laser

    www.evolutionpowertools.com Ne dirigez jamais le faisceau laser vers une • Serrez la poignée de verrouillage de l'onglet surface réfléchissante, brillante ou luisante : pour bloquer la table tournante dans le faisceau laser risquerait d’être réfléchi dans cette configuration. les yeux de l'opérateur. Ne remplacez pas •...
  • Page 99: Montage Permanent De La Scie À Onglets

    • Vérifiez à nouveau l’alignement. Remarque : Cette machine peut être fixée au B. Si le faisceau laser est parallèle aux marques support pour scie à onglets Evolution. (Fig. 43). mais ne passe pas sur elles : Il s’agit d'un établi sûr et extrêmement portatif •...
  • Page 100: Instructions D'utilisation

    www.evolutionpowertools.com Réalisez un « tour à vide » avec la machine • Évitez les opérations maladroites et les débranchée. Vérifiez que la pince de verrouillage positions de mains qui, en cas de dérapage n’interfère pas avec la trajectoire de la lame ou inattendu, pourraient diriger vos doigts ou avec la trajectoire de toute autre pièce de la tête mains vers la lame.
  • Page 101: Tronçonnage

    www.evolutionpowertools.com TRONÇONNAGE • Appuyez sur l’interrupteur à gâchette MARCHE/ Ce type de découpe sert généralement à ARRÊT du moteur et attendez que la lame de la découper des petites sections ou des sections scie atteigne sa vitesse maximale. étroites de matériau. Abaissez doucement la tête •...
  • Page 102: Découpe En Biseau

    www.evolutionpowertools.com Remarque : Un rapporteur est intégré dans la maximum alors que le carter de lame inférieur base de la machine pour faciliter le réglage. est complètement déployé et recouvre les • Serrez le bouton de verrouillage de la poignée dents de la lame avant d’enlever vos mains.
  • Page 103: Retrait De Matériau Bloqué

    établi réglable ou des tréteaux etc. Utilisez cette machine uniquement si tous les carters et dispositifs de sécurité sont opérationnels. ACCESSOIRES EVOLUTION EN OPTION Tous les paliers du moteur de cette machine SAC À POUSSIÈRE sont lubrifiés à vie. Aucune autre lubrification Il est possible d'insérer un sac à...
  • Page 104: Vérifications De Sécurité Du Montage

    www.evolutionpowertools.com VÉRIFICATIONS DE SÉCURITÉ DU MONTAGE PIÈCE ÉTAT Glissières Insérées dans le collet du biseau et connectées à la tête de coupe. Ergots de positionnement correctement déployés. Bouton de verrouillage Installé sur la poignée de l’onglet ou la table tournante. de la poignée de l'onglet Vis de blocage Insérée dans le trou fileté...
  • Page 105: Déclaration Ce De Conformité

    DÉCLARATION CE DE CONFORMITÉ Le fabricant de ce produit couvert par cette déclaration est : Evolution Power Tools, Venture One, Longacre Close, Holbrook Industrial Estate, Sheffield, S20 3FR. Le fabricant déclare par les présentes que la machine, comme décrite dans la présente déclaration, satisfait à...
  • Page 106 www.evolutionpowertools.com Notes...
  • Page 107 www.evolutionpowertools.com Notes...
  • Page 108 Evolution Power Tools Ltd Evolution Power Tools SAS Total Tools (Importing) Pty Ltd Venture One 61 Avenue Lafontaine 20 Thackray Road Longacre Close 33560 Port Melbourne Holbrook Industrial Estate Carbon-Blanc Vic 3207 Sheffield Bordeaux S20 3FR +44 (0)114 251 1022...

Table des Matières