Evolution R210 CMS Instructions Originales

Masquer les pouces Voir aussi pour R210 CMS:
Table des Matières

Publicité

Les langues disponibles
  • FR

Les langues disponibles

  • FRANÇAIS, page 66

Liens rapides

Original Instructions
Original-Bedienungsanleitung
Instructions Originales
Instrucciones originales
Istruzioni Originali
Oryginalna Instrukcja
Date Published: 10/01/2019
Originally written in UK English

Publicité

Table des Matières
loading

Sommaire des Matières pour Evolution R210 CMS

  • Page 1 Original Instructions Original-Bedienungsanleitung Instructions Originales Instrucciones originales Istruzioni Originali Oryginalna Instrukcja Date Published: 10/01/2019 Originally written in UK English...
  • Page 2: Important

    For your own safety, if you are uncertain about any aspect of using this equipment please access the relevant technical helpline. The number of which can be found on the Evolution Power Tools website. We operate several helplines throughout our worldwide organization, but technical help is also available from your supplier.
  • Page 3: Machine Specifications

    www.evolutionpowertools.com MACHINE SPECIFICATIONS MACHINE METRIC IMPERIAL Motor (230-240V ~ 50 Hz) 1200W Motor (110V ~ 50 Hz) 1200W Speed No Load 3750 min 3750 min Weight (Net) 5.8 kg 12.8 lbs Dust Port Diameter 35mm 1-3/8 In. Tool Dimensions (H x W x L) (0° / 0°) 10-15⁄64 x 260 x 393 x 381mm 15-15⁄32 x 15 In.
  • Page 4 (1.8) WARNING: Do not operate this machine if warning and/or instruction labels are missing EAC Certification or damaged. Contact Evolution Power Tools for replacement labels. Triman - Waste Collection Note: All or some of the following symbols may & Recycling appear in the manual or on the product.
  • Page 5: Safety Instructions

    [Electrical Safety] a) Power tool plugs must match the outlet. nails. For cutting stainless steel we recommend Evolution dedicated stainless steel blades. Never modify the plug in any way. Do not use Cutting galvanised steel may reduce blade life. any adapter plugs with earthed (grounded) power tools.
  • Page 6 www.evolutionpowertools.com f) Dress properly. Do not wear loose a qualified repair person using only identical clothing or jewellery. Keep your hair, clothing replacement parts. This will ensure that the safety and gloves away from moving parts. Loose of the power tool is maintained. If the supply clothes, jewellery or long hair can be caught in cord of this power tool is damaged, it must be moving parts.
  • Page 7: Blade Safety

    www.evolutionpowertools.com motor, press the saw head down and push the for a table extension or as additional support. saw through the workpiece. Cutting on the pull Unstable support for the workpiece can cause the stroke is likely to cause the saw blade to climb on blade to bind or the workpiece to shift during the top of the workpiece and violently throw the blade cutting operation pulling you and the helper into...
  • Page 8: Personal Protective Equipment (Ppe)

    www.evolutionpowertools.com from high speed steel (HSS). If the table insert WARNING: Only check the operation of becomes damaged or worn it must be replaced the blade guarding system with the machine with an identical one available from the disconnected from the power supply. manufacturer as detailed in this manual.
  • Page 9: Additional Safety Advice

    Place the saw on a secure stationary work this machine the following accessories are also surface and check the saw over carefully. available from the Evolution online shop at www. Check particularly the operation of all the evolutionpowertools.com or from your local machines safety features before attempting to operate the machine.
  • Page 10: Machine Overview

    www.evolutionpowertools.com MACHINE OVERVIEW 1. ON/OFF TRIGGER SWITCH 11. UPPER BLADE GUARD 2. BEVEL LOCKING HANDLE 12. SLIDING FENCE 3. MITRE LOCKING SCREW 13. LOWER BLADE GUARD 4. HEAD LATCHING PIN 14. ROTARY TABLE 5. MITRE ANGLE SCALE 15. MACHINE BASE/TABLE TOP 6.
  • Page 11 www.evolutionpowertools.com ASSEMBLY AND PREPARATION (7.1) WARNING: Always disconnect the saw from the power source before making any adjustments. PERMANENTLY MOUNTING THE MITRE SAW (7.2) To reduce the risk of injury from unexpected saw movement, place the saw in the desired location either on a workbench or other suitable machine stand.
  • Page 12: The Sliding Upper Fence Section

    www.evolutionpowertools.com HOLD DOWN CLAMP (Fig. 4) (7.4) Two sockets (one either side) are incorporated into the rear of the machines fence. These sockets are for positioning the top hold down clamp. • Fit the clamp to the retaining socket that best suits the cutting application, ensuring that it is fully pushed down.
  • Page 13 www.evolutionpowertools.com so positioned that it does not interfere with the path of the blade or other moving machine parts. • Avoid awkward operations and hand positions where a sudden slip could cause your fingers or a hand to move into the blade. •...
  • Page 14: Fence Alignment

    www.evolutionpowertools.com • Repeat the above steps until the correct angular alignment is achieved. • Tighten the adjustment screw locknut securely once alignment is achieved. CUTTING HEAD TRAVEL Cutting Head Downward Travel Adjustment To prevent the blade from contacting any part of the machines metal base the downward travel of the cutting head can be adjusted.
  • Page 15: Chop Cutting

    www.evolutionpowertools.com that the blade does not foul on any part of the machine castings or guards. PREPARING TO MAKE A CUT (8.5) WARNING: Do not over-reach. Keep good footing and balance. Stand to one side so that your face and body are out of line of a possible kickback. Freehand cutting is a major cause of accidents and should not be attempted.
  • Page 16 www.evolutionpowertools.com • Turn the motor on and allow the saw blade to reach full speed. • Press the lower guard locking lever to release the cutting head (Fig. 18). • Lower the cutting handle downwards and cut through the workpiece. •...
  • Page 17 Warning: Only use genuine Evolution blades or those blades specifically recommended by Evolution Power Tools and which are designed for this machine. Ensure that the maximum speed of the blade is higher than the speed of the machine’s motor.
  • Page 18 Ensure the hex key is removed and the arbor lock button has released before operating. Ensure the blade guard is fully functional before using the machine. USE OF OPTIONAL EVOLUTION ACCESSORIES (8.12) Not supplied as original equipment (see ‘Additional Accessories’).
  • Page 19 A one piece table insert is fitted to this machine. If it is damaged or worn, it must be replaced. Replacement inserts are available from Evolution Power Tools. Removing the Table Insert: Note: Please ensure the machine is unplugged from the mains supply before attempting to remove the table insert.
  • Page 20 www.evolutionpowertools.com for example, may contain resins or produce dust that can build up on the inside surfaces of the guarding system. Removing the blade, or during a blade change, accessibility to the inside surfaces and operating mechanism within the blade guards will be at its maximum.
  • Page 21: Ec Declaration Of Conformity

    EC DECLARATION OF CONFORMITY The manufacturer of the product covered by this Declaration is: UK: Evolution Power Tools Ltd. Venture One, Longacre Close, Holbrook Industrial Estate, Sheffield, S20 3FR. FR: Evolution Power Tools SAS. 61 Avenue Lafontaine, 33560, Carbon-Blanc, Bordeaux, France.
  • Page 22 Leistungen ggf. sofort zur Verfügung stehen. Wir danken Ihnen, dass Sie sich für ein Produkt von Evolution Power Tools entschieden haben. BEGRENZTE GARANTIE VON EVOLUTION Evolution Power Tools behält sich das Recht vor, ohne vorherige Mitteilung konstruktive Verbesserungen und Änderungen an...
  • Page 23: Technische Daten

    www.evolutionpowertools.com TECHNISCHE DATEN MASCHINE METRISCH IMPERIAL Motor (230-240V ~ 50 Hz) 1200W Leerlaufdrehzahl 3750min 3750rpm Nettogewicht 5.8 kg 12.8 lbs Durchmesser Entstaubungsanschluss 35mm 1-3/8 In. Werkzeugmaße (H x W x L) (0° / 0°) 10-15⁄64 x 260 x 393 x 381mm 15-15⁄32 x 15 In.
  • Page 24 WARNUNG: Verwenden Sie die Maschine nicht, wenn Warn- und / oder Hinweisschilder fehlen oder beschädigt sind. Erkundigen Sie sich Gehörschutz tragen bei Evolution Power Tools, um Ersatzschilder anzufordern. Hinweis: Alle oder einige der folgenden Symbole finden sich möglicherweise Nicht Anfassen im Handbuch oder auf dem Produkt.
  • Page 25: Sicherheitsvorkehrungen

    Netzkabel beschädigt ist, muss es durch ein ausschliesslich Sägeblätter, die für diese Maschine spezielles Kabel oder Montage beim Hersteller konzipiert wurden und/oder diejenigen, die oder seinen Kundendienst ersetzt werden. speziell von Evolution Power Tools Ltd. empfohlen werden. VERWENDUNG IM FREIEN (1.15) WARNUNG: Zu Ihrer eigenen Sicherheit...
  • Page 26: Arbeitsplatz-Sicherheit

    www.evolutionpowertools.com 1) ARBEITSPLATZSICHERHEIT 3) SICHERHEIT VON PERSONEN a) Halten Sie Ihren Arbeitsbereich sauber und a) Seien Sie aufmerksam, achten Sie darauf, gut beleuchtet. Unordnung oder unbeleuchtete was Sie tun, und gehen Sie mit Vernunft Arbeitsbereiche können zu Unfällen führen. an die Arbeit mit einem Elektrowerkzeug. b) Arbeiten Sie mit dem Elektrowerkzeug nicht Benutzen Sie kein Elektrowerkzeug, wenn in explosionsgefährdeter Umgebung, in der...
  • Page 27: Verwendung Und Behandlung Des Elektrowerkzeugs

    www.evolutionpowertools.com Sicherheit und setzen Sie sich nicht über Tätigkeit. Der Gebrauch von Elektrowerkzeugen die Sicherheitsregeln für Elektrowerkzeuge für andere als die vorgesehenen Anwendungen hinweg, auch wenn Sie nach vielfachem kann zu gefährlichen Situationen führen. Gebrauch mit dem Elektrowerkzeug h) Halten Sie Griffe und Griffflächen trocken, vertraut sind.
  • Page 28 www.evolutionpowertools.com k) Sorgen Sie bei Werkstücken, die breiter mit der linken Hand oder umgekehrt, ist sehr oder länger als die Tischoberseite sind, für gefährlich. e) Greifen Sie bei rotierendem Sägeblatt eine angemessene Abstützung, z. B. durch nicht hinter den Anschlag. Unterschreiten Sie Tischverlängerungen oder Sägeböcke.
  • Page 29: Persönliche Schutzausrüstung (Psa)

    www.evolutionpowertools.com die Nähe des auslaufenden Blatts zu reichen. bei der Bearbeitung einiger Holzprodukte, insbesondere MDF (Faserplatten mittlerer ZUSÄTZLICHE SICHERHEITSHINWEISE - Dichte) Staub erzeugt werden kann, der (3.5) GEHRUNGSSÄGEN gesundheitsschädlich sein könnte. Wir Die folgenden spezifischen Sicherheitshinweise empfehlen beim Arbeiten mit dieser für Gehrungssägen basieren auf den Maschine zusätzlich zur Staubabsaugung Anforderungen von EN 62841-3-9:2005/A11:2017.
  • Page 30 www.evolutionpowertools.com ACHTUNG: Beim Betrieb von Und das Sägeblatt vollständig abgedeckt sein. (2.8) Elektrowerkzeugen besteht Verletzungsgefahr Umstehende und andere Kollegen müssen in für die Augen durch umherfliegende einem sicheren Abstand von dieser Säge gehalten Fremdkörper, die zu schweren Augenschäden werden. Schnittreste können unter bestimmten führen können.
  • Page 31 Anweisungen dazu, wie die Batch- • Trotz der kompakten Ausführung ist die Code zu identifizieren, kontaktieren Sie bitte Gehrungssäge schwer. die Evolution Power Tools-Hotline oder im Um Rückenverletzungen zu vermeiden, Internet: www.evolutionpowertools.com sollten Sie sich immer dann, wenn Sie die Säge anheben müssen, Hilfe suchen.
  • Page 32 www.evolutionpowertools.com MASCHINENÜBERSICHT 1. EIN/AUS-AUSLÖSER 11. OBERER MESSERSCHUTZ 2. VERRIEGELUNGSGRIFF SCHRÄGE 12. GLEITANSCHLAG 3. VERRIEGELUNGSSCHRAUBE GEHRUNG 13. UNTERER MESSERSCHUTZ 4. KOPFRASTBOLZEN 14. DREHTISCH 5. GEHRUNGSWINKELSKALA 15. MASCHINENFUSS/TISCHPLATTE 6. VERRIEGELUNGSSCHRAUBE GLEITANSCHLAG 16. MOTORGEHÄUSE 7. HINTERER STABILISIERUNGSARM 17. KOHLEBÜRSTEN 8. ENTSTAUBUNGSANSCHLUSS 18. MONTAGEBOHRUNG (x 4) 9.
  • Page 33 www.evolutionpowertools.com MONTAGE UND VORBEREITUNG (7.1) WARNUNG: Trennen Sie die Säge stets von der Stromversorgung, bevor Sie jegliche Anpassungen vornehmen. DAUERHAFTE MONTAGE DER KAPPSÄGE (7.2) Um das Risiko von Verletzungen durch unerwartete Bewegungen der Säge zu verringern, stellen Sie die Säge am gewünschten Ort entweder auf eine Werkbank oder einen anderen geeigneten Maschinenständer.
  • Page 34 www.evolutionpowertools.com NIEDERHALTER (Abb. 4) (7.4) In die Rückseite des Maschinenanschlags sind zwei Halterungen (eine auf jeder Seite) eingefasst. Diese Halterungen dienen der Positionierung des Niederhalters. • Bringen Sie den Niederhalter an der Sicherungshalterung an, die am besten für die Schneidanwendung geeignet ist, und vergewissern Sie sich, dass dieser vollständig nach unten gedrückt ist.
  • Page 35 www.evolutionpowertools.com WARNUNG: Um das Risiko für Verletzungen gering (8.2) zu halten, trennen Sie die Säge immer zunächst von der Stromversorgung, bevor Sie jegliche Maschinenteile ändern oder anpassen. Vergleichen Sie die Ausrichtung des Richtungspfeils an der Schutzvorrichtung mit der Ausrichtung des Pfeils am Sägeblatt. Die Sägeblattzähne haben immer an der Vorderseite der Säge nach unten zu zeigen.
  • Page 36 www.evolutionpowertools.com • Legen Sie das Zeichendreieck so auf den Tisch, dass eine kurze Seite am Tisch und die andere kurze Seite am Sägeblatt anliegt (kommen Sie dabei nicht mit den Hartmetallspitzen der Sägeblattzähne in Berührung). (Abb. 9) • Falls das Sägeblatt nicht in einem 90° (rechten) Winkel zum Sägetisch steht, ist eine Anpassung erforderlich.
  • Page 37 www.evolutionpowertools.com WEG DES SCHNEIDKOPFES Anpassung der Abwärtsbewegung des Schneidkopfes Um zu vermeiden, dass das Sägeblatt mit jeglichen Teilen des Metallfußes der Maschine in Berührung kommt, kann die Abwärtsbewegung des Schneidkopfes angepasst werden. Senken Sie den Schneidkopf ab und kontrollieren Sie, ob das Sägeblatt mit dem Maschinenfuß...
  • Page 38 www.evolutionpowertools.com GEHRUNGSWINKELSKALEN UND -ZEIGER FREIGEBEN DES SCHNEIDKOPFES (8.6) Hinweis: In die rechte Seite des Drehtisches Sobald der Schneidkopf aus seiner sind duale Gehrungswinkelskalen verriegelten Position gelöst wird, fährt er eingegossen. Ein kleiner im Maschinenfuß automatisch in die aufrechte Position. In dieser eingearbeiteter Zeiger verweist auf den oberen Position rastet er automatisch ein.
  • Page 39 www.evolutionpowertools.com • Drücken Sie auf den Verriegelungshebel der unteren Schutzvorrichtung, um den Schneidkopf freizugeben. (Abb. 18) • Senken Sie den Schneidkopf ab und schneiden Sie durch das Werkstück. • Überlassen Sie der Drehzahl des Sägeblattes die Arbeit: Es ist nicht notwendig, unnötigen Druck auf den Schneidgriff auszuüben.
  • Page 40 www.evolutionpowertools.com Um den Schneidkopf nach links zu neigen: • Lösen Sie den Verriegelungsgriff der Schräge. (Abb. 22) • Neigen Sie den Schneidkopf in den gewünschten Winkel. Die Einstellung wird durch einen eingearbeiteten Winkelmesser erleichtert. (Abb. 23) • Ziehen Sie den Verriegelungsgriff der Schräge wieder fest, sobald der gewünschte Winkel ausgewählt wurde.
  • Page 41 Handhabung des Sägeblattes während der Installation oder beim Austausch des Sägeblattes Schutzhandschuhe trägt. Warnung: Verwenden Sie ausschließlich originale Evolution- Sägeblätter oder ausdrücklich von Evolution Power Tools Abb. 26 empfohlene Sägeblätter, die für diese Maschine geeignet sind. Stellen Sie sicher, dass die maximale Drehzahl des Sägeblattes größer als die Drehzahl des Maschinenmotors ist.
  • Page 42 Spindel losgelassen wurden, bevor Sie die Maschine verwenden. Stellen Sie sicher, dass der Messerschutz vollständig funktionsfähig ist, bevor Sie die Maschine verwenden. VERWENDUNG DER OPTIONALEN (8.12) EVOLUTION-ZUBEHÖRTEILE Nicht als Originalausrüstung im Lieferumfang enthalten (siehe ‘Zusätzliche Zubehörteile‘) STAUBBEUTEL (8.13) An den Entstaubungsanschluss an der Rückseite der Maschine kann ein Staubbeutel angebracht werden.
  • Page 43 www.evolutionpowertools.com usw. untersuchen, die dessen Betrieb Befolgen Sie im Falle des Gebrauchs einer solchen Maschine die Anweisungen des beeinträchtigen könnten. Staubsaugerherstellers. • Alle großen Bruchstücke mit einem WARNUNG: Verwenden Sie den stumpfen Werkzeug entfernen, z. B. Staubbeutel nicht beim Schneiden mit einer Langbeck-Flachzange oder metallischer Werkstoffe.
  • Page 44: Eg-Konformitätserklärung

    EG-KONFORMITÄTSERKLÄRUNG Der Hersteller des Produkts, das Gegenstand dieser Erklärung ist, ist: UK: Evolution Power Tools Ltd. Venture One, Longacre Close, Holbrook Industrial Estate, Sheffield, S20 3FR. FR: Evolution Power Tools SAS. 61 Avenue Lafontaine, 33560, Carbon-Blanc, Bordeaux, France. Der Hersteller erklärt hiermit, dass die in dieser Erklärung beschriebene Maschine sich im Einklang mit allen relevanten Bestimmungen der Maschinenrichtlinie und sonstigen anwendbaren Richtlinien laut unten stehender Auflistung befindet.
  • Page 45 www.evolutionpowertools.com...
  • Page 46 Esto le permitirá validar el periodo de garantía de su herramienta a través de la página web de Evolution mediante la introducción de sus datos y así disponer de un servicio rápido si fuera necesario. Le estamos sinceramente agradecidos por elegir un producto de Evolution Power Tools.
  • Page 47: Especificaciones De La Herramienta

    www.evolutionpowertools.com ESPECIFICACIONES DE LA HERRAMIENTA HERRAMIENTA SISTEMA MÉTRICO SISTEMA IMPERIAL Motor (230-240V~ 50 Hz) 1200 W Velocidad en vacío 3750 min 3750 rpm Peso (neto) 5,8 kg 12,8 lbs Diámetro del puerto de extracción de polvo 35 mm 1-3/8 In. Dimensiones herramienta (Al.
  • Page 48 ADVERTENCIA: No utilice la herramienta si las etiquetas de advertencia y/o instrucciones Utilice guantes de protección de seguridad faltan o están dañadas. Póngase en contacto con Evolution Tools para conseguir etiquetas de repuesto. Lea el manual de instrucciones Nota: Los símbolos siguientes pueden...
  • Page 49: Uso Previsto De Esta Herramienta

    Guarde todas las advertencias y todas las y/o accesorios recomendados específicamente instrucciones para una referencia futura. por Evolution Power Tools Ltd. La expresión “herramienta” en las advertencias se refiere a su herramienta eléctrica conectada EQUIPADA CON LA HOJA DE SIERRA a la red eléctrica (con cable) o a su herramienta...
  • Page 50 www.evolutionpowertools.com funcionamiento de las herramientas eléctricas. húmedos o mojados. Las herramientas eléctricas se reparan antes • Mantener el área de trabajo bien iluminada. de su uso, cuando están dañadas. Muchos • No utilizar las herramientas en presencia de accidentes son causados por herramientas líquidos o gases inflamables.
  • Page 51: Equipo De Protección Individual (Epi)

    www.evolutionpowertools.com seguro. reparaciones solamente deberían llevarse • Seguir las instrucciones para la lubricación y a cabo por personal cualificado utilizando cambio de accesorios. repuestos originales, de otro modo se • Examinar periódicamente los cables de la podría producir un peligro considerable herramienta y si están dañados repararlos a para el usuario.
  • Page 52 www.evolutionpowertools.com evitar la posibilidad de pérdida de visión debida debe utilizarse una hoja de sierra marcada con a virutas proyectadas. una velocidad inferior a la velocidad en vacío Se recomienda además utilizar protección marcada en la sierra ingletadora. respiratoria dado que algunas maderas Si es necesario utilizar espaciadores o anillos y productos derivados de la madera, reductores del husillo, éstos deberán ser los...
  • Page 53: Nº De Serie/Código De Lote

    www.evolutionpowertools.com Nº DE SERIE/CÓDIGO DE LOTE inesperado. • Bloquee el cabezal de corte en su posición Nota: El número de serie se localiza en la inferior. Asegúrese de que el pasador de carcasa del motor de la herramienta. Para retención del cabezal de corte está totalmente obtener instrucciones sobre cómo identificar encajado en su cavidad.
  • Page 54: Presentación De La Herramienta

    www.evolutionpowertools.com PRESENTACIÓN DE LA HERRAMIENTA 1. INTERRUPTOR DE GATILLO ENCENDIDO/ 10. PALANCA DE BLOQUEO DE LA APAGADO PROTECCIÓN DE LA HOJA DE SIERRA 2. PALANCA DE BLOQUEO DEL BISEL 11. PROTECCIÓN SUPERIOR DE LA HOJA 3. TORNILLO DE BLOQUEO DEL INGLETE 12.
  • Page 55: Montaje Y Preparación

    www.evolutionpowertools.com MONTAJE Y PREPARACIÓN (7.1) ADVERTENCIA: Desconecte siempre la sierra de la fuente de alimentación antes de realizar cualquier ajuste. MONTAJE PERMANENTE DE LA SIERRA (7.2) INGLETADORA Para reducir el riesgo de lesiones derivadas de un movimiento inesperado de la sierra, colóquela en la posición deseada sobre un banco de trabajo u otro soporte adecuado para herramientas.
  • Page 56 www.evolutionpowertools.com PRENSA DE SUJECIÓN (Fig. 4) (7.4) En la parte posterior del tope-guía de la herramienta existen dos soportes (uno a cada lado) para colocar en ellos las prensa de sujeción. • Coloque la prensa en el soporte de sujeción que mejor se adapte a la aplicación de corte, asegurándose de que está...
  • Page 57 www.evolutionpowertools.com trayectoria de la hoja de sierra. • Sujete firmemente la pieza de trabajo a la mesa y apóyela contra el tope-guía para evitar cualquier movimiento. • Utilice una prensa si es posible, pero asegúrese de que está colocada de manera que no interfiera con la trayectoria de la hoja Zona de sierra o de otras piezas móviles de la herramienta.
  • Page 58 www.evolutionpowertools.com Ajuste del tope de bisel a 45° • Afloje la palanca de bloqueo del bisel y bascule el cabezal de corte completamente hacia la izquierda hasta que se apoye contra el tope de 45 °. • Utilice una escuadra (evitando las puntas de carburo de tungsteno de los dientes de la hoja de sierra) para comprobar que la hoja de sierra está...
  • Page 59 www.evolutionpowertools.com apoyado contra el tope-guía y el otro contra la hoja de sierra (las puntas de carburo de tungsteno de los dientes de la hoja de sierra) (Fig. 14). • Repita en ambos lados de la hoja de sierra. • Si es necesario realizar un ajuste, afloje los dos tornillos de sujeción del tope-guía utilizando una llave hexagonal de 5 mm (no suministrada).
  • Page 60: Interruptor De Encendido/Apagado Del Motor

    www.evolutionpowertools.com Para liberar el cabezal de corte de su posición inferior bloqueada: • Presione suavemente la empuñadura del cabezal de corte. • Retire el pasador de retención del cabezal (Fig. 16) y permita que el cabezal de corte se eleve a su posición superior. Si la liberación es difícil: •...
  • Page 61 www.evolutionpowertools.com • Afloje el pomo del tornillo de bloqueo de inglete (Fig. 20) girándolo en sentido antihorario. • Gire la mesa giratoria hasta el ángulo deseado. La mesa giratoria dispone de un una escala graduada del ángulo de inglete con fines de ayuda durante el ajuste. •...
  • Page 62 Advertencia: Utilice únicamente hojas de sierra Evolution originales o aquellas hojas de sierra recomendadas específicamente por Evolution Power Tools y diseñadas para esta herramienta. Asegúrese de que la velocidad máxima de la hoja de sierra es superior a la velocidad del motor de la herramienta.
  • Page 63 Asegúrese de que la protección de la hoja esté completamente operativa antes de usar la herramienta. UTILIZACIÓN DE ACCESORIOS (8.12) OPCIONALES EVOLUTION No suministrados como equipamiento original (ver “Accesorios adicionales”). BOLSA PARA POLVO (8.13) Se puede acoplar una bolsa para polvo en el puerto de extracción situado en la parte posterior de la herramienta.
  • Page 64: Protección Medioambiental

    ADVERTENCIA: No intente limpiar ser reemplazado. Las piezas de repuesto están introduciendo objetos puntiagudos a través de las disponibles en Evolution Power Tools. aberturas de la carcasa de la herramienta, etc. Los orificios de ventilación de la herramienta deben Retirada del bloque de la mesa: limpiarse con aire comprimido seco.
  • Page 65: Declaración De Conformidad Ue

    DECLARACIÓN DE CONFORMIDAD UE El fabricante del producto cubierto por esta Declaración es: UK: Evolution Power Tools Ltd. Venture One, Longacre Close, Holbrook Industrial Estate, Sheffield, S20 3FR. FR: Evolution Power Tools SAS. 61 Avenue Lafontaine, 33560, Carbon-Blanc, Bordeaux, France.
  • Page 66 Smartphone.  Cela vous permettra de valider la période de garantie de votre machine via le site web d’Evolution en entrant vos coordonnées, et ainsi d’assurer un service rapide si nécessaire.  Nous vous remercions sincèrement pour la sélection d’un produit Evolution Power Tools.
  • Page 67: Caracteristiques De La Machine

    www.evolutionpowertools.com CARACTERISTIQUES DE LA MACHINE MACHINE MÉTRIQUE IMPÉRIALE Moteur (230-240V ~ 50 Hz) 1200W Vitesse à vide 3750 min 3750 rpm Poids (Net) 5,8 kg 12,8 lbs Diamètre du capteur de poussière 35mm 1-3/8 po. Dimensions de l’outil (H x L x L) (0° / 0°) 10-15 ⁄...
  • Page 68 Triman - Collecte des déchets partie du numéro de série figurant sur le caisson et recyclage moteur de la machine. Les numéros de série Evolution commencent par l’abréviation de la Déchets d’équipements machine suivie d’une lettre. A = Janvier, électriques et électroniques B = Février et ainsi de suite. Les 2 numéros suivants sont l’année de fabrication. 09 = 2009,...
  • Page 69: Avertissement Sur L'utilisation

    été conçu pour être utilisée (1.15) ATTENTION: Pour votre protection si cet outil avec des lames spéciales Evolution. Utilisez doit être utilisé à l’extérieur, il ne doit pas être uniquement des accessoires conçus pour être exposé à la pluie, ou utilisé dans des endroits utilisés dans cette machine et / ou celles qui sont...
  • Page 70 www.evolutionpowertools.com aux matériaux avec lesquels vous travaillez et de • Utiliser des lunettes de sécurité.  réduire le risque d’exposition. Comme certains • Utiliser un masque normal ou antipoussières si les matériaux peuvent produire de la poussière qui opérations de travail génèrent de la poussière.  peut être dangereuse pour votre santé, nous j) Connecter l’équipement pour l’extraction des vous recommandons l’utilisation d’un masque...
  • Page 71: Sécurité Spécifique Pour La Scie À Onglets

    www.evolutionpowertools.com • Avant d’utiliser l’outil à d’autres fins, il moment. Ne jamais tenter de récupérer un convient de l’examiner attentivement afin de matériau scié jusqu’à ce que la tête de coupe déterminer qu’il fonctionnera correctement et soit en position relevée, la garde complètement accomplira sa fonction prévue. ...
  • Page 72: (3.9) Conseils De Sécurité Supplémentaire - Porter Votre Scie À Onglets

    www.evolutionpowertools.com CONSEILS DE SÉCURITÉ SUPPLÉMENTAIRE rétractable ou une autre partie de son mécanisme (3.9) – PORTER VOTRE SCIE À ONGLETS de fonctionnement. • Bien que compacte, cette scie à onglets est Les passants et collègues doivent être maintenus lourde. Pour réduire le risque de blessure au à...
  • Page 73: Commencer Déballage

    (4.4) caisson du moteur de la machine. Pour obtenir La description Référence des instructions sur la façon d’identifier le code de lot, Veuillez contacter le service d’assistance Lame multi-usage RAGEBLADE210MULTI téléphonique Evolution Power Tools ou allez à: Sac d’aspirateur 030-0309 www.evolutionpowertools.com...
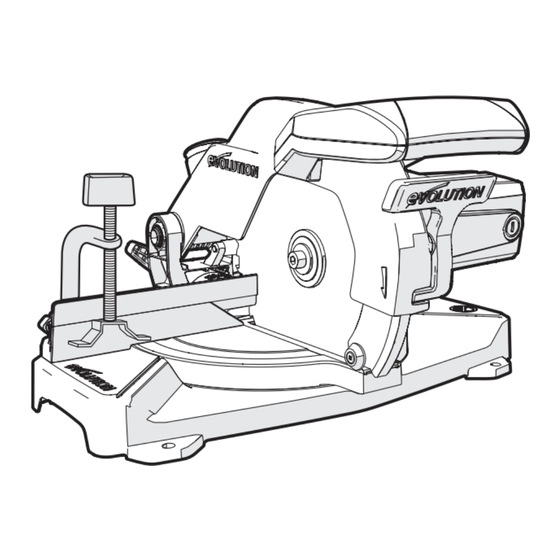
  • Page 74: Présentation De La Machine

    www.evolutionpowertools.com PRÉSENTATION DE LA MACHINE 1. INTERRUPTEUR 10. LEVIER DE BLOCAGE DE LA LAME 2. POIGNÉE DE BLOCAGE DU BISEAU 11. LAME SUPÉRIEURE 3. VIS DE BLOCAGE DE L’ANGLE 12. GUIDE COULISSANT DE COUPE EN BISEAU 13. GARDE DE LA LAME INFÉRIEURE 4. GOUPILLE DE VERROUILLAGE DE LA TÊTE 14.
  • Page 75: Assemblage Et Préparation

    www.evolutionpowertools.com ASSEMBLAGE ET PRÉPARATION (7.1) AVERTISSEMENT: Débranchez toujours la scie de la source d’alimentation avant de faire des ajustements. MONTAGE PERMANENT DE LA SCIE À ONGLETS (7.2) Pour réduire le risque de blessures causées par un mouvement de scie inattendu, placez la scie à l’endroit désiré soit sur un établi ou autre support de machine approprié. La base de la scie a quatre trous de fixation à...
  • Page 76: La Section Du Guide De Glissement Supérieure

    www.evolutionpowertools.com SERRE-FLAN (Fig. 4) (7.4) Deux fentes (une de chaque côté) sont intégrées à l’arrière du guide des machines. Ces fentes sont destinées à positionner le serre-flan. • Montez le serre-flan sur la prise de retenue qui convient le mieux à l’application de coupe, en s’assurant qu’il soit complètement enfoncé.
  • Page 77: (8.4) Angles De Réglages De Précision

    www.evolutionpowertools.com POSITIONNEMENT DU CORPS ET DES MAINS (FIG. 7) (8.3) • Ne placez jamais vos mains dans la « Zone sans mains » (au moins à 150mm de la lame). Gardez les mains loin de la trajectoire de la lame. • Fixez fermement la pièce à la table et contre le guide pour Zone sans mains empêcher tout mouvement.
  • Page 78 www.evolutionpowertools.com 45° Réglage de la butée de l’angle de biseau • Desserrez la poignée de verrouillage de biseau et inclinez la tête de coupe complètement vers la gauche jusqu’à ce qu’elle repose contre les 45° Arrêtez. • Utilisez une équerre (en évitant les pointes TCT des dents de la lame), vérifiez que la lame soit à...
  • Page 79: Graduations Pour Coupe En Biais Et Aiguille

    www.evolutionpowertools.com • Placez une équerre sur la table avec un bord court contre la clôture et l’autre bord court contre la lame (en évitant les pointes TCT des dents de la lame). (Fig. 14) • Répétition des deux côtés de la lame. • Si un réglage est nécessaire, desserrez les deux vis de fixation du guide en utilisant une clé...
  • Page 80: Marche/Arrêt Du Moteur (Fig. 17)

    www.evolutionpowertools.com Pour libérer la tête de coupe de la position verrouillée vers le bas: • Appuyez doucement sur la poignée de coupe. • Retirer la goupille de la tête de verrouillage (Fig. 16) et permettez à la tête de coupe de monter dans sa position supérieure. Si la libération est difficile: •...
  • Page 81: Coupe Biseautée - Inclinaison De La Tête De Coupe

    www.evolutionpowertools.com onglet). Des arrêts pré-ajustés sont prévus à 45°, 30°, 22,5°, 15° et 0° sur les côtés droits et gauches. Desserrez la vis de verrouillage de l’angle (Fig.20) en tournant dans le sens contraire des aiguilles d’une montre. • Tournez la table rotative à l’angle désiré. Une échelle goniométrique d’angle d’onglet est incorporée dans la table rotative pour aider au réglage.
  • Page 82: (8.9) Récupérer Le Matériel Coincé

    Figure. 26 Attention: Utilisez uniquement des lames Evolution authentiques ou ces lames spécifiquement recommandées par Evolution Power Tools et qui sont conçues pour cette machine. Faites en sorte que la vitesse maximale de la lame soit supérieure à la vitesse du moteur de la machine. ...
  • Page 83: (8.12) Utilisation Des Accessoires Evolution Optionnels

    UTILISATION DES ACCESSOIRES (8.12) EVOLUTION OPTIONNELS Non fourni comme équipement d’origine (voir ‘Accessoires supplémentaires’) SAC À POUSSIÈRE (8.13) Fig. 30 Un sac à...
  • Page 84: (6.1) Entretien

    www.evolutionpowertools.com du fabricant de l’aspirateur si une telle machine est installée.   AVERTISSEMENT: N’utilisez pas le sac à poussière lors de la coupe des matériaux métalliques. ENTRETIEN (6.1) Remarque: Tout entretien doit être effectué avec la machine éteinte et déconnectée de l’alimentation / de la batterie d’alimentation. Vérifiez que tous les dispositifs de sécurité...
  • Page 85: Déclaration De Conformité Ce

    DÉCLARATION DE CONFORMITÉ CE  Le fabricant du produit visé par la présente déclaration est: UK: Evolution Power Tools Ltd. Venture One, Longacre Close, Holbrook Industrial Estate, Sheffield, S20 3FR. FR: Evolution Power Tools SAS. 61 Avenue Lafontaine, 33560, Carbon-Blanc, Bordeaux, France.
  • Page 86 La ringraziamo sinceramente per aver scelto un prodotto Evolution Power Tools. GARANZIA LIMITATA EVOLUTION Evolution Power Tools si riserva il diritto di apportare migliorie e modifiche al design dei prodotti senza preavviso. Si prega di consultare il documento per la...
  • Page 87: Specifiche Utensile

    www.evolutionpowertools.com SPECIFICHE UTENSILE UTENSILE METRICO IMPERIALE Motore (230-240 V ~ 50 Hz) 1200 W Motore (110 V ~ 50 Hz) 1200 W Velocità a vuoto 3750 min 3750 min Peso (netto) 5,8 kg 12,8 lb Diametro attacco polvere 35 mm 1-3/8 In.
  • Page 88: Etichette E Simboli

    Volts Evolution. Utilizzare esclusivamente accessori progettati per l’utilizzo sul presente Amperes apparecchio e/o quelli espressamente raccomandati da Evolution Power Tools Ltd. Hertz SE EQUIPAGGIATO CON UNA LAMA Speed IDONEA IL PRESENTE UTENSILE PUÒ ESSERE UTILIZZATO PER TAGLIARE:...
  • Page 89: Avvertenze Di Sicurezza

    Spine elettriche non modificate e prese Evolution specifiche per acciaio inossidabile. adeguate riducono il rischio di folgorazione. b) Utilizzare un banco da lavoro asciutto e Effettuare tagli sull’acciaio zincato riduce la durata della lama.
  • Page 90 www.evolutionpowertools.com un compito differente lontano dalla portata dei bambini. f) Non forzare l’utensile elettrico da quello per il quale è stato concepito può comportare rischi. • L’utensile eseguirà il lavoro in maniera più efficiente e sicura alla velocità per la quale INDICAZIONI SANITARIE esso è...
  • Page 91: Sicurezza Della Lama

    www.evolutionpowertools.com • Quando non in utilizzo, prima di riparazioni di iniziare a utilizzare un utensile elettrico, o della sostituzione di accessori come lame indossare sempre occhiali di protezione o e superfici di taglio, scollegare gli utensili occhiali di sicurezza con protezioni laterali dall’alimentazione.
  • Page 92 www.evolutionpowertools.com all’utilizzo del dispositivo di aspirazione della alla velocità a vuoto riportata sulla troncatrice. polvere. In nessuna circostanza si deve utilizzare una È necessario indossare guanti quando si lama con una velocità nominale inferiore a maneggiano lame o materiali grezzi. Si quella a vuoto riportata sulla troncatrice.
  • Page 93: Seriale / Codice Lotto

    Evolution Power Tools o di visitare: alloggiamento. www.evolutionpowertools.com ATTENZIONE: Non utilizzare la protezione coprilama come “punto di sollevamento”. Il...
  • Page 94 www.evolutionpowertools.com MACHINE OVERVIEW 1. INTERRUTTORE A PRESSIONE ON/OFF 10. LEVA BLOCCAGGIO COPRILAMA 2. MANIGLIA BLOCCO SMUSSO 11. COPRILAMA SUPERIORE 3. VITE DI BLOCCAGGIO BISELLO 12. BATTUTA SCORREVOLE 4. PERNO DI BLOCCAGGIO 13. COPRILAMA INFERIORE 5. SCALA ANGOLATURA BISELLO 14. BANCO GIREVOLE 6.
  • Page 95: Montaggio Permanente Della

    www.evolutionpowertools.com MONTAGGIO E PREPARAZIONE (7.1) ATTENZIONE: Scollegare sempre la sega dalla fonte di alimentazione prima di eseguire qualunque regolazione. MONTAGGIO PERMANENTE DELLA (7.2) TRONCATRICE Per ridurre il rischio di infortuni causati da movimenti imprevisti della sega, posizionare la stessa nella postazione desiderata su un banco da lavoro o su altro tipo di supporto adeguato.
  • Page 96 www.evolutionpowertools.com (7.4) IL MORSETTO (Fig. 4) Due innesti (uno per lato) sono incorporati sul retro della battuta dell’apparecchio. Tali innesti sono per la collocazione del morsetto superiore. • Inserire il morsetto nell’innesto di fissaggio che si addice meglio al tipo di taglio da eseguire, assicurandosi di spingerlo in sede fino in fondo.
  • Page 97 www.evolutionpowertools.com sia in posizione tale da non interferire con il percorso della lama o di qualsiasi altra parte in movimento dell’utensile. • Evitare procedure e posizioni delle mani scomode durante le quali uno slittamento improvviso potrebbe causare l’avvicinamento di dita o mani alla lama. •...
  • Page 98 www.evolutionpowertools.com smusso a 45° con una chiave a tubo da 10 mm e una chiave esagonale da 3 mm (non in dotazione). • Utilizzare una chiave esagonale per intervenire in avanti e indietro sulla vite di regolazione conformemente esigenze (Fig. 11). •...
  • Page 99: Preparazione Al Taglio

    www.evolutionpowertools.com VERIFICHE REGOLAZIONI FINALI A utensile spento (OFF) e scollegato dalla fonte di alimentazione, eseguire le seguenti procedure (quando tutte le regolazioni sono state effettuate); • Regolare l’utensile su ognuna delle proprie impostazioni massime. • Abbassare la lama nella sua posizione più bassa e ruotarla a mano (si consiglia di eseguire l’operazione con i guanti), e accertarsi che essa non strusci contro alcuna altra parte del telaio e delle protezioni.
  • Page 100: Taglio Semplice

    www.evolutionpowertools.com • Premere l’interruttore per avviare il motore. • Rilasciare l’interruttore per spegnere il motore. TAGLIO SEMPLICE Il presente tipo di taglio è usato principalmente per operare su materiali a sezione piccola o stretta. La testa da taglio è delicatamente abbassata per attraversare il pezzo da lavorare.
  • Page 101: Rimozione Del Materiale Incastrato

    www.evolutionpowertools.com le impostazioni, è presente una scala goniometrica (Fig 23). • Serrare la vite di blocco smusso quando si è raggiunta l’angolatura desiderata. Quando l’operazione di taglio è conclusa: • Rilasciare l’interruttore a pressione ON/OFF, ma mantenere le proprie mani in posizione e consentire alla lama di fermarsi del tutto.
  • Page 102 Attenzione: Utilizzare esclusivamente lame originali Evolution o lame espressamente raccomandate da Evolution Power Tools e che siano progettate per il presente utensile. Accertarsi che la velocità massima della lama sia più elevata di quella del motore dell’utensile.
  • Page 103 Sul presente utensile è montato un inserto da banco costituito da un unico pezzo. Se danneggiato o usurato deve essere sostituito. Gli inserti di sostituzione sono disponibili presso Evolution. Rimuovere l’inserto del banco: Avvertenza: Si prega di accertarsi che l’utensile sia scollegato dall’alimentazione prima di rimuovere l’inserto del banco.
  • Page 104: Tutela Ambientale

    www.evolutionpowertools.com (6.1) MANUTENZIONE Avvertenza: Ogni attività di manutenzione deve essere condotta a utensile spento e disconnesso dalla fonte di alimentazione (a parete o a batteria). Verificare su base regolare che tutte le funzioni e le protezioni di sicurezza operino in modo corretto. Utilizzare il presente utensile soltanto se tutte le protezioni/funzioni di sicurezza sono del tutto operative.
  • Page 105: Dichiarazione Di Conformità Ce

    DICHIARAZIONE DI CONFORMITÀ CE Il produttore del prodotto oggetto della presente dichiarazione: UK: Evolution Power Tools Ltd, Venture One, Longacre Close, Holbrook Industrial Estate, Sheffield, S20 3FR. FR: Evolution Power Tools SAS, 61 Avenue Lafontaine, 33560, Carbon-Blanc, Bordeaux, France. Il produttore dichiara di seguito che l'utensile, come illustrato nella presente dichiarazione, soddisfa le disposizioni pertinenti della Direttiva Macchine e delle altre direttive idonee come di seguito descritto.
  • Page 106 Numery telefonów znajdują się na stronie Evolution Power Tools. Za pośrednictwem naszej ogólnoświatowej organizacji oferujemy dostęp do kilku infolinii obsługi technicznej. Pomoc techniczna dostępna jest również u dystrybutorów.
  • Page 107 www.evolutionpowertools.com SPECYFIKACJE urządzenia URZĄDZENIE SYSTEM METRYCZNY SYSTEM IMPERIALNY Silnik (230-240 V ~ 50 Hz) 1 200 W Prędkość bez obciążenia 3 750 min 3 750 min Waga (netto) 5,8 kg 12,8 funta Średnica otworu do zasysania pyłu 35 mm 1-3/8 cala Wymiary urządzenia (wysokość...
  • Page 108 OSTRZEŻENIE: Nie należy korzystać z Certyfikat CSA narzędzia, jeśli oznaczenia ostrzegawcze lub informacyjne są uszkodzone lub zostały usunięte. Należy skontaktować się z firmą Evolution Power Triman - zbieranie odpadów Tools w celu uzyskania nowych etykiet. i recykling Uwaga: Wszystkie lub niektóre z następujących symboli mogą...
  • Page 109: Środki Bezpieczeństwa

    Do cięcia stali prądem. b) W miarę możliwości należy korzystać nierdzewnej zalecamy specjalnie tarcze Evolution do stali nierdzewnej. Cięcie stali z czystego i suchego blatu roboczego. W ocynkowanej może skrócić żywotność celu zapewnienia dodatkowej ochrony ostrza.
  • Page 110 www.evolutionpowertools.com podejrzenia, że farba pokrywająca bezpieczniej w odpowiednim dla niego powierzchnię ciętego materiału zawiera ołów, zakresie sprawności. g) Należy używać narzędzia odpowiedniego należy zasięgnąć porady specjalisty. Farby na bazie ołowiu powinny zostać usunięte jedynie do wykonywanego zadania przez profesjonalistę i nie należy podejmować •...
  • Page 111 www.evolutionpowertools.com należy odłączyć urządzenie od źródła urazem narządu wzroku. Przed przystąpieniem zasilania. do pracy z elektronarzędziem należy założyć p) Klucze regulacyjne należy usunąć z okulary lub gogle ochronne z osłoną boczną. urządzenia W miarę potrzeby należy zastosować całkowitą • Należy wyrobić w sobie zwyczaj, by przed osłonę...
  • Page 112 www.evolutionpowertools.com systemu odsysania pyłu. przynajmniej równa prędkości na biegu Przed obsługą ostrzy lub szorstkich materiałów jałowym wskazanej na ukośnicy. Pod należy założyć rękawice ochronne. W żadnym pozorem nie należy używać tarczy z miarę możliwości zalecane jest stosowanie oznaczeniem prędkości niższym niż prędkość pokrowców na tarcze.
  • Page 113: Nr Seryjny: / Kod Partii

    W celu uzyskania informacji • Należy zablokować głowicę tnącą w dotyczących oznaczeń kodu partii należy najniższej pozycji. Należy upewnić się, skontaktować się z infolinią Evolution Power że bolec blokujący głowicy tnącej jest Tools lub odwiedzić: odpowiednio umiejscowiony w swoim www.evolutionpowertools.com...
  • Page 114: Opis Maszyny

    www.evolutionpowertools.com OPIS MASZYNY 1. PRZEŁĄCZNIK ON/OFF 11. GÓRNA OSŁONA TARCZY 2. UCHWYT BLOKADY SKOSU 12. PROWADNICA 3. ŚRUBA BLOKUJĄCA UKOS 13. DOLNA OSŁONA TARCZY 4. BOLEC BLOKADY GŁOWICY 14. STÓŁ OBROTOWY 5. SKALA REGULACJI KĄTA UKOSU 15. PODSTAWA MASZYNY/POWIERZCHNIA 6. ŚRUBA BLOKUJĄCA PROWADNICĘ STOŁU 7.
  • Page 115 www.evolutionpowertools.com MONTAŻ I PRZYGOTOWANIE (7.1) OSTRZEŻENIE: Przed zmienianiem ustawień zawsze należy odłączyć urządzenie od źródła zasilania. MONTAŻ UKOŚNICY NA STAŁE (7.2) Aby zredukować ryzyko poniesienia obrażeń w związku z nieprzewidzianym ruchem urządzenia, należy umieścić je w odpowiedniej lokacji na stole warsztatowym lub stosownym stanowisku dla ukośnicy.
  • Page 116: Część Przesuwna Ogranicznika Górnego

    www.evolutionpowertools.com ZACISK PRZYTRZYMUJĄCY (Rys. 4) (7.4) Dwa gniazda (z obu stron) zostały wbudowane w tylną część ogranicznika urządzenia. Gniazda te przeznaczone są do ustawienia zacisku przytrzymującego. • Należy wsunąć zacisk w gniazdo najbardziej odpowiednie do wykonywanego cięcia, upewniając się, że zacisk został całkowicie dociśnięty.
  • Page 117 www.evolutionpowertools.com USTAWIENIE CIAŁA ORAZ DŁONI (Rys. 7) (8.3) • Nigdy nie umieszczać dłoni w obrębie strefy niebezpiecznej (w odległości poniżej 150 mm od ostrza). Trzymać dłonie z dala od obszaru cięcia. • Należy mocno zamocować przedmiot obróbki na stole i przy Strefa Niebezpieczna ograniczniku, aby zapobiec jego przesunięciu.
  • Page 118 www.evolutionpowertools.com Regulacja blokady skosu 45° • Należy poluzować uchwyt blokady skosu i przechylić głowicę tnącą całkowicie w lewo, aż do jej zatrzymania na ograniczniku 45°. • Za pomocą ekierki należy sprawdzić, czy tarcza ustawiona jest pod kątem 45° względem stołu (unikając kontaktu z końcówkami z węglika wolframu TCT).
  • Page 119 www.evolutionpowertools.com • Należy upewnić się, że głowica tnąca znajduje się w pozycji zablokowanej, z bolcem blokującym wsuniętym całkowicie w gniazdo. (Rys. 16). • Należy umieścić ekierkę na stole, przykładając jeden krótszy bok do ogranicznika, a drugi krótszy bok do tarczy (unikając kontaktu z końcówkami z węglika wolframu TCT) (Rys.
  • Page 120 www.evolutionpowertools.com ZWOLNIENIE GŁOWICY TNĄCEJ (8.6) Głowica tnąca automatycznie uniesie się do górnej pozycji po zwolnieniu z dolnej pozycji zablokowanej. Automatycznie zablokuje się w górnej pozycji. Aby zwolnić głowicę tnącą z dolnej pozycji zablokowanej, należy: • delikatnie docisnąć uchwyt do cięcia. •...
  • Page 121 www.evolutionpowertools.com CIĘCIE UKOŚNE (Rys. 19) Stół obrotowy w tym urządzeniu może zostać obrócony do 45° w lewo lub w prawo ze swojej normalnej pozycji przecinania (ukos 0°). Progi domyślne 45°, 30°, 22.5°, 15° i 0° znajdują się zarówno po prawej, jak i po lewej stronie. •...
  • Page 122 Uwaga: Zaleca się, aby przed rozpoczęciem montażu lub wymiany tarczy operator założył rękawice ochronne. Ostrzeżenie: Należy używać wyłącznie oryginalnych tarcz Evolution lub tarcz zalecanych przez firmę Evolution Power Tools, Rys. 27 przeznaczonych dla tego urządzenia. Należy upewnić się, że maksymalna prędkość tarczy jest wyższa niż prędkość silnika.
  • Page 123: (8.12) Korzystanie Z Opcjonalnych Akcesoriów Evolution

    że klucz imbusowy zosta wyjęty, a blokada trzpienia została zwolniona. Przed użyciem należy upewnić się, że osłona tarczy jest w pełni sprawna. KORZYSTANIE Z OPCJONALNYCH AKCESORIÓW (8.12) EVOLUTION Nie załączonych jako oryginalne wyposażenie (zobacz „Dodatkowe Akcesoria”). WOREK NA PYŁ Rys. 30 (8.13)
  • Page 124 Wymienne podkładki można zakupić w firmie Urządzenia można używać tylko wtedy, gdy wszystkie elementy ochronne i osłony są w pełni Evolution Power Tools. funkcjonalne. Wszystkie łożyska silnika w tym Zdejmowanie podkładki stołowej: urządzeniu posiadają dożywotni zapas smaru. Uwaga: Przed zdjęciem podkładki stołowej należy Dodatkowe smarowanie nie jest wymagane.
  • Page 125: Deklaracja Zgodności We

    DEKLARACJA ZGODNOŚCI WE Producent artykułu objętego niniejszą deklaracją to: UK: Evolution Power Tools Ltd. Venture One, Longacre Close, Holbrook Industrial Estate, Sheffield, S20 3FR. FR: Evolution Power Tools SAS. 61 Avenue Lafontaine, 33560, Carbon-Blanc, Bordeaux, France. Producent deklaruje niniejszym, że urządzenie, jak opisano w niniejszej deklaracji, spełnia wszystkie odpowiednie przepisy dyrektywy maszynowej i innych odpowiednich dyrektyw wymienionych poniżej.
  • Page 126 www.evolutionpowertools.com Notes...
  • Page 127 www.evolutionpowertools.com Notes...
  • Page 128 Total Tools (Importing) Pty Ltd Evolution Power Tools SAS 20 Thackray Road 61 Avenue Lafontaine Port Melbourne 33560, Carbon-Blanc Vic 3207 Bordeaux T: 03 9261 1900 T: +33 (0)5 57 30 61 89 Evolution Power Tools Ltd Evolution Power Tools LLC...

Table des Matières