Hitachi WH 12DM2 Instructions De Sécurité Et Mode D'emploi
Masquer les pouces Voir aussi pour WH 12DM2:
Table des Matières

Publicité

Les langues disponibles

Les langues disponibles

Liens rapides

Variable speed
Model
WH 12DM2
Modèle
Modelo
WR 12DM2
SAFETY INSTRUCTIONS AND INSTRUCTION MANUAL
IMPROPER OR UNSAFE use of this power tool can result in death or serious bodily
injury!
This manual contains important information about product safety. Please read and
understand this manual BEFORE operating the power tool. Please keep this manual
available for other users and owners before they use the power tool. This manual should
be stored in safe place.
INSTRUCTIONS DE SECURITE ET MODE D'EMPLOI
Une utilisation INCORRECTE OU DANGEREUSE de cet outil motorisé peut entraîner la
mort ou de sérieuses blessures corporelles !
Ce mode d'emploi contient d'importantes informations à propos de la sécurité de ce
produit. Prière de lire et de comprendre ce mode d'emploi AVANT d'utiliser l'outil
motorisé. Garder ce mode d'emploi à la disponibilité des autres utilisateurs et propriétaires
avant qu'ils utilisent l'outil motorisé. Ce mode d'emploi doit être conservé dans un
endroit sûr.
INSTRUCCIONES DE SEGURIDAD Y MANUAL DE INSTRUCCIONES
¡La utilización INAPROPIADA O PELIGROSA de esta herramienta eléctrica puede
resultar en lesiones de gravedad o la muerte!
Este manual contiene información importante sobre la seguridad del producto. Lea y
comprenda este manual ANTES de utilizar la herramienta eléctrica. Guarde este manual
para que puedan leerlo otras personas antes de utilizar la herramienta eléctrica. Este
manual debe ser guardado en un lugar seguro.
WH 9DM2
WR 9DM2
WH12DM2
WARNING
AVERTISSEMENT
ADVERTENCIA
Cordless Impact Driver
Visseuse à percussion à batterie
Atornillador de impacto a battería
Cordless Impact Wrench
Clé à choc à batterie
Llave de impacto a batería
WR12DM2

Publicité

Table des Matières
loading

Sommaire des Matières pour Hitachi WH 12DM2

  • Page 1 Variable speed Cordless Impact Driver Visseuse à percussion à batterie Model • WH 12DM2 WH 9DM2 Atornillador de impacto a battería Modèle Cordless Impact Wrench Modelo • WR 12DM2 WR 9DM2 Clé à choc à batterie Llave de impacto a batería...
  • Page 2: Table Des Matières

    CONTENTS English Page Page MODEL ..............10 IMPORTANT SAFETY INFORMATION ..... 3 MEANINGS OF SIGNAL WORDS ......3 NAME OF PARTS ..........10 SPECIFICATIONS ..........11 SAFETY ..............4 GENERAL SAFETY RULES – FOR ALL ASSEMBLY AND OPERATION ....... 12 APPLICATIONS ...........
  • Page 3: Important Safety Information

    WARNINGS on the power tool and in this Instruction Manual. NEVER use this power tool in a manner that has not been specifically recommended by HITACHI. MEANINGS OF SIGNAL WORDS WARNING indicates a potentially hazardous situations which, if ignored, could result in death or serious injury.
  • Page 4: Safety

    English SAFETY GENERAL SAFETY RULES – FOR ALL BATTERY OPERATED TOOLS WARNING: Read and understand all instructions. Failure to follow all instructions listed below, may result in electric shock, fire and/or serious personal injury. SAVE THESE INSTRUCTIONS Work Area (1) Keep your work area clean and well lit. Cluttered benches and dark areas invite accidents.
  • Page 5 English Tool Use and Care (1) Use clamps or other practical way to secure and support the workpiece to a stable platform. Holding the work by hand or against your body is unstable and may lead to loss of control. (2) Do not force tool.
  • Page 6: Specific Safety Rules

    11. Never use a tool which is defective or operating abnormally. If the tool appears to be operating unusually, making strange noises, or otherwise appears defective, stop using it immediately and arrange for repairs by a Hitachi authorized service center.
  • Page 7: Important Safety Instructions For Use Of The Cordless Impact Driver

    English IMPORTANT SAFETY INSTRUCTIONS FOR USE OF THE CORDLESS IMPACT DRIVER WARNING: Death or serious bodily injury could result from improper or unsafe use of the cordless impact driver. To avoid these risks, follow these basic safety instructions: Never use this driver handle for any application other than those in this manual. Never place hands or other body parts near the drill bit or chuck during operation.
  • Page 8: Important Safety Instructions For Battery Charger

    Before using battery charger, read all instructions and cautionary markings on (1) battery charger, (2) battery, and (3) product using battery. To reduce risk of injury, charge HITACHI rechargeable battery type EB7, EB9, EB12, EB14 series. Other type of batteries may burst causing personal injury and damage.
  • Page 9: Important Safety Instructions For Use Of The Battery And Battery Charger

    UC14YF2 or UC14YFA battery charger, be sure to read all instructions and cautionary statements on it, the battery and in this manual. REMEMBER: USE ONLY HITACHI BATTERY TYPES EB7 SERIES, EB9 SERIES, EB12 SERIES, EB14 SERIES. OTHER TYPES OF BATTERIES MAY BURST AND CAUSE INJURY!
  • Page 10: Functional Description

    English FUNCTIONAL DESCRIPTION NOTE: The information contained in this Instruction Manual is designed to assist you in the safe operation and maintenance of the power tool. NEVER operate, or attempt any maintenance on the tool unless you have first read and understood all safety instructions contained in this manual.
  • Page 11 English 2. Battery Charger Battery Battery Pilot Lamp Installation Hole Installation Hole Pilot Lamp Caution Plate Body Cord Caution Plate Nameplate <UC14YF2> <UC14YFA> Nameplate Fig. 2 SPECIFICATIONS 1. Cordless Impact Driver Model WH9DM2 WH12DM2 (9.6 V) (12 V) No-load speed 0 –...
  • Page 12 English 2. Cordless Impact Wrench Model WR9DM2 WR12DM2 (9.6 V) (12 V) Motor DC motor No-load speed 0 – 2600/min Drive 3/8" (9.5 mm) square 1/2" (12.7 mm) square Capacity 1/4" – 9/16" (M6 – M14) 1/4" – 5/8" (M6 – M16) (Ordinary bolt) (Ordinary bolt) 1/4"...
  • Page 13: Assembly And Operation

    English ASSEMBLY AND OPERATION APPLICATIONS <WH12DM2, WH9DM2> Driving and removing of small screws, small bolts, etc. <WR12DM2, WR9DM2> Tightening and loosening of all types of bolts and nuts, used for securing structural items. REMOVAL AND INSTALLATION METHOD OF BATTERY How to install the battery Align the battery with the groove in tool Handle handle and slip it into place.
  • Page 14 English Insert the battery to the battery charger. Insert the battery into the battery charger as shown in Fig. 4. Make sure it contacts the bottom of the battery charger. Rechargeable battery Rechargeable battery Battery Installation Hole Pilot lamp Pilot lamp Battery Installation Hole...
  • Page 15 English Table 2 Indications of the pilot lamp Blinks Lights for 0.5 seconds. Does not light for Before (RED) 0.5 seconds. (off for 0.5 seconds) charging Lights Lights continuously While (RED) charging Lights for 0.5 seconds. Does not light for Charging Blinks complete...
  • Page 16: Before Use

    English ● When the pilot lamp flikers rapidly in red (at 0.2–second intervals), check for and take out any foreign objects in the charger’s battery installation hole. If there are no foreign objects, it is probable that the battery or charger is malfunctioning. Take it to your authorized Service Center.
  • Page 17 English The light equipped hook has the following two functions: It can be used as a hook for suspending from a waist belt when required by the nature of the work. It can be used as an auxiliary light for such operations as tightening screws in a dark place.
  • Page 18: Replacing The Batteries

    English (2) The direction of the light can be adjusted within the range of hook positions 1 – 5. (Fig. 9) Lighting time AAAA manganese batteries: approx. 15 hrs. Switch AAAA alkali batteries: approx. 30 hrs. CAUTION: ● Do not look directly into the light. Such actions could result in eye injury.
  • Page 19 (3) When removing the socket, pull it out of the anvil. Fig. 15-2 CAUTION: Please use the designated attachments which are listed in the operations manual and Hitachi’s catalog. Accidents or injuries could result from not doing so.
  • Page 20 English Make sure to firmly install the socket in the anvil. If the socket is not firmly installed it might come out and cause injuries. Push button 7. Confirm that the battery is mounted correctly 8. Check the rotational direction The bit rotates clockwise (viewed from the rear side) by pushing the R-side of the push button.
  • Page 21: Operational Cautions

    English <WH9DM2> (EB9B) Screw used No. of tightenings Wood screw 5/32" × 2" Approx. 350 (Soft wood) (ø4 × 50) Machine screw Approx. 1130 5/16" × 5/8" (M8 × 16) These values may vary slightly, according to surrounding temperature and battery characteristics.
  • Page 22 English 3. Tightening torque Refer to Fig. 17, 18, 19 and 20 for the tightening torque of bolts (according to size), under the conditions shown in Fig. 21. Please use this example as a general reference, as tightening torque will vary according to tightening conditions. NOTE: If a long striking time is used, screws will be strongly tightened.
  • Page 23 English (6) Clearance of the socket (WR12DM2, WR9DM2) A worn or deformed hex. or a square-holed socket will not give an adequate tightness to the fitting between the nut or anvil, consequently resulting in loss of tightening torque. Using an improper socket which does not match to the bolt will result in an insufficient tightening torque.
  • Page 24 English <For WH9DM2> kgf·cm 15/32"×1-3/4" N·m (in-lbs) (M12×45) 1200 kgf·cm 5/16"×1-3/6" kgf·cm 3/8"×1-3/6" (1042) N·m N·m (in-lbs) (M8×30) (in-lbs) (M10×30) 1000 1000 1000 (868) (868) (868) High strength bolt High strength bolt (694) (694) (694) High strength bolt (521) (521) (521) Ordinary bolt (347)
  • Page 25 English <For WR9DM2> kgf·cm 15/32"×1-3/4" N·m (in-lbs) (M12×45) 1400 High strength (1215) bolt kgf·cm 5/16"×1-3/6" kgf·cm 3/8"×1-3/6" N·m N·m 1200 (in-lbs) (M8×30) (in-lbs) (M10×30) (1042) 1000 1000 1000 High strength bolt (868) (868) (868) (694) (694) (694) (521) (521) (521) Ordinary bolt High strength bolt Ordinary bolt...
  • Page 26 English <For WR12DM2> 5/8" × 2–5/32" (M16 × 55) F10T bolt kgf·cm N·m (tightening time: 3 sec) (in-lbs) 2000 (1736) 1600 (1389) When full recharged 1200 (1042) When complately discharged (694) (347) Number of tightenings (PCS)/charging Fig. 22 <For WR9DM2> kgf·cm N·m 15/32"...
  • Page 27: Maintenance And Inspection

    NOTE: When replacing the carbon brush with a new one, be sure to use the Hitachi Carbon Brush Code No. 999054. Fig. 25 6. Replacing carbon brushes Take out the carbon brush by first removing the brush cap and then hooking the protrusion of the carbon brush with a flat head screw driver, etc.,...
  • Page 28 CAUTION: Repair, modification and inspection of Hitachi Power Tools must be carried out by an Hitachi Authorized Service Center. This Parts List will be helpful if presented with the tool to the Hitachi Authorized Service Center when requesting repair or other maintenance. In the operation and maintenance of power tools, the safety regulations and standards prescribed in each country must be observed.
  • Page 29: Standard Accessories

    The use of any other attachment or accessory can be dangerous and could cause injury or mechanical damage. NOTE: Accessories are subject to change without any obligation on the part of the HITACHI. STANDARD ACCESSORIES (UC14YF2) 1 Battery Charger (UC14YF2 or UC14YFA) ..1 2 Plastic Case (Code No.
  • Page 30 English 2. Phillips bit Bit No. Code No. No. 2 992671 No. 3 992672 2" (50 mm) Fig. 30 3. Hexagonal socket Engraved Part Name Code No. characters 5 mm Hexagonal socket 996177 6 mm Hexagonal socket 985329 5/16" Hexagonal socket 996178 8 mm Hexagonal socket 996179...
  • Page 31 English <WR12DM2, WR9DM2> 1. Battery EB1220BL (Code No. 320386) EB9B (Code No. 310451) Fig. 34 2. Sockets Form B Form C Form D <For WR12DM2> Table 4 Suitable Bolt Diameter Square Hexagonal Main Socket Dimensions head drive Part Name Code No. width across Form High...
  • Page 32 English <For WR9DM2> Table 5 Suitable Bolt Diameter Main Socket Square head Hexagonal Code Dimensions drive dimen- Part Name width across Form Inch sions S flats H (ordinary) (small) bolts øF 1-5/16" 3/16" 1/2" 8 mm 996125 M5 (3/16") 5/16" (8 mm) (33 mm) (5 mm) (13 mm) 1-5/16"...
  • Page 33 English <For WR9DM2> Table 7 Suitable Bolt Diameter Main Socket Square head Hexagonal Dimensions Part Name Code Inch drive dimen- width across Form (ordinary) (small) bolts sions S flats H ø 2-3/8" 15/32" 1-7/8" 1/2" 8 mm 996134 M5 (3/16") 5/16"...
  • Page 34 English 6. Duct socket: (WR12DM2) This is used for tightening bolts and nuts on flange sections of air conditioners, type ducts, etc. Fig. 37 Code No. Hexagonal width across flats Dimention S 993658 15/32" (12 mm) 1/2" 992613 1/2" (13 mm) (12.7 mm) 992615 9/16"...
  • Page 35 NOTE: This adaptor is set only on the anvil (drive angle) of the main unit. Code No. Dimention S 322752 1/2" (12.7 mm) Fig. 41 NOTE: Specifications are subject to change without any obligaiton on the part of the HITACHI.
  • Page 36: Informations Importantes De Sécurité

    AVERTISSEMENTS sur l’outil motorisé et dans ce mode d’emploi. NE JAMAIS utiliser cet outil motorisé d’une manière qui n’est pas spécifiquement recommandée par HITACHI. SIGNIFICATION DES MOTS D’AVERTISSEMENT AVERTISSEMENT indique des situations potentiellement dangereuses qui, si elles sont ignorées, pourraient entraîner la mort ou de sérieuses blessures.
  • Page 37: Securite

    Français SECURITE REGLES GENERALE DE SECURITE – POUR TOUS LES OUTILS FONCTIONNANT SUR BATTERIE AVERTISSEMENT : Lire et coxmprendre toutes les instructions. Un non respect de toutes les instructions ci-dessous peut entraîner une électrocution, un incendie et/ou de sérieuses blessures personnelles. CONSERVER CES INSTRUCTIONS Zone de travail (1) Garder la zone de travail propre et bien éclairée.
  • Page 38 Français Utilisation de l’outil et entretien (1) Utiliser un étau ou toutes autres façons de fixer et maintenir la pièce à usiner sur une plate-forme stable. Tenir la pièce avec la main ou contre son corps est instable et peut conduire à une perte de contrôle de l’outil. (2) Ne pas forcer sur l’outil.
  • Page 39: Regles De Securite Specifiques

    Si l’outil n’a pas l’air de fonctionner normalement, fait des bruits étranges ou sans cela paraît défectueux, arrêter de l’utiliser immédiatement et le faire réparer par un centre de service Hitachi autorisé. 12. Manipuler l’outil motorisé avec précaution. Si un outil motorisé tombe ou frappe un matériau dur accidentellement, il risque d’être déformé, fendu ou endommagé.
  • Page 40: Consignes De Sécurité Importantes Pour L'utilisation Du Visseuse Àpercussion À Batterie

    Français CONSIGNES DE SÉCURITÉ IMPORTANTES POUR L'UTILISATION DU VISSEUSE À PERCUSSION À BATTERIE AVERTISSEMENT : Une utilisation incorrecte ou sans sécurité du tournevis à percussion sans fil risque d'entraîner la mort ou des blessures graves. Pour éviter ces risques, observer les consignes de sécurité...
  • Page 41: Consignes De Sécurité Importantes Pour Le Chargeur De Batterie

    Pour réduire tout risque de blessure, ne recharger que les batteries rechargeables HITACHI utilisées dans le modèle series EB7, EB9, EB12 et EB14. Les autres types de batterie pourraient exploser et provoquer des blessures ou des dommages.
  • Page 42: Consignes De Sécurité Importantes Pour L'utilisation De La Batterie Et Du Chargeur De Batterie

    UC14YF2 ou UC14YFA, bien lire attentivement toutes les consignes et les avertissements signalés sur le chargeur, sur la batterie ou dans ce manuel. BIEN NOTER : UTILISER EXCLUSIVEMENT DES BATTERIES HITACHI DES SERIES EB7, EB9, EB12 ET EB14. LES AUTRES TYPES DE BATTERIE POURRAIENT EXPLOSER OU PROVOQUER DES BLESSURES ! Pour éviter tout risque de blessure, observer les consignes suivantes :...
  • Page 43 Français 13. TOUJOURS attendre au moins 15 minutes entre deux recharges pour éviter toute surchauffe du chargeur. 14. TOUJOURS débrancher le cordon d’alimentation de la prise secteur lorsqu’on ne se sert pas du chargeur. CONSERVER CES INSTRUCTIONS LES METTRE A LA DISPOSITION DES AUTRES UTILISATEURS PROPRIETAIRES DE CET OUTIL !
  • Page 44: Description Fonctionnelle

    Français DESCRIPTION FONCTIONNELLE REMARQUE : Les informations contenues dans ce mode d’emploi sont conçues pour assister l’utilisateur dans une utilisation sans danger et un entretien de l’outil motorisé. NE JAMAIS utiliser ni entreprendre une révision de l’outil sans avoir d’abord lu et compris toutes les instructions de sécurité...
  • Page 45 Français 2. Chargeur de batterie Orifice d‘installation de Orifice d‘installation de Lampe la batterie Lampe la batterie témoin témoin Plaque de précaution Plaque de Corps précaution Cordon Plaque signalétique Plaque <UC14YF2> <UC14YFA> signalétique Fig. 2 SPECIFICATIONS 1. Visseuse à percussion à batterie Modèle WH9DM2 WH12DM2...
  • Page 46 Français 2. Clé à choc à batterie Modèle WR9DM2 WR12DM2 (9,6 V) (12 V) Moteur Moteur CC Vitesse à vide 0 – 2600/min Entraînement Carré, 3/8" (9,5 mm) Carré, 1/2" (12,7 mm) Capacité 1/4" – 9/16" (M6 – M14) 1/4" – 5/8" (M6 – M16) (Boulon ordinaire) (Boulon ordinaire) 1/4"...
  • Page 47: Assemblage Et Fonctionnement

    Français ASSEMBLAGE ET FONCTIONNEMENT UTILISATIONS <WH12DM2, WH9DM2> Serrage et enlévement de petites vis, de petits boulons, etc. <WR12DM2, WR9DM2> Pour le serrage et le desserrage de tous types de boulons et d’écrous utilistés pour la consolidation de stuctures. MÉTHODE DE RETRAIT ET D’INSTALLATION DE LA BATTERIE Installation de la batterie Aligner la batterie sur la fente de la poignée Poignée...
  • Page 48 Français Insérer la batterie dans le chargeur de batterie. Insérer la batterie dans le chargeur de batterie comme indiqué à la Fig. 4. Bien s’assurer qu’elle touche le fond du chargeur de batterie. Batterie rechargeable Batterie rechargeable Orifice d’installation de la batterie Lampe pilote Lampe pilote Orifice...
  • Page 49 Français Tableau 2 Indications de la lampe témoin S’allume pendant 0,5 seconde. Clignote Avant la Ne s’allume pas pendant 0,5 seconde. (ROUGE) recharge (Eteint pendant 0,5 seconde) S’allume Pendant la S’allume sans interruption recharge (ROUGE) Clignote S’allume pendant 0,5 seconde. Recharge (ROUGE) terminée...
  • Page 50: Avant L'utilisation

    Français ATTENTION : ● Si le chargeur a fonctionné pendant longtemps de suite, il sera chaud, ce qui risque de provoquer des pannes. Lorsque la recharge est terminée, laisser le chargeur refroidir pendant environ 15 minutes avant de passer à la recharge suivante. ●...
  • Page 51 Français ATTENTION : ● Ne pas fixer l’outil de l’extrémité sur l’élément principal de l’outil lorsqu’on transporte l’élément principal avec le crochet avec lampe suspendu à la ceinture. Cela pourrait provoquer des blessures. Le crochet avec lampe possède les deux fonctions suivantes : Il peut servir de crochet pour suspension à...
  • Page 52: Utilisation De La Lampe Auxiliaire

    Français 1.2 Utilisation de la lampe auxiliaire (1) Appuyer sur l’interrupteur pour allumer la lampe. Si on l’oublie, la lampe s’éteint automatiquement 15 minutes plus tard. (2) Il est possible de régler la direction de la lampe dans la plage des positions 1 à 5 du crochet. (Fig.
  • Page 53 Français ● Utiliser les piles conformément à leurs Corps principal du crochet spécifications et à leurs indications. – 2. Mise en place de la mèche (WH12DM2, Découpe Saillie WH9DM2) Pour installer la mèche, toujours se reporter aux Piles démarches suivantes. (Fig. 13) AAAA Saillie (1) Repousser le manchon-guide vers l’arrière.
  • Page 54 ● Utiliser les accessoires spécifiés qui sont énumérés dans le mode d’emploi et le catalogue Hitachi. Sinon il y a risque d’accidents ou de blessures. ● Bien installer la douille à fond dans l’enclume. Si la douille n’est pas solidement installée, elle risque de se dégager et de provoquer des blessures.
  • Page 55 Français 11. Nombre de serrages d’écrous ou de vis possible (WH12DM2, WH9DM2) Prière de se référer au tableau ci-dessous pour connaître le nombre de serrages d’écrous ou de vis possible avec une seule charge. <WH12DM2> (EB1220BL) Vis utilisé Nombre de serrages Vis de bois 5/32"...
  • Page 56: Precautions D'utilisation

    Français PRECAUTIONS D'UTILISATION 1. Repos de l’appareil après un travail continu Après un travail de serrage de boulons effectué de façon continue, laisser l’outil reposer pendant environ 15 minutes lors du remplacement de la batterie. La température du moteur, de la gâchette, etc. augmentera si le travail est repris tout de suite après le remplacement de la batterie, ce qui risque de provoquer un grillage.
  • Page 57 Français 7. Vérifier le couple de serrage Les facteurs suivants contributent à une réduction du couple de serrage. Ainsi, vérifier le couple de serrage réel désiré en serrage quelques boulons avec une clé dynamométrique à main avant d’effecteur le travail. Facteurs influençant le couple de serrage.
  • Page 58 Français <Pour WH12DM2> kgf·cm kgf·cm 15/32"×1-3/4" 9/16"×1-15/16" N·m N·m (in-lbs) (in-lbs) (M12×45) (M14×50) 1400 1400 Boulon hautement (1215) (1215) extensible 1200 1200 kgf·cm 3/8"×1-5/32" (1042) (1042) N·m (in-lbs) (M10×30) Boulon hautement 1000 1000 1000 extensible Boulon hautement (868) (868) (868) extensible Boulon ordinaire (694)
  • Page 59 Français <Pour WR12DM2> kgf·cm 15/32"×1-3/4" kgf·cm 3/8"×1-5/32" kgf·cm 9/16"×1-15/16" N·m N·m N·m (in-lbs) (in-lbs) (in-lbs) (M12×45) (M10×30) (M14×50) 2000 2000 2000 Boulon hautement (1736) Boulon hautement (1736) (1736) extensible extensible 1500 1500 1500 Boulon hautement (1302) (1302) (1302) extensible 1000 1000 1000 (868)
  • Page 60 Français <Pour WR12DM2> 5/8"×2–5/32" (M16×55) F10T Boulon kgf·cm (Temps de serrage : 3 sec) N·m (in-lbs) 2000 (1736) 1600 (1389) Charge complète 1200 (1042) Décharge complète (694) (347) Nombre de serrages (PCS)/charge Fig. 22 <Pour WR9DM2> kgf·cm N·m 15/32"×1–3/4" (M12×45) Boulon hautement extensible (in-lbs) (Temps de serrage : 3 sec)
  • Page 61: Entretien Et Inspection

    En outre, toujours maintenir les balais en carbone balai en propres et veiller à ce qu’ils coulissent librement carbone dans les supports. REMARQUE : Lors du remplacement des balais en carbone par des neufs, bien utiliser des balais en carbone Hitachi, No. de code 999054. Fig. 25...
  • Page 62 Tous les outils motorisés de qualité auront éventuellement besoin d’une réparation ou du remplacement d’une pièce à cause de l’usure normale de l’outil. Pour assurer que seules des pièces de rechange autorisées seront utilisées, tous les entretiens et les réparations doivent être effectués uniquement par UN CENTRE DE SERVICE HITACHI AUTORISE.
  • Page 63 électrique, respecter les règlements et les normes de sécurité en vigueur dans le pays en question. MODIFICATIONS : Les outils électriques Hitachi sont constamment améliorés et modifiés afin d’incorporer les tous derniers progrès technologiques. En conséquence, il est possible que certaines pièces soient modifiées sans avis préalable.
  • Page 64: Accessoires Standard

    L’utilisation de tout autre attachement ou accessoire peut être dangereux et peut causer des blessures ou des dommages mécaniques. REMARQUE : Les accessoires sont sujets à changement sans obligation de la part de HITACHI. ACCESSOIRES STANDARD (UC14YF2) 1 Chargeur de batterie (UC14YF2 ou UC14YFA) . 1 2 Coffret en plastique (N°...
  • Page 65 Français 2. Mèche Phillips Nº de mèche Nº de code N° 2 992671 N° 3 992672 2" (50 mm) Fig. 30 3. Douille hexagonale Caractères Désignation N° de code gravés 5 mm Douille hexagonale 996177 6 mm Douille hexagonale 985329 5/16"...
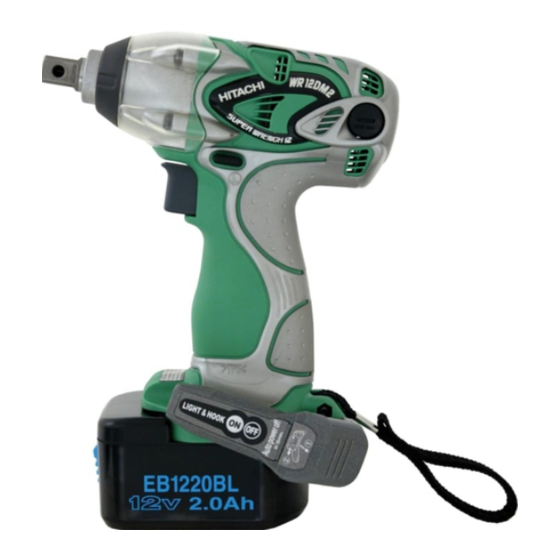
  • Page 66 Français 5. Jeu d’adaptateur de mandrin de foreuse : N° de Code 321823 Utiliser la foreuse en vente. Fig. 33 <WR12DM2, WR9DM2> 1. Batterie EB1220BL (N° de code 320386) EB9B (N° de code 310451) Fig. 34 2. Douilles Forme B Forme C Forme D <Pour WR12DM2>...
  • Page 67 Français <Pour WR9DM2> Tableau 5 Diamètre de boulon adéquat Largeur Douille principale Dimensions N° de hexagonale Dimensions de l’entraîne- Nom du produit Boulons Forme mesurée aux Code ment carré S (ordinaire) (réduit) en pouces øF bords H 1-5/16" 3/16" 1/2" 8 mm 996125 M5 (3/16") 5/16"...
  • Page 68 Français <Pour WR9DM2> Tableau 7 Diamètre de boulon adéquat Largeur Douille principale Dimensions hexagonale N° de Dimensions Nom du produit de l’entraîne- Forme Boulons mesurée aux Code ment carré S (ordinaire) (réduit) en pouces øF bords H 2-3/8" 15/32" 1-7/8" 1/2"...
  • Page 69 Français 6. Douille à tubulure : (WR12DM2) Cette douille est utilisée pour serrer boulons et écrous dans les brides des conduits d’appareils de conditionnement d’air, etc. Fig. 37 N° de code Largeur hexagonale mesurée aux bords dimension S 993658 15/32" (12 mm) 1/2"...
  • Page 70 REMARQUE : Utiliser cet adaptateur uniquement dans le prolongement de l’angle de la visseuse. No. de code dimension S 322752 1/2" (12,7 mm) Fig. 41 REMARQUE : Les spécifications sont sujettes à modification sans aucune obligation de la part de HITACHI.
  • Page 71: Información Importante Sobre Seguridad

    ADVERTENCIAS en dicha herramienta y en este Manual de instrucciones. No utilice NUNCA esta herramienta eléctrica de ninguna forma que no esté específicamente recomendada por HITACHI. SIGNIFICADO DE LAS PALABRAS DE SEÑALIZACIÓN ADVERTENCIA indica situaciones potencialmente peligrosas que, si se ignoran, pueden resultar en la muerte o en lesiones de gravedad.
  • Page 72: Seguridad

    Español SEGURIDAD NORMAS GENERALES DE SEGURIDAD – PARA TODAS LAS HERRAMIENTAS ALIMENTADAS CON BATERÍA ADVERTENCIA: Lea y entienda todas las instrucciones. Si no sigue las instrucciones indicadas a continuación, pueden producirse descargas eléctricas, incendios, y/o lesiones serias. GUARDE ESTAS INSTRUCCIONES Área de trabajo (1) Mantenga el área de trabajo limpia y bien iluminada.
  • Page 73 Español sobre una plataforma estable. La sujeción de la pieza de trabajo con la mano o contra su cuerpo puede ser inestable y conducir a la pérdida del control. (2) No fuerce la herramienta. Utilice la herramienta correcta para su aplicación. Con la herramienta correcta realizará...
  • Page 74: Normas Específicos De Seguridad

    Si la herramienta parece que funciona anormalmente, produciendo ruidos extraños, etc., deje inmediatamente de utilizarla y solicite su arreglo a un centro de reparaciones autorizado por Hitachi. 12. Maneje con cuidado las herramientas eléctricas. Si una herramienta eléctrica se ha caído o ha chocado inadvertidamente contra materiales duros, es posible que se haya deformado, rajado, o dañado.
  • Page 75: Instrucciones Importantes Para La Utilización Del Atornillador De Impacto A Batería

    Español INSTRUCCIONES IMPORTANTES PARA LA UTILIZACIÓN DEL ATORNILLADOR DE IMPACTO A BATERÍA ADVERTENCIA: Si utiliza el atornillador de impacto a batería de forma inadecuada o insegura, puede sufrir lesiones serias. Para evitar estos riesgos, siga las instrucciones básicas de seguridad. No utilice nunca este atornillador para aplicaciones que no sean las indicadas en este manual.
  • Page 76: Instrucciones Importantes De Seguridad Para El Cargador De Baterías

    (1) el cargador de baterías, (2) la batería, y (3) el producto que utiliza la batería. Para reducir el riesgo de lesiones, cargue la batería HITACHI de tipo de la serie EB7, EB9, EB12 y EB14. Otros tipos de baterías podrían explotar causando lesiones y daños.
  • Page 77: Instrucciones Importantes De Seguridad Para La Batería Y El Cargador De Baterías

    RECUERDE: ¡UTILICE SOLAMENTE BATERÍAS HITACHI DE LOS TIPOS DE LA SERIE EB7, LA SERIE EB9, LA SERIE EB12 Y LA SERIE EB14. LOS DEMÁS TIPOS DE BATERÍAS PODRÍAN EXPLOTAR Y CAUSAR LESIONES! Para evitar el riesgo de lesiones, siga las instrucciones ofrecidas a continuación:...
  • Page 78 Español 13. SIEMPRE espere 15 minutos por lo menos entre las cargas para evitar que el cargador se recaliente. 14. SIEMPRE desconecte el cable de alimentación del tomacorriente cuando no vaya a utilizar el cargador. ¡GUARDE ESTAS INSTRUCCIONES PÓNGALAS A DISPOSICIÓN DE OTROS USUARIOS PROPIETARIOS DE ESTA HERRAMIENTA!
  • Page 79: Descripción Funcional

    Español DESCRIPCIÓN FUNCIONAL NOTA: La información contenida en este Manual de instrucciones ha sido diseñada para ayudarle a utilizar con seguridad y mantener esta herramienta eléctrica. NUNCA haga funcionar ni efectúe el mantenimiento de la herramienta antes de leer y comprender todas las instrucciones de seguridad contenidas en este manual. Algunas ilustraciones de este Manual de Instrucciones pueden mostrar detalles o accesorios diferentes a los de la propia herramienta eléctrica.
  • Page 80: Especificaciones

    Español 2. Cargador de baterías Orificio de instalación Orificio de instalación de de la batería Lámpara la batería piloto Lámpara Placa de piloto precaución Cuerpo Placa de precaución Cable Placa de características Placa de <UC14YF2> <UC14YFA> características Fig. 2 ESPECIFICACIONES 1.
  • Page 81 Español 2. Llave de impacto a batería Modelo WR9DM2 WR12DM2 (9,6 V) (12 V) Motor Motor de CC Velocidad sin carga 0 – 2600/min Impulsión Cuadrado de 3/8" (9,5 mm) Cuadrado de 1/2" (12,7 mm) Capacidad 1/4" – 9/16" (M6 – M14) 1/4"...
  • Page 82: Montaje Y Operación

    Español MONTAJE Y OPERACIÓN APLICACIONES <WH12DM2, WH9DM2> Apretado y aflojado de tornillos pequeños, pernos pequeños etc. <WR12DM2, WR9DM2> Apretedo y aflojado de cualquir tipo de pernos y tuercas pasa asegurar estructuras. MÉTODO DE EXTRACCIÓN E INSTALACIÓN DE LA BATERÍA Forma de instalar la batería Alinee la batería con la ranura de la Empuñadura empuñadura de la herramienta y deslícela en...
  • Page 83 Español Inserte la batería en el cargador de baterías. Inserte la batería en el cargador de baterías como se muestra en la Fig. 4. Cerciórese de que haya quedado en contacto con la base del cargador de baterías. Batería recargable Batería recargable Orificio de instalación de la...
  • Page 84 Español Tabla 2 Indicaciones de la lámpara piloto Parpadeo Se encenderá durante 0,5 segundos. Antes de la (ROJA) No se encenderá durante 0,5 segundos. carga (Apagada durante 0,5 segundos) Durante la Iluminación Iluminación permanente carga (ROJA) Se encenderá durante 0,5 segundos. Carga Parpadeo No se encenderá...
  • Page 85: Antes De La Utilización

    Español ● Si recarga una batería caliente o expuesta al sol, la lámpara piloto puede encenderse en verde. La batería no se cargará. En tal caso, deje que la batería se enfríe antes de cargarla. ● Cuando la lámpara piloto parpadee rápidamente en rojo (a intervalos de 0,2 segundos), compruebe y elimine los objetos extraños que haya en el orificio de instalación del cargador de baterías.
  • Page 86 Español El gancho equipado de luz cumple con las dos funciones siguientes: Puede utilizarse como gancho para sujetar al cinturón cuando así lo requiera la naturaleza del trabajo. Puede utilizarse como luz auxiliar para realizar tareas tales como el apriete de tornillos en lugares oscuros.
  • Page 87: Sustitución De Las Pilas

    Español (2) La dirección de la luz se puede ajustar dentro del alcance de las posiciones 1 – 5 del gancho. (Fig. 9) Tiempo de iluminación Pilas de manganeso AAAA: aprox. 15 horas Interruptor Pilas alcalinas AAAA: aprox. 30 horas PRECAUCIÓN: ●...
  • Page 88 Español 2. Instalación de la punta del atornillador Punta del Movimiento (WH12DM2, WH9DM2) atornillador Para instalar la punta de destornillador, realice siempre el procedimiento siguiente. (Fig. 13) (1) Tire del manguito guía hacia atrás. Orificio (2) Inserte la punta de destornillador en el orificio hexagonal en hexagonal en el yunque.
  • Page 89 Por favor utilice los accesorios especificados en las instrucciones de manejo y en el catálogo de Hitachi. De lo contrario, se podrían producir lesiones o accidentes. Asegúrese de instalar firmemente el casquillo adaptador en el yunke. Si no está instalado firmemente, el casquillo adaptador se podrá...
  • Page 90 Español 11. Número posible de aprietes (WH12DM2, WH9DM2) Con respecto al número de aprietes de tornillos con una carga, consultar la tabla siguiente. <WH12DM2> (EB1220BL) Tornillos utilizados Nº de aprietes Tornillo para madera 5/32" × 2" Aprox. 530 (Madera blanda) (ø4 × 50) Tornillo para metales Aprox.
  • Page 91: Precauciones Operacionales

    Español PRECAUCIONES OPERACIONALES 1. Reposo de la herramienta después de un funcionamiento prolongado Tras una tarea de apriete de pernos de larga duración, deje la unidad en reposo durante unos 15 minutos al reemplazar la batería. Si reinicia la tarea inmediatamente después de reemplazar la batería, aumentaría la temperatura del motor, del interruptor, etc., con los consiguientes riesgos de quemadura.
  • Page 92 Español (1) Tensión Cuando se alcance el margen de descarga, la tensión se reducirá y la torsión de apriete disminuirá. (2) Tiempo de operación La tensión de apriete aumenta al aumentar el tiempo de operación. La tensión de apriete sin embargo no supera cierto valor a pesar de que la herramienta funcione durante un largo periodo de tiempo.
  • Page 93 Español <Para WH12DM2> kgf·cm 15/32"×1-3/4" kgf·cm N·m 9/16"×1-15/16" (in-lbs) (M12×45) N·m (in-lbs) (M14×50) 1400 Perno de gran 1400 (1215) resistencia a la (1215) tracción 1200 1200 (1042) kgf·cm 3/8"×1-5/32" (1042) N·m (in-lbs) (M10×30) Perno de granresis- 1000 1000 tencia a la tracción 1000 Perno de gran (868)
  • Page 94 Español <Para WR12DM2> kgf·cm 3/8"×1-5/32" kgf·cm 15/32"×1-3/4" kgf·cm 9/16"×1-15/16" N·m N·m N·m (in-lbs) (in-lbs) (M10×30) (M12×45) (in-lbs) (M14×50) 2000 2000 2000 Perno de gran Perno ordinario (1736) (1736) (1736) Perno de gran resistencia a la 1500 resistencia a la 1500 tracción 1500 tracción...
  • Page 95 Español <Para WR12DM2> 5/8" × 2–5/32" (M16 × 55) F10T perno kgf·cm (Tiempo de apriete: 3 seg.) N·m (in-lbs) 2000 (1736) 1600 Cuando esté (1389) completamente recargado 1200 Cuando esté (1042) completamente descargado (694) (347) Número de aprietes (piezas)/carga Fig. 22 <Para WR9DM2>...
  • Page 96: Mantenimiento E Inspección

    “límite de desgaste”. Además, mantenga siempre limpias las escobillas de carbón y compruebe si se mueven libremente dentro de sus portaescobillas. NOTA: Cuando reemplace las escobillas de carbón por otras nuevas, utilice escobillas Hitachi con Fig. 25 número de código 999054.
  • Page 97 Para asegurarse de que solamente se utilicen piezas de reemplazo autorizadas, todos los servicios de mantenimiento y reparación deberán realizarse SOLAMENTE EN UN CENTRO DE REPARACIONES AUTORIZADO POR HITACHI.
  • Page 98 Español 11. Lista de repuestos PRECAUCIÓN: La reparación, modificación e inspección de las herramientas eléctricas Hitachi deben ser realizadas por un Centro de Servicio Autorizado de Hitachi. Esta lista de repuestos será de utilidad si es presentada junto con la heramienta al Centro de Servicio Autorizado de Hitachi para solicitar la reparación o cualquier otro tipo de mantenimiento.
  • Page 99: Accesorios

    ACCESORIOS ADVERTENCIA: SIEMPRE utilice ÚNICAMENTE repuestos y accesorios autorizados por HITACHI. No utilice NUNCA repuestos o accesorios no previstos para usar con esta herramienta. Si tiene dudas en cuanto a la seguridad de usar determinado repuesto o accesorio junto con su herramienta, póngase en contacto con HITACHI.
  • Page 100 Español 2. Broca Phillips Nº de destornillador Nº de código Nº 2 992671 Nº 3 992672 2" (50 mm) Fig. 30 3. Receptáculo hexagonal para tuercas y pernos Caracteres Nombre de la pieza Nº de código grabados 5 mm Receptáculo hexagonal 996177 6 mm Receptáculo hexagonal 985329...
  • Page 101 Español 5. Juego adaptador de portabrocas: Nº de código 321823 Monte las brocas que se venden en el mercado para perforar orificios. Fig. 33 <WR12DM2, WR9DM2> 1. Battería EB1220BL (Nº de código 320386) EB9B (Nº de código 310451) Fig. 34 2.
  • Page 102 Español <Para WR9DM2> Tabla 5 Diámero idóneo del perno Dimensiones del Dimensión H Dimensión S Nombre del Nº de cubo principal de la boca entre caras Forma Pernos en opuestas de la impulsora producto código (ordinario) (pequeño) pulgadas øF cuadrada boca hexagonal 1-5/16"...
  • Page 103 Español <Para WR9DM2> Tabla 7 Diámero idóneo del perno Dimensión H Dimensiones del Dimensión S Nº de Nombre del entre caras de la boca cubo principal Forma Pernos en opuestas de la impulsora producto código (ordinario) (pequeño) pulgadas boca hexagonal øF cuadrada 2-3/8"...
  • Page 104 Español 6. Cubo para conductos: (WR12DM2) Este cubo se utiliza para apretar pernos y tuercas de secciones con rebordes de conductos de accondicionadonadores de aire, etc. Fig. 37 Nº de código Dimensión H entre caras opuestas de la boca hexagonal 993658 15/32"...
  • Page 105 NOTA: Este adaptedoe de brocas sirve solamente para utilizar en ángulo recto la unidad principal. Nº de código dimensión S 322752 1/2" (12,7 mm) Fig. 41 NOTA: Las especificationes están sujetas a cambio sin ninguna obligación por parte de HITACHI.
  • Page 108 Please contact HITACHI KOKI U.S.A. LTD. at 1-800-59-TOOLS (toll free), or HITACHI AUTHORIZED POWER TOOL SERVICE CENTER regarding COLLECTION. Pour le RAMASSAGE, contacter HITACHI KOKI U.S.A. LTD. au 1-800-59-TOOLS (appel gratuit), ou UN SERVICE APRES-VENTE D’OUTILS ELECTRIQUE AGREE PAR HITACHI.

Ce manuel est également adapté pour:

Wh 9dm2Wr 12dm2Wr 9dm2

Table des Matières