Table des Matières
Publicité
Les langues disponibles
Les langues disponibles
Liens rapides
Publicité
Chapitres
Table des Matières

Manuels Connexes pour ADE CK 1701


Sommaire des Matières pour ADE CK 1701
- Page 1 DCF-Funkwecker DCF Radio-controlled alarm clock | Despertador radio controlado DCF | Réveil radio-piloté DCF | Radiosveglia DCF | Budzik radiowy DCF Bedienungsanleitung CK 1701 Operating instructions | Instrucciones de operación Mode d‘emploi | Istruzioni per l‘uso | Instrukcja obsługi...
- Page 2 Funktionen mit einem außergewöhnlichen Design vereint. Mit diesem Funkwecker haben Sie die Uhrzeit stets präzise im Blick. Die langjährige Erfahrung der Marke ADE stellt eine technisch hohen Standard und bewährte Qualität sicher. Wir wünschen Ihnen jederzeit ein entspanntes Timing!
-
Page 3: Über Diese Anleitung
Bedienungsanleitung kann zu Verletzungen oder Schäden am Artikel führen. Zeichenerklärung Dieses Symbol in Verbindung mit dem Wort GEFAHR warnt vor schweren Verletzungen. Dieses Symbol in Verbindung mit dem Wort WARNUNG warnt vor Verletzungen mittleren und leichten Grades. DCF-Funkwecker CK 1701... -
Page 4: Lieferumfang
Dieses Symbol in Verbindung mit dem Wort HINWEIS warnt vor Sachschäden. Dieses Symbol kennzeichnet zusätzliche Informati- onen und allgemeine Hinweise. Lieferumfang ‚ DCF-Funkwecker ‚ Batterien Typ R03 (AAA), 1,5 V (2x) ‚ Bedienungsanleitung Ziehen Sie die Schutzfolie vom Display. DCF-Funkwecker CK 1701... -
Page 5: Table Des Matières
Inbetriebnahme ..................14 Zeitsignal empfangen ................14 Checkliste bei fehlender Datenanzeige im Display ..16 Uhrzeit manuell einstellen ............16 Funkempfang des Zeitsignals manuell starten ....17 Standort wählen ................18 Wecken....................20 Weckzeit einstellen ..............20 Geweckt werden ................21 Sonstige Funktionen................23 DCF-Funkwecker CK 1701... -
Page 6: Technische Daten
Reinigen ....................24 Störung / Abhilfe ................. 24 Konformitätserklärung ..............25 Entsorgen ....................26 Technische Daten Modell: DCF-Funkwecker CK 1701 Batterie: 2x R03 (AAA) / 1,5 V Bemessungsstrom: < 50 mA Maße: 85 x 87 x 50 mm Inverkehrbringer Waagen-Schmitt GmbH... -
Page 7: Bestimmungsgemäßer Gebrauch
Fähigkeiten oder Mangel an Erfah- rung und Wissen benutzt werden, wenn sie beaufsichtigt oder bezüglich des sicheren Gebrauchs des Artikels unterwiesen wurden und die daraus resultierenden Gefahren ver- stehen. ‚ Kinder dürfen nicht mit dem Artikel spielen. DCF-Funkwecker CK 1701... - Page 8 GEFAHR für Kinder ‚ Kinder von Verpackungsmaterial fernhalten. Bei Verschlucken besteht Erstickungsgefahr. GEFAHR von Brand/ Verbrennung und/oder Explosion ‚ Explosionsgefahr bei unsachgemäßem Auswechseln der Bat- terien. Batterien nur durch denselben oder einen gleichwerti- gen Batterietyp ersetzen. „Technischen Daten“´beachten. DCF-Funkwecker CK 1701...
- Page 9 ‚ Bein Einsetzen und Wechseln der Batterien auf die richtige Polarität (+/-) achten. ‚ Batterien keinen extremen Bedingungen aussetzen, indem diese z. B. auf Heizkörpern oder unter direkter Sonnenein- strahlung gelagert werden. Erhöhte Auslaufgefahr! ‚ Batterie- und Gerätekontakte bei Bedarf vor dem Einlegen reinigen. DCF-Funkwecker CK 1701...
-
Page 10: Garantie
Die Firma Waagen-Schmitt GmbH garantiert für 2 Jahre ab Kauf- datum die kostenfreie Behebung von Mängeln aufgrund Mate- rial- oder Fabrikationsfehlern durch Reparatur oder Austausch. Bitte geben Sie den Artikel im Garantiefall mit dem Kaufbeleg (unter Angabe des Reklamationsgrundes) an Ihren Händler zurück. DCF-Funkwecker CK 1701... -
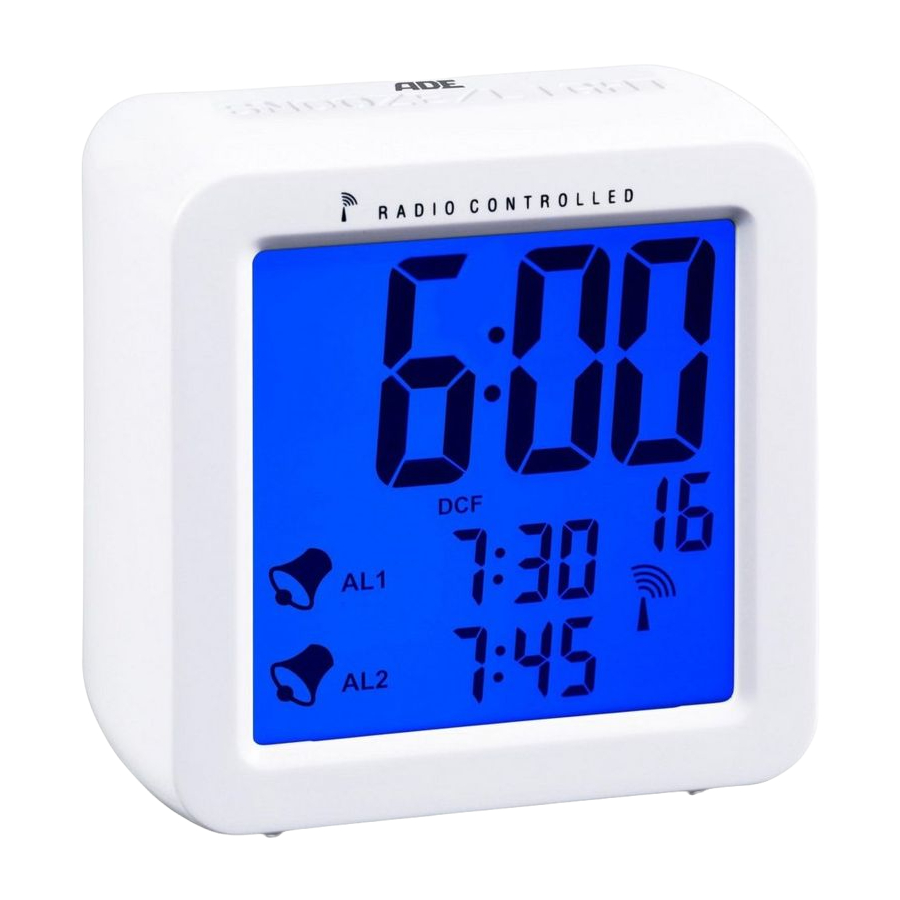
Page 11: Auf Einen Blick
Auf einen Blick Taste SNOOZE/LIGHT für Display-Beleuchtung und SNOOZE-Funktion Uhrzeit Symbol für Funkempfang Eingestellte Weckzeiten AL1 und AL2 Symbole für aktivierte Weckfunktion DCF-Funkwecker CK 1701... - Page 12 Auswahlschalter AL1/AL2 für Weckzeit-Einstellung und Weckzeit-Anzeige Taste 12/24: 12- oder 24-Stundenanzeige einstellen Taste DOWN: Verringern von Werten DCF-Funkwecker CK 1701...
- Page 13 10 Batteriefach, 2x R03 (AAA), 1,5 V Batteriefachdeckel Taste UP: ‚ Erhöhen von Werten ‚ Funkempfang zum Zeitzeichen-Sender manuell starten/unterbrechen Taste SET: ‚ Manuelle Zeiteinstellung vornehmen ‚ Gemachte Einstellungen speichen ‚ Weckfunktion aktivieren/deaktivieren Schalter SET: Einzustellende Werte auswählen (Uhrzeit: SETTIME oder Weckzeit: SETALM) DCF-Funkwecker CK 1701...
-
Page 14: Inbetriebnahme
‚ Nur den Batterietyp verwenden, der in den „Technischen Daten“ angegeben ist. ‚ Immer alle Batterien auswechseln. ‚ Alte Batterien umweltgerecht entsorgen, siehe „Entsorgen“. Zeitsignal empfangen Wenn die Batterien eingelegt sind, werden für einen kurzen Moment sämtliche Anzeigen im Display eingeblendet und ein Piepton ertönt. DCF-Funkwecker CK 1701... - Page 15 Wurde kein ausreichend starkes Signal empfangen, bricht der Funkwecker nach einigen Minuten den Empfangsvorgang ab und das Funkturm-Symbol erlöscht. Der Empfangsvorgang wird zu einem späteren Zeitpunkt neu gestartet. Die Uhrzeit läuft in diesem Fall (ausgehend von der Startzeit „00:00“) normal weiter. DCF-Funkwecker CK 1701...
-
Page 16: Checkliste Bei Fehlender Datenanzeige Im Display
Sie müssen ihn wiederholen. 1. Schalter SET auf SET TIME schieben. 2. Taste SET drücken. Im Display blinkt „00“ für die Zeitzone, in der Sie sich befinden („00“ ist die Standardeinstellung für das europäische Festland). DCF-Funkwecker CK 1701... -
Page 17: Funkempfang Des Zeitsignals Manuell Starten
− Taste UP gedrückt halten, bis Funksignal-Symbol im Display angezeigt wird. ‚ War der Empfang nicht erfolgreich, wird das Empfangs-Sym- bol nach einigen Minuten wieder ausgeblendet und die Uhrzeit im Display läuft normal weiter. DCF-Funkwecker CK 1701... -
Page 18: Standort Wählen
Wecker Signale von einem anderen Zeitzeichen-Sender empfängt oder sogar abwechselnd von zwei Zeitzeichen-Sendern. Das ist kein Gerätefehler. In die- sem Fall den Standort des Weckers wechseln. ‚ Das Wetter, z. B. ein starkes Gewitter, kann Empfangsstörun- gen verursachen. DCF-Funkwecker CK 1701... -
Page 19: Über Den Zeitzeichensender Dcf77
Der Funkwecker schaltet sich mehrmals täglich ein und synchro- nisiert die Uhrzeit mit dem Funksignal vom Sender DCF77. Im Falle eines Nicht-Empfangs, z. B. bei einem starken Gewitter, läuft das Gerät präzise weiter und schaltet dann zur nächsten vorgese- henen Zeit wieder automatisch auf Empfang. DCF-Funkwecker CK 1701... -
Page 20: Wecken
4. Mit UP oder DOWN die gewünschte Weckstunde einstellen. Wenn Sie UP oder DOWN gedrückt halten, erfolgt der Vor- bzw. Rücklauf der angezeigten Werte schneller. 5. Taste SET drücken. Die Minutenziffer blinkt. 6. Mit UP oder DOWN die gewünschte Weckminute einstellen. DCF-Funkwecker CK 1701... -
Page 21: Geweckt Werden
Zur eingestellten Zeit werden Sie von einem Wecksignal geweckt, wobei das Signal mit zunehmender Weckdauer immer intensiver wird. Weckalarm für 24 Stunden unterbrechen − Beliebige Taste drücken (außer SNOOZE/LIGHT), um den Alarm zu unterbrechen. Nach 24 Stunden wird der Alarm erneut ausgelöst. DCF-Funkwecker CK 1701... - Page 22 Weckfunktion aus- und einsschalten 1. Schalter SET auf LOCK schieben. 2. Wiederholt die Taste SET drücken, bis kein Glockensymbol mehr angezeigt wird: Weckfunktionen sind deaktiviert. 3. Durch erneutes Drücken der Taste SET werden die Weckzeiten wieder aktviert. DCF-Funkwecker CK 1701...
-
Page 23: Sonstige Funktionen
Bei der 12-Stundenanzeige werden Nachmittagsstunden mit „PM“ gekennzeichnet. Funkwecker auf Auslieferzustand zurücksetzen Setzen Sie den Funkwecker auf seinen Auslieferzustand zurück, wenn im Display ungewöhnliche bzw. offensichtlich falsche Wer- te angezeigt werden. 1. Batterien aus dem Batteriefach nehmen und einen Moment warten. DCF-Funkwecker CK 1701... -
Page 24: Reinigen
DCF77-Signal wird nicht empfangen. ‚ Gewählten Standort prüfen. ‚ Funkempfang ggf. manuell starten. ‚ Uhrzeit manuell einstellen. Anzeige ist unleserlich, die Funktion ist unklar oder die Wer- te sind offensichtlich falsch. ‚ Wecker auf den ursprünglichen Lieferzustand zurücksetzen. DCF-Funkwecker CK 1701... -
Page 25: Konformitätserklärung
‚ Schalter AL entsprechend verschieben. Konformitätserklärung Hiermit erklärt die Waagen-Schmitt GmbH, dass der Funkwecker CK 1701 den Richtlinien 2014/53/EU und 2011/65/EU entspricht. Der vollständige Text der EU-Konformitätserklärung ist unter der folgenden Internetadresse verfügbar: www.ade-germany.de/doc Die Erklärung verliert ihre Gültigkeit, falls an dem Wecker eine nicht mit uns abgestimmte Änderung vorgenommen wurde. -
Page 26: Entsorgen
Dabei werden im Gerät enthaltene Wertstoffe der Wiederver- wertung zugeführt und die Belastung der Umwelt vermieden. Geben Sie das Altgerät an einer Sammelstelle für Elektroschrott oder einem Wertstoffhof ab. Wenden Sie sich für nähere Aus- künfte an Ihr örtliches Entsorgungsunternehmen oder Ihre kommunale Verwaltung. DCF-Funkwecker CK 1701... - Page 27 Batterien und Akkus gehören nicht in den Hausmüll Alle Batterien und Akkus müssen bei einer Sammelstelle der Gemeinde, des Stadtteils oder im Handel abgegeben werden. Dadurch können Batterien und Akkus einer umweltschonen- den Entsorgung zugeführt werden. DCF-Funkwecker CK 1701...
- Page 28 With this radio-controlled alarm clock, you always have the exact time in view. The many years of experience of the brand ADE ensures a high technical standard and proven quality. We wish you easy timing at any time!
-
Page 29: General Information
Explanation of symbols This symbol, combined with the word DANGER, warns against serious injury. This symbol, combined with the word WARNING, warns against moderate and mild injuries. DCF Radio-controlled alarm clock CK 1701... -
Page 30: Scope Of Delivery
This symbol signifies additional information and general advice. Scope of delivery ‚ DCF Radio-controlled alarm clock ‚ Battery type R03 (AAA), 1.5 V (2x) ‚ Operating Manual Pull the protective film off the display. DCF Radio-controlled alarm clock CK 1701... - Page 31 Starting signal reception of the time signal manually .. 43 Choosing a location ..............44 About the time signal transmitter DCF77 ........45 Alarm ....................... 46 Setting the alarm time .............. 46 Being awakened ................47 DCF Radio-controlled alarm clock CK 1701...
-
Page 32: Technical Data
85 x 87 x 50 mm Distributor Waagen-Schmitt GmbH (no service address): Hammer Steindamm 27-29 22089 Hamburg, Germany Our products are constantly being developed and improved. For this reason, design and technical modifications are possible at any time. DCF Radio-controlled alarm clock CK 1701... -
Page 33: Intended Use
‚ Children must not play with the item. ‚ Cleaning and user maintenance must not be carried out by children, unless they are 8 years of age or older and are being supervised. DCF Radio-controlled alarm clock CK 1701... - Page 34 ‚ Avoid contact of the battery fluid with skin, eyes, and mucosa. In case of contact, rinse the affected areas right away with plenty of clean water and consult a doctor immediately. DCF Radio-controlled alarm clock CK 1701...
- Page 35 ‚ There are feet on the underside of the alarm clock. Since surfaces are made from various materials and are treated with diverse care products, the possibility cannot be DCF Radio-controlled alarm clock CK 1701...
-
Page 36: Guarantee
In the event of a guarantee claim, please return the product with the proof of purchase (stipulating the reason for claim) to your dealer. DCF Radio-controlled alarm clock CK 1701... -
Page 37: Overview
Overview 1 SNOOZE/LIGHT button for display lighting and SNOOZE function 2 Time 3 Symbol for radio reception 4 Set alarm times AL1 and AL2 5 Symbols for activated alarm function DCF Radio-controlled alarm clock CK 1701... - Page 38 6 AL1/AL2 selector switch for alarm time setting and alarm time display 7 Button 12/24: Set 12- or 24-hour display 8 DOWN button: Decrease values DCF Radio-controlled alarm clock CK 1701...
- Page 39 ‚ Manually start/pause radio reception of the time signal transmitter 13 SET button: ‚ Set the time manually ‚ Save settings made ‚ Activates/deactivates alarm function 14 SET switch: Select values to be set (time: SETTIME or alarm time: SETALM) DCF Radio-controlled alarm clock CK 1701...
-
Page 40: Start-Up
‚ Dispose of old batteries in an environmentally friendly manner, see “Disposal”. Receiving the time signal When the batteries are inserted, all displays are shown for a brief moment and a beep is heard. DCF Radio-controlled alarm clock CK 1701... - Page 41 The receiving process is started again at a later point in time. In this case, the time proceeds as usual (beginning with the start time of “00:00”). DCF Radio-controlled alarm clock CK 1701...
-
Page 42: Checklist When Data Is Missing In The Display
1. Slide the SET switch to SET TIME. 2. Press the SET button. “00” flashes in the display for the time zone you are in (“00” is the default setting for the European mainland). DCF Radio-controlled alarm clock CK 1701... -
Page 43: Starting Signal Reception Of The Time Signal Manually
− Press and hold the UP button until the radio signal symbol appears in the display. ‚ If reception was unsuccessful, the reception symbol will disappear again after a few minutes and the time continues to be displayed normally. DCF Radio-controlled alarm clock CK 1701... -
Page 44: Choosing A Location
This is not a fault in the device. In this case, change the location of the alarm clock. ‚ The weather, e.g. a heavy storm, can cause interference with the reception. DCF Radio-controlled alarm clock CK 1701... -
Page 45: About The Time Signal Transmitter Dcf77
DCF77. In the event the signal is not received, e.g. during a strong storm, the device continues to run precisely and then switches to receiving mode again at the next scheduled time. DCF Radio-controlled alarm clock CK 1701... -
Page 46: Alarm
If you press and hold UP or DOWN, the displayed values will be increased or decreased more quickly. 5. Press the SET button. The minute digit flashes. 6. Set the desired alarm minute with UP or DOWN. DCF Radio-controlled alarm clock CK 1701... -
Page 47: Being Awakened
At the set time you will be woken by an alarm signal, which will become more intense as the waking time increases. Interrupting the alarm for 24 hours − Press any button (except SNOOZE/LIGHT) to interrupt the alarm. After 24 hours, the alarm will be triggered again. DCF Radio-controlled alarm clock CK 1701... - Page 48 1. Slide the SET switch to LOCK. 2. Press the SET button repeatedly until the bell symbol is no longer displayed: Alarm functions are deactivated. 3. Pressing the SET button again activates the alarm times. DCF Radio-controlled alarm clock CK 1701...
-
Page 49: Other Functions
In the 12-hour display, afternoon hours are marked with “PM”. Resetting the radio-controlled alarm clock to factory setting Reset the radio-controlled alarm clock to its factory setting if the display shows unusual or obviously incorrect values. DCF Radio-controlled alarm clock CK 1701... -
Page 50: Cleaning
‚ If necessary, start the radio reception manually. ‚ Set the time manually. The indicator is illegible, the function is unclear, or the values are obviously false. ‚ Reset the alarm clock to the original factory setting. DCF Radio-controlled alarm clock CK 1701... -
Page 51: Declaration Of Conformity
‚ Slide the AL switch accordingly. Declaration of Conformity Waagen-Schmitt GmbH hereby declares that the radio-controlled alarm clock CK 1701 is in compliance with EU directives 2014/53/EU and 2011/65/EU. The full text of the EU declaration of conformity is available at the following internet address: www.ade-germany.de/doc... -
Page 52: Disposal
Hand in the old device at a collection point for electronic waste or at a recycling depot. For more information, contact your local waste disposal firm or your local administrative body. DCF Radio-controlled alarm clock CK 1701... - Page 53 Recyclable and disposable batteries do not belong in household waste All batteries must be handed in at a collection point in your community, suburb, or at the retailer. Such batteries can thus be disposed of in an environmentally friendly way. DCF Radio-controlled alarm clock CK 1701...
- Page 54 ¡Estimada/o cliente! Se ha decidido por la compra de un producto de gran calidad de la marca ADE, que aúna unas funciones inteligentes con un diseño extraordinario. Con este despertador radio controlado siempre tendrá a la vista la hora exacta. La larga experiencia de la marca ADE le asegura unos elevados estándares técnicos y es...
-
Page 55: Información General
Explicación de símbolos Este símbolo unido a la palabra PELIGRO advierte de heridas graves. Este símbolo unido a la palabra ADVERTENCIA advierte de heridas de grado medio o leve. Despertador radio controlado DCF CK 1701... -
Page 56: Artículos Incluidos En La Entrega
Este símbolo significa información adicional e indicaciones generales. Artículos incluidos en la entrega ‚ Despertador radio controlado DCF ‚ Pilas tipo R03 (AAA), 1,5 V (2x) ‚ Manual de instrucciones Retire la lámina de protección de la pantalla. Despertador radio controlado DCF CK 1701... - Page 57 Inicio manual de la recepción de radio de la señal horaria ..................... 69 Elegir ubicación ................70 Acerca del emisor de señal horaria DCF77 ........ 71 Despertador ..................72 Ajustar hora de alarma .............. 72 Despertarse ................... 73 Despertador radio controlado DCF CK 1701...
-
Page 58: Datos Técnicos
Hammer Steindamm 27-29 servicio técnico): 22089 Hamburgo, Alemania Nuestros productos se están desarrollando y mejorando continuamente. Por este motivo cabe la posibilidad de que en cualquier momento pudiera haber cambios en el diseño o modificaciones técnicas. Despertador radio controlado DCF CK 1701... -
Page 59: Uso Adecuado
‚ Los niños no deben jugar con el artículo. ‚ La limpieza y el mantenimiento por parte del usuario no deben ser realizados por niños, Despertador radio controlado DCF CK 1701... - Page 60 ‚ Las pilas no deben cargarse, reactivarse con otros medios, desmontarse, arrojarse al fuego o ponerse en cortocircuito. En caso contrario existe un riesgo mayor de explosión o fuga, y además pueden liberarse gases. Despertador radio controlado DCF CK 1701...
- Page 61 ‚ Cuando sea necesario, limpie los contactos del aparato y de las pilas antes de colocarlas. ‚ Emplee únicamente pilas del mismo tipo y no utilice juntas pilas de tipos diferentes o pilas usadas junto con otras nuevas. Despertador radio controlado DCF CK 1701...
-
Page 62: Garantía
En caso de solicitar la aplicación de la garantía, lleve el artículo a su distribuidor con el justificante de compra (explicando el motivo de la reclamación). Despertador radio controlado DCF CK 1701... -
Page 63: De Un Vistazo
De un vistazo 1 Botón SNOOZE/LIGHT para iluminar la pantalla y función SNOOZE 2 Hora 3 Símbolo de recepción de la señal radio 4 Horas de alarma seleccionadas AL1 y AL2 5 Símbolo de despertador activado Despertador radio controlado DCF CK 1701... - Page 64 6 Interruptor de selección AL1/AL2 para la selección y visualización de la hora de alarma 7 Botón 12/24: Seleccionar visualización de 12 o 24 horas 8 Botón DOWN: Disminuir valores Despertador radio controlado DCF CK 1701...
- Page 65 ‚ Iniciar/interrumpir manualmente la recepción radio del emisor de señal horaria 13 Botón SET: ‚ Realizar ajustes manuales ‚ Guardar los ajustes realizados ‚ Activar/desactivar la función de despertador 14 Interruptor SET: seleccionar valores (hora: SETTIME o despertador: SETALM) Despertador radio controlado DCF CK 1701...
-
Page 66: Puesta En Funcionamiento
‚ Cambie siempre todas las pilas. ‚ Elimine las pilas conforme a la normativa medioambiental, consulte "Eliminación". Recepción de señal horaria Cuando las pilas estén colocadas, se visualizarán brevemente en pantalla todos los indicadores y se oirá un pitido. Despertador radio controlado DCF CK 1701... - Page 67 El proceso de recepción se iniciará nuevamente en un momento posterior. En ese caso la hora comienza a avanzar normalmente (partiendo de las "00:00"). Despertador radio controlado DCF CK 1701...
-
Page 68: Lista De Comprobación En Caso De Fallo En La Indicación De Datos En La Pantalla
Ajustar la hora manualmente Cuando pasan más de 60 segundos entre una pulsación de botón y otra, el proceso de ajuste finaliza automáticamente y hay que volver a repetirlo. 1. Coloque el interruptor SET en SET TIME. Despertador radio controlado DCF CK 1701... -
Page 69: Inicio Manual De La Recepción De Radio De La Señal Horaria
− Mantenga pulsada la tecla UP hasta que en la pantalla aparezca el símbolo de la señal de radio. ‚ Si no se consigue la recepción, el símbolo de recepción desaparece pasados unos minutos y la hora en la pantalla sigue visualizándose normalmente. Despertador radio controlado DCF CK 1701... -
Page 70: Elegir Ubicación
No es un fallo del aparato. En estos casos, cambie la ubicación del despertador. ‚ La meteorología, por ejemplo una tormenta intensa, puede producir problemas en la recepción. Despertador radio controlado DCF CK 1701... -
Page 71: Acerca Del Emisor De Señal Horaria Dcf77
DCF77. En caso de no recibirse la señal, por ejemplo por una tormenta intensa, el aparato sigue funcionando con precisión y se vuelve a conectar nuevamente en la siguiente hora prevista. Despertador radio controlado DCF CK 1701... -
Page 72: Despertador
Si mantiene pulsado UP o DOWN, el valor avanzará o retrocederá más rápido. 5. Pulse la tecla SET. Parpadeará la cifra de los minutos. 6. Seleccione los minutos deseados con UP o con DOWN. Despertador radio controlado DCF CK 1701... -
Page 73: Despertarse
A la hora establecida, le despertará un sonido de despertador que irá aumentando en volumen gradualmente. Interrumpir el despertador 24 horas − Pulse cualquier botón (excepto SNOOZE/LIGHT), para interrumpir la alarma. Pasadas 24 horas, la alarma sonará nuevamente. Despertador radio controlado DCF CK 1701... - Page 74 2. Pulse varias veces la tecla SET hasta que deje de aparecer el símbolo de la campana: Las horas de alarma están desactivadas. 3. Pulsando nuevamente la tecla SET, se vuelven a activar las horas de alarma. Despertador radio controlado DCF CK 1701...
-
Page 75: Otras Funciones
Cuando se ha seleccionado 12 horas, las horas posteriores al mediodía se identifican con "PM". Restaurar el despertador radio controlado a la configuración de fábrica Restablezca los valores de fábrica del despertador cuando en la pantalla se muestren valores inusuales o claramente erróneos. Despertador radio controlado DCF CK 1701... -
Page 76: Limpieza
‚ Inicie manualmente la recepción de la señal. ‚ Ajuste la hora manualmente. La indicación es ilegible, la función no está clara o los valores son claramente erróneos. ‚ Restablezca la configuración inicial del despertador. Despertador radio controlado DCF CK 1701... -
Page 77: Declaración De Conformidad
‚ Mueva el interruptor AL a la posición correspondiente. Declaración de conformidad Por la presente, Waagen-Schmitt GmbH declara que despertador radio controlado CK 1701 cumple con la directiva 2014/53/EU y 2011/65/EU. Se encuentra disponible el texto completo de la declaración de conformidad de la UE en la siguiente dirección de Internet:... -
Page 78: Eliminación
Deposite el aparato antiguo en un punto de recogida de restos electrónicos o de desechos reciclables. Para más información, diríjase a su empresa de recogida de residuos o administración local. Despertador radio controlado DCF CK 1701... - Page 79 Todas las pilas y baterías deben depositarse en los puntos de recogida del ayuntamiento, distrito o en los comercios. De este modo puede realizarse la eliminación de pilas y baterías de una forma respetuosa con el medio ambiente. Despertador radio controlado DCF CK 1701...
- Page 80 Chère cliente, cher client ! Nous sommes ravis que vous ayez choisi un appareil de haute qualité de la marque ADE, qui allie des fonctions intelligentes à un design exceptionnel. Grâce à ce réveil radio-piloté, la ponctualité ne vous fera jamais défaut.
-
Page 81: Généralités
Légende Ce symbole, associé au mot DANGER, prévient de blessures graves. Ce symbole, associé au mot ATTENTION, prévient de blessures moyennes et légères. Réveil radio-piloté CK 1701 à signal DCF... -
Page 82: Contenu De L'emballage
Contenu de l’emballage ‚ Réveil radio-piloté DCF ‚ Piles de type R03 (AAA), 1,5 V (x 2) ‚ Mode d’emploi Retirez le film de protection de l'écran. Réveil radio-piloté CK 1701 à signal DCF... - Page 83 Lancer manuellement la réception radio du signal horaire ..................... 95 Choisir l’emplacement .............. 96 Par l’émetteur de signal horaire DCF77 ........97 Réveil ....................... 98 Régler l'heure de réveil ............. 98 Être réveillé ..................99 Réveil radio-piloté CK 1701 à signal DCF...
-
Page 84: Caractéristiques Techniques
(aucune adresse Hammer Steindamm 27–29 de service) : 22089 Hambourg/Allemagne Nos produits font l’objet de développements et d’améliorations continuels. Pour cette raison, des modifications de design et des modifications techniques peuvent survenir à tout moment. Réveil radio-piloté CK 1701 à signal DCF... -
Page 85: Utilisation Conforme
été instruits de l’utilisation conforme de l’article et comprennent les risques qui en découlent. ‚ Les enfants ne doivent pas jouer avec cet article. Réveil radio-piloté CK 1701 à signal DCF... -
Page 86: Danger Pour Les Enfants
Ne remplacer les piles que par le même type ou un type de piles équivalent. Respectez les caractéristiques des piles. ‚ Les piles ne doivent pas être chargées, réactivées avec d’autres moyens, démontées, jetées au feu ou court- Réveil radio-piloté CK 1701 à signal DCF... -
Page 87: Attention Risque De Dommages Matériels
‚ Si besoin, nettoyer les pôles de la piles et de l’appareil avant l’insertion. ‚ Insérer seulement des piles de même type et aucune de type différent ou des piles usées avec de nouvelles. Réveil radio-piloté CK 1701 à signal DCF... -
Page 88: Garantie
Dans le cas où vous souhaitez faire usage de cette garantie, veuillez remettre l'article ainsi que la preuve d'achat (en indiquant les raisons de votre réclamation) à votre revendeur. Réveil radio-piloté CK 1701 à signal DCF... -
Page 89: Aperçu
Aperçu 1 Touche SNOOZE/LIGHT pour l’éclairage de l’écran et la fonction SNOOZE 2 Heure 3 Symbole réception radio 4 Réveils AL1 et AL2 programmés 5 Symbole réveil activé Réveil radio-piloté CK 1701 à signal DCF... - Page 90 6 Sélecteur de mode AL1/AL2 pour la programmation et l’affichage du réveil 7 Touche 12/24 : Réglage de l’affichage 12 ou 24 heures 8 Touche DOWN : Diminuer les valeurs Réveil radio-piloté CK 1701 à signal DCF...
- Page 91 13 Touche SET : ‚ Régler l’heure manuellement ‚ Enregistrer les réglages effectués ‚ Activer/désactiver le réveil 14 Commutateur SET : sélectionner les valeurs à régler (heure : SETTIME ou alarme : SETALM) Réveil radio-piloté CK 1701 à signal DCF...
-
Page 92: Mise En Marche
‚ Mettre les anciennes piles au rebut en respectant l‘environnement, voir « Mise au rebut ». Réception du signal horaire Si les piles sont insérées, tous les affichages de l’écran seront brièvement affichés et un bip se fait entendre. Réveil radio-piloté CK 1701 à signal DCF... - Page 93 Le processus de réception est de nouveau initié plus tard. Dans ce cas, l’heure continue de fonctionner normalement (à partir de l’heure de départ « 00:00 »). Réveil radio-piloté CK 1701 à signal DCF...
-
Page 94: Liste De Contrôle En Cas De Données Erronées Affichées À L'écran
Définir l’heure manuellement S’il y a environ plus de 60 secondes d’écart entre deux touches, le réglage prend automatiquement fin et vous devez le refaire. 1. Placer le commutateur SET sur SET TIME. Réveil radio-piloté CK 1701 à signal DCF... -
Page 95: Lancer Manuellement La Réception Radio Du Signal Horaire
− Maintenir la touche UP appuyée jusqu’à ce que le symbole signal radio s’affiche à l’écran. ‚ En cas de non réception, le symbole correspondant disparaît après quelques minutes et l’heure s’affiche normalement à l’écran. Réveil radio-piloté CK 1701 à signal DCF... -
Page 96: Choisir L'emplacement
émetteurs. Il ne s’agit pas d’un dysfonctionnement. Dans ce cas, changez l’emplacement du réveil. ‚ La réception peut être perturbée par les conditions météo (par exemple par un orage). Réveil radio-piloté CK 1701 à signal DCF... -
Page 97: Par L'émetteur De Signal Horaire Dcf77
DCF77. En cas de non réception, comme cela peut se produire par temps d’orage, l’horloge continue de tourner puis se remet automatiquement en mode de réception à l’heure suivante programmée. Réveil radio-piloté CK 1701 à signal DCF... -
Page 98: Réveil
Si vous maintenez enfoncées les touches UP ou DOWN, l’avance ou le recul des valeurs affichées s’effectue plus rapidement. 5. Appuyer sur la touche SET. Le chiffre des minutes clignote. 6. Régler les minutes désirées avec UP ou DOWN. Réveil radio-piloté CK 1701 à signal DCF... -
Page 99: Être Réveillé
À l'heure programmée, vous êtes réveillé par une sonnerie, le signal s’amplifiant avec le temps. Désactiver l’alarme pendant 24 heures − Appuyer sur n’importe quel bouton (sauf SNOOZE/LIGHT) pour interrompre l’alarme. Après 24 heures, la sonnerie est de nouveau déclenchée. Réveil radio-piloté CK 1701 à signal DCF... -
Page 100: Fonction D'arrêt Automatique
1. Placer le commutateur SET sur LOCK. 2. Appuyer plusieurs fois sur la touche SET jusqu’à ce le symbole cloche disparaisse : les réveils sont désactivés. 3. Appuyer à nouveau sur la touche SET réactive les réveils Réveil radio-piloté CK 1701 à signal DCF... -
Page 101: Autres Fonctions
12 et 24 heures. Pour l’affichage 12 heures, les heures de l’après-midi sont signalées par « PM ». Revenir aux paramètres d’usine Revenir aux paramètres par défaut du réveil lorsque l’écran indique des données inhabituelles ou manifestement erronées. Réveil radio-piloté CK 1701 à signal DCF... -
Page 102: Nettoyage
‚ Au besoin, activer manuellement la réception du signal. ‚ Définir l’heure manuellement. L’affichage est illisible, le fonctionnement est défectueux ou les valeurs sont manifestement fausses. ‚ Remettre le réveil dans son état de livraison originel. Réveil radio-piloté CK 1701 à signal DCF... -
Page 103: Déclaration De Conformité
Réveil 1 ou 2 (AL1/AL2) n’apparaît pas à l’écran. ‚ Positionner le commutateur AL correspondant. Déclaration de conformité Waagen-Schmitt GmbH déclare que le réveil radio-piloté CK 1701 est conforme aux directives 2014/53/UE et 2011/65/UE. Le texte intégral de la déclaration de conformité UE est disponible à... -
Page 104: Mise Au Rebut
être recyclées, avec un moindre impact sur l'environnement. Déposez l'appareil usagé dans un point de collecte pour les déchets électroniques ou dans un centre de recyclage. Pour plus d'informations, adressez-vous à votre service de collecte local ou à votre municipalité. Réveil radio-piloté CK 1701 à signal DCF... - Page 105 Toutes les piles et batteries doivent être déposées dans un point de collecte de votre localité ou rapportées à leur point d’achat. Les piles et batteries seront ainsi traitées dans le respect de l'environnement. Réveil radio-piloté CK 1701 à signal DCF...
- Page 106 Gentile cliente, La ringraziamo per aver scelto un prodotto di alta qualità della ADE che unisce funzioni intelligenti e un design fuori dal comune. Questa radiosveglia permette di vedere l'orario in modo preciso. La lunga esperienza della ADE garantisce standard tecnici elevati e qualità consolidata.
-
Page 107: Informazioni Generali
Descrizione dei simboli Questo simbolo accompagnato dalla parola PERICOLO mette in guardia contro il rischio di gravi lesioni. Questo simbolo accompagnato dalla parola AVVERTENZA indica il rischio di lesioni di lieve o media entità. Radiosveglia DCF CK 1701... -
Page 108: Ambito Della Fornitura
ATTENZIONE indica il rischio di danni alle cose. Questo simbolo indica ulteriori informazioni o indicazioni generali. Ambito della fornitura ‚ Radiosveglia DCF ‚ 2 batterie di tipo R03 (AAA) da 1,5 V ‚ Istruzioni per l'uso Rimuovere la pellicola protettiva dal display. Radiosveglia DCF CK 1701... - Page 109 Impostazione manuale dell'orario ........120 Avvio manuale della ricezione radio del segnale orario ..................... 121 Scelta della posizione .............. 122 Informazioni sul trasmettitore di segnale orario DCF77 ..123 Sveglia ....................124 Impostazione della sveglia ............ 124 Risveglio ..................126 Radiosveglia DCF CK 1701...
-
Page 110: Dati Tecnici
Pulizia ....................128 Risoluzione dei problemi ............... 129 Dichiarazione di conformità ............129 Smaltimento ..................130 Dati tecnici Modello: Radiosveglia DCF CK 1701 Batterie: 2x R03 (AAA) / 1,5 V Corrente nominale: < 50 mA Dimensioni: 85 x 87 x 50 mm... -
Page 111: Destinazione D'uso
‚ I bambini non devono giocare con il dispositivo. Radiosveglia DCF CK 1701... - Page 112 In caso di ingestione sussiste il pericolo di soffocamento. PERICOLO di incendio, ustioni e/o esplosione ‚ La sostituzione non corretta delle batterie può costituire un pericolo di esplosione. Sostituire le batterie solo con batterie dello stesso tipo o equivalenti. Si veda "Dati tecnici". Radiosveglia DCF CK 1701...
- Page 113 ‚ Non sottoporre le batterie a temperature estreme, ad esempio conservandole vicino a termosifoni o alla luce diretta del sole. Serio rischio di fuoriuscita di liquido! ‚ Se necessario, pulire i contatti del dispositivo e le batterie prima di inserirle. Radiosveglia DCF CK 1701...
-
Page 114: Garanzia
2 anni a partire dalla data di acquisto, nel caso di difetti di materiale o fabbricazione del prodotto. A tale scopo, consegnare al rivenditore il prodotto e la prova di acquisto (citando i motivi del reclamo). Radiosveglia DCF CK 1701... -
Page 115: Descrizione
Descrizione 1 Tasto SNOOZE/LIGHT per illuminazione display e funzione SNOOZE. 2 Orario 3 Simbolo di ricezione radio 4 Orari di sveglia impostati AL1 e AL2 5 Simbolo di funzione sveglia attivata Radiosveglia DCF CK 1701... - Page 116 6 Selettore AL1/AL2 per l'impostazione e la visualizzazione dell'orario di sveglia 7 Tasto 12/24: Impostazione di visualizzazione in formato 12 o 24 ore 8 Tasto DOWN: Ridurre i valori Radiosveglia DCF CK 1701...
- Page 117 ‚ Avviare/interrompere manualmente la ricezione radio del trasmettitore di segnale orario 13 Pulsante SET: ‚ Impostare manualmente l'orario ‚ Salvare le impostazioni effettuate ‚ Attivare/disattivare la funzione sveglia 14 Selettore SET: Scegliere i valori da impostare (orario: SETTIME o sveglia: SETALM) Radiosveglia DCF CK 1701...
-
Page 118: Messa In Funzione
‚ Sostituire sempre tutte le batterie. ‚ Provvedere allo smaltimento corretto delle batterie, vedi “Smaltimento”. Ricezione del segnale orario Quando le batterie sono inserite, tutte le indicazioni sul display vengono visualizzate per un istante e si sente un bip. Radiosveglia DCF CK 1701... - Page 119 La ricezione sarà riavviata in un secondo momento. In tal caso, l'indicazione dell'orario avviene lo stesso (a partire dall'orario iniziale "00:00"). Radiosveglia DCF CK 1701...
-
Page 120: Lista Di Controllo Con Indicazione Dei Dati Sul Display
è possibile nella posizione scelta, si veda "Impostazione manuale di ora e data". Impostazione manuale dell'orario Se si attendono più di 60 secondi circa tra una pressione e l'altra dei tasti, il processo di regolazione termina automaticamente e sarà necessario ripeterlo da capo. Radiosveglia DCF CK 1701... -
Page 121: Avvio Manuale Della Ricezione Radio Del Segnale Orario
Anche in tal caso, l'indicazione dell'orario continua ad apparire con precisione. − Tenere premuto il tasto UP fino a quando il simbolo del segnale radio non viene indicato sul display. Radiosveglia DCF CK 1701... -
Page 122: Scelta Della Posizione
‚ A seconda della posizione è possibile che in casi individuali la sveglia riceva i segnali da un altro trasmettitore del segnale orario o anche alternativamente da due trasmettitori del segnale orario. Questo non è un difetto. In questo caso modificare la posizione della sveglia. Radiosveglia DCF CK 1701... -
Page 123: Informazioni Sul Trasmettitore Di Segnale Orario Dcf77
La radio sveglia passa in modalità ricezione più volte al giorno, per sincronizzare l'orario con il segnale radio proveniente dal trasmettitore DCF77. In caso di mancata ricezione, ad esempio Radiosveglia DCF CK 1701... -
Page 124: Sveglia
2. Spostare il selettore SET su LOCK. 3. Premere il tasto SET. La cifra delle ore di AL1 o AL2 (a seconda della sveglia selezionata) lampeggia. 4. Con UP o DOWN impostare l'orario desiderato di sveglia in ore. Radiosveglia DCF CK 1701... - Page 125 10. Spostare il selettore SET su LOCK. 11. Con il tasto SET attivare la sveglia desiderata: − : La sveglia 1 è attiva − : La sveglia 2 è attiva − : Le sveglie 1 e 2 sono attive Radiosveglia DCF CK 1701...
-
Page 126: Risveglio
Il segnale della sveglia è silenziato e sul display lampeggia (in caso di orario della sveglia 1) Dopo alcuni minuti (a seconda del tempo di SNOOZE impostato) il dispositivo si riaccende e risuona la sveglia. Questa azione può essere ripetuta più volte. Radiosveglia DCF CK 1701... -
Page 127: Altre Funzioni
Se l'orario estivo è attivo, sul display appare "DST" (Daylight Saving Time). Impostazione di visualizzazione in formato 12 o 24 ore − Premere il tasto 12/24 per impostare la visualizzazione in formato 12 o 24 ore. Radiosveglia DCF CK 1701... -
Page 128: Pulizia
2. Inserire nuovamente le batterie. Osservare la corretta polarità delle batterie (+/-). 3. Procedere come descritto nel capitolo "Ricezione del segnale orario". Pulizia − Se necessario, rimuovere la polvere dall'articolo con un panno morbido e asciutto o pulire con un panno leggermente umido. Radiosveglia DCF CK 1701... -
Page 129: Risoluzione Dei Problemi
La sveglia 1 o 2 (AL1/AL2) non viene indicata sul display. ‚ Spostare il selettore AL corrispondente. Dichiarazione di conformità Con la presente, Waagen-Schmitt GmbH dichiara che la radiosveglia CK 1701 è conforme alle direttive 2014/53/EU e 2011/65/EU. Radiosveglia DCF CK 1701... -
Page 130: Smaltimento
Smaltimento Smaltimento dell'imballaggio Smaltire l'imballaggio nella raccolta differenziata. Conferire il cartone nella raccolta della carta e la pellicola in quella del materiale riciclabile. Smaltimento del prodotto Smaltire il prodotto secondo le norme vigenti nel proprio paese. Radiosveglia DCF CK 1701... - Page 131 Le batterie e gli accumulatori devono essere consegnati presso un centro di raccolta comunale o di quartiere, oppure presso il proprio rivenditore, al fine di garantire il loro smaltimento in modo rispettoso dell'ambiente. Radiosveglia DCF CK 1701...
-
Page 132: Szanowny Kliencie
Szanowny Kliencie! Zakupiony wysokiej jakości produkt marki ADE łączy w sobie inteligentne funkcje z wyjątkową stylistyką. Dzięki niniejszemu budzikowi radiowemu godzina jest zawsze precyzyjnie w zasięgu wzroku. Wieloletnie doświadczenie marki ADE gwarantuje wysoki standard techniczny oraz sprawdzoną jakość. Życzymy zawsze poczucia czasu bez pośpiechu! Zespół... -
Page 133: Informacje Ogólne
Objaśnienie znaków Ten symbol w połączeniu ze słowem NIEBEZPIECZEŃSTWO ostrzega przed poważnymi obrażeniami ciała. Ten symbol w połączeniu ze słowem OSTRZEŻENIE ostrzega przed obrażeniami ciała średniego i lekkiego stopnia. Budzik radiowy DCF CK 1701... -
Page 134: Zawartość Dostawy
Ten symbol w połączeniu ze słowem WSKAZÓWKA ostrzega przed stratami materialnymi. Ten symbol oznacza dodatkowe informacje i ogólne wskazówki. Zawartość dostawy ‚ Budzik radiowy DCF ‚ Baterie typu R03 (AAA), 1,5 V (2x) ‚ Instrukcja obsługi Zdjąć folię ochronną z wyświetlacza. Budzik radiowy DCF CK 1701... - Page 135 ................146 Ręczne ustawienie godziny ..........146 Ręczne włączanie odbioru sygnału czasu ....... 147 Wybór miejsca ustawienia .............148 Informacje o nadajniku sygnału czasu DCF77 ....... 149 Budzenie ....................150 Ustawianie czasu budzenia ........... 150 Budzenie ..................151 Budzik radiowy DCF CK 1701...
-
Page 136: Dane Techniczne
Pozostałe funkcje ................153 Czyszczenie ..................154 Usterka/środek zaradczy ..............154 Deklaracja zgodności ..............155 Utylizacja ....................156 Dane techniczne Model: Budzik radiowy DCF CK 1701 Bateria: 2x R03 (AAA) / 1,5 V Prąd znamionowy: < 50 mA Wymiary: 85 x 87 x 50 mm... -
Page 137: Użycie Zgodne Z Przeznaczeniem
‚ Dzieci nie mogą bawić się produktem. Budzik radiowy DCF CK 1701... - Page 138 ‚ Dzieci należy trzymać z dala od opakowania. Połknięcie grozi uduszeniem. NIEBEZPIECZEŃSTWO pożaru/obrażeń i/lub wybuchu ‚ Niebezpieczeństwo wybuchu w przypadku niewłaściwej wymiany baterii. Baterie należy wymieniać na baterie tego samego lub równowartościowego typu. Przestrzegać parametrów z „Dane techniczne”. Budzik radiowy DCF CK 1701...
- Page 139 (+/-). ‚ Nie przechowywać baterii w skrajnych warunkach, np. na grzejnikach lub w miejscach narażonych na bezpośrednie promieniowanie słoneczne. Podwyższone niebezpieczeństwo wycieku! ‚ W razie potrzeby wyczyścić styki urządzenia i baterii przed ich włożeniem. Budzik radiowy DCF CK 1701...
-
Page 140: Gwarancja
Firma Waagen-Schmitt GmbH gwarantuje przez 2 lata od daty zakupu bezpłatne usuwanie braków z tytułu błędów materiałowych lub produkcyjnych w drodze naprawy lub wymiany. W przypadku korzystania z gwarancji prosimy o podanie sprzedawcy artykułu wraz z dowodem zakupu (podając również powód reklamacji). Budzik radiowy DCF CK 1701... -
Page 141: W Skrócie
W skrócie 1 Przycisk SNOOZE/LIGHT do podświetlenia wyświetlacza i funkcja SNOOZE 2 Godzina 3 Symbol odbioru sygnału radiowego 4 Ustawione czasy budzenia AL1 i AL2 5 Symbole uruchomionej funkcji budzenia Budzik radiowy DCF CK 1701... - Page 142 6 Przełącznik wyboru ustawienia czasu budzenia AL1/AL2 i wskazanie czasu budzenia 7 Przycisk 12/24: ustawia 12- lub 24-godzinny format czasu 8 Przycisk DOWN: Zmniejszanie wartości Budzik radiowy DCF CK 1701...
- Page 143 ‚ Ręczne uruchamianie/ przerywanie odbioru wzorca czasu z nadajnika 13 Przycisk SET: ‚ Ręczne ustawianie czasu ‚ Zapisywanie dokonanych ustawień ‚ Aktywowanie/wyłączanie funkcji budzenia 14 Przełącznik SET: Wybór ustawianych wartości (czas: SETTIME lub czas budzenia: SETALM) Budzik radiowy DCF CK 1701...
-
Page 144: Uruchomienie
‚ Wymieniać zawsze wszystkie baterie. ‚ Stare baterie należy utylizować zgodnie z zasadami ochrony środowiska, patrz „Utylizacja”. Odbiór sygnału czasowego Po włożeniu baterii na wyświetlaczu pojawią się na chwilę wszystkie wskaźniki i wyemitowany zostanie sygnał dźwiękowy. Budzik radiowy DCF CK 1701... - Page 145 Gdy sygnał odbioru nie jest wystarczająco mocny, budzik po kilku minutach przerywa tryb odbioru, a symbol wieży radiowej gaśnie. Proces ten jest wznawiany w późniejszym czasie. Godziny mijają w takiej sytuacji normalnie dalej (od początkowej godziny „00:00”). Budzik radiowy DCF CK 1701...
-
Page 146: Lista Kontrolna W Przypadku Braku Wskazań Danych Na Wyświetlaczu
„Ręczne ustawienie godziny i daty”. Ręczne ustawienie godziny Jeżeli między dwoma naciśnięciami przycisku minie ok. 60 sekund, proces ustawiania zostanie automatycznie zakończony i trzeba będzie go powtórzyć. 1. Przełącznik SET przesunąć w położenie SET TIME. Budzik radiowy DCF CK 1701... -
Page 147: Ręczne Włączanie Odbioru Sygnału Czasu
− Przytrzymać naciśnięty przycisk UP, aż na wyświetlaczu pojawi się symbol sygnału radiowego. ‚ Jeśli odbiór sygnału nie zakończył się pomyślnie, symbol odbioru zgaśnie ponownie po kilku minutach, a na wyświetlaczu dalej pojawia się normalnie czas. Budzik radiowy DCF CK 1701... -
Page 148: Wybór Miejsca Ustawienia
że budzik będzie odbierał sygnały z innego nadajnika lub równocześnie z dwóch nadajników na zmianę. Nie jest to błąd urządzenia. W takim przypadku zmienić lokalizację budzika. ‚ Warunki pogodowe, np. silne burze, mogą powodować zakłócenia odbioru. Budzik radiowy DCF CK 1701... -
Page 149: Informacje O Nadajniku Sygnału Czasu Dcf77
Budzik włącza się kilkukrotnie w ciągu dnia i synchronizuje godzinę z sygnałem radiowym z nadajnika DCF77. W przypadku braku odbioru, np. podczas silnej burzy, urządzenie będzie działało precyzyjnie dalej i o najbliższej przewidzianej godzinie ponownie przełączy się automatycznie na odbiór. Budzik radiowy DCF CK 1701... -
Page 150: Budzenie
(zgodnie z wybranych czasem budzenia). 4. Żądaną godzinę budzenia można ustawić przyciskiem UP lub DOWN. Przez trzymanie wciśniętych przycisków UP lub DOWN można przyspieszyć zmianę wyświetlanych wartości rosnąco lub malejąco. 5. Wcisnąć przycisk SET. Miga wskaźnik minut. Budzik radiowy DCF CK 1701... -
Page 151: Budzenie
: Aktywny jest czas budzenia 1 − : Aktywny jest czas budzenia 2 − : Aktywny jest czas budzenia 1 i 2 Budzenie W ustalonym czasie rozlegnie się sygnał budzenia, zyskując na intensywności wraz z upływem czasu budzenia. Budzik radiowy DCF CK 1701... -
Page 152: Funkcja Automatycznego Wyłączania
SNOOZE) urządzenie włącza się ponownie i budzi na nowo. Proces ten można powtarzać wielokrotnie. Wyłączanie i włączanie funkcji budzenia 1. Przełącznik SET przesunąć w położenie LOCK. 2. Ponownie nacisnąć przycisk SET, aż nie będzie wyświetlał się symbol dzwonka: Funkcje budzenia są nieaktywne. Budzik radiowy DCF CK 1701... -
Page 153: Pozostałe Funkcje
„DST” (Daylight Saving Time). Przestawianie 12- i 24-godzinnego formatu wyświetlania czasu − Nacisnąć przycisk 12/24, aby przełączyć między 12- i 24-godzinnym formatem wyświetlania czasu. W przypadku 12-godzinnego formatu wyświetlania czasu godziny popołudniowe będą oznaczone „PM”. Budzik radiowy DCF CK 1701... -
Page 154: Czyszczenie
− W razie potrzeby produkt odkurzyć miękką, suchą szmatką lub przetrzeć lekko wilgotną szmatką. Usterka/środek zaradczy Brak odbioru sygnału DCF77. ‚ Sprawdzić wybraną lokalizację. ‚ Ewentualnie włączyć ręcznie tryb odbioru radiowego. ‚ Ustawić ręcznie godzinę. Budzik radiowy DCF CK 1701... -
Page 155: Deklaracja Zgodności
‚ Przesunąć odpowiednio przełącznik AL. Deklaracja zgodności Niniejszym firma Waagen-Schmitt GmbH oświadcza, że budzik radiowy CK 1701 jest zgodna z dyrektywą 2014/53/UE i 2011/65/UE. Pełny tekst deklaracji zgodności UE jest dostępny pod poniższym adresem internetowym: www.ade-germany.de/doc. Deklaracja zgodności traci swoją ważność w przypadku dokonania nieuzgodnionych z nami zmian w budziku. -
Page 156: Utylizacja
Utylizacja produktu Produkt należy utylizować zgodnie z przepisami obowiązującymi w danym kraju. Urządzeń nie wolno wyrzucać razem ze zwykłymi odpadami domowymi Po zakończeniu okresu użytkowania produkt należy przekazać do odpowiedniej utylizacji. Budzik radiowy DCF CK 1701... - Page 157 Baterii i akumulatorów nie wolno wyrzucać razem z odpadami domowymi Wszystkie baterie i akumulatory należy oddawać do punktu zbiórki w gminie, dzielnicy lub sklepie. W ten sposób baterie i akumulatory mogą trafić do ekologicznej utylizacji. Budzik radiowy DCF CK 1701...