Table des Matières
Publicité
Les langues disponibles
Les langues disponibles
Liens rapides
Publicité
Chapitres
Table des Matières

Manuels Connexes pour ADE CK 1714


Sommaire des Matières pour ADE CK 1714
- Page 1 DCF-Funkwecker DCF Radio-controlled alarm clock | Despertador radio controlado DCF | Réveil radio-piloté DCF | Radiosveglia DCF | Budzik radiowy DCF Bedienungsanleitung CK 1714 Operating instructions | Instrucciones de operación | Mode d‘emploi Istruzioni per l‘uso | Instrukcja obsługi...
- Page 2 Liebe Kundin, lieber Kunde ! Sie haben sich für den Kauf eines qualitativ hochwertigen Produkts der Marke ADE entschieden, das intelligente Funktionen mit einem außergewöhnlichen Design vereint. Mit diesem Funkwecker haben Sie die Uhrzeit stets präzise im Blick. Die langjährige Erfahrung der Marke ADE stellt eine technisch hohen Standard und bewährte Qualität sicher.
-
Page 3: Über Diese Anleitung
Allgemeines Über diese Anleitung Diese Bedienungsanleitung be- schreibt den sicheren Umgang und die Pflege des Artikels. Bewahren Sie diese Bedienungsanleitung auf, falls Sie später etwas nachlesen möchten. Wenn Sie den Artikel an jemand anderen weitergeben, geben Sie auch diese Anleitung mit. - Page 4 Zeichenerklärung Dieses Symbol in Verbindung mit dem Wort GEFAHR warnt vor schweren Verletzungen. Dieses Symbol in Verbindung mit dem Wort WARNUNG warnt vor Verletzungen mittleren und leich- ten Grades. Dieses Symbol in Verbindung mit dem Wort HINWEIS warnt vor Sachschäden. Dieses Symbol kennzeichnet zusätzliche Informationen und allgemeine Hinweise.
-
Page 5: Table Des Matières
Inhaltsverzeichnis Allgemeines ............3 Bestimmungsgemäßer Gebrauch ....6 Sicherheit ............... 6 Auf einen Blick ...........10 Lieferumfang ............12 Inbetriebnahme ..........12 Zeitsignal empfangen ........13 Über den Zeitzeichensender DCF77..20 Wecken..............21 Sonstige Funktionen ........23 Reinigen ..............25 Störung und Abhilfe ........26 Technische Daten ..........27 Konformitätserklärung ........28 Garantie ..............29 Entsorgen .............29... -
Page 6: Bestimmungsgemäßer Gebrauch
Bestimmungsgemäßer Gebrauch Dieser Funkwecker empfängt sein Zeitzeichen vom deutschen Zeitzeichensender DCF77. Der Wecker ist ausschließlich für den Privatgebrauch in trockenen Innenräumen konzipiert. Sicherheit ‚ Dieser Artikel kann von Kindern ab 8 Jahren und darüber sowie von Personen mit verringerten physischen, sensorischen oder mentalen Fähigkeiten oder Mangel an Erfahrung und Wissen benutzt werden, wenn sie beaufsichtigt oder bezüglich des... - Page 7 ‚ Reinigung und Benutzerwartung dürfen nicht von Kindern vorgenommen werden, es sei denn, sie sind 8 Jahre oder älter und werden beaufsichtigt. ‚ Batterien können bei Verschlucken lebens- gefährlich sein. Artikel und Batterien für Kleinkinder unerreichbar aufbewahren. Falls Batterien verschluckt wurden, sofort medi- zinische Hilfe in Anspruch nehmen.
- Page 8 ‚ Batterien dürfen nicht geladen, mit anderen Mitteln reaktiviert, auseinander genommen, ins Feuer geworfen oder kurzgeschlossen werden. Ansonsten erhöhte Explosions- und Auslaufgefahr, außerdem können Gase entweichen! ‚ Kontakt der Batterieflüssigkeit mit Haut, Augen und Schleimhäuten vermeiden. Bei Kontakt betroffene Stellen sofort mit reichlich klarem Wasser ausspülen und umgehend Arzt aufsuchen.
- Page 9 ‚ Bein Einsetzen und Wechseln der Batterien auf die richtige Polarität (+/-) achten. ‚ Batterien keinen extremen Bedingungen aussetzen, indem diese z. B. auf Heizkörpern oder unter direkter Sonneneinstrahlung gelagert werden. Erhöhte Auslaufgefahr! ‚ Batterie- und Gerätekontakte bei Bedarf vor dem Einlegen reinigen. ‚...
-
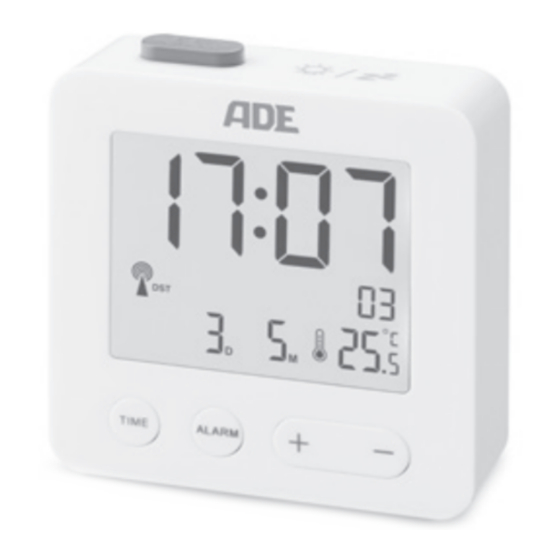
Page 10: Auf Einen Blick
Auf einen Blick... - Page 11 Wecktaste ALARM ON/OFF Sensorfeld für Beleuchtung/SNOOZE Uhrzeit Datum / Innentemperatur (°C oder °F) Taste +/– zum Einstellen von Werten Taste ALARM für Weckzeit-Eingabe Taste TIME für manuelle Zeiteinstellung Taste WAVE (Rückseite) Funksignal-Symbol Zeitzeichen-Sender 10 Batteriefach, 2x LR03/AAA (Rückseite) Ziehen Sie die Schutzfolie vom Display.
-
Page 12: Lieferumfang
Lieferumfang ‚ Funkwecker ‚ Batterien Typ LR03 (AAA), 1,5 V (2x) ‚ Bedienungsanleitung Inbetriebnahme Für den Gebrauch benötigen Sie zwei Batterien des Typs LR03 (AAA), 1,5 V. 1. Batteriefachdeckel nach oben abziehen. 2. Batterien so einlegen, wie auf dem Boden des Batteriefachs abgebildet. -
Page 13: Zeitsignal Empfangen
Hinweise zum Batterienwechsel: ‚ Nur den Batterietyp verwenden, der in den „Technischen Daten“ angegeben ist. ‚ Immer alle Batterien auswechseln. ‚ Alte Batterien umweltgerecht entsorgen, siehe „Entsorgen“. Zeitsignal empfangen Wenn die Batterien eingelegt sind, werden für einen kurzen Moment sämtliche Anzeigen im Display eingeblendet, das Display wird beleuch- tet und ein Piepton ertönt. - Page 14 Je mehr Funkwellen im Display an- gezeigt werden, desto besser ist der Empfang. Sobald das Zeitsignal in ausreichender Stärke empfangen wurde, wird im Display außerdem ‚ die Uhrzeit und ‚ das Datum angezeigt. Der Funkwecker schaltet ab sofort mehrmals in jeder Nacht automatisch auf Empfang.
-
Page 15: Checkliste Bei Fehlender Datenanzeige Im Display
(ausgehend von der Startzeit „00:00“) normal weiter. Checkliste bei fehlender Datenanzeige im Display Prüfen, ob der Standort des Funkweckers geeignet ist, siehe „Standort wählen“. Empfangsvorgang nochmals manuell starten, siehe „Funkempfang manuell starten“. Abwarten, bis der Wecker zu einem spä- teren Zeitpunkt automatisch wieder auf Empfang schaltet. -
Page 16: Uhrzeit Und Datum Manuell Einstellen
Uhrzeit und Datum manuell einstellen Wenn zwischen zwei Tastendrücken mehr als ca. 20 Sekunden liegen, wird der Einstellvorgang automa- tisch beendet. 1. Taste TIME gedrückt halten, bis im Display die Anzeige für das 12- oder 24-Stun- den-Uhrzeitformat blinkt. 2. Mit der Taste +/– gewünschtes Zeitformat („12H“... -
Page 17: Funkempfang Manuell Starten
5. Folgende Einstellungen nacheinander durchführen: − Zeitzone („00“ ist Standardeinstellung für das europäische Festland). − Stundenzeit − Minutenzeit 6. Abschließend TIME drücken, um Vorgang zu beenden. Funkempfang manuell starten Wird das nebenstehende Funksi- gnal-Symbol nicht mehr angezeigt, werden die Funksignale des Zeitzei- chen-Senders nicht mehr empfangen. -
Page 18: Standort Wählen
Beachten Sie: ‚ War der Empfang nicht erfolgreich, wird das Empfangs-Symbol nach einigen Minuten ausgeblendet und die Uhrzeit im Display läuft normal weiter. ‚ Bei erfolgreichem Empfang stellt sich der Funkwecker auf die Uhrzeit des Zeit- zeichen-Senders ein. Haben Sie bereits manuelle Zeit- und Datumseinstellungen vorgenommen, werden diese angepasst. - Page 19 ‚ Abstand zu Fernsehgeräten, Computern und Monitoren halten. Auch Basisstationen von schnurlosen Telefonen sollten sich nicht in unmittelbarer Nähe des Funkweckers befinden. ‚ Abhängig von Ihrem Standort kann es im seltenen Einzelfall vorkommen, dass der Wecker Signale von einem anderen Zeit- zeichen-Sender empfängt oder sogar ab- wechselnd von zwei Zeitzeichen-Sendern.
-
Page 20: Über Den Zeitzeichensender Dcf77
Über den Zeitzeichensender DCF77 Dieser Funkwecker erhält seine Funksignale vom Zeitzeichensender DCF77. Dieser strahlt auf seiner Langwellenfrequenz von 77,5 kHz die genaue und offizielle Uhrzeit der Bundesrepu- blik Deutschland aus. Der Sender steht in Main- flingen bei Frankfurt am Main und versorgt mit seiner Reichweite von bis zu 2000 km die mei- sten funkgesteuerten Uhren West-Europas mit den erforderlichen Funksignalen. -
Page 21: Wecken
Im Falle eines Nicht-Empfangs, z. B. bei einem starken Gewitter, läuft das Gerät präzise weiter und schaltet dann zur nächsten vorgesehenen Zeit wieder automatisch auf Empfang. Wecken Weckzeit einstellen 1. Taste ALARM gedrückt halten, bis im Display die Weckstunde blinkt und angezeigt wird. -
Page 22: Geweckt Werden
Geweckt werden Zur eingestellten Zeit werden Sie von einem Wecksignal geweckt, wobei das Signal mit zu- nehmender Weckdauer immer intensiver wird. Weckalarm für 24 Stunden unterbrechen − Beliebige Taste drücken (außer Sensorfeld oder Taste ALARM ON/OFF), um den Alarm zu unterbrechen. Nach 24 Stunden wird der Alarm erneut ausgelöst. -
Page 23: Weckfunktion Ein- Und Ausschalten
Nach ca. 5 Minuten schaltet sich das Gerät wie- der ein und weckt Sie erneut. Dieser Vorgang kann mehrfach wiederholt werden. Weckfunktion ein- und ausschalten − 1x ALARM ON/OFF drücken, um Weckfunk- tion auszuschalten, erlischt. Durch erneutes Drücken von ALARM ON/OFF ist die Weckfunktion wieder aktiv. -
Page 24: Zwischen Sommer- Und Winterzeit Umstellen
Zwischen Sommer- und Winterzeit umstellen Das Umstellen von Sommer- auf Winterzeit bzw. umgekehrt erfolgt bei gutem Zeitzeichen-Emp- fang automatisch. Ist die Sommerzeit aktiv, wird im Display „DST“ angezeigt. Funkwecker auf Auslieferzustand zurücksetzen Setzen Sie den Funkwecker auf seinen Aus- lieferzustand zurück, wenn im Display unge- wöhnliche bzw. -
Page 25: Reinigen
3. Weiter vorgehen, wie im Kapitel „Zeitsignal empfangen“ beschrieben. Reinigen Artikel nicht in Wasser oder andere Flüssigkeiten tauchen. Keine harten, kratzenden oder scheuernden Reini- gungsmittel verwenden. − Artikel bei Bedarf mit einem weichen, trockenen Tuch entstauben oder mit einem leicht angefeuchteten Tuch abwischen. -
Page 26: Störung Und Abhilfe
Störung und Abhilfe Keine Funktion. ‚ Batterien leer oder falsch herum eingelegt? Temperaturangabe erscheint zu hoch. ‚ Prüfen, ob der Funkwecker direkter Sonnen- strahlung ausgesetzt ist. Uhrzeit weicht genau um eine, zwei, drei etc. Stunden ab. ‚ Wahrscheinlich falsche Zeitzone eingestellt. -
Page 27: Technische Daten
Technische Daten Modell: DCF-Funkwecker CK 1714 Batterie: 2x LR03 (AAA), 1,5 V Bemessungsstrom: < 40 mA Messbereich: ca. -10 °C - 50 °C (ca. 14 °F - 122 °F) Abmessungen: ca. 68 x 66 x 21 mm Inverkehrbringer (keine Service-Adresse):... -
Page 28: Konformitätserklärung
Konformitätserklärung Hiermit erklärt die Waagen-Schmitt GmbH, dass der Funkwecker CK 1714 den Richtlinien 2014/53/EU und 2011/65/EU entspricht. Der vollständige Text der EU-Konformitätser- klärung ist unter der folgenden Internetadresse verfügbar: www.ade-germany.de/doc Die Erklärung verliert ihre Gültigkeit, falls an dem Artikel eine nicht mit uns abgestimmte Än- derung vorgenommen wurde. -
Page 29: Entsorgen
Behebung von Mängeln aufgrund Material- oder Fabrikationsfehlern durch Reparatur oder Austausch. Bitte geben Sie den Artikel im Ga- rantiefall mit dem Kaufbeleg (unter Angabe des Reklamationsgrundes) an Ihren Händler zurück. Entsorgen Verpackung entsorgen Entsorgen Sie die Verpackung sortenrein. Geben Sie Pappe und Karton zum Altpapier, Folien in die Wertstoff-Sammlung. - Page 30 Geräte dürfen nicht im normalen Hausmüll entsorgt werden. Am Ende seiner Lebensdauer ist der Artikel einer geordneten Entsorgung zuzuführen. Dabei werden im Gerät enthaltene Wertstoffe der Wiederverwertung zugeführt und die Belastung der Umwelt vermieden. Geben Sie das Altgerät an einer Sammelstelle für Elek- troschrott oder einem Wertstoffhof ab.
- Page 31 Batterien und Akkus gehören nicht in den Hausmüll Alle Batterien und Akkus müssen bei einer Sammelstelle der Gemeinde, des Stadtteils oder im Handel abgegeben werden. Dadurch können Batterien und Akkus einer umwelt- schonenden Entsorgung zugeführt werden.
- Page 32 With this radio- controlled alarm clock, you always have the exact time in view. The many years of experience of the brand ADE ensures a high technical standard and proven quality. We wish you easy timing at any time!
-
Page 33: General Information
General information About this manual This operating manual describes how to safely use and care for your products. Keep this operating manual in a safe place in case you would like to refer to it later. If you pass this item on to someone else, pass on this manual as well. -
Page 34: Explanation Of Symbols
Explanation of symbols This symbol, combined with the word DANGER, warns against serious injury. This symbol, combined with the word WARNING, warns against moderate and mild injuries. This symbol, combined with the word NOTE, warns against material damage. This symbol signifies additional information and general advice. - Page 35 Table of Contents General information ........33 Intended Use ............36 Safety ..............36 Overview ..............40 Scope of delivery..........42 Start-up ..............42 Receiving the time signal .......43 About the time signal transmitter DCF77 ..........50 Alarm ..............51 Other functions ..........53 Cleaning..............55 Fault and remedy ..........56 Technical Data ............57 Declaration of Conformity ......58 Guarantee ............59...
-
Page 36: Intended Use
Intended Use This radio-controlled alarm clock receives its time signal from the German time signal transmitter DCF77. The alarm clock is designed exclusively for private use in dry indoor areas. Safety ‚ This item can be used by children 8 years of age and above, as well as by persons with reduced physical, sensory, or mental capacities or lacking experience and... - Page 37 ‚ Cleaning and user maintenance must not be carried out by children, unless they are 8 years of age or older and are being supervised. ‚ Batteries, when swallowed, can be life- threatening. Keep the item and batteries out of reach of small children. If batteries have been swallowed, seek medical help immediately.
- Page 38 ‚ Batteries must not be recharged, reactivated by other means, dismantled, thrown into fire, or short-circuited. Otherwise there is an increased risk of explosion and leakage; furthermore, gases may escape! ‚ Avoid contact of the battery fluid with skin, eyes, and mucosa. In case of contact, rinse the affected areas right away with plenty of clean water and consult a doctor immediately.
- Page 39 ‚ When inserting and changing batteries, pay attention to the correct polarity (+/-). ‚ Do not expose batteries to extreme conditions, for example, by storing them on radiators or under direct sunlight. Increased risk of leakage! ‚ Clean the battery and device contacts, as needed, before inserting the battery.
-
Page 40: Overview
Overview... - Page 41 Alarm button ALARM ON/OFF Sensor field for lighting/SNOOZE Time Date/indoor temperature (°C or °F) Button +/– for setting values Button ALARM for setting alarm time Button TIME for setting time manually Button WAVE (back) Radio signal symbol of the time signal transmitter 10 Battery compartment, 2x LR03/AAA (back) Pull the protective film off the...
-
Page 42: Scope Of Delivery
Scope of delivery ‚ Radio-controlled alarm clock ‚ Battery type LR03 (AAA), 1.5 V (2x) ‚ Operating Manual Start-up For use, you will need two LR03 (AAA), 1.5V batteries. 1. Remove the battery compartment cover upwards. 2. Insert the batteries as shown on the bottom of the battery compartment. -
Page 43: Receiving The Time Signal
Notes on changing the battery: ‚ Only use the battery type specified in the “Technical Data”. ‚ Always replace all batteries. ‚ Dispose of old batteries in an environmentally friendly manner, see “Disposal”. Receiving the time signal When the batteries are inserted, all displays are shown for a brief moment, the display is illuminated and a beep is heard. - Page 44 The more radio waves shown on the display, the better is the reception. As soon as the time signal has been received in sufficient strength, the display also shows ‚ the time and ‚ the date. The radio-controlled alarm clock automatically switches to reception several times every night.
- Page 45 in time. In this case, the time proceeds as usual (beginning with the start time of “00:00”). Checklist when data is missing in the display Check whether the location of the radio- controlled alarm clock is suitable, see “Choosing a location”. Manually restart the receiving process, see “Starting signal reception manually”.
-
Page 46: Setting The Time And Date Manually
Setting the time and date manually If there is a delay of more than approx. 20 seconds between two pushes of a button, the setting process is automatically terminated. 1. Press and hold the TIME button until the indicator for the 12- and 24-hour time format blinks on the display. - Page 47 5. Perform the following settings one after the other: − Time zone ("00" is a standard setting for mainland Europe). − Hours − Minutes 6. Finally, press TIME to exit. Starting signal reception manually If the radio signal symbol to the left is no longer displayed, the radio signals from the time signal transmitter are no longer being received.
-
Page 48: Choosing A Location
Pay attention to the following: ‚ If the reception was not successful, the reception symbol fades out after a few minutes and the time on the display continues normally. ‚ Upon successful signal reception, the radio- controlled alarm clock adjusts itself to the time of the time signal transmitter. - Page 49 ‚ Maintain a distance from TV sets, computers and monitors. Base stations of cordless telephones should also not be in the immediate vicinity of the radio-controlled alarm clock. ‚ Depending on your location, it may occur in rare individual cases that the alarm clock receives signals from another time signal transmitter or even alternately from two time signal transmitters.
-
Page 50: About The Time Signal Transmitter Dcf77
About the time signal transmitter DCF77 This radio-controlled alarm clock receives its radio signals from the time signal transmitter DCF77. This broadcasts the precise and official time of the Federal Republic of Germany on the long-wave frequency of 77.5 kHz. The transmitter is located in Mainflingen near Frankfurt am Main and, with its range of up to 2000 km, supplies the majority of radio-controlled clocks in western Europe... -
Page 51: Alarm
In the event the signal is not received, e.g. during a strong storm, the device continues to run precisely and then switches to receiving mode again at the next scheduled time. Alarm Setting the alarm time 1. Press and hold the ALARM button until the alarm hour flashes in the display and “... -
Page 52: Being Awakened
Being awakened At the set time you will be woken by an alarm signal, which will become more intense as the waking time increases. Interrupting the alarm for 24 hours − Press any button (except for the sensor field or ALARM ON/OFF) to interrupt the alarm. -
Page 53: Switching The Alarm Function On/Off
After 5 minutes, the device switches on again and wakes you up again. This procedure can be repeated multiple times. Switching the alarm function on/off − Press ALARM ON/OFF 1x to switch off the alarm function, goes out. Pressing ALARM ON/OFF again reactivates the alarm function. -
Page 54: Switching Between Summer And Winter Time
Switching between summer and winter time Switching between summer and winter time, or vice versa, takes place automatically with good time signal reception. When daylight saving time is active, “DST” is displayed. Resetting the radio-controlled alarm clock to factory setting Reset the radio-controlled alarm clock to its factory setting if the display shows unusual or obviously incorrect values. -
Page 55: Cleaning
Cleaning Do not immerse the item in water or other liquids. Do not use rough, scratching or abrasive cleaning agents. − If necessary, dust the item with a soft, dry cloth or wipe it with a slightly moistened cloth. -
Page 56: Fault And Remedy
Fault and remedy No function. ‚ Are the batteries empty or have they been inserted incorrectly? Temperature indication appears too high. ‚ Check whether the radio-controlled alarm clock is exposed to direct sunlight. The time differs by exactly one, two, three, etc. -
Page 57: Technical Data
Technical Data Model: DCF Radio-controlled alarm clock CK 1714 Battery: 2x LR03 (AAA), 1.5 V Rated current: < 40 mA Measuring range: approx. -10 °C - 50 °C (approx. 14 °F - 122 °F) Dimensions: approx. 68 x 66 x 21 mm... -
Page 58: Declaration Of Conformity
Declaration of Conformity Waagen-Schmitt GmbH hereby declares that CK 1714 is in radio-controlled alarm clock compliance with EU directives 2014/53/EU and 2011/65/EU. The full text of the EU declaration of conformity is available at the following internet address: www.ade-germany.de/doc This declaration loses its validity if modifications are made to the product without our approval. -
Page 59: Guarantee
Guarantee The company Waagen-Schmitt GmbH guarantees for 2 years from the purchase date the cost-free rectification of defects on the basis of material or fabrication errors through repair or exchange. In the event of a guarantee claim, please return the product with the proof of purchase (stipulating the reason for claim) to your dealer. -
Page 60: Disposing Of The Product
Disposing of the product Dispose of the product in accordance with the regulations that apply in your country. Devices must not be disposed of in normal household waste. At the end of its life, the product must be disposed of in an appropriate way. In this way, valuable materials contained in the device will be recycled and the burden on the environment avoided. - Page 61 Recyclable and disposable batteries do not belong in household waste All batteries must be handed in at a collection point in your community, suburb, or at the retailer. Such batteries can thus be disposed of in an environmentally friendly way.
- Page 62 ¡Estimada/o cliente! Se ha decidido por la compra de un producto de gran calidad de la marca ADE, que aúna unas funciones inteligentes con un diseño extraordinario. Con este despertador radio controlado siempre tendrá a la vista la hora exacta. La larga experiencia de la marca ADE le asegura unos elevados estándares técnicos y es...
-
Page 63: Información General
Información general Acerca de estas instrucciones Este manual de instrucciones describe el manejo seguro y el cuidado del artículo. Conserve este manual de instrucciones por si necesita volver a consultarlas. Si le entrega el artículo a otra persona, acompáñelo también de estas instrucciones. -
Page 64: Explicación De Símbolos
Explicación de símbolos Este símbolo unido a la palabra PELIGRO advierte de heridas graves. Este símbolo unido a la palabra ADVERTENCIA advierte de heridas de grado medio o leve. Este símbolo unido a la palabra INDICACIÓN advierte de daños materiales. Este símbolo significa información adicional e indicaciones generales. - Page 65 Índice Información general ........63 Uso adecuado.............66 Seguridad .............66 De un vistazo .............70 Artículos incluidos en la entrega ....72 Puesta en funcionamiento ......72 Recepción de señal horaria ......73 Acerca del emisor de señal horaria DCF77 .............80 Despertador ............81 Otras funciones ..........83 Limpieza ...............85 Problemas y soluciones ........86 Datos técnicos ............87...
-
Page 66: Uso Adecuado
Uso adecuado Este despertador radio controlado recibe la señal horaria de la emisora de señal horaria alemana DCF77. El despertador está concebido exclusivamente para el uso particular en un espacio interior seco. Seguridad ‚ Este artículo puede ser utilizado por niños mayores de 8 años y por personas con discapacidad física, sensorial o mental o con falta de experiencia o conocimientos,... - Page 67 ‚ La limpieza y el mantenimiento por parte del usuario no deben ser realizados por niños, salvo que sean mayores de 8 años y estén supervisados. ‚ Las pilas pueden suponer un peligro de muerte si se ingieren. Mantenga el artículo y las pilas fuera del alcance de los niños.
- Page 68 ‚ Las pilas no deben cargarse, reactivarse con otros medios, desmontarse, arrojarse al fuego o ponerse en cortocircuito. En caso contrario existe un riesgo mayor de explosión o derrame y además pueden producirse gases. ‚ Evite el contacto del líquido de las pilas con la piel, ojos y mucosas.
- Page 69 ‚ Cuando coloque y cambie las pilas, preste atención a la polaridad correcta (+/-). ‚ No someta las pilas a condiciones extremas, por ejemplo no las coloque sobre superficies calientes ni a la luz directa del sol. ¡Riesgo elevado de derrame! ‚...
-
Page 70: De Un Vistazo
De un vistazo... - Page 71 Botón de despertador ALARM ON/OFF Campo de sensor para iluminación/SNOOZE Hora Fecha/temperatura interior (°C o °F) Botón +/– para ajustar los valores Botón ALARM para introducir la hora de la alarma Botón TIME para ajustar la hora de forma manual Botón WAVE (parte posterior) Símbolo de señal de la emisora de señal horaria...
-
Page 72: Artículos Incluidos En La Entrega
Artículos incluidos en la entrega ‚ Despertador radio controlado ‚ Pilas tipo LR03 (AAA), 1,5 V (2x) ‚ Manual de instrucciones Puesta en funcionamiento Para utilizar el despertador son necesarias dos pilas del tipo LR03 (AAA), 1,5 V. 1. Deslice la tapa de las pilas hacia arriba para extraerla. -
Page 73: Recepción De Señal Horaria
En cuanto se ponen las pilas, el despertador se conecta como receptor; consulte el capítulo siguiente. Indicaciones para la sustitución de las pilas: ‚ Utilice únicamente el tipo de pilas especificado en los "Datos técnicos". ‚ Cambie siempre todas las pilas. ‚... - Page 74 Cuantas más ondas se muestren en la pantalla, mejor es la recepción. En cuanto la señal horaria se recibe con la intensidad suficiente, se muestran también en la pantalla ‚ la hora y ‚ la fecha. El despertador se conecta varias veces para la recepción todas las noches.
- Page 75 Lista de comprobación en caso de fallo en la indicación de datos en la pantalla Compruebe si el lugar de ubicación del despertador es adecuado, consulte "Seleccionar ubicación". Reinicie manualmente el proceso de recepción, consulte "Iniciar manualmente el proceso de recepción". Espere hasta que el despertador vuelva a conectarse automáticamente para la recepción en un momento posterior.
- Page 76 Ajuste manual de hora y fecha Cuando pasan más de 20 segundos entre una pulsación de botón y otra, el proceso de ajuste finaliza automáticamente. 1. Mantenga pulsado el botón TIME hasta que en la pantalla parpadee la indicación para el formato de 12 o 24 horas.
- Page 77 5. Realice los siguientes ajustes, uno tras otro: − Zona horaria ("00" es la configuración estándar para la Europa continental). − Horas − Minutos 6. Pulse finalmente TIME para finalizar el proceso. Iniciar manualmente la recepción de la señal Si el símbolo lateral de señal radio desaparece, es que ha dejado de recibirse la señal radio del emisor de señal horaria.
-
Page 78: Elegir Ubicación
Tenga en cuenta que: ‚ Si no se consigue la recepción, el símbolo de recepción desaparece pasados unos minutos y la hora en la pantalla sigue visualizándose normalmente. ‚ Si se consigue la recepción, el radio- despertador se ajusta a la hora recibida del emisor de señal horaria. - Page 79 ‚ Póngalo separado de aparatos de televisión, ordenadores y monitores. Tampoco deben colocarse bases de teléfonos inalámbricos en las proximidades del despertador radio controlado. ‚ Dependiendo de la ubicación, puede ocurrir en casos aislados que el despertador reciba señales de otros emisores de señal horaria o incluso de dos emisores de forma alternativa.
-
Page 80: Acerca Del Emisor De Señal Horaria Dcf77
Acerca del emisor de señal horaria DCF77 Este despertador radio controlado recibe una señal radio de la emisora de señal horaria DCF77. Esta emite la hora oficial de la República Federal de Alemania en onda larga con una frecuencia de 77,5 kHz. La emisora está en Mainflingen, junto a Frankfurt am Main y, con un alcance de 2.000 km, hace llegar las señales de radio a la mayoría de los relojes radio controlados de... -
Page 81: Despertador
En caso de no recibirse la señal, por ejemplo por una tormenta intensa, el aparato sigue funcionando con precisión y se vuelve a conectar nuevamente en la siguiente hora prevista. Despertador Ajustar hora de alarma 1. Mantenga pulsado el botón ALARM hasta que parpadee en pantalla la hora y se visualice el indicador 2. - Page 82 Despertarse A la hora establecida, le despertará un sonido de despertador que irá aumentando en volumen gradualmente. Interrumpir el despertador 24 horas − Presione la tecla que desee (excepto el campo de sensor o el botón ALARM ON/OFF) para interrumpir la alarma. Pasadas 24 horas, la alarma sonará...
-
Page 83: Conectar Y Desconectar La Función Despertador
Después de 5 minutos, vuelve a conectarse el aparato y suena de nuevo el despertador. Este proceso puede repetirse varias veces. Conectar y desconectar la función despertador − Pulse una vez el botón ALARM ON/OFF para desactivar la función despertador, desaparece. - Page 84 Cambiar de hora de verano a hora de invierno El cambio de hora de verano a hora de invierno y viceversa se realizan automáticamente si hay una buena recepción de la señal horaria. Si está activada la hora de verano, en la pantalla aparecerá...
-
Page 85: Limpieza
Limpieza No sumerja el artículo en agua ni en otro líquido. No utilice productos de limpieza duros, que puedan rayar o que haya que frotar. − En caso necesario, quite el polvo al artículo con un paño suave seco o límpielo con un paño ligeramente húmedo. -
Page 86: Problemas Y Soluciones
Problemas y soluciones Sin función. ‚ ¿Se ha gastado la pila o está mal colocada? La indicación de temperatura aparenta ser excesivamente alta. ‚ Compruebe si el sensor inalámbrico está colocado directamente a la luz del sol. La hora es diferente exactamente en una, dos o tres horas. -
Page 87: Datos Técnicos
Datos técnicos Modelo: Despertador radio controlado DCF CK 1714 Pilas: 2 x LR03 (AAA)/1,5 V Intensidad de corriente: < 40 mA Rango de medida: -10 °C - 50 °C (14 °F - 122 °F) Dimensiones: 68 x 66 x 21 mm Distribuidor original (no hay dirección de... -
Page 88: Declaración De Conformidad
Declaración de conformidad Por la presente, Waagen-Schmitt GmbH declara cumple despertador radio controlado CK 1714 con la directiva 2014/53/EU y 2011/65/EU. Se encuentra disponible el texto completo de la declaración de conformidad de la UE en la siguiente dirección de Internet:... -
Page 89: Garantía
Garantía La empresa Waagen-Schmitt GmbH garantiza durante 2 años a partir de la fecha de compra, la eliminación de los defectos debidos a fallos de material o fabricación, mediante reparación o cambio del equipo. En caso de solicitar la aplicación de la garantía, lleve el artículo a su distribuidor con el justificante de compra (explicando el motivo de la reclamación). - Page 90 Eliminación del artículo Elimine el artículo conforme a la normativa correspondiente aplicable en su país. Los aparatos no deben eliminarse con la basura doméstica normal. El artículo debe ser eliminado de forma adecuada al final de su vida útil. Para ello se deben reciclar las piezas del aparato y así...
- Page 91 Las pilas y baterías no son residuos domésticos Todas las pilas y baterías deben depositarse en los puntos de recogida del ayuntamiento, distrito o en los comercios. De este modo puede realizarse la eliminación de pilas y baterías de una forma respetuosa con el medio ambiente.
- Page 92 Chère cliente, cher client ! Nous sommes ravis que vous ayez choisi un appareil de haute qualité de la marque ADE, qui allie des fonctions intelligentes à un design exceptionnel. Grâce à ce réveil radio-piloté, la ponctualité ne vous fera jamais défaut. Les années d'expérience de la marque ADE garantissent une haute technicité...
-
Page 93: Généralités
Généralités À propos de ce mode d'emploi Ce mode d'emploi décrit l'utilisation conforme ainsi que les procédures d'entretien de l'article. Conservez ce manuel pour toute référence ultérieure. Si vous cédez l’article à une tierce personne, transmettez-lui également ce mode d’emploi. Le non-respect de ce mode d'emploi peut entraîner des blessures ou endommager l'article. - Page 94 Légende Ce symbole, associé au mot DANGER, prévient de blessures graves. Ce symbole, associé au mot ATTENTION, prévient de blessures moyennes et légères. Ce symbole, associé au mot AVERTISSEMENT, prévient de dommages matériels. Ce symbole désigne des informations supplémentaires ainsi que des indications d'ordre général.
- Page 95 Table des matières Généralités ............93 Utilisation conforme ........96 Sécurité ..............96 Aperçu ..............100 Contenu de l’emballage ......102 Mise en marche ..........102 Réception du signal horaire ....... 103 Par l’émetteur de signal horaire DCF77 ..110 Réveil ..............111 Autres fonctions ..........113 Nettoyage ............115 Dysfonctionnement et solution ....116 Caractéristiques techniques .......117...
-
Page 96: Utilisation Conforme
Utilisation conforme Ce réveil radio-piloté reçoit son signal de l’émetteur horaire DCF77. Réservé à un usage privé, en intérieur et dans un milieu sec. Sécurité ‚ Cet article peut être utilisé par des enfants dès l’âge de 8 ans ainsi que par des personnes aux capacités physiques, sensorielles ou mentales limitées ou de peu d’expérience et de connaissances si ceux-ci... -
Page 97: Danger D'incendie/Brûlure Et/Ou D'explosion
‚ Le nettoyage et l’entretien ne doivent pas être réalisés par des enfants, à moins qu’ils aient 8 ans révolus et soient sous surveillance. ‚ Les piles peuvent être dangereuses pour la santé en cas d’ingestion. Placez l’appareil et ses piles hors de portée des petits enfants. En cas d’ingestion des piles, consultez immédiatement un médecin. - Page 98 ‚ Les piles ne doivent pas être chargées, réactivées avec d’autres moyens, démontées, jetées au feu ou court- circuitées. Autrement, le risque d’explosion ou de fuite augmente, par ailleurs des gaz peuvent s’échapper ! ‚ Éviter le contact du liquide de la pile avec la peau, les yeux et les muqueuses.
- Page 99 ‚ Respectez la polarité (+/-) lors du changement des piles. ‚ Évitez de soumettre les piles à des conditions extrêmes, par ex. en les posant sur un objet chaud ou à la lumière directe du soleil. Risque accru de fuite pour les piles ! ‚...
-
Page 100: Aperçu
Aperçu... - Page 101 Bouton ALARM ON/OFF Capteur de luminosité/SNOOZE Heure Date/température intérieure (°C ou °F) Bouton +/– pour choisir les valeurs Bouton ALARM pour choisir l’heure du réveil Bouton TIME pour régler l’heure manuellement Bouton WAVE (à l’arrière) Symbole de réception du signal horaire. Compartiment à...
-
Page 102: Contenu De L'emballage
Contenu de l’emballage ‚ Réveil radio-piloté ‚ Piles de type LR03 (AAA), 1,5 V (x 2) ‚ Mode d’emploi Mise en marche Le réveil fonctionne à l’aide de deux piles LR03 (AAA), 1,5 V. 1. Retirer le couvercle du compartiment batterie par le haut. 2. -
Page 103: Réception Du Signal Horaire
Indications pour remplacer les piles : ‚ Utiliser seulement le type de pile indiqué dans les « Caractéristiques techniques ». ‚ Remplacez toujours toutes les piles en même temps. ‚ Mettre les anciennes piles au rebut en respectant l‘environnement, voir « Mise au rebut ». Réception du signal horaire Dès que les piles sont insérées, toutes les informations s’affichent en même temps sur... - Page 104 Plus il y a d'ondes radio affichées à l'écran, plus la réception est bonne. Lorsque le signal horaire est assez puissant, s’affichent également ‚ l’heure ‚ la date. Dès lors, le réveil passe automatiquement en mode réception plusieurs fois par nuit. Ainsi l'heure indiquée est comparée à...
- Page 105 Liste de contrôle en cas de données erronées affichées à l’écran Assurez-vous que l’emplacement du réveil est approprié. (Voir « Choisir un emplacement ».) Réactiver manuellement la réception du signal. (Voir « Activer manuellement la réception du signal ».) Attendre que le réveil repasse automatiquement en mode réception à...
-
Page 106: Régler L'heure Et La Date Manuellement
Régler l’heure et la date manuellement S’il y a un délai de plus de 20 sec. entre deux pressions sur les boutons, le paramétrage est automatiquement interrompu. 1. Maintenez le bouton TIME appuyé jusqu’à ce que l’affichage multiformat de l’heure clignote. 2. -
Page 107: Activer Manuellement La Réception Du Signal
5. Effectuer les réglages suivants l’un après l’autre : − Fuseau horaire. (« 00 » est la valeur stan- dard pour l’Europe continentale.) − Heure − Minute 6. Appuyer sur TIME pour terminer les réglages. Activer manuellement la réception du signal Si le symbole signal radio ci-contre ne s’affiche plus, les signaux radio de l’émetteur de signal horaire ne sont... -
Page 108: Choisir L'emplacement
Notez : ‚ S’il n’y a pas de réception, le symbole réception disparaît après quelques minutes et l’heure continue de s’afficher normalement à l’écran. ‚ S’il y a réception, le radioréveil se règle sur l’heure de l’émetteur de signal horaire. Si vous avez déjà défini manuellement l’heure et la date, celles-ci s’ajustent automatiquement. - Page 109 ‚ Placer le réveil à l’écart des téléviseurs, des ordinateurs et des moniteurs. Les stations de base des téléphones sans fil devraient également être tenu à distance du réveil. ‚ Selon votre situation géographique, il peut arriver que votre réveil reçoive le signal d’un autre émetteur horaire, voire qu’il capte alternativement les signaux de deux émetteurs.
-
Page 110: Par L'émetteur De Signal Horaire Dcf77
Par l’émetteur de signal horaire DCF77 Ce réveil radio-piloté reçoit le signal de l’émetteur DCF77. Celui-ci émet sur une fréquence à ondes longues de 77,5 kHz ; son heure est l’heure officielle en vigueur dans la République fédérale d’Allemagne. L’émetteur de signal horaire est situé à Mainflingen, près de Francfort-sur-le-Main, et alimente la plupart des horloges radio d’Europe de l’Ouest ;... - Page 111 tourner puis se remet automatiquement en mode de réception à l’heure suivante programmée. Réveil Régler l'heure de réveil 1. Maintenir la touche ALARM appuyée jusqu’à ce que l’heure de l’alarme clignote à l’écran et que « » s’affiche. 2. Définir l’heure de l’alarme à l’aide des boutons + et –.
-
Page 112: Être Réveillé
Être réveillé À l'heure programmée, vous êtes réveillé par une sonnerie, le signal s’amplifiant avec le temps. Désactiver l’alarme pendant 24 heures − Appuyez sur n’importe quel bouton (sauf le capteur et le bouton ALARM ON/OFF) pour arrêter l’alarme. Après 24 heures, la sonnerie est de nouveau déclenchée. -
Page 113: Allumer/Éteindre La Fonction Réveil
Après 5 minutes, l’appareil se rallume et le réveil se redéclenche. Ce processus peut être répété plusieurs fois. Allumer/éteindre la fonction réveil − Appuyer une fois sur le bouton ALARM ON/ OFF pour désactiver la fonction réveil. Le symbole disparaît. Réactiver la fonction réveil en appuyant de nouveau sur ALARM ON/OFF. -
Page 114: Revenir Aux Paramètres D'usine
Passage de l’heure d’été à l’heure d’hiver et vice versa Le passage de l’heure d’été à l’heure d’hiver et vice versa s’effectue automatiquement si la réception est bonne. Si l’heure d’été est activée, le symbole « DST » s’affiche à l’écran. Revenir aux paramètres d’usine Revenir aux paramètres par défaut du réveil lorsque l’écran indique des données... -
Page 115: Nettoyage
Nettoyage Ne pas immerger l’appareil dans l’eau ou dans tout autre liquide. Ne pas utiliser de produit de nettoyage dur, grattant ou abrasif. − Au besoin, dépoussiérer l’appareil à l’aide d’un chiffon doux et sec ou l’essuyer avec un chiffon légèrement humide. -
Page 116: Dysfonctionnement Et Solution
Dysfonctionnement et solution Aucune fonction. ‚ Piles déchargées ou insérées à l’envers ? La température indiquée est trop élevée. ‚ Vérifier si l’appareil est exposé à la lumière directe du soleil. L’heure diffère exactement d’une, deux, trois etc. heures. ‚ Le fuseau horaire semble incorrect. -
Page 117: Caractéristiques Techniques
Caractéristiques techniques Modèle : Réveil radio-piloté CK 1714 à signal DCF Piles : 2x LR03 (AAA), 1,5 V Intensité nominale : < 40 mA Plage de mesure : env. -10 °C à 50 °C (env. 14 °F à 122 °F) Dimensions : env. 68 x 66 x 21 mm Distributeur (aucune adresse de service) :... -
Page 118: Déclaration De Conformité
Déclaration de conformité Waagen-Schmitt GmbH déclare que le réveil CK 1714 est conforme aux directives radio-piloté 2014/53/UE et 2011/65/UE. Le texte intégral de la déclaration de conformité UE est disponible à l’adresse Internet ci-dessous : www.ade-germany.de/doc La déclaration perd sa validité dans le cas où la balance subirait une modification n’ayant pas... -
Page 119: Garantie
Garantie La société Waagen-Schmitt GmbH garantit la prise en charge gratuite de défauts matériels ou de fabrication pendant 2 ans à partir de la date d’achat, par une réparation ou un remplacement. Dans le cas où vous souhaitez faire usage de cette garantie, veuillez remettre l'article ainsi que la preuve d'achat (en indiquant les raisons de votre réclamation) à... - Page 120 Mise au rebut de l'article Veuillez éliminer l'article selon les prescriptions en vigueur dans votre pays en matière de traitement des déchets. Les appareils électriques ne doivent pas être éliminés avec les déchets ménagers classiques. À la fin de sa durée de vie, l'article doit être soumis à...
- Page 121 Les piles et batteries ne doivent pas être éliminées avec les déchets ménagers. Toutes les piles et batteries doivent être déposées dans un point de collecte de votre localité ou rapportées à leur point d’achat. Les piles et batteries seront ainsi traitées dans le respect de l'environnement.
- Page 122 Gentile cliente, La ringraziamo per aver scelto un prodotto di alta qualità della ADE che unisce funzioni intelligenti e un design fuori dal comune. Questa radiosveglia permette di vedere l'orario in modo preciso. La lunga esperienza della ADE garantisce standard tecnici elevati e qualità...
-
Page 123: Informazioni Generali
Informazioni generali Informazioni sulle presenti istruzioni per l'uso Queste istruzioni per l'uso descrivono l'utilizzo sicuro e la cura del prodotto. Conservarle per eventuali consultazioni future. In caso di cessione del prodotto a terzi, consegnare anche le presenti istruzioni per l'uso. La mancata osservanza delle istruzioni per l'uso può... -
Page 124: Descrizione Dei Simboli
Descrizione dei simboli Questo simbolo accompagnato dalla parola PERICOLO mette in guardia contro il rischio di gravi lesioni. Questo simbolo accompagnato dalla parola AVVERTENZA indica il rischio di lesioni di lieve o media entità. Questo simbolo accompagnato dalla parola ATTENZIONE indica il rischio di danni alle cose. - Page 125 Indice dei contenuti Informazioni generali ........123 Destinazione d'uso ........126 Sicurezza ............126 Descrizione ............130 Ambito della fornitura........132 Messa in funzione ...........132 Ricezione del segnale orario .......133 Informazioni sul trasmettitore di segnale orario DCF77 ......140 Sveglia ..............141 Altre funzioni ...........
-
Page 126: Destinazione D'uso
Destinazione d'uso Questa radiosveglia riceve il segnale orario dal trasmettitore di segnale orario tedesco DCF77. La sveglia è progettata esclusivamente per uso privato in ambienti interni asciutti. Sicurezza ‚ Il dispositivo può essere utilizzato da bambini con un età superiore a 8 anni e da persone che hanno capacità... - Page 127 ‚ I bambini possono eseguire le operazioni di pulizia e manutenzione solo se di età superiore agli 8 anni e sotto la supervisione di una persona adulta. ‚ L'ingestione delle batterie può costituire un pericolo mortale. Tenere articolo e batterie fuori dalla portata dei bambini piccoli.
- Page 128 ‚ Le batterie non devono essere ricaricate, riattivate con altri mezzi, smontate, buttate nel fuoco o messe in cortocircuito. Altrimenti, sussiste un forte rischio di esplosione o perdita e potrebbero svilupparsi vapori tossici! ‚ Evitare il contatto del liquido delle batterie con la pelle, gli occhi e le mucose.
- Page 129 ‚ Durante l'inserimento e la sostituzione delle batterie, prestare attenzione alla corretta polarità (+/-). ‚ Non sottoporre le batterie a temperature estreme, ad esempio conservandole vicino a termosifoni o alla luce diretta del sole. Serio rischio di fuoriuscita di liquido! ‚ Se necessario, pulire i contatti del dispositivo e le batterie prima di inserirle.
-
Page 130: Descrizione
Descrizione... - Page 131 Tasto sveglia ALARM ON/OFF Campo sensore per illuminazione/SNOOZE Orario Data/Temperatura interna (°C o °F) Tasto +/– per impostare i valori Tasto ALARM per immissione orario sveglia Tasto TIME per impostazione dell'orario manuale Tasto WAVE (lato posteriore) Icona segnale radio Trasmettitore segnale orario 10 Vano batterie, 2x LR03/AAA (lato posteriore) Rimuovere la pellicola protettiva...
-
Page 132: Ambito Della Fornitura
Ambito della fornitura ‚ Radiosveglia ‚ 2 batterie di tipo LR03 (AAA) da 1,5 V ‚ Istruzioni per l'uso Messa in funzione Per il funzionamento sono necessarie due batterie del tipo LR03 (AAA), 1,5 V. 1. Sollevare il coperchio del vano batterie. 2. -
Page 133: Ricezione Del Segnale Orario
Indicazioni sulla sostituzione delle batterie: ‚ Utilizzare solo il tipo di batterie indicato nei “Dati tecnici”. ‚ Sostituire sempre tutte le batterie. ‚ Provvedere allo smaltimento corretto delle batterie, vedi “Smaltimento”. Ricezione del segnale orario Quando le batterie sono inserite, tutte le indicazioni sul display vengono visualizzate per un istante, il display si illumina e si sente un bip. - Page 134 quante più onde radio appaiono sul display, tanto più forte sarà il segnale radio. Quando la ricezione del segnale orario è sufficientemente forte, sullo schermo compariranno ‚ l'orario e ‚ la data. La radiosveglia si accende più volte automaticamente ogni notte per la ricezione. L'ora visualizzata sarà...
-
Page 135: Lista Di Controllo Con Indicazione Dei Dati Sul Display
Lista di controllo con indicazione dei dati sul display Dapprima, controllare che la sveglia sia collocata in una posizione adeguata, si veda la sezione "Scelta della posizione". Quindi, sarà possibile avviare di nuovo il processo di ricezione manualmente, consultare in proposito la sezione "Avvio manuale della ricezione del segnale". -
Page 136: Impostazione Manuale Di Ora E Data
Impostazione manuale di ora e data Se si premono entrambi i tasti per più di 20 secondi, la procedura di impostazione termina automaticamente. 1. Tenere premuto il tasto TIME, fino a quando sul display non lampeggia l'indicazione del formato orario 12 o 24 ore. 2. -
Page 137: Avvio Manuale Della Ricezione Radio
5. Eseguire le impostazioni seguenti: − Fuso orario ("00" è l'impostazione stan- dard per il continente europeo). − − Minuti 6. Infine premere TIME, per terminare la procedura. Avvio manuale della ricezione radio Se il simbolo del segnale radio non appare nella parte sinistra dello schermo, vuol dire che il dispositivo non è... -
Page 138: Scelta Della Posizione
Osservare: ‚ Se la ricezione non è andata a buon fine, il simbolo della ricezione radio scompare dopo alcuni minuti, ma l'orario continua ad essere correttamente indicato sullo schermo. ‚ Se la ricezione del segnale va a buon fine, la sveglia si regola sull'ora ricevuta dal trasmettitore del segnale orario. - Page 139 ‚ Tenere lontano da televisori, computer e monitor. Inoltre, anche le stazioni base dei telefoni cordless non dovrebbero essere collocate nelle immediate vicinanze della sveglia. ‚ A seconda della posizione è possibile che in casi individuali la sveglia riceva i segnali da un altro trasmettitore del segnale orario o anche alternativamente da due trasmettitori del segnale orario.
-
Page 140: Informazioni Sul Trasmettitore Di Segnale Orario Dcf77
Informazioni sul trasmettitore di segnale orario DCF77 Questa radiosveglia riceve il suo segnale radio dal trasmettitore di segnale orario DCF77. Che trasmette l'ora esatta e ufficiale dalla Germania sulla frequenza a onde lunghe 77,5 kHz. Il trasmettitore è situato a Mainflingen, nei pressi di Francoforte sul Meno, e il suo segnale raggiunge orologi radiocontrollati in un raggio di fino a 2.000 km nell'Europa occidentale. -
Page 141: Sveglia
In caso di mancata ricezione, ad esempio durante un forte temporale, il dispositivo continuerà a funzionare normalmente ed accederò alla modalità di ricezione alla prossima ora impostata. Sveglia Impostazione della sveglia 1. Tenere premuto il tasto ALARM, fino a quando sul display non lampeggia l'ora della sveglia e appare "... - Page 142 Risveglio All'ora impostata, l'unità emetterà un segnale di sveglia la cui intensità aumenterà con la durata della sveglia. Interruzione della radiosveglia per 24 ore − Premere un qualsiasi tasto (tranne il campo sensore o il tasto ALARM ON/OFF), per interrompere la sveglia. Suonerà nuovamente dopo 24 ore.
-
Page 143: Altre Funzioni
Dopo 5 minuti, il dispositivo si accende di nuovo e ricomincia a suonare. Questa azione può essere ripetuta più volte. Attivazione e disattivazione della sveglia − Premere 1 volta ALARM ON/OFF, per spegnere la funzione sveglia, si spegne. Premendo nuovamente ALARM ON/OFF il funzionamento della sveglia si riattiva. - Page 144 Impostazione dell'ora legale e dell'ora solare In caso di ricezione del segnale orario, il passaggio dall'ora solare all'ora legale e viceversa avviene automaticamente. Se l'orario estivo è attivo, sul display appare "DST". Ripristino della radiosveglia alle impostazioni di fabbrica Ripristinare i valori di fabbrica della radiosveglia, se sul display appaiono valori insoliti o chiaramente errati.
-
Page 145: Pulizia
Pulizia Non immergere l'articolo in acqua o altri liquidi. Non utilizzare detergenti aggressivi o abrasivi. − Se necessario, rimuovere la polvere dall'articolo con un panno morbido e asciutto o pulire con un panno leggermente umido. -
Page 146: Risoluzione Dei Problemi
Risoluzione dei problemi Nessun funzionamento. ‚ Le batterie sono scariche o sono state installate in modo errato? La temperatura sembra troppo alta. ‚ Controllare che la radiosveglia non sia esposta direttamente alla luce solare. L'orario lascia il posto a uno, due, tre ecc. ore. ‚... -
Page 147: Dati Tecnici
Dati tecnici Modello: Radiosveglia DCF CK 1714 Batterie: 2x LR03 (AAA)/1,5 V Corrente nominale: < 40 mA Portata: ca. -10 °C - 50 °C (ca. 14 °F - 122 °F) Dimensioni: ca. 68 x 66 x 21 mm Distributore (nessun servizio di assistenza):... -
Page 148: Dichiarazione Di Conformità
Dichiarazione di conformità Con la presente, Waagen-Schmitt GmbH dichiara che la CK 1714 è conforme alle radiosveglia direttive 2014/53/EU e 2011/65/EU. Il testo completo della dichiarazione di conformità EU è disponibile al seguente indirizzo Internet: www.ade-germany.de/doc La presente dichiarazione perde ogni sua validità... -
Page 149: Smaltimento
per un periodo di 2 anni a partire dalla data di acquisto, nel caso di difetti di materiale o fabbricazione del prodotto. A tale scopo, consegnare al rivenditore il prodotto e la prova di acquisto (citando i motivi del reclamo). Smaltimento Smaltimento dell'imballaggio Smaltire l'imballaggio nella raccolta... - Page 150 Il dispositivo non deve essere smaltito con i normali rifiuti domestici. Al termine della sua vita utile, l'apparecchio deve essere smaltito in modo appropriato. In tal modo si rende possibile il riutilizzo del materiale riciclabile contenuto nell’apparecchio limitando l’impatto sull’ambiente. Smaltire l’apparecchio usato presso un centro di raccolta per rifiuti elettrici o un centro di riciclaggio.
- Page 151 Le batterie e gli accumulatori non devono essere smaltiti con i rifiuti domestici Le batterie e gli accumulatori devono essere consegnati presso un centro di raccolta comunale o di quartiere, oppure presso il proprio rivenditore, al fine di garantire il loro smaltimento in modo rispettoso dell'ambiente.
-
Page 152: Szanowny Kliencie
Szanowny Kliencie! Zakupiony wysokiej jakości produkt marki ADE łączy w sobie inteligentne funkcje z wyjątkową stylistyką. Dzięki niniejszemu budzikowi radiowemu godzina jest zawsze precyzyjnie w zasięgu wzroku. Wieloletnie doświadczenie marki ADE gwarantuje wysoki standard techniczny oraz sprawdzoną jakość. Życzymy zawsze poczucia czasu bez pośpiechu! -
Page 153: Informacje Ogólne
Informacje ogólne O instrukcji Niniejsza instrukcja obsługi zawiera opis bezpiecznej obsługi i pielęgnacji artykułu. Instrukcję obsługi należy przechowywać w celu jej późniejszego wykorzystania. Jeżeli produkt będzie przekazywany innej osobie, należy przekazać również tę instrukcję. Nieprzestrzeganie instrukcji obsługi może spowodować obrażenia ciała lub uszkodzenie produktu. -
Page 154: Objaśnienie Znaków
Objaśnienie znaków Ten symbol w połączeniu ze słowem NIEBEZPIECZEŃSTWO ostrzega przed poważnymi obrażeniami ciała. Ten symbol w połączeniu ze słowem OSTRZEŻENIE ostrzega przed obrażeniami ciała średniego i lekkiego stopnia. Ten symbol w połączeniu ze słowem WSKAZÓWKA ostrzega przed stratami materialnymi. Ten symbol oznacza dodatkowe informacje i ogólne wskazówki. - Page 155 Spis treści Informacje ogólne ..........153 Użycie zgodne z przeznaczeniem ... 156 Bezpieczeństwo ..........156 W skrócie (zakres dostawy) ......160 Zawartość dostawy ........162 Uruchomienie..........162 Odbiór sygnału czasu ........163 Informacje o nadajniku sygnału czasu DCF77 ........170 Budzenie .............171 Pozostałe funkcje ...........
-
Page 156: Użycie Zgodne Z Przeznaczeniem
Użycie zgodne z przeznaczeniem Budzik radiowy pobiera wzorzec czasu z niemieckiego nadajnika DCF77. Budzik jest przeznaczony wyłącznie do użytku prywatnego w suchych pomieszczeniach. Bezpieczeństwo ‚ Ten produkt może być używany przez dzieci w wielu do lat 8 oraz przez osoby z ograniczonymi zdolnościami fizycznymi, sensorycznymi lub umysłowymi, bądź... - Page 157 ‚ Dzieci nie mogą czyścić ani serwisować urządzenia, chyba że mają 8 lat lub więcej i są nadzorowane. ‚ Połknięcie baterii stanowi zagrożenie dla życia. Produkt i baterie należy przechowywać w miejscach niedostępnych dla dzieci. W razie połknięcia baterii należy natychmiast skontaktować...
- Page 158 ‚ Baterii nie wolno ładować, reaktywować w inny sposób, rozkładać na części, wrzucać w ogień lub powodować ich zwarcia. W innym przypadku grozi niebezpieczeństwo wybuchu lub wycieku kwasu z baterii lub ulotnienia się gazów! ‚ Unikać kontaktu kwasem z baterii ze skórą, oczami oraz śluzówką.
- Page 159 ‚ Wkładając baterie lub wymieniając je na nowe, należy uważać na właściwe położenie biegunów (+/-). ‚ Nie przechowywać baterii w skrajnych warunkach, np. na grzejnikach lub w miejscach narażonych na bezpośrednie promieniowanie słoneczne. Podwyższone niebezpieczeństwo wycieku! ‚ W razie potrzeby wyczyścić styki urządzenia i baterii przed ich włożeniem.
-
Page 160: W Skrócie (Zakres Dostawy)
W skrócie (zakres dostawy) - Page 161 Przycisk budzenia ALARM ON/OFF Pole czujnika oświetlenia/SNOOZE Godzina Data / temperatura wewnętrzna (°C lub °F) Przycisk +/– do ustawiania wartości Przycisk ALARM do wprowadzania czasu budzenia Przycisk TIME do ręcznego ustawiania czasu Przycisk WAVE (tył) Symbol sygnału radiowego Nadajnik wzorca czasu 10 Komora baterii, 2x LR03/AAA (tył) Zdjąć...
-
Page 162: Zawartość Dostawy
Zawartość dostawy ‚ Budzik radiowy ‚ Baterie typu LR03 (AAA), 1,5 V (2x) ‚ Instrukcja obsługi Uruchomienie Do uruchomienia produktu niezbędne są dwie baterie typu LR03 (AAA), 1,5 V. 1. Pokrywę komory na baterie pociągnąć do góry. 2. Baterie ułożyć w taki sposób, jak jest to przedstawione na spodzie komory na baterie. -
Page 163: Odbiór Sygnału Czasu
Wskazówki dotyczące wymiany baterii: ‚ Należy korzystać tylko z typu baterii podanego w „Dane techniczne”. ‚ Wymieniać zawsze wszystkie baterie. ‚ Stare baterie należy utylizować zgodnie z zasadami ochrony środowiska, patrz „Utylizacja”. Odbiór sygnału czasu Po włożeniu baterii na wyświetlaczu pojawią się... - Page 164 Czym więcej fali radiowych na wyświetlaczu, tym lepsza siła sygnału. Jeżeli odbierany sygnał czasu jest wystarczająco silny, na wyświetlaczu pojawi się ponadto ‚ godzina i ‚ data. Od tej chwili budzik radiowy włącza się każdej nocy automatycznie na tryb odbioru. Przy czym wyświetlany czas jest porównywany i w razie potrzeby korygowany czasem otrzymanym z nadajnika znacznika czasu.
-
Page 165: Lista Kontrolna W Przypadku Braku Wskazań Danych Na Wyświetlaczu
Lista kontrolna w przypadku braku wskazań danych na wyświetlaczu Należy sprawdzić, czy lokalizacja budzika radiowego jest odpowiednia, patrz „Wybór lokalizacji”. Ponownie włączyć ręcznie tryb odbioru, patrz „Ręczne włączanie odbioru radiowego”. Należy odczekać, aż budzik przełączy się później automatycznie na tryb odbioru. Należy ręcznie zmienić... -
Page 166: Ręczne Ustawianie Godziny I Daty
Ręczne ustawianie godziny i daty Po wciśnięciu po sobie dwóch przycisków w odstępie większym niż 20 sekund tryb ustawień wyłączy się automatycznie. 1. Przytrzymać wciśnięty przycisk TIME, aż na wyświetlaczu będzie migać wskazanie formatu 12- lub 24-godzinnego. 2. Przyciskiem +/– należy ustawić żądany format czasu („12H”... - Page 167 5. Wykonać po sobie następujące ustawienia: − Strefa czasowa („00” to ustawienie standardowe dla kontynentu europej- skiego). − Godzina − Minuty 6. Następnie wcisnąć TIME, aby zakończyć proces. Ręczne włączanie trybu odbioru radiowego Jeżeli pokazany obok symbol sygnału radiowego nie wyświetla się, oznacza to, że sygnały radiowe nadajnika sygnału czasu nie są...
-
Page 168: Wybór Miejsca Ustawienia
Prosimy pamiętać: ‚ Jeżeli odbiór nie zakończył się pomyślnie, symbol odbioru zgaśnie po kilku minutach i godzina na wyświetlaczu będzie pokazywana dalej normalnie. ‚ W przypadku pomyślnego odbioru budzik radiowy ustawi się na godzinę nadajnika sygnału czasu. Jeżeli wprowadzono już ręcznie ustawienia czasu i daty, zostaną... - Page 169 ‚ Zachować odstęp od telewizora, komputera i monitorów. Również stacje bazowe telefonów bezprzewodowych nie powinny znajdować się w bezpośredniej bliskości od budzika. ‚ W zależności od lokalizacji może w pojedynczych przypadkach dojść do sytuacji, że budzik będzie odbierał sygnały z innego nadajnika lub równocześnie z dwóch nadajników na zmianę.
-
Page 170: Informacje O Nadajniku Sygnału Czasu Dcf77
Informacje o nadajniku sygnału czasu DCF77 Budzik otrzymuje sygnały dźwiękowe z nadajnika DCF77. Wysyła on na częstotliwości fal radiowych 77,5 kHz dokładny i oficjalny czas Republiki Federalnej Niemiec. Nadajnik jest ustawiony w Mainflingen koło Frankfurtu nad Menem i dzięki swojemu zasięgowi do 2000 km przekazuje wymagane sygnały radiowe do większości zegarów sterowanych radiowo w Europie Zachodniej. -
Page 171: Budzenie
W przypadku braku odbioru, np. podczas silnej burzy, urządzenie będzie działało precyzyjnie dalej i o najbliższej przewidzianej godzinie ponownie przełączy się automatycznie na odbiór. Budzenie Ustawianie czasu budzenia 1. Przycisk ALARM trzymać wduszony do momentu, aż na wyświetlaczu będzie migać godzina budzenia i pojawi się... - Page 172 Budzenie W ustalonym czasie rozlegnie się sygnał budzenia, zyskując na intensywności wraz z upływem czasu budzenia. Wstrzymanie alarmu budzenia na 24 godziny − Nacisnąć dowolny przycisk (oprócz pola czujnika lub przycisku ALARM ON/ OFF), aby przerwać alarm. Rozlegnie się ponownie po 24 godzinach. Funkcja automatycznego wyłączania Alarm wyłączy się...
-
Page 173: Pozostałe Funkcje
Po 5 minutach urządzenie włącza się ponownie i budzi jeszcze raz. Proces ten można powtarzać wielokrotnie. Włączanie i wyłączanie funkcji budzenia − Wcisnąć raz przycisk ALARM, aby wyłączyć funkcję budzenia, zgaśnie. Przez ponowne wciśnięcie przycisku ALARM ON/ OFF funkcja budzenia będzie znowu aktywna. Pozostałe funkcje Oświetlenie wyświetlacza −... - Page 174 Przełączanie między czasem letnim i zimowym Przełączanie z czasu letniego na zimowy i odwrotnie odbywa się przy dobrym odbiorze sygnału czasu automatycznie. Gdy jest włączony czas letni, na wyświetlaczu pojawi się „DST”. Przestawienie budzika radiowego na ustawienia fabryczne Należy przestawić budzik na ustawienia fabryczne, gdy na wyświetlaczu pojawią...
-
Page 175: Czyszczenie
Czyszczenie Nie zanurzać produktu w wodzie lub innych płynach. Nie używać twardych, drapiących lub szorujących środków czystości. − W razie potrzeby produkt odkurzyć miękką, suchą szmatką lub przetrzeć lekko wilgotną szmatką. -
Page 176: Usterki I Ich Usuwanie
Usterki i ich usuwanie Urządzenie nie działa. ‚ Baterie wyczerpane lub włożone nieprawidłowo? Dane temperatury wydają się za wysokie. ‚ Sprawdzić, czy budzik radiowy jest narażony na bezpośrednie promieniowanie słoneczne. Wskazywany czas różni się dokładnie o jedną, dwie, trzy itd. godziny. ‚... -
Page 177: Dane Techniczne
Dane techniczne Model: Budzik radiowy DCF CK 1714 Bateria: 2x LR03 (AAA)/1,5 V Prąd znamionowy: < 40 mA Zakres pomiarowy: ok. -10 °C - 50 °C (ok. 14 °F - 122 °F) Wymiary: ok. 68 x 66 x 21 mm... -
Page 178: Deklaracja Zgodności
Deklaracja zgodności Niniejszym firma Waagen-Schmitt GmbH oświadcza, że CK 1714 jest budzik radiowy zgodna z dyrektywą 2014/53/UE i 2011/65/UE. Pełny tekst deklaracji zgodności UE jest dostępny pod poniższym adresem internetowym: www.ade-germany.de/doc Deklaracja traci swą ważność, jeśli w wadze zostaną wykonane jakikolwiek zmiany, które nie zostały z nami omówione. -
Page 179: Utylizacja
produkcyjnych w drodze naprawy lub wymiany. W przypadku korzystania z gwarancji prosimy o podanie sprzedawcy artykułu wraz z dowodem zakupu (podając również powód reklamacji). Utylizacja Utylizacja opakowania Opakowanie należy utylizować zgodnie z jego rodzajem. Tektura i karton powinny trafić do pojemnika na papier, folia do pojemnika na surowce wtórne. - Page 180 Urządzeń nie wolno wyrzucać razem ze zwykłymi odpadami domowymi. Po zakończeniu okresu użytkowania produkt należy przekazać do odpowiedniej utylizacji. Surowce wtórne znajdujące się w urządzeniu zostaną przekazane do recyklingu, co zmniejszy zanieczyszczenie środowiska. Zużyte urządzenie należy oddać do punktu zbiórki odpadów elektrycznych lub do punktu zbiórki surowców wtórnych.
- Page 181 Baterii i akumulatorów nie wolno wyrzucać razem z odpadami domowymi Wszystkie baterie i akumulatory należy oddawać do punktu zbiórki w gminie, dzielnicy lub sklepie. W ten sposób baterie i akumulatory mogą trafić do ekologicznej utylizacji.