Table des Matières
Publicité
Les langues disponibles
Les langues disponibles
Liens rapides
REVISION B
Form No. 3316484.000 4/17
English, French, Spanish
©2017 Dometic Corporation
LaGrange, IN 46761
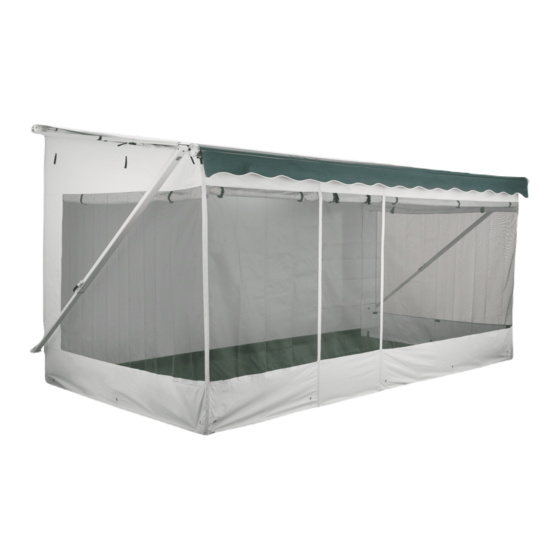
VERANDA ROOM
935000.140 SIDE & DOOR ASSEMBLY - STANDARD
935000.150 SIDE & DOOR ASSEMBLY - TALL
935002.120 2' FRONT PANEL - STANDARD
935002.130 2' FRONT PANEL - TALL
935004.120 4' FRONT PANEL - STANDARD
935004.130 4' FRONT PANEL - TALL
935008.120 8' FRONT PANEL - STANDARD
935008.130 8' FRONT PANEL - TALL
Read these instructions carefully. These
instructions MUST stay with this product.
USA
SERVICE OFFICE
Dometic Corporation
1120 North Main Street
Elkhart, IN 46514
RECORD THIS INFORMATION FOR FUTURE
REFERENCE:
Model Number
Serial Number
Date Purchased
Retailer / Qualified Installer
MODELS
CANADA
Dometic Corporation
46 Zatonski, Unit 3
Brantford, ON N3T 5L8
CANADA
SERVICE CENTER &
DEALER LOCATIONS
Please Visit:
www.eDometic.com
Publicité
Chapitres
Table des Matières

Manuels Connexes pour Dometic 935000.140


Sommaire des Matières pour Dometic 935000.140
- Page 1 Date Purchased Retailer / Qualified Installer VERANDA ROOM MODELS 935000.140 SIDE & DOOR ASSEMBLY - STANDARD 935000.150 SIDE & DOOR ASSEMBLY - TALL 935002.120 2' FRONT PANEL - STANDARD 935002.130 2' FRONT PANEL - TALL 935004.120 4' FRONT PANEL - STANDARD 935004.130 4' FRONT PANEL - TALL...
-
Page 2: Table Des Matières
This Veranda Room (hereinafter referred to as "Veranda Room" or "Product") is designed and intended to fit on most Dometic awnings and many other recreational vehicle (hereinafter referred to as "RV") awnings with a 3-1/2" roller tube. Use these instructions to ensure correct installation, function, and operation of product. -
Page 3: General Safety Messages
Standard Height Veranda Room Tall Height Veranda Room Ground to awning rail 93" to 110" Ground to awning rail 111" to 120" 935000.140 Side & Door Asm.- Standard 935000.150 Side & Door Asm.- Tall Consists of: Consists of: (1) Zippered Door - Standard (34" x 93-1/2")* (1) Zippered Door - Tall (34"... -
Page 4: General Information
GENERAL INFORMATION Tools & Supplies Required The Veranda Room is designed to fit on most Dometic awnings and many other RV awnings with a 3-1/2" roller Installation: tube. The rafter poles enable the Veranda Room to be the ● Tape Measure... - Page 5 If the customer preferred 4' panels then (3 each) 4' panels and (1 each) 2' panel are used. If 2' panels FIG. 1 are used the same awning requires 7. See Table 2 on page 4 for Dometic suggested awning length and panels required.
-
Page 6: Installation Instructions
INSTALLATION INSTRUCTIONS 1. T he first step to ensure proper installation of a FIG. 4 Veranda Room is to park the RV on a flat and Top Hole level surface. 2. Open the awning (1) so that the slope of the canopy approximates the angle of the side panels (2). - Page 7 INSTALLATION INSTRUCTIONS 5. Release the adjustment clamp (35) on the FIG. 7 vertical pole (34) and extend the pole until it reaches the roller tube clamp (8). Insert the metal pin (36) on the end of the vertical pole (34) into the bottom hole of the roller tube clamp (8).
- Page 8 INSTALLATION INSTRUCTIONS 19. Slide three poly rope clips (21) onto the poly FIG. 9 rope sewn on the side panel. Position the top poly rope clip about 4" directly below the pole holder (12) and drill a 1/8" pilot hole (23) for the installation of the twist fastener (24).
- Page 9 INSTALLATION INSTRUCTIONS 22. Make sure the RV entrance steps are in the 25. Locate the step and determine the uppermost extended or down position. part (30) of it by feeling. Mark the edges of the step on each side (31). See FIG. 15. ...
-
Page 10: Operating Instructions
INSTALLATION INSTRUCTIONS 30. Secure all panels and vehicle skirting by driving FIG. 18 the tent stakes inside the room, through the grommets into the ground. Since the Veranda Room comes in an adjustable height, it is designed such that adjustment for height can be achieved by shortening the bottom of the panels. -
Page 11: Maintenance
MAINTENANCE Storage Cleaning Fold the side panels by laying them with the privacy Periodically clean the fabric using a mild laundry panels closed and the screen side up on a flat detergent or an approved awning or vinyl cleaner. surface. When using a commercial cleaner make sure to Fold the panel into a square by folding the upper follow the manufacturers instructions. - Page 12 Date d’achat Détaillant/Installateur qualifié VÉRANDA MODÈLES 935000.140 ENSEMBLE DE PORTE ET CÔTÉ - STANDARD 935000.150 ENSEMBLE DE PORTE ET CÔTÉ - HAUT 935002.120 PANNEAU AVANT 2 PI - STANDARD 935002.130 PANNEAU AVANT 2 PI - HAUT 935004.120 PANNEAU AVANT 4 PI - STANDARD 935004.130 PANNEAU AVANT 4 PI - HAUT...
-
Page 13: Instructions De Sécurité Importantes
INTRODUCTION Cette véranda (ci-après dénommée « produit » ou « véranda ») est conçue pour s’adapter sur la plupart des auvents Dometic et sur plusieurs auvents de véhicule récréatif (ci-après dénommé « VR ») avec un tube de roulement de 3 1/2 po. Utiliser ces instructions pour s’assurer de l’installation appropriée du produit, ainsi que de son fonctionnement. -
Page 14: Messages Généraux Sur La Sécurité
Entre le sol et le rail de l’auvent : 93 po à 110 po Entre le sol et le rail de l’auvent : 111 po à 120 po 935000.140 Ensemble de porte et côté - Standard 935000.150 Ensemble de porte et côté - Haut... -
Page 15: Informations Générales
INFORMATIONS GÉNÉRALES Outils et matériaux nécessaires pour Cette véranda est conçue pour s’adapter sur la plupart des auvents Dometic et sur plusieurs auvents de véhicule l’installation : récréatif avec un tube de roulement de 3-1/2 po. Ces ● Ruban à mesurer barres de soutien permettent à... - Page 16 4 pi et 1 panneau de 2 pi sont utilisés. Si des panneaux de 2 pi sont utilisés, le même auvent en nécessite 7. Voir Table 2 on page 15 pour la longueur suggérée par Dometic pour l’auvent et les panneaux requis.
-
Page 17: Instructions D'installation
INSTRUCTIONS D'INSTALLATION 1. L a première étape pour s’assurer d’une FIG. 4 Orifice installation adéquate de la Véranda est de supérieur stationner la véranda sur une surface plane et à niveau. 2. Ouvrir l’auvent (1) afin que la pente de la voilure soit approximative à... - Page 18 INSTRUCTIONS D'INSTALLATION 5. Release the adjustment clamp (35) on the FIG. 7 vertical pole (34) and extend the pole until it reaches the roller tube clamp (8). Insert the metal pin (36) on the end of the vertical pole (34) into the bottom hole of the roller tube clamp (8).
- Page 19 INSTRUCTIONS D'INSTALLATION 19. Faire glisser trois agrafes de corde poly (21) FIG. 9 dans la corde poly cousue sur le panneau latéral. Positionner l’agrafe de la corde poly supérieure approx. à 4 po directement sous le support à poteau (12) et percer un trou pilote de 1/8 po (23) pour l’installation du dispositif de fixation (24).
- Page 20 INSTRUCTIONS D'INSTALLATION 22. S’assurer que les marches d’entrée de la VR 25. Localiser la marche et déterminer la partie la sont étendues ou en position abaissée. plus élevée (30) au toucher. Marquer les bords de la marche des deux côtés (31). Voir FIG. 15. ...
-
Page 21: Mode D'emploi
INSTRUCTIONS D'INSTALLATION 30. Fixer solidement les panneaux et les jupes du FIG. 18 véhicule en plantant les pieux de tente à l’intérieur de la véranda, à travers les œillets dans le sol. Puisque la hauteur de la véranda est ajustable, elle est conçue pour que l’ajustement soit effectué... -
Page 22: Entretien
ENTRETIEN Entreposage Nettoyage Plier les panneaux latéraux en les étendant avec Nettoyer périodiquement le tissu en utilisant un les panneaux privatifs fermés et la toile orientée détergent à lessive ou un nettoyant de vinyle ou vers le haut sur une surface plane. d’auvent approuvé. - Page 23 Fecha de compra Minorista / Instalador calificado VERANDA MODELOS 935000.140 ENSAMBLE LATERAL Y PUERTA - ESTÁNDAR 935000.150 ENSAMBLE LATERAL Y PUERTA - ALTA 935002.120 PANEL FRONTAL DE 2' - ESTÁNDAR 935002.130 PANEL FRONTAL DE 2' - ALTA 935004.120 PANEL FRONTAL DE 4' - ESTÁNDAR 935004.130 PANEL FRONTAL DE 4' - ALTA...
-
Page 24: Instrucciones De Seguridad Importantes
Esta veranda (en lo sucesivo denominada "Veranda" o el "Producto") está diseñada y destinada para ajustarse a la mayoría de las marquesinas Dometic y muchas otras marquesinas de vehículos recreativos (en lo sucesivo denominados "VR") con un rodillo de 3-1/2". Use estas instrucciones para asegurar la instalación, función y operación correctas del producto. -
Page 25: Mensajes De Seguridad General
Veranda alta De 93" a 110" del suelo al riel de la marquesina De 111" a 120" del suelo al riel de la marquesina 935000.140 Ensamble lateral y puerta - Estándar 935000.150 Ensamble lateral y puerta - Alta Consiste de: Consiste de: (1) Puerta con cremallera - Estándar (34"... -
Page 26: Información General
INFORMACIÓN GENERAL Herramientas y suministros requeridos La Veranda está diseñada para ajustarse a la mayoría de las marquesinas Dometic y muchas otras marquesinas de para la instalación: VR con rodillo de 3-1/2". Los travesaños permiten que la ● Cinta de medir Veranda sea de la longitud total de la marquesina o (con el uso de paneles frontales más cortos) la Veranda se pueda... - Page 27 INFORMACIÓN GENERAL L ea TODOS los siguientes pasos antes de FIG. 1 comenzar la instalación. Durante la instalación, tenga cuidado de no raspar ni dañar los paneles y faldas. Para emparejar correctamente la Veranda con una combinación de marquesina y VR en particular, debe conocerse la siguiente información: a.
-
Page 28: Instrucciones De Instalación
INSTRUCCIONES DE INSTALACIÓN 1. E l primer paso para asegurar la instalación FIG. 4 Agujero correcta de una Veranda es estacionar el VR superior sobre una superficie plana y nivelada. 2. Abra la marquesina (1) de modo que la inclinación de la misma se aproxime al ángulo de los paneles laterales (2). - Page 29 INSTRUCCIONES DE INSTALACIÓN 5. Release the adjustment clamp (35) on the FIG. 7 vertical pole (34) and extend the pole until it reaches the roller tube clamp (8). Insert the metal pin (36) on the end of the vertical pole (34) into the bottom hole of the roller tube clamp (8).
- Page 30 INSTRUCCIONES DE INSTALACIÓN Cuando la marquesina está relativamente 19. Deslice tres sujetadores de cuerda de poliéster nivelada y el poste del cuarto de malla está (21) sobre la cuerda de poliéster cosida en el panel en la posición más baja, si se anticipa lluvia, lateral.
- Page 31 INSTRUCCIONES DE INSTALACIÓN 22. Asegúrese de que los escalones de entrada del 25. Localice el escalón y determine la parte más alta VR estén en la posición extendida o baja. (30) del mismo palpando. Marque los bordes del escalón en cada lado (31). Ver FIG. 15. Si el VR está...
-
Page 32: Instrucciones De Operación
INSTRUCCIONES DE INSTALACIÓN 30. Asegure todos los paneles y faldas del vehículo FIG. 17 clavando las estacas de carpa a través de la habitación y los ojales en el suelo. Debido a que la Veranda viene con altura ajustable, está diseñada de tal manera que dicho ajuste de altura se puede obtener al acortar el fondo de los paneles. -
Page 33: Mantenimiento
MANTENIMIENTO Almacenamiento Limpieza Doble los paneles laterales tendiéndolos con los Limpie regularmente la tela usando un detergente paneles de privacidad cerrados y el lado de la de ropa suave o un limpiador para marquesina o malla boca arriba sobre una superficie plana. vinilo aprobado.