Beurer LB 50 Mode D'emploi
Masquer les pouces Voir aussi pour LB 50:
Table des Matières

Publicité

Les langues disponibles
  • FR

Les langues disponibles

  • FRANÇAIS, page 23

Liens rapides

Luftbefeuchter
Gebrauchsanleitung
Humidifier
Instruction for Use
Humidificateur d´air
Mode d´emploi
Humidificador
Instrucciones para el uso
Umidifficatore dell´aria
Instruzioni per l´uso
LB 50
Hava nemlendirici
Kullanma Talimatı
Nawilżacz powietrza
Instrukcja obsługi

Publicité

Table des Matières
loading

Sommaire des Matières pour Beurer LB 50

  • Page 1 LB 50 Hava nemlendirici Luftbefeuchter Gebrauchsanleitung Kullanma Talimatı Humidifier Instruction for Use Humidificateur d´air Mode d´emploi Nawilżacz powietrza Instrukcja obsługi Humidificador Instrucciones para el uso Umidifficatore dell´aria Instruzioni per l´uso...
  • Page 3: Table Des Matières

    DEUTSCH Inhalt Zum Kennenlernen ......1 Sicherheitshinweise ......2 Gerätebeschreibung ......3 Luftbefeuchter ......... 3 Bedienfeld ........3 Inbetriebnahme ........ 4 Bedienung ........4 Pflege ..........5 Übersicht ........5 Vor dem Reinigen und Entkalken ... 6 Gerät reinigen ......... 7 Gerät entkalken ......
  • Page 4: Sicherheitshinweise

    ICHERHEITSHINWEISE Aufbewahrung und Pflege Lesen Sie diese Gebrauchsanleitung sorgfäl- tig! Ein Nichtbeachten der nachfolgenden ACHTUNG Hinweise kann Personen- oder Sachschä- Reinigen Sie das Gerät nur in der an- den verursachen. Bewahren Sie die Ge- gegebenen Weise. brauchsanleitung auf und machen Sie diese Stellen Sie sicher, dass kein Wasser in auch anderen Anwendern zugänglich.
  • Page 5: Gerätebeschreibung

    ERÄTEBESCHREIBUNG Luftbefeuchter Abdeckung Dampfdüse Dampfturm Kalkpad (unterhalb des Dampfturms in der Heißwasserkammer) Heißwasserkammer (unterhalb des Dampfturms, nicht abgebildet) Gehäuse des Luftbefeuchters Griffmulden am Wassertank Wassertank, Inhalt 5 Liter Tankverschluss mit Ventil Wasserstandsanzeige Luftfilterklappe (Geräte-Rückseite) Schwarzer Luftfilter (Geräte-Rückseite) Bedienfeld (siehe auch Abbildung unten) Kabel mit Netzstecker (Geräte-Rückseite) Bedienfeld...
  • Page 6: Inbetriebnahme

    NBETRIEBNAHME Auspacken Netzkabel anschließen Prüfen Sie den Lieferumfang. Wenn Teile WARNUNG fehlen, wenden Sie sich bitte an Ihren Bevor Sie das Gerät in Betrieb nehmen, Fachhändler. überprüfen Sie das Kabel [14] auf et- Entfernen Sie alle Verpackungs- und waige Beschädigungen. Gerät niemals Transportsicherungen.
  • Page 7: Pflege

    Spülen Sie den Wassertank [8] mit frischem Wasser aus. Füllen Sie den Wassertank [8] mit kaltem Leitungswasser. Schrauben Sie den Tankverschluss [9] auf den Wassertank [8]. Setzen Sie den Wassertank [8] in den Luftbefeuchter ein. Setzen Sie die Abdeckung [1] oben auf den Luftbefeuchter. Gerät einschalten ACHTUNG Luftbefeuchter nie ohne Wassertank [8] oder Dampfturm [3] einschalten.
  • Page 8: Vor Dem Reinigen Und Entkalken

    Wann muss ich … welches Teil … wie pflegen? Einmal wöchentlich Gerät innen Siehe Kapitel 6, Abschnitt „Gerät reinigen“, Seite 7 Abdeckung [1] Dampfdüse [2] und Dampfturm [3] Wassertank [8] und Tankver- schluss [9] Gehäuse außen [6] Je nach Verschmutzung, Kalkpad [4] Siehe Kapitel 6, Abschnitt „Gerät mindestens aber einmal...
  • Page 9: Gerät Reinigen

    Gerät reinigen Gerät innen und außen reinigen WARNUNG Elektrische Teile nicht mit Wasser in Berührung bringen. Gerät keinesfalls unter fließendes Wasser halten oder in Wasser tauchen. Falls sich noch Restwasser im Gerät befindet, schütten Sie es weg. Nehmen Sie dazu das Gerät mit beiden Händen und kippen Sie das Wasser seitlich aus dem Unterteil.
  • Page 10: Nach Dem Reinigen Und Entkalken

    Schütten Sie die Entkalkerlösung weg. Kippen Sie das Gerät seitlich und entfer- nen Sie so die Entkalkerlösung. Spülen Sie das Gerät gründlich mit frischem Wasser aus. Nach dem Reinigen und Entkalken Kalkpad einlegen Legen Sie das gereinigte Kalkpad oder das Ersatz-Kalkpad [4] in die Heißwas- serkammer [5].
  • Page 11: Technische Angaben

    Verzögerte Sehr kaltes Wasser im Wasser- Wärmeres Wasser verwenden. Dampfabgabe tank [8]. Gerät stark verkalkt. Gerät entkalken. Rote Kontroll- Wassertank [8] leer. Wasser nachfüllen. anzeige [A] Ventil des Tankverschlusses [9] ist Reinigen Sie das Ventil. leuchtet mit Schmutz überzogen. Gerät stark verkalkt. Gerät entkalken.
  • Page 12: Garantie Und Service

    Material- und Fabrikationsfehler des Produk- von 3 Jahren ab Kaufdatum gegenüber der tes. Die Garantie gilt nicht: Beurer GmbH, Söflinger Straße 218, 89077 – im Falle von Schäden, die auf unsachge- Ulm, Germany, geltend zu machen. Der mäßer Bedienung beruhen, Kunde hat im Garantiefall das Recht zur –...
  • Page 13: Getting To Know Your Appliance

    ENGLISH Contents Getting to know your appliance ... 11 Safety information ......12 Appliance description ....13 Humidifier ........13 Control panel ........ 13 Start-up ........... 14 Operation ........15 Care ..........16 Overview ........16 Before cleaning and descaling ..17 Cleaning the appliance ....
  • Page 14: Safety Information

    AFETY INFORMATION Storage and care Read the instructions for use carefully. Failure to observe the following information IMPORTANT can cause injuries or damage to property. Only clean the appliance in the manner Keep the instructions carefully and also specified. make them accessible to other users. Make sure that no water gets inside the Always pass on these instructions together appliance or onto the cable [14] or...
  • Page 15: Appliance Description

    PPLIANCE DESCRIPTION Humidifier Cover Steam nozzle Steam tower (beneath the steam tower in the hot water chamber) Hot water chamber (beneath the steam tower, not illustrated) Humidifier casing Water tank handles Water tank, volume 5 litres Tank catch, with valve Water level indicator Air filter flap (back of appliance) Black air filter (back of appliance)
  • Page 16: Start-Up

    TART Unpacking Connecting mains cable Check contents: If any parts are missing, WARNING please contact your authorized dealer. Before putting appliance into Remove all packaging and transport operation, make sure that the cable [14] locks. is not damaged. Never operate the appliance mains cable...
  • Page 17: Operation

    PERATION Filling the tank Fill the tank when putting the appliance into operation for the first time or if the red indicator [A] is illuminated, indicating that the water level is too low. IMPORTANT Only ever use fresh tap water to fill the tank. Never put any additives into the water.
  • Page 18: Care

    Overview Your humidifier should be cleaned and WARNING descaled regularly in order to ensure that Before clean descale your residue from the water such as limescale humidifier: does not accumulate in the appliance. Only be absolutely sure to pull out the plug if the humidifier is carefully maintained can [14] from the wall socket.
  • Page 19: Before Cleaning And Descaling

    Before cleaning and descaling Unplug the appliance Switch off the appliance with the ON/OFF button [D]. The green indicator light [B] goes out. Pull the plug [14] out from the wall socket and wait at least 15 minutes until the humidifier has entirely cooled.
  • Page 20: Descaling The Appliance

    If there is any water left in the appliance, pour it out. Use a new pad [4]. Wash out the new pad [4] with clean water and put in the hotwater chamber. Descaling the appliance Descale the humidifier Never try to remove any limescale deposit with pointed or sharp objects.
  • Page 21: In The Event Of Problems

    IN THE EVENT OF PROBLEMS Problem Cause Remedy Appliance not connected to power Insert the plug [14] into the No steam mains and switch on the exiting appliance. Water tank [8] empty. Replenish water. Water tank [8] not fitted correctly. Fit tank properly.
  • Page 22: Benefits Of Humidification

    ENEFITS OF HUMIDIFICATION Optimal indoor air humidity should be 50 – Properly dosed artificial air humidification 55%. Particularly during the heating period, also binds dust and prevents drying humidity often well below this damage to equipment (wood, paper, etc.), recommended level. This is due to heat- musical instruments and plants.
  • Page 23: Premières Expériences

    FRANÇAIS Sommaire Premières expériences ....21 Remarques de sécurité ....22 Description de l'appareil ....23 Humidificateur ........ 23 Panneau de commande ....23 Mise en service ......24 Utilisation ........25 Entretien ......... 26 Aperçu ..........26 Avant le nettoyage et le détartrage 27 Nettoyage de l’appareil ....
  • Page 24: Remarques De Sécurité

    2. R EMARQUES DE SECURITE Rangement et entretien Lisez attentivement présent mode d’emploi ! non-observation ATTENTION marques suivantes peut causer des dom- Nettoyez l’appareil uniquement selon la mages personnels ou matériels. Conservez méthode indiquée. le mode d’emploi et faites en sorte qu’il soit Veillez à...
  • Page 25: Description De L'appareil

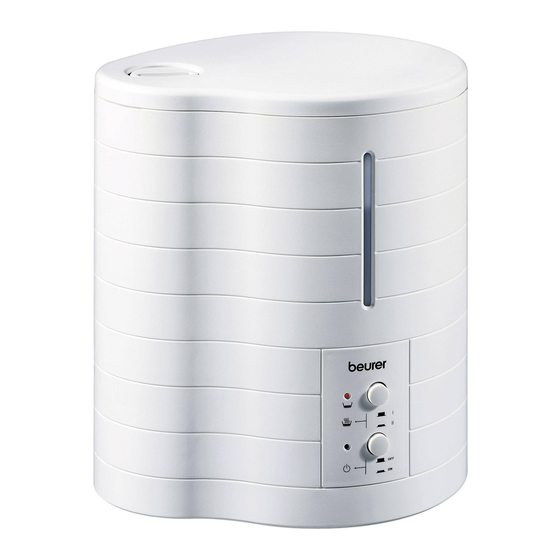
    3. D ESCRIPTION DE L APPAREIL Humidificateur Couvercle Buse de vapeur Tour d’évaporation Tampon anti-tartre (sous la tour d’évaporation dans la chambre d’eau chaude) Chambre d’eau chaude (sous la tour d’évaporation, non illus- trée) Carter de l’humidificateur Creux de préhension sur le réservoir d’eau Réservoir d’eau, capacité...
  • Page 26: Mise En Service

    4. M ISE EN SERVICE Déballage Branchement de l’appareil Vérifiez la fourniture. S’il manque des AVERTISSEMENT pièces, veuillez vous adresser à votre dé- Avant de mettre l’appareil en marche, positaire. vérifiez que le cordon [14] ne présente Retirez toutes les fixations utilisées pour aucun dommage.
  • Page 27: Utilisation

    5. U TILISATION Remplissage du réservoir d’eau Si vous voulez mettre l’appareil en marche ou si le témoin de contrôle rouge [A] s’allume indiquant que le niveau d’eau est bas, remplissez le réservoir d’eau. ATTENTION Pour remplir le réservoir d’eau, utilisez exclusivement de l’eau du robinet propre.
  • Page 28: Entretien

    NTRETIEN Aperçu Votre humidificateur doit être nettoyé et AVERTISSEMENT détartré régulièrement pour que les dépôts Avant de nettoyer ou de détartrer votre générés par l’eau (par exemple calcaire) ne humidificateur : puissent pas se déposer dans l’appareil. Débranchez impérativement l’appareil Seul un entretien soigneux garantira une [14].
  • Page 29: Nettoyage De L'appareil

    Avant le nettoyage et le détartrage Mise hors secteur de l’appareil Eteignez l’appareil au moyen de la touche ON/OFF [D]. Le témoin de contrôle vert [B] s’éteint. Débranchez l’appareil [14] et attendez au moins 15 minutes que l’humidificateur ait complètement refroidi. Démontage de l’appareil Retirez le couvercle [1] de l’humidificateur.
  • Page 30: Détartrage De L'appareil

    tampon anti-tartre avec les déchets ménagers. Si l’appareil contient encore un reste d’eau, videz cette eau. Utilisez un tampon anti-tartre [4] neuf. Lavez le tampon anti-tartre [4] neuf à l’eau claire et placez-le dans la chambre d’eau chaude. Détartrage de l’appareil Détartrage de l’humidificateur N’essayez en aucun cas d’enlever les dépôts de tartre au moyen d’objets...
  • Page 31: Que Faire En Cas De Problème

    7. Q UE FAIRE EN CAS DE PROBLEME Problème Cause Remède Appareil pas branché. Branchez l’appareil [14] et Absence de allumez-le. dégagement de Réservoir d’eau [8] vide. Ajoutez de l’eau. vapeur Réservoir d’eau [8] mis en place de Mettez le réservoir en place manière incorrecte.
  • Page 32: Utilite De Lhumidification

    9. U ’ TILITE DE L HUMIDIFICATION L’humidité relative optimale à l’intérieur doit Concrètement, l’humidification artificielle être de 50 – 55 %. Notamment pendant la permet d’éviter les conséquences néfastes période de chauffage, l’humidité de l’air est suivantes sur la santé pouvant découler d’un souvent très inférieure à...
  • Page 33: Para Conocer El Producto

    ESPAÑOL Contenido Para conocer el producto ..... 31 Instrucciones de seguridad ..32 Descripción del aparato ....33 Humidificador del aire ....33 Panel de manejo ......33 Puesta en servicio ......34 Manejo ..........35 Cuidados ........36 Generalidades ......36 Antes de limpiar y descalcificar ..
  • Page 34: Instrucciones De Seguridad

    NSTRUCCIONES DE SEGURIDAD Almacenamiento y cuidado ¡Lea detenidamente estas instrucciones de uso! Si no se observa las instrucciones ATENCIÓN siguientes, es posible que se produzcan Limpie el aparato manera daños personales o materiales. Guarde el indicada. presente manual de instrucciones para el Asegure que no pueda penetrar agua uso y póngala a disposición de los otros en el interior del aparato, ni sobre el...
  • Page 35: Descripción Del Aparato

    ESCRIPCIÓN DEL APARATO Humidificador del aire Cubierta Tobera de vapor Torre de vapor Almohadilla antical (debajo de la torre de vapor, en la cámara de agua caliente) Cámara de agua caliente (debajo de la torre de vapor, no representada) Caja del humidificador Asideros del depósito de agua Depósito de agua, capacidad 5 litros Cierre de depósito con válvula...
  • Page 36: Puesta En Servicio

    UESTA EN SERVICIO Desembalar Conectar el cable Compruebe el suministro. Si faltasen ADVERTENCIA piezas, por favor diríjase a su distribuidor. Antes de poner el aparato en servicio, Quite todo el embalaje y sujeciones de compruebe que el cable [14] no esté transporte.
  • Page 37: Manejo

    ANEJO Llenar el depósito de agua Llena el depósito de agua cuando vaya a utilizar el aparato, o cuando se encienda el indicador de control rojo [A] señalando un nivel de agua demasiado bajo. ATENCIÓN Utilice exclusivamente agua corriente limpia para llenar el depósito de agua. No añada ningún aditivo al agua.
  • Page 38: Cuidados

    UIDADOS Generalidades Su humidificador debería ser limpiado y ADVERTENCIA descalcificado regularmente, para que los Antes de limpiar o descalcificar su residuos del agua, como p.ej. la cal, no se humidificador: puedan acumular en el aparato. Sólo el imprescindible desenchufar cuidado esmerado asegura el máximo clavija [14] de la toma de corriente.
  • Page 39: Antes De Limpiar Y Descalcificar

    Antes de limpiar y descalcificar Desenchufar el aparato de la red Apague el aparato con la tecla “ON/OFF” [D]. Se apaga el indicador de control [B] verde. Desenchufe la clavija [14] de la toma de corriente y espere por lo menos 15 minutos, hasta que el humidificador se haya enfriado completamente.
  • Page 40: Descalcificar El Aparato

    Si quedara un resto de agua en el aparato, tírela. Utilice una nueva almohadilla de cal [4]. Lave la nueva almohadilla de cal [4] con agua limpia y colóquela en la cámara de agua caliente. Descalcificar el aparato Descalcificar el humidificador Nunca intente quitar depósitos de cal con objetos puntiagudos o afilados.
  • Page 41: Qué Hacer Si Hay Problemas

    ¿Q UÉ HACER SI HAY PROBLEMAS Problema Causa Remedio Aparato no conectado a la red. Enchufar la clavija [14] y No hay vapor encender el aparato. Depósito de agua [8] vacío. Añadir agua. El depósito de agua [8] no está Colocar correctamente colocado correctamente.
  • Page 42: Los Beneficios De La Humidificación Del Aire

    OS BENEFICIOS DE LA HUMIDIFICACIÓN DEL AIRE La humedad óptima del aire ambiental en En concreto, la humidificación artificial del interiores debería ser del 50 – 55 %. Sobre aire puede evitar los siguientes daños todo durante la temporada de calefacción, la para la salud, que se pueden originar por humedad del aire suele estar muy por debajo una aportación reducida de oxígeno:...
  • Page 43: Presentazione

    ITALIANO Sommario Presentazione ........ 41 Avvertenze di sicurezza ....42 Descrizione dell’apparecchio ..43 Umidificatore ........43 Pannello di comando ......43 Messa in servizio ......44 Uso ..........45 Cura ..........46 Panoramica ........46 Prima della pulizia e della decalcificazione ........
  • Page 44: Avvertenze Di Sicurezza

    VVERTENZE DI SICUREZZA Conservazione e cura Leggere accuratamente le presenti istruzioni per l’uso. La non osservanza delle avverten- ATTENZIONE ze riportate qui si seguito può causare infor- Pulire l’apparecchio solo nel modo tuni alle persone o danni materiali. Conser- indicato. vare le istruzioni per l’uso e metterle a di- Prestare attenzione a non far penetrare sposizione anche degli altri utenti.
  • Page 45: Descrizione Dell'apparecchio

    ’ ESCRIZIONE DELL APPARECCHIO Umidificatore Copertura Ugello di erogazione del vapore Torre di vaporizzazione Pastiglia anticalcare (sotto la torre di vaporizzazione, nella camera d’acqua calda) Camera d’acqua calda (sotto la torre di vaporizzazione, non raffigurata) Involucro dell’umidificatore Impugnature sul serbatoio dell’acqua Serbatoio dell’acqua, capienza 5 litri Tappo del serbatoio con valvola Indicazione del livello d’acqua...
  • Page 46: Messa In Servizio

    ESSA IN SERVIZIO Disinballo Allacciamento del cavo di alimentazione Controllare il contenuto della fornitura. Se mancano pezzi, rivolgersi al proprio riven- AVVERTENZA ditore specializzato. Prima mettere funzione Rimuovere tutti i dispositivi di imballaggio l’apparecchio, controllare se il cavo [14] e di trasporto. presenta danneggiamenti.
  • Page 47: Uso

    Riempimento del serbatoio dell’acqua Riempire il serbatoio dell’acqua quando si mette in funzione l’apparecchio oppure quando la spia di controllo rossa [A] si accende indicando un livello d’acqua troppo basso. ATTENZIONE Per riempire il serbatoio utilizzare unicamente acqua di rubinetto fresca. Non aggiungere all’acqua in nessun caso additivi.
  • Page 48: Cura

    Panoramica Pulire e decalcificare regolarmente l’umidifi- AVVERTENZA catore per prevenire il deposito nell’appa- Prima di eseguire la pulizia o la decalcifi- recchio di sostanze sciolte nell’acqua, come cazione dell’umidificatore: ad es. il calcare. Solo una cura scrupolosa sconnettere assolutamente la spina garantisce che l’umidificatore conservi una elettrica [14] dalla presa.
  • Page 49: Prima Della Pulizia E Della Decalcificazione

    Prima della pulizia e della decalcificazione Disinserire l’apparecchio dalla rete Spegnere l’apparecchio con il pulsante ON/OFF [D]. La spia di controllo verde [B] si spegne. Sconnettere la spina elettrica [14] dalla presa e attendere almeno 15 minuti finché l’umidificatore non si sarà completamente raffreddato. Smontare l’apparecchio Rimuovere la copertura [1] dall’umidificatore.
  • Page 50: Decalcificazione Dell'apparecchio

    tire la pastiglia anticalcare nei rifiuti casalinghi. Svuotare l’eventuale acqua residua dall’apparecchio. Utilizzare una nuova pastiglia anticalcare [4]. Lavare la nuova pastiglia anticalcare [4] con acqua limpida e inserirla nella camera d’acqua calda. Decalcificazione dell’apparecchio Decalcificare l’umidificatore Non tentare in nessun caso di rimuovere i depositi calcarei con l’ausilio di oggetti appuntiti o sostanze aggressive.
  • Page 51: Che Fare Quando Sorgono Problemi

    HE FARE QUANDO SORGONO PROBLEMI Problema Causa Rimedio L’apparecchio non è connesso alla Innestare la spina (14) e ac- Nessuna eroga- rete. cendere l’apparecchio. zione di vapore Il serbatoio dell’acqua [8] è vuoto. Rabboccare con acqua. Il serbatoio dell’acqua [8] non è Inserire correttamente il serba- inserito correttamente.
  • Page 52 ’ TILITÀ DI MIDIFICAZIONE DELL ARIA Il tasso ottimale di umidità in ambienti chiu- Concretamente, l’umidificazione artificiale si è di 50 – 55%. Soprattutto durante il dell’aria può prevenire i seguenti possibili periodo di riscaldamento l’umidità è spesso danni alla salute dovuti ad un ridotto apporto di molto inferiore a questo valore raccoman- ossigeno: dato.
  • Page 53 TÜRKÇE çindekiler Tanımak için ........51 Güvenlik bilgileri ......52 Cihazın Tarifi ........53 Hava nemlendirici ......53 Kumanda alanı ......53 Çalı tırılması ........54 Kullanımı ........55 Bakımı ..........56 Genel bakı ........56 lk kez temizlemeden ve kireçten arındırmadan önce .......
  • Page 54 ÜVENL K B LG LER Bu kullanma kılavuzunu itinayla okuyunuz! Muhafaza ve bakım A a ıdaki bilgi ve uyarılara uyulmaması, D KKAT insanlara ve e yalara zarar gelmesine neden olabilir. Bu kullanma kılavuzunu saklayınız Cihazı sadece belirtildi i ekilde kılavuza ba ka kullanıcıların temizleyiniz.
  • Page 55: Hava Nemlendirici

    HAZIN AR F Hava nemlendirici Kapak Buhar çıkı a zı Buhar kulesi Kireç pedi (buhar kulesinin alt tarafında sıcak su hücresinde) Sıcak su hücresi (buhar kulesinin alt tarafında, resim yok veya görünmüyor) Hava nemlendiricinin gövdesi Su tankında tutamak çukurları Su tankı, kapasitesi 5 litre Tank kapa ı, valfli Su seviyesi göstergesi Hava filtresi kapa ı...
  • Page 56 Ç ALI TIRILMASI Ambalajdan çıkarılması Elektrik kablosunun ba lanması Teslimat kapsamını kontrol ediniz. E er UYARI parça veya parçalar eksikse, lütfen yetkili Cihazı çalı tırmadan önce, kabloda [14] satıcınıza ba vurunuz. herhangi bir hasar olup olmadı ını Tüm ambalaj nakliyat emniyet kontrol ediniz.
  • Page 57 ULLANIMI Su tankının doldurulması Cihazı çalı tıraca ınız zaman veya kırmızı kontrol lambası [A] yanarak, su seviyesinin dü ük oldu unu gösterirse, su tankını [8] doldurunuz. D KKAT Su tankını [8] doldurmak için sadece temiz musluk suyu kullanınız. Suya herhangi bir ek madde ilave etmeyiniz. Cihazı...
  • Page 58: Genel Bakı

    AKIMI Genel bakı Hava nemlendirici muntazam aralıklar ile UYARI temizlenmeli ve örn. sudaki kireç gibi artık ve Hava nemlendiriciyi temizlemeden veya tortuların cihaza yapı masının önlenmesi kireçten arındırmadan önce: için, cihazda kireçten arındırma i lemi Elektrik fi ini [14] kesinlikle çekip yapılmalıdır.
  • Page 59: Lk Kez Temizlemeden Ve Kireçten Arındırmadan Önce

    lk kez temizlemeden ve kireçten arındırmadan önce Cihazın elektrik ba lantısının çözülmesi Cihazı kapatmak için, ON/OFF tu una [D] basınız. Ye il kontrol göstergesi [B] söner. Elektrik fi ini [14] çekip prizden çıkarınız ve hava nemlendirici tamamen so uyuncaya kadar, en az 15 dakika bekleyiniz. Cihazın demonte edilmesi Hava nemlendiricinin kapa ını...
  • Page 60: Cihazın Kireçten Arındırılması

    E er cihazın içinde su artıkları varsa, bu artıkları dökünüz. Yeni bir kireç pedi [4] kullanınız. Yeni kireç pedini [4] temiz su ile yıkayınız ve sıcak su hücresine [5] yerle tiriniz. Cihazın kireçten arındırılması Hava nemlendiricinin kireçten arındırılması Kireç tortularını kesinlikle sivri veya keskin cisimler ile temizlemeye çalı...
  • Page 61: Problemlerde Ne Yapmalı

    ROBLEMLERDE NE YAPMALI Problem Nedeni Giderilmesi Cihazın elektrik ebekesine ba lı Elektrik fi ini [14] prize takınız Buhar çıkmıyor de il. ve cihazı açınız. Su tankı [8] bo . Su ilave ediniz. tankı yerine do ru Su tankını [8] yerine do ru takılmamı...
  • Page 62 AVA NEMLEND R C N N FAYDALARI Meskende kapalı yerlerdeki ideal hava Do ru dozajlanmı yapay hava nemi oranı % 50 – 55 arasında olmalıdır. nemlendirme, ek olarak çevredeki tozları Öncelikle ısıtma evresinde, hava nemi da tutar ve meskendeki e yalarda (ah ap, oranı...
  • Page 63 ......61 ........62 .......63 ....63 ....63 ....64 ......64 ..........65 ...........65 ..........66 ......67 ..67 ..........68 ..68 ....69 ..69 .......70 : 150...
  • Page 64 [14] [14] 2002/96/EC – WEEE („Waste Electrical and Electronic Equipment“).
  • Page 66 [14] [14] [4]. 6 « », « », . 3. [14] [1]. [8].
  • Page 67 [3]. ON/OFF [D]. [B]. « » [C] ( . 150 ( . 400 ON/OFF [D]. [14]...
  • Page 68 . 6, « », . 67 . 6, « », . 67 (7 - 14° dH) [1]. [8]. [3]. [5].
  • Page 69 3 « »).
  • Page 70 [3]. [8]. [11] [11]. [12] [12] [12] [11]. [11] [11], [14] [9].
  • Page 71 [8]. [9]. –...
  • Page 72 • • • • • • Мы предоставляем гарантию на дефекты материалов и изготовления на срок 24 месяца со дня продажи через розничную сеть. Гарантия не распространяется: • на случаи ущерба, вызванного неправильным использованием • на быстроизнашивающиеся части (головка испарителя, фильтры, стаканчик для медикаментов) • на дефекты, о которых покупатель знал в момент покупки • на случаи собственной вины покупателя. Товар сертифицирован: увлажнители воздуха, ООО „ВСЦ МИРАТЕКС „ №РОСС DE.AB02.B07630 срок действия с 07.12.2012 по 06.12.2015 гг. AB 02 Срок эксплуатации изделия: мин. 5 лет...
  • Page 73 POLSKI .....71 ..72 ......73 .....73 ........73 Uruchomienie ........74 ..........75 Konserwacja ........76 ........76 Przed oczyszczeniem i usuwaniem kamienia ........77 .....77 ..78 Po oczyszczeniu i kamienia ........78 Zakres dostawy ....78 Dane techniczne ......79 ..80 higienicznego, bezzapachowego i bezbakte- pomieszczeniach mieszkalnych i roboczych. UWAGA ru: 150 ml/h i 400 ml/h, macje.
  • Page 74 SKAZÓWKI DOT Przechowywanie i konserwacja UWAGA sposób. wraz z u przy pustym zbiorniku wody [8] oraz ó- twopalnych. Naprawa stwo poparzenia wie napr sprzedawcy. wierzchniami. Utylizacja UWAGA parowej [3], dyszy parowej [2] lub sów dot. utylizacji odpadów. Urz dzenie utyli ceniem dot.
  • Page 75 Pokrywa Dysza parowa na na rysunku) wody biornika z zaworem Klapa filtru powietrza (tylna strona Czarny filtr powietrza (tylna strona pusty. Przycisk pary dla regulacji wil- 0 ml/h wietrza...
  • Page 76 RUCHOMIENIE Wypakowanie wiedniej placówki handlowej. jest uszkodz portowe i opakowanie. sieciowym. znamionowej. gniazdo wtykowe. sany w rozdziale 6 „Konserwacja”, podroz- Uwaga zbiornik wody, strona 75.
  • Page 77 Zbior UWAGA gowej. nik wody UWAGA wodnej [3]. zacyjna Po kilku mi pary. zbiorniku wody.
  • Page 78 ONSERWACJA Przed czyszczeniem lub usuwaniem ka- UWAGA Kiedy Pokrywa [1] Dysza parowa [2] i Zbiornik wody [8] i nika [9] zanieczyszczenia albo co strona 77 Czarny filtr powietrza [12] 14° zalecamy cotygodniowe czyszczenie jest pokryta war mienia.
  • Page 79 Przed oczyszczeniem i usuwaniem kamienia roztworu octu i ciep Pokrywa [1] placówce handlowej.
  • Page 80 [5]. kamienia. roztwór do usuwania kamienia. Zalecamy cotygodniowe czyszczenie filtra powietrza. na klapie i...
  • Page 81 PROBLEMÓW Problem Przyczyna Brak wytwarza- nia pary Zbiornik wody [8] pusty. wody [8]. Zbiornik wody [8] nieszczelny. k wody [8]. nieszczelne Woda w zbiorniku wody [8] bardzo cieplejszej wody. wytwarzanie zimna. pary Zbiornik wody [8] pusty. zanieczyszczony. e mocno pokryte kamie- wody [8].
  • Page 82 OWIETRZA w pomieszczeniach wynosi 50 – 55 %. nadto kurz i zapobiega uszkodzeniom owodo- szczególnie w sezonie grzewczym. Przy- ru) takich jak instrumenty muzyczne oraz go. Wysokie koszty ogrzewania, nie otwie- ranie okien i niekorzystne warunki pogodo- otwarciu okien i drzwi”. 20°C odpowiada wil doprowadzanie wilgoci do powietrza.

Table des Matières