Beurer LB 50 Mode D'emploi
Masquer les pouces Voir aussi pour LB 50:
Table des Matières

Publicité

Les langues disponibles
  • FR

Les langues disponibles

  • FRANÇAIS, page 22

Liens rapides

D
Gebrauchsanweisung ............ 2-11
G
Instructions for use.............. 12-21
F
Mode d'emploi ..................... 22-31
E
Manual de instrucciones ..... 32-41
I
Istruzioni per l'uso ............... 42-51
Hava Nemlendirici
T
Kullanım kılavuzu ................. 52-61
Увлажнитель воздуха
r
Инструкция по
применению .........................62-71
Nawilżacz powietrza
Q
Instrukcja obsługi .................72-81
LB 50

Publicité

Table des Matières
loading

Sommaire des Matières pour Beurer LB 50

  • Page 1: Table Des Matières

    LB 50 Luftbefeuchter Umidificatore dell’aria Gebrauchsanweisung .... 2-11 Istruzioni per l’uso ....42-51 Air humidifier Hava Nemlendirici Instructions for use....12-21 Kullanım kılavuzu ....52-61 Humidificateur d’air Увлажнитель воздуха Mode d'emploi ..... 22-31 Инструкция по применению ......62-71 Humidificador de aire Nawilżacz powietrza...
  • Page 2: Lieferumfang

    DEUTSCH Inhalt 1. Zum Kennenlernen ............. 2 7. Bedienung ..............7 2. Bestimmungsgemäßer Gebrauch ......3 8. Pflege ................8 3. Funktionen des Gerätes ..........3 9. Was tun bei Problemen? .......... 10 4. Sicherheitshinweise............ 4 10. Technische Angaben ..........11 5.
  • Page 3: Bestimmungsgemäßer Gebrauch

    • Haustiere und Zimmerpflanzen werden belastet • Staubentwicklung wird gefördert • Elektrostatische Aufladung von Textilien und Kunstfasern, wie Teppiche und Kunststoffböden • Einrichtungsgegenstände aus Holz und besonders Parkettböden nehmen Schaden • Musikinstrumente verstimmen sich. Es empfiehlt sich, den Luftbefeuchter gleich zu Beginn der Heizperiode in Betrieb zu nehmen. Dadurch bleibt die vorhandene Feuchtigkeit im Innenraum und den Möbeln gleichmäßig erhalten.
  • Page 4: Sicherheitshinweise

    4. Sicherheitshinweise Lesen Sie diese Gebrauchsanweisung sorgfältig! Ein Nichtbeachten der nachfolgenden Hinweise kann Per- sonen- oder Sachschäden verursachen. Bewahren Sie die Gebrauchsanweisung auf und machen Sie diese auch anderen Anwendern zugänglich. Übergeben Sie diese Anweisung bei Weitergabe des Geräts. WARNUNG Halten Sie Kinder von Verpackungsmaterial fern.
  • Page 5: Aufbewahrung Und Pflege

    • Das Gerät ist nur für den in dieser Gebrauchsanleitung beschriebenen Zweck vorgesehen. Der Hersteller kann nicht für Schäden haftbar gemacht werden, die durch unsachgemäßen oder leicht- sinnigen Gebrauch entstehen. • Dieses Gerät ist nicht dafür bestimmt durch Personen ( einschließlich Kinder) mit eingeschränkten physischen, sensorischen oder geistigen Fähigkeiten oder mangels Erfahrung und/oder mangels Wissen benutzt zu werden, es sei denn, sie werden durch eine für ihre Sicherheit zuständige Person beaufsichtigt oder erhielten von ihr Anweisungen, wie das Gerät zu benutzen ist.
  • Page 6: Gerätebeschreibung

    5. Gerätebeschreibung Luftbefeuchter 1 Abdeckung 2 Dampfdüse 3 Dampfturm 4 Kalkpad (unterhalb des Dampfturms in der Heißwasserkammer) 5 Heißwasserkammer (unterhalb des Dampfturms, nicht abgebildet) 6 Gehäuse des Luftbefeuchters 7 Griffmulden am Wassertank 8 Wassertank, Inhalt 5 Liter 9 Tankverschluss mit Ventil 10 Wasserstandsanzeige 11 Luftfilterklappe (Geräte-Rückseite) 12 Schwarzer Luftfilter (Geräte-Rückseite)
  • Page 7: Netzkabel Anschließen

    Luftbefeuchter aufstellen ACHTUNG Stellen Sie das Gerät so auf, dass die drehbare Dampfdüse [2] nicht direkt auf eine Wand gerichtet ist. Die austretende Feuchtigkeit könnte zu Beschädigungen der Wand führen, insbesondere von Tapeten. • Stellen Sie den Luftbefeuchter auf einen ebenen, festen und wasserunempfindlichen Untergrund. •...
  • Page 8: Pflege

    3. Dampfmenge wählen • Wählen Sie die Dampfmenge über die Dampf-Taste [C] Stufe I: wenig Dampf (ca. 150 ml/h) Stufe II: viel Dampf (ca. 400 ml/h) Nach wenigen Minuten beginnt das Gerät mit der geänderten Dampfabgabe. 4. Gerät ausschalten Hinweis •...
  • Page 9: Gerät Zerlegen

    Vor dem Reinigen und Entkalken 1. Gerät vom Netz nehmen • Schalten Sie das Gerät mit der ON/OFF-Taste [D] aus. Die grüne Kontrollanzeige [B] erlischt. • Ziehen Sie den Netzstecker [14] aus der Steckdose und warten Sie mindestens 15 Minuten, bis der Luft- befeuchter vollständig ausgekühlt ist.
  • Page 10: Gerät Zusammensetzen

    • Verwenden Sie ein handelsübliches Entkalkungsmittel. • Füllen Sie die Heißwasserkammer [5] bis zum Rand mit Entkalkerlösung. • Lassen Sie die Entkalkerlösung so lange einwirken, bis sich der Kalk gelöst hat. • Schütten Sie die Entkalkerlösung weg. Kippen Sie das Gerät seitlich und entfernen Sie so die Entkalker- lösung.
  • Page 11: Technische Angaben

    Die gesetzlichen Gewährleistungen des Kunden bleiben durch die Garantie unberührt. Für Geltendma- chung eines Garantiefalles innerhalb der Garantiezeit ist durch den Kunden der Nachweis des Kaufes zu führen. Die Garantie ist innerhalb eines Zeitraumes von 3 Jahren ab Kaufdatum gegenüber der Beurer GmbH, Ulm (Germany) geltend zu machen.
  • Page 12: Scope Of Supply

    ENGLISH Contents 1. Getting to know your appliance ....... 12 7. Operation ..............17 2. Intended use ............. 13 8. Care ................18 3. Instrument functions ..........13 9. In the event of problems .......... 20 4. Safety information ............ 13 10.
  • Page 13: Intended Use

    • Electrostatic charging of textiles and synthetic fibres, such as carpets and plastic floor coverings • Wooden furniture, and especially parquet floors, are damaged • Musical instruments go out of tune. It is advisable to start operating the air humidifier right at the start of the heating period. The existing humid- ity inside the room and in the furniture can then be kept constant.
  • Page 14: Electric Shock

    WARNING Keep packaging material away from children! There is a choking hazard. Electric shock WARNING As with every electrical device, use this air humidifier carefully and cautiously, in order to avoid hazards due to electric shock. • Therefore, observe the following instructions for use: –...
  • Page 15: Storage And Care

    • Ensure that the mains cable does not pose a trip hazard. • Do not insert any objects into openings on the device. • Do not place any objects on the device. • Do not expose the device to high temperatures. •...
  • Page 16: Appliance Description

    5. Appliance description Air humidifier 1 Cover 2 Steam nozzle 3 Steam tower 4 Pad (beneath the steam tower in the hot water chamber) 5 Hot water chamber (beneath the steam tower, not illustrated) 6 Air humidifier casing 7 Water tank handles 8 Water tank, volume 5 litres 9 Tank catch, with valve 10 Water level indicator...
  • Page 17: Operation

    Air humidifier placement Caution Place the appliance so that the steam nozzle is not pointing directly at a wall. The exiting moisture might otherwise cause damage to walls, particularly to wallpaper. • Place the air humidifier on a firm, even, water-resistant surface. •...
  • Page 18: Switching Off The Appliance

    4. Switching off the appliance Note • The appliance is suitable for continuous operation. We recommend, however, that it is not operated for any length of time without supervision (night operation). • The appliance has an automatic switch-off function when the tank is empty. Press the ON/OFF button [D] in order to switch off the appliance.
  • Page 19: Disassemble The Appliance

    2. Disassemble the appliance • Remove the cover [1] from the air humidifier. • Pull the water tank out of the air humidifier using the handles [7]. Unscrew the tank catch [9] from the tank. • Pull up the steam tower [3] out of the air humidifier. Remove the steam nozzle [2] from the steam tower [3]. •...
  • Page 20: Cleaning The Air Filter

    After cleaning and descaling 1. Insert the pad • Put the cleaned pad or replacement pad [4] into the hotwater chamber. 2. Assemble the appliance • Put the steam tower [3] back into the air humidifier. Press the steam nozzle [2] into the opening at the top of the steam tower [3].
  • Page 21: Technical Details

    10. Technical details Rated output 380 W Nominal voltage 230 V / 50 Hz Water tank volume approx. 5 litres Evaporation rate Level I: 150 ml/h Level II: 400 ml/h Overheating protection Through thermostat Safeguard against If there is not enough water in the heater unit, the appliance switches off auto- running dry matically.
  • Page 22 FRANÇAIS Contenu 1. Premieres experiences ..........22 7. Utilisation ..............27 2. Utilisation conforme aux recommandations ... 23 8. Entretien ..............28 3. Fonctions de l’appareil ..........23 9. Que faire en cas de probleme ? ....... 30 4. Remarque de securite ..........24 10.
  • Page 23: Utilisation Conforme Aux Recommandations

    • Il favorise le dépôt de poussière • Il augmente la charge électrostatique des textiles et des fibres synthétiques, comme les tapis et les revêtements de sol en plastique • Il endommage les meubles en bois et notamment les parquets •...
  • Page 24: Remarque De Securite

    4. Remarque de securite Lisez attentivement le présent mode d’emploi ! La non-observation des remarques suivantes peut causer des dommages personnels ou matériels. Conservez le mode d’emploi et faites en sorte qu’il soit accessible aux autres utilisateurs. Lors du transfert de l’appareil, n’oubliez pas de donner aussi le présent mode d’emploi. AVERTISSEMENT Maintenez les emballages hors de la portée des enfants.
  • Page 25: Rangement Et Entretien

    Utilisation ATTENTION L’appareil doit être éteint et débranché après chaque utilisation et avant chaque nettoyage. • L’appareil est conçu pour l’utilisation décrite dans ce mode d’emploi. Le fabricant ne peut être tenu responsable des dommages causés par une utilisation inappropriée ou non conforme. •...
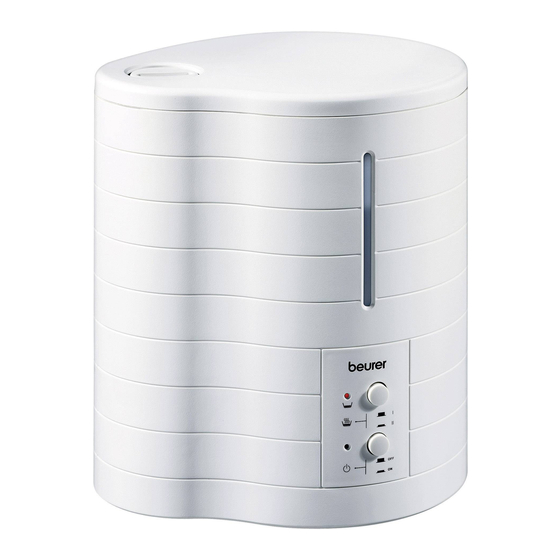
  • Page 26: Description De L'appareil

    5. Description de l‘appareil Humidificateur d’air 1 Couvercle 2 Buse de vapeur 3 Tour d’évaporation 4 Tampon anti-tartre (sous la tour d’évaporation dans la chambre d’eau chaude) 5 Chambre d’eau chaude (sous la tour d’évaporation, non illustrée) 6 Carter de l’humidificateur d’air 7 Creux de préhension sur le réservoir d’eau 8 Réservoir d’eau, capacité...
  • Page 27: Branchement De L'appareil

    Mise en place de l’humidificateur d’air ATTENTION Installez l’appareil de sorte que la buse de vapeur rotative ne soit pas tournée directement vers un mur. L’hu- midité qui en sort pourrait provoquer des dommages sur le mur, notamment sur le papier peint. •...
  • Page 28: Entretien

    3. Choix de la quantité de vapeur • Choisissez la quantité de vapeur au moyen de la touche vapeur [C] Position I : peu de vapeur (env. 150 ml/h) Position II : beaucoup de vapeur (env. 400 ml/h) Au bout de quelques minutes, le débit de vapeur de l’appareil commence à changer. 4.
  • Page 29: Démontage De L'appareil

    Avant le nettoyage et le détartrage 1. Mise hors secteur de l’appareil • Eteignez l’appareil au moyen de la touche ON/OFF [D]. Le témoin de contrôle vert [B] s’éteint. • Débranchez l’appareil [14] et attendez au moins 15 minutes que l’humidificateur d’air ait complètement refroidi.
  • Page 30: Assemblage De L'appareil

    Détartrage de l’appareil Détartrage de l’humidificateur d’air Remarque • N’essayez en aucun cas d’enlever les dépôts de tartre au moyen d’objets pointus ou tranchants. Vous pourriez endommager l’humidificateur d’air ou lui faire perdre son étanchéité. • Respectez également les consignes du fabricant de votre détartrant. •...
  • Page 31: Données Techniques

    Témoin de contrôle Réservoir d’eau [8] vide. Ajoutez de l’eau. rouge [A] allumé La vanne du bouchon du réservoir [9] Nettoyez la vanne. est recouverte de saleté. Appareil très entartré. Détartrez l’appareil. Réservoir d’eau [8] mal fermé. Fermez correctement le bouchon. Réservoir d’eau [8] mis en place de Mettez le réservoir en place manière incorrecte.
  • Page 32: Para Conocer El Producto

    ESPAÑOL Contenido 1. Para conocer el producto ......... 32 7. Manejo ..............37 2. Uso correcto ............. 33 8. Cuidados ..............38 3. Funciones del aparato ..........33 9. ¿Qué hacer si hay problemas? ........ 40 4. Instrucciones de seguridad ........34 10.
  • Page 33: Uso Correcto

    • se estimula la formación de polvo • la carga electroestática de los tejidos y fibras sintéticas, como alfombras y suelos plásticos, es mayor • los muebles de madera y, en especial, los suelos de parquet se estropean • los instrumentos musicales se desafinan. Se recomienda poner el humidificador de aire en uso nada más comenzar la temporada de calefacción.
  • Page 34: Instrucciones De Seguridad

    4. Instrucciones de seguridad ¡Lea detenidamente estas manual de instrucciones! Si no se observa las instrucciones siguientes, es posible que se produzcan daños personales o materiales. Guarde el presente manual de instrucciones y póngala a disposición de los otros eventuales usuarios. En caso de transmitir el aparato, entréguelo con estas manual de instrucciones.
  • Page 35: Almacenamiento Y Cuidado

    Manejo ATENCIÓN Se deberá desconectar y desenchufar el aparato después de cada utilización y antes de cada limpieza. • Este aparato solo está diseñado para el fin descrito en estas instrucciones de uso. El fabricante no se responsabiliza de los daños derivados de un uso indebido o irresponsable. •...
  • Page 36: Descripción Del Aparato

    5. Descripción del aparato Humidificador de aire 1 Cubierta 2 Tobera de vapor 3 Torre de vapor 4 Almohadilla antical (debajo de la torre de vapor, en la cámara de agua caliente) 5 Cámara de agua caliente (debajo de la torre de vapor, no representada) 6 Caja del humidificador de aire 7 Asideros del depósito de agua...
  • Page 37: Manejo

    Colocar el humidificador de aire ATENCIÓN Coloque el aparato de manera que la tobera giratoria de vapor no esté directamente orientada hacia una pared. La quedad saliente podría causar daños a la pared, en particular a los papeles pintados. • Coloque el humidificador de aire sobre una superficie plana, firme y resistente al agua. •...
  • Page 38: Apagar El Aparato

    3. Seleccionar la cantidad de vapor • Seleccione la cantidad de vapor con la tecla de vapor [C] Escalón I: poco vapor (aprox. 150 ml/h) Escalón II: mucho vapor (aprox. 400 ml/h) A los pocos minutos, el aparato comienza a sacar vapor con la intensidad seleccionada. 4.
  • Page 39: Desmontar El Aparato

    Antes de limpiar y descalcificar 1. Desenchufar el aparato de la red • Apague el aparato con la tecla “ON/OFF” [D]. Se apaga el indicador de control [B] verde. • Desenchufe la clavija [14] de la toma de corriente y espere por lo menos 15 minutos, hasta que el humi- dificador de aire se haya enfriado completamente.
  • Page 40: Montar El Aparato

    • Llene la cámara de agua caliente hasta el borde con solución descalcificadora. • Deje actuar la solución descalcificadora hasta que la cal se haya soltado. • Tire la solución descalcificadora. Bascule el aparato lateralmente para vaciar la solución descalcificadora. •...
  • Page 41: Datos Téchnicos

    10. Datos téchnicos Potencia nominal 380 Vatios Tensión nominal 230 V / 50 Hz Capacidad depósito Aprox. 5 litros de agua Rendimiento de Escalón I: 150 ml/h evaporación Escalón II: 400 ml/h Protección contra Por termostato recalentamiento Seguro contra marcha Cuando no hubiera agua suficiente en el cabezal calefactor, el aparato se des- en seco conecta automáticamente.
  • Page 42: Stato Di Fornitura

    ITALIANO Contenuto 1. Presentazione ............42 7. Uso ................47 2. Uso conforme ............43 8. Cura ................48 3. Funzioni dell’apparecchio ........43 9. Che fare quando sorgono problemi? ....... 50 4. Avvertenze di sicurezza ..........44 10. Specifiche techniche ..........51 5.
  • Page 43: Uso Conforme

    • Effetti negativi per animali domestici e piante da appartamento • Aumento della polvere • Carica elettrostatica di tessuti in fibra sintetica, quali tappeti e pavimenti in materiale plastico • Danneggiamento di mobili in legno e in particolare dei pavimenti in parquet •...
  • Page 44: Avvertenze Di Sicurezza

    4. Avvertenze di sicurezza Leggere accuratamente le presenti istruzioni per l’uso. La non osservanza delle avvertenze riportate qui si seguito può causare infortuni alle persone o danni materiali. Conservare le istruzioni per l’uso e metterle a disposizione anche degli altri utenti. Consegnare queste istruzioni per l’uso a chiunque intenda servirsi dell’articolo.
  • Page 45: Conservazione E Cura

    Impiego ATTENZIONE Dopo ogni uso e prima delle operazioni di pulizia, spegnere l’apparecchio ed estrarre la spina. • L’apparecchio è concepito solo per l’impiego descritto nelle presenti istruzioni per l’uso. Il produttore non è da ritenersi responsabile in caso di danni riconducibili a uso non conforme o sconsiderato. •...
  • Page 46: Smaltimento

    Smaltimento ATTENZIONE Per motivi ecologici, l’apparecchio non deve essere smaltito tra i normali rifiuti quando viene buttato via. Lo smaltimento deve essere effettuato negli appositi centri di raccolta. Smaltire l’apparecchio secondo la direttiva europea sui rifiuti di apparecchiature elettriche ed elettroniche (RAEE).
  • Page 47: Installazione Dell'umidificatore

    Pulizia prima di iniziare l’uso Prima di usare l’apparecchio per la prima volta, consigliamo per motivi igienici di lavare accuratamente con acqua fredda l’umidificatore e la pastiglia anticalcare [4] Procedere come descritto al capitolo 8 “Cura”, sezione “Pulizia dell’apparecchio”. Installazione dell’umidificatore ATTENZIONE Collocare l’apparecchio in modo che l’ugello orientabile di erogazione del vapore non sia rivolto direttamente contro una parete.
  • Page 48: Spegnimento Dell'apparecchio

    3. Selezione della quantità di vapore • Selezionare la quantità di vapore agendo sul pulsante del vapore [C] Livello I: poco vapore (circa150 ml/h) Livello II: molto vapore (circa 400 ml/h) Dopo pochi minuti l‘apparecchio inizia ad erogare la nuova quantità impostata di vapore. 4.
  • Page 49: Smontare L'apparecchio

    Con un grado di durezza II (da 7 a Apparecchio Consultare il capitolo 8, sezione 14° dH) dell’acqua utilizzata, con- “Decalcificazione dell’apparec- sigliamo una pulizia settimanale chio”. dell’apparecchio. Pulire al più tardi quando la camera d’acqua calda è coperta da uno strato di calcare. Prima della pulizia e della decalcificazione 1.
  • Page 50: Rimontare L'apparecchio

    Decalcificazione dell’apparecchio 1. Decalcificare l’umidificatore Nota • Non tentare in nessun caso di rimuovere i depositi calcarei con l’ausilio di oggetti appuntiti o sostanze aggressive. L’umidificatore potrebbe danneggiarsi o non essere più stagno. • Rispettare sempre le indicazioni del produttore concernenti il decalcificante. •...
  • Page 51: Specifiche Techniche

    La spia di controllo Il serbatoio dell’acqua [8] è vuoto. Rabboccare con acqua. rossa [A] è accesa La valvola del tappo del serbatoio [9] è Pulire la valvola. ricoperta di sporcizia. L’apparecchio è fortemente calcificato. Decalcificare l’apparecchio. Il serbatoio dell’acqua [8] non è chiuso Chiudere correttamente il tappo.
  • Page 52 TÜRKÇE Içindekiler 1. Tanimak için .............. 52 7. Kullanimi ..............57 2. Amacına uygun kullanım .......... 53 8. Bakimi ............... 58 3. Cihazın işlevleri ............53 9. Problemlerde ne yapmali? ........60 4. Güvenlik bilgileri ............53 10. Teknik bilgiler ............61 5.
  • Page 53: Amacına Uygun Kullanım

    • Halı veya muşamba gibi sentetik lifli ürünlerde elektrostatik yük oluşur • Özellikle parke gibi tahta kaplamalar zarar görür • Müzik enstrümanlarının ayarı bozulur. Hava nemlendiricinin hemen ısıtma evresinin başlangıcında devreye sokulması önerilir. Böylelikle mevcut nem, mekan ve mobilyalar içinde muntazam oranda kalır. Cihaz, ısıtma evresinin ilk haftalarında, en az % 50 oranına ulaşılacak şekilde kullanılmalıdır.
  • Page 54 UYARI Çocukları ambalaj malzemesinden uzak tutun. Boğulma tehlikesi vardır. Elektrik Çarpması UYARI Elektrik çarpması tehlikesinden kaçınmak için elektrikli her alet gibi bu hava nemlendiricisi de dikkatli biçimde kullanılmalıdır. • Bu nedenle cihazınızı çalıştırırken şunlara dikkat edin – yalnız cihaz üzerinde belirtilen elektrik voltajı ile, –...
  • Page 55 • Cihazı yüksek sıcaklıklardan koruyun. • Cihazı özenle kullanarak su nedeniyle oluşabilecek hasarları önleyin (örn. ahşap zeminlerde su sıçraması nedeniyle oluşabilecek hasarlar). • Cihaz yanlışlıkla devrilirse, cihaz kapalı ve prize takılı olmasa dahi su sızdırabilir. • Hava nemlendiricinin bulunduğu ortam nemli olabilir. •...
  • Page 56: Cihazin Tarifi

    5. Cihazin tarifi Hava nemlendirici 1 Kapak 2 Buhar çıkış ağzı 3 Buhar kulesi 4 Kireç pedi (buhar kulesinin alt tarafında sıcak su hücresinde) 5 Sıcak su hücresi (buhar kulesinin alt tarafında, resim yok veya görünmüyor) 6 Hava nemlendiricinin gövdesi 7 Su tankında tutamak çukurları...
  • Page 57: Kullanimi

    Hava nemlendiricinin yerleştirilmesi DİKKAT Cihazı, çevrilebilen buhar çıkış ağzı [2] doğrudan bir duvara yöneltilmemiş olacak şekilde yerleştiriniz. Cihaz- dan çıkan nem, duvarda zarara neden olabilir, özellikle de duvar kağıdında hasar oluşabilir. • Hava nemlendiriciyi düz, sağlam ve suya karşı hassas olmayan bir zeminin üzerine yerleştiriniz. •...
  • Page 58: Bakimi

    4. Cihazın kapatılması • Cihaz sürekli kullanılmaya uygundur. Yine de, cihazı uzun süre denetimsiz çalıştırmamanızı tavsiye ediyoruz (gece çalıştırma durumunda). • Cihaz, su tankı boş olduğu zaman devreye giren bir otomatik kapatma fonksiyonuna sahiptir. Cihazı kapatmak için, ON/OFF tuşuna [D] basınız. Yeşil kontrol göstergesi [B] söner. 8.
  • Page 59: Cihazın Temizlenmesi

    2. Cihazın demonte edilmesi • Hava nemlendiricinin kapağını [1] çıkarınız. • Su tankını [8] tutamak çukurlarından [7] tutarak, yukarıya doğru hava nemlendiriciden çekip çıkarınız. Tank kapağını [9] çevirerek, su tankından [8] çözüp alınız. • Buhar kulesini [3] yukarıya doğru hava nemlendiriciden çekip çıkarınız. Buhar çıkış ağzını [2] buhar kule- sinden [3] çıkarınız.
  • Page 60: Hava Filtresinin Temizlenmesi

    Temizleme ve kireçten arındırma işlemlerinden sonra 1. Kireç pedi takılması • Temizlenmiş kireç pedini veya yedek kireç pedini [4] sıcak su hücresine [5] yerleştiriniz. 2. Cihazın toplanması (monte edilmesi) • Buhar kulesini [3] yeniden hava nemlendiricinin içine yerleştiriniz. Buhar çıkış ağzını [2], buhar kulesinin [3] üst tarafındaki deliği bastırınız.
  • Page 61: Teknik Bilgiler

    10. Teknik bilgiler Nominal güç 380 Watt Nominal gerilim 230 V / 50 Hz Su tankının kapasitesi Yakl. 5 litre Buharlaştırma gücü Kademe I: 150 ml/h Kademe II: 400 ml/h Aşırı ısınmaya karşı Termostat üzerinden koruma Kuru çalışmaya karşı Isıtma kafasında artık yeterli miktarda su olmayınca, cihaz otomatik olarak önlem kapanır.
  • Page 62 РУССКИЙ Cодержание 1. Для знакомства ............62 7. Использование ............67 2. Использование по назначению ......63 8. Уход ................68 3. Функции прибора ............ 63 9. Что делать в случае проблем? ......70 4. Указания по технике безопасности ...... 63 10.
  • Page 63: Использование По Назначению

    • Неблагоприятные условия для домашних животных и комнатных растений • Более высокая скорость пылеобразования • Повышение статического заряда текстильных изделий и искусственных волокон, например ковров и синтетических напольных покрытий • Порча предметов мебели из дерева, а также паркетных покрытий • Расстраивание музыкальных инструментов. Рекомендуется...
  • Page 64 ПРЕДОСТЕРЕЖЕНИЕ Не разрешайте детям играть с упаковочным материалом. Они могут задохнуться. Поражение электрическим током ПРЕДОСТЕРЕЖЕНИЕ Как и любой другой электрический прибор, данный увлажнитель воздуха требует осторожного и бережного обращения во избежание опасности поражения электрическим током. • Поэтому – используйте прибор только с указанным на нем напряжением; –...
  • Page 65 • Данный прибор не предназначен для использования лицами (включая детей) с ограниченными психическими, сенсорными или умственными способностями, с недостаточными знаниями или опытом, за исключением случаев, когда за ними осуществляется надлежащий надзор или если они получат от Вас инструкцию по использованию прибора. •...
  • Page 66: Панель Управления

    5. Описание прибора Увлажнитель воздуха 1. Крышка 2. Паровое сопло 3. Паровая камера 4. Таблетка от накипи (под паровой камерой в камере горячей воды) 5. Камера горячей воды (под паровой камерой, не показана) 6. Корпус увлажнителя 7. Ручки на резервуаре для воды 8.
  • Page 67 Установка увлажнителя воздуха ВНИМАНИЕ! Установите прибор таким образом, чтобы поворотное паровое сопло [2] не было направлено прямо на стенку. Выходящая влага может повредить стенку, в частности, обои. • Установите увлажнитель воздуха на ровную, прочную и не поддающуюся действию воды поверхность. •...
  • Page 68 4. Выключение прибора Указание • Прибор предназначен для непрерывного режима работы. Тем не менее, мы не рекомендуем использовать его длительное время безприсмотра(например, ночью). • Прибор оснащен функцией автоматического отключения при опорожнении резервуара для воды. Для выключения прибора нажмите кнопку ON/OFF [D]. Зеленый контрольный индикатор [В] гаснет. 8.
  • Page 69 Перед очисткой и удалением накипи 1. Отсоединение прибора от сети • Включите прибор кнопкой ON/OFF [D]. Зеленый контрольный индикатор [В] гаснет. • Вытащите вилку [14] из розетки и подождите не менее 15 минут, пока прибор полностью не охладится. 2. Разборка прибора •...
  • Page 70: Сборка Прибора

    • Оставьте раствор действовать до тех пор, пока накипь не растворится. • Вылейте раствор. Для этого наклоните прибор в бок. • Тщательно промойте прибор свежей водой. После очистки и удаления накипи 1. Укладывание таблетки от накипи • Уложите очищенную или запасную таблетку от накипи [4] в камеру горячей воды [5]. 2.
  • Page 71: Технические Данные

    10. Технические данные Номинальная мощность 380 Вт Номинальное напряжение 230 В / 50 Гц Объем резервуара для воды около 5 литров Производительность пара Положение I: 150 мл/ч Положение II: 400 мл/ч Система защиты от С помощью термостата перегрева Система защиты от сухого Если...
  • Page 72: Zakres Dostawy

    POLSKI Spis treści 1. Najważniejsze informacje ......... 72 7. Obsługa ..............77 2. Użytkowanie zgodne z przeznaczeniem ....73 8. Konserwacja ............. 78 3. Działanie urządzenia..........73 9. Postępowanie w razie problemów ......80 4. Wskazówki dot. bezpieczeństwa ......74 10. Dane techniczne ............. 81 5.
  • Page 73: Użytkowanie Zgodne Z Przeznaczeniem

    • powstają warunki sprzyjające infekcjom oraz chorobom dróg oddechowych • występuje wyczerpanie, zmęczenie i trudności w koncentracji • negatywnymi skutkami obciążone są także zwierzęta i rośliny • wzmaga się tworzenie kurzu • powstają wyładowania elektrostatyczne materiałów z tworzywa sztucznego, np. dywanów i wykładzin •...
  • Page 74: Wskazówki Dot. Bezpieczeństwa

    4. Wskazówki dot. bezpieczeństwa Należy starannie przeczytać instrukcję obsługi! Niestosowanie się do poniższych wskazówek może spowo- dować szkody rzeczowe i osobowe. Należy zachować niniejszą instrukcję obsługi i udostępniać ją także innym użytkownikom. Przy odstąpieniu urządzenia przekazać niniejszą instrukcję obsługi wraz z urządzeniem. OSTRZEŻENIE Opakowanie należy przechowywać...
  • Page 75 Obsługa UWAGA Po każdym użyciu i przed każdym czyszczeniem należy wyłączyć urządzenie i wyciągnąć wtyczkę. • Urządzenie jest przeznaczone wyłącznie do używania w celu określonym w niniejszej instrukcji obsługi. Producent nie ponosi odpowiedzialności za szkody wynikłe z nieprawidłowego lub lekko- myślnego użytkowania.
  • Page 76: Opis Urządzenia

    5. Opis urządzenia Nawilżacz powietrza 1 Pokrywa 2 Dysza parowa 3 Wieża parowa 4 Wkładka zmiękczająca wodę (pod wieżą parową w komorze gorącej wody) 5 Komora gorącej wody (pod wieżą parową, niezaznaczona na rysunku) 6 Obudowa nawilżacza powietrza 7 Wgłębienia chwytowe na zbiorniku wody 8 Zbiornik wody, pojemność...
  • Page 77: Obsługa

    • Nawilżacz należy ustawić na płaskim, stałym i odpornym na wodę podłożu. • Kabel sieciowy [14] usytuować tak, aby nie mógł on spowodować przewrócenia urządzenia. Podłączyć kabel sieciowy OSTRZEŻENIE • Przed uruchomieniem urządzenia sprawdzić, czy kabel sieciowy [14] nie jest uszkodzony. Nigdy nie używać...
  • Page 78: Konserwacja

    4. Wyłączyć urządzenie Wskazówka • Urządzenie nadaje się do pracy ciągłej. Zalecamy jednak nie załączać urządzenia na dłuższy czas bez nadzoru (pracę nocną). • Urządzenie posiada funkcję automatycznego wyłączania przy pustym zbiorniku wody. Nacisnąć przycisk ON/OFF [D] dla wyłączenia nawilżacza powietrza. Zielone światło sygnalizacyjne [B] gaśnie. 8.
  • Page 79 2. Rozłożyć urządzenie • Zdjąć pokrywę [1] z nawilżacza powietrza. • Wyciągnąć zbiornik wody [8] z nawilżacza powietrza w górę za pomocą wgłębień chwytowych [7]. Odkrę- cić zamknięcie zbiornika [9] od zbiornika wody [8]. • Wyciągnąć wieżę parową [3] z nawilżacza powietrza w górę. Zdjąć dyszę parową [2] z wieży parowej [3]. •...
  • Page 80: Postępowanie W Razie Problemów

    Po oczyszczeniu i usunięciu kamienia 1. Włożyć wkładkę zmiękczającą wodę • Włożyć oczyszczoną lub zapasową wkładkę [4] do komory gorącej wody [5]. 2. Złożyć urządzenie • Z powrotem włożyć wieżę wodną [3] do nawilżacza powietrza. Wcisnąć dyszę parową [2] do otworu u góry wieży parowej [3].
  • Page 81: Dane Techniczne

    10. Dane techniczne Moc znamionowa 380 W Napięcie znamionowe 230 V / 50 Hz Pojemność zbiornika wody Ok. 5 litrów Wydajność wytwarza- Stopień I: 150 ml/h nia pary Stopień II: 400 ml/h Ochrona przed Za pomocą termostatu przegrzaniem Ochrona przed pracą przy Przy niewystarczającej ilości wody w głowicy grzejnej następuje automatyczne braku wody wyłączenie urządzenia.
  • Page 84 Beurer GmbH • Söflinger Str. 218 • 89077 Ulm, Germany www.beurer.com • www.beurer-gesundheitsratgeber.com • www.beurer-healthguide.com...

Table des Matières