Table des Matières
Publicité
Les langues disponibles
Les langues disponibles
Liens rapides
Gebrauchs- und Montageanleitung
Induktions-Glaskeramik-Kochfeld
Instructions for fitting and use
Glass ceramic induction hob
Instructions de montage et d'utilisation
Table de cuisson vitrocéramique à induction
Gebruiks- en montage-instructies
Keramische inductiekookplaat
Istruzioni per uso e montaggio
Piano di cottura ad induzione in vetroceramica
Instrucciones para el uso y montaje
Encimera vitrocerámica per inducción
Manual de instruções de uso e de montagem
Placa de cozinhar de indução em vitrocerâmica
225146 N21
Publicité
Chapitres
Table des Matières

Manuels Connexes pour Teka IR 624


Sommaire des Matières pour Teka IR 624
- Page 1 Gebrauchs- und Montageanleitung Induktions-Glaskeramik-Kochfeld Instructions for fitting and use Glass ceramic induction hob Instructions de montage et d’utilisation Table de cuisson vitrocéramique à induction Gebruiks- en montage-instructies Keramische inductiekookplaat Istruzioni per uso e montaggio Piano di cottura ad induzione in vetroceramica Instrucciones para el uso y montaje Encimera vitrocerámica per inducción Manual de instruções de uso e de montagem...
-
Page 2: Table Des Matières
GB ............18 Hier finden Sie... Bitte lesen Sie die Informationen in diesem Heft sorgfältig durch F ............34 bevor Sie Ihr Kochfeld in Betrieb nehmen. Sie finden hier wich- tige Hinweise für Ihre Sicherheit, den Gebrauch, die Pflege und NL............ -
Page 3: Sicherheitshinweise
Sicherheitshinweise Für Anschluss und Funktion • Keine Alufolie bzw. Kunststoff auf die Kochzonen legen. Von Sicherheitshinweise der heißen Kochzone alles fernhalten, was schmelzen kann, • Die Geräte werden nach den einschlägigen Sicherheitsbestim- z.B. Kunststoffe, Folie, besonders Zucker und stark zuckerhal- mungen gebaut. -
Page 4: Gerätebeschreibung
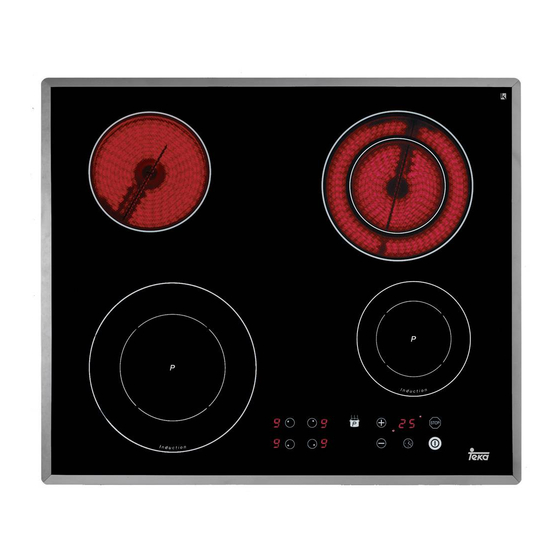
Gerätebeschreibung ät e hr ei Kochfeld Kochzone Bedienung durch Sensortasten Das Dekor kann von den Abbildungen abweichen. Die Bedienung des Glaskeramik-Kochfeldes erfolgt durch Touch- A. Induktionskochzone hinten links Control Sensortasten. Die Sensortasten funktionieren wie folgt: mit der Fingerspitze ein Symbol auf der Glaskeramikoberfläche B. -
Page 5: Bedienung
Bedienung Das Kochfeld Betriebsdauerbegrenzung Bedienung Die Kochfläche ist mit einem Induktionskochfeld ausgestattet. Das Induktionskochfeld besitzt eine automatische Betriebsdauer- Eine Induktionsspule unterhalb der Glaskeramik-Kochfläche begrenzung. erzeugt ein elektromagnetisches Wechselfeld, das die Glaskera- Die kontinuierliche Nutzungsdauer jeder Kochzone ist abhängig mik durchdringt und im Geschirrboden den wärmeerzeugenden von der gewählten Kochstufe (siehe Tabelle). -
Page 6: Geschirr Für Induktionskochfeld
Bedienung Geschirr für Induktionskochfeld • Kochtöpfe nach Möglichkeit immer mit einem passenden Deckel verschließen. Das für die Induktionskochfläche benutzte Kochgefäß muss aus • Zu jeder Speisemenge sollte der richtige Topf verwendet wer- Metall sein, magnetische Eigenschaften haben und eine ausrei- den. -
Page 7: Tastenbetätigung
Bedienung Tastenbetätigung Die hier beschriebene Steuerung erwartet nach der Betätigung einer (Aus- wahl-) Taste anschließend die Betätigung einer nachfolgenden Taste. Die Betätigung der nachfolgenden Taste muss grundsätzlich innerhalb von 10 Sekunden begonnen werden, ansonsten erlischt die Auswahl. Die Plus-/ Minus-Tasten können einzeln angetippt werden oder permanent gedrückt gehalten werden. -
Page 8: Stop-Funktion
Bedienung STOP-Funktion Der Kochvorgang kann kurzzeitig durch die STOP-Funktion unterbrochen werden, z.B. wenn es an der Haustüre klingelt. Um den Kochvorgang mit den gleichen Kochstufen fortzusetzen, muss die STOP-Funktion aufgehoben wer- den. Ein evtl. eingestellter Timer wird angehalten und läuft danach weiter. Aus Sicherheitsgründen steht diese Funktion nur 10 Minuten zu Verfügung. -
Page 9: Abschaltautomatik (Timer)
Bedienung Abschaltautomatik (Timer) Durch die Abschaltautomatik wird jede eingeschaltete Kochzone nach einer einstellbaren Zeit automatisch abgeschaltet. Es können Kochzeiten von 1 bis 99 Minuten eingestellt werden. 1. Das Kochfeld einschalten. 2. Eine oder mehrere Kochzonen einschalten und gewünschte Kochstufen wählen. 3. -
Page 10: Ankochautomatik
Bedienung Ankochautomatik Bei der Ankochautomatik erfolgt das Ankochen mit Kochstufe 9. Nach einer bestimmten Zeit wird automatisch auf eine geringere Fortkochstufe (1 bis 8) zurückgeschaltet. Bei Anwendung der Ankochautomatik muss lediglich die Fortkochstufe gewählt werden, mit der das Gargut weitergegart werden soll, weil die Elek- tronik selbständig zurückschaltet. -
Page 11: Powerstufe (Kochzonen Mit P)
Bedienung Powerstufe (Kochzonen mit P) Die Powerstufe stellt den Induktionskochzonen zusätzliche Leistung zur Ver- fügung. Eine große Menge Wasser kann schnell zum Kochen gebracht wer- den. Die Powerstufe arbeitet für 10 Minuten, anschließend wird automatisch auf Kochstufe 9 zurückgeschaltet. 1. Eine Kochzone muss eingeschaltet sein. Der Bereitschaftspunkt der Kochzone muss leuchten. -
Page 12: Reinigung Und Pflege
Reinigung und Pflege Spezielle Verschmutzungen Reinigung und Pflege Starke Verschmutzungen und Flecken (Kalkflecken, perlmuttartig glänzende Flecken) sind am besten zu • Vor dem Reinigen das Kochfeld ausschalten und abkühlen beseitigen, wenn das Kochfeld noch handwarm ist. lassen. Benutzen Sie dazu handelsübliche Reinigungsmittel. •... -
Page 13: Was Tun Bei Problemen
Was tun bei Problemen? Der Fehlercode E2 wird angezeigt? Was tun bei Problemen? Die Elektronik ist zu heiß. Den Einbau des Kochfeldes prüfen, speziell auf gute Belüftung achten. Siehe Kapitel Überhitzungsschutz. Unqualifizierte Eingriffe und Reparaturen am Gerät sind gefähr- lich, weil Stromschlag- und Kurzschlussgefahr besteht. Sie sind zur Vermeidung von Körperschäden und Schäden am Gerät zu Der Fehlercode U400 wird angezeigt? unterlassen. -
Page 14: Montageanleitung
Montageanleitung Sicherheitshinweise für den Einbau Montageanleitung Küchenmöbelmonteur Wichtige Hinweise • Liegt das Kochfeld über Möbelteilen (Seitenwände, Schubkäs- • Furniere, Kleber bzw. Kunststoffbeläge der angrenzenden ten, etc.), so muss ein Zwischenboden, im Mindestabstand Möbel müssen temperaturbeständig sein (>75°C). Sind die von 20 mm zur Kochfeldunterseite eingebaut werden, sodass Furniere und Beläge nicht genügend temperaturbeständig, können sie sich verformen. - Page 15 Montageanleitung Clipse • Die Clipse in den angegebenen Abstän- den in den Arbeitsplatten-Ausschnitt ein- schlagen. Durch horizontalen Anschlag ist keine Höhenausrichtung erforderlich. • Wichtig: der horizontale Anschlag der Clipse muss bündig auf der Arbeitsplatte aufliegen. (Bruchgefahr vermeiden) • Gemäß Abbildung die Kochfläche links anlegen (a), ausrichten (b) und einclipsen (c).
- Page 16 Montageanleitung Lasche • Das Kochfeld einsetzen und ausrichten. • Von unten die Laschen mit Schrauben an den vorgesehenen Befestigungslöchern einsetzen, ausrichten und festziehen. • Die Schrauben nur mit einem Schrauben- dreher von Hand anziehen; keinen Akku- schrauber verwenden. • Auf die richtige Lage der Lasche bei dün- nen Arbeitsplatten achten.
-
Page 17: Elektrischer Anschluss
Montageanleitung Elektrischer Anschluss Technische Daten • Der elektrische Anschluss darf nur von einem autorisier- Abmessungen Kochfeld Höhe/ Breite/ Tiefe mm 50 x 600 x 510 ten Fachmann vorgenommen werden! • Die gesetzlichen Vorschriften und Anschlussbedingungen des Kochzonen örtlichen Elektroversorgungsunternehmens müssen vollstän- hinten links Ø... - Page 18 Disposing of the packaging For your information... Please dispose of the packaging that came with your appliance in Please read this manual carefully before using your appliance. It an environmentally friendly way. Recycling in this way saves on contains important safety advice; it explains how to use and look resources and cuts down on waste.
-
Page 19: Safety Instructions
Safety instructions Connection and operation • Do not put kitchen foil or plastic onto the cooking zones. Keep Safety instructions everything which could melt, such as plastics, foil and in • The appliances are constructed in accordance with the particular sugar and sugary foods, away from the hot cooking relevant safety regulations. -
Page 20: Appliance Description
Appliance description pl ia ip ti Cooking zone Operating the hob with the touch keys The decorative design may deviate from the illustrations. The ceramic glass hob is operated with touch control sensor A. Induction cooking zone back left buttons. The touch keys are operated as follows: touch a symbol on the surface of the ceramic glass plate. -
Page 21: Operation
Operation The hob Operating time limit Operation The hob is equipped with an induction cooking mode. An The induction hob has an automatic time limit function. induction coil underneath the glass ceramic hob generates an The duration of continuous use of each cooking zone depends on electromagnetic alternating field which penetrates the glass the cooking level selected (see chart), provided that the setting of ceramic and induces the heat-generating current in the pot base. -
Page 22: Cookware For Induction Hobs
Operation Cookware for induction hobs Power settings The cookware used for the induction cooking zone must be made The heating power of the cooking zones can be set at various of metal, have magnetic properties and a sufficient base area. power levels. -
Page 23: Operating The Buttons
Operation Operating the buttons The controls described here expect the pressing of a (selection) button to be followed by the pressing of a subsequent button. The pressing of a subsequent button must always commence within 10 seconds, otherwise the selection will be deleted. The plus and minus buttons can be touched individually or be permanently pressed. -
Page 24: Stop Function
Operation STOP function The cooking process can be briefly interrupted with the STOP function, e.g. if the doorbell rings. The STOP function must be released in order to continue cooking at the same power level. If a timer has been set it will pause and will then continue. -
Page 25: Automatic Switch-Off (Timer)
Operation Automatic switch-off (timer) The automatic switch-off device is used to automatically switch off any cooking zone after a stipulated period of time. Cooking times ranging from 1 minute to 99 minutes can be set. 1. Switch on the hob. 2. -
Page 26: Automatic Boost Function
Operation Automatic boost function Parboiling takes place at power level 9 with the automatic boost function. After a certain time the power level will switch down automatically to a lower simmering setting (1 to 8). When using the automatic boost function only the simmering setting with which the food is to be cooked through needs to be selected since the electronic unit switches down automatically. -
Page 27: Power Boost Setting (Cooking Zones Marked With A P)
Operation Power boost setting (cooking zones marked with a P) The power boost setting makes additional power available for induction cooking zones. A large quantity of water can be brought to the boil very quickly. The power boost setting operates for 10 minutes, after which the power level is automatically reduced to cooking level 9. -
Page 28: Cleaning And Care
Cleaning and Care Specific soiling Cleaning and Care Heavy soiling and stains (limescaling and shiny, mother-of- pearl-type stains) can best be removed when the hob is still • Before cleaning, switch off the hob and let it cool down. slightly warm. Use commercial cleaning agents to clean the hob. •... -
Page 29: What To Do If Trouble Occurs
What to do if trouble occurs Error code E2 is indicated? What to do if trouble occurs The electronic unit is too hot. Check the installation of the hob. Make sure that there is sufficient ventilation. See the section on thermal cut-off. Interference with and repairs to the appliance by unqualified persons are dangerous as they can result in electric shock, or short circuit. -
Page 30: Instructions For Assembly
Instructions for assembly Safety instructions for kitchen unit fitters Installation Instructions for assembly • Veneers, adhesives and plastic surfaces of surrounding Important furniture must be temperature resistant (>75°C). If the veneers • If the cooking surface is located above furniture parts (side and surfaces are not sufficiently heat resistant they can panels, drawers, etc.), then an intermediate bottom must be become deformed. - Page 31 Instructions for assembly Clips • Drive the clips into the worktop cut-out at the intervals indicated. It is not necessary to adjust the height due to the horizontal stop motion device. • Important! The horizontal drive of the clips must be flush with the worktop (avoid the risk of breaks).
- Page 32 Instructions for assembly Bracket • Insert the hob and align it. • From the bottom, insert the brackets with screws in the holes provided for fastening the brackets, align the brackets and screw them tight. • Tighten the screws with a hand screw driver only;...
-
Page 33: Electrical Connection
Instructions for assembly Electrical connection Technical data • The electrical connection must be carried out by a Dimensions Hob Height/ Width/ Depth 50 x 600 x 510 qualified electrician who is authorised to carry out such work! Cooking zones • Statutory regulations and the connection specifications issued Back left Ø... - Page 34 Elimination de l’emballage Ce que vous trouverez ici... Eliminez le plus écologiquement possible l'emballage de trans- Lisez soigneusement les informations portées dans ce manuel port. Le recyclage des matériaux d'emballage permet d'économi- avant de mettre votre table de cuisson en service. Vous y trouve- ser des matières premières et de réduire le volume des déchets.
-
Page 35: Consignes De Sécurité
Consignes de sécurité Pour raccordement et fonctionnement • Ne déposez pas de feuille d'aluminium ou de film plastique sur Consignes de sécurité les zones de cuisson. Eloigner de la zone de cuisson chaude • Les appareils ont été conçus selon les normes de sécurité en tout ce qui risque de fondre, par ex. -
Page 36: Description De L'appareil
Description de l’appareil s cr ti o l’ ar ei Table de cuisson Zone de cuisson Commande par touches sensitives Le décor peut être différent de celui illustré. La commande de la table vitrocéramique se fait via les touches A. Zone de cuisson à induction arrière gauche sensitives Touch-Control. -
Page 37: Utilisation
Utilisation La table de cuisson Limitation de la durée de fonctionnement Utilisation La surface de cuisson est composée d'une table de cuisson à La table de cuisson à induction possède une limitation automa- induction. Une bobine à induction, située sous la surface vitrocé- tique de la durée de fonctionnement. -
Page 38: Vaisselle Pour Table De Cuisson À Induction
Utilisation Vaisselle pour table de cuisson à • Veillez toujours à une quantité suffisante de liquide dans la cocotte-minute; celle-ci, ainsi que la zone de cuisson pourrai- induction ent être endommagées par la surchauffe d’une casserole vide. Le récipient utilisé avec la table à induction doit être en métal, •... -
Page 39: Utilisation Des Touches
Utilisation Utilisation des touches Dans la commande décrite ici, l’appui d’une touche de sélection doit être suivi par l’appui d’une autre touche. L’appui de la touche suivante doit toujours avoir lieu sous 10 secondes, dans le cas contraire, la sélection s’efface. Les touches Plus/Moins peuvent être effleurées individuellement ou être maintenues appuyées. -
Page 40: Fonction Stop
Utilisation Fonction STOP Le déroulement de la cuisson peut être interrompu momentanément à l’aide de la fonction STOP, lorsque quelqu’un sonne à la porte. Pour continuer la cuisson avec les mêmes positions de cuisson, la fonction STOP doit être annulée. Une minuterie programmée sera arrêtée et continuera ensuite à décompter. -
Page 41: Arrêt Automatique (Minuterie)
Utilisation Arrêt automatique (minuterie) L’arrêt automatique permet d’arrêter automatiquement chaque zone de cuis- son en fonctionnement après une durée de cuisson réglable. Peuvent être réglés, des temps de cuisson allant de 1 à 99 minutes. Vous pouvez choisir entre 1 à 99 minutes. 1. -
Page 42: Précuisson Automatique
Utilisation Précuisson automatique Avec la précuisson automatique, la précuisson se fait sur position 9. Après un certain temps, le réglage est ramené automatiquement sur une position infé- rieure (1 à 8) pour terminer la cuisson. En utilisant la précuisson automatique, régler seulement la position de cuis- son à... -
Page 43: Position Power (Zones De Cuisson Avec P)
Utilisation Position Power (zones de cuisson avec P) La position Power fournit une puissance supplémentaire aux zones de cuis- son à induction. Une grande quantité d’eau peut très rapidement être portée à ébullition. La position Power travaille pendant 10 minutes, ensuite la puissance est automatiquement ramenée sur la position de cuisson 9. -
Page 44: Nettoyage Et Entretien
Nettoyage et entretien Salissures résistantes Nettoyage et entretien Des salissures importantes et taches (taches de calcaire, taches brillantes ‘nacrées’) peuvent facilement être éliminées • Avant le nettoyage, éteignez la table de cuisson et laissez-la lorsque la table de cuisson est encore tiède. Pour cela, utilisez refroidir. -
Page 45: Que Faire En Cas D'anomalie
Que faire en cas d'anomalie? Le code d’erreur E2 s’affiche ? Que faire en cas d'anomalie? L’électronique a trop chauffée. Vérifiez l’encastrement de la table de cuisson et, en particulier, la ventilation de cette dernière. Voir chapitre 1 «Protection en cas de surchauffe». interventions réparations qualifiées... -
Page 46: Instructions De Montage
Instructions de montage Consignes de sécurité pour l'installateur Montage Instructions de montage des meubles de cuisine Renseignements importants • Lorsque la table de cuisson est installée sur un meuble (paroi • Les placages, colles et revêtements plastiques des meubles latérale, tiroirs, etc.), prévoyez impérativement une isolation et avoisinants doivent résister à... - Page 47 Instructions de montage Clips • Enfoncez les clips dans la découpe réali- sée dans le plan de travail en respectant les écarts indiqués. Grâce à la fixation horizontale, aucun ajustement vertical n'est nécessaire. • Important! La butée horizontale des clips doit poser à...
- Page 48 Instructions de montage Languette • Posez la table de cuisson dans la découpe réalisée dans le plan de travail et ajustez- • En passant par le bas, fixez les languettes à l’aide de vis dans les trous de fixation prévus à cet effet; ajustez la plaque et ser- rez bien les vis.
-
Page 49: Raccordement Électrique
Instructions de montage Raccordement électrique Caractéristiques techniques • Le branchement électrique ne doit être effectué que par Dimensions Table de cuisson Hauteur/ un spécialiste agréé! Largeur/ Profondeur 50 x 600 x 510 • Les réglementations et conditions de branchement des com- pagnies locales de distribution d'électricité... - Page 50 Verwijderen van de verpakking Hier vindt u... Verwijder de transportverpakking op een zo milieubewust moge- Lees eerst zorgvuldig de informatie in dit boekje door vooraleer u lijke manier. De recyclage van het verpakkingsmateriaal uw kookplaat in gebruik neemt. Hier vindt u belangrijke richtlijnen bespaart grondstoffen en vermindert de afvalberg.
-
Page 51: Veiligheidsinstructies
Veiligheidsinstructies Voor aansluiting en werking • Geen aluminiumfolie of kunststof op de kookzones leggen. Veiligheidsinstructies Alles wat kan smelten uit de buurt van de hete kookzone hou- • De apparaten worden volgens de geldende veiligheidsvoor- den, bijv. kunststof, folie, in het bijzonder suiker en gerechten schriften gebouwd. -
Page 52: Beschrijving Van Het Apparaat
Beschrijving van het apparaat ij vi ar a kookplaat kookzone Bediening door sensoren Het decor kan van de afbeeldingen afwijken. De bediening van de keramische kookplaat gebeurt door touch- A. Inductiekookzone links achter control-sensoren. De sensoren functioneren als volgt: met de vin- gertop een symbool op het keramische oppervlak even aanra- B. -
Page 53: Bediening
Bediening De kookplaat Gebruiksduurbeperking Bediening De kookplaat is met een inductiekookveld uitgerust. Een inductie- De inductiekookplaat bezit een automatische gebruiksduurbeper- spoel onder de keramische kookplaat wekt een elektromagne- king. tisch wisselveld op, dat de vitrokeramiek doordringt en in de De ononderbroken gebruiksduur voor elke kookzone is afhanke- bodem van de pan een warmtevormende stroom induceert. -
Page 54: Servies Voor Inductiekookplaat
Bediening Servies voor inductiekookplaat • Voor elke te bereiden hoeveelheid de passende pan gebrui- ken. Een grote, nauwelijks gevulde pan verbruikt veel energie. De pannen die voor de inductiekookplaat worden gebruikt moe- ten van metaal zijn, magnetische eigenschappen bezitten en een Kookstanden voldoende grote bodem hebben. -
Page 55: Bediening Van De Toetsen
Bediening Bediening van de toetsen De hier beschreven besturing verwacht na het bedienen van een (keuze-) toets daarna de bediening van een volgende toets. De volgende toets moet principieel binnen 10 seconden worden bediend, anders wordt de keuze geannuleerd. De plus-/min-toetsen kunnen apart aangeraakt of ingedrukt gehouden wor- den. -
Page 56: Stop-Functie
Bediening STOP-functie Het koken kan tijdelijk met de STOP-toets worden onderbroken, bijv. als er aan de deur wordt gebeld. Om het koken met dezelfde kookstanden voort te zetten, moet de STOP-functie worden beëindigd. Een ev. ingestelde timer wordt gestopt en loopt daarna verder. Om veiligheidsredenen is deze functie slechts 10 minuten beschikbaar. -
Page 57: Automatische Uitschakeling (Timer)
Bediening Automatische uitschakeling (timer) Door de automatische uitschakeling wordt elke ingeschakelde kookzone na een instelbare tijd automatisch uitgeschakeld. Er kunnen kooktijden van 1 tot 99 minuten worden ingesteld. 1. De kookplaat inschakelen. 2. Een of meer kookzones inschakelen en gewenste kookstanden kiezen. 3. -
Page 58: Aankookautomatiek
Bediening Aankookautomatiek Bij de aankookautomatiek gebeurt het aan de kook brengen met kookstand 9. Na een bepaalde tijd wordt automatisch naar een lagere doorkookstand (1 tot 8) teruggeschakeld. Bij het gebruik van de aankookautomatiek moet alleen de doorkookstand worden gekozen waarmee de bereiding verder moet worden gekookt, omdat de elektronica automatisch terugschakelt. -
Page 59: Powerstand (Kookzones Met P)
Bediening Powerstand (kookzones met P) De powerstand stelt extra vermogen voor de inductiekookzones ter beschik- king. Een grote hoeveelheid water kan snel aan de kook worden gebracht. De powerstand werkt gedurende 10 minuten, vervolgens wordt automatisch naar kookstand 9 teruggeschakeld. 1. -
Page 60: Reiniging En Onderhoud
Reiniging en onderhoud Speciale verontreinigingen Reiniging en onderhoud Sterke verontreinigingen en vlekken (kalkvlekken, parelmoer- achtig glanzende vlekken) kunt u het best verwijderen als de • Vóór het reinigen de kookplaat uitschakelen en laten afkoelen. kookplaat nog lauwwarm is. Gebruik hiervoor gebruikelijke reini- •... -
Page 61: Wat Te Doen Bij Problemen
Wat te doen bij problemen? De foutcode E2 wordt aangetoond? Wat te doen bij problemen? De elektronica is te heet. De inbouw van de kookplaat controle- ren, in het bijzonder op goede beluchting letten. Zie hoofdstuk Oververhittingsbeveiliging. Ongekwalificeerde ingrepen en reparaties aan het apparaat zijn gevaarlijk omdat er gevaar voor stroomstoten en kortsluiting bestaat. -
Page 62: Montagehandleiding
Montagehandleiding Veiligheidsinstructies voor de Inbouw Montagehandleiding keukenmeubelmonteur Belangrijke opmerkingen • Indien de kookplaat boven meubelgedeelten (zijwanden, laden • Het fineer, de lijm of de kunststofbekleding van de aangren- e.d.) ligt, moet een tussenbodem met een minimale afstand zende meubels moeten temperatuurbestendig zijn (>75°C). van 20 mm t.o.v. - Page 63 Montagehandleiding Clips • De clips op de aangegeven afstanden in de uitsparing van het aanrechtblad inslaan. Door de horizontale aanslag is geen aanpassing in de hoogte nodig. • Belangrijk: de horizontale aanslag van de clips moet vlak op het aanrechtblad liggen (breukgevaar vermijden).
- Page 64 Montagehandleiding Plaatstrip • De kookplaat inzetten en justeren. • Onderlangs de plaatstrips met schroeven aan de voorziene bevestigingsgaten inzet- ten, justeren en aanhalen. • De schroeven alleen met een schroeven- draaier met de hand aanhalen; geen elek- trische schroevendraaier gebruiken. •...
-
Page 65: Elektrische Aansluiting
Montagehandleiding Elektrische aansluiting Technische gegevens • De elektrische aansluiting mag uitsluitend door een Afmetingen Kookplaat erkend vakman worden uitgevoerd! hoogte/ breedte/ diepte 50 x 600 x 510 • De wettelijke voorschriften en aansluitvoorwaarden van de plaatselijke elektriciteitsmaatschappij moeten strikt worden Kookzones nageleefd. - Page 66 Smaltimento dell'imballaggio Qui trovate... Smaltire gli imballi per il trasporto nel rispetto dell'ambiente. La Siete pregati di leggere attentamente le informazioni contenute rimessa dell’imballo nel circolo di produzione consente di rispar- nel presente manuale prima di mettere in funzione l’apparecchio. miare le materie prime e di diminuire la quantità...
-
Page 67: Indicazioni Di Sicurezza
Indicazioni di sicurezza Per il collegamento e funzionamento • Non appoggiare sulla superficie di cottura né fogli di alluminio, Indicazioni di sicurezza né materiale plastico. Tener lontano dal piano di cottura caldo • Gli apparecchi corrispondono alle attuali prescrizioni di tutto ciò... -
Page 68: Descrizione Dell'apparecchio
Descrizione dell'apparecchio s cr io n d el ar e c hi Piano di cottura Zona di cottura Uso dei sensori La decorazione del piano può differire dalle illustrazioni. L'uso del piano di cottura in vetroceramica avviene tramite i tasti A. -
Page 69: I Comandi
I comandi Il piano di cottura Limitazione della durata d'esercizio I comandi Il piano di cottura è dotato di un campo di cottura ad induzione. Il piano di cottura dispone di un dispositivo automatico che limita Una bobina di induzione situata sotto la superficie di cottura in la durata d'esercizio. -
Page 70: Pentole Da Utilizzare Per La Cottura Ad Induzione
I comandi Pentole da utilizzare per la cottura ad • Assicurarsi che la pentola a pressione contenga sufficiente liquido, perché il surriscaldamento provocato dalla sua man- induzione canza potrebbe danneggiare la pentola e la zona di cottura. I recipienti utilizzati per la superficie di cottura ad induzione •... -
Page 71: Comando A Tasti
I comandi Comando a tasti Per azionare il comando qui descritto, dopo aver premuto un tasto (di sele- zione) se ne deve premere di seguito un altro. Il secondo tasto deve essere premuto entro 10 secondi, perché altrimenti si disattiva la selezione desiderata. I tasti Più... -
Page 72: Funzione Stop
I comandi Funzione STOP Il processo di cottura può essere brevemente interrotto mediante la funzione STOP (p.e. per andare a rispondere al telefono). Per poter poi riprendere il processo di cottura allo stesso livello di potenza, bisogna disattivare la funzi- one STOP. -
Page 73: Spegnimento Automatico (Timer)
I comandi Spegnimento automatico (timer) Lo spegnimento automatico disattiva ogni zona di cottura accesa al termine di un periodo di tempo predetermintato. Si possono impostare periodi di cottura da 1 a 99 minuti. 1. Accendere il piano di cottura. 2. Accendere una o più zone di cottura e selezionare il livello di potenza desiderato. -
Page 74: Cottura Con Avvio Rapido
I comandi Cottura con avvio rapido Con questa funzione la cottura inizia al grado 9 per poi essere diminuita auto- maticamente (gradi da 1 a 8) trascorso un determinato periodo di tempo. Quando si attiva la funzione di cottura con avvio rapido, si deve impostare anche il livello di potenza per il proseguimento di cottura che sarà... -
Page 75: Funzione Power (Zona Di Cottura Con P)
I comandi Funzione Power (zona di cottura con P) La funzione Power mette a disposizione delle zone di cottura ad induzione delle potenze supplementari. Si può, per esempio, far bollire velocemente una grande quantità d'acqua. La funzione Power è attiva per 10 minuti, trascorsi i quali il livello di potenza si abbassa automaticamente a 9. -
Page 76: Pulizia E Manutenzione
Pulizia e manutenzione Macchie particolari Pulizia e manutenzione Eliminare lo sporco più difficile e le macchie persistenti (ad es. di calcare) al termine della cottura quando la zona di cottura è • Lasciare raffreddare le superfici prima di procedere alla ancora tiepida. -
Page 77: Cosa Fare In Caso Di Problemi
Cosa fare in caso di problemi? Viene visualizzato il codice di errore E2? Cosa fare in caso di problemi? L'elettronica è troppo calda. Controllare l'incasso del piano di cottura e assicurarsi che la ventilazione sia sufficiente. Vedi capitolo «Protezione da surriscaldamento». Evitare lavori e riparazioni dell'apparecchio che non siano ese- guiti da personale qualificato, perché... -
Page 78: Istruzioni Di Montaggio
Istruzioni di montaggio Indicazioni di sicurezza per il montaggio Incasso Istruzioni di montaggio dei mobili da cucina Avvertenze importanti • Qualora si trovino altri mobili (pareti laterali, cassetti, ecc.) • Impiallacciature, collanti o rivestimenti plastici sui mobili adia- sotto il piano di cottura, deve essere installato un doppio fondo centi devono essere termoresistenti (>75°C). - Page 79 Istruzioni di montaggio Le clip • Inserire le clip nell'intaglio del piano di lavoro alle distanze indicate. L'inserimento orizzontale non necessita di un'ulteriore regolazione in altezza. • Importante! l'inserimento orizzontale delle clip deve combiaciare con lo stello livello del piano di lavoro (evitare il rischio di rot- ture).
- Page 80 Istruzioni di montaggio Linguetta • Inserire ed allineare il piano di cottura. • Fissare ed allineare le linguette con le viti nei fori previsti passando dal lato inferiore. • Avvitare le viti solo con un cacciavite a mano; non usare utensili automatici. •...
-
Page 81: Collegamento Elettrico
Istruzioni di montaggio Collegamento elettrico Dati tecnici • L'allacciamento elettrico del piano di cottura deve essere Dimensioni Piano di cottura altezza effettuato da un tecnico autorizzato. /larghezza/ profondità 50 x 600 x 510 • Devono essere osservate le norme di legge e le disposizioni di collegamento dell'azienda elettrica locale. - Page 82 Eliminación de los materiales de Aquí encontrará usted... embalaje Lea por favor cuidadosamente las informaciones de este manual antes de poner en funcionamiento su encimera. Usted encon- Eliminar el embalaje de transporte en lo posible acorde al medio trará aquí indicaciones importantes para su seguridad, el ambiente.
-
Page 83: Advertencias De Seguridad
Advertencias de seguridad Conexión y funcionamiento • No colocar papel de aluminio o plásticos sobre las zonas de Advertencias de seguridad cocción. Mantener alejados de la proximidad de las placas de • Los aparatos son montados siguiendo las disposiciones de cocción aquellos materiales fácilmente fundibles, tales como seguridad correspondientes. -
Page 84: Descripción Del Aparato
Descripción del aparato s cr ci ó d el p ar Encimera Zona de cocción Manejo mediante teclas de sensor La decoración puede diferir de la representada en las figuras. El manejo del campo de cocción de vitrocerámica se lleva a cabo A. -
Page 85: Utilización
Utilización La encimera de cocción Limitación de la duración del servicio Utilización La encimera de cocción está equipada con una campo de coc- La encimera de vitrocerámica dispone de una limitación automá- ción por inducción. Una bobina de inducción debajo de la super- tica de la duración del funcionamiento. -
Page 86: Batería De Cocina Para La Encimera Por Inducción
Utilización Batería de cocina para la encimera por • Las ollas a presión permiten un ahorro considerable de tiempo y de energía gracias al espacio de cocción cerrado y a la pre- inducción sión que se genera dentro del mismo. Mediante una duración más breve de la cocción no se pierden tantas vitaminas. -
Page 87: Accionamiento De Tecla
Utilización Accionamiento de tecla El manejo aquí descrito espera, después de accionar una tecla (de selec- ción), seguidamente el accionamiento de la tecla siguiente. El accionamiento de la tecla siguiente tiene que llevarse a cabo por principio dentro de un plazo de 10 segundos, ya que en caso contrario se anula la selección. -
Page 88: Función De Stop
Utilización Función de STOP El proceso de cocción puede interrumpirse brevemente por medio de la fun- ción STOP, por ejemplo cuando llaman a la puerta de la casa. Para proseguir después el proceso de cocción con los mismos niveles, hay que anular la función STOP. -
Page 89: Automatismo De Desconexión (Temporizador)
Utilización Automatismo de desconexión (temporizador) Por medio del automatismo de desconexión es posible desconectar automá- ticamente después de un tiempo determinado todas las zonas de cocción que estuvieran conectadas. Es posible ajustar tiempos de cocción de entre 1 y 99 minutos. 1. -
Page 90: Función Golpe De Cocción
Utilización Función golpe de cocción Con el automatismo de inicio de la cocción, la cocción comienza al nivel 9. Después de un tiempo determinado se cambia a un nivel de cocción más bajo (de 1 a 8). Cuando se emplea el automatismo de inicio de cocción sólo hay que elegir el nivel de cocción con el que se desea que prosiga la cocción después del ini- cio, ya que la electrónica cambia automáticamente a ese nivel. -
Page 91: Nivel «Power» (Zonas De Cocción Con P)
Utilización Nivel «power» (zonas de cocción con P) El nivel «power» pone potencia adicional a disposición de las zonas de coc- ción por inducción. Así es posible poner a punto de ebullición rápidamente una gran cantidad de agua. El nivel «power» funciona durante 10 minutos, después se cambia automáti- camente al nivel 9. -
Page 92: Limpieza Y Conservación
Limpieza y conservación Suciedad especial Limpieza y conservación Suciedad fuerte y manchas (manchas de cal, manchas que bri- llan a modo de nácar) se eliminan mejor cuando la encimera está • Apagar los quemadores y dejar enfriar antes de la limpieza. aún un poco caliente. -
Page 93: Qué Hacer En Caso De Problemas
Qué hacer en caso de problemas ¿Se indica el código de error E2? Qué hacer en caso de problemas La electrónica está demasiado caliente. Comprobar el montaje de la encimera, observar especialmente que haya una buena ventilación. Manipulaciones y reparaciones en el aparato por parte de perso- Ver el capítulo «Protección contra sobrecalentamiento». -
Page 94: Instrucciones De Montaje
Instrucciones de montaje Indicaciones de seguridad para el • Se debe evitar un exceso de generación de calor desde abajo, Instrucciones de montaje como el causado p.ej. por un horno sin ventilador de corriente montador de muebles de cocina transversal. •... - Page 95 Instrucciones de montaje Clips • A continuación, clavar los clips en el recorte de la placa de trabajo según las distancias indicadas en la figura. Gracias al tope horizontal no resulta necesario nivelar la altura. • Importante: El tope horizontal de los clips tiene que quedar raso sobre la superficie de trabajo (evitar riesgo de rotura).
- Page 96 Instrucciones de montaje Brida • Colocar y alinear la encimera • Colocar las piezas de unión desde abajo en los agujeros de fijación previstos, ali- nearlas y apretarlas. • Apretar los tornillos a mano con un destor- nillador; no emplear un destornillador eléc- trico.
-
Page 97: Conexión Eléctrica
Instrucciones de montaje Conexión eléctrica Datos técnicos • ¡La conexión eléctrica debe ser llevada a cabo exclusiva- Dimensiones Encimera Alto/Ancho/Largo mm 50 x 600 x 510 mente por un profesional autorizado! • Deben respetarse en toda su extensión las prescripciones Zonas de cocción legales vigentes y las condiciones de conexión de la compañía trasera izquierda... - Page 98 Eliminação da embalagem Aqui você encontra... Elimine a embalagem de transporte do modo mais ecológico Leia cuidadosamente as informações contidas nesta brochura possível. O retorno dos materiais de embalagem ao ciclo de antes de colocar o aparelho em funcionamento. Aqui encontra materiais economiza matéria-prima e reduz o lixo.
-
Page 99: Indicações De Segurança
Indicações de segurança Ligação e funcionamento • Não colocar papel de alumínio ou plástico sobre as zonas de Indicações de segurança cozinhar. Manter distante da zona de cozinhar quente tudo o • Os aparelhos são construídos de acordo com as normas de que possa derreter, como p. -
Page 100: Descrição Do Aparelho
Descrição do aparelho s cr iç ã o ar el Placa de cozinhar Zona de cozinhar Comando através das teclas de sensor A aparência pode divergir das ilustrações. O comando da placa de cozinhar vitrocerâmica é efectuado A. Zona de cozinhar de indução traseira esquerda através de teclas de sensor Touch-Control. -
Page 101: Manejo
Manejo A placa de cozinhar Limitação do tempo de funcionamento Manejo A superfície de cozinhar está equipada com uma placa de A placa de cozinhar de indução possui um sistema automático cozinhar de indução. A bobina de indução, localizada por baixo de limitação do tempo de funcionamento. -
Page 102: Louça Para Placa De Cozinhar De Indução
Manejo Louça para placa de cozinhar de indução • Atender sem pre a uma quantidade suficiente de líquido na panela de pressão, uma vez que ao cozinhar vazia podem ser As panelas usadas sobre a placa de cozinhar de indução têm provocadas danificações da zona de cozinhar e da própria que ser de metal, ter propriedades magnéticas e uma área de panela devido a sobreaquecimento. -
Page 103: Accionamento De Teclas
Manejo Accionamento de teclas Após o accionamento de uma tecla (de selecção), o comando aqui descrito espera a seguir o accionamento de uma tecla seguinte. O accionamento da tecla seguinte tem que ser sempre iniciado dentro de 10 segundos; caso contrário, a selecção é apagada. As teclas de Mais/Menos podem ser tocadas individualmente ou mantidas permanentemente carregadas. -
Page 104: Função Stop
Manejo Função STOP O processo de cozinhar pode ser interrompido brevemente com a função STOP, p. ex. se alguém tocar à porta. Para continuar o processo de cozinhar com os mesmos níveis de cozimento, a função STOP precisa de ser anu- lada. -
Page 105: Sistema Automático De Desconexão (Temporizador)
Manejo Sistema automático de desconexão (temporizador) Através do sistema automático de desconexão, cada zona de cozinhar ligada é desconectada automaticamente após um determinado período de tempo ajustável. Pode-se ajustar tempos de cozinhar de 1 até 99 minutos. 1. Ligar a placa de cozinhar. 2. -
Page 106: Sistema Automático Para Levar A Fervura
Manejo Sistema automático para levar a fervura No sistema automático para levar a fervura, a primeira fervura é efectuada com o nível de cozimento 9. Após um determinado período de tempo, o sis- tema volta automaticamente para um nível de continuação de cozimento mais baixo (1 a 8). -
Page 107: Nível Power (Zonas De Cozinhar Com P)
Manejo Nível Power (zonas de cozinhar com P) O nível Power coloca à disposição das zonas de cozinhar de indução uma função adicional. Uma quantidade grande de água pode ser levada a ferver rapidamente. O nível Power trabalha durante 10 minutos e a seguir reduz-se automatica- mente para o nível de cozimento 9. -
Page 108: Limpeza E Conservação
Limpeza e conservação Sujidades especiais Limpeza e conservação Sujidades fortes e manchas (manchas de calcário, manchas nacaradas) são mais fáceis de remover quando a placa de cozi- • Desligue e deixe a placa de cozinhar arrefecer antes de a nhar ainda está morna. Utilize para isso produtos de limpeza do limpar. -
Page 109: Caso Surjam Problemas
Caso surjam problemas O código de erro E2 é indicado? Caso surjam problemas A electrónica está demasiado quente. Verificar a instalação da placa de cozinhar, atender em especial a uma boa ventilação. Ver capítulo Protecção contra o sobreaquecimento. As operações e reparações efectuadas no aparelho por pessoas não qualificadas são perigosas, uma vez que existe perigo de choque eléctrico e curto-circuito. -
Page 110: Instruções De Montagem
Instruções de montagem Indicações de segurança para o Montagem Instruções de montagem instalador de móveis de cozinha Indicações importantes • Se a placa de cozinhar estiver assente sobre partes de móveis • Os contraplacados, as colas e os revestimentos de material (paredes laterais, gavetas, etc.), tem que ser instalado um sintético dos móveis adjacentes têm que ser resistentes à... - Page 111 Instruções de montagem Clipes • Crave os clipes no entalhe do balcão nas distâncias indicadas ilustrações seguintes. Com o encosto horizontal não é necessário um alinhamento da altura. • Importante: o encosto horizontal dos clipes tem que estar alinhado sobre o bal- cão de serviço (evitar o perigo de ruptura).
- Page 112 Instruções de montagem Braçadeiras • Coloque a placa de cozinhar e alinhe-a. • Aplique as braçadeiras a partir de baixo com os parafusos nas perfurações de fixação previstas para o efeito, alinhe e aperte bem. • Aperte os parafusos apenas com uma chave de parafusos manual;...
-
Page 113: Ligação Eléctrica
Instruções de montagem Ligação eléctrica Características técnicas • A ligação eléctrica só pode ser efectuada por um técnico Medidas Placa de cozinhar autorizado! altura/ largura/ profundidademm 50 x 600 x 510 • As normas legais e as condições de ligação da empresa local de abastecimento de energia eléctrica têm que ser completa- Zonas de cozinhar mente respeitadas.