Shad S0GS66ST Mode D'emploi
Liens rapides
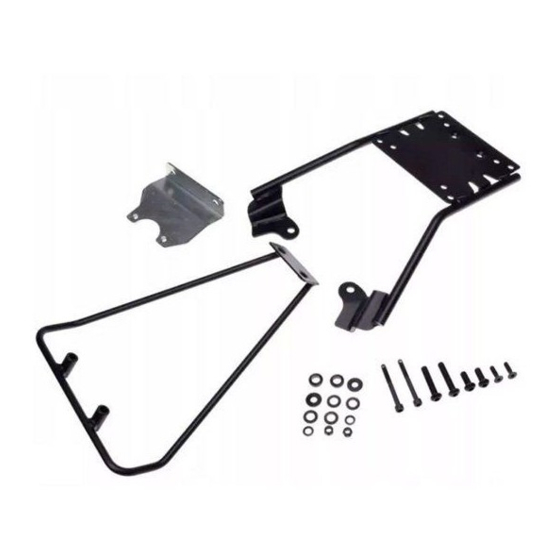
Consejo para un correcto montaje del kit: No apretar los tornillos del todo hasta asegurarse que el KIT está correctamente colocado y
alineado. En caso de montar el soporte KIT TOP (S0GS66ST) y su moto ya posee el soporte KIT SIDE (S0GS66SF) montado, deberá
desestimar los distanciadores (5).
Advice for correct fitting of the kit: Do not fully tighten the screws until it is ensured that the KIT is correctly attached and aligned. If
your motorcycle already has the KIT SIDE (S0GS66SF) support assembled and you want to assemble the KIT TOP (S0GS66ST) support,
you must discard the spacers (5).
Conseil pour un montage correct du kit: Ne pas serrer les vis avant d'être sûr que le KIT est correctement monté et ajusté. En cas de
montage du support KIT TOP (S0GS66ST) et si votre moto possède déjà le support KIT SIDE (S0GS66SF) installé, vous devrez rejeter
les entretoises (5).
Hinweis für einen korrekten Einbau des Bausatzes: Ziehen Sie die Schrauben nicht ganz fest, bevor Sie sich nicht vergewissert haben,
daß der Bausatz korrekt eingestellt und ausgerichtet ist. Falls sie die Halterung des KIT TOP (S0GS66ST) mintieren möchten, und Ihr
Motorrad hat schon eine anmontierte Halterung KIT SIDE (S0GS66SF), müssen die Distanzrohre beseitigt werden (5).
Consiglio per un montaggio corretto del kit: Non stringere del tutto le viti fin tanto non si è sicuri che il kit è collocato correttamente e
allineato. Se si vuole montare il supporto KIT TOP (S0GS66ST) e sulla moto c'è già montato il supporto KIT SIDE (S0GS66SF), si
dovranno eliminare i separatori (5).
1.
B
2.
C
E
F
2
3
1
5
6
Descolgar los intermitentes traseros (A).
Desmontar el asiento (B). Desmontar y
desestimar los tornillos laterales (C) del
agarradero (D) y en zona (E) por debajo del
guardabarros, los tornillos (F).
D
Dismantle the back indicators (A). Dismantle the
seat (B). Dismantle and remove the lateral screws
(C) from the handle (D) and in zone (E)
underneath the fenders, the screws(F).
Décrocher les clignotants arrière (A). Démonter le
siège (B). Démonter et rejeter les vis latérales (C)
de la poignée (D)et dans la zone (E) en dessous
du garde-boue, les vis (F).
Die hinteren Blinklichter (A) abmontieren. Sitz
abmontieren (B). Die Seiten-Schrauben (C) des
Haltegriffs(D) abnehmen und beseitigen und in
A
der Zone (E) unter dem Kotflügel, abmontieren
und Schrauben beseitigen (F).
Staccare le frecce posteriori (A). Smontare il
sellino (B). Smontare ed eliminare le viti laterali
(C) della Maniglia (D) e nella zona (E) sotto il
parafango, le vite (F).
Montar el soporte refuerzo (1) en zona chasis
según dibujo, mediante los tornillos (2) y
arandelas (3).
Follow the drawing to assemble the
reinforcement support (1) in the chassis zone by
means of the screws (2) and the washers (3).
Monter le support renforcement (1) dans la zone
châssis comme montre le design, au moyen des
vis (2) et des rondelles (3).
Den Stützbügel mit den jeweiligen Schrauben
(2) und Dichtungsscheiben (3) im dem Bereich
des Fahrgestelles (1) montieren.
Seguendo il disegno, montare il supporto di
rinforzo (1) nella zona telaio mediante le viti (2)
e le rondelle (3).
Montar el soporte KIT TOP (4) sobre el
4
agarradero (D), mediante los tornillos (5) y las
arandelas (6).
Assemble the KIT TOP support (4) over the
handle (D), using the screws (5) and washers (6).
D
Monter le support KIT TOP (4) sur la poignée (D),
au moyen des vis (5) et des rondelles (6).
Die Halterung KIT TOP (4) auf den Haltegriff (D),
mittels der Schrauben (5) und der Scheiben (6)
anmontieren.
Montare il supporto KIT TOP (4) sulla maniglia
(D), usando le viti (5) e le guarnizioni (6).

Manuels Connexes pour Shad S0GS66ST


Sommaire des Matières pour Shad S0GS66ST
- Page 1 Consejo para un correcto montaje del kit: No apretar los tornillos del todo hasta asegurarse que el KIT está correctamente colocado y alineado. En caso de montar el soporte KIT TOP (S0GS66ST) y su moto ya posee el soporte KIT SIDE (S0GS66SF) montado, deberá...
- Page 2 Montar el soporte KIT TOP unión (7) mediante los distanciadores (8), las arandelas (9) y los tornillos (10). Unir el soporte KIT TOP (4) al soporte KIT TOP unión (7), mediante los tornillos (11), las arandelas (12) y las tuercas (13). Assemble the KIT TOP union (7) with the spacers (8), the washers (9) and the screws (10).