Shad SH46 Mode D'emploi
Masquer les pouces
Voir aussi pour SH46:
- Manuel d'installation (2 pages) ,
- Manuel d'utilisation (2 pages)
1.
2.
3.
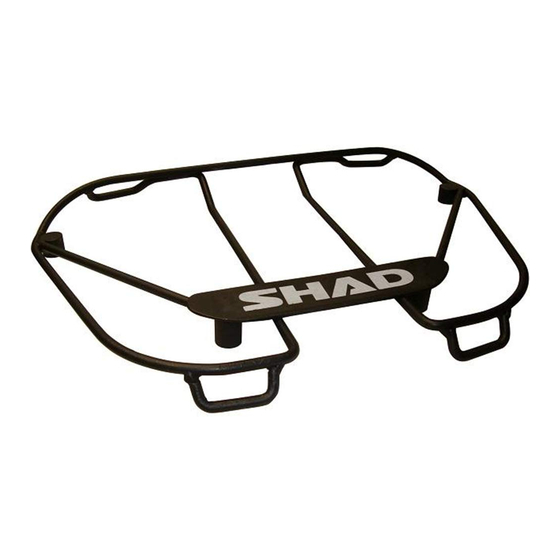
COMPONENTES / PARTS / COMPOSANTES / EINZELBAUTEILE / COMPONENTI:
POS.
REF.
CANT.
1 201061
4
Adhesivo Espumado - Foamed Steacker - Adhesive Escumé - Geschäumte Aufkleber - Adhesivi Schiumati
2 304079
2
Tornillo M6 x 30 DIN 7380 - Screw - Vis - Schraube - Vite
3 304052
2
Tornillo M6 x 20 DIN 7380 - Screw - Vis - Schraube - Vite
4 303017
4
Arandela especial Ø6 - Special washer - Rondelle spéciale - Spezielle Fassungspfanne - Rondella speciale
5 200418
4
Junta Torica Pequeña - Little O-ring Seal - Jointe Torique Petite - Kleine O-ring Dichtung - Piccolo Giunto O-ring
6 261603
4
Junta Torica Grande - Big O-ring Seal - Jointe Torique Grande - Große O-ring Dichtung - Grande Giunto O-ring
7 260213
2
Distanciador Ø16 Ø9 x 12 - Distancers - Entre-toise - Abstandshalter - Separatore
8 261590
1
Soporte Superior Maleta - Bag Superior Support - Support Superieur Valisse - Bag Überlegen Stutzungd - Supporto Superiore Valigia
Ø 8 mm
5
5 5
4
4
3
3
1
1
5
5 5
4
4
2
2
1
1
SOPORTE SUPERIOR MALETA
CONSEJO PARA UN CORRECTO MONTAJE DEL KIT: No apretar los tornillos del todo hasta
asegurarse que el KIT está correctamente colocado y alineado.
MONTAJE MALETA SH46
Colocar la plantilla según dibujo y realizar las marcas y proceder a realizar los agujeros Ø8.
Nota: asegurarse que las marcas son correctas colocando la parrilla (8) superficialmente
encima de dichas marcas, por si hay que modificar un poco la posición. También se aconseja
hacer los agujeros lo más perpendicular posible.
Montar la parrilla superior (8) en zona delantera por el interior de la maleta mediante las
arandelas (4), los tornillos (3), las juntas pequeñas (5), y por la parte superior mediante las
juntas grandes (6) y en zona posterior por el interior de la maleta mediante las arandelas (4),
los tornillos (2), las juntas pequeñas (5). Y por la parte superior mediante las juntas grandes
(6) y los distanciadores (7). Acabar montando los adhesivos espumados (1) sobre los tornillos.
BAG SUPERIOR SUPPORT
SUGGESTIONS FOR THE CORRECT ASSEMBLY OF THE KIT: Before the screws are
completely tighten, make sure that the KIT is properly placed and aligned.
ASSEMBLING BAG SH46
Put the template as the draw shows; mark it and make the holes of Ø8. Note: check the
marks are properly made by placing the grid (8) over such marks, in order to identify if a litle
modification is needed. It is also recommended to make the holes as perpendicular as
possible.
Assemble the top grid (8) to the front area at the bag interior by means of the washers (4),
the screws (3), and the little seal (5); and at the top area using the big seals (6).
In the rear area at the bag interior by using the washers (4), the screws (2),
8
and the little seals (5). And in the top area using the big seals (6) and the
spacers (7). Finally, assemble the foamed stickers (1) over the screws.
SUPPORT SUPERIEUR VALISSE
6
CONSEIL POUR LE CORRECT MONTAGE DU KIT: Ne pas serrer les vis
complètement avant d'être sur que le KIT est correctement placé et réglé.
MONTAGE VALISSE SH46
Placer la semelle comme montre le design, faire les marques et les trous Ø8.
7
Note: pour être sure que les marques sont correctes, placer la grille (8) au-
6
dessus de dites marques, a la fin qu'on puisse modifier leur place en cas de
besoin. Il est aussi conseillé de faire les trous le plus perpendiculaires
possible.
Monter la grille superieure (8) sur la zone avant par l'interieure de la valisse au moyen
des rondelles (4), les vis (3), et les jointes petites (5); et sur la parte superieure au moyen des
jointes grandes (6).
Et sur la zone posterieure par l'interieure de la valisse au moyen des rondelles (4), des vis (2),
les jointes petites (5). Et sur la zone superieure au moyen des jointes grandes (6) et les
entretoises (7). Pour finir, monter les adhesives escumés (1) sur les vis.
BAG ÜBERLEGEN STUTZUNGD
EIN TIP FÜR DEN RICHTIGEN ZUSAMMENBAU DES KITS: Die Schrauben erst dann fest
anziehen nachdem Sie sich versichert haben, dass das KIT richtig angebracht und
ausgerichtet worden ist.
MONTAGE BAG SH46
Legen Sie die Vorlage als die Auslosung zeigt, markieren Sie es und machen die Löcher Ø8.
Hinweis: Überprüfen Sie die Noten richtig sind, indem Sie die Vorlage (8) über solche
Marken, um festzustellen, ob ein litle Änderung notwendig ist, gemacht. Es wird auch
empfohlen, um die Löcher als senkrecht wie möglich zu machen.
Montieren Sie das obere Rost (8) mit dem vorderen Bereich an der Tasche innen durch die
Scheibe (4), die Schrauben (3) und der kleinen Dichtung (5) und am oberen Bereich mit den
großen Dichtungen (6). Im hinteren Bereich an der Tasche innen mit den Scheiben (4), die
Schrauben (2), und die kleinen Dichtungen (5). Und im oberen Bereich mit den großen
Dichtungen (6) und die Abstandshalter (7).
Schließlich montieren die geschäumte Aufkleber (1) über die Schrauben.
SUPPORTO SUPERIORE VALIGIA
CONSIGLIO PER UN CORRETTO MONTAGGIO DEL KIT: Non stringere del tutto le viti fino a
che non si è controllato che il KIT è collocato ed allineato correttamente.
MONTAGIO VALIGLIA SH46
Posizionare il modello comme mostrato nei disegno, fare segni e facere bucci de Ø 8. Nota:
assicurarsi che i segni sono corrette posizionando la griglia (8) sopra questi marchi, se si deve
modificare un po 'la posizione. Si consiglia inoltre di fare i buchi più verticale possibile.
Montare la griglia superiore (8) nella zona anteriore interna della valigia mediante le rondelle
(4), le viti (3) i piccoli giunti (5) e nella parte superiore mediante i grandi giunti (6).
E nella zona posteriore interna della valigia mediante le rondelle (4), le viti (2), le piccoli
giunti (5). E nella parte superiore mediante i grandi giunti (6) ed i distanziali (7).
Infine montare i adhesivi schiumati (1) sulle i viti.

Manuels Connexes pour Shad SH46


Sommaire des Matières pour Shad SH46
- Page 1 CONSEJO PARA UN CORRECTO MONTAJE DEL KIT: No apretar los tornillos del todo hasta asegurarse que el KIT está correctamente colocado y alineado. MONTAJE MALETA SH46 Colocar la plantilla según dibujo y realizar las marcas y proceder a realizar los agujeros Ø8.
- Page 2 SOPORTE SUPERIOR MALETA CONSEJO PARA UN CORRECTO MONTAJE DEL KIT: No apretar los tornillos del todo hasta asegurarse que el KIT está correctamente colocado y alineado. Ø 8 mm MONTAJE MALETA SH48 Colocar la plantilla según dibujo y realizar las marcas y proceder a realizar los agujeros Ø8. Nota: asegurarse que las marcas son correctas colocando la parrilla (8) superficialmente encima de dichas marcas, por si hay que modificar un poco la posición.
- Page 3 SOPORTE SUPERIOR MALETA CONSEJO PARA UN CORRECTO MONTAJE DEL KIT: No apretar los tornillos del todo hasta asegurarse que el KIT está correctamente colocado y alineado. Ø 8 mm MONTAJE MALETA SH49 Colocar la plantilla según dibujo y realizar las marcas y proceder a realizar los agujeros Ø8. Nota: asegurarse que las marcas son correctas colocando la parrilla (8) superficialmente encima de dichas marcas, por si hay que modificar un poco la posición.
- Page 4 SOPORTE SUPERIOR MALETA CONSEJO PARA UN CORRECTO MONTAJE DEL KIT: No apretar los tornillos del todo hasta asegurarse que el KIT está correctamente colocado y alineado. Ø 8 mm MONTAJE MALETA SH50 Colocar la plantilla según dibujo y realizar las marcas y proceder a realizar los agujeros Ø8. Nota: asegurarse que las marcas son correctas colocando la parrilla (8) superficialmente encima de dichas marcas, por si hay que modificar un poco la posición.