Publicité

Les langues disponibles
  • FR

Les langues disponibles

Liens rapides

RADIO-CONTROLLED* ALARM CLOCK
SVEGLIA RADIOCONTROLLATA*
FUNKWECKER*
RÉVEIL RADIO-COMMANDÉ*
DESPERTADOR RADIO-CONTROLADO*
Art.No.: RDP1003
EN INSTRUCTION MANUAL ............... 2
IT
ISTRUZIONI PER L'USO .............. 14
DE BEDIENUNGSANLEITUNG .......... 26
FR MODE D'EMPLOI ....................... 38
ES MANUAL DE INSTRUCCIONES .... 52
*Radio-controlled clock function not available in all territories. / Funzione di orologio radiocontrollati non disponibile in ogni territorio. / Funkuhrfunktion nicht in jederm Gebiet verfügbar. / La fonction
d'horloge radio-piloté n'est pas disponible dans tous les territoires. / La función de reloj radiocontrolado no está disponible en todos los territorios.
°C/°F
SET
180°/360°
TIME/TEMP

Publicité

Table des Matières
loading

Sommaire des Matières pour Explore Scientific RDP1003

  • Page 1 RADIO-CONTROLLED* ALARM CLOCK SVEGLIA RADIOCONTROLLATA* FUNKWECKER* RÉVEIL RADIO-COMMANDÉ* DESPERTADOR RADIO-CONTROLADO* Art.No.: RDP1003 180°/360° °C/°F EN INSTRUCTION MANUAL ....2 TIME/TEMP ISTRUZIONI PER L’USO ....14 DE BEDIENUNGSANLEITUNG ..26 FR MODE D‘EMPLOI ....... 38 ES MANUAL DE INSTRUCCIONES ..52 *Radio-controlled clock function not available in all territories.
  • Page 2: General Warnings

    ABOUT THIS INSTRUCTION MANUAL GENERAL WARNINGS These operating instructions are to be considered a component of the device. • Risk of electric shock — This device contains elec- Please read the safety instructions and the operating tronic components that operate via a power source instructions carefully before use.
  • Page 3: Before You Begin

    BEFORE YOU BEGIN proper handling could trigger a short-circuit, a fire, or an explosion. • We recommend using alkaline batteries. If temper- • Do not disassemble the device. In the event of a atures regularly fall below 0°C (32°F), we recom- defect, please contact your dealer.
  • Page 4: Product Overview

     PRODUCT OVERVIEW  1. Press [ ] to activate backlight and pro- jection for 5 seconds or to activate the snooze function to delay the alarm by 5 minutes. 2. Projection lens 3. In standard mode, press [+] to switch 12/24 hour format.
  • Page 5 7. In standard mode, press to toggle alarm on/ off. 8. In standard mode, press to flip projection 180°. Press and hold to switch from time to tempera- ture projection. 9. Battery compartment. Slide down to open. 10. Continous Projection on/off (only with AC/DC Adapter) 11.
  • Page 6 BUTTON 180°/360° [–] MODE TIME/TEMP Temperature, Turn Alarm Turn on backlight 12/24 hour Alarm 1, on/off Weekday, and projection for 5 format Projection PRESS Alarm 2, Calendar °C/°F seconds switch (AM/ 180° switch Second time Stop alarm week (SNOOZE when display (ringing) alarm is ringing)
  • Page 7: Lcd Display

     LCD DISPLAY 1. Main Time display 2. Date display and Weekday or Calendar week (Press [ ] to switch) 3. Temperature display or Alarm Time display (AL1/AL2) or Second Time display (Press [SET] to switch) ] RCC signal received ] DST ON (Daylight Saving Time) ] Foreign time / Time zone +/-12h (Hold [+] to activate/deactivate)
  • Page 8: Getting Started

    GETTING STARTED CLOCK INSERT BATTERIES CLOCK RECEPTION 1. Remove the battery door from the back. 1. When you insert or replace the batteries, RCC recep- 2. Insert 2x AAA (LR03)/1.5V batteries. Please en- tion is initiated. To manually start RCC reception sure the polarities (+/-) of the batteries match upon press and hold [ ] button.
  • Page 9: Set The Clock Manually

    SET THE CLOCK MANUALLY SET SECOND TIME FUNCTION 1. Press and hold [SET] button to enter time and date 1. Press [SET] button several times until the display setting. shows the second time. 2. The setting parameter will flash. 2. Press and hold [SET] button to enter time setting. 3.
  • Page 10 °C/°F SETTING TURN ON/OFF ALARM Press [ ] button to switch Celsius (°C) / Fahr- 1. In standard mode, press the [ ] button to turn enheit (°F). on/off the alarm. The sequence is: AL1 on  AL2 on  AL1+AL2 on  AL1+AL2 off. ALARM 2.
  • Page 11: Ec Declaration Of Conformity

    (only with AC/DC adapter). EC DECLARATION OF CONFORMITY Hereby, Bresser GmbH declares that the equipment type with part number: RDP1003 SPECIFICATIONS is in compliance with Directive: 2014/53/ EU. The full text of the EU declaration of conformity is Dimensions (Main unit): available at the following internet address: www.bress-...
  • Page 12: Fcc Declaration Of Conformity

    FCC DECLARATION OF CONFORMITY DISPOSAL This device complies with Part 15 of the Dispose of the packaging materials properly, FCC Rules. Operation is subject to the fol- according to their type, such as paper or card- lowing two conditions: (1) this device may board.
  • Page 13: Service And Warranty

    You can consult the full guarantee terms as well as information on extending the guarantee period www.bresser.de/download/RDP1003 and details of our services at www.bresser.de/ warranty_terms. SERVICE AND WARRANTY:...
  • Page 14: Avvertenze Generali

    INFORMAZIONI SUL MANUALE DI • PERICOLO DI SOFFOCAMENTO — I bambini pos- sono utilizzare il dispositivo solo sotto la vigilanza ISTRUZIONI di un adulto. I materiali di imballaggio, i sacchetti Il presente manuale è parte integrante del prodot- di plastica e le fasce in gomma possono causare soffocamento e, pertanto, devono essere conser- Non azionare il dispositivo prima di aver letto attenta- vati in modo che i bambini non riescano a raggiun-...
  • Page 15: Prima Di Iniziare

    PRIMA DI INIZIARE • Non smontare il dispositivo. Qualora dovesse ri- levarsi difettoso, rivolgersi al proprio rivenditore • Si consiglia l'uso di batterie alcaline. Se le tempe- autorizzato. Il rivenditore provvederà a contattare rature tendono regolarmente a scendere sotto 0 °C il Centro assistenza e, se necessario, spedirà...
  • Page 16  INFORMAZIONI GENERALI SUL  PRODOTTO 1. Premere [ ] per attivare la retroillumina- zione e la proiezione per 5 secondi o per atti- vare lo snooze e ritardare l'allarme di 5 minuti. 2. Lente di proiezione. 3. In modalità standard, premere [+] per passare al formato 12/24 ore.
  • Page 17 6. In modalità standard, premere [SET] per cam- biare modalità in base alla sequenza. Tempe- ratura > AL1 > AL2 > Seconda ora. Nella mo- dalità di impostazione dell'ora o della sveglia, premere per confermare l'impostazione. 7. In modalità standard, premere per attivare/ disattivare la sveglia.
  • Page 18 TASTO 180°/360° [–] MODALITÀ TIME/TEMP (IMPOSTAZIONE) Attrivare/ Visualizza- Accendere la Disattivare Visualizzare la re il giorno Azionare Attivare il retroilluminazione la sveglia temperatura, della l'iInterrut- PREMERE formato 12 e la proiezione la sveglia 1, la settimana, °C/°F tore per la Interrompe- ore (AM/PM) per 5 secondi...
  • Page 19: Display Lcd

     DISPLAY LCD 1. Visualizzazione dell'ora 2. Visualizzazione della data e del giorno della set- timana o della settimana del calendario (preme- re il tasto [ ] per cambiare visualizzazione) 3. Visualizzazione della temperatura o dell'ora della sveglia (AL1/AL2) o della seconda ora (premere [SET] per cambiare) ] indica lo stato della ricezione del Segnale RCC ricevuto...
  • Page 20: Operazioni Preliminari

    OPERAZIONI PRELIMINARI PORTA DI RICARICA USB La porta di ricarica USB consente di caricare dispositi- vi USB come smartphone o lettori MP3. INSTALLAZIONE DELLE BATTERIE 1. Rimuovere lo sportello dal vano batterie situato sul OROLOGIO retro. 2. Inserire due batterie AAA tipo LR03 da 1,5 V. Accer- tarsi che i poli (+/-) delle batterie corrispondano RICEZIONE DELL'OROLOGIO ai segni riportati nel vano.
  • Page 21: Impostazione Manuale Dell'orologio

    6. Se il dispositivo non riceve ancora il segnale, proce-  Ora  Minuto  Esci. dere all'impostazione manuale dell'ora. 7. Se non si esegue alcuna azione per 20 secondi, il valore impostato viene salvato e la modalità impo- NOTA: se si utilizza un adattatore di alimentazione, stazione viene chiusa.
  • Page 22: Impostazione Del Fuso Orario

    IMPOSTAZIONE °C/°F 5. Premere il tasto [SET] per confermare l'imposta- zione e passare al parametro successivo. 1. Premere il pulsante [ ] per passare da Cel- 6. Sequenza di impostazione: Ore  minuti  Esci. sius (°C) a Fahrenheit (°F). IMPOSTAZIONE DEL FUSO ORARIO SVEGLIA (OROLOGIO ESTERO)
  • Page 23: Attivazione/Disattivazione Della Sveglia

    PROIEZIONE ATTIVAZIONE/DISATTIVAZIONE Il proiettore visualizza l'ora sul soffitto o sulla parete e può ruotare di 180°. La visualizzazione risulta più DELLA SVEGLIA chiara in una stanza buia. Per ottenere una proiezio- 1. In modalità standard, premere il tasto [ ] per ne ottimale, posizionare l'unità...
  • Page 24: Smaltimento

    CE del Parlamento europeo sullo smaltimento il tipo di apparecchiatura identificato con il di apparecchiature elettriche ed elettroniche, codice RDP1003 è conforme alla direttiva così come recepita nelle legislazioni locali, i dispositivi 2014/53/UE. Il testo integrale della dichiarazione di elettronici usati devono essere smaltiti separatamente conformità...
  • Page 25: Garanzia E Assistenza

    è necessaria la registra- zione nel sito Web del Produttore. www.bresser.de/download/RDP1003 È possibile consultare le condizioni di garanzia nella loro interezza, le informazioni sulla proroga del perio- SERVICE AND WARRANTY: do di garanzia e i dettagli sui servizi offerti dal Pro- duttore all'indirizzo www.bresser.de/warranty_terms.
  • Page 26: Zu Dieser Anleitung

    ZU DIESER ANLEITUNG • ERSTICKUNGSGEFAHR! Kinder sollten das Gerät nur unter Aufsicht benutzen. Verpackungsmateria- Lesen Sie vor der Benutzung des Geräts aufmerk- lien (Plastiktüten, Gummibänder, etc.) von Kindern sam die Sicherheitshinweise und die Bedienungs- fernhalten! Es besteht ERSTICKUNGSGEFAHR! anleitung. Bewahren Sie diese Bedienungsanleitung •...
  • Page 27: Lieferumfang

    VOR DEM GEBRAUCH • Benutzen Sie nur die empfohlenen Batterien. Erset- zen Sie schwache oder verbrauchte Batterien im- • Wir empfehlen die Verwendung von Alkali-Mangan- mer durch einen komplett neuen Satz Batterien mit Batterien. Bei Temperaturen, die regelmäßig unter voller Kapazität. Verwenden Sie keine Batterien un- 0°C (32°F) fallen, empfehlen wir Lithiumbatterien.
  • Page 28: Produktübersicht

     PRODUKTÜBERSICHT  1. Drücken Sie [ ], um die Hintergrundbe- leuchtung und die Projektion für 5 Sekunden zu aktivieren oder um die SNOOZE/Schlummerfunk- tion zu aktivieren, um den Alarm um 5 Minuten zu verzögern. 2. Projektionslinse 3. Drücken Sie im Standardmodus [+], um in das 12/24-Stunden-Format zu wechseln.
  • Page 29 diese Taste gedrückt, um den RCC-Empfang einzu- leiten. 6. Drücken Sie im Standardmodus [SET], um den Mo- dus zu wechseln: Temperatur > AL1 > AL2 > Zweite Uhrzeit. Drücken Sie im Zeit- oder Alarmeinstellm- odus die Taste, um die Einstellung zu bestätigen. 7.
  • Page 30 TASTE 180°/360° [–] MODUS TIME/TEMP Alarm Hintergrund- ein-/aus- beleuchtung Temperatur, schalten 12/24 und Projektion Alarm 1, Wochentag, Projektion Stunden für 5 Sekunden drücken Alarm 2, Kalenderwo- °C/°F 180° Umkeh- Alarm Formatwech- aktivieren Zweite Uhrzeit rung stoppen sel (AM/PM) (SNOOOZE bei anzeigen Standard (Klingel-...
  • Page 31: Lcd-Anzeige

     LCD-ANZEIGE 1. Zeitanzeige 2. Datumsanzeige und Wochentag oder Kalender- woche (zum Umschalten [ ] drücken) 3. Temperaturanzeige oder Alarmzeitanzeige (AL1/AL2) oder Zweite Uhrzeit Anzeige (zum Umschalten [SET] drücken) ] RCC-Signal empfangen ] Sommerzeit EIN (MESZ) ] Auslandszeit / Zeitzone +/-12h (Halten Sie [+] gedrückt, zum aktivieren/ deaktivieren) ] SNOOZE/Schlummermodus aktiviert...
  • Page 32: Erste Schritte

    ERSTE SCHRITTE USB-LADEANSCHLUSS Der USB-Ladeanschluss ermöglicht das Aufladen von USB-Geräten wie Smartphones oder MP3-Player. BATTERIEN EINLEGEN 1. Entfernen Sie die Batteriefachabdeckung von der Rückseite. 2. Legen Sie 2x AAA (LR03)/1,5V Batterien ein. Bitte stellen Sie sicher, dass die Polaritäten (+/-) der Bat- UHRENEMPFANG terien bei der Installation übereinstimmen.
  • Page 33: Die Uhr Manuell Einstellen

    6. Wenn das Gerät das Signal immer noch nicht emp- 5. Drücken Sie die Taste [SET], um die Einstellung zu be- fängt, fahren Sie bitte fort, die Uhrzeit manuell ein- stätigen und zum nächsten Parameter zu gelangen. zustellen. 6. Reihenfolge der Einstellung: Jahr ...
  • Page 34 °C/°F-EINSTELLUNG 5. Drücken Sie die [SET] Taste, um die Einstellung zu bestätigen und zum nächsten Parameter zu gelan- Drücken Sie die [ ] Taste, um Celsius (°C) / gen oder zum Verlassen. Fahrenheit (°F) zu wechseln. 6. Reihenfolge der Einstellung: Stunden Minuten ...
  • Page 35: Alarm Ein-/Ausschalten

    ALARM EIN-/AUSSCHALTEN PROJEKTION Der Projektor zeigt die Uhrzeit oder Temperatur an Ih- 1. Im Standardmodus die Taste [ ] drücken, um den rer Decke oder Wand an und kann um 180° gedreht Alarm ein- oder auszuschalten. Die Reihenfolge ist: werden. Die Projektion ist in einem dunklen Raum bes- AL1 ein ...
  • Page 36: Eg-Konformitätserklärung

    Umweltamt. EG-KONFORMITÄTSERKLÄRUNG Werfen Sie Elektrogeräte nicht in den Hausmüll! Hiermit erklärt die Bresser GmbH, dass der Funkanlagentyp mit Artikelnummer: RDP1003 Gemäß der Europäischen Richtlinie 2002/96/EG der Richtlinie 2014/53/EU entspricht. Der voll- über Elektro- und Elektronik-Altgeräte und deren ständige Text der EG-Konformitätserklärung ist unter der...
  • Page 37: Garantie & Service

    Die reguläre Garantiezeit beträgt 2 Jahre und beginnt am Tag des Kaufs. Um von einer verlängerten, frei- willigen Garantiezeit wie auf dem Geschenkkarton www.bresser.de/download/RDP1003 angegeben zu profitieren, ist eine Registrierung auf unserer Website erforderlich. Die vollständigen Garan- SERVICE AND WARRANTY: tiebedingungen sowie Informationen zu Garantiezeit- verlängerung und Serviceleistungen können Sie unter...
  • Page 38: Avertissements - Généralités

    A PROPOS DE CE MODE D’EMPLOI AVERTISSEMENTS - Ce mode d’emploi fait partie intégrante de GÉNÉRALITÉS l’appareil. Veuillez lire les consignes de sécurité et le mode • Risque d’électrocution — Cet appareil contient d’emploi attentivement avant utilisation. des composants électroniques qui fonctionnent Conservez ce mode d’emploi pour consultation via une alimentation électrique (bloc secteur et/ ultérieure.
  • Page 39: Contenu De La Livraison

    CONTENU DE LA LIVRAISON tement la partie touchée avec beaucoup d’eau et contactez un médecin. Réveil, adaptateur secteur, mode d’emploi, 2 piles • Risque d’incendie/explosion — N’exposez pas AAA. l’appareil à des températures élevées. Utilisez uni- quement les piles recommandées. Ne court-circui- AVANT L’UTILISATION tez pas l’appareil ou les piles et ne les jetez pas •...
  • Page 40: Description Du Produit

     DESCRIPTION DU PRODUIT  1. Appuyez sur [ ] pour activer le rétroé- clairage et la projection pendant 5 secondes ou pour activer la fonction snooze et retarder l’alarme de 5 minutes. 2. Lentille de projection 3. En mode standard, appuyez sur [+] pour chan- ger le format 12/24 heures.
  • Page 41 d’unité de température °C/°F. Maintenez la touche enfoncée pour lancer la réception du signal radio-piloté. 6. En mode standard, appuyez sur [SET] pour changer de mode : Température > AL1 > AL2 > Deuxième horaire. En mode de réglage de l’heure ou de l’alarme, appuyez pour confirmer le réglage.
  • Page 42 TOUCHE 180°/360° [–] MODE TIME/TEMP Activer/ Température, Allumer le ré- désactiver Alarme 1, Changer le Jour de la troéclairage et l’alarme Basculer à la Alarme 2, format 12/24 semaine, projection pendant °C/°F projection à PUYER Affichage du heures semaine 5 secondes Arrêter 180°...
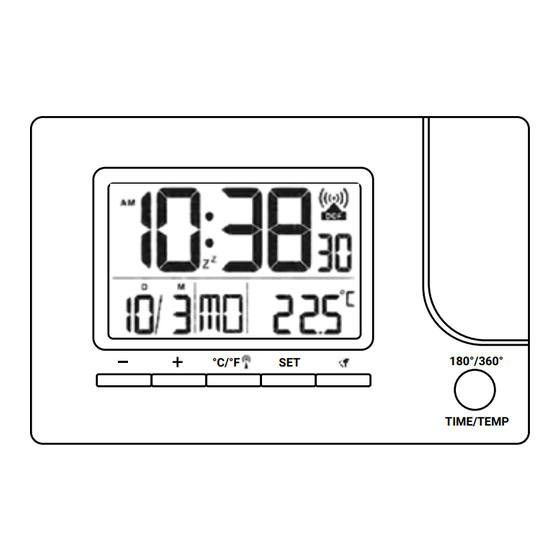
  • Page 43: Écran Lcd

     ÉCRAN LCD 1. Affichage de l’heure principale 2. Affichage de la date et du jour de la semaine ou de la semaine calendrier (Appuyez sur [ pour basculer) 3. Affichage de la température ou de l’heure d’alarme (AL1/AL2) ou affichage du deuxième horaire (Appuyez sur [SET] pour basculer) ] Signal radio-piloté...
  • Page 44: Pour Commencer

    POUR COMMENCER PORT DE CHARGE USB Le port de charge USB vous permet de charger des périphériques USB tels que des smartphones ou des INSERTION DES PILES lecteurs MP3. 1. Retirez le couvercle du compartiment à piles situé au dos. HORLOGE 2.
  • Page 45: Réglage Manuel De L'horloge

    5. Pour arrêter la réception du signal, maintenez la 6. Séquence de réglage : Année  Mois  Date  Heure  Minute  Quitter touche [ ] enfoncée. 7. Si aucune touche n’est activée pendant 20 sec- 6. Si l’appareil ne reçoit toujours pas le signal, réglez ondes, le réglage sera enregistré...
  • Page 46: Réglage Du Fuseau Horaire

    RÉGLAGE °C/°F glage et passer au paramètre suivant ou quitter. 6. Séquence de réglage : Heure  Minute  Quitter Appuyez sur la touche [ ] pour basculer en- tre degrés Celsius (°C) / Fahrenheit (°F). RÉGLAGE DU FUSEAU HORAIRE ALARME (HEURE ETRANGERE) Pour choisir une heure d’un autre fuseau horaire, suivez...
  • Page 47: Fonctionnement

    le réglage sera enregistré et l’appareil sortira du mode d’alarme prévue, sauf si vous avez désactivez la de réglage. fonction d’alarme en appuyant sur la touche UP] . ACTIVATION/DÉSACTIVATION DE PROJECTION Le projecteur affiche l’heure ou la température sur L’ALARME votre plafond ou votre mur et peut pivoter à...
  • Page 48: Déclaration De Conformité Ce

    Dimensions (unité principale) : le type d’appareil de numéro de pièce : 140 x 40 x 95 mm (L x l x h) RDP1003 satisfait à la Directive : 2014/53/ UE. L’intégralité de la déclaration de conformité UE Poids (unité principale) : est disponible à...
  • Page 49: Elimination

    ELIMINATION les ordures ménagères enfreint la Directive relative aux piles. Les piles qui contiennent des toxines sont Eliminez les matériaux d’emballage correcte- marquées avec un signe et un symbole chimique. ment en fonction de leur type, tels que le papier ou le carton.
  • Page 50: Service And Warranty

    (code QR) pour découvrir les versions disponibles. Alternativement vous pouvez également envoyer un www.bresser.de/download/RDP1003 email à l’adresse manuals@bresser.de ou laisser un message au numéro +49 (0) 28 72 – 80 74-220*. SERVICE AND WARRANTY: Veuillez toujours indiquer votre nom, votre adresse, un numéro de téléphone valide et une adresse email,...
  • Page 52: Advertencias Generales

    ACERCA DE ESTE MANUAL DE • Peligro de asfixia — Los niños solo pueden uti- lizar el aparato bajo la supervisión de un adulto. INSTRUCCIONES Mantenga el material de embalaje, como bolsas de Este manual de instrucciones debe considerarse plástico y gomas elásticas, fuera del alcance de un componente del aparato.
  • Page 53: Volumen De Suministro

    ANTES DE EMPEZAR asistencia y podrá enviar el aparato para su repa- ración si es necesario. • Le recomendamos utilizar pilas alcalinas. Si las • Utilice solo las pilas recomendadas. Siempre re- temperaturas caen regularmente por debajo de emplace las pilas débiles o gastadas por un nuevo 0 °C (32 °F), recomendamos usar pilas de litio.
  • Page 54: Vista General Del Producto

     VISTA GENERAL DEL PRODUCTO  1. Pulse [ ] para activar la retroilumina- ción y la proyección durante 5 segundos o para activar la función de repetición y repetir la alarma 5 minutos después. 2. Lente de proyección. 3. En modo estándar, pulse [+] para cambiar al formato de 12/24 horas.
  • Page 55 5. En modo estándar, con la temperatura en pan- talla, pulse [ ] para cambiar la unidad de temperatura entre °C y °F. Si mantiene pulsado el botón, iniciará la recepción de radiocontrol. 6. En modo estándar, pulse [SET] para cambiar de modo: Temperatura >...
  • Page 56 BOTÓN 180°/360° [–] MODO TIME/TEMP Activar/de- Indicación de sactivar Día de la Activar retroilumi- Cambiar temperatura, alarma semana, nación y proyección PUL- formato Voltear proyec- alarma 1, semana °C/°F 5 segundos de 12/24 h ción 180° alarma 2, Detener del calen- (SNOOZE mientras (AM/PM) segunda hora...
  • Page 57: Pantalla Lcd

     PANTALLA LCD 1. Indicación de la hora principal 2. Indicación de la fecha y el día de la semana o semana del calendario (pulsar [ ] para cam- biar) 3. Indicación de la temperatura o de la hora de alarma (AL1/AL2), o indicación de la segunda hora (pulsar [SET] para cambiar) ] Recibiendo señal de radiocontrol...
  • Page 58: Primeros Pasos

    PRIMEROS PASOS PUERTO DE CARGA USB El puerto de carga USB permite cargar aparatos USB como smartphones o reproductores de MP3. INSERCIÓN DE LAS PILAS 1. Retire la cubierta del compartimento de las pilas RELOJ de la parte posterior. 2. Inserte 2 pilas AAA (LR03) de 1,5 V. Asegúrese de RECEPCIÓN DE LA HORA que las polaridades (+/-) de las pilas coincidan en 1.
  • Page 59: Ajuste Manual Del Reloj

    6. Si el aparato sigue sin recibir la señal, ajuste la 7. Si no se realiza ninguna acción en 20 segundos, hora manualmente. el ajuste se guardará y se abandonará el modo de ajuste. NOTA: Si utiliza un adaptador de corriente, aumente la separación de la unidad principal y el adaptador de IDIOMA corriente para evitar interferencias a la hora de recibir...
  • Page 60: Activación/Desactivación De La Alarma

    AJUSTE DEL HUSO HORARIO (HORA ALARMA AJUSTE DE LA HORA DE ALARMA DUAL EXTRANJERA) Es posible ajustar dos horas de alarma (AL1 y AL2). Para ajustar la hora de un huso horario extranjero, proce- 1. En modo estándar, pulse el botón [SET] varias veces da del siguiente modo: hasta que en la pantalla aparezca «AL1»...
  • Page 61 AL1 activada  AL2 activada  AL1+AL2 activa- 1. Pulse el botón [ ] para activar la proyección das  AL1+AL2 desactivadas. 5 segundos. 2. La hora de alarma predeterminada de AL1 son las 2. Pulse el botón [180°/360°/TIME/TEMP] para vol- 6:00 h, y la de AL2, las 8:00 h.
  • Page 62: Declaración De Conformidad Ce

    ¡No tire aparatos electrónicos a la basura do- el tipo de equipo con el número de referen- méstica! De acuerdo con la Directiva 2002/96/ cia RDP1003 es acorde a la Directiva CE del Parlamento Europeo sobre residuos de 2014/53/UE. El texto completo de la declaración de aparatos eléctricos y electrónicos y su adapta-...
  • Page 63: Garantía Y Asistencia

    El periodo regular de garantía es de 2 años y comienza el día de la compra. Para beneficiarse de un período de garantía voluntario ampliado, como se indica en la caja www.bresser.de/download/RDP1003 de regalo, es necesario registrarse en nuestro sitio web. Puede consultar las condiciones de garantía SERVICE AND WARRANTY: completas, así...
  • Page 64 MANUAL DOWNLOAD: SERVICE AND WARRANTY: www.bresser.de/warranty_terms www.bresser.de/download/RDP1003 Explore Scientific GmbH Gutenbergstr. 2 · DE-46414 Rhede · Germany www.bresser.de · service@bresser.de Explore Scientific, LLC 1010 S. 48th Street, Springdale, AR 72762 www.explorescientificusa.com...

Table des Matières