Table des Matières

Publicité

Les langues disponibles
  • FR

Les langues disponibles

  • FRANÇAIS, page 38

Liens rapides

RADIO-CONTROLLED* ALARM CLOCK
SVEGLIA RADIOCONTROLLATA*
FUNKWECKER*
RÉVEIL RADIO-COMMANDÉ*
DESPERTADOR RADIO-CONTROLADO*
RADIOGESTUURDE WEKKER MET GROOT DISPLAY
Art.No.: RDC1004
EN INSTRUCTION MANUAL ............... 2
IT
ISTRUZIONI PER L'USO .............. 14
DE BEDIENUNGSANLEITUNG .......... 26
FR MODE D'EMPLOI ....................... 38
ES MANUAL DE INSTRUCCIONES .... 50
NL
MANUEEL INSTRUCTIE
*Radio-controlled clock function not available in all territories. / Funzione di orologio radiocontrollati non disponibile in ogni territorio. / Funkuhrfunktion nicht in jederm Gebiet verfügbar. / La fonction
d'horloge radio-piloté n'est pas disponible dans tous les territoires. / La función de reloj radiocontrolado no está disponible en todos los territorios./De radiogestuurde klokfunctie is niet beschikbaar
in alle gebieden.
.............. 62

Publicité

Table des Matières
loading

Sommaire des Matières pour Explore Scientific RDC1004

  • Page 1 RADIO-CONTROLLED* ALARM CLOCK SVEGLIA RADIOCONTROLLATA* FUNKWECKER* RÉVEIL RADIO-COMMANDÉ* DESPERTADOR RADIO-CONTROLADO* RADIOGESTUURDE WEKKER MET GROOT DISPLAY Art.No.: RDC1004 EN INSTRUCTION MANUAL ....2 ISTRUZIONI PER L’USO ....14 DE BEDIENUNGSANLEITUNG ..26 FR MODE D‘EMPLOI ....... 38 ES MANUAL DE INSTRUCCIONES ..50 MANUEEL INSTRUCTIE ....
  • Page 2: General Warnings

    ABOUT THIS INSTRUCTION GENERAL WARNINGS MANUAL These operating instructions are to be • Risk of electric shock — This device con considered a component of the device. tains electronic components that operate Please read the safety instructions and the via a power source (batteries). Children operating instructions carefully before use.
  • Page 3: Scope Of Delivery

    pacity. Do not use batteries from different tact, rinse the affected region immediately with a plenty of water and seek medical brands or with different capacities. The attention. batteries should be removed from the unit if it has not been used for a long time. •...
  • Page 4: Product Overview

     PRODUCT OVERVIEW Press the touch button to activate backlight for 9 seconds or to activate the snooze function to delay the alarm by 5 minutes.  Light sensor for automatic backlight at night. Press and hold [SET] to enter time and date settings mode.
  • Page 5 Battery compartment. Stand. TOUCH BUTTONS Clean the touch buttons with a dry cloth regularly to ensure perfect function.  ...
  • Page 6 BUTTON AL.SET DOWN MODE Press AL.SET or any other Turn Alarm Turn on PRESS _______ button to °C/°F on/off night light stop alarm Standard (ringing) mode Enter into Enter into Button tones Initiate RCC HOLD Time setting Alarm setting _______ on/off receiving mode...
  • Page 7: Lcd Display

      LCD DISPLAY Time display Alarm Time display Date display Indoor Temperature and humidity display ] RCC signal received  ] DST ON (Daylight Saving Time) ] Snooze activated ] Night light ON ] Alarm ON  ] Low battery indicator...
  • Page 8: Getting Started

    GETTING STARTED symbol [ ] flashes. 4. If the RCC receiving process is successful, a INSERT BATTERIES completed RCC symbol [ ] will be shown 1. Remove the battery door from the back. in the display and the date and time will be 2.
  • Page 9: Time Zone Setting

    and date setting. TIME ZONE SETTING 3. The setting parameter will flash. To set a different time zone, proceed as follows: 4. Press [UP] button once, the figure will in 1. Press and hold [SET] button to enter time crease 1 unit (when setting minute, second and date setting.
  • Page 10 6. Sequence of setting: Hour  Minute  Exit time, unless you switch off the alarm func 8. If there is no action in 20 seconds, the setting tion by pressing the [UP] button. will be saved and will exit the setting mode. SPECIFICATIONS TURN ON/OFF ALARM 1.
  • Page 11: Ec Declaration Of Conformity

    Australia or New Zealand market. EC DECLARATION OF CONFORMITY clares that the equipment type with part number: RDC1004 is in compli ance with Directive: 2014/53/EU. The full text of the EU declaration of conformity is availa ble at the following internet address: www.bresser.de/download/RDC1004/CE/...
  • Page 12 NOTES ON CLEANING collected separately and recycled in an envi ronmentally friendly manner. • Remove the batteries before cleaning. • Only use a dry cloth to clean the exterior In accordance with the regulations con of the device. To avoid damaging the cerning batteries and rechargeable bat electronics, do not use any cleaning fluid.
  • Page 13: Service And Warranty

    Would you like detailed instructions for this www.bresser.de/download/RDC1004 product in a particular language? Then visit SERVICE AND WARRANTY: our website via the link below (QR code) for available versions.
  • Page 14: Avvertenze Generali

    prescritto nel presente manuale. In caso INFORMAZIONI SUL MANUALE contrario, non sarà possibile escludere il DI ISTRUZIONI rischio di infortuni elettrici. Il presente manuale è parte integrante del • PERICOLO DI SOFFOCAMENTO — I bambini prodotto. Non azionare il dispositivo prima possono utilizzare il dispositivo solo sotto di aver letto attentamente le istruzioni di sicurezza e la vigilanza di un adulto.
  • Page 15: Accessori In Dotazione

    Rimuovere le batterie dall’unità se questa • PERICOLO DI INCENDIO/ESPLOSIONE Non esporre il dispositivo a temperature rimarrà inutilizzata per un periodo prolungato. ACCESSORI IN DOTAZIONE cortocircuiti a carico del dispositivo o delle batterie. Non gettare il dispositivo o le batterie Sveglia radiocontrollata, manuale di istruzioni, nel fuoco.
  • Page 16 INFORMAZIONI GENERALI SUL PRODOTTO attivare la retroilluminazione per 9 secondi o per attivare lo snooze e ritardare la sveglia di 5 minuti. Sensore di luce per la retroilluminazione automatica di notte. Tenendo premuto [SET], è possibile impostare l’ora e la data. Tenere premuto [AL.SET] per passare alla modalità...
  • Page 17 Premere per attivare/disattivare la funzione di retroilluminazione automatica (luce notturna). Spina jack di alimentazione. Stand. TASTI A SFIORAMENTO sfioramento con un panno asciutto per garantirne il perfetto funzionamento.
  • Page 18 TASTO AL.SET (imp. UP (su) DOWN (giù) allarme) MODALITÀ Premere AL.SET o qualsiasi altro Attivare/ Accendere PREMERE PER _______ pulsante per disattivare °C/°F la luce notturna interrompere la la sveglia sveglia (mentre Standard suona) Accedere alla Accedere alla TENERE Attivare/ Avviare la modalità...
  • Page 19: Display Lcd

      DISPLAY LCD Visualizzazione dell'ora Visualizzazione dell'ora di sveglia Visualizzazione della data Visualizzazione della temperatura interna e dell'umidità ] Segnale RCC ricevuto  ] Ora legale attivata ] Snooze attivato ] Luce notturna accesa ] Sveglia attivata ] Indicatore di batteria scarica ...
  • Page 20: Operazioni Preliminari

    OPERAZIONI PRELIMINARI 2. La durata del processo di ricezione è di 7 minuti. 3. Durante il processo di ricezione, sul display INSTALLAZIONE DELLE BATTERIE lampeggia il simbolo [ 1. Rimuovere lo sportello dal vano batterie 4. Se il processo di ricezione dell'RCC ha esito situato sul retro.
  • Page 21 attiva. Premere e tenere premuto il pulsante il valore impostato viene salvato e la modalità [DOWN] per disattivare la ricezione RCC. impostazione viene chiusa. 2. Tenendo premuto questo tasto [ SET ], è possibile impostare l’ora e la data. IMPOSTAZIONE DEL FUSO ORARIO 3.
  • Page 22: Attivazione/Disattivazione Della Sveglia

    FUNZIONAMENTO impostazione della sveglia. 3. Il parametro di impostazione inizia a 1. All'ora impostata, la sveglia inizia a suonare. lampeggiare. 2. Mentre la sveglia suona, premere il tasto a 4. Premere il tasto [ UP ] o [ DOWN ] per impostare i dati desiderati.
  • Page 23: Dichiarazione Di Conformità Ce

    Gmb H dic hi ar a che il ti po d i Tre batterie AAA tipo LR03 da 1,5 V apparecchiatura identificato con il codice RDC1004 è conforme alla direttiva 2014/53/ NOTE • Quando la temperatura è inferiore a -10 °C UE.
  • Page 24: Smaltimento

    • Tenere il dispositivo al riparo da polvere e Le normative riguardanti le batterie e le umidità. batterie ricaricabili ne vietano espressamente lo smaltimento tra i normali rifiuti domestici. Assicurarsi di smaltire le batterie SMALTIMENTO usate in accordo alle disposizioni vigenti, I materiali di imballaggio devono essere servendosi di un punto di raccolta locale o smaltiti nel modo appropriato, a seconda...
  • Page 25 Se si desidera ricevere istruzioni particolareggiate su questo prodotto in una lingua specifica, accedere al sito Web del Produttore servendosi del collegamento sottostante (codice QR) www.bresser.de/download/RDC1004 per le versioni disponibili. SERVICE AND WARRANTY: In alternativa, è possibile inviare un'e-mail a manuals@bresser.de o lasciare un messaggio...
  • Page 26: Zu Dieser Anleitung

    • ERSTICKUNGSGEFAHR! Kinder sollten das ZU DIESER ANLEITUNG Gerät nur unter Aufsicht benutzen. Verpa Lesen Sie vor der Benutzung des Geräts ckungsmaterialien (Plastiktüten, Gummi aufmerksam die Sicherheitshinweise und bänder, etc.) von Kindern fernhalten! Es die Bedienungsanleitung. besteht ERSTICKUNGSGEFAHR! Bewahren Sie diese Bedienungsanleitung für •...
  • Page 27: Vor Dem Gebrauch

    können Kurzschlüsse, Brände und sogar VOR DEM GEBRAUCH Explosionen ausgelöst werden! • Wir empfehlen die Verwendung von Alkali • Bauen Sie das Gerät nicht auseinander! Mangan-Batterien. Bei Temperaturen, die Wenden Sie sich im Falle eines Defekts bit regelmäßig unter 0°C (32°F) fallen, empfeh te an Ihren Fachhändler.
  • Page 28: Produktübersicht

     PRODUKTÜBERSICHT Drücken Sie die Berührungstaste, um die Hintergrundbeleuchtung für 9 Sekunden zu aktivieren oder um die SNOOZE/Schlummerfunktion zu akti  vieren, um den Alarm um 5 Minuten zu verzögern. Lichtsensor für die automatische Hin tergrundbeleuchtung bei Nacht. Halten Sie die Taste [SET] gedrückt, ge ben Sie die Uhrzeit und das Datum ein.
  • Page 29 Sie diese Taste gedrückt, um den RCC-Empfang einzuleiten. Drücken Sie diese Taste, um die automatische Hintergrund beleuchtung (Nachtlicht) zu aktivieren/deaktivieren. Batteriefach. Standfuß. TOUCH-BUTTONS Reinigen Sie die Touch-Buttons regelmäßig mit einem trockenen   Tuch, um eine einwandfreie Funktion zu gewährleisten.
  • Page 30 TASTE AL.SET DOWN MODUS Drücken Sie AL.SET oder eine beliebige Alarm Nachtlicht drücken _______ andere Taste, °C/°F ein-/ausschalten einschalten um den Alarm zu stoppen Standard Modus (Klingelton) In den In den gedrückt Alarmeinstel- Tastentöne RCC-Empfang Zeiteinstellungs- _______ halten lungsmodus ein-/ausschalten einleiten modus wechseln wechseln...
  • Page 31: Lcd-Anzeige

      LCD-ANZEIGE Zeitanzeige Alarmzeitanzeige Datumsdisplay Innentemperatur und Luftfeuchtigkeit ] RCC-Signal empfangen  ] Sommerzeit EIN (MESZ) ] SNOOZE/ Schlummermodus aktiviert ] Nachtlicht EIN ] Wecker aktiv  ] Anzeige bei schwacher Batterie...
  • Page 32: Erste Schritte

    ERSTE SCHRITTE tet. Um den RCC-Empfang manuell zu star ten, halten Sie die Taste [DOWN] gedrückt. BATTERIEN EINLEGEN 2. Die Empfangsprozessdauer beträgt 7 Minu 1. Entfernen Sie die Batteriefachabdeckung ten. von der Rückseite. 3. Während des Empfangsvorgangs blinkt das 2. Legen Sie 3x AAA (LR03)/1,5V Batterien RCC-Signalsymbol [ ein.
  • Page 33: Die Uhr Manuell Einstellen

    6. Wenn das Gerät das Signal immer noch 0 zurückgesetzt). Halten Sie die [DOWN] nicht empfängt, fahren Sie bitte fort, die Taste gedrückt, um die Zahl schneller zu Uhrzeit manuell einzustellen. verringern. 6. Drücken Sie die [SET] Taste, um die Ein DIE UHR MANUELL EINSTELLEN stellung zu bestätigen und zum nächsten 1.
  • Page 34: Alarm Ein-/Ausschalten

    5. Drücken Sie die Taste [SET] mehrmals, bis 8. Wenn innerhalb 20 Sekunden keine weitere Sie den Einstellmodus verlassen. Aktion erfolgt, wird die Einstellung gespei chert und der Einstellmodus verlassen. °C/°F-EINSTELLUNG 1. Drücken Sie die [DOWN] Taste, um Celsius ALARM EIN-/AUSSCHALTEN (°C) / Fahrenheit (°F) zu wechseln.
  • Page 35: Eg-Konformitätserklärung

    Sie schalten 3x AAA (LR03) 1,5V Batterien die Alarmfunktion durch Drücken der [UP] Taste aus. EG-KONFORMITÄTSERKLÄRUNG Hiermit erklärt die Explore Scientific SPEZIFIKATIONEN GmbH, dass der Funkanlagentyp mit Artikelnummer: RDC1004 der Richtlinie Abmessungen (Hauptgerät): 2014/53/EU entspricht. Der vollständige Text der 143 x 25 x 80 mm (L x B x H) EG-Konformitätserklärung ist unter der folgenden...
  • Page 36: Entsorgung

    verwenden Sie keine Reinigungsflüssigkeit. Sie können die Batterien nach Gebrauch • Schützen Sie das Gerät vor Staub und entweder in unserer Verkaufsstelle Feuchtigkeit. oder in unmittelbarer Nähe (z.B. im Handel oder in kommunalen Sammelstellen) unent ENTSORGUNG geltlich zurückgeben. Bitte entsorgen Sie Ihre gebrauchten Batterien wie gesetzlich vorge Entsorgen Sie die Verpackungsmateriali schrieben - an einer lokalen Sammelstelle...
  • Page 37 MANUAL DOWNLOAD: einsehen. Sie wünschen eine ausführliche Anleitung zu diesem Produkt in einer bestimmten Sprache? www.bresser.de/download/RDC1004 Dann besuchen Sie unsere Website über nachfolgenden Link (QR Code) für verfügbare SERVICE AND WARRANTY: Versionen. Alternativ können Sie uns auch eine E-Mail an die Adresse manuals@bresser.de schicken...
  • Page 38: Avertissements - Généralités

    A PROPOS DE CE MODE liser cet appareil que sous la surveillance d’un adulte. N’utilisez l’appareil que de la D’EMPLOI façon décrite dans le manuel, autrement Ce mode d’emploi fait partie intégrante de vous encourez le risque de subir une élec- l’appareil.
  • Page 39: Contenu De La Livraison

    CONTENU DE LA LIVRAISON • Risque d’incendie/explosion — N’exposez pas l’appareil à des températures élevées. Réveil, mode d’emploi, 3 piles AAA. Utilisez uniquement les piles recomman AVANT L’UTILISATION dées. Ne court-circuitez pas l’appareil ou les piles et ne les jetez pas au feu. Une •...
  • Page 40: Description Du Produit

     DESCRIPTION DU PRODUIT Appuyez sur le bouton tactile pour activer le rétroéclairage pendant 9 secondes ou pour activer la fonction snooze et retarder l’alarme de 5 min  utes. Capteur de luminosité pour rétroé clairage automatique la nuit. Maintenez la touche [SET] enfoncée pour passer au mode de réglage de l'heure et de la date.
  • Page 41: Boutons Tactiles

    tenez cette touche enfoncée pour lancer la réception du signal radio-piloté. Appuyez pour activer/dés activer la fonction de ré troéclairage automatique (éclairage de nuit). Compartiment des piles. Pied. BOUTONS TACTILES Nettoyez régulièrement les   boutons tactiles avec un chiffon sec pour en garantir le bon fonctionnement.
  • Page 42 TOUCHE AL.SET DOWN MODE Appuyez sur AL.SET ou une Activer/dés autre touche Activer/désactiver APPUYER _______ activer °C/°F pour l’éclairage de nuit l’alarme arrêter l’alarme Mode (sonnerie) standard Passer au Activer/dés MAIN Passer au Lancer la récep mode de activer TENIR mode de réglage tion du signal _______...
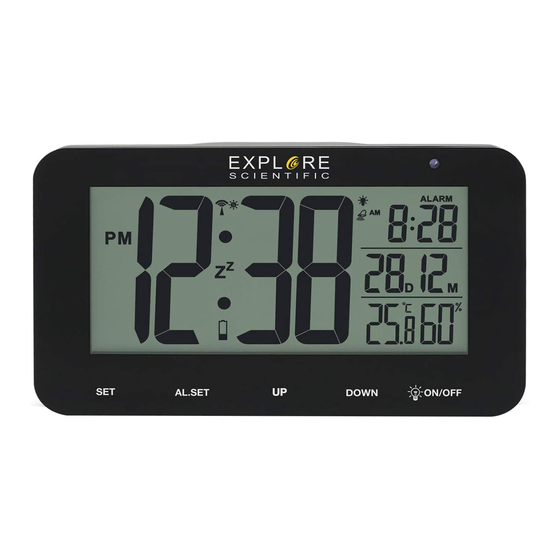
  • Page 43: Écran Lcd

    ÉCRAN LCD   Affichage de l’heure Affichage de l’heure de l’alarme Affichage de la date Affichage de la température intérieure et de l’humidité ] Signal radio-piloté reçu  ] HEURE D’ÉTÉ (DST) ] Fonction snooze activée ] Eclairage de nuit activé ] Alarme activée ...
  • Page 44: Pour Commencer

    POUR COMMENCER 2. Le processus de réception dure 7 minutes. 3. Au cours du processus de réception, l’icône du signal radio-piloté [ ] clignote. INSERTION DES PILES 4. Si le processus de réception du signal abou 1. Retirez le couvercle du compartiment à tit, l’icône complète du signal radio-piloté...
  • Page 45: Réglage Manuel De L'horloge

    RÉGLAGE MANUEL DE L’HORLOGE 12h  Format horaire 12/24h  Heure  1. Si [ ] clignote, la réception radio-pilotée Minute  Année  Mois  Date  Quitter est active. Maintenez la touche [DOWN] 8. Si aucune touche n’est activée pendant 30 enfoncée pour désactiver la réception ra secondes, le réglage sera enregistré...
  • Page 46: Configuration/Réglage De L'heure De L'alarme

    ALARME ACTIVATION/DÉSACTIVATION DE L’ALARME 1. En mode standard, appuyez sur la touche CONFIGURATION/RÉGLAGE DE L’HEURE DE [UP] pour activer/désactiver l’alarme. L’ALARME 2. L’alarme dure 2 minutes et accélère avec le 1. Maintenez la touche [AL.SET] enfon temps. cée pour passer au mode de réglage de l’alarme.
  • Page 47: Déclaration De Conformité Ce

    Poids (unité principale) : clare que le type d’appareil de numé 146 g (sans les piles) ro de pièce : RDC1004 satisfait à la Directive : 2014/53/UE. L’intégralité de la dé Plage d’affichage de la température : claration de conformité UE est disponible à...
  • Page 48: Elimination

    électroniques, n’utilisez pas de liquide de allemande, les appareils électroniques usagés nettoyage. doivent faire l’objet d’une collecte séparée et • Protégez l’appareil contre la poussière et doivent être recyclés dans le respect de l’en l’humidité. vironnement. Conformément aux réglementations ELIMINATION sur les piles et les piles rechargeables, Eliminez les matériaux d’emballage cor il est formellement interdit de jeter les piles...
  • Page 49: Garantie & Réparation

    à la page www. bresser.de/warranty_terms. Souhaitez-vous obtenir un mode d’emploi www.bresser.de/download/RDC1004 détaillé pour ce produit dans une autre langue ? Rendez-vous sur notre site internet via le SERVICE AND WARRANTY: lien ci-dessous (code QR) pour découvrir les...
  • Page 50: Advertencias Generales

    solo pueden utilizar el aparato bajo la su ACERCA DE ESTE MANUAL DE pervisión de un adulto. Utilice el aparato INSTRUCCIONES solo como se describe en el manual; de Este manual de instrucciones debe lo contrario, corre el riesgo de sufrir una considerarse un componente del aparato.
  • Page 51: Volumen De Suministro

    VOLUMEN DE SUMINISTRO • Riesgo de incendio/explosión — No ex ponga el aparato a altas temperaturas. Reloj despertador, manual de instrucciones, Utilice solo las pilas recomendadas. No 3 pilas AAA. cortocircuite el aparato o las pilas, ni los ANTES DE EMPEZAR tire al fuego.
  • Page 52: Vista General Del Producto

     VISTA GENERAL DEL PRODUCTO Pulse el botón táctil para activar la retroiluminación durante 9 segundos o para activar la función de repetición y repetir la alarma 5 minutos después.  Sensor de luz para encender la ret roiluminación automáticamente por la noche.
  • Page 53 Pulse el botón para activar/ desactivar la función de ret roiluminación automática (luz nocturna). Compartimento de las pilas. Soporte. BOTONES TÁCTILES Limpie los botones táctiles con un paño seco regularmente para asegurar un funcionamiento perfecto.  ...
  • Page 54 BOTÓN AL.SET DOWN MODO Pulse AL.SET o cualquier otro Activar/des botón para Encender la PULSAR _______ activar °C/°F detener luz nocturna la alarma la alarma Modo (sonando) estándar Activar/des Entrar en Entrar en modo Iniciar MANT. activar modo de ajuste de ajuste de recepción de _______...
  • Page 55: Pantalla Lcd

      PANTALLA LCD Indicación de la hora Indicación de la hora de alarma Indicación de la fecha Indicación de temperatura interior y humedad ] Recibiendo señal de radiocontrol  ] Horario de verano activado ] Repetición activada ] Luz nocturna activada ] Alarma activada ...
  • Page 56: Primeros Pasos

    PRIMEROS PASOS 2. El proceso de recepción dura 7 minutos. 3. Durante el proceso de recepción parpadea el símbolo de la señal de radiocontrol [ INSERCIÓN DE LAS PILAS 4. Si el proceso de recepción de radiocontrol 1. Retire la cubierta del compartimento de las es correcto, aparecerá...
  • Page 57: Ajuste Manual Del Reloj

    AJUSTE MANUAL DEL RELOJ  Formato de hora 12/24  h  Hora  1. Si [ ] parpadea, significa que la recep Minuto  Año  Mes  Fecha  Salir ción de radiocontrol está activa. Para des 8. Si no se realiza ninguna acción en 30 segun activar la recepción de radiocontrol, man dos, el ajuste se guardará...
  • Page 58 ALARMA FUNCIONAMIENTO AJUSTE DE LA HORA DE ALARMA 1. La señal de alarma suena a la hora ajusta 1. Mantenga pulsado el botón [AL.SET] para entrar en el modo de ajuste de alarma. 2. Mientras suena la alarma, pulse el botón 3.
  • Page 59: Declaración De Conformidad Ce

    Rango de indicación de temperatura: declara que el tipo de equipo con el De 0 °C a +50 °C (de 32 °F a 122 °F) número de referencia RDC1004 es acorde a la Directiva 2014/53/UE. El texto Rango de humedad: completo de la declaración de conformidad 20 % - 95 %...
  • Page 60 DESECHADO De acuerdo con la normativa sobre pi las y acumuladores, está expresamente Deseche los materiales de embalaje de prohibido tirarlos a la basura doméstica nor bidamente, separándolos según el tipo, mal. Asegúrese de desechar las pilas usadas como papel o cartón. Póngase en con según la ley: en un punto de recogida local o tacto con el servicio local de eliminación de en tiendas que ofrezcan el servicio.
  • Page 61: Garantía Y Asistencia

    ¿Desea instrucciones detalladas para este www.bresser.de/download/RDC1004 producto en un idioma en particular? Visite SERVICE AND WARRANTY: nuestro sitio web a través del siguiente enlace (código QR) para ver las versiones disponibles.
  • Page 62: Algemene Waarschuwingen

    ABOUT THIS INSTRUCTION ALGEMENE WAARSCHUWINGEN Deze gebruiksaanwijzing moet worden • Risico op elektrische schokken — Dit app beschouwd als onderdeel van het apparaat. araat heeft elektronische onderdelen die Lees voor het gebruik de veiligheidsvoorschriften werken via een stroombron (voeding en/of en de gebruiksaanwijzing zorgvuldig door.
  • Page 63: Inhoud Van De Verpakking

    • Explosiegevaar — Stel het apparaat niet INHOUD VAN DE VERPAKKING bloot aan hoge temperaturen. Gebruik alleen Wekker, Gebruiksaanwijzing, 3x AAA batterijen de aanbevolen batterijen. Apparaat of bat terijen niet kortsluiten of in het vuur gooien! VOOR DE INGEBRUIKNAME Overmatige hitte of onjuist gebruik kan •...
  • Page 64: Overzicht Van Het Product

    OVERZICHT VAN HET PRODUCT 1.Druk op touch-knop om de achtergrond- verlichting gedurende 9 seconden te ac- tiveren of om de sluimerfunctie te activeren en het alarm gedurende 5 minuten uit te stellen. 2.Lichtsensor voor automatische achtergr ondverlichting tijdens de nacht. 3.Druk op [SET] en ingedrukt houden om de tijd en datum instelmodus te openen.
  • Page 65 8.Batterijvak. 9.Stand. TOUCH-KNOPPEN Reinig de touch-knoppen reg- elmatig met een droog doekje om de uitstekende werking te waarborgen.
  • Page 66 KNOP AL.SET DOWN MODUS Druk op AL.SET of iedere willekeurige Alarm aan Nachtlicht _______ °C/°F DRUKKEN andere knop om /uitzetten inschakelen het alarm te Standaard stoppen (wanneer modus het afgaat) Naar de Naar de alarm Knop geluiden RCC- VASTHOUDEN tijdinstelmodus _______ instelmodus aan/uit...
  • Page 67 LCD-SCHERM Weergave van tijd Weergave van alarmtijd Weergave van datum Weergave van binnentem peratuur en -vochtigheid ] RCC-signaal ontvangen ] DST AAN (Daylight Saving Time, zomertijd) ] Sluimerfunctie geactiveerd ] Nachtlicht AAN ] Alarm AAN ] Lege batterij-indicator...
  • Page 68: Aan De Slag

    AAN DE SLAG RCC-symbool [ ] op het scherm weerge geven en worden datum en tijd automatisch DE BATTERIJEN INSTALLEREN ingesteld. Als er na 7 minuten nog steeds 1. Verwijder het batterijdeksel aan de achterkant. geen RCC is ontvangen, wordt de RCC-inste 2.
  • Page 69: Tijdzone Instellen

    3. De instelparameter knippert. TIJDZONE INSTELLEN 4. Druk één keer op de [UP] knop, de waarde Om een andere tijdzone in te stellen, voer het wordt met 1 eenheid ver-hoogd (tijdens het volgende uit: instellen van de minuten worden de seconden 1.
  • Page 70: Technische Gegevens

    4. Druk op de [AL.SET] knop om de instelling te 3.Als u niet op een knop drukt om het alarm uit bevestigen en naar de volgende parameter te te zetten, wordt het alarm automatisch na 2 gaan. minuten uitgeschakeld. 5. Volgorde van de instellingen: Uur Minuut 4.Om het alarm te stoppen drukt u op [AL.SET] ...
  • Page 71 Voeding: 3x AAA (LR03) 1,5V batterijen EG-VERKLARING VAN OVEREENSTEMMING Explore Scientific GmbH verklaart hi- erbij dat het apparaattype met artike lnummer RDC1005: in overeenstemmi- ng is met Richtlijn: 2014/30/EU. De volledige tekst van de EU-conformiteitsverklaring is be- schikbaar op het volgende internetadres: www.bresser.de/download/RDC1004/CE/...
  • Page 72 OPMERKING BIJ HET wetgeving, moeten gebruikte elektronische ap- paraten gescheiden worden ingezameld en op SCHOONMAKE een milieuvriendelijke manier worden gerecycled. • Haal de batterijen uit alvorens schoon te maken. • Gebruik uitsluitend een droge doek om de In overeenstemming met de regelgeving buitenkant van het apparaat schoon te maken.
  • Page 73: Service En Garantie

    Wilt u gedetailleerde instructies voor dit product in een betaalde taal? Bezoek dan onze website www.bresser.de/download/RDC1004 via de onderstaande link (QR-code) voor besc- hikbare versies. SERVICE EN GARANTIE: U kunt ook een e-mail sturen naar manuals @bresser.de of een bericht achterlaten op +49...
  • Page 76: Service And Warranty

    MANUAL DOWNLOAD: SERVICE AND WARRANTY: www.bresser.de/download/RDC1004 www.bresser.de/warranty_terms Explore Scientific GmbH Gutenbergstr. 2 · DE-46414 Rhede · Germany www.bresser.de · service@bresser.de Explore Scientific, LLC 1010 S. 48th Street, Springdale, AR 72762 www.explorescientific.com...

Table des Matières